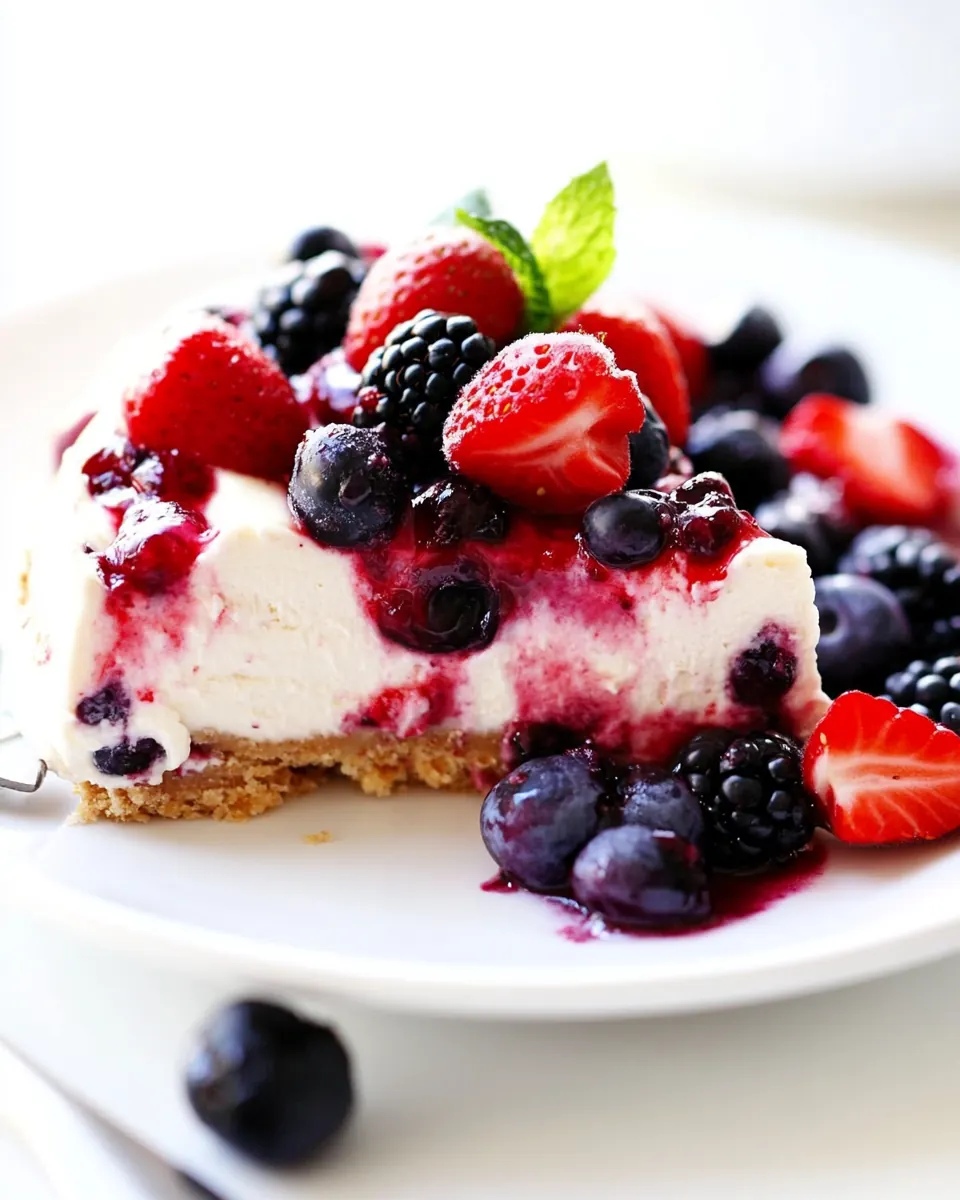
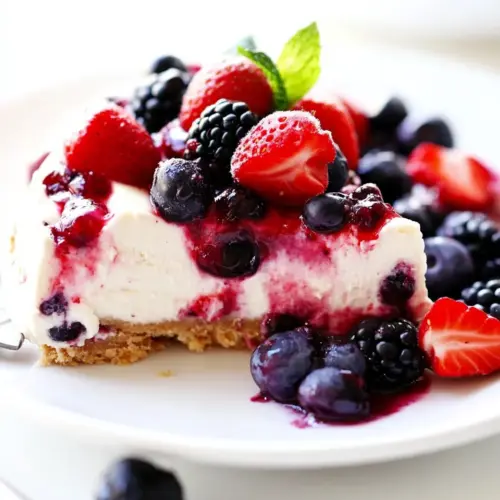
No Bake Very Berry Cheesecake
No Bake Very Berry Cheesecake is one of those treats I reach for when I want something impressive with minimal fuss. The first time I made this, I was racing the clock before guests arrived, and the ease of assembling the creamy filling into a ready crust felt like a small kitchen miracle. I remember laughing with a friend as we tasted warm berry juices against the cool, silky filling, and that memory keeps pulling me back to this recipe whenever summer berries are at their peak.
I like to make this for casual get togethers when I want to serve a dessert that looks special but lets me stay present with people instead of hiding in the kitchen. The texture contrast between the crunchy crust and the cloudlike filling is exactly the kind of balance I aim for, and the bright berries on top add both freshness and color. Over the years I have learned small tricks that make each slice prettier and more stable, and I enjoy swapping berry combinations depending on what is ripe. Whether you are hosting a backyard lunch or want a light finish to a longer meal, No Bake Very Berry Cheesecake always delivers that satisfying ending without the oven heat.
Recipe Snapshot
10 mins
10 mins
Easy
250 kcal
American
Gluten-Free, Low FODMAP
Desserts
Mixing bowl, Whisk, Spatula, Refrigerator, Knife
Why This No Bake Very Berry Cheesecake Is So Good
What makes this recipe effortless
I love how little time this takes from start to finish. With no baking required, you can assemble everything in under 15 minutes, then let the refrigerator do the work. That means I can focus on plating and conversation while the cheesecake comes together, which is a true time saver when entertaining.
Bright, seasonal berry flavor
Using a mix of strawberries, blueberries, and blackberries gives the cheesecake a natural, varied sweetness and a pleasing texture. I often taste the berries as I go, balancing tart and sweet so the final bite is lively but not cloying.
Silky, indulgent filling without complicated steps
The filling relies on cream cheese and heavy whipping cream whipped together to light peaks, creating a velvety mouthfeel. I appreciate that there are no tempering tricks or tricky caramelizations here, just straightforward whisking that anyone can master.
Versatile for occasions
This cheesecake adapts well to celebrations or simple family dinners. I’ve brought it to summer picnics and holiday brunches, and it always reads as both festive and approachable. The presentation with extra berries on top makes it look special with very little effort.
Reliable texture and presentation
The premade graham cracker crust keeps slices neat and consistent, and refrigeration firms the filling so you get clean wedges every time. I value recipes that are forgiving, and this one rarely disappoints even if you assemble it a bit early or later than planned.
Key Ingredients for No Bake Very Berry Cheesecake
These ingredients come together with an easy philosophy: a sturdy, sweet base; a rich, airy filling; and fresh berries for contrast. Each component plays a clear role. The crust provides texture and structure, the filling gives creaminess and body, and the berries add brightness and acidity to balance the richness. When I pick ingredients I look for good quality dairy and ripe fruit, because those will make the final slices sing.
- 2 (8-ounce) blocks softened cream cheese: Softened to room temperature and whipped until smooth, provides the rich, creamy base and structure for the no-bake cheesecake filling; blends easily with sugar and cream to create a silky texture and stable body without baking.
- 1/2 cup granulated sugar: Granulated to add sweetness and help stabilize the cream cheese mixture; dissolves into the filling to balance tartness from the berries and contributes to mouthfeel and overall flavor harmony.
- 1/2 cup heavy whipping cream: Whipped into stiff peaks to lighten and loosen the cream cheese mixture, adding richness and a fluffy, mousse-like consistency; helps provide volume and a tender, creamy mouthfeel in the finished cheesecake.
- 1 cup chopped strawberries: Chopped into small pieces and folded into the filling to contribute fresh berry flavor, juiciness, and a pleasant tart contrast; also adds pops of color and natural sweetness throughout the cheesecake.
- 1/2 cup blueberries: Folded gently into the filling or used as a garnish to provide bursts of mild, sweet-tart flavor and a contrasting texture; contributes visual appeal and complements the strawberry and blackberry notes.
- 1/2 cup blackberries: Folded into the filling or scattered on top for deep, earthy berry flavor and a juicy texture that balances sweetness; adds dark color contrast and fruity complexity to each bite.
- 1 premade graham cracker crust: Used as the ready-made base that provides a buttery, crunchy foundation and holds the filling; premade crust saves time while offering a classic graham cracker flavor and a firm platform for slicing.
- additional berries for topping: Scattered over the top for final presentation to add freshness, color, and an inviting finish; additional berries also contribute light acidity, textural contrast, and an appealing seasonal garnish.
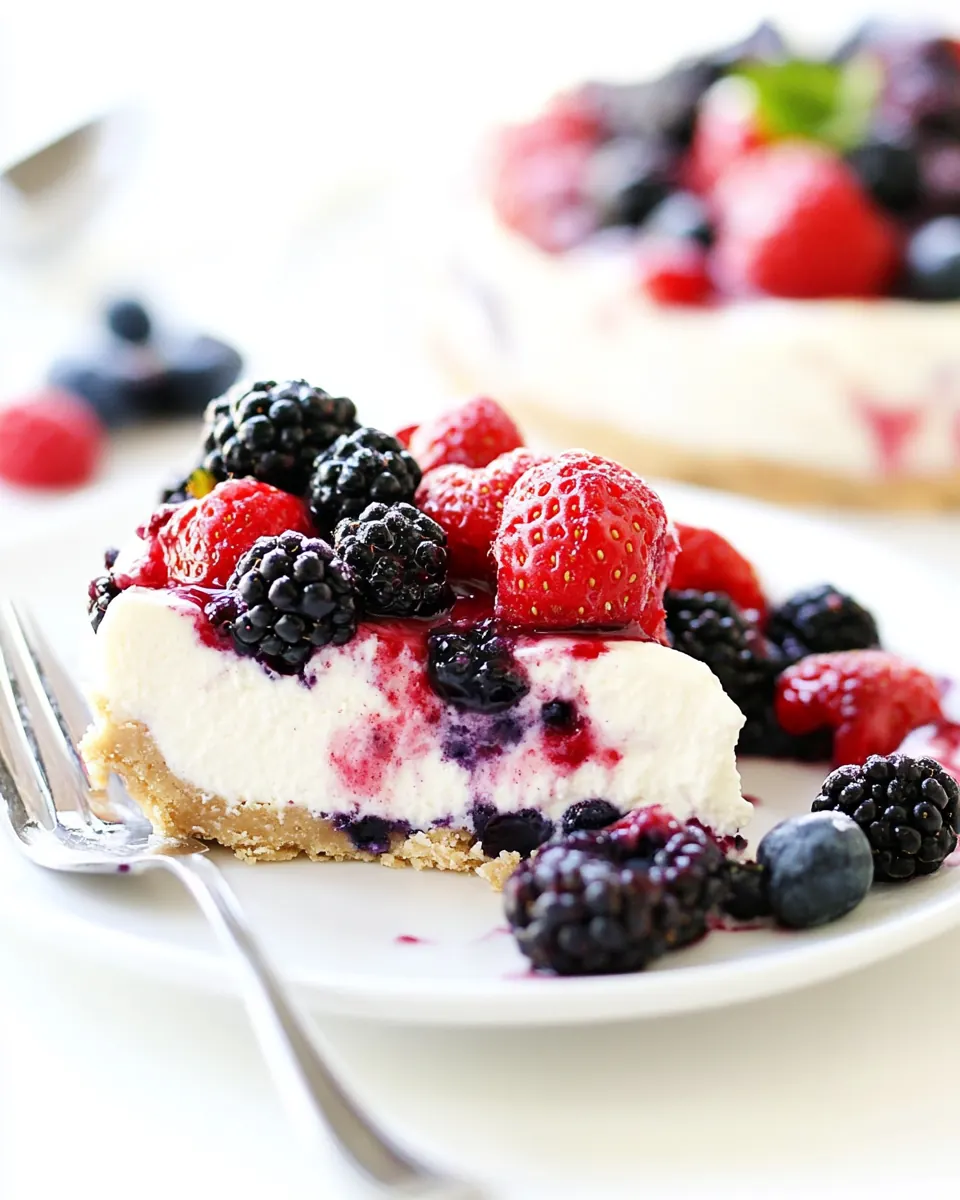
Putting Together No Bake Very Berry Cheesecake
Assembling this cheesecake is straightforward, and I enjoy the tactile nature of folding fruit into a billowy filling. Below I expand each original direction into steps that guide you through sensory cues and common pitfalls, so you can replicate the silky texture and tidy presentation every time.
- In a medium-sized bowl whisk the 2 (8-ounce) blocks softened cream cheese and 1/2 cup granulated sugar until smooth and creamy. Add the 1/2 cup heavy whipping cream and continue whisking until stiff peaks form.: As you start whisking, you will notice the texture transform from slightly lumpy to glossy and smooth, a key visual cue that the dairy and sugar have melded. The aroma at this point is subtly tangy and sweet, and the bowl should feel cool to the touch. I like to use a whisk or a hand mixer on low so the texture becomes uniformly soft without incorporating too much air, which can make the filling loose. One common mistake is working with too cold cream cheese , which leaves stubborn lumps; if that happens, pause and let it rest at room temperature for a few minutes, or chop it into smaller pieces to soften quicker. This step matters because a fully smooth base lets the whipped cream blend evenly, giving the cheesecake its signature silkiness.
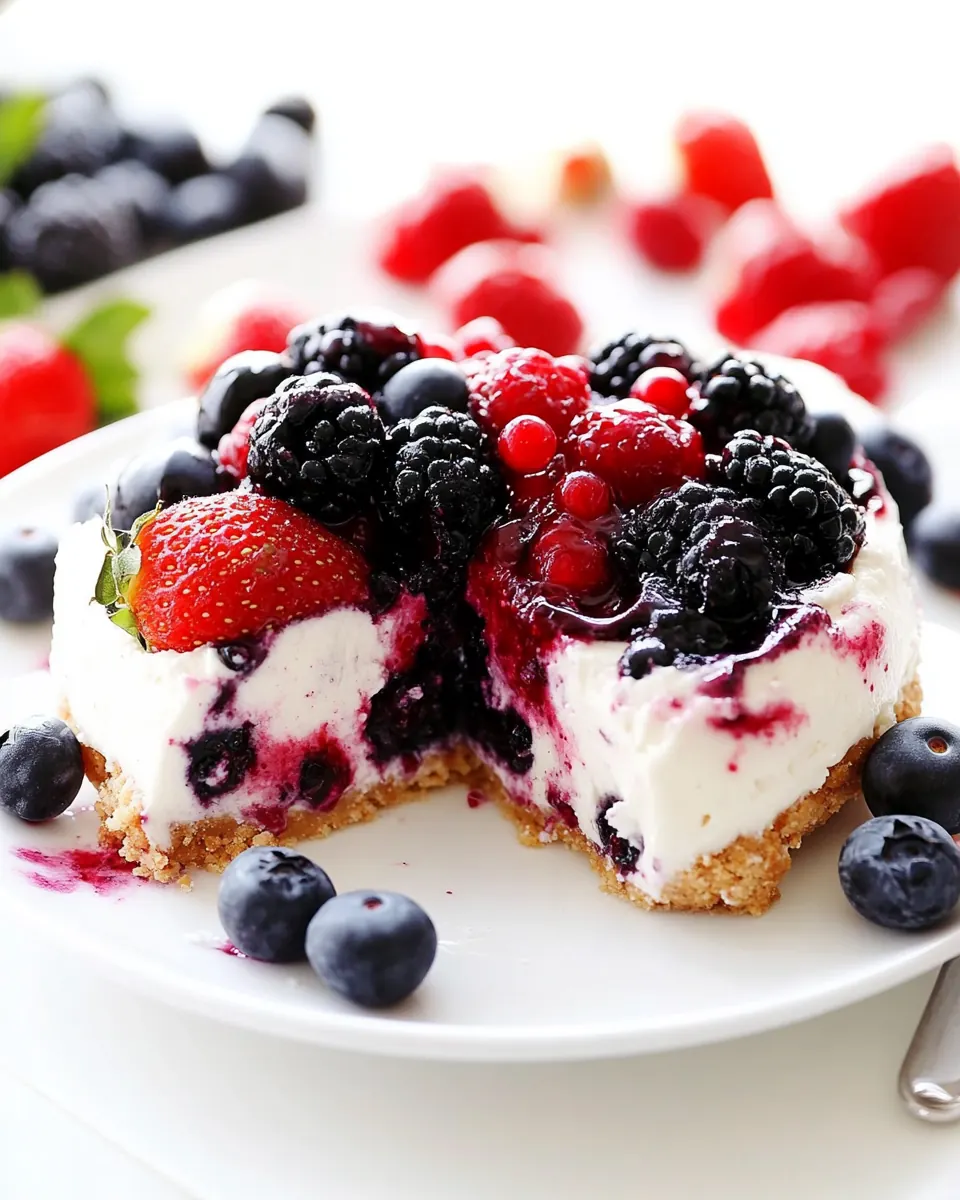
- Fold in the 1 cup chopped strawberries, 1/2 cup blueberries, and 1/2 cup blackberries and spread the mixture evenly into the 1 premade graham cracker crust.: When you add chilled heavy whipping cream , the mixture will lighten and gain volume, and you should watch for glossy peaks that hold their shape when you lift the whisk. The sound changes too, becoming quieter as the mixture stabilizes, and the surface will look aerated and billowy. The reason this matters is that properly whipped cream keeps the filling airy while still firm enough to set in the fridge. A typical error is underwhipping, which makes the filling collapse, or overwhipping, which makes the cream grainy. If you overwhip, gently fold in a spoonful of room temperature filling to bring it back together. Using a cold bowl and chilled cream helps you reach the right stiffness faster and more predictably.
- Refrigerate for at least an hour or until set. Top with additional berries for topping. Serve fresh.: As you fold the strawberries , blueberries , and blackberries into the whipped base, aim for gentle turns rather than vigorous mixing so you preserve the air you just created. Visually, you want streaks of pink and purple distributed throughout the filling, and the scent of fresh berries will bloom. When spreading into the premade graham cracker crust , use a spatula to press the filling smoothly to the edges for clean slices later. A frequent misstep is overmixing the fruit into the filling which can release too much juice and thin the texture, or piling too much fruit in one spot that causes uneven setting. If the berries seem particularly juicy, pat them dry first or fold them in at the last moment to avoid watering down the filling. Achieving an even layer ensures every slice has a balanced bite of cream and fruit.
- Refrigerate for at least an hour or until set: During refrigeration the filling chills and firms, and you will notice the surface change from glossy to slightly matte as it sets. The cold heightens the creamy mouthfeel and makes slicing easier, so patience here really pays off. I recommend letting it rest longer if you prefer very neat slices, and the body will feel firmer to the touch at the rim. A common mistake is trying to cut the cheesecake too soon, which leads to soft, messy wedges; if that happens, return the cheesecake to the fridge and wait additional time. The why is simple: chilling stabilizes the whipped cream and helps the filling bind with the crust for proper texture balance.
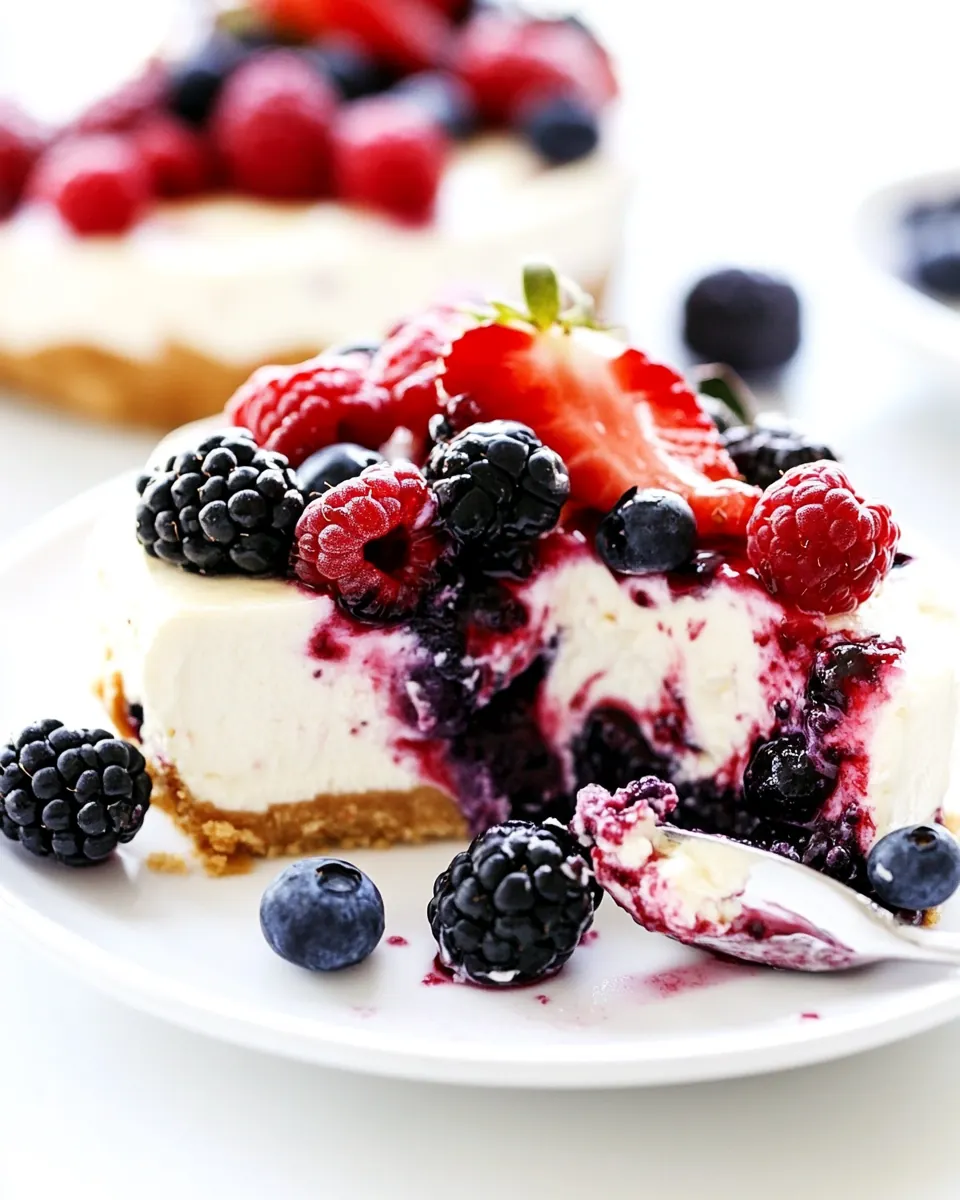
- Top with additional berries for topping: Adding fresh berries on top provides a bright, fresh contrast and a pop of color. Arrange them thoughtfully so each slice gets a pretty assortment, and the aroma of ripe berries will lift the whole dessert. If you like a touch of shine, brush them with a tiny amount of warmed berry jam, but avoid heavy glazes that can make slices slide. One slip-up I see often is piling berries so high they fall when cutting; keep the topping moderate for clean presentation. This finishing touch completes the flavor profile by adding a juicy counterpoint to the creamy filling, and it looks elegant without extra effort.
- Serve fresh: The best way to enjoy this cheesecake is chilled, with each slice offering the cool creaminess of the filling, the crunchy give of the crust, and bursts of fresh berry juiciness. Use a sharp, warm knife for the cleanest slices, wiping the blade between cuts if necessary. Avoid leaving slices at room temperature for too long or the filling will soften. Serving right after removing from the fridge preserves texture and makes sure the flavors are bright and balanced for your guests.
Recipe Variations about No Bake Very Berry Cheesecake
I like to offer simple variations that keep the recipe easy while adjusting flavor and presentation. Below are tips and ideas that help you customize the dessert without changing the core technique.
- Swap berry ratios – Increase the amount of strawberries for a sweeter profile or emphasize blackberries for more tartness. Adjusting ratios changes the flavor balance while keeping the same texture and set.
- Lighten the filling – For an even airier texture, fold in an extra two tablespoons of whipped heavy whipping cream whipped to medium peaks, being careful not to overmix which can deflate the filling.
- Decorative topping – Arrange additional whole blueberries and halved strawberries in a ring for a polished look, or scatter mixed berries casually for a rustic presentation that still photographs well.
- Make it larger – If you need more slices, transfer the filling into a larger 9 inch premade crust and increase berries proportionally, watching for a slightly thinner filling layer which may set faster.
- Prepare ahead – Assemble up to 24 hours in advance and keep covered in the refrigerator for easier entertaining, but add the extra berry topping just before serving to preserve freshness.
Perfect Matches for No Bake Very Berry Cheesecake
This cheesecake pairs well with light accompaniments and many occasions, from midday gatherings to celebratory dinners. Below I outline serving suggestions, storage notes, and ideal moments to present this dessert so you can plan around flavor and convenience.
- Serve with fresh coffee or tea – A mild brewed coffee or a subtly floral tea complements the sweet cream and berry brightness without overpowering it. This pairing makes it ideal for brunch or an afternoon get together.
- Lovely for summer occasions – The fresh berry topping makes this cheesecake a natural choice for summer picnics, backyard lunches, or casual holiday meals when berries are at their best.
- Storage tips – Keep the cheesecake covered in the refrigerator for up to three days. For best texture, add the additional berry topping just before serving to avoid sogginess.
- Portioning advice – The premade graham cracker crust usually yields neat slices; use a warm knife and wipe it between cuts for clean presentation, particularly when serving at a party.
- Occasion flexibility – This dessert works well for intimate dinners, celebratory brunches, or as a make ahead treat for guests; its simplicity allows you to focus on the company rather than complicated plating.
FAQ
Conclusion
This No Bake Very Berry Cheesecake stands out because it combines simplicity with vivid summer flavors, offering creamy texture and fresh fruit in every slice. If you want a dessert that looks polished but allows you to enjoy your guests instead of fussing in the kitchen, this recipe is an excellent choice. Try it as written the first time, then play with berry ratios or presentation to make it your own; it is forgiving, quick, and reliably delicious.
No Bake Very Berry Cheesecake
Equipment
- Mixing Bowl
- Whisk
- Spatula
- Refrigerator
- Knife
Ingredients
- 2 (8-ounce) blocks softened cream cheese Softened to room temperature and whipped until smooth, provides the rich, creamy base and structure for the no-bake cheesecake filling; blends easily with sugar and cream to create a silky texture and stable body without baking.
- 1/2 cup granulated sugar Granulated to add sweetness and help stabilize the cream cheese mixture; dissolves into the filling to balance tartness from the berries and contributes to mouthfeel and overall flavor harmony.
- 1/2 cup heavy whipping cream Whipped into stiff peaks to lighten and loosen the cream cheese mixture, adding richness and a fluffy, mousse-like consistency; helps provide volume and a tender, creamy mouthfeel in the finished cheesecake.
- 1 cup chopped strawberries Chopped into small pieces and folded into the filling to contribute fresh berry flavor, juiciness, and a pleasant tart contrast; also adds pops of color and natural sweetness throughout the cheesecake.
- 1/2 cup blueberries Folded gently into the filling or used as a garnish to provide bursts of mild, sweet-tart flavor and a contrasting texture; contributes visual appeal and complements the strawberry and blackberry notes.
- 1/2 cup blackberries Folded into the filling or scattered on top for deep, earthy berry flavor and a juicy texture that balances sweetness; adds dark color contrast and fruity complexity to each bite.
- 1 premade graham cracker crust Used as the ready-made base that provides a buttery, crunchy foundation and holds the filling; premade crust saves time while offering a classic graham cracker flavor and a firm platform for slicing.
- additional berries for topping Scattered over the top for final presentation to add freshness, color, and an inviting finish; additional berries also contribute light acidity, textural contrast, and an appealing seasonal garnish.
Instructions
- In a medium-sized bowl whisk the 2 (8-ounce) blocks softened cream cheese and 1/2 cup granulated sugar until smooth and creamy. Add the 1/2 cup heavy whipping cream and continue whisking until stiff peaks form.: As you start whisking, you will notice the texture transform from slightly lumpy to glossy and smooth, a key visual cue that the dairy and sugar have melded. The aroma at this point is subtly tangy and sweet, and the bowl should feel cool to the touch. I like to use a whisk or a hand mixer on low so the texture becomes uniformly soft without incorporating too much air, which can make the filling loose. One common mistake is working with too cold cream cheese , which leaves stubborn lumps; if that happens, pause and let it rest at room temperature for a few minutes, or chop it into smaller pieces to soften quicker. This step matters because a fully smooth base lets the whipped cream blend evenly, giving the cheesecake its signature silkiness.
- Fold in the 1 cup chopped strawberries, 1/2 cup blueberries, and 1/2 cup blackberries and spread the mixture evenly into the 1 premade graham cracker crust.: When you add chilled heavy whipping cream , the mixture will lighten and gain volume, and you should watch for glossy peaks that hold their shape when you lift the whisk. The sound changes too, becoming quieter as the mixture stabilizes, and the surface will look aerated and billowy. The reason this matters is that properly whipped cream keeps the filling airy while still firm enough to set in the fridge. A typical error is underwhipping, which makes the filling collapse, or overwhipping, which makes the cream grainy. If you overwhip, gently fold in a spoonful of room temperature filling to bring it back together. Using a cold bowl and chilled cream helps you reach the right stiffness faster and more predictably.
- Refrigerate for at least an hour or until set. Top with additional berries for topping. Serve fresh.: As you fold the strawberries , blueberries , and blackberries into the whipped base, aim for gentle turns rather than vigorous mixing so you preserve the air you just created. Visually, you want streaks of pink and purple distributed throughout the filling, and the scent of fresh berries will bloom. When spreading into the premade graham cracker crust , use a spatula to press the filling smoothly to the edges for clean slices later. A frequent misstep is overmixing the fruit into the filling which can release too much juice and thin the texture, or piling too much fruit in one spot that causes uneven setting. If the berries seem particularly juicy, pat them dry first or fold them in at the last moment to avoid watering down the filling. Achieving an even layer ensures every slice has a balanced bite of cream and fruit.
- Refrigerate for at least an hour or until set: During refrigeration the filling chills and firms, and you will notice the surface change from glossy to slightly matte as it sets. The cold heightens the creamy mouthfeel and makes slicing easier, so patience here really pays off. I recommend letting it rest longer if you prefer very neat slices, and the body will feel firmer to the touch at the rim. A common mistake is trying to cut the cheesecake too soon, which leads to soft, messy wedges; if that happens, return the cheesecake to the fridge and wait additional time. The why is simple: chilling stabilizes the whipped cream and helps the filling bind with the crust for proper texture balance.
- Top with additional berries for topping: Adding fresh berries on top provides a bright, fresh contrast and a pop of color. Arrange them thoughtfully so each slice gets a pretty assortment, and the aroma of ripe berries will lift the whole dessert. If you like a touch of shine, brush them with a tiny amount of warmed berry jam, but avoid heavy glazes that can make slices slide. One slip-up I see often is piling berries so high they fall when cutting; keep the topping moderate for clean presentation. This finishing touch completes the flavor profile by adding a juicy counterpoint to the creamy filling, and it looks elegant without extra effort.
- Serve fresh: The best way to enjoy this cheesecake is chilled, with each slice offering the cool creaminess of the filling, the crunchy give of the crust, and bursts of fresh berry juiciness. Use a sharp, warm knife for the cleanest slices, wiping the blade between cuts if necessary. Avoid leaving slices at room temperature for too long or the filling will soften. Serving right after removing from the fridge preserves texture and makes sure the flavors are bright and balanced for your guests.
Notes
- Swap berry ratios - Increase the amount of strawberries for a sweeter profile or emphasize blackberries for more tartness. Adjusting ratios changes the flavor balance while keeping the same texture and set.
- Lighten the filling - For an even airier texture, fold in an extra two tablespoons of whipped heavy whipping cream whipped to medium peaks, being careful not to overmix which can deflate the filling.
- Decorative topping - Arrange additional whole blueberries and halved strawberries in a ring for a polished look, or scatter mixed berries casually for a rustic presentation that still photographs well.
- Make it larger - If you need more slices, transfer the filling into a larger 9 inch premade crust and increase berries proportionally, watching for a slightly thinner filling layer which may set faster.
- Prepare ahead - Assemble up to 24 hours in advance and keep covered in the refrigerator for easier entertaining, but add the extra berry topping just before serving to preserve freshness.