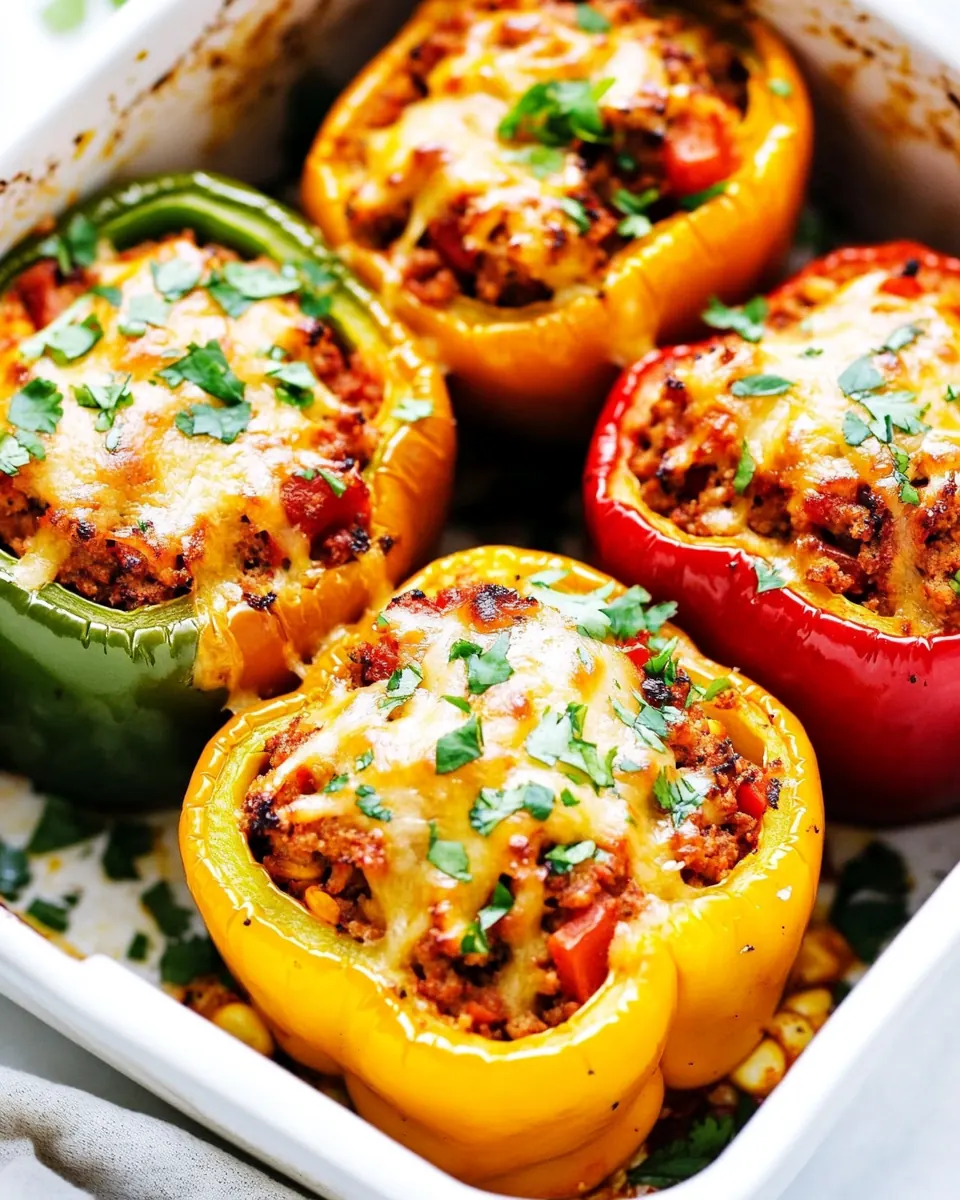
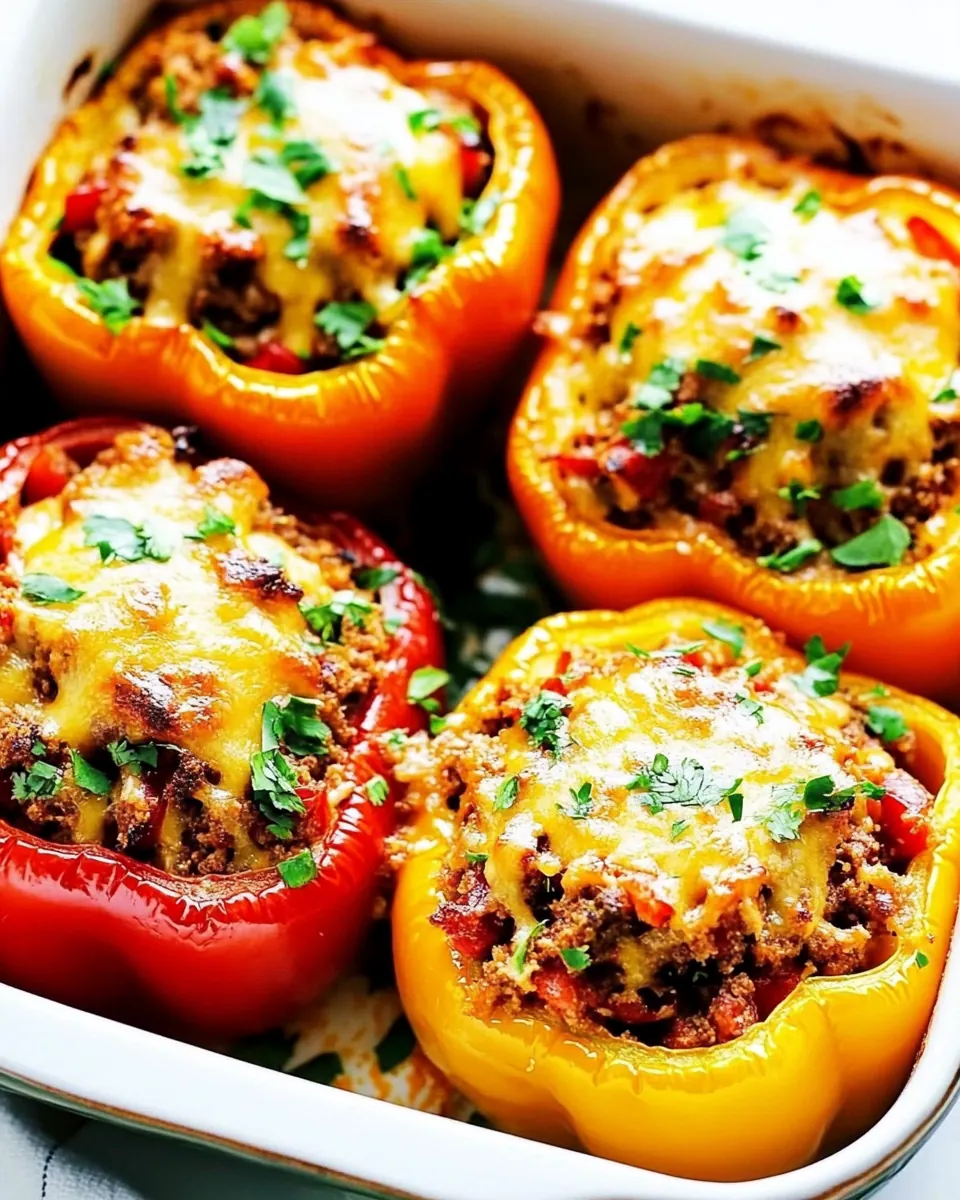
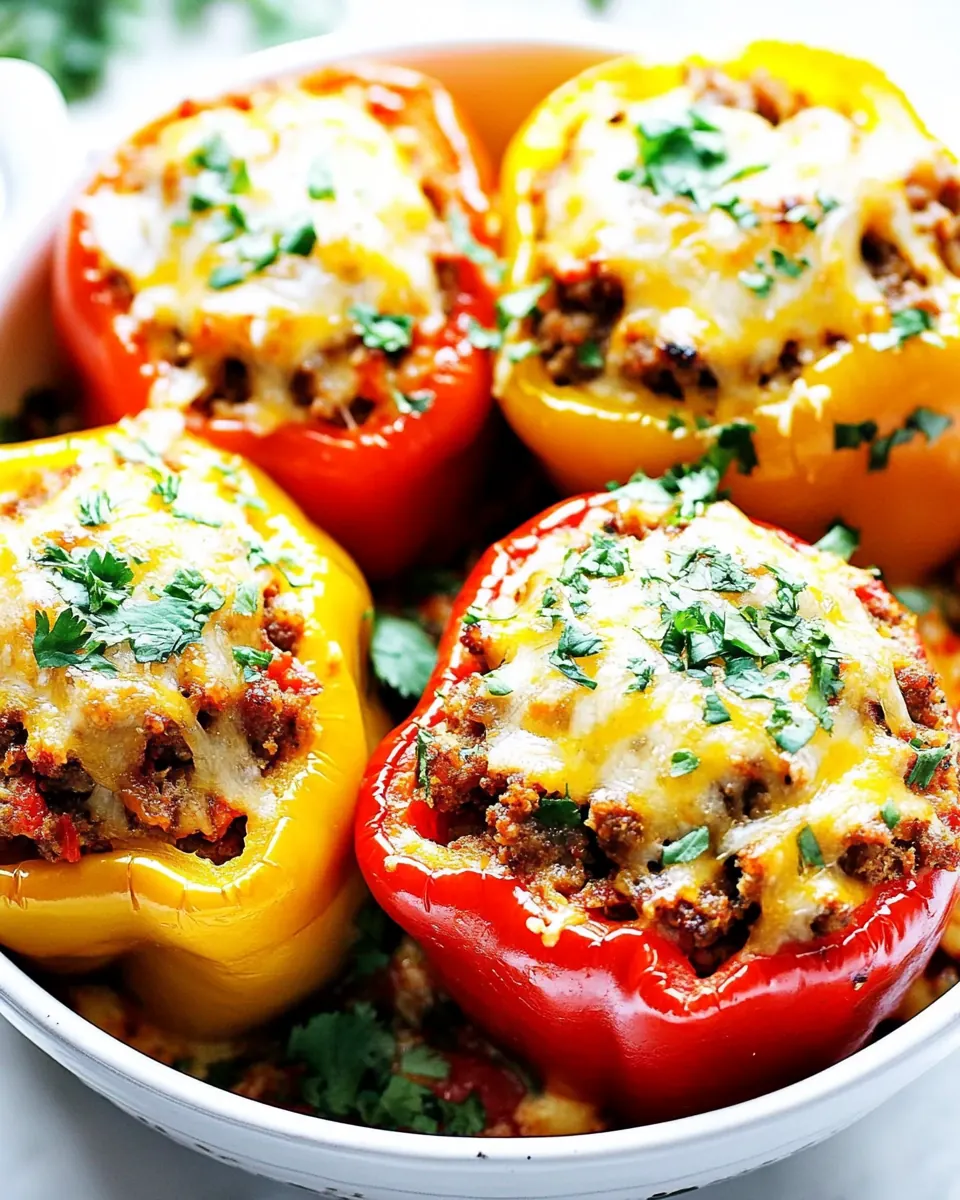
Mexican Stuffed Peppers
Mexican Stuffed Peppers are one of those dishes I fall back on when I want big flavor with minimal fuss. The first time I made them I was feeding a group after a long day, and the fragrant kitchen, full of bubbling salsa and toasty spices, immediately felt like home. I remember pulling those glossy stuffed peppers from the oven, the cheese melted and slightly blistered, and everyone diving in while the edges were still steaming.
Over the years I have adjusted the filling to match what I have on hand, but the heart of the dish stays the same: savory browned ground beef, tangy jarred salsa, fluffy rice, and bright herbs tucked into tender roasted peppers. This recipe has become my go to for casual dinner parties and easy weeknight meals because it scales well, reheats beautifully, and invites everyone to add a finishing touch at the table. I’ll tell you the small swaps that make it even better, and why each step matters for the final texture and taste.
Recipe Snapshot
60 mins
30 mins
30 mins
Medium
400 kcal
Mexican
Gluten-Free, Low FODMAP
Dinner
Large fry pan, Microwave safe dish, 3 quart baking dish, Stove, Oven
Why You’ll Love This Mexican Stuffed Peppers
A comfort meal that performs
I love Mexican Stuffed Peppers because they deliver comfort without being heavy. The combination of seasoned ground beef and warm rice hits savory and filling notes, while the salsa keeps the mixture lively. You get a complete plate in every pepper, which makes serving simple and satisfying.
Effortless weeknight star
One reason I reach for this recipe is how approachable it is. Most of the work happens in one pan, and the microwave step for the peppers cuts down on oven time. If you are juggling kids, work, or guests, this dish feels like you put in more effort than you actually did.
Flexible and forgiving
I find this recipe very forgiving. The filling tolerates small swaps and additions, so you can tailor heat levels and textures without breaking the dish. That flexibility makes it a recipe I confidently recommend to home cooks who like to improvise.
Bright finish that balances richness
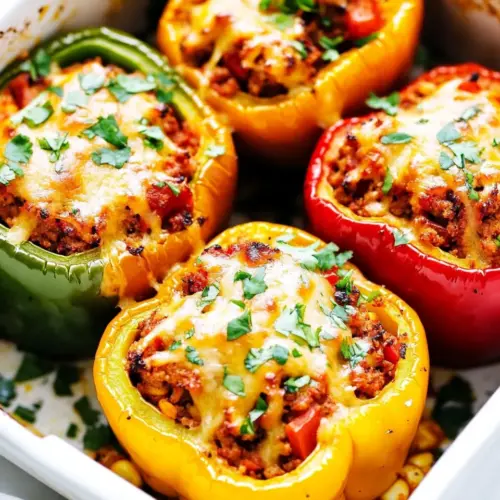
Topping the finished peppers with chopped cilantro and a dollop of sour cream lifts the palate. Those fresh, cool notes balance the savory, cheesy filling and keep each bite interesting. Little details like that transform a hearty plate into something vibrant.
Great for feeding a crowd
Because each pepper is its own serving, Mexican Stuffed Peppers is ideal for gatherings. They look beautiful arranged in a baking dish, and guests can personalize with extra garnishes. I love the convivial energy that comes when people scoop and top their own peppers.
Recipe Ingredients for Mexican Stuffed Peppers
I treat these ingredients as a small ensemble where each player has a clear job. The peppers are the vessel and texture anchor, the ground beef provides savory depth, and the rice brings body and structure. The jarred salsa seasons and adds moisture so the filling stays juicy. The spices and fresh herbs give contrast, while the cheese and sour cream add creaminess and a finishing note.
- 6 bell peppers, stems and tops removed, then seeded and: Hollowed to hold the filling and provide a colorful, crisp vessel for baking, these peppers soften when roasted and offer a sweet, slightly tangy flavor that balances rich fillings.
- 1 pound 90% lean ground beef: Cooked until browned to add hearty texture and savory depth, the lean ground beef supplies protein and a meaty base that absorbs spices and salsa for cohesive stuffing.
- 1 medium onion, chopped, about 1 1/2 cups: Sautéed until translucent to add aromatic sweetness and body, chopped onion contributes moisture and a mild sharpness that complements the beef and rice.
- 24 ounce jar restaurant style salsa: Stirred in to provide saucy moisture, chunky texture, and tangy tomato-based flavor, the restaurant–style salsa seasons the filling and keeps it from drying out while baking.
- 1 teaspoon chile powder: Sprinkled into the filling to introduce warm, smoky heat and a subtle earthy sweetness, chile powder helps unify the savory components and enhance overall spice.
- 1 teaspoon cumin: Added for warm, nutty, slightly bitter notes that accentuate the savory profile, cumin brings a classic Mexican flavor that pairs well with chili powder and beef.
- 1 cup long grain white rice: Cooked and mixed into the stuffing to add tender, starchy bulk and absorb flavors, long grain white rice provides structure and helps stretch the filling to feed more people.
- 2 cups water: Simmered with rice to hydrate and cook the grains, water is essential for achieving tender, fluffy rice and properly melding the filling consistency.
- 1/2 teaspoon kosher salt: Measured to season the rice and filling to taste, kosher salt enhances natural flavors and balances the acidity from salsa and spices without overpowering.
- 1 cup shredded cheese, Mexican blend or cheddar: Sprinkled on top before or after baking to add creamy, melty richness and a salty, tangy finish, shredded cheese creates a golden, bubbling crust over the stuffed peppers.
- 2 tablespoons chopped cilantro: Stirred into the finished dish or used as a garnish to add bright, herbal freshness, chopped cilantro lightens rich flavors and adds a citrusy, green note.
- 1/4 cup sour cream (optional): Dolloped as an optional creamy topping to add cool tang and richness, sour cream softens spicy heat and offers a smooth contrast to the warm stuffed peppers.
Making This Mexican Stuffed Peppers
These directions will walk you through preparing the filling, softening the peppers, stuffing, and finishing them in the oven. I like to keep the timing smooth so the filling is hot and the peppers are tender but not collapsed. Read each step before starting and lay out your mise en place for a calm, efficient process.
- Preheat the oven to 350ºF.: The warmth of the oven creates an even finishing environment for the peppers and melting cheese. You should smell a faint dry heat as it comes up to temperature, which helps the cheese melt consistently. Preheating matters because placing peppers into an oven that is still warming can extend bake times and alter texture, leaving the peppers softer than intended. A common mistake is not preheating, which leads to unpredictable cooking, so wait until the oven signals it has reached the set temperature.
- Brown the ground beef in a large fry pan over medium high heat for 5 minutes or until cooked almost through. Add the onion cook until softened, about 5 more minutes. Stir in the jarred salsa, chile powder, and cumin. Add the white rice and water, season with kosher salt and bring to a boil, then reduce to medium low. Cover and cook for 20 minutes, stirring occasionally, until the rice is tender, adding more water if necessary. When the rice is tender, fold in 3/4 of the chopped cilantro, reserving some for garnish.: As the ground beef hits the hot pan it will sizzle and release savory aromas, with little browned bits forming on the surface, which are flavor gold. Browning develops Maillard notes that make the filling more complex, and cooking until almost done ensures it will finish cooking as it combines with other ingredients. A common pitfall is overcrowding the pan, which causes steaming instead of browning, so brown in batches if needed to preserve that toasted scent and texture.
- While the meat and rice are cooking, cut off the tops of the peppers, spoon out the ribs and seeds, then rinse. Lightly sprinkle the inside of the peppers with kosher salt and place in a microwave safe dish with 1/4 cup water. Cover with plastic wrap and microwave for 5 minutes or until they soften but still hold their shape.: When you add the chopped onion , you will hear a softer sizzle and smell the onion sweetening as it becomes translucent. Softened onions blend into the filling and release moisture that helps the rice cook without sticking. If the onion is left undercooked it can be sharp and crunchy in the final dish, so cook until tender and fragrant and scrape any fond from the pan to capture flavor.
- Transfer the peppers to a 3 quart baking dish. Fill the peppers with the hot meat and rice mixture.: Adding the salsa will hiss slightly and steam as it hits the hot pan, releasing tomato and chile aromas. The chile powder and cumin bloom in the hot fat, intensifying their perfume. This step builds the core seasoning profile, and mixing thoroughly ensures every grain of rice gets seasoned. A frequent mistake is adding spices too late, which keeps them from fully flavoring the mixture, so add them now for balanced depth.
- Bake for 18-20 minutes or until peppers are tender. Sprinkle with cheese and heat for an additional minute or two until the cheese has melted. Garnish with the chopped cilantro and sour cream if you’d like, and serve.: When the rice and water join the pan, you will see steam rising as the mixture comes to a boil, with the surface moving gently. Reducing to medium low creates a steady simmer that allows the grains to absorb liquid and become tender rather than breaking apart. This control keeps the texture fluffy. If the heat is too high the liquid evaporates too quickly, leaving the rice undercooked, so maintain a gentle simmer.
- Cover and cook for 20 minutes, stirring occasionally, until the rice is tender, adding more water if necessary.: Covered, the pan traps steam which helps the rice cook through evenly. During this time you may hear faint bubbling and notice the aroma deepening as flavors meld. Stirring occasionally prevents the bottom from sticking and allows you to judge moisture; add a splash of water if the mixture looks dry before the grains are tender. A common error is removing the lid too frequently, which lets heat escape and prolongs cooking, so check sparingly.
- When the rice is tender, fold in 3/4 of the chopped cilantro, reserving some for garnish.: Folding in the chopped cilantro at the end keeps its bright herbal character and prevents it from wilting into the filling. You will see fresh green flecks distributed through the mixture, adding visual contrast and a lift of flavor. If you add the herb too early, it loses that fresh brightness, so reserve some for garnish and fold the rest in gently.
- While the meat and rice are cooking, cut off the tops of the peppers, spoon out the ribs and seeds, then rinse.: Preparing the peppers creates a clean cavity for the filling, and rinsing removes loose seeds that could add bitterness. As you cut, the fresh vegetal scent is crisp and green. Aim for neat cuts so the peppers sit upright. A common oversight is leaving too much of the white ribs inside, which can be tough, so remove them carefully.
- Lightly sprinkle the inside of the peppers with kosher salt and place in a microwave safe dish with 1/4 cup water.: Salting the interiors seasons the cavity, and the small amount of water in the microwave dish creates steam that softens the peppers while preserving their shape. You should hear a quiet steam release as they cook, and their skins will become more pliable, easing stuffing. Avoid overcooking in the microwave, as peppers can become limp and collapse in the oven.
- Cover with plastic wrap and microwave for 5 minutes or until they soften but still hold their shape.: The microwaving process yields a tender but structured pepper , which will finish in the oven. You want the flesh to give slightly when pressed but remain toothsome. Overmicrowaving leads to peppers that fall apart when baked, so stop as soon as they are softened yet resilient.
- Transfer the peppers to a 3 quart baking dish.: Moving the softened peppers into a baking dish positions them to catch any juices during baking, which concentrates flavor around the base. The dish should be just large enough so the peppers support each other and stay upright. Crowding too tightly can prevent even browning, while too much space allows them to tip.
- Fill the peppers with the hot meat and rice mixture.: Filling while the mixture is hot helps the peppers warm through quickly in the oven and melds the flavors. You will feel the heat and see steam rise as the filling nests inside, and the weight should be evenly distributed so each pepper bakes uniformly. Overstuffing can cause spills and uneven cooking, so pack gently without compressing the grains.
- Bake for 18 to 20 minutes or until peppers are tender.: In the oven the peppers will soften further and the filling will settle, producing a gentle bubbling at the edges where juices meet the dish. The pepper skins should become glossy and easily pierced with a fork. Baking too long can dry the filling, so test for tenderness after 18 minutes to avoid loss of juiciness.
- Sprinkle with cheese and heat for an additional minute or two until the cheese has melted.: Adding the cheese at the end ensures it melts into a creamy, slightly stretchy topping without overbaking. You may see small pools of melted cheese and a faint toasty aroma as it warms. If you leave the cheese in too long the topping can harden or brown excessively, so apply briefly until melted.
- Garnish with the chopped cilantro and sour cream if you’d like, and serve.: The final garnish of reserved cilantro and optional sour cream adds cooling brightness and a creamy counterpoint to the warm, spiced filling. Serve immediately so the contrast between hot filling and cool garnish is most noticeable. A common mistake is waiting to serve, which reduces that textural and temperature interplay.
Recipe Variations about Mexican Stuffed Peppers

There are lots of ways to personalize Mexican Stuffed Peppers while keeping the core structure intact. Below are practical variations and adaptations that preserve the spirit of the dish and let you tailor heat, texture, and cooking method.
- Mix meats: Swap part of the ground beef for ground turkey or sausage to change the fat level and flavor profile, keeping the same cooking steps so the filling reaches the proper tenderness.
- Beans and vegetables: Stir in canned corn or black beans to increase fiber and color, making sure they are drained and warmed before folding into the filling so the texture stays cohesive.
- Make it slower: Finish the stuffed peppers in a slow cooker by arranging them upright and cooking on high for about three hours, which yields exceptionally tender flesh and melded flavors.
- Spice control: Adjust the amount of chile powder or choose a milder salsa to make the dish family friendly, tasting the filling before stuffing to reach your preferred heat level.
- Cheese finish: Try different melting cheeses for varied textures, using Mexican blend for creamy melt or sharper cheddar for more pronounced tang, and always add cheese at the end to prevent overbaking.
Serving Suggestions
I like to present Mexican Stuffed Peppers as a colorful, complete plate for casual dinners and gatherings. The peppers stand out visually and invite guests to top them to taste. Pairing, timing, and leftover guidance below will help you serve confidently for many occasions.
- Serve with a simple green salad: A crisp salad with a light vinaigrette offers a refreshing contrast to the warm, savory peppers and keeps the meal balanced.
- Family dinners: These peppers work well for easy family dinners because each person gets a tidy, portion controlled serving that reheats well the next day.
- Entertaining: For casual dinner parties arrange the peppers in a large baking dish, provide extra cilantro and sour cream on the side, and let guests customize toppings to their liking.
- Storage tips: Store leftovers in an airtight container for up to three days. Reheat gently in a 325ºF oven until warmed through, or microwave in short bursts to preserve texture.
- Seasonal pairings: In cooler months serve with warm sides like roasted root vegetables, while in summer pair with bright, chilled salsas and a light bean salad to keep the plate lively.
FAQ
Conclusion
What makes this recipe special is its combination of savory, bright, and creamy elements tucked into individual bell peppers for a complete, satisfying plate. You get the comfort of seasoned meat and rice, the tang of salsa, and the fresh snap of cilantro in every bite, which is why I keep this in my regular rotation. Give it a try on a busy weeknight or when hosting; it scales easily, reheats well, and invites personal touches so everyone walks away happy.
Mexican Stuffed Peppers
Equipment
- Large fry pan
- Microwave safe dish
- 3 quart baking dish
- Stove
- Oven
Ingredients
- 6 bell peppers, stems and tops removed, then seeded and Hollowed to hold the filling and provide a colorful, crisp vessel for baking, these peppers soften when roasted and offer a sweet, slightly tangy flavor that balances rich fillings.
- 1 pound 90% lean ground beef Cooked until browned to add hearty texture and savory depth, the lean ground beef supplies protein and a meaty base that absorbs spices and salsa for cohesive stuffing.
- 1 medium onion, chopped, about 1 1/2 cups Sautéed until translucent to add aromatic sweetness and body, chopped onion contributes moisture and a mild sharpness that complements the beef and rice.
- 24 ounce jar restaurant style salsa Stirred in to provide saucy moisture, chunky texture, and tangy tomato-based flavor, the restaurant-style salsa seasons the filling and keeps it from drying out while baking.
- 1 teaspoon chile powder Sprinkled into the filling to introduce warm, smoky heat and a subtle earthy sweetness, chile powder helps unify the savory components and enhance overall spice.
- 1 teaspoon cumin Added for warm, nutty, slightly bitter notes that accentuate the savory profile, cumin brings a classic Mexican flavor that pairs well with chili powder and beef.
- 1 cup long grain white rice Cooked and mixed into the stuffing to add tender, starchy bulk and absorb flavors, long grain white rice provides structure and helps stretch the filling to feed more people.
- 2 cups water Simmered with rice to hydrate and cook the grains, water is essential for achieving tender, fluffy rice and properly melding the filling consistency.
- 1/2 teaspoon kosher salt Measured to season the rice and filling to taste, kosher salt enhances natural flavors and balances the acidity from salsa and spices without overpowering.
- 1 cup shredded cheese, Mexican blend or cheddar Sprinkled on top before or after baking to add creamy, melty richness and a salty, tangy finish, shredded cheese creates a golden, bubbling crust over the stuffed peppers.
- 2 tablespoons chopped cilantro Stirred into the finished dish or used as a garnish to add bright, herbal freshness, chopped cilantro lightens rich flavors and adds a citrusy, green note.
- 1/4 cup sour cream, optional Dolloped as an optional creamy topping to add cool tang and richness, sour cream softens spicy heat and offers a smooth contrast to the warm stuffed peppers.
Instructions
- Preheat the oven to 350ºF.: The warmth of the oven creates an even finishing environment for the peppers and melting cheese. You should smell a faint dry heat as it comes up to temperature, which helps the cheese melt consistently. Preheating matters because placing peppers into an oven that is still warming can extend bake times and alter texture, leaving the peppers softer than intended. A common mistake is not preheating, which leads to unpredictable cooking, so wait until the oven signals it has reached the set temperature.
- Brown the ground beef in a large fry pan over medium high heat for 5 minutes or until cooked almost through. Add the onion cook until softened, about 5 more minutes. Stir in the jarred salsa, chile powder, and cumin. Add the white rice and water, season with kosher salt and bring to a boil, then reduce to medium low. Cover and cook for 20 minutes, stirring occasionally, until the rice is tender, adding more water if necessary. When the rice is tender, fold in 3/4 of the chopped cilantro, reserving some for garnish.: As the ground beef hits the hot pan it will sizzle and release savory aromas, with little browned bits forming on the surface, which are flavor gold. Browning develops Maillard notes that make the filling more complex, and cooking until almost done ensures it will finish cooking as it combines with other ingredients. A common pitfall is overcrowding the pan, which causes steaming instead of browning, so brown in batches if needed to preserve that toasted scent and texture.
- While the meat and rice are cooking, cut off the tops of the peppers, spoon out the ribs and seeds, then rinse. Lightly sprinkle the inside of the peppers with kosher salt and place in a microwave safe dish with 1/4 cup water. Cover with plastic wrap and microwave for 5 minutes or until they soften but still hold their shape.: When you add the chopped onion , you will hear a softer sizzle and smell the onion sweetening as it becomes translucent. Softened onions blend into the filling and release moisture that helps the rice cook without sticking. If the onion is left undercooked it can be sharp and crunchy in the final dish, so cook until tender and fragrant and scrape any fond from the pan to capture flavor.
- Transfer the peppers to a 3 quart baking dish. Fill the peppers with the hot meat and rice mixture.: Adding the salsa will hiss slightly and steam as it hits the hot pan, releasing tomato and chile aromas. The chile powder and cumin bloom in the hot fat, intensifying their perfume. This step builds the core seasoning profile, and mixing thoroughly ensures every grain of rice gets seasoned. A frequent mistake is adding spices too late, which keeps them from fully flavoring the mixture, so add them now for balanced depth.
- Bake for 18-20 minutes or until peppers are tender. Sprinkle with cheese and heat for an additional minute or two until the cheese has melted. Garnish with the chopped cilantro and sour cream if you’d like, and serve.: When the rice and water join the pan, you will see steam rising as the mixture comes to a boil, with the surface moving gently. Reducing to medium low creates a steady simmer that allows the grains to absorb liquid and become tender rather than breaking apart. This control keeps the texture fluffy. If the heat is too high the liquid evaporates too quickly, leaving the rice undercooked, so maintain a gentle simmer.
- Cover and cook for 20 minutes, stirring occasionally, until the rice is tender, adding more water if necessary.: Covered, the pan traps steam which helps the rice cook through evenly. During this time you may hear faint bubbling and notice the aroma deepening as flavors meld. Stirring occasionally prevents the bottom from sticking and allows you to judge moisture; add a splash of water if the mixture looks dry before the grains are tender. A common error is removing the lid too frequently, which lets heat escape and prolongs cooking, so check sparingly.
- When the rice is tender, fold in 3/4 of the chopped cilantro, reserving some for garnish.: Folding in the chopped cilantro at the end keeps its bright herbal character and prevents it from wilting into the filling. You will see fresh green flecks distributed through the mixture, adding visual contrast and a lift of flavor. If you add the herb too early, it loses that fresh brightness, so reserve some for garnish and fold the rest in gently.
- While the meat and rice are cooking, cut off the tops of the peppers, spoon out the ribs and seeds, then rinse.: Preparing the peppers creates a clean cavity for the filling, and rinsing removes loose seeds that could add bitterness. As you cut, the fresh vegetal scent is crisp and green. Aim for neat cuts so the peppers sit upright. A common oversight is leaving too much of the white ribs inside, which can be tough, so remove them carefully.
- Lightly sprinkle the inside of the peppers with kosher salt and place in a microwave safe dish with 1/4 cup water.: Salting the interiors seasons the cavity, and the small amount of water in the microwave dish creates steam that softens the peppers while preserving their shape. You should hear a quiet steam release as they cook, and their skins will become more pliable, easing stuffing. Avoid overcooking in the microwave, as peppers can become limp and collapse in the oven.
- Cover with plastic wrap and microwave for 5 minutes or until they soften but still hold their shape.: The microwaving process yields a tender but structured pepper , which will finish in the oven. You want the flesh to give slightly when pressed but remain toothsome. Overmicrowaving leads to peppers that fall apart when baked, so stop as soon as they are softened yet resilient.
- Transfer the peppers to a 3 quart baking dish.: Moving the softened peppers into a baking dish positions them to catch any juices during baking, which concentrates flavor around the base. The dish should be just large enough so the peppers support each other and stay upright. Crowding too tightly can prevent even browning, while too much space allows them to tip.
- Fill the peppers with the hot meat and rice mixture.: Filling while the mixture is hot helps the peppers warm through quickly in the oven and melds the flavors. You will feel the heat and see steam rise as the filling nests inside, and the weight should be evenly distributed so each pepper bakes uniformly. Overstuffing can cause spills and uneven cooking, so pack gently without compressing the grains.
- Bake for 18 to 20 minutes or until peppers are tender.: In the oven the peppers will soften further and the filling will settle, producing a gentle bubbling at the edges where juices meet the dish. The pepper skins should become glossy and easily pierced with a fork. Baking too long can dry the filling, so test for tenderness after 18 minutes to avoid loss of juiciness.
- Sprinkle with cheese and heat for an additional minute or two until the cheese has melted.: Adding the cheese at the end ensures it melts into a creamy, slightly stretchy topping without overbaking. You may see small pools of melted cheese and a faint toasty aroma as it warms. If you leave the cheese in too long the topping can harden or brown excessively, so apply briefly until melted.
- Garnish with the chopped cilantro and sour cream if you’d like, and serve.: The final garnish of reserved cilantro and optional sour cream adds cooling brightness and a creamy counterpoint to the warm, spiced filling. Serve immediately so the contrast between hot filling and cool garnish is most noticeable. A common mistake is waiting to serve, which reduces that textural and temperature interplay.
Notes
- Mix meats: Swap part of the ground beef for ground turkey or sausage to change the fat level and flavor profile, keeping the same cooking steps so the filling reaches the proper tenderness.
- Beans and vegetables: Stir in canned corn or black beans to increase fiber and color, making sure they are drained and warmed before folding into the filling so the texture stays cohesive.
- Make it slower: Finish the stuffed peppers in a slow cooker by arranging them upright and cooking on high for about three hours, which yields exceptionally tender flesh and melded flavors.
- Spice control: Adjust the amount of chile powder or choose a milder salsa to make the dish family friendly, tasting the filling before stuffing to reach your preferred heat level.
- Cheese finish: Try different melting cheeses for varied textures, using Mexican blend for creamy melt or sharper cheddar for more pronounced tang, and always add cheese at the end to prevent overbaking.