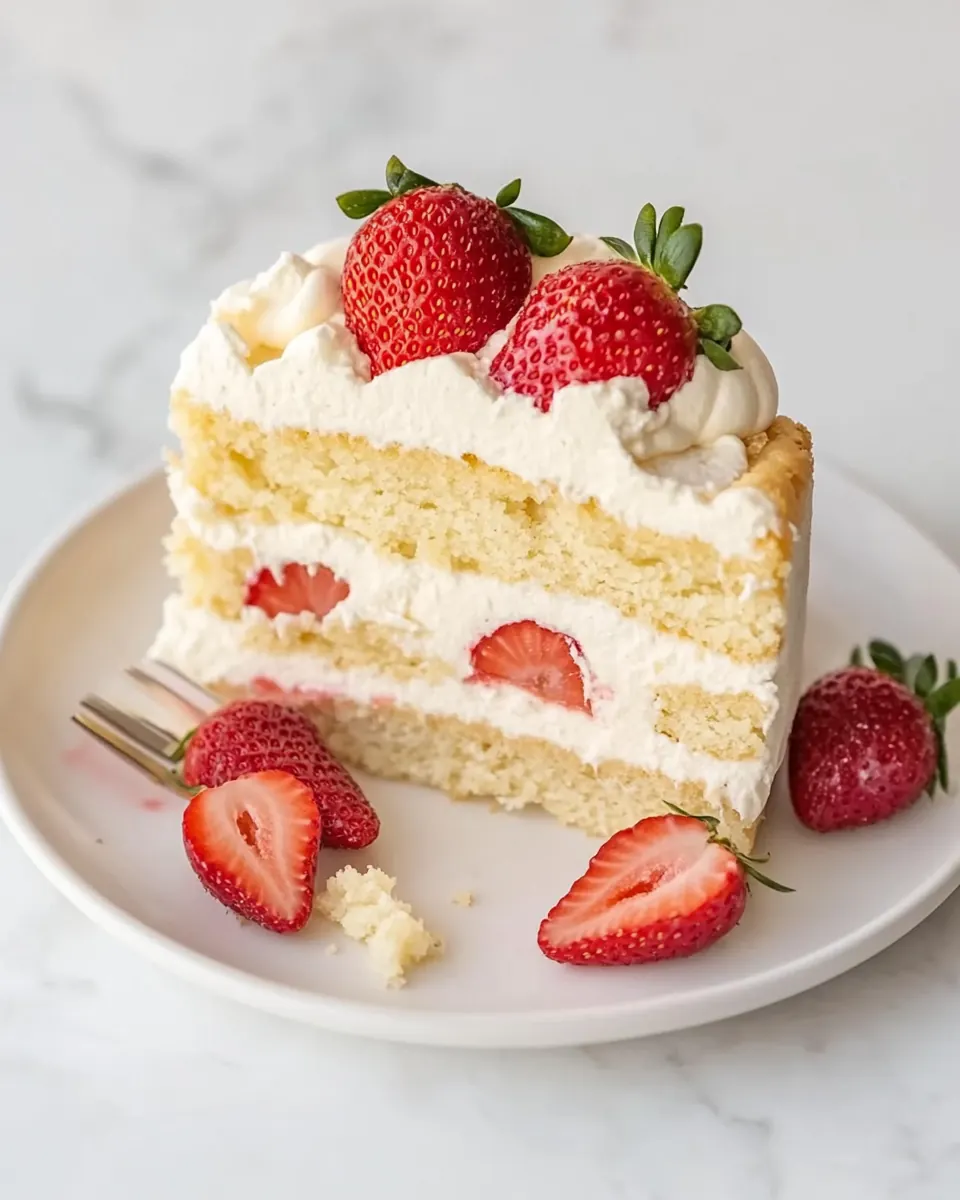
Keto Strawberry Shortcake
Keto Strawberry Shortcake has been my go to when I want a dessert that feels indulgent without derailing a low carb day. The first time I made this recipe I remember the kitchen filling with a warm, toasty almond aroma while the strawberries gleamed like little red jewels. I was chasing a childhood memory of a picnic dessert, and this version somehow manages to be both nostalgic and modern, with textures that surprise you in the best way.
Over the years I’ve learned to trust simple ingredients and careful technique, and this Keto Strawberry Shortcake highlights that philosophy. I love how the crumb stays tender thanks to the almond flour, while the whipped frosting and bright strawberries keep each bite lively. I often make it for friends who are skeptical about low carb baking, and seeing their faces light up when they taste it never gets old.
Recipe Snapshot
30 mins
5 mins
25 mins
Easy
350 kcal
American
Keto, Gluten-Free
Desserts
Oven, 9 inch springform cake pans, Mixing bowls, Whisk, Offset spatula
Why Try This Keto Strawberry Shortcake
It tastes like the original, without the sugar crash
I really appreciate that this Keto Strawberry Shortcake keeps the essence of the classic treat, yet uses low carb sweetener so you get the sweet finish without a mid afternoon slump. The balance of creamy frosting and tart strawberries recreates that familiar harmony we all love.
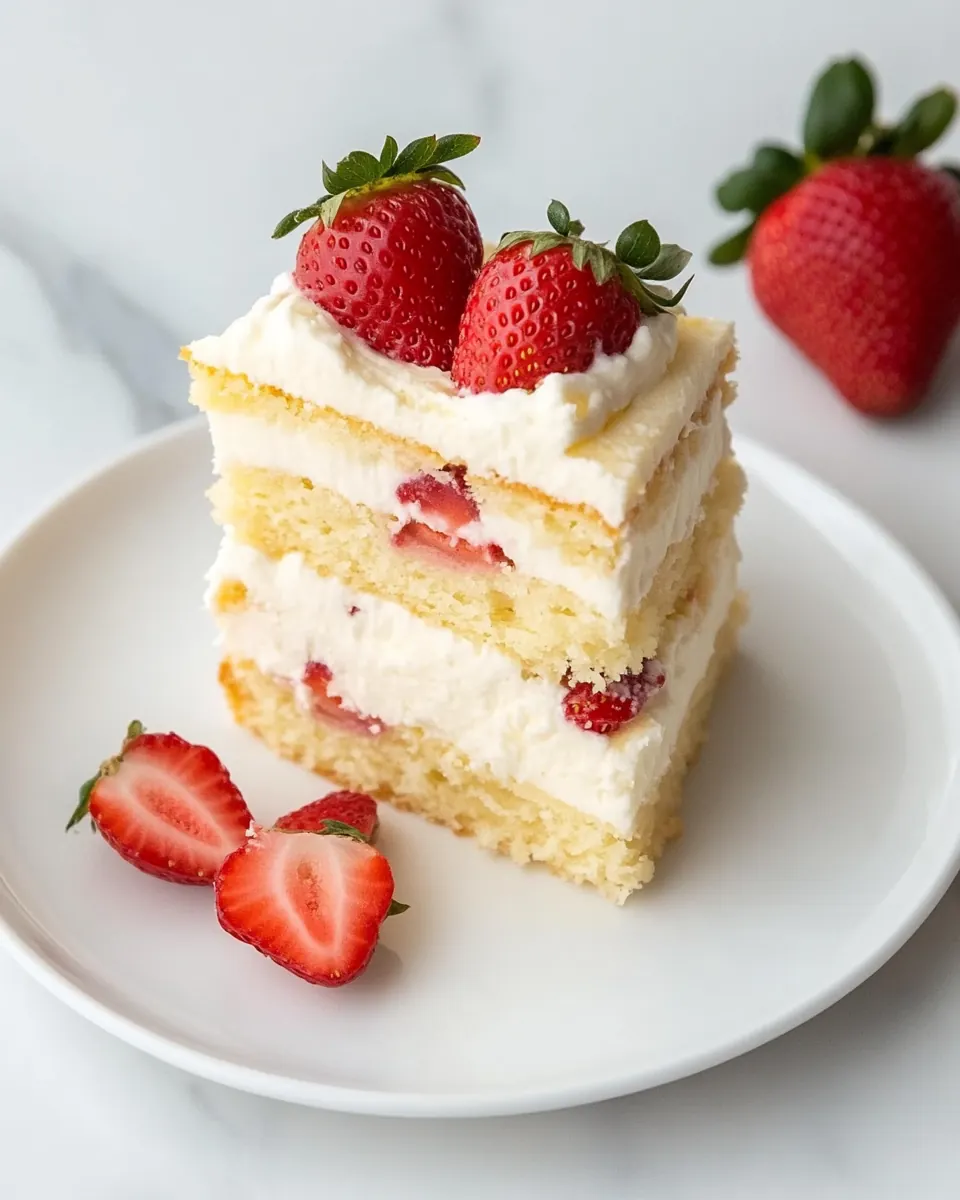
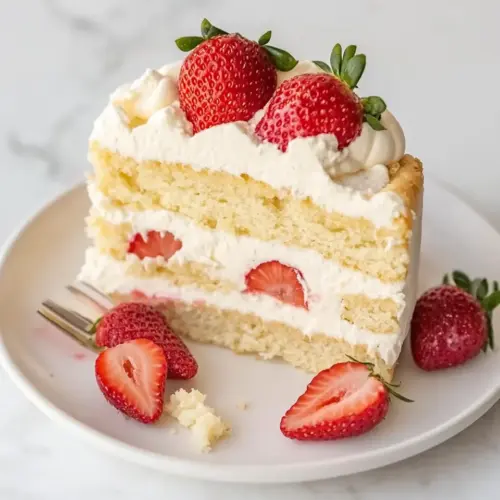
The texture is impressive
When I slice into the cake, the crumb is moist and slightly dense in the best way, which shows how well the almond flour performs. I like that the cake holds its shape for neat layers, so it makes for a beautiful presentation when guests arrive.
Simple pantry ingredients
Most of the components are things I usually have on hand, like eggs, butter, and a keto sweetener. That simplicity means you can pull this together quickly when you decide to treat yourself, or when company drops in unexpectedly.
Flexible to your tastes
I often play with the amount of frosting or how I slice the strawberries, so this recipe adapts to different preferences. If you want more fruit forward slices or a thicker frosting layer, both paths work beautifully.
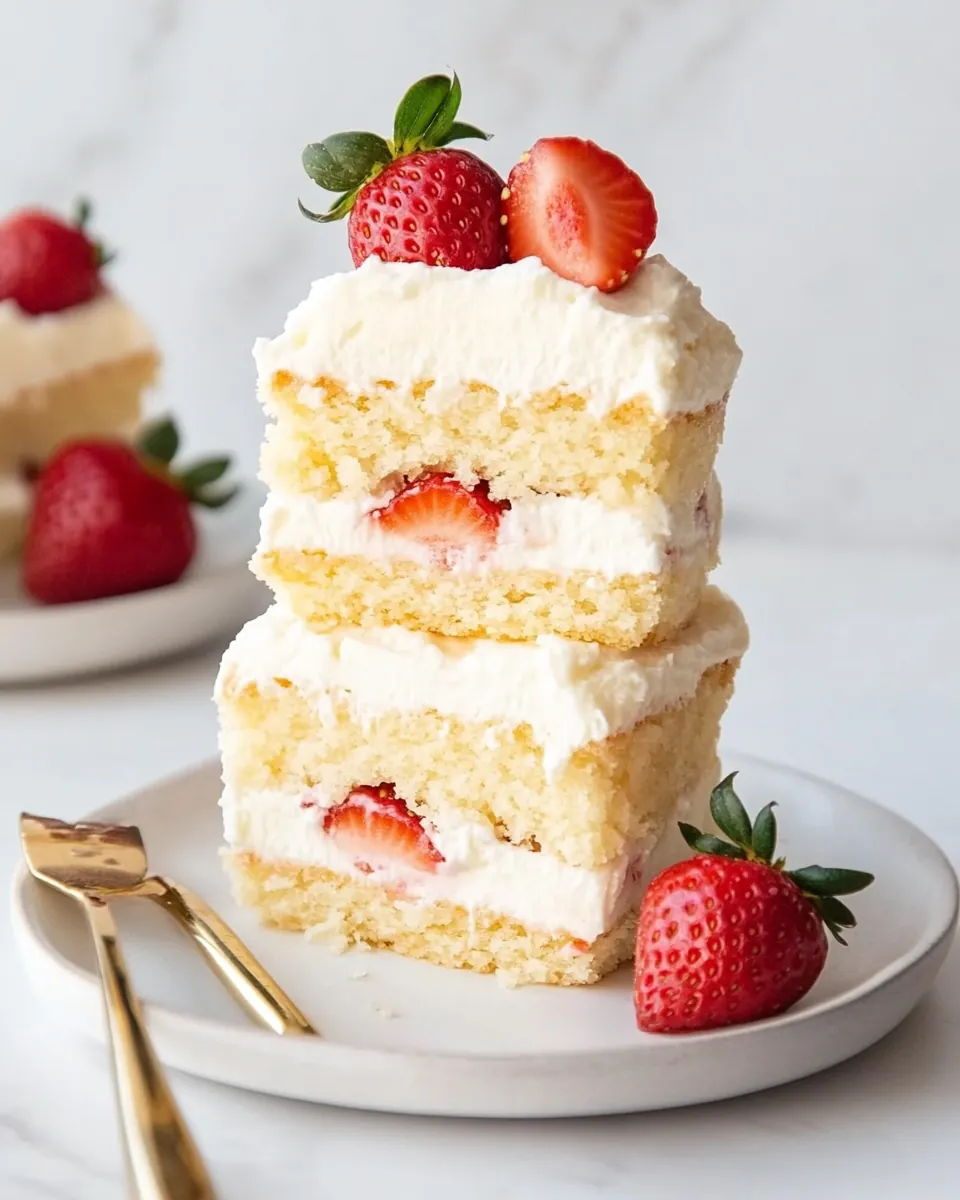
Visually striking and festive
Finally, this Keto Strawberry Shortcake looks like a celebration on a plate. The contrast of pale cake, white frosting, and red fruit makes it a perfect centerpiece for spring gatherings, and I always enjoy the compliments it brings.
Everything You Need for Keto Strawberry Shortcake
The ingredient list here is designed to create a harmonious balance between tender crumb and bright, fresh fruit. The key players are the almond flour which gives structure and a delicate nuttiness, eggs which provide lift and moisture, and the keto vanilla frosting that brings creaminess and sweet contrast to the tart strawberries. Each item plays a role in texture, flavor, or stability so the final dessert slices cleanly and tastes satisfying.
- 4 cups almond flour: Provide a nutty, low-carb base that adds structure and moistness to baked goods; finely ground texture helps mimic traditional flour while contributing healthy fats and protein. Use measured cups to maintain the recipe’s crumb and prevent dense results by avoiding overpacking. Blends well with eggs and melted butter to create a tender cake-like shortcake suitable for ketogenic diets.
- 2 teaspoon baking powder: Act as a chemical leavening agent to create lift and lightness in the batter; reacts with moisture and eggs to produce carbon dioxide and a softer crumb. Use the specified amount to balance rise without imparting metallic or bitter off-flavors. Sift or whisk into dry ingredients to ensure even distribution for consistent texture throughout.
- 1 cup allulose: Sweeten the dessert without raising blood sugar, providing bulk and browning similar to sugar when baked; dissolves into the batter to contribute tenderness and mouthfeel. Measure precisely because sugar substitutes can affect texture and moisture differently than cane sugar. Incorporate with wet ingredients until fully dissolved to avoid graininess in the finished shortcake.
- 8 large eggs room temperature: Bind ingredients, provide richness, and help with leavening and structure due to proteins and emulsifying properties; room temperature eggs mix more uniformly for a consistent batter. Separate or beat eggs as recipe techniques require to incorporate air and improve volume. Use large eggs as specified to maintain correct liquid-to-dry ratio and predictable texture.
- 1/4 cup butter melted: Contribute fat for richness, tenderness, and a moist crumb while enhancing flavor; melted state allows easy incorporation into the batter for even distribution. Cool slightly before mixing with eggs to prevent curdling, and measure carefully to preserve intended fat content. Butter also promotes browning and a pleasant mouthfeel in the finished shortcake.
- 1 tablespoon vanilla extract: Add aromatic sweetness and depth of flavor that complements strawberries and vanilla frosting; liquid form disperses flavor evenly throughout the batter. Use the suggested amount to avoid overpowering other flavors while enhancing overall dessert complexity. Choose pure extract for a clean, natural vanilla note rather than artificial alternatives.
- 2 cups keto vanilla frosting: Provide a creamy, sweet topping that adds moisture, frosting consistency, and traditional shortcake richness; keto formulation keeps the dessert low-carb while delivering familiar dessert profile. Spread or pipe over cooled shortcake layers to prevent melting and maintain presentation. Use at room temperature for ease of application and even coverage.
- 2 cups strawberries hulled and sliced: Offer fresh, bright tartness and natural sweetness that balances the rich, buttery shortcake and sweet frosting; hulled and sliced form ensures even distribution and easy eating. Choose ripe berries for optimal flavor and texture, and slice uniformly for consistent layering between shortcake pieces. Serve shortly after assembling to preserve freshness and prevent sogginess.
Putting Together Keto Strawberry Shortcake
Assembling this cake is straightforward and rewarding. The steps move from preparing the batter to baking and finally to layering and decorating, so work methodically and give yourself time to cool the layers completely before frosting. You will be rewarded with neat slices and bright, balanced flavors.
- Preheat the oven to 180 C/350 F. Grease two 9-inch springform cake pans and set aside.: The moment the oven begins to warm you will notice a subtle rise in eagerness, and preheating ensures the pans reach the correct environment so the cakes bake evenly. Greasing the pans helps the cakes release cleanly without tearing, and using springform pans makes removal gentle on the crumb. You should feel the warmth in the air as the oven stabilizes, and visually the racks will be ready for even heat circulation. One reason this matters is that a properly preheated oven gives the batter an immediate lift from the start, preventing dense centers. A common mistake is placing pans in too early or opening the door while the oven climbs, which can cause uneven rise. Make sure the oven thermometer reads steady and the pans are positioned on the middle rack to avoid hot spot browning. If your oven runs hot, lower the temperature slightly to prevent the edges from overbrowning while the center remains underbaked. Also double check that your springform latches are secure so the batter does not leak, and line the bottoms with parchment for an extra-safe release.
- In a small bowl, mix together the almond flour and baking powder and set aside. In a separate bowl, whisk together the sweetener, eggs, melted butter, and vanilla extract until glossy and smooth. Gently fold through the dry ingredients until combined.: When you combine dry almond flour and baking powder , you are creating the structure base, and sifting or whisking them helps prevent lumps and ensures even distribution of leavening. Whisking the liquids until glossy aerates the mixture slightly, giving the batter a silkier texture that will translate into a tender crumb. Folding the dry into the wet should be done gently to retain air and avoid overworking the batter, which could make the texture gummy. Sensory cues here include a glossy, ribbon like batter and a nutty scent from the almond flour . A frequent error is vigorous mixing, which collapses the air you just incorporated and yields a denser cake. Use a spatula to fold with gentle strokes, scraping the bowl edges to ensure no pockets of dry flour remain. If the batter looks too thick, resist adding extra liquid; instead check that the eggs were at room temperature as cold eggs can make batter stiff. The goal is a cohesive batter with a smooth sheen and a consistency that pours slowly from the spatula.
- Transfer the cake batter amongst the two cake pans and bake for 27-30 minutes, or until a skewer comes out clean.: As you fill the pans, notice how the batter levels out with a slight surface tension, and when it bakes it will take on a pale golden edge. The smell will shift toward warm nuttiness, and the top will spring back when lightly pressed. Baking for the stated time usually yields a set center and a gently browned exterior, but ovens vary, so the skewer test is the best indicator of doneness. Insert a skewer near the center and if it comes out clean or with a few moist crumbs you are done. One trap is overbaking which dries the crumb, so start checking a few minutes before the lower end of the time window. Also be careful not to open the oven too often, which can cause the layers to sink. If the tops brown quickly but the centers are not set, tent with foil to slow browning and allow the inside to finish baking evenly.
- Remove the cakes from the oven and let them cool in the cake pans completely, before frosting and layering.: Cooling in the pans helps the cakes settle and prevents them from tearing when removed. As they cool you will notice steam fade and the aroma mellow into a comforting nuttiness, and the texture firms just enough to handle. Patience here allows the crumb to set, which is essential for clean slices and stable layers. A common misstep is attempting to frost warm cakes, which causes the frosting to melt and slide, so give adequate cooling time. If you are short on time, you can place the pans on a wire rack in a cool area, but avoid refrigeration right away as that can stiffen the butter fats unevenly. When the cakes are fully cool, run a thin knife around the edges of the springform to release them gently and transfer to your serving plate for assembly.
- Place the first cake on a flat plate or surface. Spread half the frosting on top, followed by half the strawberries. Place the second cake layer on top, and spread with the remaining frosting and top with the remaining strawberries.: The assembly is the final flourish where textures and flavors meet. When you spread the keto vanilla frosting , you are creating a creamy barrier that contrasts the nutty crumb, while the sliced strawberries add bright acidity and juiciness. Use an offset spatula to create an even layer so each slice gets a balanced ratio of cake to frosting to fruit. Sensory cues include the cool touch of the frosting and the fresh scent of the strawberries . Avoid piling too many berries in one spot, which can lead to slipping and leaking juices. If your frosting seems very soft, chilling briefly helps it stabilize before the final decoration. Serve chilled or slightly cool for the best texture contrast between the tender cake and the cool frosting.
Ways to Adapt This Recipe

This section explores ways I personalize the Keto Strawberry Shortcake. Small adjustments can shift texture, sweetness, or presentation while keeping the core character intact. Below are several tested tips you can use to adapt the recipe to your taste and occasion.
- Reduce sweetness: Cut the allulose slightly if you prefer a less sweet profile, and balance with slightly riper strawberries for natural sweetness.
- Firmer frosting: Chill the frosting briefly before spreading if you want cleaner layers, especially in warm kitchens.
- Even layers: Use a kitchen scale to portion batter evenly between pans for perfectly matched cake heights.
- Make ahead: Bake the layers a day in advance and wrap tightly, then assemble the day you serve for freshness and easier timing.
- Freeze slices: Individually wrap portions and freeze up to six months, thawing overnight in the refrigerator before serving.
Perfect Pairings for Keto Strawberry Shortcake
This dessert shines in many settings, from casual afternoon tea to a springtime celebration. Think about pairing it with light beverages and simple sides that complement the nutty cake and bright strawberries. The serving ideas below include storage and occasion notes to help you plan.
- Casual brunch: Serve slices with small bowls of extra sliced strawberries so guests can add more fruit if they like, and offer smaller forks for easy sharing.
- Spring gatherings: The cake’s color palette suits spring events, making it a great centerpiece for a picnic style table or a garden party.
- Storage: Keep the cake covered in the refrigerator for up to five days, as refrigeration preserves the texture and prevents spoilage.
- Freezing: Slice and freeze individual pieces in airtight containers for up to six months, thawing in the refrigerator before serving.
- Occasions: This dessert works well for birthdays, baby showers, or anytime you want a lighter celebration cake that still feels indulgent.
FAQ
Conclusion
This Keto Strawberry Shortcake stands out because it combines a tender almond crumb with creamy keto frosting and bright, fresh strawberries for a dessert that feels both classic and modern. Give it a try when you want a show stopping dessert that stays true to low carb goals, and invite friends who are curious about keto baking to share the experience. I hope this recipe becomes one of your reliable favorites for spring gatherings and special moments, delivering both flavor and a beautiful presentation.
Keto Strawberry Shortcake
Equipment
- Oven
- 9 inch springform cake pans
- Mixing Bowls
- Whisk
- Offset Spatula
Ingredients
- 4 cups almond flour Provide a nutty, low-carb base that adds structure and moistness to baked goods; finely ground texture helps mimic traditional flour while contributing healthy fats and protein. Use measured cups to maintain the recipe’s crumb and prevent dense results by avoiding overpacking. Blends well with eggs and melted butter to create a tender cake-like shortcake suitable for ketogenic diets.
- 2 teaspoon baking powder Act as a chemical leavening agent to create lift and lightness in the batter; reacts with moisture and eggs to produce carbon dioxide and a softer crumb. Use the specified amount to balance rise without imparting metallic or bitter off-flavors. Sift or whisk into dry ingredients to ensure even distribution for consistent texture throughout.
- 1 cup allulose Sweeten the dessert without raising blood sugar, providing bulk and browning similar to sugar when baked; dissolves into the batter to contribute tenderness and mouthfeel. Measure precisely because sugar substitutes can affect texture and moisture differently than cane sugar. Incorporate with wet ingredients until fully dissolved to avoid graininess in the finished shortcake.
- 8 large eggs room temperature Bind ingredients, provide richness, and help with leavening and structure due to proteins and emulsifying properties; room temperature eggs mix more uniformly for a consistent batter. Separate or beat eggs as recipe techniques require to incorporate air and improve volume. Use large eggs as specified to maintain correct liquid-to-dry ratio and predictable texture.
- 1/4 cup butter melted Contribute fat for richness, tenderness, and a moist crumb while enhancing flavor; melted state allows easy incorporation into the batter for even distribution. Cool slightly before mixing with eggs to prevent curdling, and measure carefully to preserve intended fat content. Butter also promotes browning and a pleasant mouthfeel in the finished shortcake.
- 1 tablespoon vanilla extract Add aromatic sweetness and depth of flavor that complements strawberries and vanilla frosting; liquid form disperses flavor evenly throughout the batter. Use the suggested amount to avoid overpowering other flavors while enhancing overall dessert complexity. Choose pure extract for a clean, natural vanilla note rather than artificial alternatives.
- 2 cups keto vanilla frosting Provide a creamy, sweet topping that adds moisture, frosting consistency, and traditional shortcake richness; keto formulation keeps the dessert low-carb while delivering familiar dessert profile. Spread or pipe over cooled shortcake layers to prevent melting and maintain presentation. Use at room temperature for ease of application and even coverage.
- 2 cups strawberries hulled and sliced Offer fresh, bright tartness and natural sweetness that balances the rich, buttery shortcake and sweet frosting; hulled and sliced form ensures even distribution and easy eating. Choose ripe berries for optimal flavor and texture, and slice uniformly for consistent layering between shortcake pieces. Serve shortly after assembling to preserve freshness and prevent sogginess.
Instructions
- Preheat the oven to 180 C/350 F. Grease two 9-inch springform cake pans and set aside.: The moment the oven begins to warm you will notice a subtle rise in eagerness, and preheating ensures the pans reach the correct environment so the cakes bake evenly. Greasing the pans helps the cakes release cleanly without tearing, and using springform pans makes removal gentle on the crumb. You should feel the warmth in the air as the oven stabilizes, and visually the racks will be ready for even heat circulation. One reason this matters is that a properly preheated oven gives the batter an immediate lift from the start, preventing dense centers. A common mistake is placing pans in too early or opening the door while the oven climbs, which can cause uneven rise. Make sure the oven thermometer reads steady and the pans are positioned on the middle rack to avoid hot spot browning. If your oven runs hot, lower the temperature slightly to prevent the edges from overbrowning while the center remains underbaked. Also double check that your springform latches are secure so the batter does not leak, and line the bottoms with parchment for an extra-safe release.
- In a small bowl, mix together the almond flour and baking powder and set aside. In a separate bowl, whisk together the sweetener, eggs, melted butter, and vanilla extract until glossy and smooth. Gently fold through the dry ingredients until combined.: When you combine dry almond flour and baking powder , you are creating the structure base, and sifting or whisking them helps prevent lumps and ensures even distribution of leavening. Whisking the liquids until glossy aerates the mixture slightly, giving the batter a silkier texture that will translate into a tender crumb. Folding the dry into the wet should be done gently to retain air and avoid overworking the batter, which could make the texture gummy. Sensory cues here include a glossy, ribbon like batter and a nutty scent from the almond flour . A frequent error is vigorous mixing, which collapses the air you just incorporated and yields a denser cake. Use a spatula to fold with gentle strokes, scraping the bowl edges to ensure no pockets of dry flour remain. If the batter looks too thick, resist adding extra liquid; instead check that the eggs were at room temperature as cold eggs can make batter stiff. The goal is a cohesive batter with a smooth sheen and a consistency that pours slowly from the spatula.
- Transfer the cake batter amongst the two cake pans and bake for 27-30 minutes, or until a skewer comes out clean.: As you fill the pans, notice how the batter levels out with a slight surface tension, and when it bakes it will take on a pale golden edge. The smell will shift toward warm nuttiness, and the top will spring back when lightly pressed. Baking for the stated time usually yields a set center and a gently browned exterior, but ovens vary, so the skewer test is the best indicator of doneness. Insert a skewer near the center and if it comes out clean or with a few moist crumbs you are done. One trap is overbaking which dries the crumb, so start checking a few minutes before the lower end of the time window. Also be careful not to open the oven too often, which can cause the layers to sink. If the tops brown quickly but the centers are not set, tent with foil to slow browning and allow the inside to finish baking evenly.
- Remove the cakes from the oven and let them cool in the cake pans completely, before frosting and layering.: Cooling in the pans helps the cakes settle and prevents them from tearing when removed. As they cool you will notice steam fade and the aroma mellow into a comforting nuttiness, and the texture firms just enough to handle. Patience here allows the crumb to set, which is essential for clean slices and stable layers. A common misstep is attempting to frost warm cakes, which causes the frosting to melt and slide, so give adequate cooling time. If you are short on time, you can place the pans on a wire rack in a cool area, but avoid refrigeration right away as that can stiffen the butter fats unevenly. When the cakes are fully cool, run a thin knife around the edges of the springform to release them gently and transfer to your serving plate for assembly.
- Place the first cake on a flat plate or surface. Spread half the frosting on top, followed by half the strawberries. Place the second cake layer on top, and spread with the remaining frosting and top with the remaining strawberries.: The assembly is the final flourish where textures and flavors meet. When you spread the keto vanilla frosting , you are creating a creamy barrier that contrasts the nutty crumb, while the sliced strawberries add bright acidity and juiciness. Use an offset spatula to create an even layer so each slice gets a balanced ratio of cake to frosting to fruit. Sensory cues include the cool touch of the frosting and the fresh scent of the strawberries . Avoid piling too many berries in one spot, which can lead to slipping and leaking juices. If your frosting seems very soft, chilling briefly helps it stabilize before the final decoration. Serve chilled or slightly cool for the best texture contrast between the tender cake and the cool frosting.
Notes
- Reduce sweetness: Cut the allulose slightly if you prefer a less sweet profile, and balance with slightly riper strawberries for natural sweetness.
- Firmer frosting: Chill the frosting briefly before spreading if you want cleaner layers, especially in warm kitchens.
- Even layers: Use a kitchen scale to portion batter evenly between pans for perfectly matched cake heights.
- Make ahead: Bake the layers a day in advance and wrap tightly, then assemble the day you serve for freshness and easier timing.
- Freeze slices: Individually wrap portions and freeze up to six months, thawing overnight in the refrigerator before serving.