Instant Pot Roast
Instant Pot Roast is the kind of dish I turn to when I want comfort without spending all afternoon in the kitchen. I remember the first time I tried something like this, a rainy evening when the house smelled like warm tomato and garlic, and the family gathered around the table talking about everything and nothing. That memory stuck with me, and over time I learned how to coax the deepest flavors from simple ingredients, so the roast tastes rich and homey even when life is busy.
On another weeknight, when I had a hundred small tasks pulling at me, the Instant Pot Roast saved dinner. The pressure cooker does the heavy lifting, turning a tough cut of beef into tender, pull apart goodness while the potatoes and carrots soften to just the right texture. I like how it frees up oven space and cuts down active cooking time, yet the result still feels slow cooked and soulful. I often find myself lingering in the kitchen just to inhale that savory aroma as I lift the lid.
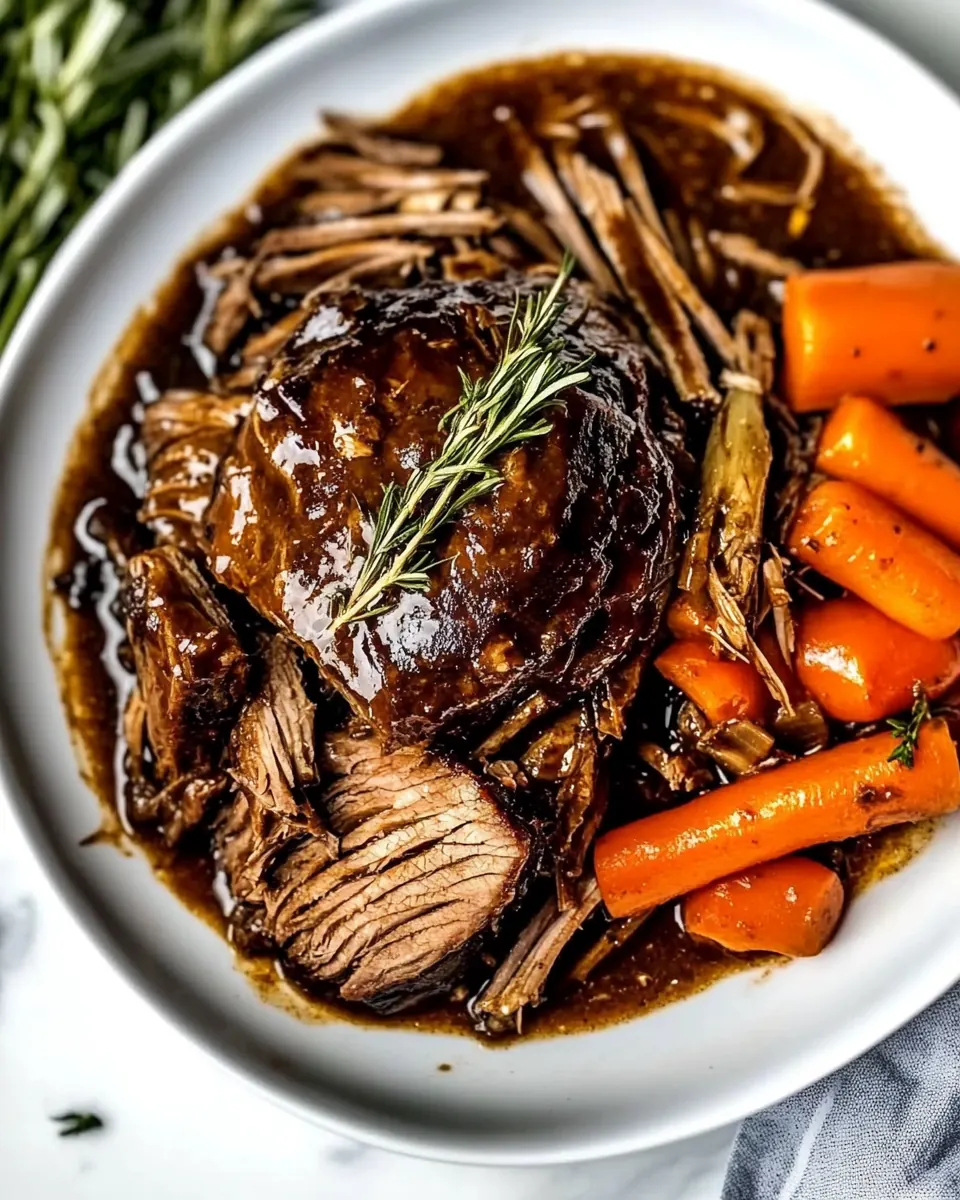
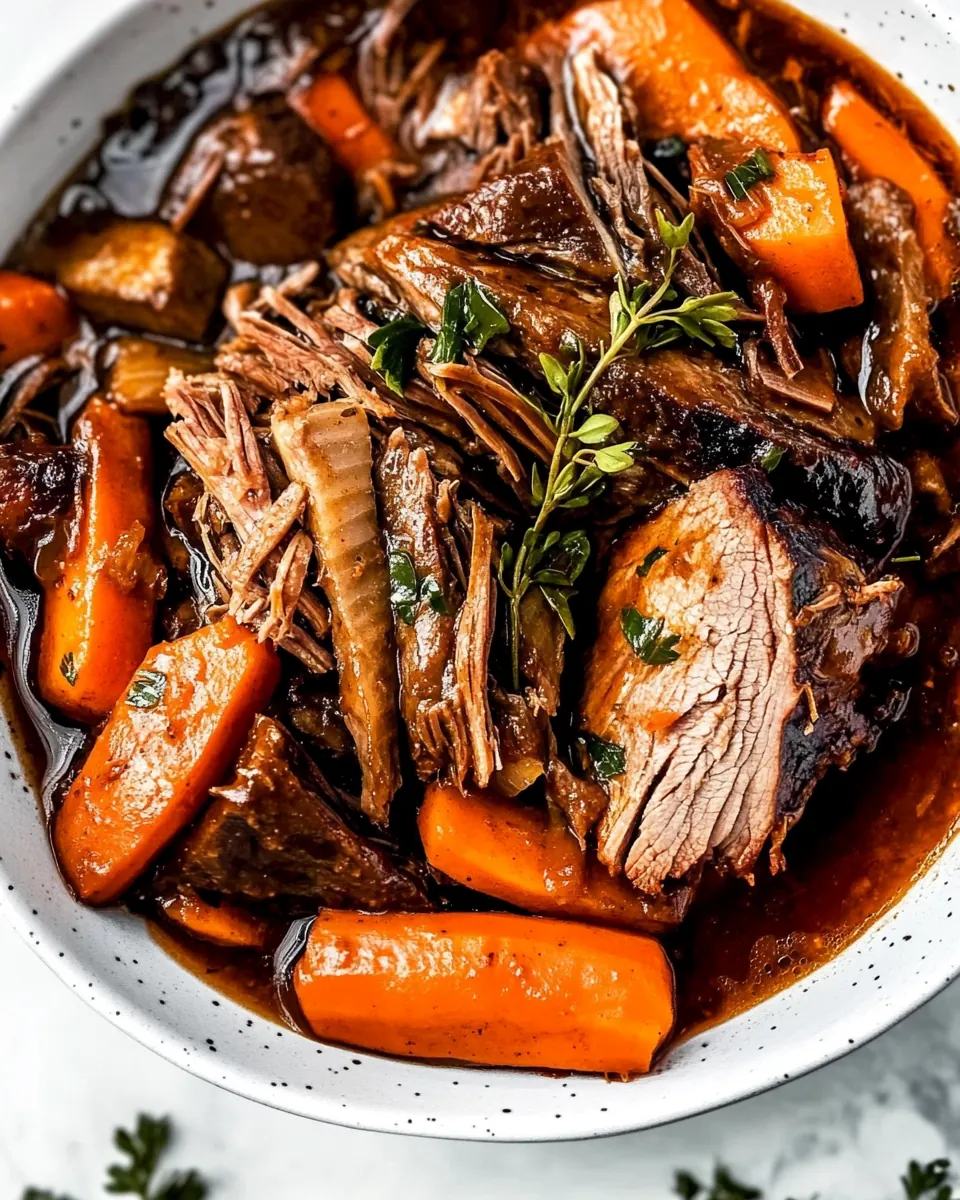
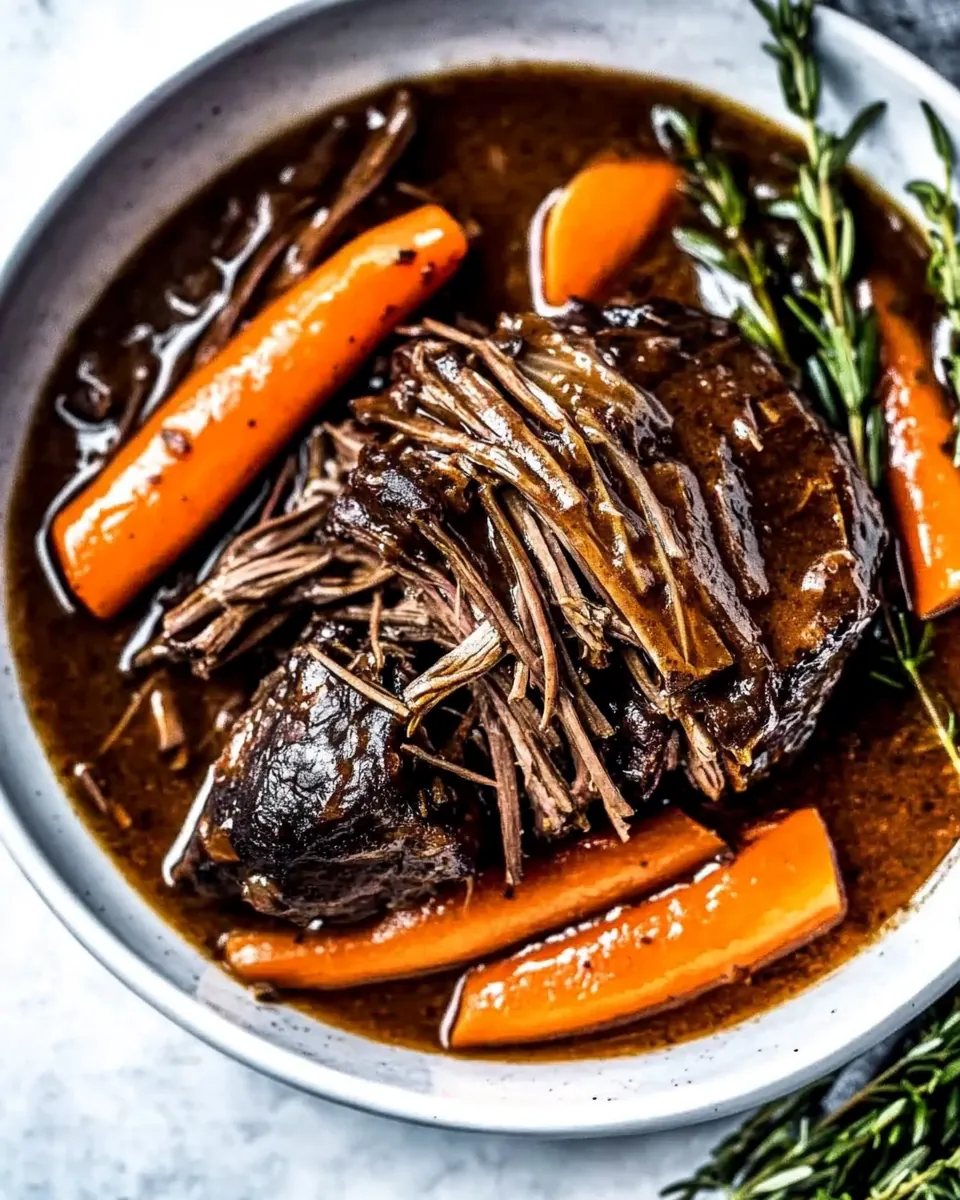
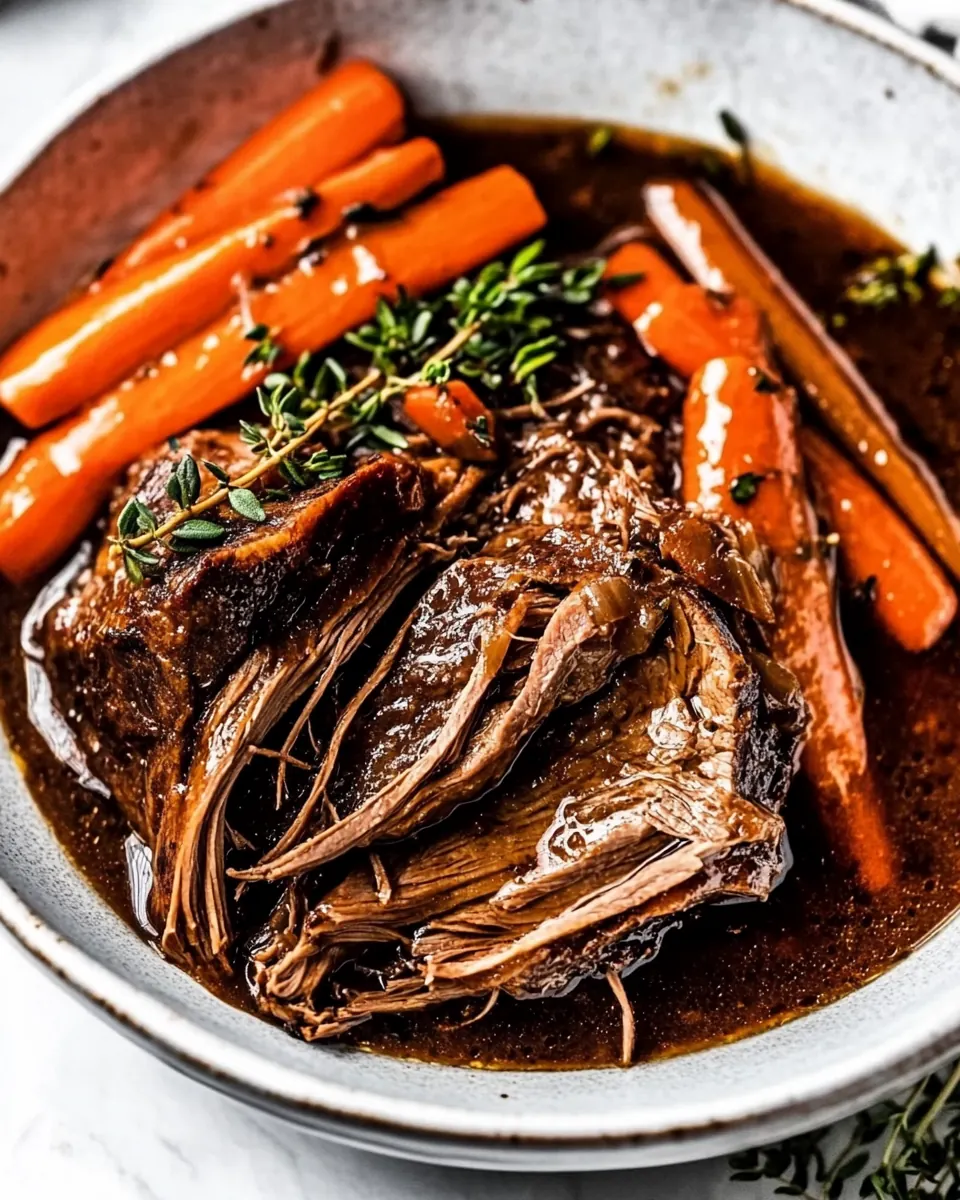
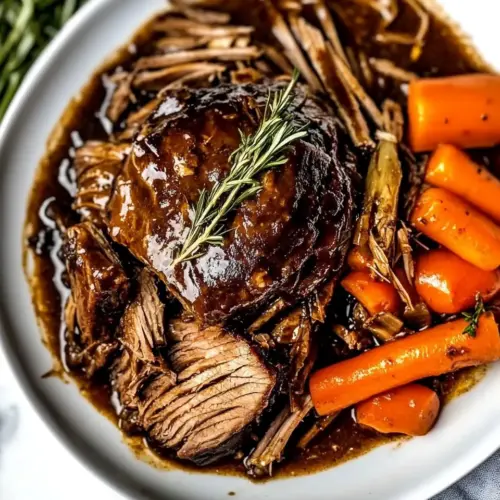
When friends come over, I’ll make this dish because it feeds a crowd without fuss, and because it presents beautifully on a platter with glossy gravy pooled around slices of beef and colorful vegetables. Each bite has a little of everything, and I enjoy seeing the relief on people’s faces when they taste something that feels like a hug in a bowl. The Instant Pot Roast has become one of those recipes I rely on, tweak, and love sharing with anyone who asks for a dependable, comforting meal.
Recipe Snapshot
1 hr 55 mins
20 mins
95 mins
Medium
400 kcal
American
Vegan, Gluten-Free
Dinner
Instant Pot, Small bowl, Slotted spoon
What Sets This Instant Pot Roast Apart
Hands Off, Big Payoff
I love how the Instant Pot Roast gives you deep, braised flavor with minimal babysitting. The pressure environment extracts collagen from the beef, producing tender meat and velvety juices in a fraction of the time of traditional braising. That means you get the reward of a slow cooked meal without needing to watch a pot for hours.
One Pot Simplicity
Using the electric pressure cooker keeps everything contained, which simplifies cleanup and concentrates flavors. I find the method really makes the tomato sauce and Worcestershire meld into a savory base that clings to the meat and vegetables, creating a unified dish that tastes thoughtfully prepared even on chaotic nights.
Layered Aromatics
The combination of whole garlic, chopped garlic, and fresh rosemary gives this roast aromatic depth. I appreciate that the recipe uses both stuffed garlic cloves and minced garlic so you get pockets of gentle roasted garlic plus a bright, fragrant lift on the vegetables. That contrast keeps every bite interesting.
Flexible Vegetables
I like that the recipe staggers the cooking of the baby red potatoes and baby carrots so the carrots remain intact and flavorful. That little timing trick preserves texture and prevents the meal from turning into a uniform mash, which I always prefer when serving guests.
Reliable Gravy
Finishing with a cornstarch slurry to thicken the cooking juices makes a natural, glossy gravy that ties the whole plate together. I always appreciate a sauce that tastes like it belongs to the meat, instead of a jarred shortcut. It’s an easy flourish that elevates the meal and makes leftovers sing the next day.
What You Need for Instant Pot Roast
The ingredients here are straightforward and humble, yet they work together to build rich, soulful flavor. The beef provides the meaty backbone, garlic and rosemary lift the aroma, and the tomato sauce and Worcestershire add savory depth and acidity. The potatoes and carrots make the dish a complete one pot meal, while the cornstarch creates a silky gravy to finish.
- 2 1/2 to 3 pound boneless chuck roast cut in half: Cut into manageable pieces and sear to build a rich, caramelized crust that adds deep savory flavor to the braised roast; choose boneless chuck for its marbling which breaks down into tender, juicy meat during pressure cooking. Use halves to ensure even cooking and easier carving after the Instant Pot cycle completes, and allow meat to rest briefly to redistribute juices before slicing.
- 6 cloves garlic divided: Crush or thinly slice and divide cloves to provide pungent, aromatic depth and subtle sweetness when cooked; distribute evenly so some garlic infuses the meat while reserved cloves add fresh bursts of flavor to the vegetables. Smash lightly to release oils and add directly to the cooking liquid to enhance overall savory complexity in the finished dish.
- 2 long sprigs fresh rosemary cut into thirds (or 3 shorter sprigs cut in half): Trim and cut long rosemary sprigs to release fragrant oils that perfume the roast and complement the beef with pine-like, slightly citrusy notes; nestle sprigs around and under the roast to infuse the meat during pressure cooking. Remove larger woody stems before serving to avoid tough bites and leave smaller pieces tucked with the roast for continued aroma.
- 1 tablespoon chopped fresh rosemary: Chop finely to provide concentrated herb flavor that seasons the cooking liquid and meat without the chewiness of whole sprigs; sprinkle into a rub or the sauce to brighten and lift the savory profile. Stir into the finishing gravy or slurry to distribute fresh herbiness throughout the dish and enhance aromatic complexity.
- 1 teaspoon kosher salt plus a few pinches: Season evenly to enhance the natural beef flavors and help develop a savory crust during searing; use measured kosher salt and add a few pinches later to adjust seasoning after cooking. Dissolve some salt into the cooking liquid to help extract juices from the meat and balance the acidity from tomato sauce and Worcestershire.
- 1/2 teaspoon ground black pepper: Grind or sprinkle to introduce a warm, slightly hot note that balances richness and rounds out the roast's flavor; use moderate quantity to avoid overpowering the herbs and aromatics. Combine with salt before rubbing onto the meat to ensure even distribution and controlled seasoning.
- 1/2 cup water: Add to provide necessary steam for pressure building and to form the base of the braising liquid; water helps prevent scorching and ensures consistent pressure-cooking. Use measured amount to control sauce concentration and to allow the tomato sauce and Worcestershire to meld into a flavorful gravy.
- 1 pound baby red potatoes scrubbed and left whole: Leave whole to maintain texture and to absorb savory cooking juices, contributing a tender, slightly sweet side component; whole baby reds also provide visual appeal and withstand the pressure-cooking process without falling apart. Scrub thoroughly to remove soil and avoid peeling so their skins help hold shape and concentrate flavor.
- 1 (8-ounce) can tomato sauce: Pour in to contribute acidity, umami, and body to the braising liquid while creating a cohesive sauce that clings to the roast and vegetables; tomato sauce balances savory elements and thickens when reduced or combined with slurry. Use measured can to ensure consistent tomato flavor and to help deglaze the pot after searing.
- 3 tablespoons Worcestershire sauce: Stir in for deep, savory umami and tang that enhances beefy flavors and adds complexity to the sauce; Worcestershire helps balance acidity and sweetness while rounding the overall taste profile. Add during braising so its subtle fermented notes fully integrate with the meat and aromatics.
- 2 1/2 cups baby carrots **see note: Add to incorporate sweetness and a crisp, tender vegetable contrast to the roast; baby carrots maintain shape and become tender while soaking up the braising flavors. Place with potatoes to create a balanced one-pot meal and adjust cooking time as needed to avoid over-softening.
- 2 tablespoons cornstarch plus 2 tablespoons water to create a slurry: Mix into a smooth slurry to thicken the cooking liquid into a glossy gravy that coats slices of roast and vegetables; cornstarch binds with hot liquid when added at the end to achieve desired sauce consistency. Combine equal parts with cold water to prevent lumps, then stir in gradually while simmering until the sauce reaches the preferred thickness.
How to Make Instant Pot Roast
This recipe unfolds in clear stages, from prepping and seasoning the roast to pressure cooking, adding the vegetables, and finishing with a thickened gravy. Follow the sequence and the sensory cues, and you will get reliably tender meat and flavorful vegetables every time.
- Pat the roast dry and cut 6 1-inch deep slits in the top. Peel the garlic cloves and cut them in half. Stuff each slit with a half clove of garlic and a piece of cut rosemary spring. Season all over with the salt and black pepper. In the bottom of an Instant Pot or similar electric pressure cooker or multi-cooker, pour in the water, then add the beef, nestling the pieces in snugly.: Your hands will notice the difference as you pat the beef dry, removing excess moisture that would otherwise steam rather than sear slightly, and the smell of raw meat becomes more pronounced, a clean, meaty scent. The action of cutting slits and pressing in garlic halves and rosemary lets aromatic pockets melt into the roast during pressure cooking, creating concentrated flavor wells inside the meat. Visually, the shallow slits will look like small dimples where the herbs nestle, and you should feel the slight resistance of muscle as you slice. One common mistake is cutting slits too shallow, which means the garlic will not infuse the interior properly, or too deep, which can cause the roast to fall apart unevenly during cooking. Take your time and use a sharp knife so the slits are neat and the herb pieces sit snugly.
- Arrange the potatoes on top of the beef. Mince the remaining garlic and scatter on top of the potatoes. Sprinkle the chopped rosemary all over the potatoes and beef. Then, sprinkle a pinch of salt on top of the potatoes.: The tactile process of peeling and halving garlic releases a sharp, sulphury aroma that mellows as the garlic cooks, so you will notice a bright high note while preparing. Halved cloves melt into the meat, turning sweet and soft rather than remaining sharp, which is why this step matters; the transformation to roasted garlic provides pockets of creamy garlic intensity in each slice. If garlic skins stay on or pieces are too large, they may not soften fully; conversely, chopping too finely makes the garlic distribute and brown excessively. Aim for clean halves so you get soft, jammy garlic rather than burnt bits.
- Pour the tomato sauce and Worcestershire over the beef.: Pressing the garlic and rosemary into the slits delivers concentrated aromatic bursts throughout the roast as it cooks, and your fingers will smell herbaceous and warm when you finish, which is a small but satisfying sign of progress. The rosemary imparts a piney brightness that offsets the rich beef , and the garlic becomes mellow and sweet within the meat. A common error is overcrowding the slits, which can prevent even cooking or make the roast release water prematurely. Place one small herb piece and one garlic half per slit for balanced perfuming.
- Cover and seal the Instant Pot. Cook on Manual/High Pressure for 60 minutes. It will take 10 to 15 minutes for the Instant Pot to come to pressure, then the countdown will begin. When the cook time has elapsed, allow the pressure to release naturally for 10 minutes, then quick release any remaining pressure.: Rubbing the exterior with kosher salt and freshly ground black pepper draws out flavors and helps form a lightly seasoned crust that will contribute to the overall mouthfeel of each slice. The salt enhances natural umami, while the pepper adds subtle warmth. You should feel a fine, even coating when you run your fingers over the roast. Avoid under-seasoning, which yields a bland finished dish, or over-salting, which can make the meat taste harsh; measure carefully and taste the cooking liquid later to adjust if needed.
- Carefully open the lid and add the baby carrots on top.: Pouring the water provides the steam source the cooker needs to pressurize, and gently nestling the roast pieces ensures they cook evenly and stay submerged enough to benefit from the surrounding braising liquid. As the pot warms, you will hear a soft hiss and sense the atmosphere changing, and the meat will start to give off a savory perfume. A typical mistake is adding too little liquid or crowding the pot, which prevents pressure from building correctly. Ensure the base liquid reaches the level recommended by your cooker and the roast fits comfortably without forcing.
- Reseal the lid and cook on Manual/High Pressure for 5 minutes more. Let the pressure release naturally for 10 minutes (this natural release is KEY for a tender roast). Quick release any remaining pressure. With a slotted spoon, remove the meat and vegetables to a large platter or bowl, discarding any large pieces of fat.: Placing the baby red potatoes above the roast keeps them from becoming overcooked and helps them absorb flavorful juices without disintegrating. You will notice the tomatoes and meat juices soon mingle around their bases as the pot seals, and the potatoes will steam gently rather than boil, yielding tender but intact texture. A common slip is burying potatoes beneath the meat, which can make them mushy; layering them on top preserves structure and keeps the final plate visually appealing.
- Make sure the Instant Pot is off. In a small bowl, briskly whisk together the slurry of 2 tablespoons cornstarch and 2 tablespoons water until smoothly combined. While whisking the cooking juices in the Instant Pot, slowly pour in the slurry. Turn the pot to SAUTE, then cook, stirring frequently, until the juices have thickened into a thin gravy, about 3 to 5 minutes. Turn off the Instant Pot.: The minced garlic brightens the top layer with fresher, sharper garlic notes that contrast with the mellow stuffed cloves inside the roast. The scent is more immediate and zesty, which balances the deeper braised flavors. Make sure the garlic is evenly distributed so it does not concentrate and burn when the pot reaches high heat. Overmincing can cause the garlic to mostly dissolve into the juices and lose its textural presence, so aim for small, uniform bits.
- Add the beef and vegetables back to the pot and stir to warm through (the potatoes, veggies, and meat will all break down a little and be tender and delicious). Serve hot, ensuring each serving gets a little bit of everything.: The scattered chopped rosemary adds an even distribution of herb flavor, and as the pot builds pressure it will perfume both the meat and vegetables. The tiny green flecks become visually appealing against the red potatoes and the brown exterior of the roast, and their oil releases into the cooking liquid. One issue I see is using dried rosemary instead of fresh, which lacks the same bright quality; fresh chopped rosemary is worth the slight extra effort for aroma and flavor lift.
- Then, sprinkle a pinch of salt on top of the potatoes: Adding a light sprinkling of salt to the potatoes seasons them directly so every bite has depth, and it helps draw a little moisture out that then mixes with the tomato base. The potatoes should feel lightly seasoned to the touch, not overly salty. A common mistake is ignoring this step, which can leave the vegetables tasting flat compared to the meat; small, even pinches make a big difference.
- Pour the tomato sauce and Worcestershire over the beef: The moment you pour the tomato sauce and Worcestershire sauce the kitchen fills with a rich, savory aroma, a mix of tang and umami that promises depth in the braising liquid. These liquids form the core flavor of the gravy, melding with meat juices to create complexity. Be sure to pour evenly so the sauce coats the roast and reaches the base of the pot. A frequent oversight is skimping on the Worcestershire, which diminishes the umami backbone; use the full amount for balanced richness.
- Cover and seal the Instant Pot: You will hear the pressure cooker begin to whirr as it seals, and within minutes the environment changes to a humid, intense heat that breaks down collagen and tenderizes the beef . The sealed environment traps aromatics and forces flavors into the meat. Do not attempt to open the lid while pressurized, which is dangerous and interrupts the cooking process. Ensure the valve is properly set to seal before leaving it to do its work.
- Cook on Manual/High Pressure for 60 minutes: During this stage the pot transforms tough connective tissue into silky tenderness, and the aroma slowly intensifies. Expect the cooker to take 10 to 15 minutes to come to pressure before the countdown begins, which is normal. The long high pressure helps create a uniformly tender roast that pulls apart easily. A common error is rushing this step with a shorter time, which leaves meat tough; trust the timing for the desired texture.
- Allow the pressure to release naturally for 10 minutes then quick release any remaining pressure: The natural pressure release lets the juices redistribute and prevents violent boiling that can make meats stringy, and you will notice a calmer, deeper fragrance as steam eases out. After 10 minutes, quick releasing remaining pressure speeds up finishing while preserving tenderness. Be cautious of hot steam when you vent, and avoid standing directly over the valve which risks burns.
- Carefully open the lid and add the baby carrots on top: Opening the lid releases a steam wave rich with meaty, herbaceous scent, and adding the baby carrots at this point ensures they cook quickly without turning to mush. They will sit atop the potatoes and meat, absorbing surface flavors while retaining texture. A mistake is adding them earlier in the process, which often results in overly soft or disintegrated carrots, unless that is your desired outcome.
- Reseal the lid and cook on Manual/High Pressure for 5 minutes more: This short second pressure cycle tenderizes the carrots while keeping them intact, and during this time the pot hums softly as the flavors mingle. Letting the pressure release naturally for 10 minutes after this cycle is important for maintaining the roast s tenderness, and quick releasing thereafter finishes the job. Overcooking here will make carrots and potatoes overly soft, so stick to the brief time indicated.
- With a slotted spoon, remove the meat and vegetables to a large platter or bowl, discarding any large pieces of fat: Lifting the components out lets you inspect texture and trim away any unwanted fat, and the visual of glossy meat and bright vegetables arranged together is deeply satisfying. The juices left behind will become the base for your gravy. A common oversight is leaving large fat pieces on the meat, which can make the final plate greasy; trim discreetly for a balanced finish.
- Make sure the Instant Pot is off: Turning the cooker off before thickening the sauce prevents overcooking and ensures you can control the sauté process safely, and the residual heat keeps the juices hot enough to react with the slurry. This pause lets you prepare the cornstarch mixture without rushing and ensures the gravy thickens evenly. Forgetting to turn off sauté can cause boiling over or excessive reduction, so check the display before proceeding.
- Briskly whisk together the slurry of 2 tablespoons cornstarch and 2 tablespoons water until smoothly combined: The slurry should be glossy and lump free, which is essential for a smooth gravy, and the cool paste contrasts with the warm cooking juices, so whisk quickly. A smooth slurry prevents grainy texture in the finished sauce. A typical mistake is adding dry cornstarch directly to hot liquid, which forms stubborn lumps; always pre-mix into a smooth slurry first.
- While whisking the cooking juices in the Instant Pot, slowly pour in the slurry: As you whisk, the liquids will thicken visibly into a glossy gravy, and you will hear the gentle simmer intensify as the sauce transforms and starts to coat the whisk. This step matters because it concentrates flavor and gives the final dish a luscious mouthfeel. Pour slowly while whisking to avoid clumping. If the gravy becomes too thick, you can thin it with a splash of water, but avoid over thinning which dilutes flavor.
- Turn the pot to SAUTE then cook, stirring frequently, until the juices have thickened into a thin gravy, about 3 to 5 minutes: The sauté stage encourages gentle boiling that activates the cornstarch, producing a silky, slightly thickened sauce that clings to the meat. You will see the juices change from watery to glossy, and the aroma becomes concentrated and rich. Stirring frequently prevents scorching and ensures even thickening. Overheating here can break down the starch and make the sauce thin again, so watch the texture closely and remove from heat when it reaches the desired consistency.
- Turn off the Instant Pot: Powering down stops the sauce from reducing further, preserving the ideal gravy thickness, and leaves you with a calm, ready-to-serve pot. The room will hold that rich, braised scent and you can move on to plating without worry. Leaving it on can cause excessive reduction or risk of burning the gravy.
- Add the beef and vegetables back to the pot and stir to warm through: Returning the beef and vegetables lets them soak a bit in the gravy, marrying flavors and warming everything to serving temperature, and you will notice the glossy sauce cling to each piece for an inviting finish. Stir gently so the roast slices remain intact but absorb sauce, and watch for a uniform, hot temperature throughout. Over stirring can shred the meat and make textures muddled, so be gentle and deliberate.
- Serve hot, ensuring each serving gets a little bit of everything: Ladling the mixture onto plates with a generous spoonful of gravy gives the visual and textural balance of meat, potatoes, and carrots, and the steam rising from the plate releases the final aromatic notes. Aim for even portions so everyone enjoys the full array of flavors. A common serving mistake is skimping on gravy, which leaves the dish dry; be generous and let the sauce shine.
Variations to Try
I like experimenting with small changes that alter texture or flavor without changing the heart of the recipe. Below are practical variations and notes to help you adapt the dish for what you have on hand or the texture you prefer.
- Swap cooking liquid – Use the suggested V-8 juice alternative from the notes for a slightly vegetable forward braise, reducing the Worcestershire to two tablespoons if you choose this path so the balance stays harmonious.
- Use regular carrots – Chop regular carrots into two inch chunks and add them with the potatoes if you prefer firmer pieces that hold up throughout the full cook time.
- Make it in larger batches – If feeding a crowd, double the roast and vegetables but ensure your Instant Pot model can accommodate the volume without exceeding the max fill line.
- Adjust for softer vegetables – If you like very soft carrots, add them at the beginning; expect them to become very tender and possibly break down into the sauce.
- Make extra gravy – Increase the tomato sauce by a few tablespoons and reserve additional cooking juices before adding the slurry if you want a looser, saucier finish for leftovers or dipping.
Best Served With
This Instant Pot Roast is intrinsically a full meal, but how you present it can shape the occasion. Below are serving ideas and considerations for different settings, from family dinners to special gatherings.
- Simple family dinner – Serve warm spoonfuls of roast, potatoes, and carrots plated with generous gravy for a cozy weeknight meal that is filling and straightforward.
- Holiday style – Present the roast on a large platter with the vegetables arranged around it for a centerpiece appropriate for winter gatherings or small holiday meals.
- Leftover planning – Store the gravy separately and reheat gently in the oven or microwave, spooning sauce over portions to keep the meat moist when serving later in the week.
- Seasonal pairing – This falls and winter friendly dish pairs well with simple green sides or a bread to sop up gravy, making it appropriate for colder months when hearty meals are most welcome.
- Serving style – Offer family style on the table so guests can choose larger or smaller portions and get an even mix of meat and vegetables, which makes for a relaxed, communal meal.
- Storage tips – Refrigerate in airtight containers up to four days, freeze up to three months, and thaw overnight before reheating; keep gravy separate if possible to retain texture and flavor.
FAQ
Conclusion
This Instant Pot Roast stands out because it delivers slow cooked depth with the speed and convenience of a pressure cooker, creating tender beef, well seasoned potatoes, and just right carrots finished in a silky gravy. I hope you give it a try soon, whether for a cozy family dinner or a simple gathering where you want a hearty, comforting main without fuss. It s satisfying, approachable, and one of those recipes that becomes a go to once you see how reliably it performs.
Instant Pot Roast
Equipment
- Instant Pot
- Small Bowl
- Slotted Spoon
Ingredients
- 2 1/2 to 3 pound boneless chuck roast cut in half Cut into manageable pieces and sear to build a rich, caramelized crust that adds deep savory flavor to the braised roast; choose boneless chuck for its marbling which breaks down into tender, juicy meat during pressure cooking. Use halves to ensure even cooking and easier carving after the Instant Pot cycle completes, and allow meat to rest briefly to redistribute juices before slicing.
- 6 cloves garlic divided Crush or thinly slice and divide cloves to provide pungent, aromatic depth and subtle sweetness when cooked; distribute evenly so some garlic infuses the meat while reserved cloves add fresh bursts of flavor to the vegetables. Smash lightly to release oils and add directly to the cooking liquid to enhance overall savory complexity in the finished dish.
- 2 long sprigs fresh rosemary cut into thirds (or 3 shorter sprigs cut in half) Trim and cut long rosemary sprigs to release fragrant oils that perfume the roast and complement the beef with pine-like, slightly citrusy notes; nestle sprigs around and under the roast to infuse the meat during pressure cooking. Remove larger woody stems before serving to avoid tough bites and leave smaller pieces tucked with the roast for continued aroma.
- 1 tablespoon chopped fresh rosemary Chop finely to provide concentrated herb flavor that seasons the cooking liquid and meat without the chewiness of whole sprigs; sprinkle into a rub or the sauce to brighten and lift the savory profile. Stir into the finishing gravy or slurry to distribute fresh herbiness throughout the dish and enhance aromatic complexity.
- 1 teaspoon kosher salt plus a few pinches Season evenly to enhance the natural beef flavors and help develop a savory crust during searing; use measured kosher salt and add a few pinches later to adjust seasoning after cooking. Dissolve some salt into the cooking liquid to help extract juices from the meat and balance the acidity from tomato sauce and Worcestershire.
- 1/2 teaspoon ground black pepper Grind or sprinkle to introduce a warm, slightly hot note that balances richness and rounds out the roast's flavor; use moderate quantity to avoid overpowering the herbs and aromatics. Combine with salt before rubbing onto the meat to ensure even distribution and controlled seasoning.
- 1/2 cup water Add to provide necessary steam for pressure building and to form the base of the braising liquid; water helps prevent scorching and ensures consistent pressure-cooking. Use measured amount to control sauce concentration and to allow the tomato sauce and Worcestershire to meld into a flavorful gravy.
- 1 pound baby red potatoes scrubbed and left whole Leave whole to maintain texture and to absorb savory cooking juices, contributing a tender, slightly sweet side component; whole baby reds also provide visual appeal and withstand the pressure-cooking process without falling apart. Scrub thoroughly to remove soil and avoid peeling so their skins help hold shape and concentrate flavor.
- 1 (8-ounce) can tomato sauce Pour in to contribute acidity, umami, and body to the braising liquid while creating a cohesive sauce that clings to the roast and vegetables; tomato sauce balances savory elements and thickens when reduced or combined with slurry. Use measured can to ensure consistent tomato flavor and to help deglaze the pot after searing.
- 3 tablespoons Worcestershire sauce Stir in for deep, savory umami and tang that enhances beefy flavors and adds complexity to the sauce; Worcestershire helps balance acidity and sweetness while rounding the overall taste profile. Add during braising so its subtle fermented notes fully integrate with the meat and aromatics.
- 2 1/2 cups baby carrots **see note Add to incorporate sweetness and a crisp, tender vegetable contrast to the roast; baby carrots maintain shape and become tender while soaking up the braising flavors. Place with potatoes to create a balanced one-pot meal and adjust cooking time as needed to avoid over-softening.
- 2 tablespoons cornstarch plus 2 tablespoons water to create a slurry Mix into a smooth slurry to thicken the cooking liquid into a glossy gravy that coats slices of roast and vegetables; cornstarch binds with hot liquid when added at the end to achieve desired sauce consistency. Combine equal parts with cold water to prevent lumps, then stir in gradually while simmering until the sauce reaches the preferred thickness.
Instructions
- Pat the roast dry and cut 6 1-inch deep slits in the top. Peel the garlic cloves and cut them in half. Stuff each slit with a half clove of garlic and a piece of cut rosemary spring. Season all over with the salt and black pepper. In the bottom of an Instant Pot or similar electric pressure cooker or multi-cooker, pour in the water, then add the beef, nestling the pieces in snugly.: Your hands will notice the difference as you pat the beef dry, removing excess moisture that would otherwise steam rather than sear slightly, and the smell of raw meat becomes more pronounced, a clean, meaty scent. The action of cutting slits and pressing in garlic halves and rosemary lets aromatic pockets melt into the roast during pressure cooking, creating concentrated flavor wells inside the meat. Visually, the shallow slits will look like small dimples where the herbs nestle, and you should feel the slight resistance of muscle as you slice. One common mistake is cutting slits too shallow, which means the garlic will not infuse the interior properly, or too deep, which can cause the roast to fall apart unevenly during cooking. Take your time and use a sharp knife so the slits are neat and the herb pieces sit snugly.
- Arrange the potatoes on top of the beef. Mince the remaining garlic and scatter on top of the potatoes. Sprinkle the chopped rosemary all over the potatoes and beef. Then, sprinkle a pinch of salt on top of the potatoes.: The tactile process of peeling and halving garlic releases a sharp, sulphury aroma that mellows as the garlic cooks, so you will notice a bright high note while preparing. Halved cloves melt into the meat, turning sweet and soft rather than remaining sharp, which is why this step matters; the transformation to roasted garlic provides pockets of creamy garlic intensity in each slice. If garlic skins stay on or pieces are too large, they may not soften fully; conversely, chopping too finely makes the garlic distribute and brown excessively. Aim for clean halves so you get soft, jammy garlic rather than burnt bits.
- Pour the tomato sauce and Worcestershire over the beef.: Pressing the garlic and rosemary into the slits delivers concentrated aromatic bursts throughout the roast as it cooks, and your fingers will smell herbaceous and warm when you finish, which is a small but satisfying sign of progress. The rosemary imparts a piney brightness that offsets the rich beef , and the garlic becomes mellow and sweet within the meat. A common error is overcrowding the slits, which can prevent even cooking or make the roast release water prematurely. Place one small herb piece and one garlic half per slit for balanced perfuming.
- Cover and seal the Instant Pot. Cook on Manual/High Pressure for 60 minutes. It will take 10 to 15 minutes for the Instant Pot to come to pressure, then the countdown will begin. When the cook time has elapsed, allow the pressure to release naturally for 10 minutes, then quick release any remaining pressure.: Rubbing the exterior with kosher salt and freshly ground black pepper draws out flavors and helps form a lightly seasoned crust that will contribute to the overall mouthfeel of each slice. The salt enhances natural umami, while the pepper adds subtle warmth. You should feel a fine, even coating when you run your fingers over the roast. Avoid under-seasoning, which yields a bland finished dish, or over-salting, which can make the meat taste harsh; measure carefully and taste the cooking liquid later to adjust if needed.
- Carefully open the lid and add the baby carrots on top.: Pouring the water provides the steam source the cooker needs to pressurize, and gently nestling the roast pieces ensures they cook evenly and stay submerged enough to benefit from the surrounding braising liquid. As the pot warms, you will hear a soft hiss and sense the atmosphere changing, and the meat will start to give off a savory perfume. A typical mistake is adding too little liquid or crowding the pot, which prevents pressure from building correctly. Ensure the base liquid reaches the level recommended by your cooker and the roast fits comfortably without forcing.
- Reseal the lid and cook on Manual/High Pressure for 5 minutes more. Let the pressure release naturally for 10 minutes (this natural release is KEY for a tender roast). Quick release any remaining pressure. With a slotted spoon, remove the meat and vegetables to a large platter or bowl, discarding any large pieces of fat.: Placing the baby red potatoes above the roast keeps them from becoming overcooked and helps them absorb flavorful juices without disintegrating. You will notice the tomatoes and meat juices soon mingle around their bases as the pot seals, and the potatoes will steam gently rather than boil, yielding tender but intact texture. A common slip is burying potatoes beneath the meat, which can make them mushy; layering them on top preserves structure and keeps the final plate visually appealing.
- Make sure the Instant Pot is off. In a small bowl, briskly whisk together the slurry of 2 tablespoons cornstarch and 2 tablespoons water until smoothly combined. While whisking the cooking juices in the Instant Pot, slowly pour in the slurry. Turn the pot to SAUTE, then cook, stirring frequently, until the juices have thickened into a thin gravy, about 3 to 5 minutes. Turn off the Instant Pot.: The minced garlic brightens the top layer with fresher, sharper garlic notes that contrast with the mellow stuffed cloves inside the roast. The scent is more immediate and zesty, which balances the deeper braised flavors. Make sure the garlic is evenly distributed so it does not concentrate and burn when the pot reaches high heat. Overmincing can cause the garlic to mostly dissolve into the juices and lose its textural presence, so aim for small, uniform bits.
- Add the beef and vegetables back to the pot and stir to warm through (the potatoes, veggies, and meat will all break down a little and be tender and delicious). Serve hot, ensuring each serving gets a little bit of everything.: The scattered chopped rosemary adds an even distribution of herb flavor, and as the pot builds pressure it will perfume both the meat and vegetables. The tiny green flecks become visually appealing against the red potatoes and the brown exterior of the roast, and their oil releases into the cooking liquid. One issue I see is using dried rosemary instead of fresh, which lacks the same bright quality; fresh chopped rosemary is worth the slight extra effort for aroma and flavor lift.
- Then, sprinkle a pinch of salt on top of the potatoes: Adding a light sprinkling of salt to the potatoes seasons them directly so every bite has depth, and it helps draw a little moisture out that then mixes with the tomato base. The potatoes should feel lightly seasoned to the touch, not overly salty. A common mistake is ignoring this step, which can leave the vegetables tasting flat compared to the meat; small, even pinches make a big difference.
- Pour the tomato sauce and Worcestershire over the beef: The moment you pour the tomato sauce and Worcestershire sauce the kitchen fills with a rich, savory aroma, a mix of tang and umami that promises depth in the braising liquid. These liquids form the core flavor of the gravy, melding with meat juices to create complexity. Be sure to pour evenly so the sauce coats the roast and reaches the base of the pot. A frequent oversight is skimping on the Worcestershire, which diminishes the umami backbone; use the full amount for balanced richness.
- Cover and seal the Instant Pot: You will hear the pressure cooker begin to whirr as it seals, and within minutes the environment changes to a humid, intense heat that breaks down collagen and tenderizes the beef . The sealed environment traps aromatics and forces flavors into the meat. Do not attempt to open the lid while pressurized, which is dangerous and interrupts the cooking process. Ensure the valve is properly set to seal before leaving it to do its work.
- Cook on Manual/High Pressure for 60 minutes: During this stage the pot transforms tough connective tissue into silky tenderness, and the aroma slowly intensifies. Expect the cooker to take 10 to 15 minutes to come to pressure before the countdown begins, which is normal. The long high pressure helps create a uniformly tender roast that pulls apart easily. A common error is rushing this step with a shorter time, which leaves meat tough; trust the timing for the desired texture.
- Allow the pressure to release naturally for 10 minutes then quick release any remaining pressure: The natural pressure release lets the juices redistribute and prevents violent boiling that can make meats stringy, and you will notice a calmer, deeper fragrance as steam eases out. After 10 minutes, quick releasing remaining pressure speeds up finishing while preserving tenderness. Be cautious of hot steam when you vent, and avoid standing directly over the valve which risks burns.
- Carefully open the lid and add the baby carrots on top: Opening the lid releases a steam wave rich with meaty, herbaceous scent, and adding the baby carrots at this point ensures they cook quickly without turning to mush. They will sit atop the potatoes and meat, absorbing surface flavors while retaining texture. A mistake is adding them earlier in the process, which often results in overly soft or disintegrated carrots, unless that is your desired outcome.
- Reseal the lid and cook on Manual/High Pressure for 5 minutes more: This short second pressure cycle tenderizes the carrots while keeping them intact, and during this time the pot hums softly as the flavors mingle. Letting the pressure release naturally for 10 minutes after this cycle is important for maintaining the roast s tenderness, and quick releasing thereafter finishes the job. Overcooking here will make carrots and potatoes overly soft, so stick to the brief time indicated.
- With a slotted spoon, remove the meat and vegetables to a large platter or bowl, discarding any large pieces of fat: Lifting the components out lets you inspect texture and trim away any unwanted fat, and the visual of glossy meat and bright vegetables arranged together is deeply satisfying. The juices left behind will become the base for your gravy. A common oversight is leaving large fat pieces on the meat, which can make the final plate greasy; trim discreetly for a balanced finish.
- Make sure the Instant Pot is off: Turning the cooker off before thickening the sauce prevents overcooking and ensures you can control the sauté process safely, and the residual heat keeps the juices hot enough to react with the slurry. This pause lets you prepare the cornstarch mixture without rushing and ensures the gravy thickens evenly. Forgetting to turn off sauté can cause boiling over or excessive reduction, so check the display before proceeding.
- Briskly whisk together the slurry of 2 tablespoons cornstarch and 2 tablespoons water until smoothly combined: The slurry should be glossy and lump free, which is essential for a smooth gravy, and the cool paste contrasts with the warm cooking juices, so whisk quickly. A smooth slurry prevents grainy texture in the finished sauce. A typical mistake is adding dry cornstarch directly to hot liquid, which forms stubborn lumps; always pre-mix into a smooth slurry first.
- While whisking the cooking juices in the Instant Pot, slowly pour in the slurry: As you whisk, the liquids will thicken visibly into a glossy gravy, and you will hear the gentle simmer intensify as the sauce transforms and starts to coat the whisk. This step matters because it concentrates flavor and gives the final dish a luscious mouthfeel. Pour slowly while whisking to avoid clumping. If the gravy becomes too thick, you can thin it with a splash of water, but avoid over thinning which dilutes flavor.
- Turn the pot to SAUTE then cook, stirring frequently, until the juices have thickened into a thin gravy, about 3 to 5 minutes: The sauté stage encourages gentle boiling that activates the cornstarch, producing a silky, slightly thickened sauce that clings to the meat. You will see the juices change from watery to glossy, and the aroma becomes concentrated and rich. Stirring frequently prevents scorching and ensures even thickening. Overheating here can break down the starch and make the sauce thin again, so watch the texture closely and remove from heat when it reaches the desired consistency.
- Turn off the Instant Pot: Powering down stops the sauce from reducing further, preserving the ideal gravy thickness, and leaves you with a calm, ready-to-serve pot. The room will hold that rich, braised scent and you can move on to plating without worry. Leaving it on can cause excessive reduction or risk of burning the gravy.
- Add the beef and vegetables back to the pot and stir to warm through: Returning the beef and vegetables lets them soak a bit in the gravy, marrying flavors and warming everything to serving temperature, and you will notice the glossy sauce cling to each piece for an inviting finish. Stir gently so the roast slices remain intact but absorb sauce, and watch for a uniform, hot temperature throughout. Over stirring can shred the meat and make textures muddled, so be gentle and deliberate.
- Serve hot, ensuring each serving gets a little bit of everything: Ladling the mixture onto plates with a generous spoonful of gravy gives the visual and textural balance of meat, potatoes, and carrots, and the steam rising from the plate releases the final aromatic notes. Aim for even portions so everyone enjoys the full array of flavors. A common serving mistake is skimping on gravy, which leaves the dish dry; be generous and let the sauce shine.
Notes
- Swap cooking liquid - Use the suggested V-8 juice alternative from the notes for a slightly vegetable forward braise, reducing the Worcestershire to two tablespoons if you choose this path so the balance stays harmonious.
- Use regular carrots - Chop regular carrots into two inch chunks and add them with the potatoes if you prefer firmer pieces that hold up throughout the full cook time.
- Make it in larger batches - If feeding a crowd, double the roast and vegetables but ensure your Instant Pot model can accommodate the volume without exceeding the max fill line.
- Adjust for softer vegetables - If you like very soft carrots, add them at the beginning; expect them to become very tender and possibly break down into the sauce.
- Make extra gravy - Increase the tomato sauce by a few tablespoons and reserve additional cooking juices before adding the slurry if you want a looser, saucier finish for leftovers or dipping.