How to Activate Yeast
How to Activate Yeast is one of those tiny rituals that changes baking from guesswork into reliable magic. I still remember the first time I coaxed life from a packet of powder, the kitchen humid and warm, my hands slightly trembling because I was making bread for guests. That first bubble rose like a promise, and from then on I never underestimated the calm patience that activating yeast requires.
When I teach friends how to bake, I like to tell them that activating yeast is equal parts science and intuition. You learn to read the surface for that delicate foam, and to trust the faint yeasty scent that tells you the microorganisms are waking up. Over time you start hearing the tiny fizz and seeing the swirl of bubbles as clearly as reading a recipe, and that confidence changes everything you bake.
Recipe Snapshot
5 mins
5 mins
Easy
100 kcal
American
Vegan, Gluten-Free
Breakfast
Bowl, Spoon, Thermometer
What We Adore About This How to Activate Yeast
Consistent Results Every Time
I love that mastering How to Activate Yeast gives you predictability. When you know the right water temperature and how to watch for foam, your doughs rise on schedule, and you waste less time guessing. This consistency makes busy weeknights and special occasions equally manageable.
Simple Science, Big Impact
Understanding the biology behind the process makes me feel like a confident cook. The tiny yeast cells feed, bubble, and produce carbon dioxide that gives your bread lift. Once you grasp this, you start appreciating why warm water and waiting matter, and you can troubleshoot with ease when things go sideways.
Fast Confidence Boost
I find that successfully activating yeast is an instant confidence builder. It takes minutes to do, but that small win ripples through the rest of your baking. You start to trust your instincts, and you take on more ambitious recipes because the first step no longer intimidates you.
Minimal Ingredients, Maximum Versatility
There is beauty in simplicity here. With just water and active dry yeast you can kickstart loaves, rolls, and even some sweet doughs. The technique scales easily, and once you have the basics down, you can adapt to different recipes without relearning the fundamentals.
Quick and Accessible
Finally, I adore how approachable this technique is. You do not need fancy equipment, and the steps are portable to any kitchen. That accessibility makes baking feel democratic, and it keeps me excited to experiment.
How to Activate Yeast Shopping List
These are the foundational players for activating yeast. They are straightforward, and each one has a role in waking up the yeast and ensuring a lively, foamy proof. The balance between temperature and yeast amount is the true key, and the simplicity means you can focus on technique.
- 2 cups water: Bring to a warm temperature (about 100–110°F or 38–43°C) to dissolve yeast and activate its enzymes; helps create the moist environment needed for fermentation while avoiding temperatures that will kill the yeast. Measure accurately to maintain proper yeast-to-liquid ratio for predictable rising and flavor development. Stir briefly to ensure even temperature and complete dissolution before combining with dry ingredients.
- 2 teaspoons active dry yeast: Provide to initiate fermentation by producing carbon dioxide and alcohol, causing dough to rise and develop airy texture and flavor during proofing. Sprinkle evenly over warm liquid or dissolve beforehand to ensure uniform activation and prevent clumping; monitor for foaming within 5–10 minutes as a sign of viability.
How to Prepare How to Activate Yeast
These steps are short but precise, and they set the tone for every successful loaf you will bake. Follow them patiently, and use your senses to confirm that the yeast has come to life.
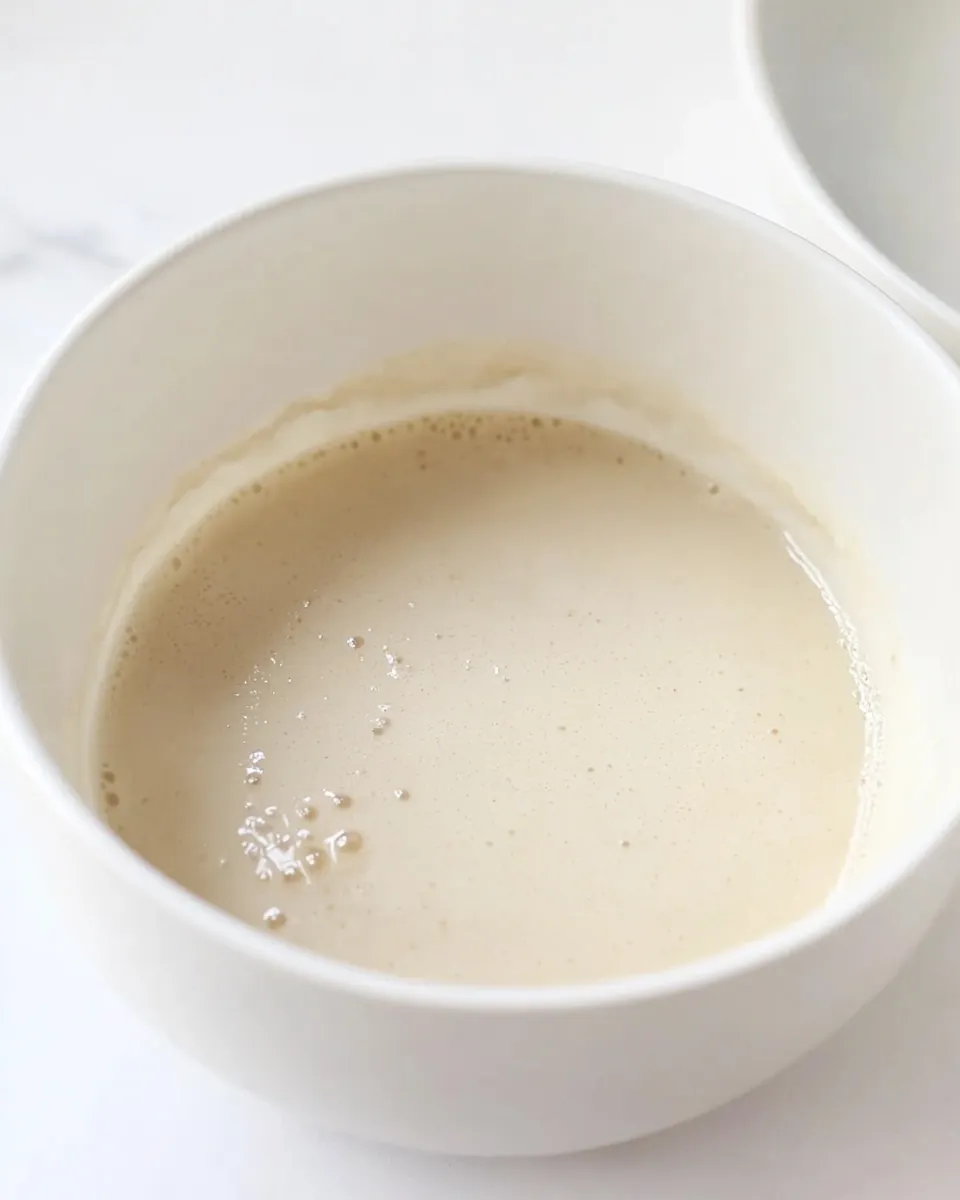
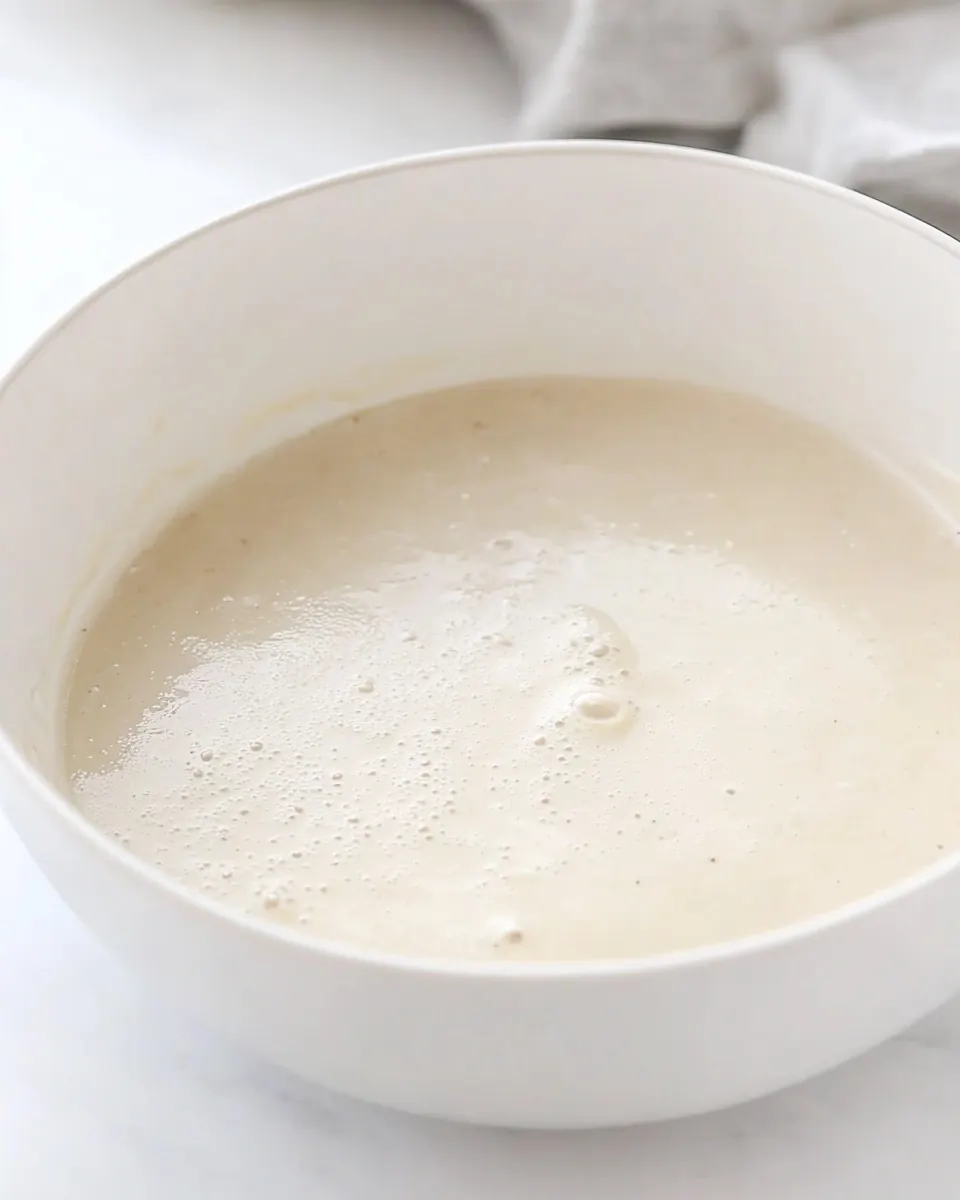
- Add warm water to a bowl. Sprinkle in the yeast and sugar and stir it together.: The immediate thing you notice is the gentle warmth of the bowl, and the way the water looks almost motionless until you stir. Ideally the water is between 100 to 110°F , which feels warm on your wrist like a cozy bath for the yeast. The reason this temperature matters is that it wakes the yeast without causing thermal shock. If the water is too hot, the yeast will die and produce no foam, while too cold water will make the process painfully slow. A typical mistake is assuming tap temperature is fine; take a moment to feel the water or use a thermometer for accuracy. As you pour, listen for a faint ripple, and note that the surface should not be steaming. If the bowl seems too hot to touch, let the water cool slightly before adding the yeast.
- WAIT! Let the mixture bloom for 10 minutes. You should see bubbles and foam forming, if after 10 minutes nothing has happened then the yeast has died and you will need to start over.: At this point you might detect a subtle yeasty scent as the granules hydrate. Stirring helps distribute the yeast evenly through the water so each cell has access to moisture. Sugar, when included, acts as an early food source that jumpstarts activity, though the yeast will feed on flour later. Use a gentle circular motion with a spoon to dissolve the granules; you should not need vigorous agitation. A frequent error is over stirring which can collapse delicate bubbles as they form, or under stirring which leaves clumps that hydrate unevenly. Watch the surface for tiny specks suspending in the water, and expect the mixture to look homogenous within moments. If any clumps remain, give a few more gentle stirs.
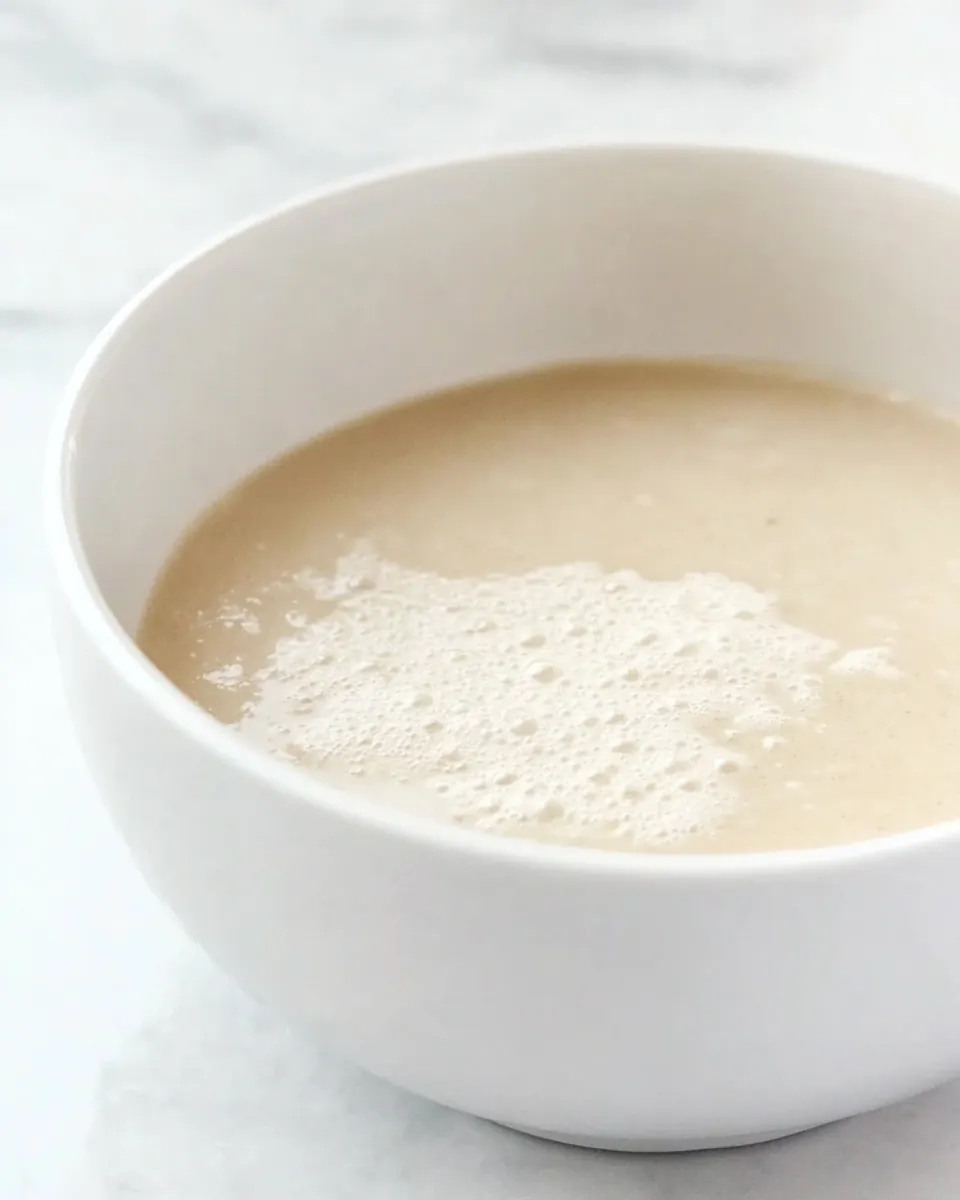
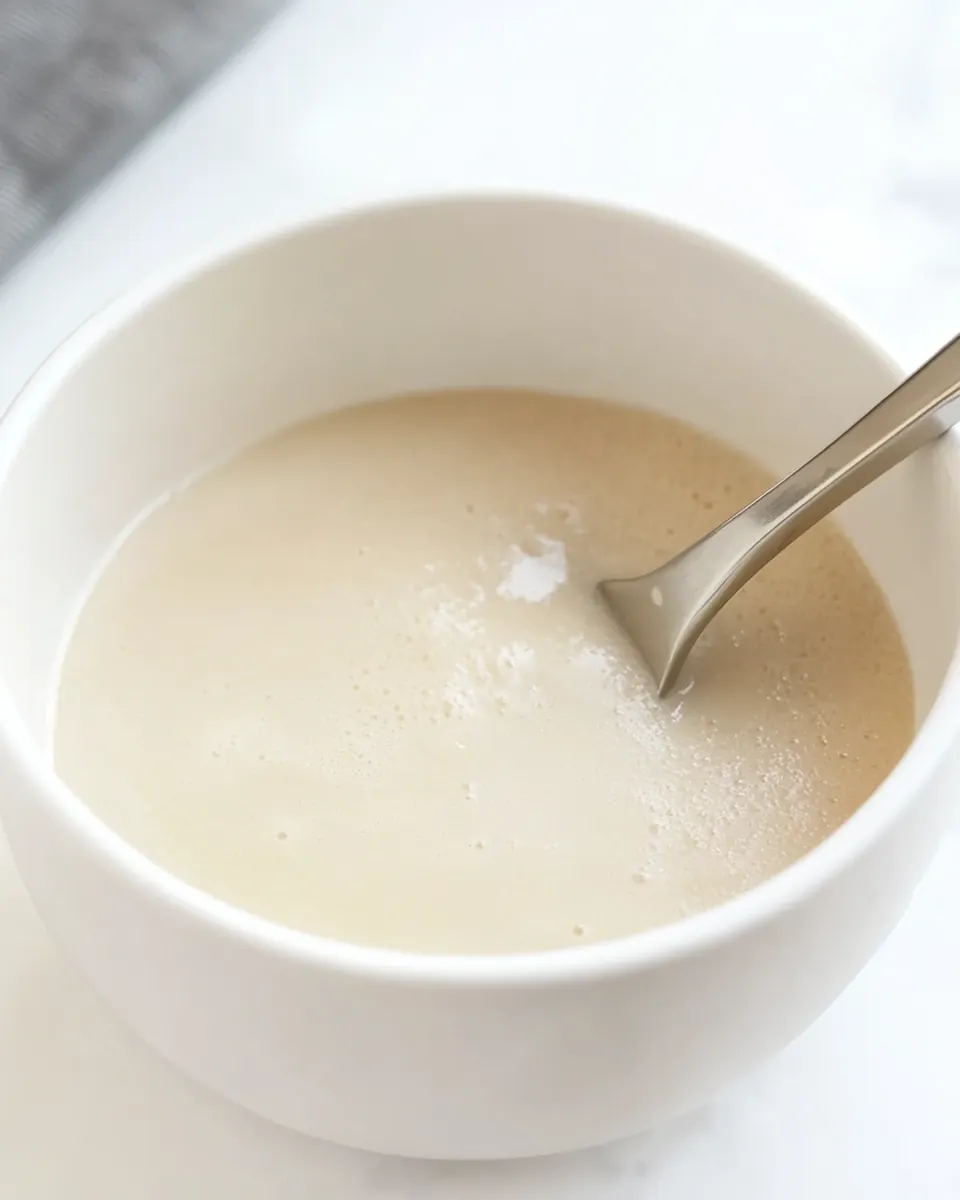
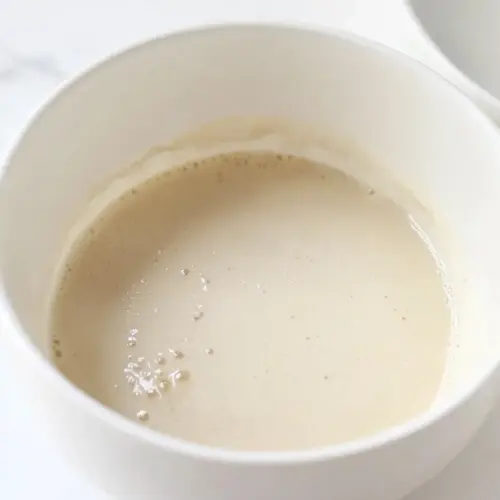
- WAIT! Let the mixture bloom for 10 minutes: In this waiting period your senses are the most useful tools. You will begin to see small bubbles at the surface and a thin layer of foam that signals the yeast is alive. There is often a faint, pleasantly sour aroma, which is a good sign. The waiting allows yeast to reproduce and produce carbon dioxide, which is essential for rising. A common mistake is impatience, trying to skip this step, which often causes dense dough later. If after the recommended time you see no bubbles or foam, the yeast is likely inactive and you should start over with fresher yeast or properly warmed water. During this time avoid exposing the bowl to a draft, which can cool the water and slow activity, and resist the urge to poke at the mixture since that can disrupt early foaming.
- You should see bubbles and foam forming, if after 10 minutes nothing has happened then the yeast has died and you will need to start over: The moment you spot a frothy cap is rewarding, and the texture will be light and slightly pillowy. This visual cue tells you the yeast is producing gas and is ready to be incorporated into dough. Smell the mixture to confirm a faint, bready scent; absence of that scent plus no bubbles is a clear sign of failure. If the yeast has died, discard the mixture, rinse your bowl, and try again with fresh yeast and better temperature control. One troubleshooting tip is to check the expiration date or to test a small pinch of yeast in warm water to verify activity before committing to larger quantities. Avoid guessing at readiness; rely on the foam and bubbles as your objective indicators.
Ways to Adapt This Recipe
These suggestions will help you adapt the technique for different doughs and schedules. Each tip begins with a bolded phrase to make scanning easier.
- Temperature Check Use a thermometer to confirm the water is in the safe activation range, especially in cooler kitchens.
- Freshness Test If unsure about yeast age, proof a teaspoon first in a small bowl as a quick viability check.
- Scaled Quantities Increase water and yeast proportionally when you scale up recipes to keep the balance right.
- Cold Rise Option If you are planning a slow overnight rise, you can mix directly without a full bloom, but expect longer proof times.
- Sugar Boost Adding a pinch of sugar can speed up the initial bloom, useful when your kitchen is cool.
Serve This How to Activate Yeast With
Serving here means what you pair with the doughs that start with activated yeast. Below are ideas for occasions, pairings, and storage that help you get the most from the technique.
- Freshly baked bread Serve warm slices with a soft spread, and enjoy the aroma and tender crumb that proper activation helps create. This works well for family dinners and weekend breakfasts alike.
- Rolls and buns These are lovely for gatherings, and they benefit from the reliable rise that comes from a good yeast bloom. Offer them at brunch or a casual dinner.
- Pizza dough Activated yeast gives pizza a satisfying lift and chewy crumb, making it ideal for easy weeknight dinners where you top to taste.
- Storage tips If you do not use the activated mixture immediately, it is best folded into dough and refrigerated for a slow rise, or redo the activation when ready for best results.
- Seasonal uses This method is evergreen and suits all seasons, whether you bake hearty loaves in winter or light rolls in summer.
FAQ
Conclusion
This technique for activating yeast is special because it turns a simple packet into a lively, foamy starter that sets up successful baking. It is quick, requires minimal ingredients, and once you learn the sensory cues, you gain confidence that transforms your loaves and rolls. Give it a try the next time you bake, and notice how a small, patient step at the beginning makes the rest of the process easier and more reliable. With a little practice, you will be able to read the foam and trust your results, and that quiet achievement is one of the most satisfying parts of baking.
How to Activate Yeast
Equipment
- Bowl
- Spoon
- Thermometer
Ingredients
- 2 cups water Bring to a warm temperature (about 100–110°F or 38–43°C) to dissolve yeast and activate its enzymes; helps create the moist environment needed for fermentation while avoiding temperatures that will kill the yeast. Measure accurately to maintain proper yeast-to-liquid ratio for predictable rising and flavor development. Stir briefly to ensure even temperature and complete dissolution before combining with dry ingredients.
- 2 teaspoons active dry yeast Provide to initiate fermentation by producing carbon dioxide and alcohol, causing dough to rise and develop airy texture and flavor during proofing. Sprinkle evenly over warm liquid or dissolve beforehand to ensure uniform activation and prevent clumping; monitor for foaming within 5–10 minutes as a sign of viability.
Instructions
- Add warm water to a bowl. Sprinkle in the yeast and sugar and stir it together.: The immediate thing you notice is the gentle warmth of the bowl, and the way the water looks almost motionless until you stir. Ideally the water is between 100 to 110°F , which feels warm on your wrist like a cozy bath for the yeast. The reason this temperature matters is that it wakes the yeast without causing thermal shock. If the water is too hot, the yeast will die and produce no foam, while too cold water will make the process painfully slow. A typical mistake is assuming tap temperature is fine; take a moment to feel the water or use a thermometer for accuracy. As you pour, listen for a faint ripple, and note that the surface should not be steaming. If the bowl seems too hot to touch, let the water cool slightly before adding the yeast.
- WAIT! Let the mixture bloom for 10 minutes. You should see bubbles and foam forming, if after 10 minutes nothing has happened then the yeast has died and you will need to start over.: At this point you might detect a subtle yeasty scent as the granules hydrate. Stirring helps distribute the yeast evenly through the water so each cell has access to moisture. Sugar, when included, acts as an early food source that jumpstarts activity, though the yeast will feed on flour later. Use a gentle circular motion with a spoon to dissolve the granules; you should not need vigorous agitation. A frequent error is over stirring which can collapse delicate bubbles as they form, or under stirring which leaves clumps that hydrate unevenly. Watch the surface for tiny specks suspending in the water, and expect the mixture to look homogenous within moments. If any clumps remain, give a few more gentle stirs.
- WAIT! Let the mixture bloom for 10 minutes: In this waiting period your senses are the most useful tools. You will begin to see small bubbles at the surface and a thin layer of foam that signals the yeast is alive. There is often a faint, pleasantly sour aroma, which is a good sign. The waiting allows yeast to reproduce and produce carbon dioxide, which is essential for rising. A common mistake is impatience, trying to skip this step, which often causes dense dough later. If after the recommended time you see no bubbles or foam, the yeast is likely inactive and you should start over with fresher yeast or properly warmed water. During this time avoid exposing the bowl to a draft, which can cool the water and slow activity, and resist the urge to poke at the mixture since that can disrupt early foaming.
- You should see bubbles and foam forming, if after 10 minutes nothing has happened then the yeast has died and you will need to start over: The moment you spot a frothy cap is rewarding, and the texture will be light and slightly pillowy. This visual cue tells you the yeast is producing gas and is ready to be incorporated into dough. Smell the mixture to confirm a faint, bready scent; absence of that scent plus no bubbles is a clear sign of failure. If the yeast has died, discard the mixture, rinse your bowl, and try again with fresh yeast and better temperature control. One troubleshooting tip is to check the expiration date or to test a small pinch of yeast in warm water to verify activity before committing to larger quantities. Avoid guessing at readiness; rely on the foam and bubbles as your objective indicators.
Notes
- Temperature Check Use a thermometer to confirm the water is in the safe activation range, especially in cooler kitchens.
- Freshness Test If unsure about yeast age, proof a teaspoon first in a small bowl as a quick viability check.
- Scaled Quantities Increase water and yeast proportionally when you scale up recipes to keep the balance right.
- Cold Rise Option If you are planning a slow overnight rise, you can mix directly without a full bloom, but expect longer proof times.
- Sugar Boost Adding a pinch of sugar can speed up the initial bloom, useful when your kitchen is cool.