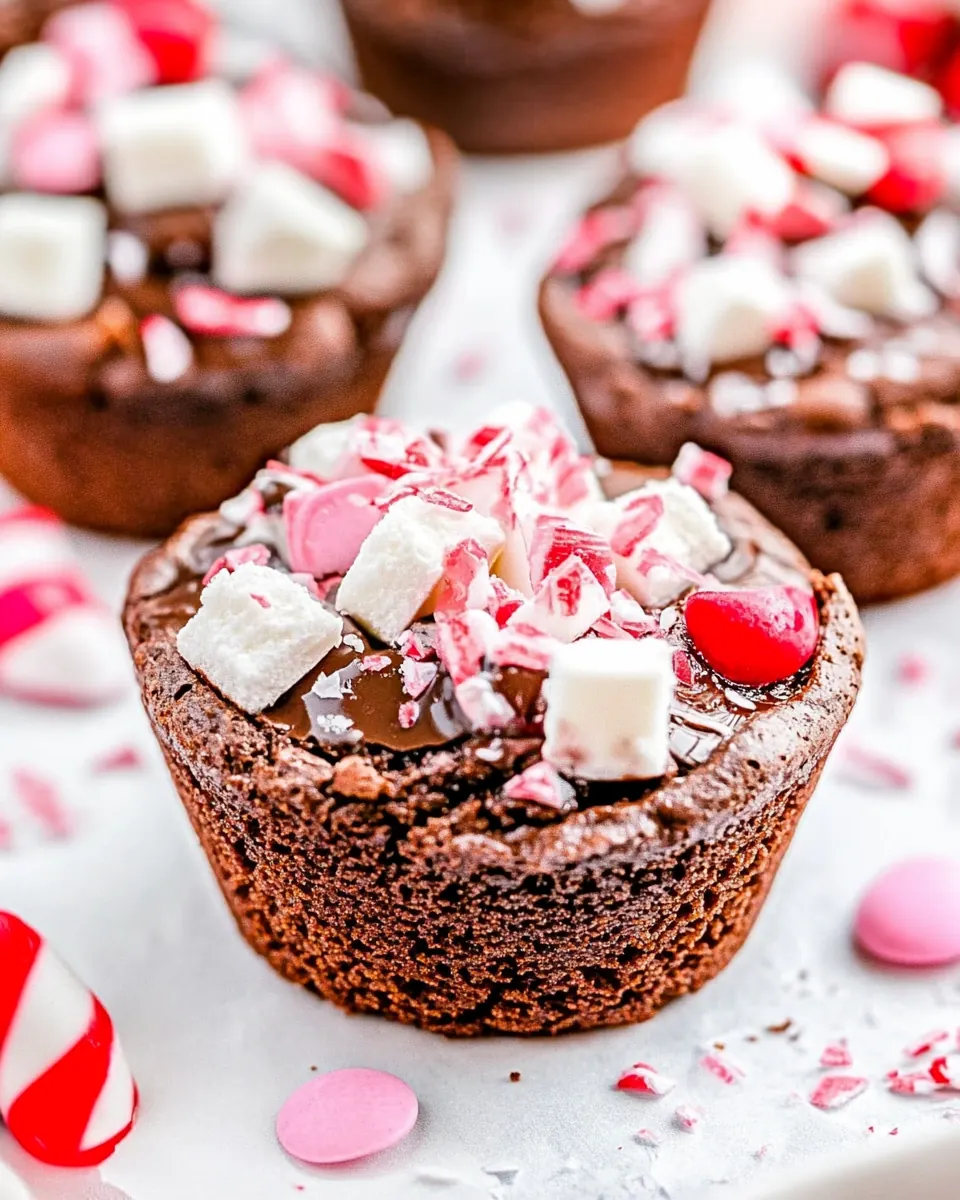
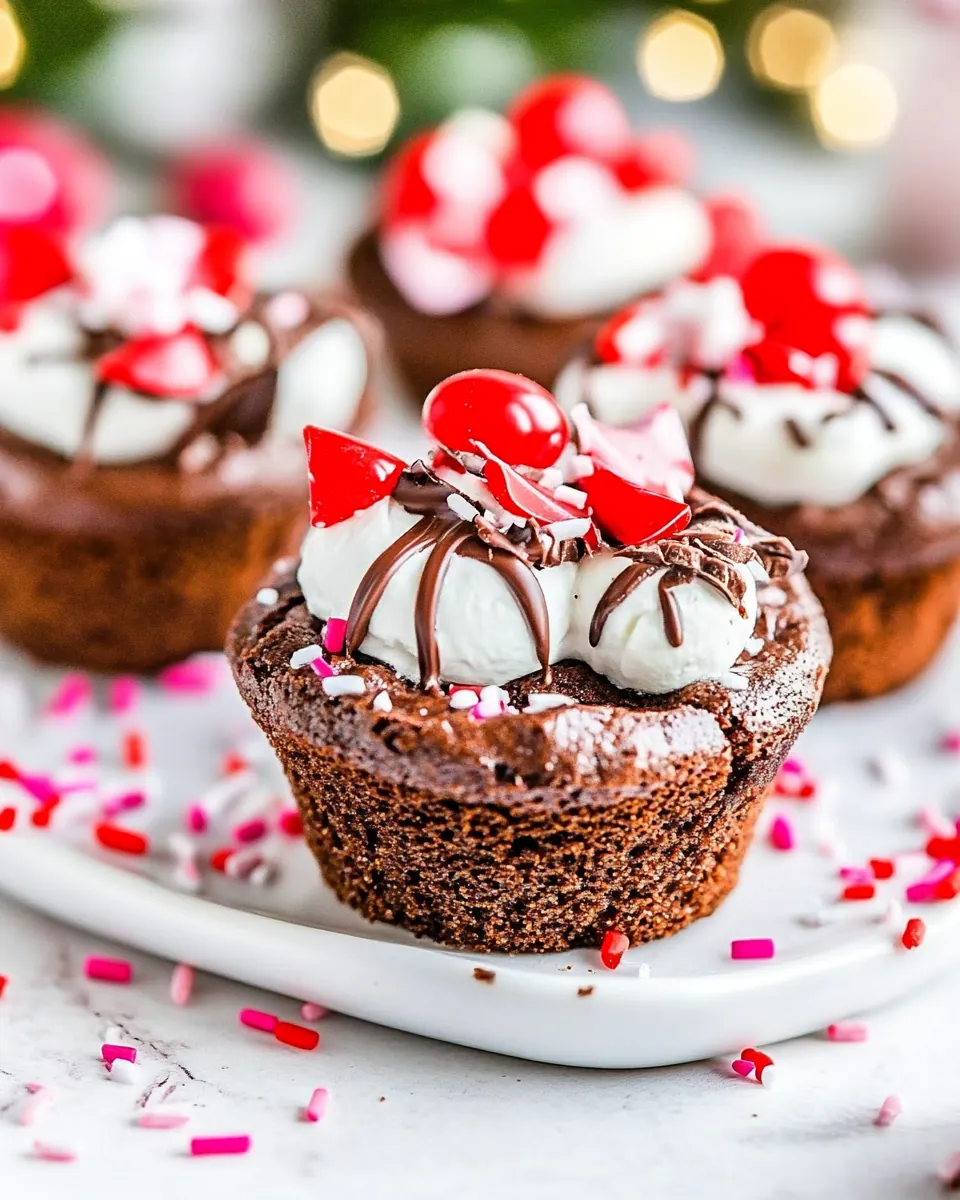
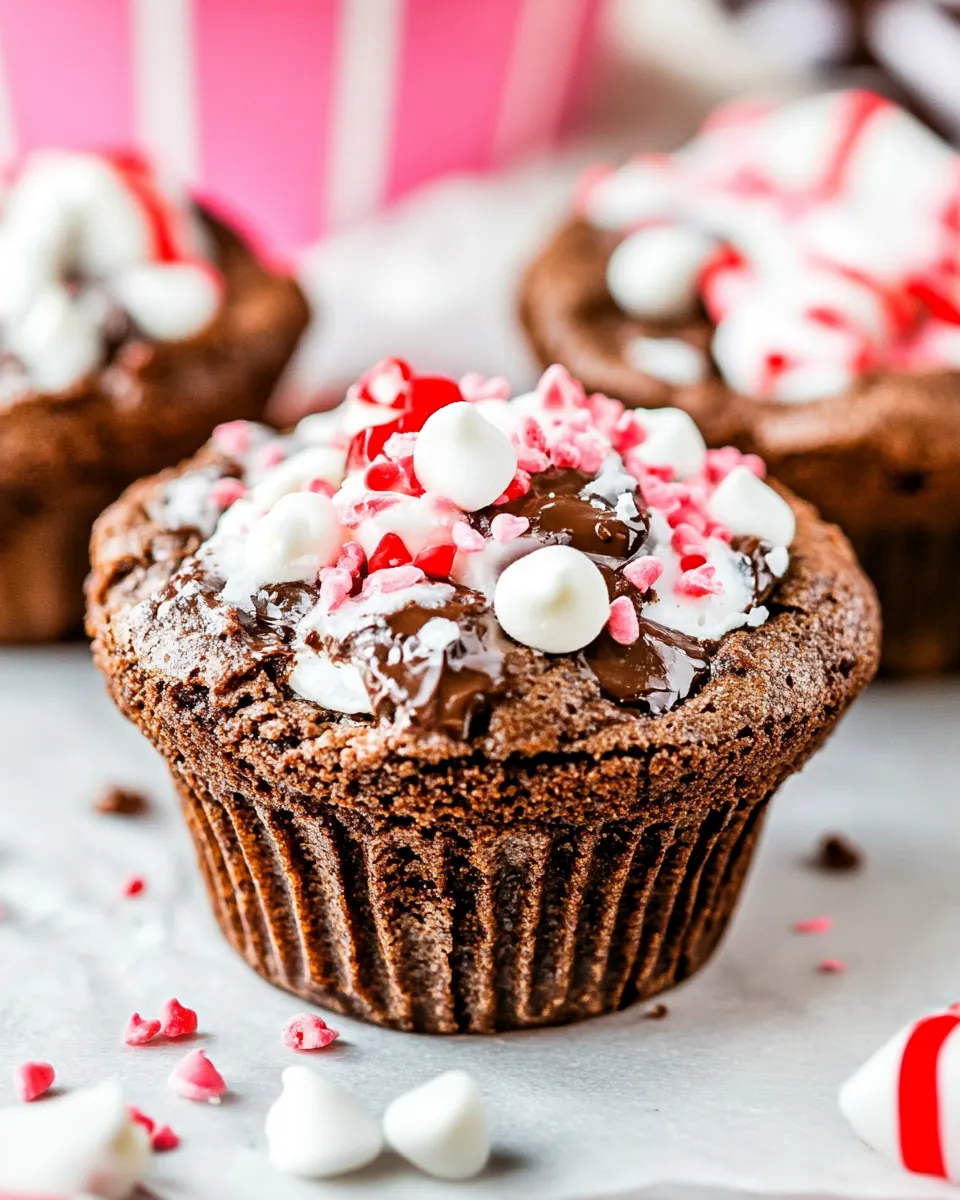
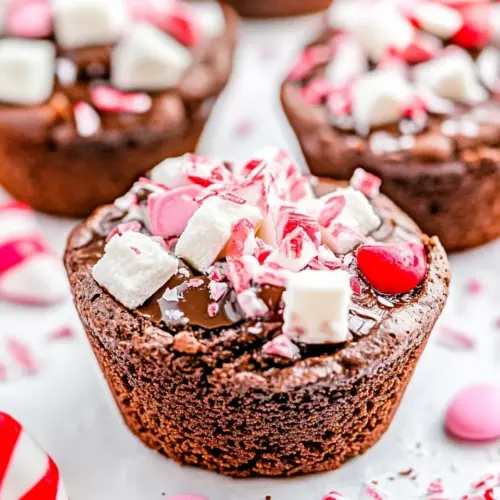
Hot Chocolate Brownie Cups
Hot Chocolate Brownie Cups have been my go to when I want something playful and deeply chocolatey at the same time.
I remember the first time I made these, a blustery winter afternoon with holiday lights still up, and the house smelling like toasted sugar. I was chasing the idea of combining a fudgy brownie base with a cloud of creamy, stabilized whipped cream that actually held its shape. The contrast between the warm, slightly chewy brownie and the cool, velvety topping felt almost theatrical, yet effortless to serve to friends who kept asking for another bite.
Over time I refined the little rituals that make these special, like pressing a warm Chocolate Kisses into the center while the cups are still soft, and folding in a packet of instant white chocolate pudding mix into the whipped cream so it keeps that silky, cocoa like flavor and firm texture. These treats are compact, festive, and they travel well to holiday parties or snowy family gatherings. I love that they can be dressed up with crushed candy canes or kept simple with a dusting of chocolate sprinkles.
Recipe Snapshot
25 mins
15 mins
10 mins
Medium
200 kcal
American
Gluten-Free, Low FODMAP
Desserts
Mini Muffin Pan
What You’ll Enjoy About This Hot Chocolate Brownie Cups
1. Crowd Pleaser and Conversation Starter
These Hot Chocolate Brownie Cups are tiny but mighty. I can bring a tray to a gathering and watch people gravitate toward them. They look like a decadent treat, and they invite curiosity because they combine two beloved desserts into one neat bite. I often hear guests remark on the balance of textures, which makes me grin every time.
2. Fast to Make, Big on Flavor
I value recipes that respect time without sacrificing taste. Using a reliable brownie mix or a straightforward homemade batter means you can get these in the oven quickly, and the whole process from start to finish is genuinely approachable even when life is busy. The shortcut of using a small candy like Chocolate Kisses gives an instant, glossy chocolate center that tastes far more elaborate than the effort required.
3. Textural Delight
Texture is everything for me, and these cups deliver. The edges of the mini brownie crisp slightly in the oven while the middle stays tender, so when you bite into them you get a pleasant chew. Topped with stabilized whipped cream that holds its piped shape, each mouthful alternates between warm, dense brownie and cool, billowy cream. That contrast is what keeps people reaching for seconds.
4. Festive and Adaptable
The recipe reads like a blank canvas for seasonal decor. I love finishing mine with crushed peppermint, chocolate sprinkles, or a drizzle of extra melted Chocolate Kisses. Because the core is straightforward, you can tailor them to a holiday table or a cozy movie night. They feel celebratory, yet they are forgiving if you need to scale quantities up or down.
5. Reliable for Make Ahead and Transport
I appreciate desserts that travel well, and these do too. If you make the brownie cups in advance and wait to pipe the stabilized whipped cream until just before serving, they keep their charm and structure. That makes them a dependable choice for holiday potlucks or family visits where you need something impressive but low stress.
Everything You Need for Hot Chocolate Brownie Cups
These ingredients are simple and focused on creating a cozy bite. The key players are the fudgy brownie base, the melting center from the Chocolate Kisses, and the stabilized whipped cream that brings the hot chocolate feeling without collapsing. Each element has a role, from structure to flavor to presentation.
- 1 package brownie mix or your favorite brownie recipe: Provides the brownie base and structure for the cups, delivering rich chocolate flavor and a fudgy texture when baked; follow package directions or your recipe for batter consistency and baking time to ensure proper cup formation.
- 24 Chocolate Kisses: Adds individual pockets of melted chocolate and a glossy, creamy center when placed into warm brownies; unwrap and press into the center immediately after baking for molten chocolate effect and a decorative topper.
- 2 cups heavy whipping cream: Creates a silky, whipped cream topping with a rich mouthfeel when chilled and whipped to soft peaks; use cold cream and chilled bowl for best volume and stability while assembling the cups.
- 2 tablespoons powdered sugar: Sweetens and stabilizes whipped cream while adding a fine, smooth texture; sift or sprinkle in while whipping to incorporate evenly and enhance overall sweetness without grittiness.
- 2 tablespoons instant white chocolate pudding mix use the dry mix, do not make the pudding: Boosts white chocolate flavor and helps thicken the whipped topping slightly without making pudding; fold the dry instant mix into the cream while whipping to intensify flavor and improve structure.
- Garnish: candy canes, mini marshmallows, chocolate sprinkles, chocolate sauce (optional): Provides optional decorative accents and complementary textures—crunch, chew, or extra chocolate—allowing customization for presentation and seasonal flair; use sparingly to avoid overpowering the brownie cups.
The Process for Making Hot Chocolate Brownie Cups

Working through these steps is where the magic happens. I like to set up my station so the mini muffin pan is ready, the Chocolate Kisses are unwrapped and on a small plate, and a very cold bowl awaits the heavy cream. This keeps the flow calm and efficient.
- Preheat the oven to 350 degrees fahrenheit. Prepare a 24 mini muffin pan by spraying with a baking spray that includes flour.: The air warms and you will smell that slight metallic warmth from the oven as it climbs to 350 degrees fahrenheit . A light film of baking spray that contains flour helps the tiny brownie cups release cleanly, so you avoid tearing edges. When I prepare pans, I tap them gently to check even coverage, and I wipe any excess spray from rims so batter sits neatly in each well. One common mistake is skipping the flour containing spray and using only oil, which can let the fragile mini cups stick and break when you unmold them. If you notice the spray pooling, blot with a paper towel before filling.
- Prepare the brownie mix according to the package directions, or follow recipe directions. Fill mini muffin cups 2/3 full.: At this point the batter should be glossy and slightly thick, not gloopy or runny. Filling each cup about two thirds full gives the brownie room to rise into a domed, chewy bite without overflowing. As you spoon batter in, you will hear soft plops and see the wells fill with deep chocolate color. Use a small cookie scoop for consistency, and wipe excess batter off the rim to prevent baked spillage. A frequent slip up is overfilling, which leads to lopsided cups and sticky edges that are hard to remove. If your batter feels too stiff, stir in a tablespoon of water to adjust texture sparingly.
- Bake for 7-10 minutes or until the edges are set but the centers are still soft, but not liquid.: During baking the kitchen fills with warm cocoa aromas and a hint of caramelized sugar. Watch for the edges to pull slightly away from the sides, and the center to appear matte rather than wet. The centers should jiggle gently when you nudge the pan, not slosh like batter. That slight wobble will set as they cool into a fudgy interior. Avoid overbaking because that robs the cups of their tender center and makes them cakier than intended. If you open the oven door too often, you risk temperature loss and uneven rise.
- As soon as you remove them from the oven, press one kiss into each brownie cup with the pointed down, flat part on top. You can leave them as is or as soon as they begin to melt and soften you can use a thin spatula or a spoon to smooth out the chocolate and make it look more like cocoa!: The contrast of warm brownie and cool Chocolate Kisses creates a glossy domed center as the chocolate softens. Pressing the kiss while the cup is hot encourages it to melt just enough to become shiny and spread, and smoothing with a thin spatula gives a charming hot chocolate surface. Listen for a slight pop as the kiss settles, and watch for a gleam indicating the chocolate has softened. A common misstep is waiting too long to press the chocolate, resulting in only partial melting and uneven texture. If the kisses do not soften, place the pan back in the oven for thirty to sixty seconds, watching closely.
- Allow the brownie cups to cool completely then transfer them to a cooling rack. While they are cooling, prepare the stabilized whipped cream.: Cooling changes the crumb structure, firming the edges and setting the glossy centers into a stable pocket. Moving them to a rack lets air circulate so condensation does not form under the cups. Meanwhile, chilling your tools for the whipped cream primes you for success, since a cold bowl helps the heavy whipping cream reach peaks faster. A mistake I sometimes see is piping on warm brownies, which melts the topping and ruins the presentation. Be patient and confirm they are fully room temperature before moving on.
- Whip the heavy cream at high speed in a very cold bowl until it starts to thicken. Add the powdered sugar and continue beating until soft peaks will form. Next, add the mix and beat until stiff peaks form. Watch it carefully, as this can happen quickly. Don’t want to overmix or it will curdle.: As you whip, the heavy whipping cream goes from shiny liquid to billowy peaks with a soft whispering sound from the mixer. When it begins to thicken, the surface takes on a velvety look and the whisk leaves trails. Adding the powdered sugar sweetens and slightly stabilizes the foam, while the dry instant white chocolate pudding mix gives body and a subtle cocoa freshness. When stiff peaks form, the cream holds its shape but still yields comfortably under pressure. Overwhipping leads to grainy texture or even butter separation, so stop as soon as the peaks stand tall. If the mixture starts to look curdled, fold gently to reincorporate and chill briefly.
- When the brownies are fully cooled you may pipe on the stabilized whipped cream. Garnish with mini marshmallows, pieces of peppermint sticks, sprinkles and chocolate sauce if desired.: Piping introduces a visual flourish, and you will feel the resistance of the bag as you build tall swirls of creamy white against the dark brownie . The aroma will shift to sweet and minty if you add crushed candy canes, and the contrasting textures of crunchy garnish and soft cream make each bite interesting. A common error is overfilling the cups with topping, which makes them hard to handle and eat neatly. Keep proportions balanced so the first bite includes all layers harmoniously.
Tips and Tricks about Hot Chocolate Brownie Cups
I like to collect simple, actionable tips that save time and improve texture. These are the practical notes I use when I make a batch, and they focus on timing, equipment, and presentation so you get consistent results every time.
- Chill your tools: Place the mixing bowl and whisk in the fridge for at least fifteen minutes before whipping the heavy whipping cream to help it reach stiff peaks faster and more reliably.
- Measure the batter carefully: Use a small cookie scoop to portion the brownie batter so each mini cup bakes evenly and looks uniform on the tray.
- Timing for the kiss: Insert the Chocolate Kisses the moment the cups leave the oven to create a glossy, melting center that spreads slightly into the warm brownie.
- Stabilize with pudding mix: Adding the dry instant white chocolate pudding mix to the whipped cream gives structure and a subtle flavor boost without thinning the topping.
- Presentation matters: Pipe the whipped cream with a medium star tip for a nostalgic hot chocolate look, and finish with a single mini marshmallow or crushed peppermint for visual contrast.
- Store correctly: Keep finished cups covered in the refrigerator, but if storing untopped, they can sit at room temperature for up to five days for easy make ahead options.
How to Serve Hot Chocolate Brownie Cups
These little desserts are versatile, and I enjoy serving them warm or cool depending on the moment. They are perfect for holiday gatherings, cozy dessert tables, or a special snack during a movie night with friends and family.
- As a holiday centerpiece: Arrange the Hot Chocolate Brownie Cups on a tiered tray with a few candy canes and sprinkles scattered around for a festive table display that invites sampling.
- For dessert after dinner: Serve two per person alongside a small cup of hot cocoa for an indulgent double chocolate experience, making the portion feel like a luxurious finish to a meal.
- Party platter: Keep the brownie cups untopped while transporting, then pipe the stabilized whipped cream on site to retain the freshest look and texture for guests.
- Kid friendly option: Let kids add their own garnish station with mini marshmallows and chocolate sprinkles so they can personalize each cup and feel involved in the preparation.
- Storage and make ahead: If you want to prepare in advance, bake the mini brownie cups and store them uncovered at room temperature for up to five days; add the whipped cream just before serving for best texture.
- Seasonal pairing: These work well in winter or during Christmas parties, but they are also charming for birthday dessert tables where a small, rich bite is preferred.
FAQ
Conclusion
What makes these Hot Chocolate Brownie Cups special is the way they balance a fudgy brownie base, a melting chocolate center, and a stable, white chocolate flavored whipped cream topping into a single, bite sized treat. They’re quick to assemble, festive to present, and forgiving enough for busy holiday prep. I encourage you to try them at your next gathering, and enjoy playing with garnishes like crushed candy cane or mini marshmallows to make each bite feel a little celebratory.
Hot Chocolate Brownie Cups
Equipment
- Mini Muffin Pan
Ingredients
- 1 package brownie mix or your favorite brownie recipe Provides the brownie base and structure for the cups, delivering rich chocolate flavor and a fudgy texture when baked; follow package directions or your recipe for batter consistency and baking time to ensure proper cup formation.
- 24 Chocolate Kisses Adds individual pockets of melted chocolate and a glossy, creamy center when placed into warm brownies; unwrap and press into the center immediately after baking for molten chocolate effect and a decorative topper.
- 2 cups heavy whipping cream Creates a silky, whipped cream topping with a rich mouthfeel when chilled and whipped to soft peaks; use cold cream and chilled bowl for best volume and stability while assembling the cups.
- 2 tablespoons powdered sugar Sweetens and stabilizes whipped cream while adding a fine, smooth texture; sift or sprinkle in while whipping to incorporate evenly and enhance overall sweetness without grittiness.
- 2 tablespoons instant white chocolate pudding mix use the dry mix, do not make the pudding Boosts white chocolate flavor and helps thicken the whipped topping slightly without making pudding; fold the dry instant mix into the cream while whipping to intensify flavor and improve structure.
- Optional Garnish: candy canes, mini marshmallows, chocolate sprinkles, chocolate sauce Provides optional decorative accents and complementary textures—crunch, chew, or extra chocolate—allowing customization for presentation and seasonal flair; use sparingly to avoid overpowering the brownie cups.
Instructions
- Preheat the oven to 350 degrees fahrenheit. Prepare a 24 mini muffin pan by spraying with a baking spray that includes flour.: The air warms and you will smell that slight metallic warmth from the oven as it climbs to 350 degrees fahrenheit . A light film of baking spray that contains flour helps the tiny brownie cups release cleanly, so you avoid tearing edges. When I prepare pans, I tap them gently to check even coverage, and I wipe any excess spray from rims so batter sits neatly in each well. One common mistake is skipping the flour containing spray and using only oil, which can let the fragile mini cups stick and break when you unmold them. If you notice the spray pooling, blot with a paper towel before filling.
- Prepare the brownie mix according to the package directions, or follow recipe directions. Fill mini muffin cups 2/3 full.: At this point the batter should be glossy and slightly thick, not gloopy or runny. Filling each cup about two thirds full gives the brownie room to rise into a domed, chewy bite without overflowing. As you spoon batter in, you will hear soft plops and see the wells fill with deep chocolate color. Use a small cookie scoop for consistency, and wipe excess batter off the rim to prevent baked spillage. A frequent slip up is overfilling, which leads to lopsided cups and sticky edges that are hard to remove. If your batter feels too stiff, stir in a tablespoon of water to adjust texture sparingly.
- Bake for 7-10 minutes or until the edges are set but the centers are still soft, but not liquid.: During baking the kitchen fills with warm cocoa aromas and a hint of caramelized sugar. Watch for the edges to pull slightly away from the sides, and the center to appear matte rather than wet. The centers should jiggle gently when you nudge the pan, not slosh like batter. That slight wobble will set as they cool into a fudgy interior. Avoid overbaking because that robs the cups of their tender center and makes them cakier than intended. If you open the oven door too often, you risk temperature loss and uneven rise.
- As soon as you remove them from the oven, press one kiss into each brownie cup with the pointed down, flat part on top. You can leave them as is or as soon as they begin to melt and soften you can use a thin spatula or a spoon to smooth out the chocolate and make it look more like cocoa!: The contrast of warm brownie and cool Chocolate Kisses creates a glossy domed center as the chocolate softens. Pressing the kiss while the cup is hot encourages it to melt just enough to become shiny and spread, and smoothing with a thin spatula gives a charming hot chocolate surface. Listen for a slight pop as the kiss settles, and watch for a gleam indicating the chocolate has softened. A common misstep is waiting too long to press the chocolate, resulting in only partial melting and uneven texture. If the kisses do not soften, place the pan back in the oven for thirty to sixty seconds, watching closely.
- Allow the brownie cups to cool completely then transfer them to a cooling rack. While they are cooling, prepare the stabilized whipped cream.: Cooling changes the crumb structure, firming the edges and setting the glossy centers into a stable pocket. Moving them to a rack lets air circulate so condensation does not form under the cups. Meanwhile, chilling your tools for the whipped cream primes you for success, since a cold bowl helps the heavy whipping cream reach peaks faster. A mistake I sometimes see is piping on warm brownies, which melts the topping and ruins the presentation. Be patient and confirm they are fully room temperature before moving on.
- Whip the heavy cream at high speed in a very cold bowl until it starts to thicken. Add the powdered sugar and continue beating until soft peaks will form. Next, add the mix and beat until stiff peaks form. Watch it carefully, as this can happen quickly. Don’t want to overmix or it will curdle.: As you whip, the heavy whipping cream goes from shiny liquid to billowy peaks with a soft whispering sound from the mixer. When it begins to thicken, the surface takes on a velvety look and the whisk leaves trails. Adding the powdered sugar sweetens and slightly stabilizes the foam, while the dry instant white chocolate pudding mix gives body and a subtle cocoa freshness. When stiff peaks form, the cream holds its shape but still yields comfortably under pressure. Overwhipping leads to grainy texture or even butter separation, so stop as soon as the peaks stand tall. If the mixture starts to look curdled, fold gently to reincorporate and chill briefly.
- When the brownies are fully cooled you may pipe on the stabilized whipped cream. Garnish with mini marshmallows, pieces of peppermint sticks, sprinkles and chocolate sauce if desired.: Piping introduces a visual flourish, and you will feel the resistance of the bag as you build tall swirls of creamy white against the dark brownie . The aroma will shift to sweet and minty if you add crushed candy canes, and the contrasting textures of crunchy garnish and soft cream make each bite interesting. A common error is overfilling the cups with topping, which makes them hard to handle and eat neatly. Keep proportions balanced so the first bite includes all layers harmoniously.
Notes
- Chill your tools: Place the mixing bowl and whisk in the fridge for at least fifteen minutes before whipping the heavy whipping cream to help it reach stiff peaks faster and more reliably.
- Measure the batter carefully: Use a small cookie scoop to portion the brownie batter so each mini cup bakes evenly and looks uniform on the tray.
- Timing for the kiss: Insert the Chocolate Kisses the moment the cups leave the oven to create a glossy, melting center that spreads slightly into the warm brownie.
- Stabilize with pudding mix: Adding the dry instant white chocolate pudding mix to the whipped cream gives structure and a subtle flavor boost without thinning the topping.
- Presentation matters: Pipe the whipped cream with a medium star tip for a nostalgic hot chocolate look, and finish with a single mini marshmallow or crushed peppermint for visual contrast.
- Store correctly: Keep finished cups covered in the refrigerator, but if storing untopped, they can sit at room temperature for up to five days for easy make ahead options.