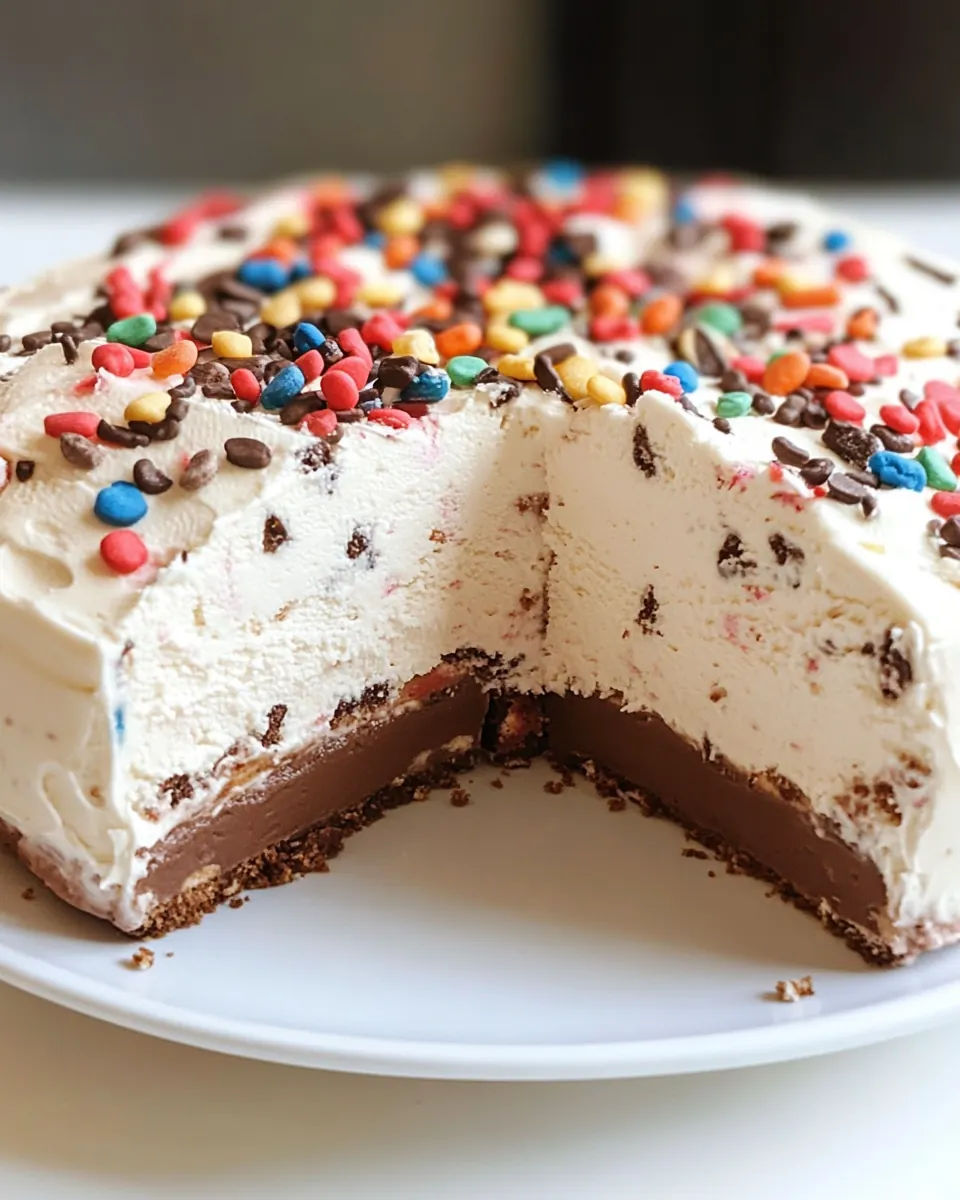
Homemade Ice Cream Crunch Cake
Homemade Ice Cream Crunch Cake has been my go to celebration dessert ever since a summer backyard party when I first learned how simple it is to turn two favorite ice cream flavors into a layered showstopper. I remember juggling a handful of crackers and a bowl of softened ice cream while kids chased the sprinkler, and somehow that messy, joyful moment led to this easy, nostalgic cake that everyone still asks for.
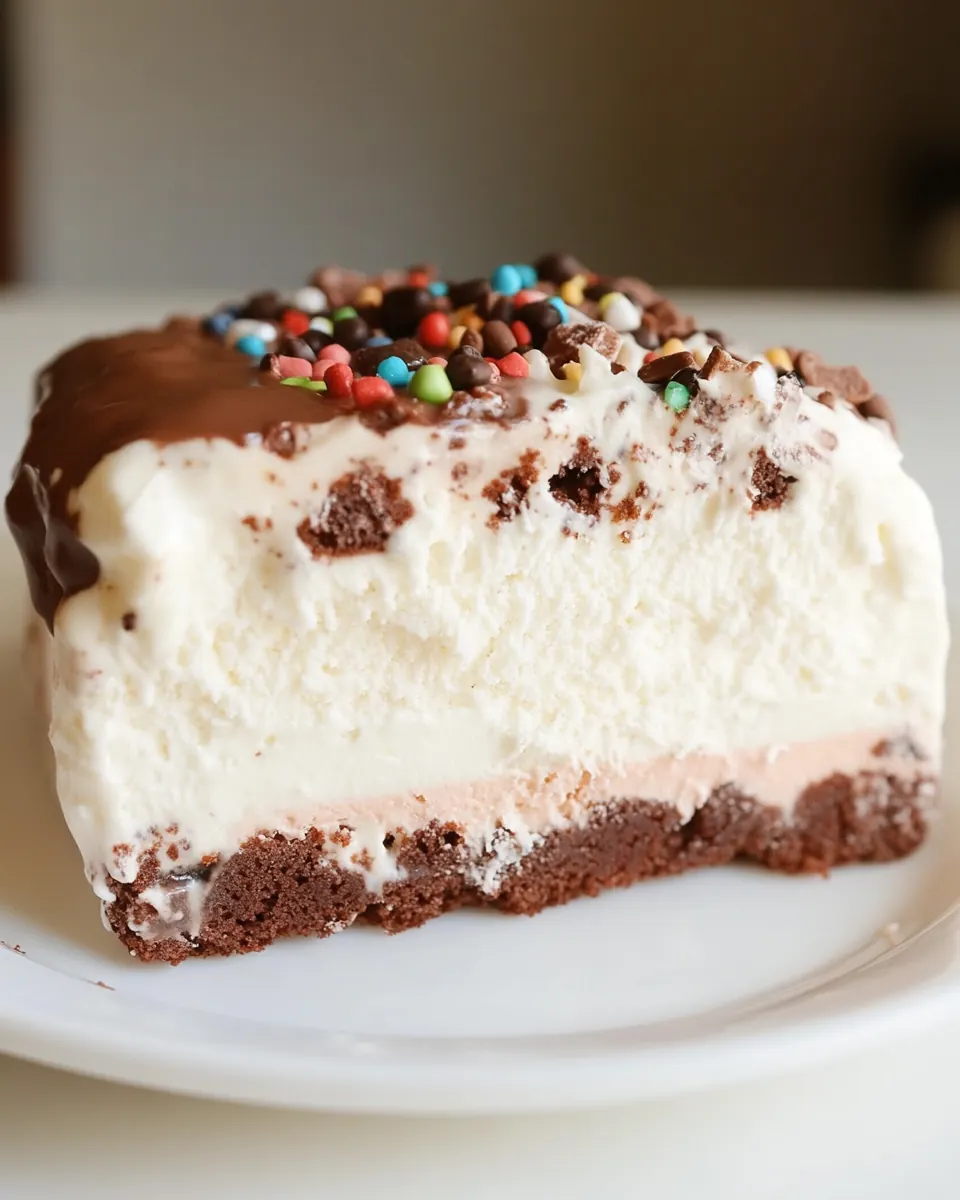
That afternoon taught me a useful lesson about timing and patience, two unlikely partners when you are working with frozen things. I now plan assembly around small windows of attention, chilling serving platters in advance and whipping cream while the layers firm up. The resulting texture contrast between creamy vanilla ice cream, rich chocolate ice cream, crackly OREO thins, and fluffy heavy whipping cream is what keeps me coming back to this dessert.
I like to think of this as the cake you can assemble at the last minute with minimal equipment, yet it reads like you spent hours in the kitchen. Guests often comment on the playful crunch and the glossy ribbons of hot fudge sauce, and children are drawn to the rainbow sprinkles. Over time I refined a few small moves that make the outcome consistent, from lining pans with plenty of plastic wrap to freezing layers overnight for clean slices. This recipe lives at the intersection of comfort and celebration, and whenever I serve Homemade Ice Cream Crunch Cake, people smile before they even take a bite.
Recipe Snapshot
2 hr
120 mins
Medium
350 kcal
American
Keto, Gluten-Free
Desserts
8 inch cake pans, Plastic wrap, Large bowl, Mixer, Serving platter
Why You Need This Homemade Ice Cream Crunch Cake
Layered Texture Drama
I love how Homemade Ice Cream Crunch Cake builds excitement with texture. Each bite combines creamy vanilla ice cream and dense chocolate ice cream with the crisp, sandy crunch of crushed OREO thins. That contrast elevates what could be a simple frozen dessert into something dynamic and memorable.
Minimal Baking, Maximum Impact
One of the best things is that you do not need an oven to make this feel special. We keep things approachable by working mainly with freezing and simple assembly. The use of ready made components like hot fudge sauce lets you focus on composition rather than complex techniques, so it is perfect for busy hosts.
Kid Friendly and Crowd Ready
I find this cake is a hit with kids and adults alike. The visual appeal of sprinkles and the familiar flavors of OREO thins and hot fudge sauce make it an instant favorite at gatherings. Because it slices neatly when fully frozen, it is easy to serve to a crowd and to plan ahead.
Flexible and Forgiving
There is room to personalize without risking the final result. You can vary decorations or the ratio of vanilla ice cream to chocolate ice cream, and the assembly still works. That forgiveness makes it a recipe I return to again and again when I want reliable wow factor.
Great Make Ahead Dessert
Finally, this cake shines when made ahead. Freeze the layers and assemble on the day you need it, or fully assemble and keep frozen for hours. Planning ahead reduces day of stress, and you get a dessert that feels like a special effort while actually being impressively low maintenance.
What’s In This Homemade Ice Cream Crunch Cake

These ingredients are intentionally simple, chosen to create contrast and balance. The two ice cream flavors provide the creamy foundation, hot fudge sauce adds a glossy, chocolatey center, and crushed OREO thins deliver the crunch. Whipped topping made from heavy whipping cream rounds everything out with a light, airy finish. Together they layer into a dessert that feels decadent while staying straightforward to assemble.
- 1.5 quarts vanilla ice cream: Churned and slightly softened to spread easily between layers, provides creamy sweetness and a smooth vanilla flavor that forms one half of the cake's ice cream base. Helps create contrasting textures when alternated with the chocolate layer and freezes firm to hold the cake shape during assembly and serving.
- 1.5 quarts chocolate ice cream: Swirled and softened for spreading, supplies rich cocoa flavor and a dense, chocolaty layer that balances the vanilla ice cream. Contributes decadent mouthfeel and visual contrast while firming up in the freezer to maintain the cake's layered structure.
- 3/4 cup hot fudge sauce: Heated until pourable to act as a gooey, chocolatey ribbon between the ice cream layers; adds intense fudgy flavor and glossy texture. Helps bind crushed cookies and ice cream, and provides pockets of warm-like richness even when chilled.
- 12 OREO thins crushed: Crushed finely to create crunchy contrast and distribute chocolate cookie flavor throughout the cake; adds texture and a pleasant crumbly bite. Acts as a crunchy layer that complements the smoothness of the ice cream and helps vary the mouthfeel in each slice.
- 1 1/2 cups heavy whipping cream: Whipped to soft peaks to form a light, airy topping or filling layer that offsets the dense ice cream; adds richness and stabilizes decorations. Provides a silky finish that can be sweetened and flavored to enhance overall creaminess while helping to hold sprinkles in place.
- 1/4 cup sugar: Granulated to dissolve into the whipped cream, supplying sweetness and helping to stabilize the whipped texture. Balances the cold dessert's flavors and ensures the cream holds volume for an attractive, scoopable topping.
- 1 teaspoon vanilla: Added to the whipped cream to introduce warm vanilla aromatics and round out sweetness; enhances overall flavor harmony between layers. Small quantity intensifies vanilla notes without altering texture noticeably.
- rainbow sprinkles or other decorations as desired.: Used sparingly to decorate the finished cake, offering bright color and playful visual appeal while adding a slight sugary crunch. Allows for customization of appearance and can signal portions or festive themes without changing the core flavors.
Homemade Ice Cream Crunch Cake Instructions
I like to walk through the assembly calmly, with each component prepped and chilled. Start by softening the ice cream just enough to work with it, line pans thoroughly, and whip the cream while layers firm up. Keep your workspace cold and your movements deliberate for the cleanest layers.
- Remove ice cream from the freezer and defrost about 15 minutes.: The softened ice cream should smell cool and milky rather than melted liquor, and it should give slightly under a spoon but still hold some shape. This short window allows the ice cream to spread smoothly without becoming soupy, which helps avoid air pockets. A common mistake is letting it sit too long, causing runoff and an uneven final texture, so watch the clock and check consistency every five minutes.
- While ice cream is softening, line two 8-inch cake pans well with plastic wrap, leaving several inches of overhang.: You will notice the plastic wrap glinting as it smooths over the pan, and having generous overhang makes unmolding effortless. This step prevents the ice cream from bonding to the pan and protects sharp edges when you remove layers. Avoid skipping the overhang, as wrestling the cake out with small edges can tear the layers.
- Spoon soft ice cream into each prepared pan, pressing down to remove air bubbles as you go. Cover with plastic wrap and press down evenly to smooth the top. Freeze for 8-12 hours or until hardened.: As you press, the surface will grow smooth and compact, with a soft hiss as air escapes and the ice cream settles. Removing air pockets ensures even density and tidy slices. One trap is overpacking which can cause bulging seams, so press firmly but evenly to maintain a flat top.
- 1 hour before assembling cake, place serving platter into freezer. (Make sure your platter can freeze!): The plastic wrap will take the imprint of your hand as you smooth, and this creates a polished finish that freezes into place. A smooth top prevents uneven stacking later on, and it makes assembling the cake neater. If you see any drips or stray crumbs, wipe them away before freezing to avoid icy blemishes.
- Place heavy cream, sugar and vanilla into a large bowl and whip until stiff peaks form. Refrigerate.: The ice cream should become solid and unyielding, with no sag when you nudge the top. Proper freezing time guarantees clean slices and stable layers during assembly. Do not rush this step, as insufficient freezing leads to squashed layers and messy presentation when you stack the cake.
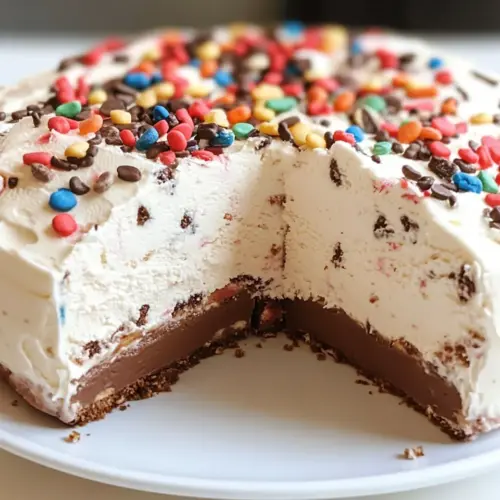
- To assemble cake: remove ice cream layers and serving platter from freezer. Unwrap the tops of the ice cream layers and using the excess plastic wrap, remove layers from pans. Place chocolate layer on the bottom. Smooth an even layer of hot fudge over the chocolate layer, leaving a 1/2 inch border. Sprinkle crushed OREO thins over hot fudge and press down gently. Add vanilla layer overtop. Spread whipped cream overtop of the entire cake, add sprinkles as desired and freeze until ready to serve.: A chilled platter reduces melt while you transfer layers, and you may hear a faint cold snap as the platter chills. This small preparation helps maintain firm edges when you move the cake. Forgetting this will increase condensation and can soften the bottom layer prematurely.
- Place heavy cream, sugar and vanilla into a large bowl and whip until stiff peaks form: As you whip, the cream will thicken, turning from glossy ribbons to peaks that stand tall; you will smell the sweet aroma of vanilla . Stiff peaks give structure for spreading and help the topping hold shape on the frozen cake. Underwhipping results in runny frosting, while overwhipping can turn the cream grainy, so stop when peaks hold firmly.
- Refrigerate: Cooling the whipped cream briefly keeps it stable and prevents it from melting the frozen layers during assembly, and the bowl will feel cool to the touch. Chilled whipped cream spreads more cleanly, minimizing slippage. If you skip refrigerating, the topping may become soft and slide off the ice cream under ambient heat.
- To assemble cake: remove ice cream layers and serving platter from freezer : You should feel the solid chill under your fingers and see perfectly frozen, flat surfaces on the ice cream rounds. Working quickly keeps edges crisp and avoids melting. If the kitchen is warm, an extra minute in the freezer for the platter or layers will prevent smearing during transfer.
- Unwrap the tops of the ice cream layers and using the excess plastic wrap, remove layers from pans: The layers should lift out smoothly under the plastic wrap, revealing clean sides, and you may hear a soft crack as the frozen edge releases. This technique preserves the integrity of the layers and prevents tearing. If the layer resists, return the pan to the freezer briefly instead of forcing it, which can crack the cake.
- Place chocolate layer on the bottom: When you set the chocolate ice cream layer down, its dark surface looks dense and glossy, creating a sturdy base. Position it carefully so the edge is aligned to ensure even stacking. Sliding or misalignment here makes subsequent layers uneven, so adjust while the layers are still solid.
- Smooth an even layer of hot fudge over the chocolate layer, leaving a 1/2 inch border: The hot fudge sauce should spread shiny and thick, creating a semi firm middle that contrasts with ice cream. Leaving a border prevents the fudge from oozing over when you add the next layer. If you apply too much fudge, it may squeeze out the sides when pressed, so aim for a controlled, thin ribbon rather than a puddle.
- Sprinkle crushed OREO thins over hot fudge and press down gently: The crumbs will sink slightly into the fudge, creating a satisfying crunch layer; you will see tiny dark flecks against the sauce. Press gently so the crumbs adhere without compacting into a dense slab. Pressing too hard flattens the texture and makes the crunch less distinct, so use a light hand.
- Add vanilla layer overtop: Place the vanilla ice cream round carefully, aligning it with the bottom layer; the contrast between light and dark looks striking. The top should sit flush, creating a compact stack. If the vanilla layer is uneven, press lightly to align, but avoid forcing it which could displace the crunchy middle.
- Spread whipped cream overtop of the entire cake, add sprinkles as desired and freeze until ready to serve: The whipped topping should sweep smoothly across the frozen surface, creating soft peaks and a snowy finish that holds sprinkles in place. Sprinkles add color and a tiny extra crunch. Let the assembled cake refreeze fully to ensure neat slices, and avoid cutting too soon which will produce smear rather than clean wedges.
Recipe Variations about Homemade Ice Cream Crunch Cake

This cake is flexible if you want to play with textures or presentation. Below are practical variations and ideas to adapt the recipe while preserving the core layering technique and crunchy center.
- Single Flavor Layer — Use three quarts of one flavor of ice cream if you prefer uniform taste, which simplifies assembly and emphasizes a single profile for guests who love a pure chocolate or vanilla experience.
- Different Cookie Crunch — Swap the OREO thins for crushed wafer cookies or salted shortbread to alter the sweet salt balance, keeping the same pressing technique so the crumbs adhere to the hot fudge sauce.
- Decor Swap — Replace rainbow sprinkles with chopped nuts or toasted coconut for a more grown up finish, applying them immediately after spreading the whipped cream so they stick well.
- Mini Cakes — Make individual servings using small ramekins or muffin tins lined with plastic wrap for faster freezing and charming single portion presentations.
- Make Ahead Strategy — Freeze layers separately for up to three days and assemble on the event day; this keeps slices neater and reduces last minute stress.
Serving Ideas for Homemade Ice Cream Crunch Cake
This cake is festive and flexible, perfect for summer parties, birthdays, or casual family gatherings. Serving it well involves maintaining cold plates, planning portion sizes, and pairing with simple accompaniments that do not overpower the dessert. Below are multiple serving ideas and contexts for which this cake excels.
- Party Centerpiece — Place the fully assembled cake on a chilled platter at the center of a dessert table, and slice just before serving to preserve clean wedges.
- Birthday Alternative — Use themed sprinkles or candles for birthdays, and consider adding small, individual garnishes for each slice to personalize servings.
- Summer Potlucks — Transport the cake frozen on dry ice or in a cooler to maintain structure, then serve immediately for a refreshing option that is easier than a traditional baked cake.
- Storage Tip — Wrap leftover slices tightly in plastic wrap and store in the freezer for up to one week; thaw briefly on chilled plates before serving to soften slightly without losing shape.
- Occasion Pairings — This dessert works well for casual lunches, late night treats, or holiday gatherings in warm climates, where a no bake, frozen option is appreciated for its ease and crowd pleasing flavors.
- Portion Control — For a lighter finish to a rich meal, serve smaller slices with a sprinkling of crushed OREO thins on top to keep the visual punch while reducing calories per serving.
FAQ
Conclusion
This recipe stands out for the joyful contrast it creates between creamy ice cream and crunchy cookie layers. If you enjoy make ahead desserts that look impressive with minimal effort, this is a perfect option to add to your repertoire. Try it at your next gathering, and you will likely find it becomes a requested repeat, bringing a playful, nostalgic finish to any meal.
Homemade Ice Cream Crunch Cake
Equipment
- 8 inch cake pans
- Plastic Wrap
- Large Bowl
- Mixer
- Serving Platter
Ingredients
- 1.5 quarts vanilla ice cream Churned and slightly softened to spread easily between layers, provides creamy sweetness and a smooth vanilla flavor that forms one half of the cake's ice cream base. Helps create contrasting textures when alternated with the chocolate layer and freezes firm to hold the cake shape during assembly and serving.
- 1.5 quarts chocolate ice cream Swirled and softened for spreading, supplies rich cocoa flavor and a dense, chocolaty layer that balances the vanilla ice cream. Contributes decadent mouthfeel and visual contrast while firming up in the freezer to maintain the cake's layered structure.
- 3/4 cup hot fudge sauce Heated until pourable to act as a gooey, chocolatey ribbon between the ice cream layers; adds intense fudgy flavor and glossy texture. Helps bind crushed cookies and ice cream, and provides pockets of warm-like richness even when chilled.
- 12 OREO thins crushed Crushed finely to create crunchy contrast and distribute chocolate cookie flavor throughout the cake; adds texture and a pleasant crumbly bite. Acts as a crunchy layer that complements the smoothness of the ice cream and helps vary the mouthfeel in each slice.
- 1 1/2 cups heavy whipping cream Whipped to soft peaks to form a light, airy topping or filling layer that offsets the dense ice cream; adds richness and stabilizes decorations. Provides a silky finish that can be sweetened and flavored to enhance overall creaminess while helping to hold sprinkles in place.
- 1/4 cup sugar Granulated to dissolve into the whipped cream, supplying sweetness and helping to stabilize the whipped texture. Balances the cold dessert's flavors and ensures the cream holds volume for an attractive, scoopable topping.
- 1 teaspoon vanilla Added to the whipped cream to introduce warm vanilla aromatics and round out sweetness; enhances overall flavor harmony between layers. Small quantity intensifies vanilla notes without altering texture noticeably.
- rainbow sprinkles or other decorations as desired. Used sparingly to decorate the finished cake, offering bright color and playful visual appeal while adding a slight sugary crunch. Allows for customization of appearance and can signal portions or festive themes without changing the core flavors.
Instructions
- Remove ice cream from the freezer and defrost about 15 minutes.: The softened ice cream should smell cool and milky rather than melted liquor, and it should give slightly under a spoon but still hold some shape. This short window allows the ice cream to spread smoothly without becoming soupy, which helps avoid air pockets. A common mistake is letting it sit too long, causing runoff and an uneven final texture, so watch the clock and check consistency every five minutes.
- While ice cream is softening, line two 8-inch cake pans well with plastic wrap, leaving several inches of overhang.: You will notice the plastic wrap glinting as it smooths over the pan, and having generous overhang makes unmolding effortless. This step prevents the ice cream from bonding to the pan and protects sharp edges when you remove layers. Avoid skipping the overhang, as wrestling the cake out with small edges can tear the layers.
- Spoon soft ice cream into each prepared pan, pressing down to remove air bubbles as you go. Cover with plastic wrap and press down evenly to smooth the top. Freeze for 8-12 hours or until hardened.: As you press, the surface will grow smooth and compact, with a soft hiss as air escapes and the ice cream settles. Removing air pockets ensures even density and tidy slices. One trap is overpacking which can cause bulging seams, so press firmly but evenly to maintain a flat top.
- 1 hour before assembling cake, place serving platter into freezer. (Make sure your platter can freeze!): The plastic wrap will take the imprint of your hand as you smooth, and this creates a polished finish that freezes into place. A smooth top prevents uneven stacking later on, and it makes assembling the cake neater. If you see any drips or stray crumbs, wipe them away before freezing to avoid icy blemishes.
- Place heavy cream, sugar and vanilla into a large bowl and whip until stiff peaks form. Refrigerate.: The ice cream should become solid and unyielding, with no sag when you nudge the top. Proper freezing time guarantees clean slices and stable layers during assembly. Do not rush this step, as insufficient freezing leads to squashed layers and messy presentation when you stack the cake.
- To assemble cake: remove ice cream layers and serving platter from freezer. Unwrap the tops of the ice cream layers and using the excess plastic wrap, remove layers from pans. Place chocolate layer on the bottom. Smooth an even layer of hot fudge over the chocolate layer, leaving a 1/2 inch border. Sprinkle crushed OREO thins over hot fudge and press down gently. Add vanilla layer overtop. Spread whipped cream overtop of the entire cake, add sprinkles as desired and freeze until ready to serve.: A chilled platter reduces melt while you transfer layers, and you may hear a faint cold snap as the platter chills. This small preparation helps maintain firm edges when you move the cake. Forgetting this will increase condensation and can soften the bottom layer prematurely.
- Place heavy cream, sugar and vanilla into a large bowl and whip until stiff peaks form: As you whip, the cream will thicken, turning from glossy ribbons to peaks that stand tall; you will smell the sweet aroma of vanilla . Stiff peaks give structure for spreading and help the topping hold shape on the frozen cake. Underwhipping results in runny frosting, while overwhipping can turn the cream grainy, so stop when peaks hold firmly.
- Refrigerate: Cooling the whipped cream briefly keeps it stable and prevents it from melting the frozen layers during assembly, and the bowl will feel cool to the touch. Chilled whipped cream spreads more cleanly, minimizing slippage. If you skip refrigerating, the topping may become soft and slide off the ice cream under ambient heat.
- To assemble cake: remove ice cream layers and serving platter from freezer : You should feel the solid chill under your fingers and see perfectly frozen, flat surfaces on the ice cream rounds. Working quickly keeps edges crisp and avoids melting. If the kitchen is warm, an extra minute in the freezer for the platter or layers will prevent smearing during transfer.
- Unwrap the tops of the ice cream layers and using the excess plastic wrap, remove layers from pans: The layers should lift out smoothly under the plastic wrap, revealing clean sides, and you may hear a soft crack as the frozen edge releases. This technique preserves the integrity of the layers and prevents tearing. If the layer resists, return the pan to the freezer briefly instead of forcing it, which can crack the cake.
- Place chocolate layer on the bottom: When you set the chocolate ice cream layer down, its dark surface looks dense and glossy, creating a sturdy base. Position it carefully so the edge is aligned to ensure even stacking. Sliding or misalignment here makes subsequent layers uneven, so adjust while the layers are still solid.
- Smooth an even layer of hot fudge over the chocolate layer, leaving a 1/2 inch border: The hot fudge sauce should spread shiny and thick, creating a semi firm middle that contrasts with ice cream. Leaving a border prevents the fudge from oozing over when you add the next layer. If you apply too much fudge, it may squeeze out the sides when pressed, so aim for a controlled, thin ribbon rather than a puddle.
- Sprinkle crushed OREO thins over hot fudge and press down gently: The crumbs will sink slightly into the fudge, creating a satisfying crunch layer; you will see tiny dark flecks against the sauce. Press gently so the crumbs adhere without compacting into a dense slab. Pressing too hard flattens the texture and makes the crunch less distinct, so use a light hand.
- Add vanilla layer overtop: Place the vanilla ice cream round carefully, aligning it with the bottom layer; the contrast between light and dark looks striking. The top should sit flush, creating a compact stack. If the vanilla layer is uneven, press lightly to align, but avoid forcing it which could displace the crunchy middle.
- Spread whipped cream overtop of the entire cake, add sprinkles as desired and freeze until ready to serve: The whipped topping should sweep smoothly across the frozen surface, creating soft peaks and a snowy finish that holds sprinkles in place. Sprinkles add color and a tiny extra crunch. Let the assembled cake refreeze fully to ensure neat slices, and avoid cutting too soon which will produce smear rather than clean wedges.
Notes
- Single Flavor Layer — Use three quarts of one flavor of ice cream if you prefer uniform taste, which simplifies assembly and emphasizes a single profile for guests who love a pure chocolate or vanilla experience.
- Different Cookie Crunch — Swap the OREO thins for crushed wafer cookies or salted shortbread to alter the sweet salt balance, keeping the same pressing technique so the crumbs adhere to the hot fudge sauce.
- Decor Swap — Replace rainbow sprinkles with chopped nuts or toasted coconut for a more grown up finish, applying them immediately after spreading the whipped cream so they stick well.
- Mini Cakes — Make individual servings using small ramekins or muffin tins lined with plastic wrap for faster freezing and charming single portion presentations.
- Make Ahead Strategy — Freeze layers separately for up to three days and assemble on the event day; this keeps slices neater and reduces last minute stress.