Healthy Fish Sticks Recipe with Cucumber Dill Sauce
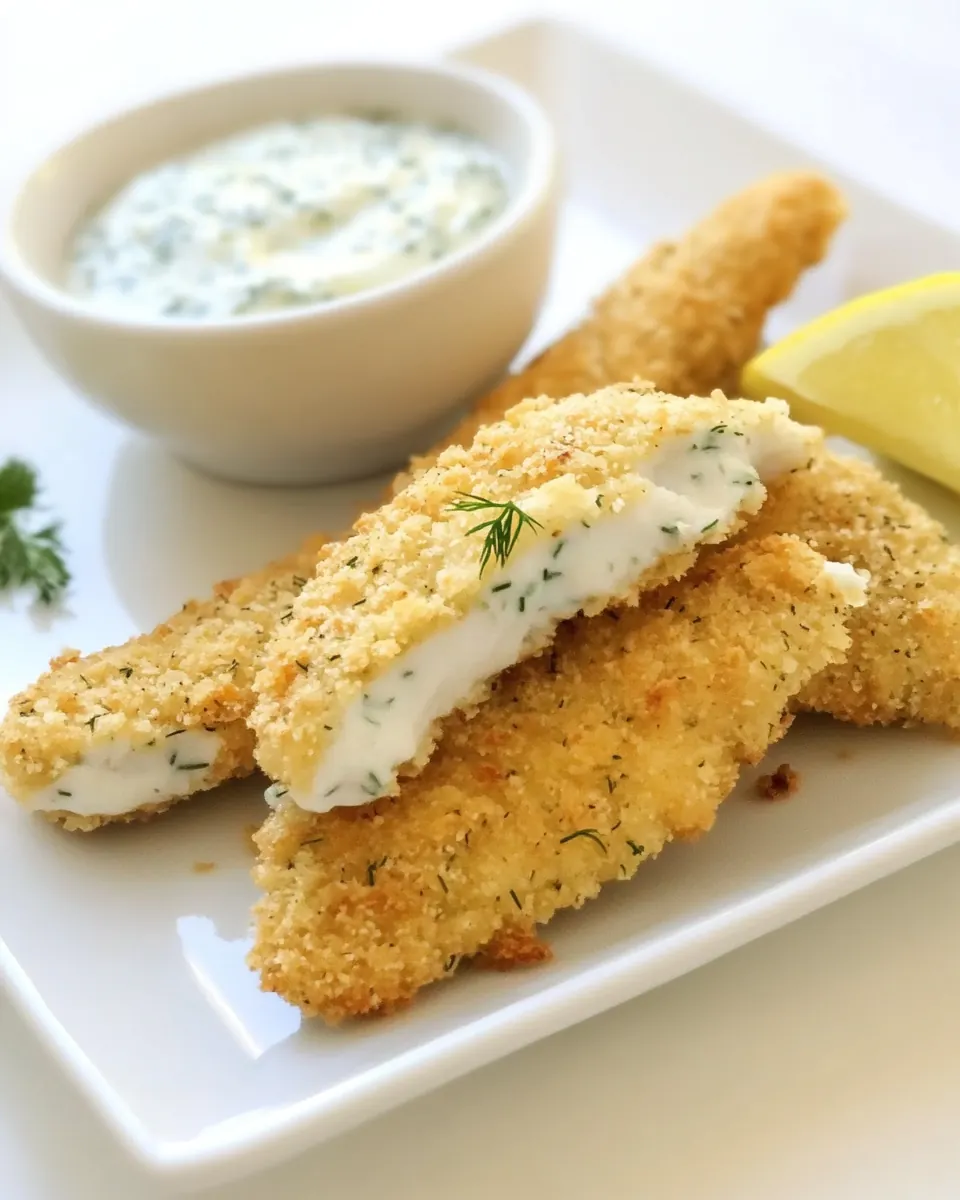
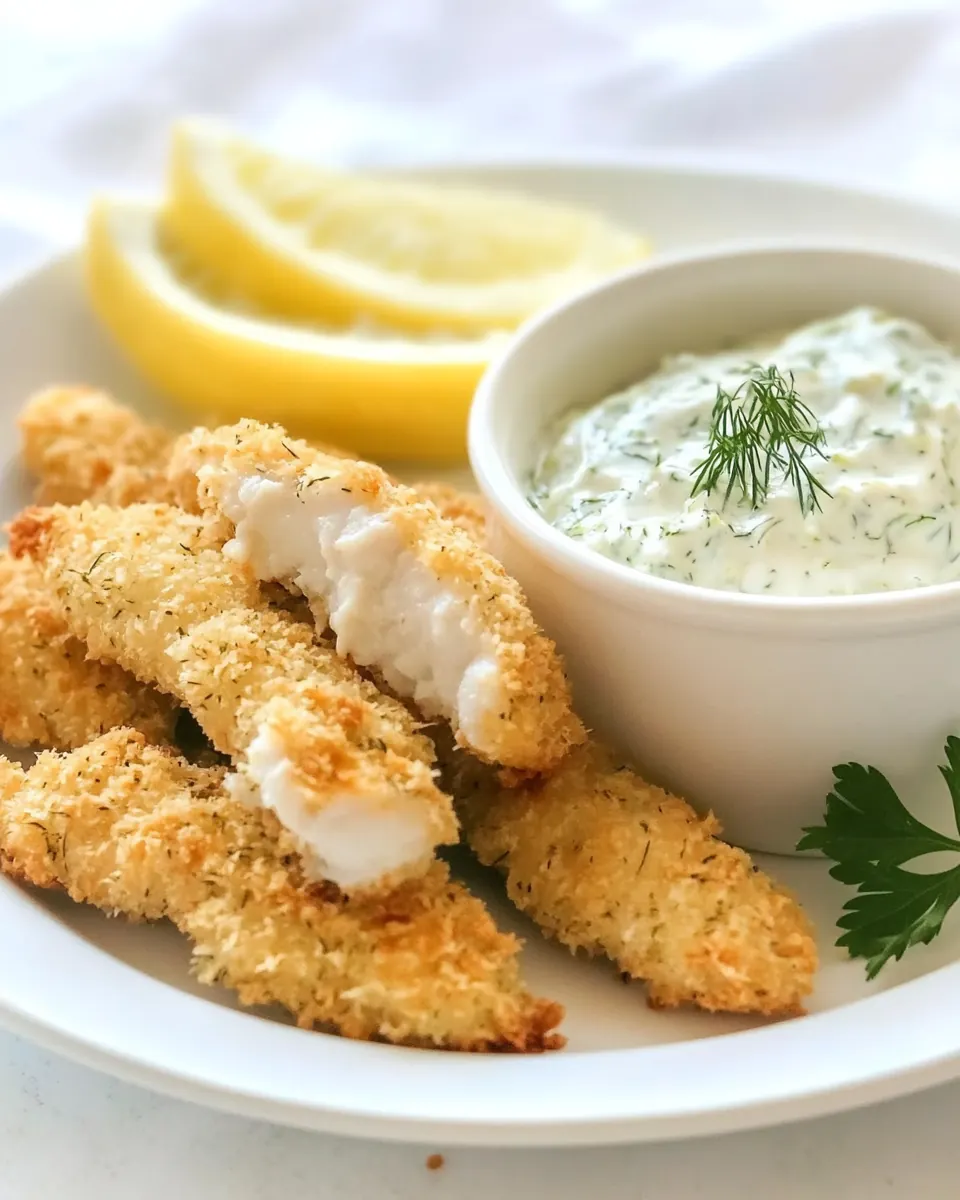
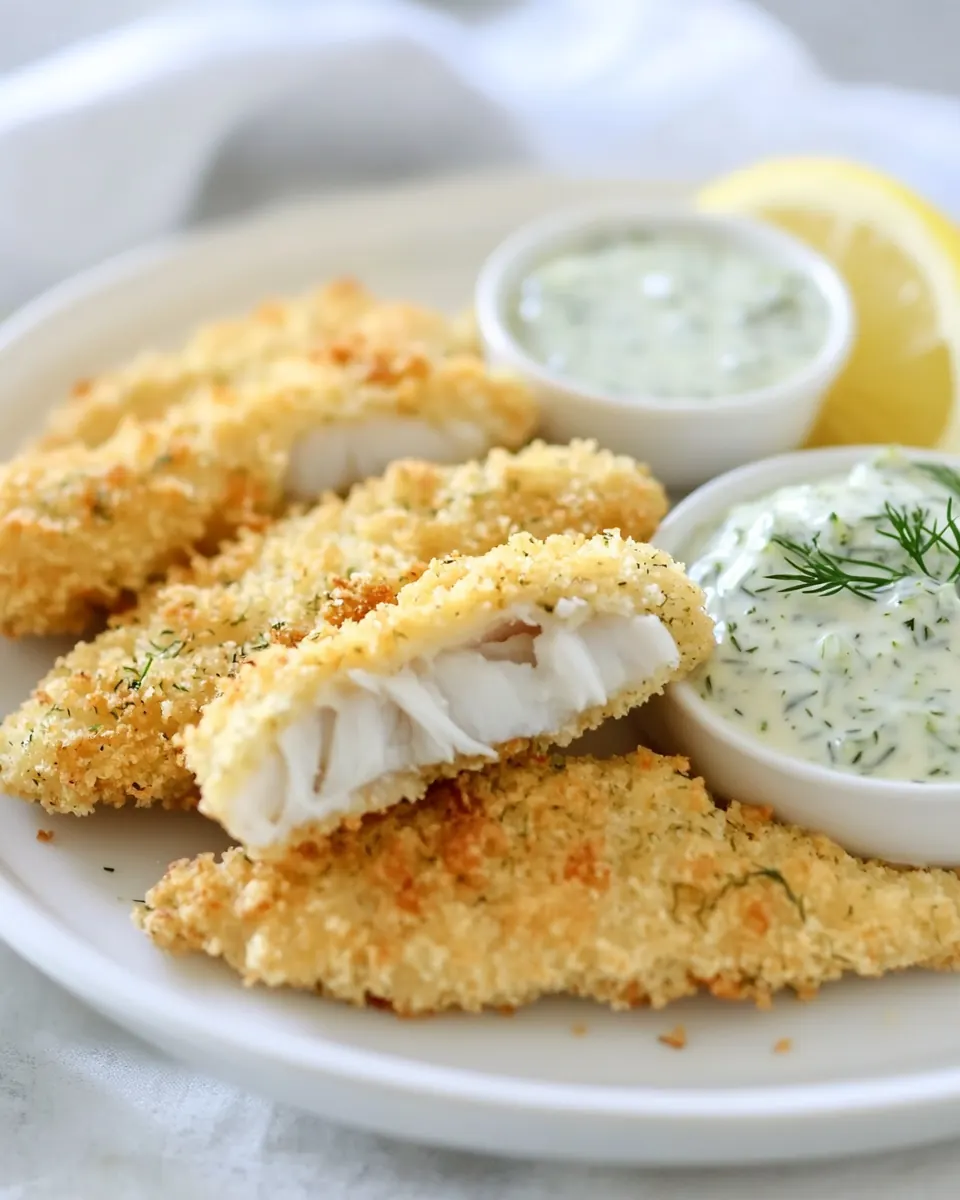
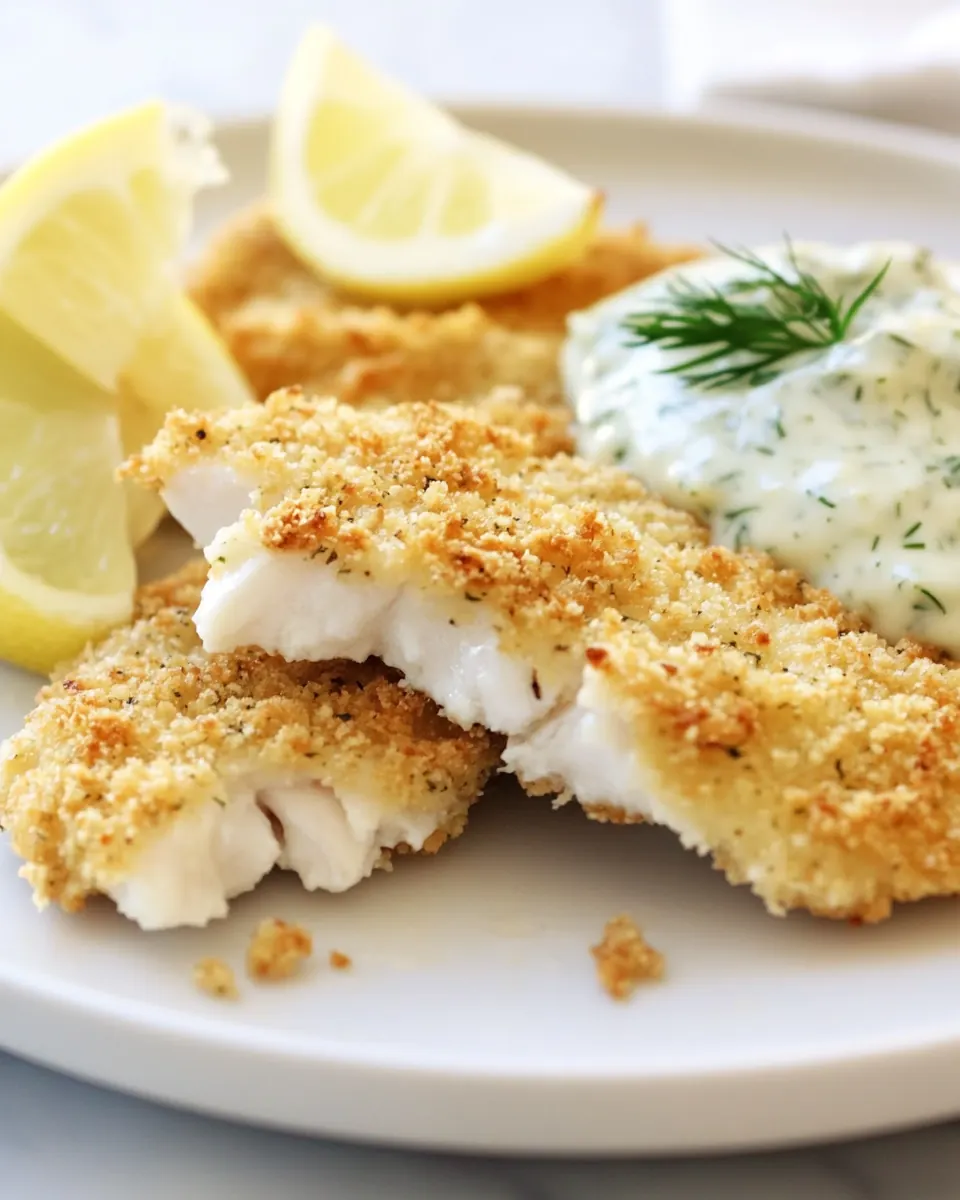
Healthy Fish Sticks Recipe with Cucumber Dill Sauce is one of those dishes I revert to when I want something that feels both nostalgic and fresh, a meal that comforts without weighing you down. The first time I made these I remember the sizzle as the panko hit the hot baking sheet, and how the kitchen filled with a warm, toasty aroma that made everyone wander in for a peek. I love how the crunchy exterior contrasts with the tender, flaky tilapia, and how a cool cucumber and dill sauce brightens each bite.
Growing up, fish sticks were the ultimate simple supper, but I wanted to elevate that childhood memory into something we actually look forward to. I swapped heavy batters for a crisp panko bread crumbs crust and kept the sauce light with low fat sour cream and a touch of mayonnaise for silkiness. The result feels celebratory yet wholesome, perfect for feeding a family or impressing friends with minimal fuss. I often serve these with lemon wedges, because that bright squeeze of lemon lifts the whole plate.
Recipe Snapshot
30 mins
15 mins
15 mins
Easy
350 kcal
American
Gluten-Free, Low FODMAP
Dinner
Baking sheet, Silicone baking mat or parchment paper, Three shallow bowls, Wire rack
Why This Healthy Fish Sticks Recipe with Cucumber Dill Sauce Works
Crispy without the guilt
I love that these Healthy Fish Sticks Recipe with Cucumber Dill Sauce give you a satisfyingly crunchy bite without deep frying. Baking the coated tilapia keeps the texture light, and the panko bread crumbs toast up golden, giving you that classic crunch with fewer calories. For busy weeknights, that’s a huge win in my house.
Simple, clean flavors
We rely on a handful of clean ingredients to do the heavy lifting. The mild white fish pairs perfectly with the bright, herby dill and crisp cucumber in the sauce, creating balance. I always appreciate recipes where each component sings on its own, and this one does just that.
Speed and approachability
When time is tight, this recipe shines. The dredging station is straightforward, and the baking step is largely hands off, so you can prep a quick salad or set the table while the oven does the work. I find that the method is forgiving for cooks of all skill levels, which makes it my go to when friends pop in unexpectedly.
Kid friendly, adult approved
These fish sticks have a universal appeal. Kids love the crunchy coating and familiar shape, while adults appreciate the fresher sauce and lighter technique. I often let little hands help with dredging, which turns dinner prep into a fun activity rather than a chore.
Versatile serving options
I adore how adaptable this dish is. Serve it for casual lunches, light dinners, or as a crowd pleasing appetizer platter. The lemon wedges and cool cucumber dill sauce make it feel a bit fancy, so it’s great for entertaining without a lot of stress.
What You’ll Need for Healthy Fish Sticks Recipe with Cucumber Dill Sauce
These ingredients are chosen to create a harmony of texture and flavor. The tilapia provides a mild, flaky base that lets the crispy panko bread crumbs shine. A small dredging station of all purpose flour and beaten eggs ensures an even, crunchy coating. For the sauce, low fat sour cream and a touch of mayonnaise bring creaminess, while crisp cucumber and aromatic green onion add freshness and bite.
- 1 1/5 lb s. fresh tilapia filets or other white fish such as cod: Provide flaky, lean protein and mild flavor to form the main component of the fish sticks; slice into strips and season before dredging for optimal texture and even cooking. Offer a firm yet tender bite when baked or pan-fried, making them suitable for a healthier preparation. Pair well with the crunchy panko coating and the cooling cucumber dill sauce for balanced flavor.
- 1/3 cup all purpose flour: Act as a light coating binder that helps the egg adhere to the fish and panko without weighing it down; whisk with seasoning for even distribution. Create a thin flour layer that promotes browning and provides initial structure to the breading. Use sparingly to prevent a gummy crust while ensuring the panko sticks properly.
- 2 eggs: Bind the breading to the fish and add moisture to create a cohesive crust that crisps when cooked; whisk eggs until smooth for even adhesion. Contribute richness to the coating process and help the panko color and set during cooking. Adjust quantity if making larger batches to maintain consistent coverage.
- splash milk: Moisten the eggs and flour mixture to loosen the batter slightly and help the coating adhere smoothly; add only a splash to avoid a runny mixture. Contribute subtle fat for tenderness and assist in creating an even exterior on the fish sticks. Use dairy or a milk alternative as preferred for dietary needs.
- 1 3/4 teaspoons creole seasoning divided: Season the fish and flour mixture to impart a balanced, savory heat with Creole aromatics; split the seasoning to layer flavor in both dredge steps. Enhance complexity with paprika, garlic, and cayenne notes while avoiding overpowering the delicate fish. Adjust the amount to taste while keeping some reserved for finishing.
- 1 1/2 cups panko bread crumbs: Provide a light, airy crunch that crisps beautifully in the oven or skillet and creates a restaurant-style texture. Absorb minimal oil compared to heavier crumbs, delivering a crisp exterior while keeping the fish moist inside. Combine with seasonings to ensure every bite has flavorful crunch.
- 1/2 cup low fat sour cream: Contribute tangy creaminess to the cucumber dill sauce while keeping calories lower than full-fat alternatives; balance moisture and acidity for a refreshing dip. Help bind the chopped cucumber and green onion into a smooth sauce that complements the fried texture. Adjust seasoning to taste for desired tang.
- 1/4 cup mayonnaise: Add richness and a smooth emulsified base to the sauce, enhancing mouthfeel and carrying the herbs and aromatics. Combine with sour cream to create a balanced, slightly tangy dip that complements the seasoned fish sticks. Use a light mayonnaise if preferred to reduce fat while maintaining creaminess.
- 1 green onion sliced – white and light green parts: Provide a mild, oniony crunch and fresh aromatic lift to the sauce; use white and light green parts for a tender bite without overpowering. Slice thinly to distribute flavor evenly and add subtle visual contrast and freshness. Adjust quantity to taste for desired bite and pungency.
- 1/3 cup cucumber peeled and finely diced: Add a cool, crisp texture and mild watery sweetness to the sauce while contributing hydrating freshness; peel and finely dice to prevent excess moisture. Disperse small pieces throughout the dip for pleasant contrast with the crunchy fish sticks. Pat dry slightly if needed to avoid thinning the sauce.
- 1/4 teaspoon dried dill: Impart a concentrated herbaceous note to the sauce with a slightly tangy, lemony profile; use sparingly to avoid an overpowering dried flavor. Rehydrate briefly in the sauce as it sits to release aroma and blend with other components. Adjust quantity for stronger dill presence if preferred.
- salt & pepper to taste: Enhance and balance flavors with a mild saline contrast and bright peppery bite, customized to taste; season both the fish and the sauce carefully. Use kosher or sea salt for clearer seasoning and freshly ground pepper for optimal flavor release. Add incrementally to avoid oversalting delicate fish.
- lemon wedges: Provide bright, acidic finishing accents to brighten the fish and cut through richness; serve wedges for squeezing over the cooked sticks just before eating. Offer a fresh citrus aroma and tang that complements the Creole seasoning and creamy dill sauce. Use conservatively to prevent sogginess of the coating.
The Method for Healthy Fish Sticks Recipe with Cucumber Dill Sauce
This method is straightforward and forgiving. I like to set up the dredging station first so the workflow is smooth, then bake the fish until the coating is crisp and the flesh flakes. The sauce comes together in a small bowl and chills while the fish bakes, letting the flavors meld. Below you will find each cleaned step from the original directions followed by an expanded, sensory rich explanation.
- Preheat oven to 350 degrees. Line baking sheet with silicone baking mat or parchment paper and set aside.: The air warms evenly and you will notice a faint hot metal smell as the oven reaches temperature, which primes the baking surface for crisping the panko bread crumbs . Preheating ensures the crust begins to toast right away, preventing sogginess. A common mistake is placing coated fish into a cold oven which leads to a pale, soft crust. If your oven runs hot or cool, use an oven thermometer to confirm accuracy and adjust as needed. Lay out the baking sheet with a silicone mat or parchment so the bottom of the fish does not stick, this also helps promote even browning across the underside of the crumbs. Expect about 10 to 15 minutes for the oven to fully stabilize, and avoid opening the door frequently because that drops heat and lengthens baking time.
- Create dredging station by placing flour in one shallow bowl, eggs, milk, and 1/4 teaspoon creole seasoning in a second shallow bowl and panko and remaining creole seasoning in the third bowl. Whisk eggs and milk to combine. Stir panko with seasonings. Cut tilapia filets into strips and dredge in flour, then egg mixture, then panko. Place on baking sheet. Repeat with remaining pieces of fish.: At the start you will smell the faint toasted scent of the creole seasoning as you mix it into the crumbs and eggs, which foreshadows the savory notes it will impart. Setting up three shallow bowls keeps your hands free and your workflow efficient, minimizing dropped crumbs and messy counters. Use a fork or whisk to beat the eggs and milk until slightly frothy, which helps the mixture adhere. Stir the panko bread crumbs and the remaining seasoning with a fork to break up clumps and ensure even distribution. A frequent error is skipping the flour step which weakens adhesion, causing crumbs to fall off during baking. Keep the bowls lined up in the order of use to maintain rhythm and reduce cross contamination. If the batter becomes too runny, press the pieces into the crumbs and then rest them for a minute before baking to let the coating set.
- Bake 12-15 minutes depending on how thick your fish is. Fish is completely cooked when opaque and flakes easily. Remove and set aside.: You will notice the eggs lighten in color and the surface will become slightly frothy when adequately whisked, which helps the coating cling. This airy texture allows small pockets of steam to form under the crust while baking, aiding in lift and preventing an overly dense crust. Whisking also integrates the creole seasoning into the wet mix so the seasoning penetrates the interior of the coating. Avoid over whisking to the point of incorporating too much air, which can cause the coating to bubble and flake off. If your mixture looks separated or watery, whisk a bit longer until homogenous, and keep cold ingredients from chilling the mixture too much as it reduces adhesion.
- Combine all ingredients together in a small bowl and refrigerate until ready to serve.: When you mix the panko bread crumbs with the creole seasoning, the crumbs will take on a faint aromatic note, and when pressed between your fingers you should feel them remain light rather than clump. This seasoning step is crucial because it layers flavor directly into the crust. If the crumbs feel damp or clumpy, spread them on a tray and toast briefly in the oven to revive their crispness before coating. A common misstep is packing the crumbs into the bowl, which compacts them and yields a heavy, uneven crust. Instead, fluff them with a fork and toss gently to keep texture airy and uniform.
- Squeeze lemon wedges over warm fish and top with sauce.: As you cut the tilapia into strips, notice the raw fish should feel firm and slightly moist, not slimy. Dredging in the all purpose flour first creates a dry surface that helps the egg adhere, while the egg and milk mixture gives a tacky layer for the panko bread crumbs to cling to. Press the crumbs gently onto the fish so they adhere but do not compact them, preserving the panko's texture. You'll hear a soft patting sound as you press the crumbs and see them settle into an even coating. A common error is rushing the process and skipping the flour step which leads to a patchy crust. If crumbs fall away during transfer, press them on again and let the coated pieces rest briefly to set before arranging on the baking sheet.
- Place on baking sheet: Arrange the coated strips on the prepared baking sheet with a little space between each piece so hot air can circulate and crisp each side. When you transfer them, you should see the coating intact, and the surface should glisten slightly from the egg wash, not be wet or dripping. If pieces are crowded, they steam rather than crisp, so leave room. Using a silicone mat or parchment prevents sticking and encourages even browning on the bottom. A mistake to avoid is placing the fish too close together which yields a soggy underside; give each strip breathing room and rotate the pan halfway through baking if your oven has hot spots.
- Repeat with remaining pieces of fish: Repeat the dredging and placing process with the rest of the tilapia , keeping a rhythm so the first pieces do not sit too long before baking, which can cause the coating to loosen. As you work, you can briefly chill finished pieces if you need to pause, which firms the coating and reduces crumb fall off. Avoid stacking or overlapping pieces which will ruin the crust. If you notice excess flour dusting the surface, gently shake it off before the egg bath to prevent flour clumps in the final crust.
- Bake 12-15 minutes depending on how thick your fish is: In the oven you will hear faint pops as the crumbs toast and smell a warm, toasty aroma from the panko bread crumbs . The exact time depends on thickness, so start checking at 10 minutes if your strips are thin. Bake until the fish is opaque and flakes easily with a fork, which is the true indicator of doneness. Overbaking dries the fish, while underbaking leaves it translucent and soft at the center. Use a fork to test the thickest piece, and if it flakes cleanly, it is done. If unsure, insert an instant read thermometer into the thickest part; it should read 145 degrees F for fully cooked white fish.
- Fish is completely cooked when opaque and flakes easily: During this stage you will notice the flesh turn from translucent to an even opaque white and the surface will exhibit golden brown points where the panko toasted. The flakes should separate with gentle pressure from a fork, and the texture should be moist and tender. Resist the urge to slice into multiple pieces to check doneness, as that releases juices and can dry the fish. A frequent mistake is assuming golden crust equals done; always confirm by checking the center. After removing from the oven, let the fish rest briefly to allow carryover heat to finish cooking gently.
- Remove and set aside: Lifting the baked strips off the pan you will feel the warmth and notice the crispness of the coating. Place them on a wire rack if possible to keep the bottom crisp rather than resting on a plate where steam can soften the crust. This brief rest also lets the surface settle so the sauce clings better. Avoid stacking pieces, which traps steam and ruins the texture. If you must hold them for a short time before serving, keep them loosely covered in a low oven to retain warmth and crispness.
- Combine all ingredients together in a small bowl and refrigerate until ready to serve: When you mix the low fat sour cream , mayonnaise , diced cucumber , sliced green onion , dried dill , and salt and pepper, the aroma is bright and slightly tangy, with herb notes rounding the flavor. Chilling the sauce lets the flavors meld and the cucumber release a touch of moisture, which integrates into the creamy base. Taste after chilling and adjust salt or pepper if needed. A common error is making the sauce too far ahead without draining excess cucumber moisture, which can thin the sauce; gently press diced cucumber on a paper towel to remove surplus liquid before mixing if needed.
- Squeeze lemon wedges over warm fish and top with sauce: The final act is sensory rich, the steam rising from the warm fish meets the cool, herby sauce, and the bright citrus from the lemon snaps everything into balance. A quick squeeze of lemon adds acidity that cuts through the richness and enhances the flavors. Spoon the chilled sauce on top or serve it on the side for dipping. Avoid adding the sauce too early to piping hot fish if you want to preserve its cool texture, and serve lemon wedges so each diner can control brightness to taste.
Helpful Notes about Healthy Fish Sticks Recipe with Cucumber Dill Sauce
This list expands on practical pointers I rely on whenever I make these fish sticks. Each tip is a short, focused idea meant to boost texture, flavor, and ease while cooking. I use these notes to keep the process calm and consistent.
- Prep your station: Line up your all purpose flour, egg wash, and panko bread crumbs so the dredging flows quickly and cleanly, which prevents the coating from getting soggy from extended handling.
- Even thickness: Trim or gently pound the tilapia so strips are similar in thickness, ensuring each piece cooks in the same amount of time and none dry out.
- Mild seasoning balance: Split the creole seasoning between the egg wash and the crumbs for even seasoning throughout the crust without making the interior too salty.
- Rest on a rack: After baking, move fish to a wire rack to preserve crisp edges and prevent trapped steam from softening the crust.
- Cucumber prep: Peel and finely dice the cucumber, then pat it dry to keep the sauce thick and spoonable rather than runny.
- Serve lemon on the side: Fresh lemon juice brightens the dish at the last minute, and letting guests add it avoids overpowering those sensitive to acidity.
Best Served With
I like to pair these fish sticks with simple sides that complement the crisp texture and cool sauce. They work well for casual lunches, light dinners, or as part of a spread for a summer gathering. Think seasonal salads and bright, crisp vegetables to echo the cucumber in the sauce. Below are serving ideas, storage suggestions, and occasion notes formatted as a list for easy reference.
- Light green salad: A salad of mixed greens or crisp romaine echoes the refreshing notes in the sauce and provides a crunchy contrast to the tender fish.
- Steamed vegetables: Simple steamed carrots or green beans add color and are quick to prepare alongside the fish for a balanced plate.
- Casual family dinner: These are perfect for a no fuss weeknight meal where everyone can dip and customize with lemon and sauce.
- Summer lunches: Serve chilled leftover fish sticks sliced in a wrap with extra sauce for cooling lunches on warm afternoons.
- Storage tips: Refrigerate leftovers in an airtight container for up to two days, and reheat in a hot oven to restore crispness rather than a microwave which softens the crust.
- Seasonal pairing: The cucumber dill sauce makes this especially lovely in summer when cucumbers and fresh herbs are at their best, but it also works as a bright counterpoint in other seasons.
FAQ
Conclusion
This Healthy Fish Sticks Recipe with Cucumber Dill Sauce stands out because it combines crunchy, golden panko crust with a bright, cooling sauce for a balanced bite that feels both comforting and fresh. Give it a try the next time you want a simple, wholesome meal that comes together quickly and impresses without fuss. I hope it becomes one of your go to recipes for weeknights and laid back gatherings, bringing a little extra crunch and brightness to your table.

Healthy Fish Sticks Recipe with Cucumber Dill Sauce
Equipment
- Baking Sheet
- Silicone baking mat or parchment paper
- Three shallow bowls
- Wire Rack
Ingredients
- 1 1/5 lb s. fresh tilapia filets or other white fish such as cod Provide flaky, lean protein and mild flavor to form the main component of the fish sticks; slice into strips and season before dredging for optimal texture and even cooking. Offer a firm yet tender bite when baked or pan-fried, making them suitable for a healthier preparation. Pair well with the crunchy panko coating and the cooling cucumber dill sauce for balanced flavor.
- 1/3 cup all purpose flour Act as a light coating binder that helps the egg adhere to the fish and panko without weighing it down; whisk with seasoning for even distribution. Create a thin flour layer that promotes browning and provides initial structure to the breading. Use sparingly to prevent a gummy crust while ensuring the panko sticks properly.
- 2 eggs Bind the breading to the fish and add moisture to create a cohesive crust that crisps when cooked; whisk eggs until smooth for even adhesion. Contribute richness to the coating process and help the panko color and set during cooking. Adjust quantity if making larger batches to maintain consistent coverage.
- splash milk Moisten the eggs and flour mixture to loosen the batter slightly and help the coating adhere smoothly; add only a splash to avoid a runny mixture. Contribute subtle fat for tenderness and assist in creating an even exterior on the fish sticks. Use dairy or a milk alternative as preferred for dietary needs.
- 1 3/4 teaspoons creole seasoning divided Season the fish and flour mixture to impart a balanced, savory heat with Creole aromatics; split the seasoning to layer flavor in both dredge steps. Enhance complexity with paprika, garlic, and cayenne notes while avoiding overpowering the delicate fish. Adjust the amount to taste while keeping some reserved for finishing.
- 1 1/2 cups panko bread crumbs Provide a light, airy crunch that crisps beautifully in the oven or skillet and creates a restaurant-style texture. Absorb minimal oil compared to heavier crumbs, delivering a crisp exterior while keeping the fish moist inside. Combine with seasonings to ensure every bite has flavorful crunch.
- 1/2 cup low fat sour cream Contribute tangy creaminess to the cucumber dill sauce while keeping calories lower than full-fat alternatives; balance moisture and acidity for a refreshing dip. Help bind the chopped cucumber and green onion into a smooth sauce that complements the fried texture. Adjust seasoning to taste for desired tang.
- 1/4 cup mayonnaise Add richness and a smooth emulsified base to the sauce, enhancing mouthfeel and carrying the herbs and aromatics. Combine with sour cream to create a balanced, slightly tangy dip that complements the seasoned fish sticks. Use a light mayonnaise if preferred to reduce fat while maintaining creaminess.
- 1 green onion sliced - white and light green parts Provide a mild, oniony crunch and fresh aromatic lift to the sauce; use white and light green parts for a tender bite without overpowering. Slice thinly to distribute flavor evenly and add subtle visual contrast and freshness. Adjust quantity to taste for desired bite and pungency.
- 1/3 cup cucumber peeled and finely diced Add a cool, crisp texture and mild watery sweetness to the sauce while contributing hydrating freshness; peel and finely dice to prevent excess moisture. Disperse small pieces throughout the dip for pleasant contrast with the crunchy fish sticks. Pat dry slightly if needed to avoid thinning the sauce.
- 1/4 teaspoon dried dill Impart a concentrated herbaceous note to the sauce with a slightly tangy, lemony profile; use sparingly to avoid an overpowering dried flavor. Rehydrate briefly in the sauce as it sits to release aroma and blend with other components. Adjust quantity for stronger dill presence if preferred.
- salt & pepper to taste Enhance and balance flavors with a mild saline contrast and bright peppery bite, customized to taste; season both the fish and the sauce carefully. Use kosher or sea salt for clearer seasoning and freshly ground pepper for optimal flavor release. Add incrementally to avoid oversalting delicate fish.
- lemon wedges Provide bright, acidic finishing accents to brighten the fish and cut through richness; serve wedges for squeezing over the cooked sticks just before eating. Offer a fresh citrus aroma and tang that complements the Creole seasoning and creamy dill sauce. Use conservatively to prevent sogginess of the coating.
Instructions
- Preheat oven to 350 degrees. Line baking sheet with silicone baking mat or parchment paper and set aside.: The air warms evenly and you will notice a faint hot metal smell as the oven reaches temperature, which primes the baking surface for crisping the panko bread crumbs . Preheating ensures the crust begins to toast right away, preventing sogginess. A common mistake is placing coated fish into a cold oven which leads to a pale, soft crust. If your oven runs hot or cool, use an oven thermometer to confirm accuracy and adjust as needed. Lay out the baking sheet with a silicone mat or parchment so the bottom of the fish does not stick, this also helps promote even browning across the underside of the crumbs. Expect about 10 to 15 minutes for the oven to fully stabilize, and avoid opening the door frequently because that drops heat and lengthens baking time.
- Create dredging station by placing flour in one shallow bowl, eggs, milk, and 1/4 teaspoon creole seasoning in a second shallow bowl and panko and remaining creole seasoning in the third bowl. Whisk eggs and milk to combine. Stir panko with seasonings. Cut tilapia filets into strips and dredge in flour, then egg mixture, then panko. Place on baking sheet. Repeat with remaining pieces of fish.: At the start you will smell the faint toasted scent of the creole seasoning as you mix it into the crumbs and eggs, which foreshadows the savory notes it will impart. Setting up three shallow bowls keeps your hands free and your workflow efficient, minimizing dropped crumbs and messy counters. Use a fork or whisk to beat the eggs and milk until slightly frothy, which helps the mixture adhere. Stir the panko bread crumbs and the remaining seasoning with a fork to break up clumps and ensure even distribution. A frequent error is skipping the flour step which weakens adhesion, causing crumbs to fall off during baking. Keep the bowls lined up in the order of use to maintain rhythm and reduce cross contamination. If the batter becomes too runny, press the pieces into the crumbs and then rest them for a minute before baking to let the coating set.
- Bake 12-15 minutes depending on how thick your fish is. Fish is completely cooked when opaque and flakes easily. Remove and set aside.: You will notice the eggs lighten in color and the surface will become slightly frothy when adequately whisked, which helps the coating cling. This airy texture allows small pockets of steam to form under the crust while baking, aiding in lift and preventing an overly dense crust. Whisking also integrates the creole seasoning into the wet mix so the seasoning penetrates the interior of the coating. Avoid over whisking to the point of incorporating too much air, which can cause the coating to bubble and flake off. If your mixture looks separated or watery, whisk a bit longer until homogenous, and keep cold ingredients from chilling the mixture too much as it reduces adhesion.
- Combine all ingredients together in a small bowl and refrigerate until ready to serve.: When you mix the panko bread crumbs with the creole seasoning, the crumbs will take on a faint aromatic note, and when pressed between your fingers you should feel them remain light rather than clump. This seasoning step is crucial because it layers flavor directly into the crust. If the crumbs feel damp or clumpy, spread them on a tray and toast briefly in the oven to revive their crispness before coating. A common misstep is packing the crumbs into the bowl, which compacts them and yields a heavy, uneven crust. Instead, fluff them with a fork and toss gently to keep texture airy and uniform.
- Squeeze lemon wedges over warm fish and top with sauce.: As you cut the tilapia into strips, notice the raw fish should feel firm and slightly moist, not slimy. Dredging in the all purpose flour first creates a dry surface that helps the egg adhere, while the egg and milk mixture gives a tacky layer for the panko bread crumbs to cling to. Press the crumbs gently onto the fish so they adhere but do not compact them, preserving the panko's texture. You'll hear a soft patting sound as you press the crumbs and see them settle into an even coating. A common error is rushing the process and skipping the flour step which leads to a patchy crust. If crumbs fall away during transfer, press them on again and let the coated pieces rest briefly to set before arranging on the baking sheet.
- Place on baking sheet: Arrange the coated strips on the prepared baking sheet with a little space between each piece so hot air can circulate and crisp each side. When you transfer them, you should see the coating intact, and the surface should glisten slightly from the egg wash, not be wet or dripping. If pieces are crowded, they steam rather than crisp, so leave room. Using a silicone mat or parchment prevents sticking and encourages even browning on the bottom. A mistake to avoid is placing the fish too close together which yields a soggy underside; give each strip breathing room and rotate the pan halfway through baking if your oven has hot spots.
- Repeat with remaining pieces of fish: Repeat the dredging and placing process with the rest of the tilapia , keeping a rhythm so the first pieces do not sit too long before baking, which can cause the coating to loosen. As you work, you can briefly chill finished pieces if you need to pause, which firms the coating and reduces crumb fall off. Avoid stacking or overlapping pieces which will ruin the crust. If you notice excess flour dusting the surface, gently shake it off before the egg bath to prevent flour clumps in the final crust.
- Bake 12-15 minutes depending on how thick your fish is: In the oven you will hear faint pops as the crumbs toast and smell a warm, toasty aroma from the panko bread crumbs . The exact time depends on thickness, so start checking at 10 minutes if your strips are thin. Bake until the fish is opaque and flakes easily with a fork, which is the true indicator of doneness. Overbaking dries the fish, while underbaking leaves it translucent and soft at the center. Use a fork to test the thickest piece, and if it flakes cleanly, it is done. If unsure, insert an instant read thermometer into the thickest part; it should read 145 degrees F for fully cooked white fish.
- Fish is completely cooked when opaque and flakes easily: During this stage you will notice the flesh turn from translucent to an even opaque white and the surface will exhibit golden brown points where the panko toasted. The flakes should separate with gentle pressure from a fork, and the texture should be moist and tender. Resist the urge to slice into multiple pieces to check doneness, as that releases juices and can dry the fish. A frequent mistake is assuming golden crust equals done; always confirm by checking the center. After removing from the oven, let the fish rest briefly to allow carryover heat to finish cooking gently.
- Remove and set aside: Lifting the baked strips off the pan you will feel the warmth and notice the crispness of the coating. Place them on a wire rack if possible to keep the bottom crisp rather than resting on a plate where steam can soften the crust. This brief rest also lets the surface settle so the sauce clings better. Avoid stacking pieces, which traps steam and ruins the texture. If you must hold them for a short time before serving, keep them loosely covered in a low oven to retain warmth and crispness.
- Combine all ingredients together in a small bowl and refrigerate until ready to serve: When you mix the low fat sour cream , mayonnaise , diced cucumber , sliced green onion , dried dill , and salt and pepper, the aroma is bright and slightly tangy, with herb notes rounding the flavor. Chilling the sauce lets the flavors meld and the cucumber release a touch of moisture, which integrates into the creamy base. Taste after chilling and adjust salt or pepper if needed. A common error is making the sauce too far ahead without draining excess cucumber moisture, which can thin the sauce; gently press diced cucumber on a paper towel to remove surplus liquid before mixing if needed.
- Squeeze lemon wedges over warm fish and top with sauce: The final act is sensory rich, the steam rising from the warm fish meets the cool, herby sauce, and the bright citrus from the lemon snaps everything into balance. A quick squeeze of lemon adds acidity that cuts through the richness and enhances the flavors. Spoon the chilled sauce on top or serve it on the side for dipping. Avoid adding the sauce too early to piping hot fish if you want to preserve its cool texture, and serve lemon wedges so each diner can control brightness to taste.
Notes
- Prep your station: Line up your all purpose flour, egg wash, and panko bread crumbs so the dredging flows quickly and cleanly, which prevents the coating from getting soggy from extended handling.
- Even thickness: Trim or gently pound the tilapia so strips are similar in thickness, ensuring each piece cooks in the same amount of time and none dry out.
- Mild seasoning balance: Split the creole seasoning between the egg wash and the crumbs for even seasoning throughout the crust without making the interior too salty.
- Rest on a rack: After baking, move fish to a wire rack to preserve crisp edges and prevent trapped steam from softening the crust.
- Cucumber prep: Peel and finely dice the cucumber, then pat it dry to keep the sauce thick and spoonable rather than runny.
- Serve lemon on the side: Fresh lemon juice brightens the dish at the last minute, and letting guests add it avoids overpowering those sensitive to acidity.