Halloween Mini Pizzas
Halloween Mini Pizzas came into my life during a chaotic October when I wanted something playful, fast, and crowd friendly for a neighborhood trick or treat gathering. I remember kneading the pizza dough with sticky fingers while my kids argued over which shapes to cut, and that moment turned a simple snack into a tiny celebration. The first bite, warm and cheesy, made everyone pause and grin, and from that evening on I kept a roll of refrigerated pizza dough in the fridge whenever I needed a no stress, festive nibble.
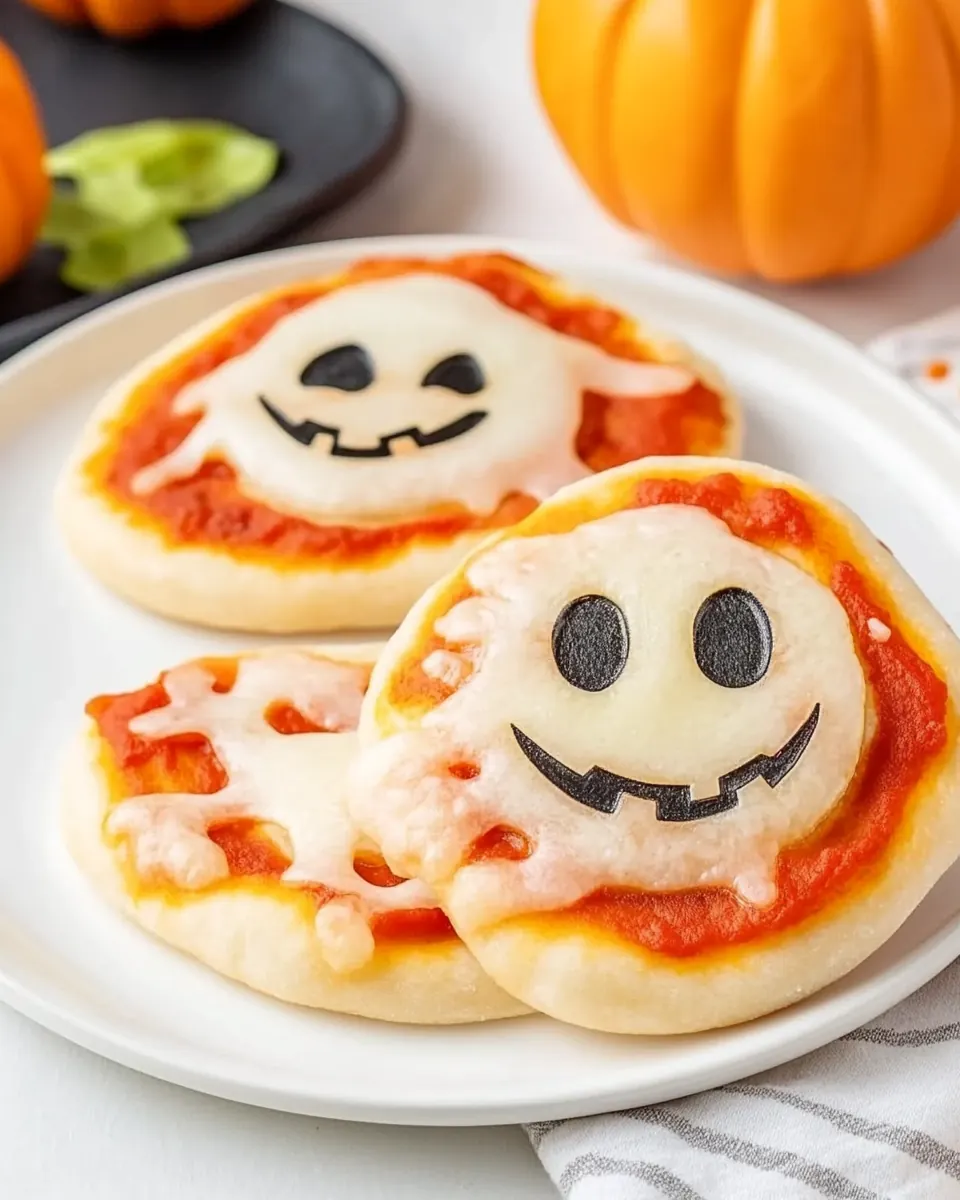
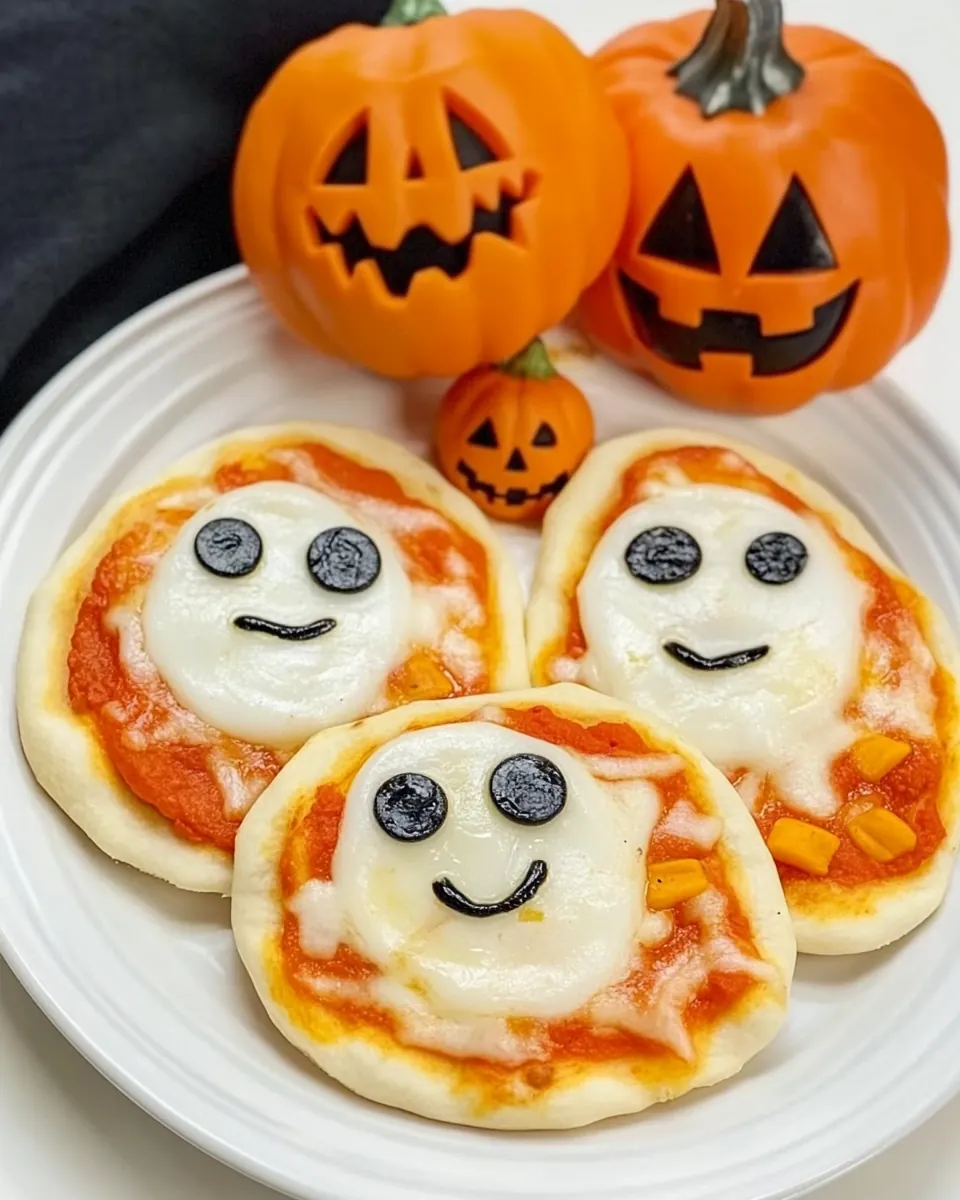
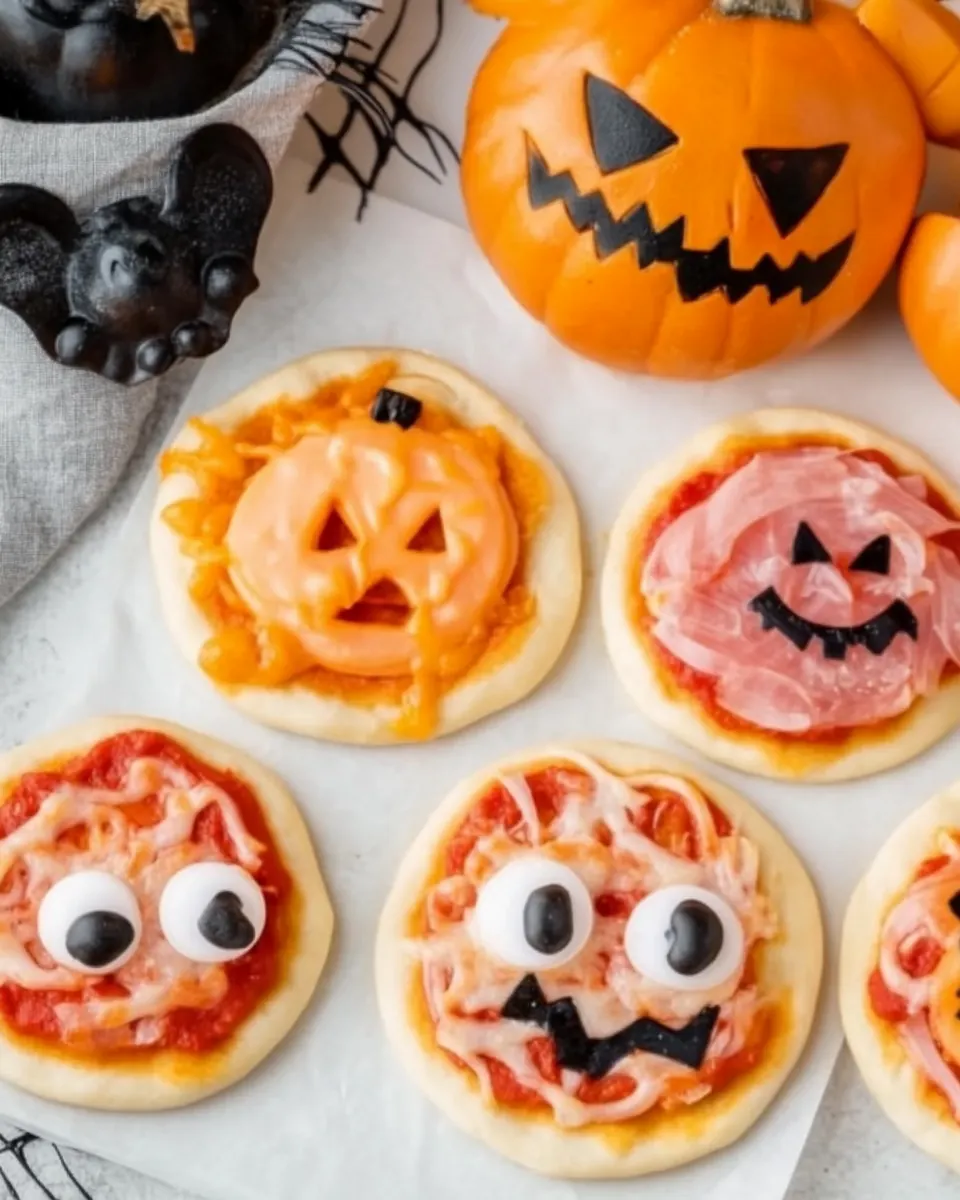
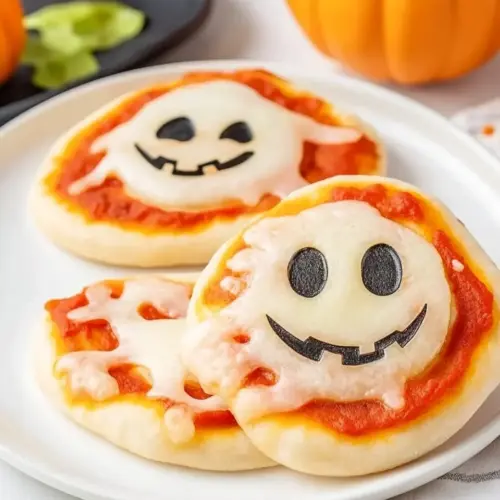
Over time I tweaked the assembly so the faces held their shape, and now I have a small set of tricks that make these little rounds reliably fun. We alternate between spooky jack o lantern smiles, ghostly cutouts, and bat silhouettes, using plain sliced mozzarella cheese and carved colby cheese for contrast. The trickiest part used to be keeping the cheese from drooping into unrecognizable blobs, but adding the cheese near the end of baking changed everything. Guests always ask for the recipe, and I love how a few pantry staples can produce something both simple and showy.
These Halloween Mini Pizzas are a recipe I reach for when I want food that doubles as decor. They travel well to parties, and they are forgiving when kids want to help. I’ll share the little rituals I follow, from how I stretch the pizza dough to how I press the cookie cutters into the cheese so faces stay clear. If you enjoy hands on snacks that bring people together, this is a tiny project worth making again and again.
Recipe Snapshot
27 mins
15 mins
12 mins
Medium
200 kcal
American
Gluten-Free, Low FODMAP
Appetizers
Halloween cookie cutters about 2 inches across in size
Why You’ll Love This Halloween Mini Pizzas
They are incredibly approachable
I love that Halloween Mini Pizzas require only a handful of ingredients and straightforward steps, which means I can involve my kids without feeling like the kitchen will turn into a war zone. No long ingredient lists, no intimidating techniques, just simple assembly and a little creativity. That accessibility makes them perfect for busy weeknights or last minute party plans.
Visual impact for very little effort
One thing that keeps me coming back to Halloween Mini Pizzas is the way they instantly elevate a table. Using cookie cutters to shape the mozzarella cheese and colby cheese creates playful faces that look like you spent ages prepping, when in reality it takes only minutes. I enjoy the surprised smiles when guests realize these are homemade.
Customizable and forgiving
I’m a fan of recipes that bend to what you have on hand, and these mini pizzas are exactly that. Whether you choose to add the optional mini pepperoni or keep them simple with sauce and cheese, the base is resilient. If a crust gets a little thicker or thinner, they still bake evenly, and reheating later keeps them tasty enough for seconds.
Great for group cooking
Making a batch of Halloween Mini Pizzas turns a snack into an activity. I like setting up a little assembly station where everyone can add sauce, choose shapes, and position the black olives for eyes. It becomes a social moment, not just food prep, and that communal element is why I make them for gatherings.
Fast finish with big flavor
These pizzas cook quickly, and I appreciate recipes that deliver warmth and melty mozzarella cheese without long waits. The short bake time means the crust ends up tender with a slight golden edge, while the cheese still looks neat. That combination of speed and delicious results makes them a repeat recipe in my rotation.
Ingredients You’ll Need for Halloween Mini Pizzas

I pick ingredients that work together to create a familiar pizza profile, but on a bite sized scale. The dough forms the canvas, the pizza sauce brings acidity and warmth, and the cheeses provide texture and melt. Small accents like black olives or mini pepperoni turn simple rounds into lively characters. Together these elements keep the flavors balanced while letting the shapes steal the show.
- 13.8 ounces pizza dough one roll refrigerated, can also use homemade see notes: Stretchable and yeasty, provides the base for the mini pizzas and determines crust texture; handle gently to retain air pockets and bake until golden for light, chewy results.
- 1 1/2 cups pizza sauce or any red pasta sauce: Tangy and herbaceous, adds moisture and savory tomato flavor to each bite; spread evenly to build a seasoned sauce layer that complements the cheeses and toppings.
- 1/2 cup mini pepperoni (optional): Sliced and slightly spicy, contributes bursts of meaty flavor and visual contrast; scatter sparingly for balanced taste and to avoid overpowering the other components.
- 2 tablespoons black olives: Briny and rich, supplies deep olive flavor and a dark visual accent ideal for Halloween themes; chop or slice thinly to distribute salty umami across the pizzas.
- 6 slices mozzarella cheese: Mild and melty, creates stretchy, creamy texture when melted and helps bind toppings together; layer or tear slices to cover mini crusts for classic pizza melt.
- 4 slices colby cheese: Sharp and buttery, offers a slightly firmer melt and orange hue useful for festive decorations; slice thin and arrange to provide pockets of pronounced cheddar-like flavor.
How to Prepare Halloween Mini Pizzas
These steps are straightforward, but I always walk through them with a calm, playful approach so the little details shine. Take your time rolling the pizza dough, and set up everything before you preheat the oven. Once you begin, the process moves quickly, so having cookie cutters and cheeses ready keeps things smooth and fun for helpers.
- Preheat the oven to 375 degrees. Spray a baking sheet lightly with spray oil or line with parchment paper.: As the oven warms you should notice a faint, clean heat scent filling the kitchen, signaling the air is ready to crisp the crust. This temperature helps the exterior of the mini crust become slightly golden while the center stays tender, which is key for a pleasant bite. A common issue is placing the tray in before the oven reaches temperature, which can cause an underbaked center; always wait for the full preheat. If your oven runs hot or cool, use an oven thermometer to confirm the actual temperature, ensuring even browning.
- Roll out the pizza dough until flat. Using a round cookie cutter or bowl that is slightly larger than the cookie cutters, cut ten circles from the pizza dough. You can re-roll any scrap dough if necessary.: A well prepared tray prevents sticking and helps the bottom of each mini pizza crisp. The smell is subtle, mostly a neutral warm aroma as the sheet warms in the oven. Avoid over spraying, which can lead to oil pooling and greasy edges; a light mist is sufficient. If you skip this, the underside may adhere and tear when you remove the pizzas, so take this small step to preserve shape and texture.
- Spread a thin layer of pizza sauce onto each pizza dough. Add pepperoni if desired.: When you roll the pizza dough , you want a uniform thickness so all ten circles bake evenly, and you will feel the dough loosen and relax under the rolling motion. A slightly flour dusted surface prevents sticking while keeping the dough tender. Overworking the dough can make it elastic and spring back, which makes cutting circles harder, so let it rest a minute if it resists stretching. If the dough tears, pinch it back together gently rather than reworking it aggressively.
- Bake for 10 minutes without the cheese or until the edges of the dough have just started to brown.: As you press the cutter down you should hear a soft, clean sound as the dough separates, and the edges will look neat and slightly compressed. Arrange the circles with space between them so air can circulate during baking, which helps the bottoms brown. Re rolling scraps works fine, but avoid multiple re rolls that can tighten the gluten and make crusts tougher. If edges look ragged, a quick pinch smooths them out.
- Use the cookie cutters to cut out Halloween shapes from the cheese.: The visual cue is a glossy, even red smear that reaches near the edge but leaves a small rim for a crust. That thin smear keeps the base from becoming soggy and ensures the sauce warms but does not burn before the crust finishes. Using too much sauce can create a wet center and longer bake times, so measure roughly with a teaspoon or small spoon. If a dollop looks heavy, blot the excess on the spoon before spreading.
- Remove the pizzas from the oven and lay the cheese cutouts onto the mini pizzas. Add black olives as eyes.: When you place the optional mini pepperoni , you will see tiny rounds of reddish brown sitting atop the sauce, releasing a savory scent as they warm. Place them sparingly so each face has room for cheese shapes and details. Overcrowding with pepperoni can make the surface greasy and obscure the design, so keep distribution light. If slices curl or release oil, blot lightly with paper towel before the next step to maintain a clean look.
- Place the pizzas back in the oven for about 2 minutes until the cheese has just melted, then serve and enjoy!: During this stage you will notice the aroma of baked dough and a faint toasty note from the edges, and the surface should look set but not golden brown. This partial bake firms the crust so it supports cheese shapes placed later, preventing sagging. A common mistake is baking too long here, which can over brown the rim and dry the base; watch for just a hint of color. Rotate the tray halfway if your oven has hot spots to ensure uniform color.
- Use the cookie cutters to cut out Halloween shapes from the cheese: Pressing the cookie cutters into the mozzarella cheese and colby cheese gives clean silhouettes that will maintain their identity when briefly returned to the oven, and you will hear a soft slice as the cutter passes through. Cutting just before assembly keeps the pieces cool and firm, which helps preserve detail. If the cheese sticks to the cutter, chill the slices for a few minutes or dust the cutter with a little cornstarch to release it cleanly. Avoid pressing too hard which can warp the shape.
- Remove the pizzas from the oven and lay the cheese cutouts onto the mini pizzas: At this point the kitchen fills with a warm, inviting smell and the crusts will feel firm to the touch yet still tender. Place the cheese shapes carefully so they sit on the slightly warm dough, and add black olives as eyes by pressing them gently into the cheese so they adhere. If you rush and return the tray while the pizzas are too hot, the cheese can slump and lose shape, so handle them carefully. If an olive dislodges during placement, press it back in and hold for a second to set.
- Place the pizzas back in the oven for about 2 minutes until the cheese has just melted then serve and enjoy: In these final moments you will see the cheese soften and gleam without fully losing its cut edges, and the smell becomes richly cheesy and slightly toasted. This quick finish melts the surfaces enough to bind toppings while preserving the distinctive shapes you worked to create. A common pitfall is leaving them too long, which can cause the cheese to ooze and blur the design, so watch closely. Serve as soon as the cheese is glossy and slightly set, while warm and inviting.
Recipe Tips about Halloween Mini Pizzas
Small details make these mini pizzas look and taste better. Below are expanded tips that cover timing, assembly, and presentation to help you get consistent results. Each tip begins with a practical phrase to make it easy to skim while you work.
- Prep your station first so you can move smoothly from rolling the pizza dough to cutting shapes and baking without scrambling, which keeps the process calm and helps volunteers stay engaged.
- Use moderate thickness for cheese slices to ensure cutouts hold their shape yet melt quickly, balancing structure and texture for tidy, melty faces.
- Apply sauce sparingly across each mini pizza to avoid soggy centers, aiming for an even glossy smear that leaves a small rim for crust development.
- Choose cookie cutters wisely pick shapes that translate well at small scale, since intricate cutters may lose detail once the cheese softens in the oven.
- Check oven temperature using an oven thermometer if you notice uneven browning, this helps you make small adjustments and avoid over or under baking.
- Keep optional toppings light like the mini pepperoni, which add flavor without overwhelming the cheese cutouts, preserving the visual design.
Pairing Suggestions for Halloween Mini Pizzas
These mini pizzas work well across casual gatherings, holiday buffet tables, or family snack times, and a few complementary items can turn them into a full offering. Consider beverages and side bites that are easy to eat while standing, and think about seasonal touches that echo the Halloween theme.
- Serve with a simple green salad dressed lightly so it complements rather than competes with the savory cheese and sauce flavors, adding a fresh counterpoint to the warm bites.
- Offer a vegetable platter like carrot sticks and cucumber rounds for crunch and color, which pairs well with the rich, melty cheeses on the mini pizzas.
- Set them out for lunch or snack these are perfect for relaxed midday gatherings where guests can graze and mingle, and they fit nicely on a platter with napkins for easy serving.
- Make them a Ramadan iftar snack they warm nicely and provide a quick savory bite after fasting, especially when paired with fresh fruit and a hydrating drink.
- Store leftovers properly cool to room temperature then refrigerate in an airtight container for up to two days, and reheat briefly in a hot oven to revive crispness before serving.
- Seasonal garnish consider adding a scattering of chopped fresh herbs right before serving to bring a bright finish that contrasts with the melted cheeses.
- Occasion presentation arrange them on a platter lined with parchment and tuck in Halloween decor like small pumpkins or themed picks for a festive display that is still easy to clear away.
FAQ
Conclusion
These Halloween Mini Pizzas stand out because they combine playful presentation with straightforward technique, producing warm, cheesy bites that are both festive and fast. I encourage you to gather a few cookie cutters, roll out a refrigerated dough, and let the family join in shaping the faces, because the process is as much fun as the result. Enjoy the cheerful reactions and the simple satisfaction of serving a homemade snack that looks like a party on a platter.
Halloween Mini Pizzas
Equipment
- Halloween cookie cutters about 2 inches across in size
Ingredients
- 13.8 ounces pizza dough one roll refrigerated, can also use homemade see notes Stretchable and yeasty, provides the base for the mini pizzas and determines crust texture; handle gently to retain air pockets and bake until golden for light, chewy results.
- 1 1/2 cups pizza sauce or any red pasta sauce Tangy and herbaceous, adds moisture and savory tomato flavor to each bite; spread evenly to build a seasoned sauce layer that complements the cheeses and toppings.
- 1/2 cup mini pepperoni optional Sliced and slightly spicy, contributes bursts of meaty flavor and visual contrast; scatter sparingly for balanced taste and to avoid overpowering the other components.
- 2 tablespoons black olives Briny and rich, supplies deep olive flavor and a dark visual accent ideal for Halloween themes; chop or slice thinly to distribute salty umami across the pizzas.
- 6 slices mozzarella cheese Mild and melty, creates stretchy, creamy texture when melted and helps bind toppings together; layer or tear slices to cover mini crusts for classic pizza melt.
- 4 slices colby cheese Sharp and buttery, offers a slightly firmer melt and orange hue useful for festive decorations; slice thin and arrange to provide pockets of pronounced cheddar-like flavor.
Instructions
- Preheat the oven to 375 degrees. Spray a baking sheet lightly with spray oil or line with parchment paper.: As the oven warms you should notice a faint, clean heat scent filling the kitchen, signaling the air is ready to crisp the crust. This temperature helps the exterior of the mini crust become slightly golden while the center stays tender, which is key for a pleasant bite. A common issue is placing the tray in before the oven reaches temperature, which can cause an underbaked center; always wait for the full preheat. If your oven runs hot or cool, use an oven thermometer to confirm the actual temperature, ensuring even browning.
- Roll out the pizza dough until flat. Using a round cookie cutter or bowl that is slightly larger than the cookie cutters, cut ten circles from the pizza dough. You can re-roll any scrap dough if necessary.: A well prepared tray prevents sticking and helps the bottom of each mini pizza crisp. The smell is subtle, mostly a neutral warm aroma as the sheet warms in the oven. Avoid over spraying, which can lead to oil pooling and greasy edges; a light mist is sufficient. If you skip this, the underside may adhere and tear when you remove the pizzas, so take this small step to preserve shape and texture.
- Spread a thin layer of pizza sauce onto each pizza dough. Add pepperoni if desired.: When you roll the pizza dough , you want a uniform thickness so all ten circles bake evenly, and you will feel the dough loosen and relax under the rolling motion. A slightly flour dusted surface prevents sticking while keeping the dough tender. Overworking the dough can make it elastic and spring back, which makes cutting circles harder, so let it rest a minute if it resists stretching. If the dough tears, pinch it back together gently rather than reworking it aggressively.
- Bake for 10 minutes without the cheese or until the edges of the dough have just started to brown.: As you press the cutter down you should hear a soft, clean sound as the dough separates, and the edges will look neat and slightly compressed. Arrange the circles with space between them so air can circulate during baking, which helps the bottoms brown. Re rolling scraps works fine, but avoid multiple re rolls that can tighten the gluten and make crusts tougher. If edges look ragged, a quick pinch smooths them out.
- Use the cookie cutters to cut out Halloween shapes from the cheese.: The visual cue is a glossy, even red smear that reaches near the edge but leaves a small rim for a crust. That thin smear keeps the base from becoming soggy and ensures the sauce warms but does not burn before the crust finishes. Using too much sauce can create a wet center and longer bake times, so measure roughly with a teaspoon or small spoon. If a dollop looks heavy, blot the excess on the spoon before spreading.
- Remove the pizzas from the oven and lay the cheese cutouts onto the mini pizzas. Add black olives as eyes.: When you place the optional mini pepperoni , you will see tiny rounds of reddish brown sitting atop the sauce, releasing a savory scent as they warm. Place them sparingly so each face has room for cheese shapes and details. Overcrowding with pepperoni can make the surface greasy and obscure the design, so keep distribution light. If slices curl or release oil, blot lightly with paper towel before the next step to maintain a clean look.
- Place the pizzas back in the oven for about 2 minutes until the cheese has just melted, then serve and enjoy!: During this stage you will notice the aroma of baked dough and a faint toasty note from the edges, and the surface should look set but not golden brown. This partial bake firms the crust so it supports cheese shapes placed later, preventing sagging. A common mistake is baking too long here, which can over brown the rim and dry the base; watch for just a hint of color. Rotate the tray halfway if your oven has hot spots to ensure uniform color.
- Use the cookie cutters to cut out Halloween shapes from the cheese: Pressing the cookie cutters into the mozzarella cheese and colby cheese gives clean silhouettes that will maintain their identity when briefly returned to the oven, and you will hear a soft slice as the cutter passes through. Cutting just before assembly keeps the pieces cool and firm, which helps preserve detail. If the cheese sticks to the cutter, chill the slices for a few minutes or dust the cutter with a little cornstarch to release it cleanly. Avoid pressing too hard which can warp the shape.
- Remove the pizzas from the oven and lay the cheese cutouts onto the mini pizzas: At this point the kitchen fills with a warm, inviting smell and the crusts will feel firm to the touch yet still tender. Place the cheese shapes carefully so they sit on the slightly warm dough, and add black olives as eyes by pressing them gently into the cheese so they adhere. If you rush and return the tray while the pizzas are too hot, the cheese can slump and lose shape, so handle them carefully. If an olive dislodges during placement, press it back in and hold for a second to set.
- Place the pizzas back in the oven for about 2 minutes until the cheese has just melted then serve and enjoy: In these final moments you will see the cheese soften and gleam without fully losing its cut edges, and the smell becomes richly cheesy and slightly toasted. This quick finish melts the surfaces enough to bind toppings while preserving the distinctive shapes you worked to create. A common pitfall is leaving them too long, which can cause the cheese to ooze and blur the design, so watch closely. Serve as soon as the cheese is glossy and slightly set, while warm and inviting.
Notes
- Prep your station first so you can move smoothly from rolling the pizza dough to cutting shapes and baking without scrambling, which keeps the process calm and helps volunteers stay engaged.
- Use moderate thickness for cheese slices to ensure cutouts hold their shape yet melt quickly, balancing structure and texture for tidy, melty faces.
- Apply sauce sparingly across each mini pizza to avoid soggy centers, aiming for an even glossy smear that leaves a small rim for crust development.
- Choose cookie cutters wisely pick shapes that translate well at small scale, since intricate cutters may lose detail once the cheese softens in the oven.
- Check oven temperature using an oven thermometer if you notice uneven browning, this helps you make small adjustments and avoid over or under baking.
- Keep optional toppings light like the mini pepperoni, which add flavor without overwhelming the cheese cutouts, preserving the visual design.