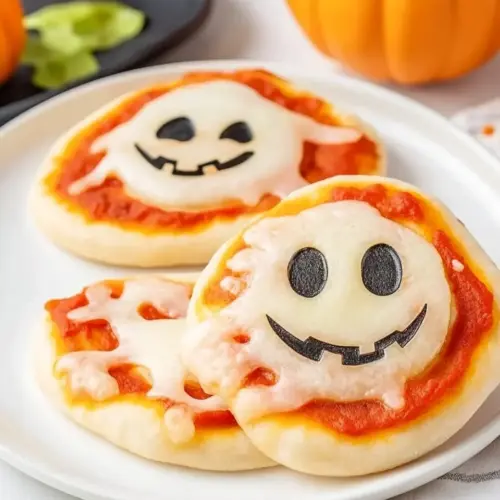
Halloween Mini Pizzas
Halloween Mini Pizzas are crispy edged, cheesy little rounds topped with playful cutout faces, offering a fun and easy weeknight dinner or party snack. Warm, melty mozzarella cheese and colorful colby cheese shapes sit on a tender pizza dough base with bright pizza sauce, making them ideal for festive gatherings. Quick to assemble and crowd pleasing, they are a must make for holiday get togethers.
Equipment
- Halloween cookie cutters about 2 inches across in size
Ingredients
- 13.8 ounces pizza dough one roll refrigerated, can also use homemade see notes Stretchable and yeasty, provides the base for the mini pizzas and determines crust texture; handle gently to retain air pockets and bake until golden for light, chewy results.
- 1 1/2 cups pizza sauce or any red pasta sauce Tangy and herbaceous, adds moisture and savory tomato flavor to each bite; spread evenly to build a seasoned sauce layer that complements the cheeses and toppings.
- 1/2 cup mini pepperoni optional Sliced and slightly spicy, contributes bursts of meaty flavor and visual contrast; scatter sparingly for balanced taste and to avoid overpowering the other components.
- 2 tablespoons black olives Briny and rich, supplies deep olive flavor and a dark visual accent ideal for Halloween themes; chop or slice thinly to distribute salty umami across the pizzas.
- 6 slices mozzarella cheese Mild and melty, creates stretchy, creamy texture when melted and helps bind toppings together; layer or tear slices to cover mini crusts for classic pizza melt.
- 4 slices colby cheese Sharp and buttery, offers a slightly firmer melt and orange hue useful for festive decorations; slice thin and arrange to provide pockets of pronounced cheddar-like flavor.
Instructions
- Preheat the oven to 375 degrees. Spray a baking sheet lightly with spray oil or line with parchment paper.: As the oven warms you should notice a faint, clean heat scent filling the kitchen, signaling the air is ready to crisp the crust. This temperature helps the exterior of the mini crust become slightly golden while the center stays tender, which is key for a pleasant bite. A common issue is placing the tray in before the oven reaches temperature, which can cause an underbaked center; always wait for the full preheat. If your oven runs hot or cool, use an oven thermometer to confirm the actual temperature, ensuring even browning.
- Roll out the pizza dough until flat. Using a round cookie cutter or bowl that is slightly larger than the cookie cutters, cut ten circles from the pizza dough. You can re-roll any scrap dough if necessary.: A well prepared tray prevents sticking and helps the bottom of each mini pizza crisp. The smell is subtle, mostly a neutral warm aroma as the sheet warms in the oven. Avoid over spraying, which can lead to oil pooling and greasy edges; a light mist is sufficient. If you skip this, the underside may adhere and tear when you remove the pizzas, so take this small step to preserve shape and texture.
- Spread a thin layer of pizza sauce onto each pizza dough. Add pepperoni if desired.: When you roll the pizza dough , you want a uniform thickness so all ten circles bake evenly, and you will feel the dough loosen and relax under the rolling motion. A slightly flour dusted surface prevents sticking while keeping the dough tender. Overworking the dough can make it elastic and spring back, which makes cutting circles harder, so let it rest a minute if it resists stretching. If the dough tears, pinch it back together gently rather than reworking it aggressively.
- Bake for 10 minutes without the cheese or until the edges of the dough have just started to brown.: As you press the cutter down you should hear a soft, clean sound as the dough separates, and the edges will look neat and slightly compressed. Arrange the circles with space between them so air can circulate during baking, which helps the bottoms brown. Re rolling scraps works fine, but avoid multiple re rolls that can tighten the gluten and make crusts tougher. If edges look ragged, a quick pinch smooths them out.
- Use the cookie cutters to cut out Halloween shapes from the cheese.: The visual cue is a glossy, even red smear that reaches near the edge but leaves a small rim for a crust. That thin smear keeps the base from becoming soggy and ensures the sauce warms but does not burn before the crust finishes. Using too much sauce can create a wet center and longer bake times, so measure roughly with a teaspoon or small spoon. If a dollop looks heavy, blot the excess on the spoon before spreading.
- Remove the pizzas from the oven and lay the cheese cutouts onto the mini pizzas. Add black olives as eyes.: When you place the optional mini pepperoni , you will see tiny rounds of reddish brown sitting atop the sauce, releasing a savory scent as they warm. Place them sparingly so each face has room for cheese shapes and details. Overcrowding with pepperoni can make the surface greasy and obscure the design, so keep distribution light. If slices curl or release oil, blot lightly with paper towel before the next step to maintain a clean look.
- Place the pizzas back in the oven for about 2 minutes until the cheese has just melted, then serve and enjoy!: During this stage you will notice the aroma of baked dough and a faint toasty note from the edges, and the surface should look set but not golden brown. This partial bake firms the crust so it supports cheese shapes placed later, preventing sagging. A common mistake is baking too long here, which can over brown the rim and dry the base; watch for just a hint of color. Rotate the tray halfway if your oven has hot spots to ensure uniform color.
- Use the cookie cutters to cut out Halloween shapes from the cheese: Pressing the cookie cutters into the mozzarella cheese and colby cheese gives clean silhouettes that will maintain their identity when briefly returned to the oven, and you will hear a soft slice as the cutter passes through. Cutting just before assembly keeps the pieces cool and firm, which helps preserve detail. If the cheese sticks to the cutter, chill the slices for a few minutes or dust the cutter with a little cornstarch to release it cleanly. Avoid pressing too hard which can warp the shape.
- Remove the pizzas from the oven and lay the cheese cutouts onto the mini pizzas: At this point the kitchen fills with a warm, inviting smell and the crusts will feel firm to the touch yet still tender. Place the cheese shapes carefully so they sit on the slightly warm dough, and add black olives as eyes by pressing them gently into the cheese so they adhere. If you rush and return the tray while the pizzas are too hot, the cheese can slump and lose shape, so handle them carefully. If an olive dislodges during placement, press it back in and hold for a second to set.
- Place the pizzas back in the oven for about 2 minutes until the cheese has just melted then serve and enjoy: In these final moments you will see the cheese soften and gleam without fully losing its cut edges, and the smell becomes richly cheesy and slightly toasted. This quick finish melts the surfaces enough to bind toppings while preserving the distinctive shapes you worked to create. A common pitfall is leaving them too long, which can cause the cheese to ooze and blur the design, so watch closely. Serve as soon as the cheese is glossy and slightly set, while warm and inviting.
Notes
- Prep your station first so you can move smoothly from rolling the pizza dough to cutting shapes and baking without scrambling, which keeps the process calm and helps volunteers stay engaged.
- Use moderate thickness for cheese slices to ensure cutouts hold their shape yet melt quickly, balancing structure and texture for tidy, melty faces.
- Apply sauce sparingly across each mini pizza to avoid soggy centers, aiming for an even glossy smear that leaves a small rim for crust development.
- Choose cookie cutters wisely pick shapes that translate well at small scale, since intricate cutters may lose detail once the cheese softens in the oven.
- Check oven temperature using an oven thermometer if you notice uneven browning, this helps you make small adjustments and avoid over or under baking.
- Keep optional toppings light like the mini pepperoni, which add flavor without overwhelming the cheese cutouts, preserving the visual design.