Lime Meringue Tart
Lime Meringue Tart came into my life on a humid afternoon when I needed a bright, uplifting dessert to finish a long week of work.
That first time I baked it, I remember the sharp, citrus scent filling the kitchen as I zested the limes, and how the tang cut through a heavy day like a cool breeze. I kept returning to the recipe because the contrast between the silky, slightly tangy filling and the pillowy egg whites of the meringue was the kind of flavor conversation I love to spark at a dinner table. Over time, I adjusted small things so the texture stayed custardy and the meringue held its shape without becoming grainy.
I also learned how comforting it is to watch the filling thicken on the stovetop, the way the mixture loosens into a glossy, jammy ribbon, and why patience pays off. Guests often ask how I get that glossy sheen on the tart and why the crust stays crisp even after the filling goes in. Those are tricks I treasure, and I enjoy sharing them with anyone who wants to try. The tart has become my go to when I want something that looks celebratory but is reliably simple to pull together.
Recipe Snapshot
50 mins
20 mins
30 mins
Medium
300 kcal
American
Gluten-Free, Low FODMAP
Desserts
Saucepan, Mixing bowl, Stand mixer, Oven, Tart pan
The Appeal of This Lime Meringue Tart
Bright, Concentrated Citrus Flavor
I love how Lime Meringue Tart showcases lime in a way that feels both bold and refined. The lime juice and zest concentrate into a filling that sings, while the sugar balances the acidity so it never tastes sharp. I often tell friends this is the recipe where citrus behaves like a main event, not an accent.
Textural Contrast That Excites
The interplay between the smooth, slightly gelatinous filling and the airy, glossy meringue is what keeps me coming back. When I cut a slice, I want the filling to sit cleanly, yet yield luxuriously under my fork. The crust provides a subtle crunch so every bite has layers, and I find that contrast elevates the whole dessert experience.
Reliable Techniques, Big Payoff
We rely on straightforward methods here, so you can make this tart with confidence. Heating the lime mixture gently and tempering the eggs prevents scrambling, and whipping the whites over warm water before finishing in a mixer gives stability. These steps feel technical at first, but once you get the rhythm, the result is consistently impressive.
Flexible and Crowd Friendly
I frequently bring this tart to gatherings because it travels well and slices into neat portions. Whether you are feeding a small family or a party, the recipe scales and still holds its texture. That reliability makes it a favorite for celebrations and casual get togethers alike.
A Little Theater for the Table
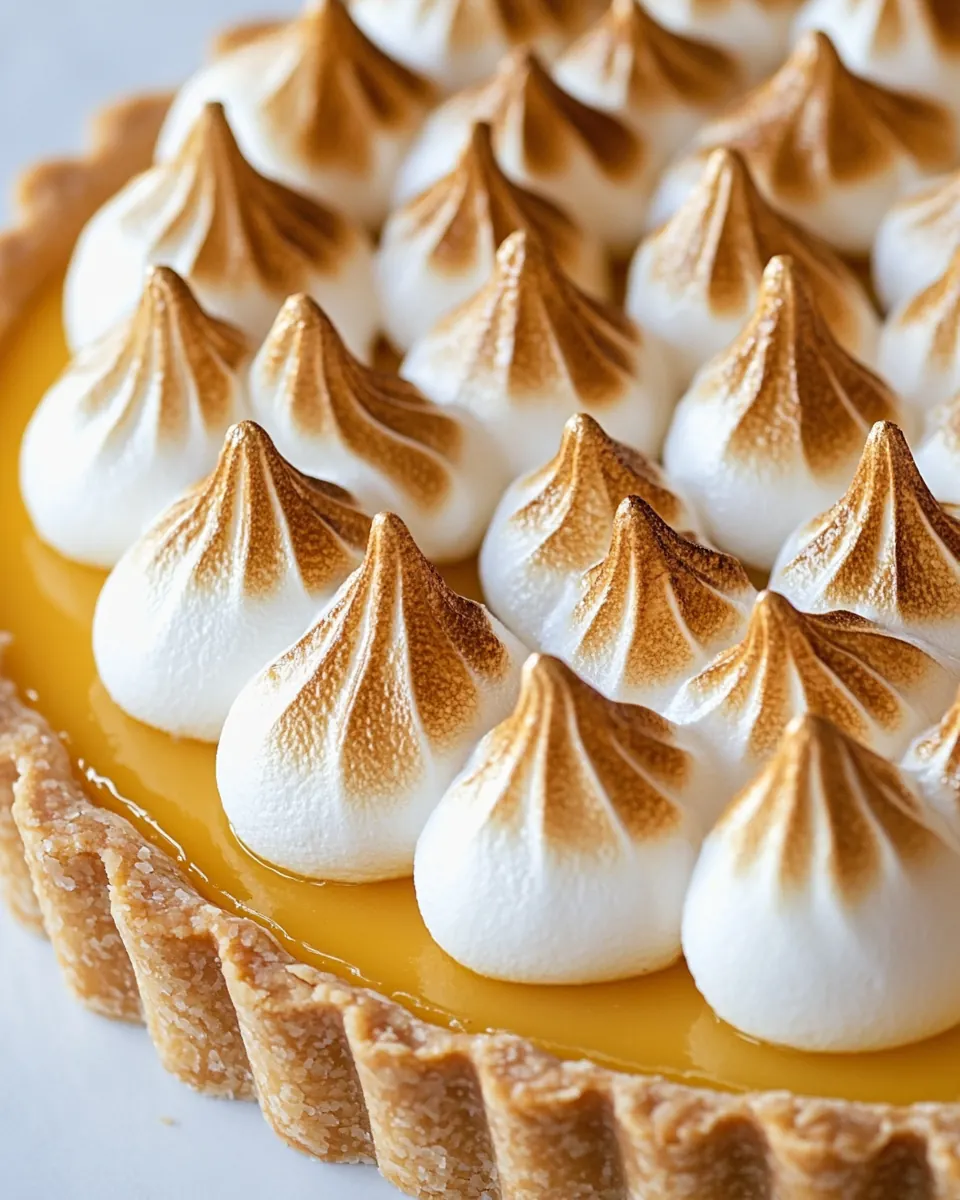
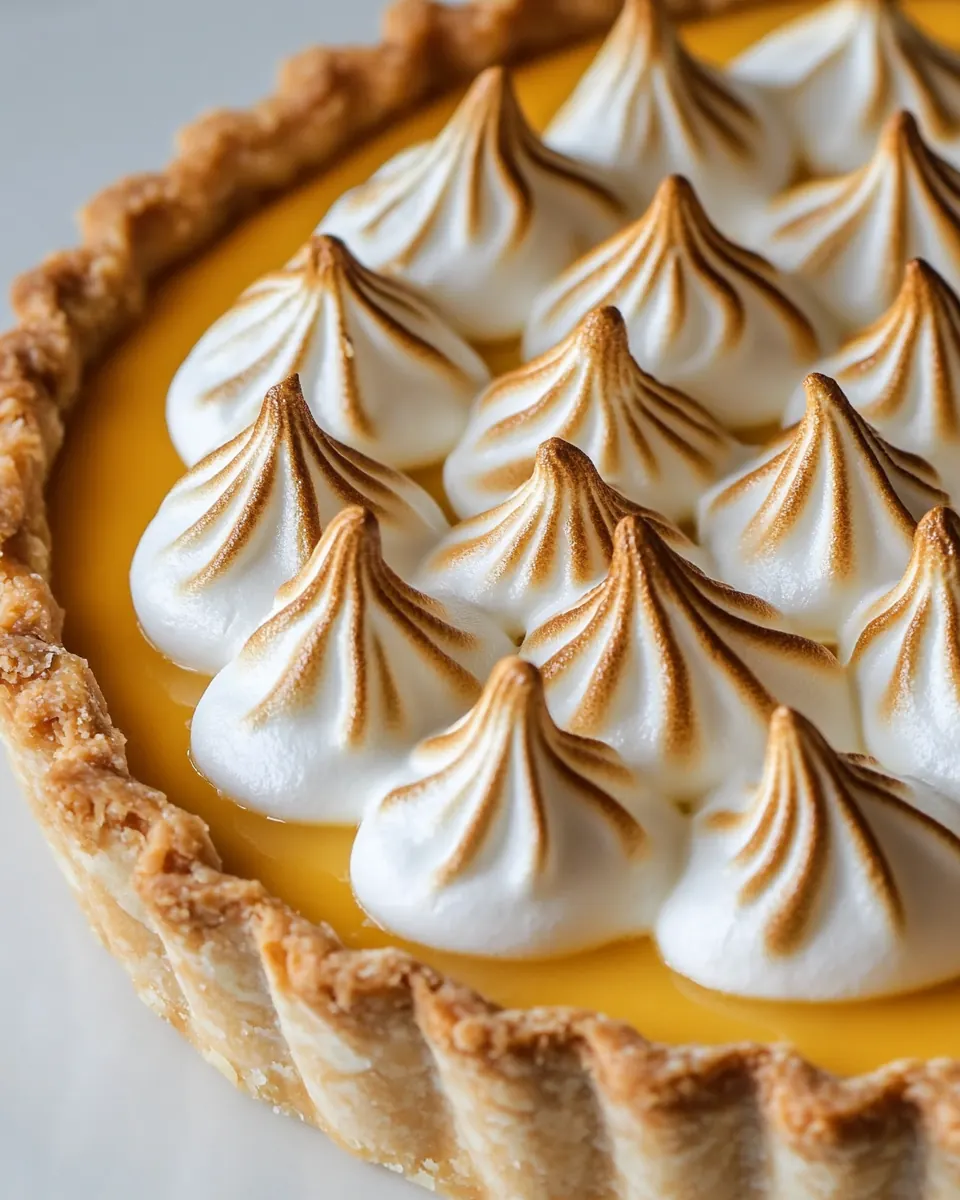
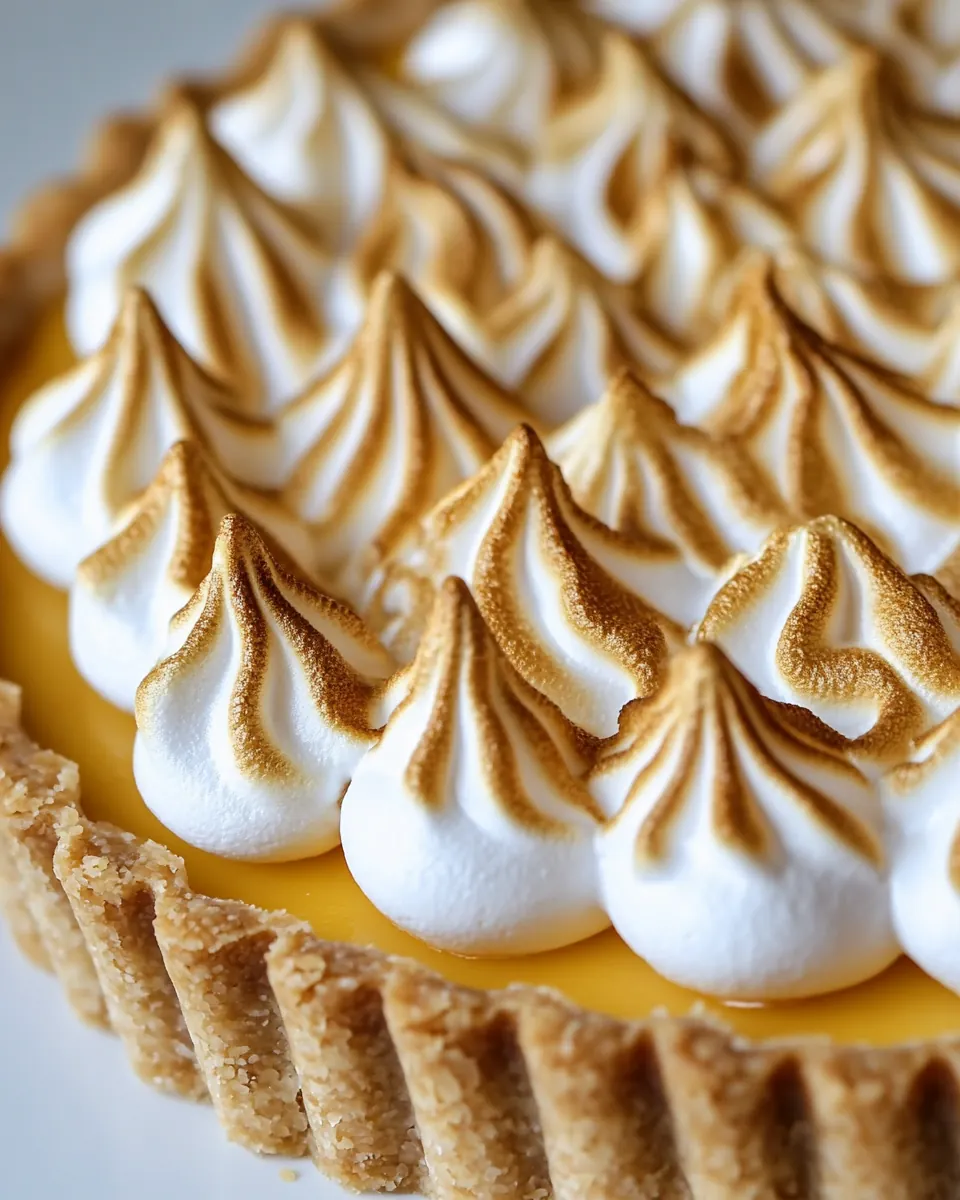
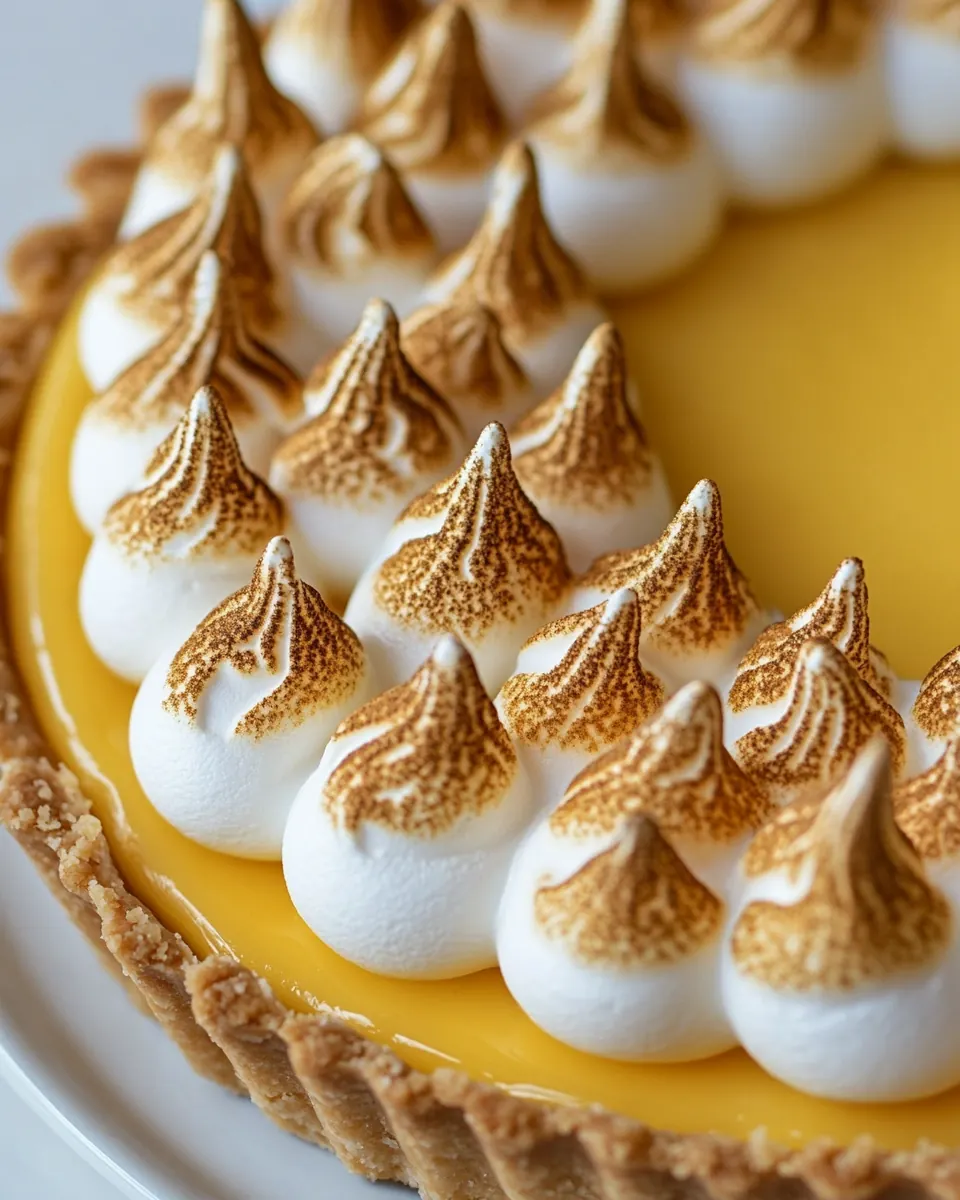
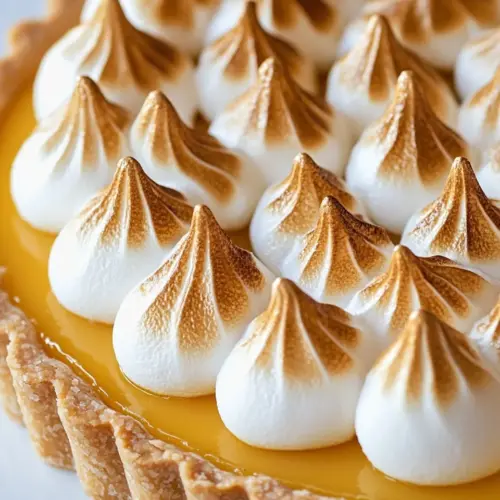
Toasting the meringue under a broiler or with a torch adds that final flourish. Guests love the brief drama of browning the peaks, and it creates a rustic, golden finish that photographs beautifully. I enjoy that moment of showmanship, it turns a simple tart into an event.
Ingredients to Make Lime Meringue Tart
These ingredients work together to create a balanced tart where each element plays a clear role. The crust is your foundation, offering structure and crunch. The lime filling is the star, combining acidity and sugar to make a glossy, spoonable custard. The meringue provides lightness and visual contrast, its sweetness rounding the flavors. Together, they form a classic trio of texture and taste that is more than the sum of its parts.
- 8 tablespoons (115 g) butter, salted or unsalted, cut into pieces: Softened and cut into pieces to ensure even melting, provides a rich, tender texture and flaky crumb to the tart crust; salt content can be adjusted to balance sweetness and enhance overall flavor. Use chilled butter if making a pâte sablée or shortcrust to achieve proper lamination and prevent overworking the dough.
- 3/4 cup (180 ml) freshly-squeezed lime juice, from about 5-6 limes: Freshly squeezed to deliver bright, acidic flavor and natural aroma that sets the tart's citrus backbone; acidity also helps to set the curd and balance the sweetness of sugar and meringue. Measure juice after squeezing to ensure correct curd consistency and strain to remove pulp or seeds for a smooth filling.
- 3/4 cup (150 g) sugar: Granulated sugar used to sweeten the lime curd and stabilize the meringue; contributes to texture and helps with setting by interacting with eggs and citrus to create a glossy, stable filling. Adjust amount carefully to preserve tartness while providing sufficient structure and sheen.
- zest of two limes, unsprayed (see Note): Finely grated zest brings concentrated citrus oils and aromatic intensity to amplify lime flavor without adding extra acidity; unsprayed zest avoids pesticide residues and preserves pure taste. Zest should be added early to the curd to infuse the filling or reserved for garnish to boost fragrance.
- pinch of salt: Small amount used to enhance and balance the sweet and sour components of both the filling and meringue; salt deepens flavor and reduces any bitterness from the citrus. Incorporate sparingly, distributing evenly to avoid overt salinity while improving overall taste clarity.
- 3 large egg yolks: Thickened yolks provide richness, body, and emulsifying power to the lime curd, helping it set into a silky, custard-like consistency; they also contribute color and smooth mouthfeel. Temper yolks with hot lime–sugar mixture to prevent curdling and cook gently until the desired thickness is achieved.
- 3 large eggs: Whole eggs supply additional structure, protein, and volume to the curd, assisting in coagulation and ensuring a stable, sliceable filling; they also lighten the texture slightly compared with yolks alone. Whisk thoroughly and temper to avoid scrambling, then cook until just thickened for optimal creaminess.
- 2 large egg whites: Separated whites reserved for the meringue to create light, airy peaks that contrast the dense curd; whipping the whites adds volume and a tender cloudlike topping when properly stabilized. Ensure no trace of yolk or fat remains for maximum lift and whip to glossy soft peaks before adding sugar.
- 5 tablespoons (75 g) sugar: Sugar for the meringue stabilizes beaten egg whites, adds sweetness, and helps create glossy, stable peaks that hold shape when baked or torched; dissolving sugar properly yields a smooth, satiny meringue. Add gradually while whipping to achieve stiff, glossy peaks and avoid grainy texture.
- pinch of salt: Small pinch enhances the sweetness and overall flavor of the meringue by balancing taste and lifting other components; it can also assist slightly in stabilizing whipped egg whites. Use minimal salt to avoid diminishing the meringue's delicate sweetness while improving depth.
- a few drops vanilla extract: A few drops introduce a subtle warm, vanilla note that rounds out the tart's bright lime flavor without overpowering it, enhancing aromatic complexity and perceived sweetness. Use pure vanilla extract sparingly to complement the citrus and harmonize the curd and meringue layers.
- One recipe, French tart dough, pre-baked, or another favorite tart dough: Pre-baked tart shell provides a crisp, sturdy base to hold the lime curd and meringue; using French tart dough or a favorite recipe ensures proper texture, thickness, and flavor compatibility. Blind-bake until golden and cooled to prevent a soggy bottom when filling and finishing the tart.
How to Assemble Lime Meringue Tart
I like to approach assembly in a calm, methodical way so the texture of each element is maintained. Start by preparing and pre baking the crust so it stays crisp. Then focus on the filling, tempering the eggs carefully to avoid scrambling, and finally make the meringue with attention to temperature and sugar addition.
- Preheat the oven to 375º (180ºC.): You will notice the oven warming the kitchen and a slight dry heat that encourages even baking. Preheating matters because a cold oven will change the bake time and can leave the crust soggy. A common mistake is skipping full preheat, which results in uneven browning. Make sure the rack is positioned for even heat circulation and that the oven reaches temperature before inserting the tart shell.
- In a medium-sized saucepan, warm the butter, lime juice, sugar, zest, and salt.: As the ingredients heat, the kitchen fills with a bright citrus aroma combined with the rich scent of butter . Warm until the sugar dissolves and the mixture becomes homogeneous, but avoid boiling which can drive off delicate citrus oils. If the mixture overheats, the filling may separate or become grainy, so keep the heat gentle and stir frequently.
- In a separate bowl, whisk together the eggs and the yolks.: Whisking by hand or with a fork creates a uniform pale mixture that will take the warm liquid without cooking. The sound of the whisk changes as the mixture smooths, and the visual cue is a consistent, slightly frothy yellow. A common pitfall is under whisking, which makes tempering uneven and may lead to curdled bits when combined with hot liquid.
- When the butter has melted and the mixture is warm, gradually pour some of the warm lime juice mixture into the eggs, whisking constantly. Scrape the warmed eggs back into the saucepan and cook the mixture over low heat.: As you temper, you will feel the bowl warming and see the eggs thin without scrambling. This process protects the eggs and results in a smooth custard. Return to the saucepan and cook gently, stirring so heat distributes evenly. If you add the hot liquid too quickly, the eggs will scramble and ruin the texture, so patience here prevents disaster.
- Stir the mixture constantly over low heat, using the whisk, until the filling thickens and begins to resemble soft jelly. Do not let it boil. (For the intrepid, you can do this step in a large bowl set over a saucepan of simmering water instead of over direct heat.): You will see the filling change from a loose liquid to a glossy, ribbon like consistency that coats the whisk. The smell becomes more concentrated, and the texture should feel velvety. Constant stirring prevents hotspots and curdling. If the mixture comes to a boil the eggs will scramble, so keep the temperature controlled and steady.
- Remove from heat and scrape the filling into the pre-baked tart shell.: The filling will be warm and slightly thick, spreading smoothly into the shell. It should sit level but not runny. The sensory cue is a glossy surface and a custard that moves slowly when tilted. Pour too hot and you risk softening the crust; too cool and it will not spread evenly. Let it settle briefly to remove air pockets before moving on.
- Bake for 10 minutes.: During this short bake, the filling sets further and the top acquires a subtle sheen. Watch the edges to ensure the crust does not over brown. A common error is leaving it too long, which can dry the filling out; the goal is a just set center with a tender, custardy mouthfeel.
- To make the meringue (see Note for alternative method), whisk together the egg whites, sugar, and salt in the bowl of a stand mixer. Set the bowl over a pan of simmering water, and whisk it as it heats, checking it with an instant-read thermometer.: The bowl will warm and the mixture will become glossy and smooth as the sugar dissolves. Bringing the whites to about 140 F (60 C) helps ensure food safety and stabilizes the foam. If you skip warming, the meringue may be looser and less stable, especially in humid conditions, so this step improves reliability.
- Once it reaches 140 F (60 C), transfer the bowl to the standing mixer and beat at high speed until cool, scraping down the sides once of the mixer bowl, midway during mixing, and add the vanilla. Whip until the meringue is light and fluffy.: You will hear the mixer change pitch as the foam builds, and visually the peaks will go from soft to glossy and then to stiff. The meringue should feel satiny and hold its shape. If it looks grainy, it means the sugar did not fully dissolve or it was over whipped; avoid over whipping which can cause separation.
- Heat the broiler and move the oven rack to the top third of the oven.: The broiler provides intense top heat that lightly caramelizes the meringue. Positioning is crucial so the meringue browns quickly without burning. Leaving it too low results in slow browning and drying, while too close can char the peaks in seconds, so keep a vigilant eye.
- Scrape the meringue into a pasty bag fitted with a star tip and pipe a ring around the perimeter of the tart. Or spread in a ring around the tart with a spatula.: Piping creates decorative peaks that take on color attractively, while spreading yields a more rustic look. You should feel the meringue's weight as you pipe, and see defined ridges form. Overworking it can deflate the foam, so handle gently and confident.
- Pop the tart under the broiler, watching carefully, as it will brown quickly. When the top begins to darken, remove the tart from the oven and cool completely before slicing.: The meringue will go from pale to golden in moments, releasing a toasty aroma that complements the lime. Remove as soon as the desired color appears to avoid bitterness. Cooling fully lets the filling set so slices cut cleanly; slicing too soon will produce messy, weeping edges.
Recipe Variations about Lime Meringue Tart
This group of variations helps you adapt the recipe without changing its core identity. Each tip highlights a controlled change to texture, presentation, or make ahead strategy so you can tailor the tart to your needs while preserving the classic balance of lime filling and meringue.
- Swap crusts: Try a pre baked shortcrust for a classic base or a pressed cookie crust if you want a quicker assembly, both will alter the bite but keep the filling intact.
- Meringue styling: Pipe tall peaks for a dramatic presentation, or spread the meringue thinly and torch just the top for a subtler finish, both approaches change how the toasted notes read in each bite.
- Advance prep for filling: Make the lime filling up to five days ahead and refrigerate, it will save time on the day of service while retaining flavor when reheated gently.
- Serving sizes: Bake in individual tartlets for a party friendly format, they are easier to portion and look elegant on a dessert tray.
- Texture control: For an extra creamy filling, whisk more vigorously when combining after cooking to smooth any small curdles, which yields silkier mouthfeel.
How to Enjoy Lime Meringue Tart
Serving this tart is about balancing temperature and texture so each slice shines. Let it cool completely for neat slices, and consider small accents to complement the lime without overwhelming it. This section explores occasions, pairings, and storage so you can plan when and how to serve the tart.
- Room temperature slices: Serve the tart at room temperature for the best flavor and texture, allowing the filling to be creamy and the meringue soft yet structured.
- After dinner dessert: Bring it out following a light meal, the bright citrus acts as a palate cleanser and feels uplifting after heavier courses.
- Celebratory occasions: The tart’s appearance is festive, making it ideal for birthdays, showers, or holiday gatherings where a showstopping dessert is welcome.
- Storage tips: Refrigerate leftovers in an airtight container for up to two days to preserve the filling; note the meringue will soften with time so enjoy soon for best texture.
- Seasonal pairing: Serve in spring and summer when citrus feels most at home, pairing with fresh fruit or a light floral tea to complement the lime notes.
FAQ
Conclusion
What makes this tart special is the bright lime filling balanced by a silky texture and crowned with a toasted, airy meringue. It manages to feel both celebratory and approachable, which is why I come back to it for gatherings and quiet weekends alike. Give it a try and enjoy the mix of tart and sweet in every slice, and don’t be surprised if it becomes a regular on your dessert rotation.
Lime Meringue Tart
Equipment
- Saucepan
- Mixing Bowl
- Stand mixer
- Oven
- Tart Pan
Ingredients
- 8 tablespoons (115 g) butter, salted or unsalted, cut into pieces Softened and cut into pieces to ensure even melting, provides a rich, tender texture and flaky crumb to the tart crust; salt content can be adjusted to balance sweetness and enhance overall flavor. Use chilled butter if making a pâte sablée or shortcrust to achieve proper lamination and prevent overworking the dough.
- 3/4 cup (180 ml) freshly-squeezed lime juice, from about 5-6 limes Freshly squeezed to deliver bright, acidic flavor and natural aroma that sets the tart's citrus backbone; acidity also helps to set the curd and balance the sweetness of sugar and meringue. Measure juice after squeezing to ensure correct curd consistency and strain to remove pulp or seeds for a smooth filling.
- 3/4 cup (150 g) sugar Granulated sugar used to sweeten the lime curd and stabilize the meringue; contributes to texture and helps with setting by interacting with eggs and citrus to create a glossy, stable filling. Adjust amount carefully to preserve tartness while providing sufficient structure and sheen.
- zest of two limes, unsprayed (see Note) Finely grated zest brings concentrated citrus oils and aromatic intensity to amplify lime flavor without adding extra acidity; unsprayed zest avoids pesticide residues and preserves pure taste. Zest should be added early to the curd to infuse the filling or reserved for garnish to boost fragrance.
- pinch of salt Small amount used to enhance and balance the sweet and sour components of both the filling and meringue; salt deepens flavor and reduces any bitterness from the citrus. Incorporate sparingly, distributing evenly to avoid overt salinity while improving overall taste clarity.
- 3 large egg yolks Thickened yolks provide richness, body, and emulsifying power to the lime curd, helping it set into a silky, custard-like consistency; they also contribute color and smooth mouthfeel. Temper yolks with hot lime-sugar mixture to prevent curdling and cook gently until the desired thickness is achieved.
- 3 large eggs Whole eggs supply additional structure, protein, and volume to the curd, assisting in coagulation and ensuring a stable, sliceable filling; they also lighten the texture slightly compared with yolks alone. Whisk thoroughly and temper to avoid scrambling, then cook until just thickened for optimal creaminess.
- 2 large egg whites Separated whites reserved for the meringue to create light, airy peaks that contrast the dense curd; whipping the whites adds volume and a tender cloudlike topping when properly stabilized. Ensure no trace of yolk or fat remains for maximum lift and whip to glossy soft peaks before adding sugar.
- 5 tablespoons (75 g) sugar Sugar for the meringue stabilizes beaten egg whites, adds sweetness, and helps create glossy, stable peaks that hold shape when baked or torched; dissolving sugar properly yields a smooth, satiny meringue. Add gradually while whipping to achieve stiff, glossy peaks and avoid grainy texture.
- pinch of salt Small pinch enhances the sweetness and overall flavor of the meringue by balancing taste and lifting other components; it can also assist slightly in stabilizing whipped egg whites. Use minimal salt to avoid diminishing the meringue's delicate sweetness while improving depth.
- a few drops vanilla extract A few drops introduce a subtle warm, vanilla note that rounds out the tart's bright lime flavor without overpowering it, enhancing aromatic complexity and perceived sweetness. Use pure vanilla extract sparingly to complement the citrus and harmonize the curd and meringue layers.
- One recipe, French tart dough, pre-baked, or another favorite tart dough Pre-baked tart shell provides a crisp, sturdy base to hold the lime curd and meringue; using French tart dough or a favorite recipe ensures proper texture, thickness, and flavor compatibility. Blind-bake until golden and cooled to prevent a soggy bottom when filling and finishing the tart.
Instructions
- Preheat the oven to 375º (180ºC.): You will notice the oven warming the kitchen and a slight dry heat that encourages even baking. Preheating matters because a cold oven will change the bake time and can leave the crust soggy. A common mistake is skipping full preheat, which results in uneven browning. Make sure the rack is positioned for even heat circulation and that the oven reaches temperature before inserting the tart shell.
- In a medium-sized saucepan, warm the butter, lime juice, sugar, zest, and salt.: As the ingredients heat, the kitchen fills with a bright citrus aroma combined with the rich scent of butter . Warm until the sugar dissolves and the mixture becomes homogeneous, but avoid boiling which can drive off delicate citrus oils. If the mixture overheats, the filling may separate or become grainy, so keep the heat gentle and stir frequently.
- In a separate bowl, whisk together the eggs and the yolks.: Whisking by hand or with a fork creates a uniform pale mixture that will take the warm liquid without cooking. The sound of the whisk changes as the mixture smooths, and the visual cue is a consistent, slightly frothy yellow. A common pitfall is under whisking, which makes tempering uneven and may lead to curdled bits when combined with hot liquid.
- When the butter has melted and the mixture is warm, gradually pour some of the warm lime juice mixture into the eggs, whisking constantly. Scrape the warmed eggs back into the saucepan and cook the mixture over low heat.: As you temper, you will feel the bowl warming and see the eggs thin without scrambling. This process protects the eggs and results in a smooth custard. Return to the saucepan and cook gently, stirring so heat distributes evenly. If you add the hot liquid too quickly, the eggs will scramble and ruin the texture, so patience here prevents disaster.
- Stir the mixture constantly over low heat, using the whisk, until the filling thickens and begins to resemble soft jelly. Do not let it boil. (For the intrepid, you can do this step in a large bowl set over a saucepan of simmering water instead of over direct heat.): You will see the filling change from a loose liquid to a glossy, ribbon like consistency that coats the whisk. The smell becomes more concentrated, and the texture should feel velvety. Constant stirring prevents hotspots and curdling. If the mixture comes to a boil the eggs will scramble, so keep the temperature controlled and steady.
- Remove from heat and scrape the filling into the pre-baked tart shell.: The filling will be warm and slightly thick, spreading smoothly into the shell. It should sit level but not runny. The sensory cue is a glossy surface and a custard that moves slowly when tilted. Pour too hot and you risk softening the crust; too cool and it will not spread evenly. Let it settle briefly to remove air pockets before moving on.
- Bake for 10 minutes.: During this short bake, the filling sets further and the top acquires a subtle sheen. Watch the edges to ensure the crust does not over brown. A common error is leaving it too long, which can dry the filling out; the goal is a just set center with a tender, custardy mouthfeel.
- To make the meringue (see Note for alternative method), whisk together the egg whites, sugar, and salt in the bowl of a stand mixer. Set the bowl over a pan of simmering water, and whisk it as it heats, checking it with an instant-read thermometer.: The bowl will warm and the mixture will become glossy and smooth as the sugar dissolves. Bringing the whites to about 140 F (60 C) helps ensure food safety and stabilizes the foam. If you skip warming, the meringue may be looser and less stable, especially in humid conditions, so this step improves reliability.
- Once it reaches 140 F (60 C), transfer the bowl to the standing mixer and beat at high speed until cool, scraping down the sides once of the mixer bowl, midway during mixing, and add the vanilla. Whip until the meringue is light and fluffy.: You will hear the mixer change pitch as the foam builds, and visually the peaks will go from soft to glossy and then to stiff. The meringue should feel satiny and hold its shape. If it looks grainy, it means the sugar did not fully dissolve or it was over whipped; avoid over whipping which can cause separation.
- Heat the broiler and move the oven rack to the top third of the oven.: The broiler provides intense top heat that lightly caramelizes the meringue. Positioning is crucial so the meringue browns quickly without burning. Leaving it too low results in slow browning and drying, while too close can char the peaks in seconds, so keep a vigilant eye.
- Scrape the meringue into a pasty bag fitted with a star tip and pipe a ring around the perimeter of the tart. Or spread in a ring around the tart with a spatula.: Piping creates decorative peaks that take on color attractively, while spreading yields a more rustic look. You should feel the meringue's weight as you pipe, and see defined ridges form. Overworking it can deflate the foam, so handle gently and confident.
- Pop the tart under the broiler, watching carefully, as it will brown quickly. When the top begins to darken, remove the tart from the oven and cool completely before slicing.: The meringue will go from pale to golden in moments, releasing a toasty aroma that complements the lime. Remove as soon as the desired color appears to avoid bitterness. Cooling fully lets the filling set so slices cut cleanly; slicing too soon will produce messy, weeping edges.
Notes
- Swap crusts: Try a pre baked shortcrust for a classic base or a pressed cookie crust if you want a quicker assembly, both will alter the bite but keep the filling intact.
- Meringue styling: Pipe tall peaks for a dramatic presentation, or spread the meringue thinly and torch just the top for a subtler finish, both approaches change how the toasted notes read in each bite.
- Advance prep for filling: Make the lime filling up to five days ahead and refrigerate, it will save time on the day of service while retaining flavor when reheated gently.
- Serving sizes: Bake in individual tartlets for a party friendly format, they are easier to portion and look elegant on a dessert tray.
- Texture control: For an extra creamy filling, whisk more vigorously when combining after cooking to smooth any small curdles, which yields silkier mouthfeel.