Grilled Tri Tip with Santa Maria Salsa
Grilled Tri Tip with Santa Maria Salsa is the kind of dish I return to whenever the weather warms and friends drift toward the backyard.
Years ago I learned to treat a good cut of tri-tip like a blank canvas, and this recipe taught me how a simple salsa can lift smoky meat into something celebratory. I remember the first time I served this, the grill hissed and the neighborhood drifted over, drawn by the scent of searing tri-tip and bright, acidic tomatoes. Someone asked for the recipe between bites, and the conversation turned into a lesson on temperature and patience.
What I love most is how the Grilled Tri Tip with Santa Maria Salsa balances rustic grill flavors with the salsa’s lively herbs and peppers. I often prep the salsa ahead so the flavors marry, while the steak rests in salt for an hour, which is a small trick that makes a big difference. Sharing this is a ritual now, a way to mark a weekend or a holiday without fuss. I hope when you make it, you’ll hear that same sizzle and feel that same easy, grateful energy at your table.
Recipe Snapshot
1 hr 5 mins
15 mins
50 mins
Medium
350 kcal
American
Gluten-Free, Paleo
Dinner
Gas, charcoal, or electric grill
Why You’ll Love This Grilled Tri Tip with Santa Maria Salsa
Bold, straightforward flavor
I love how Grilled Tri Tip with Santa Maria Salsa keeps things honest. The tri-tip needs only coarse salt and a grounded spice rub to show its beefy character, while the salsa adds brightness without distracting from the meat. It’s the kind of combination where each bite is layered, yet every element still reads clearly.
Great for gatherings
We often host relaxed dinners, and this recipe is perfect because you can prep the salsa ahead and use indirect grilling for a mostly hands off cook. I can mingle, pour drinks, and still deliver a centerpiece that looks and tastes like I spent hours on it. It stretches well for a crowd too, which is why I reach for it in summer.
Accessible techniques
If you’re new to grilling larger cuts, this is a friendly teaching recipe. I’ll walk you through brining with salt, two zone grilling, and how to read internal temperature, so you’ll feel confident. These are transferable skills you’ll use on many other cuts.
Fresh salsa that complements, not overpowers
The Santa Maria style salsa here is tomato forward, with heat from Anaheim peppers and a bright lift from lime juice and cilantro. I appreciate that it acts as a condiment, enhancing the tri-tip rather than masking it. It’s especially helpful for those who love a contrast of smoky and fresh in one bite.
Flexible and forgiving
This dish is forgiving on timing and temperature if you follow a few checkpoints. I’ve pulled tri-tip a little earlier or later depending on the crowd and still served a great meal, thanks to resting and slicing against the grain. That adaptability is one of the main reasons I keep this recipe in my rotation.
Essential Ingredients for Grilled Tri Tip with Santa Maria Salsa
The ingredient philosophy here is simple: a robust tri-tip stands in for bold, meaty flavor while a bright, herbaceous salsa cuts through the richness. Each ingredient plays a clear role, from seasoning and smoke to acidity and texture. The salt and spice rub build a savory crust, the two zone grill adds caramelized char and gentle finish, and the salsa provides freshness and moisture for every slice.
- 12 lb tri-tip steak fat trimmed off: Trimmed and rich, helps provide the primary protein and hearty flavor for the dish while benefiting from a deeply flavored crust when grilled to medium-rare or preferred doneness.
- 2 tablespoon coarse Kosher salt or sea salt: Coarse and briny, enhances meat seasoning by drawing out moisture, creating a savory crust, and balancing richer flavors in the rub for the tri-tip.
- 2 teaspoon black pepper: Pungent and warming, offers sharp, earthy heat that complements the salt and other spices, contributing to a robust, meaty seasoning profile.
- 2 teaspoon garlic powder: Aromatic and savory, supplies a concentrated garlic flavor that deepens the overall umami of the rub without adding moisture.
- 2 teaspoon chili powder: Smoky and slightly spicy, introduces a warm chili heat that layers with other spices to provide complexity in the meat seasoning.
- 1 tablespoon brown sugar dark: Rich and caramel-like, adds a touch of sweetness to balance savory and spicy elements while encouraging browning during grilling.
- 2 teaspoon smoked paprika: Deep and smoky, imparts an intensified smoked flavor note that complements grilled meat and reinforces the barbecue character.
- 1 teaspoon dry mustard: Sharp and tangy, contributes a bright mustard bite that cuts through fattiness and lifts the overall seasoning blend.
- 128 oz can diced tomatoes drained: Juicy and acidic, provides a chunky tomato base for the salsa once drained, contributing bulk and a tangy tomato presence to the sauce.
- 2 stalks celery finely chopped: Crunchy and aromatic, adds fresh vegetal texture and a mild, slightly bitter backbone that enhances the salsa’s complexity.
- 3 scallions chopped, green and white parts: Fresh and oniony, brings crisp, mild allium flavor with both green and white parts contributing brightness and subtle sweetness to the salsa.
- 2 Anaheim peppers seeded and finely chopped: Mild and slightly sweet, supplies gentle pepper heat and crisp texture when finely chopped, enhancing the salsa’s fresh pepper notes.
- 1/4 cup cilantro chopped: Herbaceous and citrusy, offers bright, leafy freshness that lifts the salsa and pairs well with lime and tomato components.
- 2 tablespoon lime juice: Bright and acidic, introduces fresh citrus tang that balances richness and enhances the overall freshness of the salsa.
- 1 tablespoon distilled white vinegar: Sharp and acidic, adds a clean vinegar bite that heightens brightness and stabilizes the salsa’s flavors.
- 1 tablespoon Worcestershire sauce: Savory and umami-rich, contributes depth and a subtle savory backbone that ties the grilled meat and salsa flavors together.
- 1 teaspoon oregano dried: Earthy and aromatic, provides a warm, slightly bitter herbal layer that supports the savory components of the salsa.
- 1 teaspoon basil dried: Sweet and slightly floral, lends a gentle herbal sweetness that complements oregano and other seasonings in the sauce.
- 1 teaspoon hot sauce ie, Tobasco, Louisiana Hot Sauce: Fiery and vinegary, injects concentrated heat and tang that can be adjusted to taste to lift the salsa’s spice level.
- 11/2 teaspoon garlic salt: Salty and garlicky, combines salt with a subtle garlic kick to reinforce overall seasoning and enhance savory notes throughout the dish.
The Process for Making Grilled Tri Tip with Santa Maria Salsa
These instructions guide you step by step through seasoning, grilling using two zones, finishing over direct heat, and preparing the salsa. Read each step fully so you know the sensory cues and common pitfalls before firing up the grill.
- Sprinkle the coarse Kosher (or sea) salt all over the tri-tip. Place in the refrigerator for 1 hour.: You will notice the salt drawing moisture out, creating a slightly tacky surface as it begins a short dry brine. This process concentrates flavor and helps the meat form a better crust when it hits heat; you should smell a subtle saline aroma but not a cured scent. One common mistake is leaving it much longer than stated, which can over-salt the surface, so stick closely to the hour. For troubleshooting, if the salt feels like it is clumping in spots, lightly pat the surface so it evens out before refrigerating.
- In a small bowl, mix together the black pepper, garlic powder, chili powder, paprika, brown sugar, and dry mustard.: As you blend the rub, inhale the layered spices the mixture releases, from sweet molasses notes of the brown sugar to the smoky perfume of smoked paprika . The rub balances sweet, heat, and tang so that the crust develops complexity under high heat. If your rub seems too damp, the brown sugar might clump; break it up with a fork so it sprinkles evenly. Avoid overmixing to the point the spices lose their distinct aromas.
- Fire your grill up for 2-zone cooking. One side with direct heat and the other side with no heat.: You should hear the initial roar of the flame and feel a wave of warm air when you sweep your hand above the hot side, while the cool zone will have negligible radiant heat. Two zone grilling lets you sear and then finish without burning, which is crucial for a thick roast like this. A common error is having both sides too hot, which causes rapid charring before the interior cooks. If your grill gets too hot, reduce the fuel or move coals away to stabilize temperatures.
- Remove the tri-tip from the refrigerator. Dust off the excess salt, but leave enough of it to season the steak. Sprinkle the rub all over the meat. Use your fingers to press it into the steak.: You want the surface tacky but not encrusted; the scent of the spices should become more pronounced as they meet the meat's fat. Pressing the rub in helps ensure it adheres and forms a cohesive crust. Avoid knocking off the rub as you handle the roast; excessive handling can flake the seasoning away. If you see patches without rub, gently press more in rather than reapplying heavily.
- Place the tri-tip on the indirect heat side of your grill and lower the lid. Cook until an internal temperature reaches 110°F, about 30 to 45 minutes. Flip the meat about halfway while cooking.: In this phase you will hear a low, even sizzle and watch the surface slowly deepen in color without aggressive charring. The slow heat allows connective tissue to relax and juices to redistribute gently. A well timed flip exposes a fresh surface to even heat and helps uniform color development. One common mistake is opening the lid too frequently; resist peeking or you will extend cook time significantly. If the surface is steaming rather than browning, your heat may be too high on the indirect side.
- Move the tri-tip to the direct heat side of the grill and cook until an internal temperature of 130°F is reached. Remove from the grill and let the meat rest for 5 to 10 minutes (the temperature will rise to 135°F).: Here you want to hear a higher pitched sizzle and watch for a deep, crusty sear to form quickly, signaling Maillard reactions. The direct flame creates that caramelized exterior that contrasts the tender interior. Resting is critical because it lets juices redistribute, ensuring each slice stays moist. A typical error is slicing immediately, which bleeds juices out and leaves the meat drier. If charring happens too fast, move briefly back to indirect heat to finish gently.
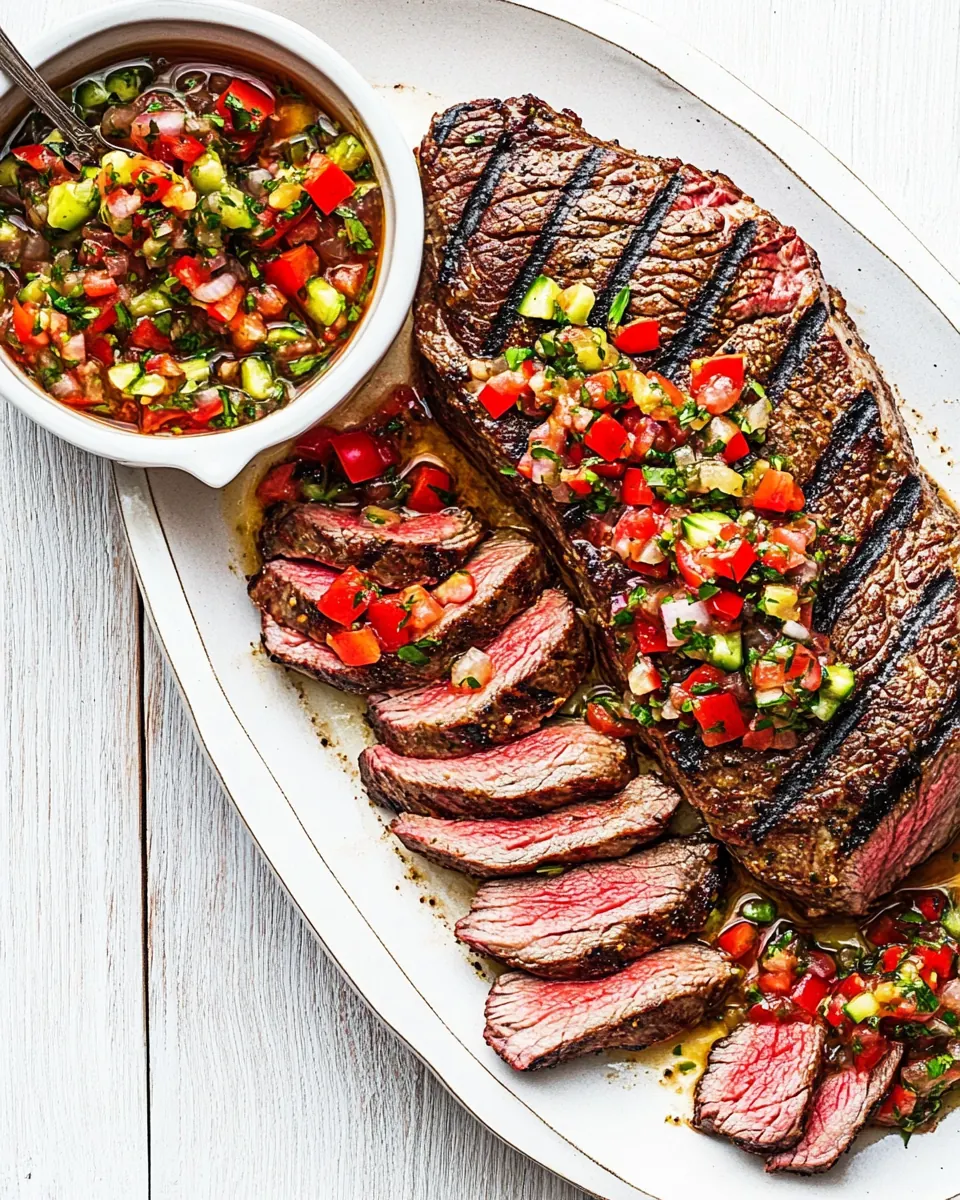
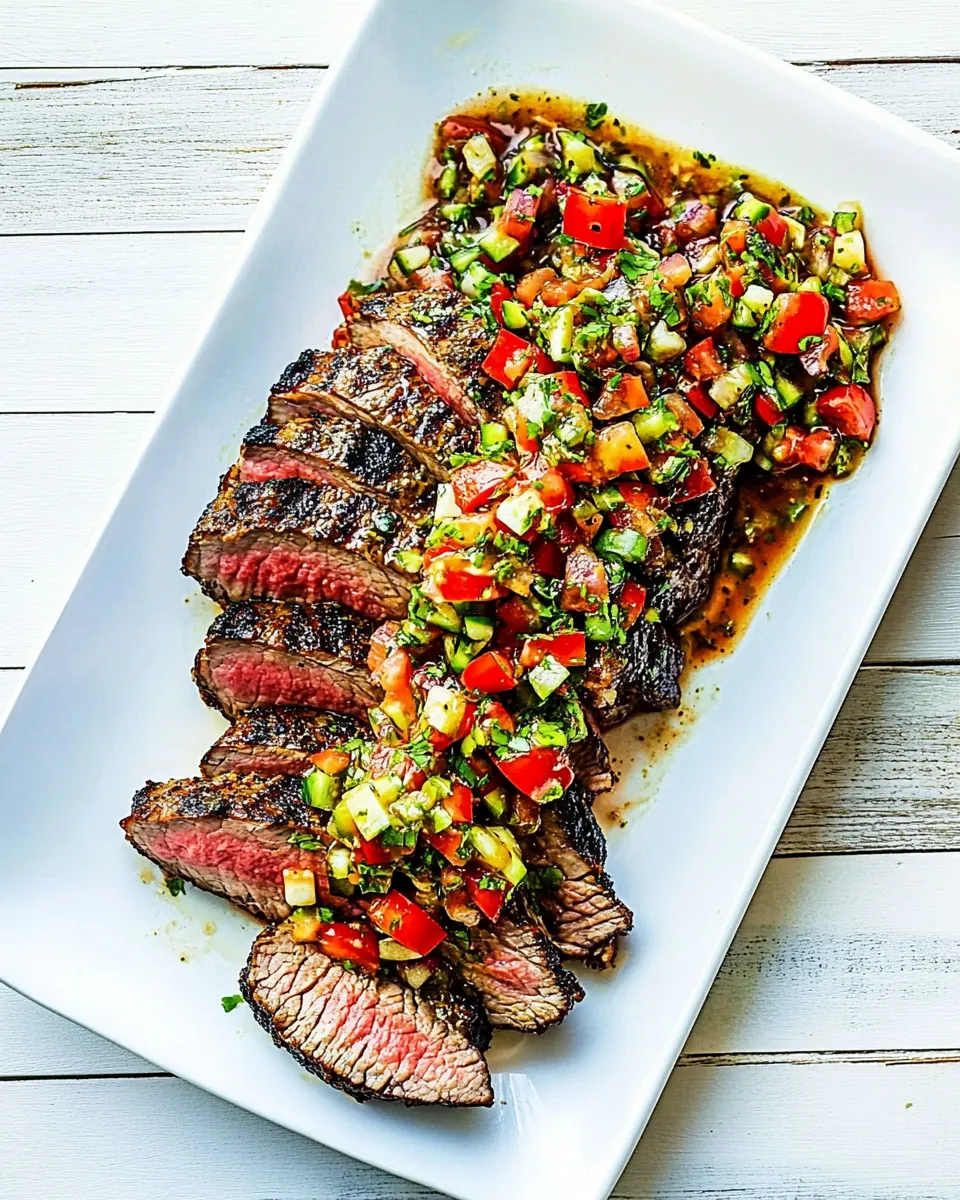
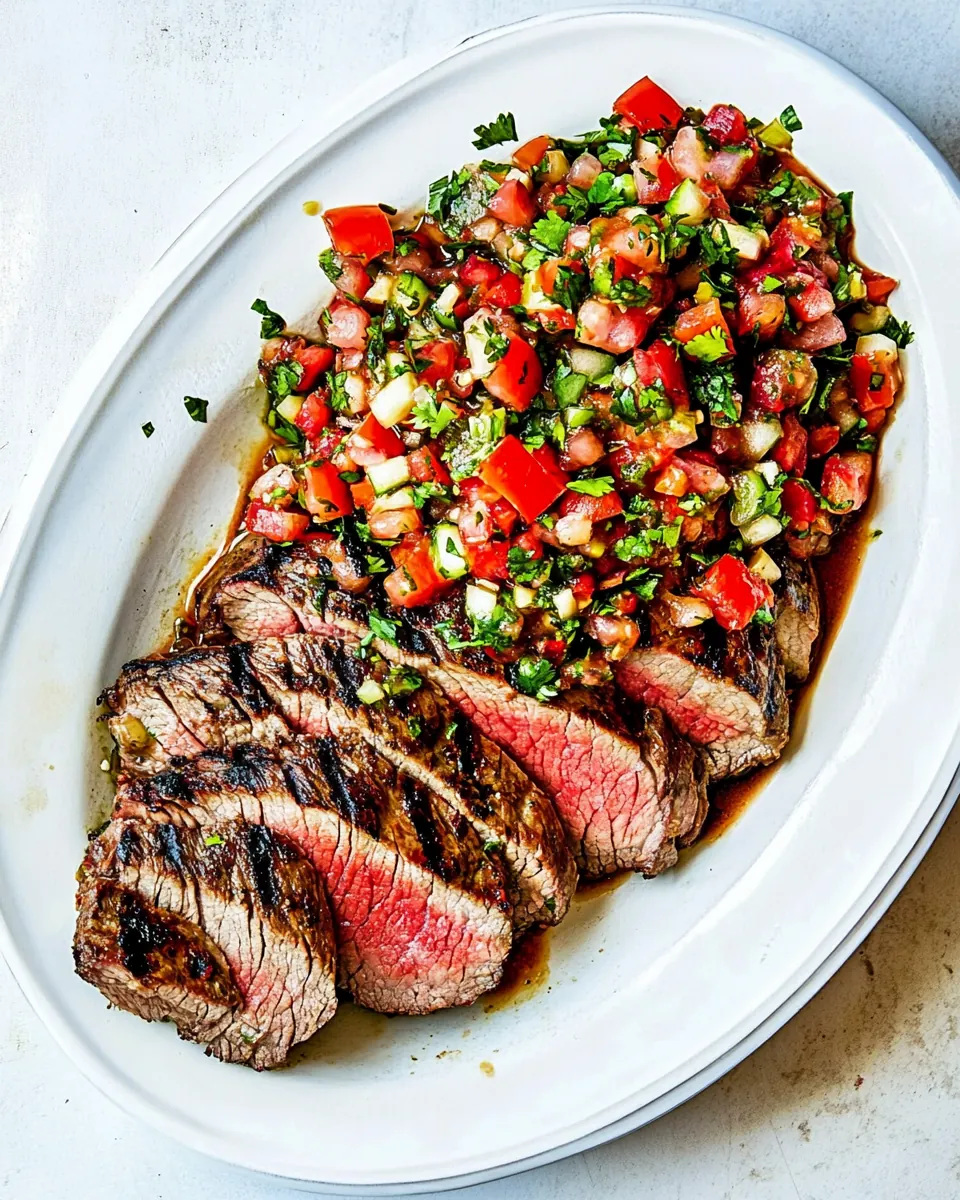
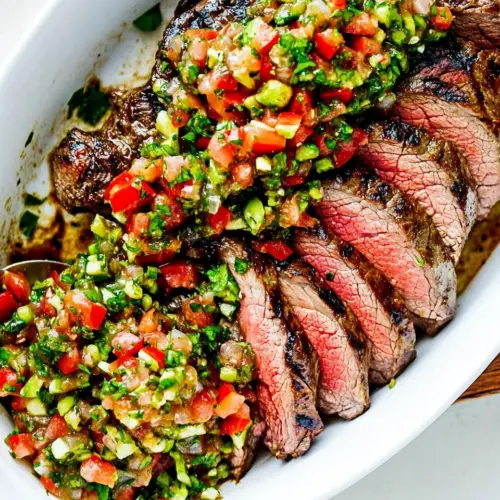
- Slice against the grain and then top with the salsa, with extra served at the table.: When you slice, notice the fibers and cut perpendicular to them for maximum tenderness; each slice should present a clean, moist cross section with a pink center if you followed the temperature targets. Spoon the bright salsa over the meat so each bite gets acid, herb, and pepper contrast to the smoky richness. Overly thin slicing can make the meat feel dry, so aim for slightly thicker pieces. If the slices appear stringy, you likely cut with the grain; turn the roast and adjust your angle.
- In a large bowl, mix all of the ingredients together. Chill in the refrigerator until ready to use. (You can make this up to several hours of grilling, or you can make it while the tri-tip is chilling with salt in the fridge).: The salsa will smell herbaceous and tart once combined, with the lime juice and vinegar brightening the tomatoes . Chilling helps meld flavors while preserving texture; the celery and Anaheim peppers should retain a pleasant crunch. A common misstep is letting the salsa sit uncovered too long, which dulls fresh notes; keep it sealed until service. If the salsa seems watery, small additional dicing and draining can tighten the texture before serving.
Variations to Try
If you want to shift textures or flavors, these variations are simple swaps that keep the spirit of the dish intact. Each tip below highlights a small change that yields a noticeable difference on the plate.
- Smokier profile: Use a handful of soaked wood chips on a gas grill or add a couple of smoking chunks to charcoal to increase smoke aroma, which deepens the final flavor without changing the core method.
- Spicier salsa: Keep the seeds in the Anaheim peppers or add a higher heat pepper to the salsa in small amounts, tasting as you go to avoid overtaking the meat.
- Sweeter balance: Stir in a teaspoon of honey or a pinch more brown sugar to the salsa for a touch of sweetness that plays nicely with charred edges.
- Smaller portion: If tri-tip is too large, ask your butcher for a smaller piece or cook two smaller roasts to maintain timing and manageability on the grill.
- Make-ahead option: Prepare the salsa the night before and refrigerate sealed, then remove from chill about 20 minutes before serving so flavors loosen and aromas return.
Serving This Grilled Tri Tip with Santa Maria Salsa
This recipe works wonderfully as a main for relaxed dinners and weekend barbecues. Serve it sliced on a platter with salsa spooned over and extra on the side to let guests customize their bites. It suits summer gatherings and festive meals where you want bold flavors without fuss.
- Plated family dinner: Slice the tri-tip and arrange on a large board, spoon salsa down the center, and let each person help themselves, which is ideal for informal weeknight feasts.
- Sandwich service: Pile thin slices into rolls for hearty sandwiches, adding salsa on the side so sandwiches remain crisp and not soggy.
- Party platter: Present the meat on a wooden board with a bowl of salsa and small plates, making it easy for guests to graze while you keep socializing.
- Occasions: Excellent for summer cookouts, weekend dinners, Independence Day celebrations, or any time you want a crowd pleasing grilled main.
- Storage: Store leftover sliced meat tightly wrapped for up to 5 days; keep salsa chilled in an airtight container for up to one week, though freshness declines after a few days.
- Seasonal pairings: Pair with charred corn, grilled vegetables, or a simple green salad in summer to complement the smoky and fresh contrasts of the dish.
FAQ
Conclusion
The simplicity and balance of Grilled Tri Tip with Santa Maria Salsa is what makes it special, pairing smoky, well seasoned beef with a bright, tangy tomato salsa. Give it a try the next time you fire up the grill, and you’ll find it rewarding to prepare and easy to share with friends. The combination of a seasoned crust, careful temperature control, and a fresh condiment makes this a reliable recipe to reach for for casual gatherings or small celebrations, and I hope it becomes a staple in your summer rotation.
Grilled Tri Tip with Santa Maria Salsa
Equipment
- Gas, charcoal, or electric grill
Ingredients
- 12 lb tri-tip steak fat trimmed off Trimmed and rich, helps provide the primary protein and hearty flavor for the dish while benefiting from a deeply flavored crust when grilled to medium-rare or preferred doneness.
- 2 tablespoon coarse Kosher salt or sea salt Coarse and briny, enhances meat seasoning by drawing out moisture, creating a savory crust, and balancing richer flavors in the rub for the tri-tip.
- 2 teaspoon black pepper Pungent and warming, offers sharp, earthy heat that complements the salt and other spices, contributing to a robust, meaty seasoning profile.
- 2 teaspoon garlic powder Aromatic and savory, supplies a concentrated garlic flavor that deepens the overall umami of the rub without adding moisture.
- 2 teaspoon chili powder Smoky and slightly spicy, introduces a warm chili heat that layers with other spices to provide complexity in the meat seasoning.
- 1 tablespoon brown sugar dark Rich and caramel-like, adds a touch of sweetness to balance savory and spicy elements while encouraging browning during grilling.
- 2 teaspoon smoked paprika Deep and smoky, imparts an intensified smoked flavor note that complements grilled meat and reinforces the barbecue character.
- 1 teaspoon dry mustard Sharp and tangy, contributes a bright mustard bite that cuts through fattiness and lifts the overall seasoning blend.
- 128 oz can diced tomatoes drained Juicy and acidic, provides a chunky tomato base for the salsa once drained, contributing bulk and a tangy tomato presence to the sauce.
- 2 stalks celery finely chopped Crunchy and aromatic, adds fresh vegetal texture and a mild, slightly bitter backbone that enhances the salsa’s complexity.
- 3 scallions chopped, green and white parts Fresh and oniony, brings crisp, mild allium flavor with both green and white parts contributing brightness and subtle sweetness to the salsa.
- 2 Anaheim peppers seeded and finely chopped Mild and slightly sweet, supplies gentle pepper heat and crisp texture when finely chopped, enhancing the salsa’s fresh pepper notes.
- 1/4 cup cilantro chopped Herbaceous and citrusy, offers bright, leafy freshness that lifts the salsa and pairs well with lime and tomato components.
- 2 tablespoon lime juice Bright and acidic, introduces fresh citrus tang that balances richness and enhances the overall freshness of the salsa.
- 1 tablespoon distilled white vinegar Sharp and acidic, adds a clean vinegar bite that heightens brightness and stabilizes the salsa’s flavors.
- 1 tablespoon Worcestershire sauce Savory and umami-rich, contributes depth and a subtle savory backbone that ties the grilled meat and salsa flavors together.
- 1 teaspoon oregano dried Earthy and aromatic, provides a warm, slightly bitter herbal layer that supports the savory components of the salsa.
- 1 teaspoon basil dried Sweet and slightly floral, lends a gentle herbal sweetness that complements oregano and other seasonings in the sauce.
- 1 teaspoon hot sauce ie, Tobasco, Louisiana Hot Sauce Fiery and vinegary, injects concentrated heat and tang that can be adjusted to taste to lift the salsa’s spice level.
- 11/2 teaspoon garlic salt Salty and garlicky, combines salt with a subtle garlic kick to reinforce overall seasoning and enhance savory notes throughout the dish.
Instructions
- Sprinkle the coarse Kosher (or sea) salt all over the tri-tip. Place in the refrigerator for 1 hour.: You will notice the salt drawing moisture out, creating a slightly tacky surface as it begins a short dry brine. This process concentrates flavor and helps the meat form a better crust when it hits heat; you should smell a subtle saline aroma but not a cured scent. One common mistake is leaving it much longer than stated, which can over-salt the surface, so stick closely to the hour. For troubleshooting, if the salt feels like it is clumping in spots, lightly pat the surface so it evens out before refrigerating.
- In a small bowl, mix together the black pepper, garlic powder, chili powder, paprika, brown sugar, and dry mustard.: As you blend the rub, inhale the layered spices the mixture releases, from sweet molasses notes of the brown sugar to the smoky perfume of smoked paprika . The rub balances sweet, heat, and tang so that the crust develops complexity under high heat. If your rub seems too damp, the brown sugar might clump; break it up with a fork so it sprinkles evenly. Avoid overmixing to the point the spices lose their distinct aromas.
- Fire your grill up for 2-zone cooking. One side with direct heat and the other side with no heat.: You should hear the initial roar of the flame and feel a wave of warm air when you sweep your hand above the hot side, while the cool zone will have negligible radiant heat. Two zone grilling lets you sear and then finish without burning, which is crucial for a thick roast like this. A common error is having both sides too hot, which causes rapid charring before the interior cooks. If your grill gets too hot, reduce the fuel or move coals away to stabilize temperatures.
- Remove the tri-tip from the refrigerator. Dust off the excess salt, but leave enough of it to season the steak. Sprinkle the rub all over the meat. Use your fingers to press it into the steak.: You want the surface tacky but not encrusted; the scent of the spices should become more pronounced as they meet the meat's fat. Pressing the rub in helps ensure it adheres and forms a cohesive crust. Avoid knocking off the rub as you handle the roast; excessive handling can flake the seasoning away. If you see patches without rub, gently press more in rather than reapplying heavily.
- Place the tri-tip on the indirect heat side of your grill and lower the lid. Cook until an internal temperature reaches 110°F, about 30 to 45 minutes. Flip the meat about halfway while cooking.: In this phase you will hear a low, even sizzle and watch the surface slowly deepen in color without aggressive charring. The slow heat allows connective tissue to relax and juices to redistribute gently. A well timed flip exposes a fresh surface to even heat and helps uniform color development. One common mistake is opening the lid too frequently; resist peeking or you will extend cook time significantly. If the surface is steaming rather than browning, your heat may be too high on the indirect side.
- Move the tri-tip to the direct heat side of the grill and cook until an internal temperature of 130°F is reached. Remove from the grill and let the meat rest for 5 to 10 minutes (the temperature will rise to 135°F).: Here you want to hear a higher pitched sizzle and watch for a deep, crusty sear to form quickly, signaling Maillard reactions. The direct flame creates that caramelized exterior that contrasts the tender interior. Resting is critical because it lets juices redistribute, ensuring each slice stays moist. A typical error is slicing immediately, which bleeds juices out and leaves the meat drier. If charring happens too fast, move briefly back to indirect heat to finish gently.
- Slice against the grain and then top with the salsa, with extra served at the table.: When you slice, notice the fibers and cut perpendicular to them for maximum tenderness; each slice should present a clean, moist cross section with a pink center if you followed the temperature targets. Spoon the bright salsa over the meat so each bite gets acid, herb, and pepper contrast to the smoky richness. Overly thin slicing can make the meat feel dry, so aim for slightly thicker pieces. If the slices appear stringy, you likely cut with the grain; turn the roast and adjust your angle.
- In a large bowl, mix all of the ingredients together. Chill in the refrigerator until ready to use. (You can make this up to several hours of grilling, or you can make it while the tri-tip is chilling with salt in the fridge).: The salsa will smell herbaceous and tart once combined, with the lime juice and vinegar brightening the tomatoes . Chilling helps meld flavors while preserving texture; the celery and Anaheim peppers should retain a pleasant crunch. A common misstep is letting the salsa sit uncovered too long, which dulls fresh notes; keep it sealed until service. If the salsa seems watery, small additional dicing and draining can tighten the texture before serving.
Notes
- Smokier profile: Use a handful of soaked wood chips on a gas grill or add a couple of smoking chunks to charcoal to increase smoke aroma, which deepens the final flavor without changing the core method.
- Spicier salsa: Keep the seeds in the Anaheim peppers or add a higher heat pepper to the salsa in small amounts, tasting as you go to avoid overtaking the meat.
- Sweeter balance: Stir in a teaspoon of honey or a pinch more brown sugar to the salsa for a touch of sweetness that plays nicely with charred edges.
- Smaller portion: If tri-tip is too large, ask your butcher for a smaller piece or cook two smaller roasts to maintain timing and manageability on the grill.
- Make-ahead option: Prepare the salsa the night before and refrigerate sealed, then remove from chill about 20 minutes before serving so flavors loosen and aromas return.