Beignet Recipe
Beignet Recipe has been one of those comforting treats I return to when I want something pillowy, sweet, and a little nostalgic. Growing up, I chased the warm scent of frying dough through my kitchen on weekend mornings, and those moments shaped how I think about sharing food. The first sentence you read now mirrors that feeling, because these little fritters have been part of cozy mornings, late night cravings, and celebrations that call for a simple, showstopping sweet.
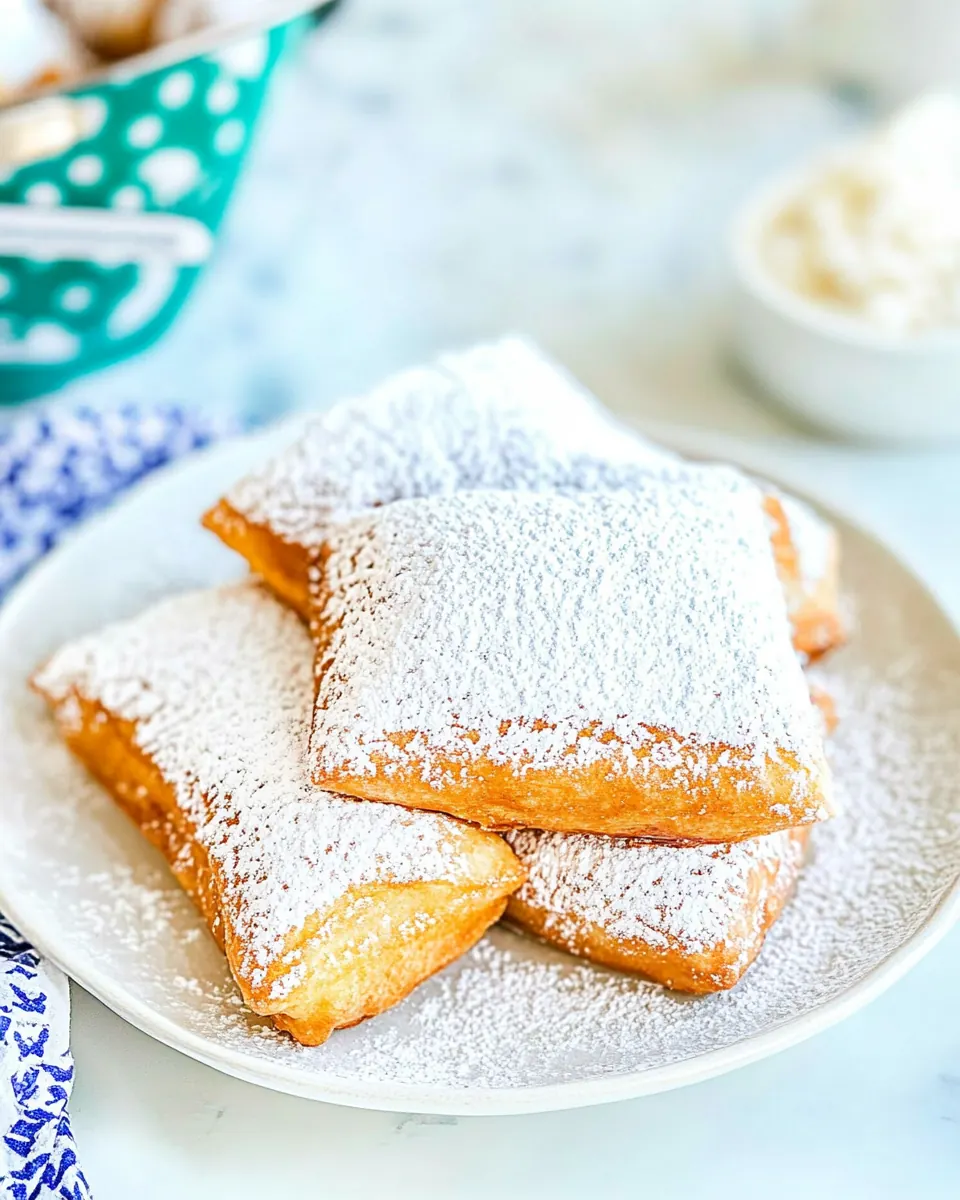
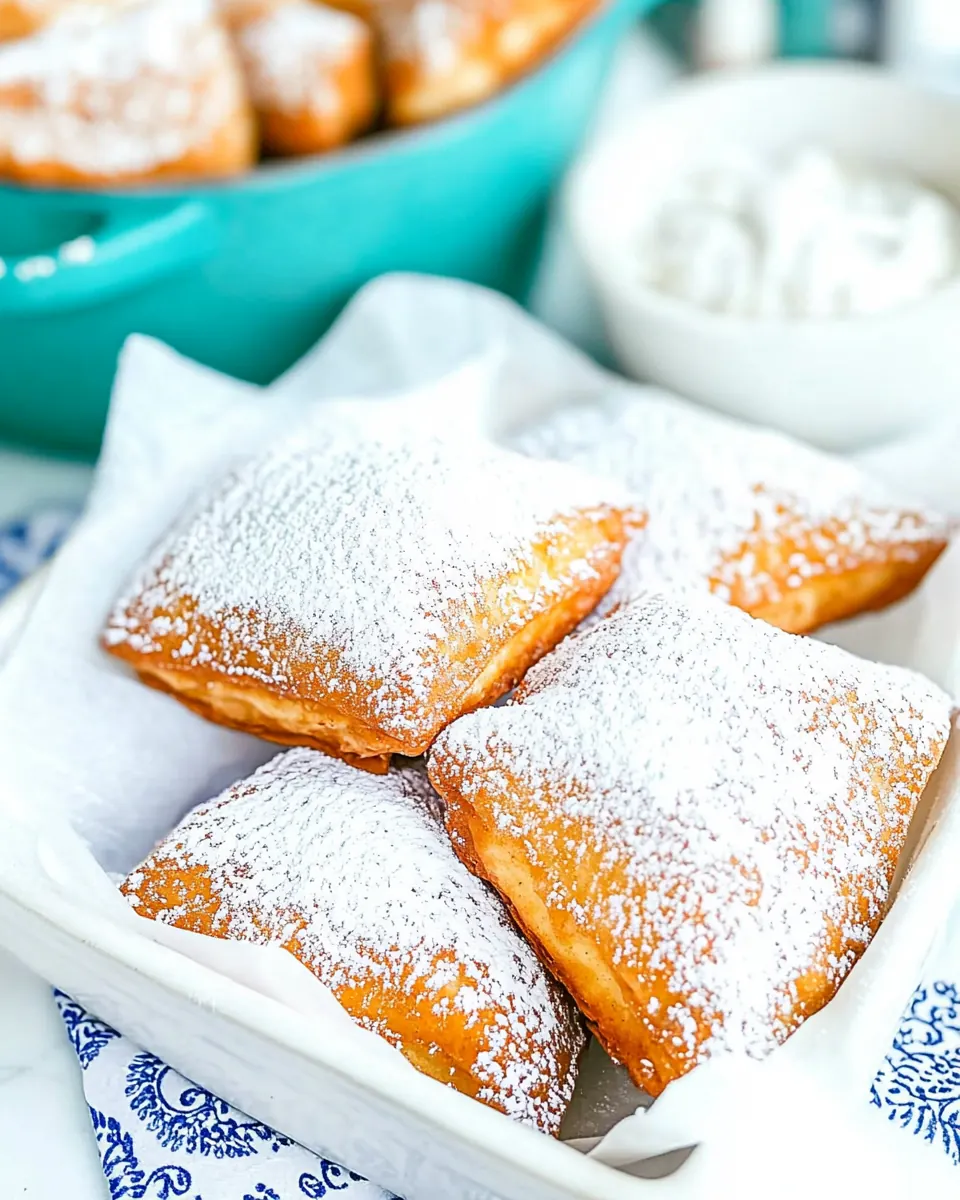
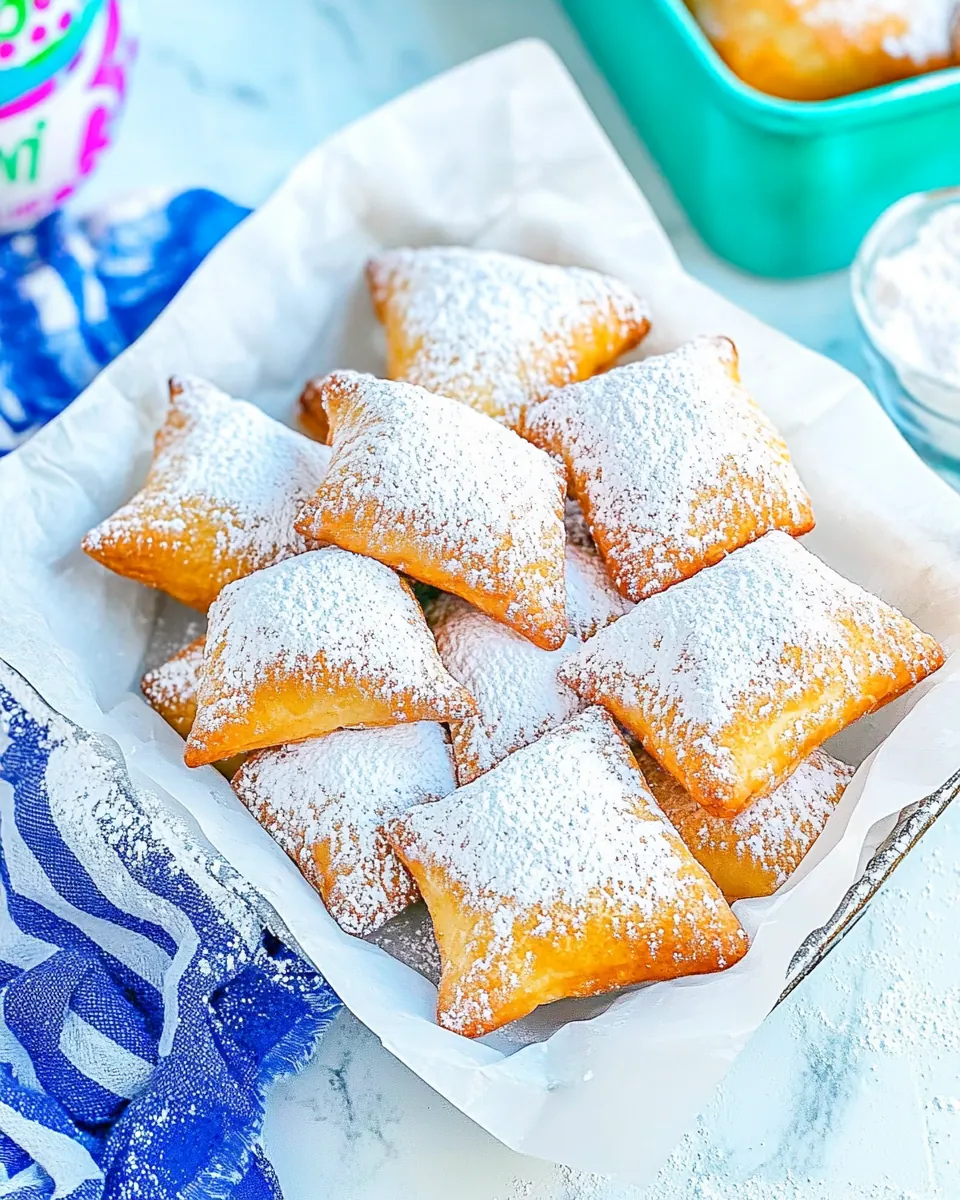
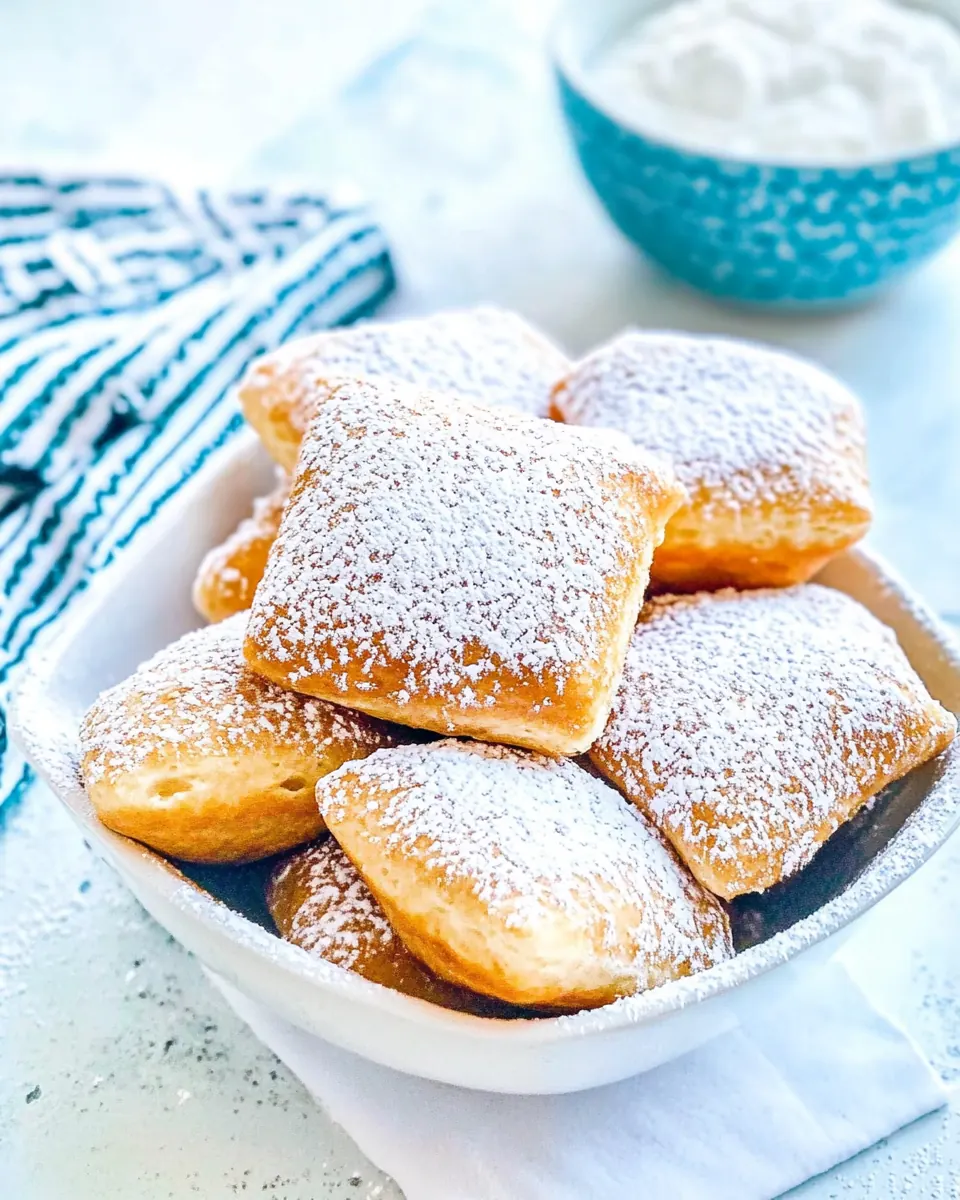
There is a habit I keep when I make Beignet Recipe for friends. I take time with the dough, feeling its texture change under my palms, and I watch the oil carefully as the surface shimmers. Those small rituals turn the process into something meditative, and they help me relax before guests arrive. I love how the powdered sugar melts into tiny clouds on top of hot dough, and how the beignets crackle softly as you tear one open. Each bite delivers a soft interior and a slightly crisp exterior, and that contrast is what makes them hard to resist.
Recipe Snapshot
50 mins
20 mins
30 mins
Medium
220 kcal
American
Gluten-Free, Low FODMAP
Desserts
Large bowl, Whisk, Rolling pin, Large pot, Candy thermometer, Tongs, Pizza cutter
What We Adore About This Beignet Recipe
Comforting Texture
I adore how Beignet Recipe produces a tender interior that almost feels like a warm pillow. When you knead and let the dough rise, the air pockets develop so the finished pieces are light yet substantial. I pay close attention to the dough’s elasticity, because that determines whether the final beignet is airy or dense.
Simple Ingredients, Big Payoff
The list for this Beignet Recipe is refreshingly short. With pantry staples like all purpose flour, eggs, and sugar, you can create something that tastes like a treat from a pastry shop. I love recipes that reward minimal ingredient lists with maximum flavor and texture, and this one does exactly that.
Hands On and Satisfying
Making Beignet Recipe is tactile and engaging. From proofing the yeast to rolling the dough and watching the beignets puff in the oil, every step feels rewarding. I find that cooking this way helps me focus and really enjoy the pace of the kitchen.
Perfect for Gatherings
These beignets are crowd friendly. Because they fry quickly, you can make batch after batch and keep a steady flow of fresh, hot beignets for guests. I like serving them straight from the fryer, dusted in powdered sugar, while people chat and sip coffee.
Flexible and Forgiving
I appreciate how adaptable the recipe is. Whether you need to pause and refrigerate the dough or adjust to slightly different temperatures, Beignet Recipe still shines. I’ve rescued batches that were a touch sticky or a little dry by minor adjustments, and the result remained delicious.
Ingredients You’ll Need for Beignet Recipe
These ingredients form a straightforward and harmonious lineup. Each item plays a clear role: the warm water wakes the yeast, the sugar feeds it, the flour provides structure, and the butter and milk add tenderness and richness. Together they create dough that puffs and browns beautifully when fried.
- 3/4 cup warm water 105-110 degrees F: Provide warm liquid to activate yeast and hydrate the dough; maintain 105–110°F to ensure proper fermentation without killing yeast and to create a tender, elastic dough.
- 2 1/4 teaspoons active dry yeast this is one standard size yeast packet: Activate and leaven the dough by producing carbon dioxide during fermentation; use one standard packet to reliably aerate the mixture and contribute to light, airy beignets.
- 1/3 cup granulated sugar: Add sweetness to balance flavors and feed yeast slightly during fermentation; sugar also promotes browning in the fried beignets for an appealing crust.
- 2 eggs room temperature: Enrich the dough with fat and structure, improving texture and tenderness; room–temperature eggs incorporate more evenly, aiding emulsification and binding.
- 1/2 cup whole milk room temperature: Contribute moisture and richness to the dough while softening the crumb; whole milk at room temperature blends smoothly and supports browning during frying.
- 1/2 teaspoon vanilla: Impart subtle aromatic sweetness to enhance overall flavor; use a measured amount to complement the sugar without overpowering the delicate beignet taste.
- 4 cups all-purpose flour have some extra for rolling if needed: Form the bulk of the dough’s structure by supplying gluten-forming proteins; have extra on hand for dusting and rolling to prevent sticking.
- 3 tablespoons salted butter melted: Add richness and tenderize the dough through fat content; melted salted butter mixes evenly and contributes a slightly savory note to balance sweetness.
- 4 8 cups vegetable oil for frying: Provide the cooking medium for frying to achieve a crisp, golden exterior and a light interior; using the proper amount ensures safe frying depth and consistent temperature control.
- 2 cups powdered sugar: Finish the beignets with a sweet, powdery coating that adds immediate sweetness and visual appeal; dust generously after frying to create the classic presentation.
Putting Together Beignet Recipe
There is a comforting rhythm to assembling these beignets, from proofing the yeast to frying the golden pillows. Below, I expand each instruction into detailed steps so you can follow along with confidence. Keep your tools and ingredients nearby, and pay attention to the sensory cues that tell you the dough and oil are behaving correctly.
- Pour warm (105-110 degrees F) water into a large bowl. Sprinkle on the yeast and sugar and then whisk together. Cover with a light towel or wrap – you do not need to seal it, just cover it to protect from drafts. Let sit for 5-10 minutes. It should become slightly foamy. If it does not foam, than the yeast may be bad, or the water was too hot and killed the yeast.: The water should feel like a warm bath on your wrist, not hot, and you should be able to see faint ripples as you pour. When you combine the water with the yeast and sugar , you will notice a slight change in viscosity as the sugar dissolves. Within minutes, a fresh, yeasty aroma should emerge if the temperature is correct. Watch closely for foaming, which looks like small bubbles and a cloudy surface. If the mixture remains flat, that is usually a sign the yeast was overheated or inactive, and the dough will not rise properly. Avoid using water that is too hot because it kills the yeast, leaving you with dense beignets. A common mistake here is rushing and using tap water that feels warm but is actually too hot, so I test with a thermometer for certainty.
- Add in eggs, milk and vanilla and whisk together. Mix in 1/2 of the flour, then the melted butter, then the rest of the flour.: After sprinkling, use a whisk to combine the components until the sugar mostly dissolves. The action releases a faint sweet scent and a very mild, tangy yeast note as the mixture begins to work. Whisking aerates the mix, giving the yeast the oxygen it needs to bloom. If you find clumps of dry yeast, press gently with the whisk to dislodge them, ensuring uniform activation. A top error is under-whisking, which can leave pockets of undissolved sugar or yeast and yield an inconsistent rise.
- Knead the mixture with your hands until the dough is smooth. If it is too sticky, you may want to add more flour, one tablespoon at a time. Place the dough into a lightly oiled bowl.: Covering traps warmth while still allowing a tiny amount of airflow, which aids blooming. You will notice the surface of the mixture become slightly frothy within 5 to 10 minutes, and the aroma will grow more pronounced. A flimsy towel works well because it prevents drafts that can cool the bowl. Do not tightly seal the bowl, because trapped steam may create a different environment than what the yeast prefers. One common slip is placing the bowl in a cold spot, which delays or prevents foaming, so find a warm corner instead.
- Cover the dough with plastic wrap or a warm damp towel, and leave it undisturbed in a warm, draft free place. Make sure you don’t sit it near a fan or an AC vent. Allow the dough to rise until doubled in size (1-2 hours).: During this rest, the bowl develops a bubbly foam cap if the yeast is healthy. The texture should look aerated, with small, uniform bubbles rather than huge gashes. If the mixture is entirely still, the yeast may be old or dead. I usually sniff the bowl too; a gentle yeasty scent means things are moving. Mistakes include waiting too little time and moving on when the yeast has not bloomed, which leads to a sluggish dough that will not rise well later.
- Roll out dough to 1/4 inch thick. Cut into 2 1/2 inch squares. A pizza cutter works well for this.: When you add the eggs , milk , and vanilla , the mixture becomes creamier and glossier. Whisk until you have a combined, homogeneous liquid. The scent becomes slightly richer, and the liquid will coat the whisk. This step integrates fats and proteins that give the dough elasticity and flavor. If the milk is cold, it can slow the yeast reaction, so bring it to room temperature beforehand. A mistake here is adding eggs straight from the fridge, which chills the mixture and extends rise time.
- Heat oil in a large pot to 370 degrees. You should have at least 2 inches of oil for the deep frying.: Adding flour in stages helps control the dough texture. As you incorporate the first half of the flour , the batter will thicken and become more dough like. When you pour in the melted butter , you will see the mixture glisten and feel silkier, which contributes to a tender crumb. Adding the remaining flour brings the dough together so it cleans the sides of the bowl but remains slightly tacky. If it becomes excessively stiff, you may have added too much flour , which makes the final beignets heavy. The common misstep is adding all the flour at once, which can lead to overworking the dough.
- Deep fry the beignets in batches, don’t crowd. They should pop up when you put them in the oil or the oil is not hot enough. Spoon the oil over the tops of the beignets as the bottoms are frying. Make sure to turn them over so they are golden (not brown) on both sides. It will only take 1-2 minutes per side.: As you knead, you will feel the dough transform from shaggy to elastic and slightly springy. The motion warms the dough and aligns gluten strands, giving structure and chew. I aim for a surface that is smooth and only slightly tacky. If the dough clings heavily, dust lightly with extra flour one tablespoon at a time to avoid toughness. A typical error is kneading too briefly, leaving a rough dough that tears instead of stretching during the rise.
- Drain on a plate lined with paper towels. Sprinkle generously with confectioners’ sugar and serve hot.: Coating the bowl with a thin sheen of oil prevents sticking while allowing the dough to expand. You'll notice the dough shine faintly where it contacts the oil. This little protection makes the dough easier to remove after rising. Avoid using too much oil, which can pool and change the dough's exterior texture. A mistake here is neglecting to oil the bowl, which causes the dough to stick and deflate when you try to remove it later.
- Cover the dough with plastic wrap or a warm damp towel and leave it undisturbed in a warm draft free place: During the rise you should see gradual expansion, and the dough will feel lighter when you gently press it. The top may show small bubbles and a soft, pillowy surface. Drafts will cool the dough and slow the yeast, so choose a cozy spot. Avoid placing it near an AC vent or fan which will chill it. If the dough is slow to double, confirm the ambient temperature; slightly warming the room helps.
- Allow the dough to rise until doubled in size 1 to 2 hours: The doubling is the visual cue that the gluten network is set and the yeast has created enough gas to make the beignets airy. The smell will shift toward a pleasantly fermented note. If it takes substantially longer, your room may be cool or the yeast weak. Resist the urge to rush this step, because under-risen dough results in dense beignets. One common pitfall is checking too often and letting heat escape, which prolongs the rise.
- Roll out dough to 1/4 inch thick: Rolling reveals the dough's developed elasticity as it stretches smoothly under the rolling pin. You want an even thickness so the beignets cook uniformly. The surface should feel soft and slightly tacky, and the edges should not tear. If the dough resists and springs back, let it rest for a few minutes to relax the gluten. Overrolling can compress the air pockets you worked to create, so handle gently.
- Cut into 2 1/2 inch squares: Using a cutter or a pizza cutter gives crisp edges that fry evenly. When you lift a cut piece, it should hold shape while still feeling light. If pieces are irregular, they will cook at different rates, so aim for consistent squares. A frequent mistake is cutting too large pieces, which extend frying time and risk an undercooked center.
- Heat oil in a large pot to 370 degrees: The oil should shimmer and gently ripple when ready, and a thermometer will confirm the steady 370 degrees. At this heat the beignets puff quickly and form a golden exterior while the interior cooks through. Oil that is cooler will soak in and make greasy beignets, while oil that is hotter can over brown the outside before the center is done. Using a reliable thermometer prevents those outcomes. Do not overcrowd the pot, because adding many pieces at once drops the temperature dramatically.
- You should have at least 2 inches of oil for the deep frying: The oil depth ensures the beignets float and rotate slightly as they fry, promoting even browning. You should hear a steady gentle sizzle as you add pieces, not a violent pop. If the oil splatters excessively, it may be too hot or there might be excess moisture on the dough pieces, so pat them lightly dry. A common mistake is using too shallow oil which causes uneven cooking and soggy bottoms.
- Deep fry the beignets in batches dont crowd: When the pieces hit the oil they should immediately begin to puff and rise, and you will see small bubbles clinging to the surface. Spoon hot oil over the tops to encourage puffing, and flip them so both sides reach a golden color rather than dark brown. Each side usually takes 1 to 2 minutes, and the exterior should be crisp while the center stays soft. Avoid crowding which cools the oil and results in greasy beignets. A typical error is frying too many at once, which reduces oil temperature and ruins texture.
- They should pop up when you put them in the oil or the oil is not hot enough: When beignets fail to rise in the oil, the likely culprit is an oil temperature that is too low or underproofed dough. The correct reaction is immediate and buoyant, causing pieces to float. If you notice flat results, check the thermometer and the dough's rise. Reheating the oil or allowing the dough a little more time to rest often fixes this. Avoid adding cold pieces from the refrigerator directly to oil, as that shock cools the surface and hinders puffing.
- Spoon the oil over the tops of the beignets as the bottoms are frying: This action helps the top expand and brown evenly, producing that classic puff. You will see steam escape from the dough and the surface acquire a light golden sheen. The sound is a consistent sizzle rather than a frantic crackle. Skipping this spooning can leave the top pale and undercooked, so I do it gently to encourage uniformity.
- Make sure to turn them over so they are golden not brown on both sides: Flip with tongs when the first side is golden, and watch as the second side browns quickly. The visual cue to aim for is a warm honey color, not a deep mahogany. If they brown too fast, the oil may be too hot, so reduce the heat slightly. A common oversight is leaving them too long on one side and getting overly dark edges with an undercooked interior.
- It will only take 1 to 2 minutes per side: Timing is brief, so stay focused and use a timer if helpful. You will hear a steady gentle sizzle and see a soft rise in the dough before removing. The smell will be pleasantly toasty and sweet, but not acrid. Overcooking dries out the interior, so quick turns are key. Avoid assuming they need more time because they look slightly pale; a pale interior may still be cooked if the exterior is golden.
- Drain on a plate lined with paper towels: Drain briefly to remove excess oil, then transfer to a clean plate for dusting. You will notice the surface lose a glossy sheen as oil drains, and the beignets will feel light rather than greasy. Leaving them on towels too long can cause steam softening, so transfer promptly to serving ware. A mistake is stacking them while hot which traps steam and makes the exterior soggy.
- Sprinkle generously with confectioners sugar and serve hot: The powdered sugar should cling to the warm surface, creating a snowy coating that melts slightly on contact. The aroma becomes sweet and inviting, and the contrast between the crisp shell and tender interior is immediate. Serve right away for the best textural contrast, because these are at their peak when warm. A final error to avoid is dusting too early if you plan to store them, because moisture can dissolve the sugar into a glaze instead of a powdery dusting.
Recipe Tips about Beignet Recipe
These tips expand on the notes and give practical advice for reliable results and easier prepping. I include storage pointers and tool recommendations so you can reproduce this recipe with confidence.
- Storage tip Use an airtight container at room temperature for 2 to 3 days, but expect the texture to soften with time, so reheat briefly to refresh them.
- Freezing tip Freeze cooled beignets for 1 to 2 months, then reheat in a warm oven to restore some crispness before dusting with powdered sugar.
- Thermometer recommendation A candy or deep fry thermometer is worth the investment, it helps you hit the 105 to 110 degrees for the water and 370 degrees for the oil precisely.
- Oil selection Choose neutral vegetable oil for frying so the beignet flavor remains pure and the oil reaches high heat without imparting other flavors.
- Dusting technique Sprinkle powdered sugar generously immediately after frying while beignets are hot, so the sugar adheres and melts slightly into the crust.
What Complements This Beignet Recipe
Beignets pair beautifully with coffee and tea for casual breakfasts, or as a sweet finish to a festive brunch. Below I describe serving ideas, occasions, and storage approaches in depth.
- Breakfast pairing Serve warm beignets with a robust cup of coffee or a milky latte, the bitterness of coffee balances the sweet powdered sugar and soft dough.
- Brunch occasion Offer beignets alongside fruit platters and savory quiches for a mixed brunch spread where guests can choose sweet or savory bites.
- Crowd serving For gatherings, fry in batches and keep them warm in a low oven set to a gentle temperature, then dust with powdered sugar just before serving to preserve texture.
- Seasonal occasions These are lovely for holiday mornings or special celebrations where a warm, shareable pastry creates ceremony and comfort.
- Storage and reheating Store at room temperature in an airtight container for a few days, or freeze for longer storage, then reheat in the oven to refresh the exterior before serving.
- Presentation idea Dust generously with powdered sugar and serve on a wide platter so guests can help themselves, adding a rustic, welcoming touch.
FAQ
Conclusion
What makes this Beignet Recipe special is its combination of simple ingredients and joyful technique, delivering warm, airy fritters dusted in powdered sugar. Give these a try because they are satisfying, shareable, and perfect for making memories around a kitchen table. I hope you enjoy the ritual of proofing, rolling, and frying these beignets, and that the results bring the same small pleasures to your home that they have to mine.

Beignet Recipe
Equipment
- Large Bowl
- Whisk
- Rolling Pin
- Large Pot
- Candy thermometer
- Tongs
- Pizza Cutter
Ingredients
- 3/4 cup warm water 105-110 degrees F Provide warm liquid to activate yeast and hydrate the dough; maintain 105–110°F to ensure proper fermentation without killing yeast and to create a tender, elastic dough.
- 2 1/4 teaspoons active dry yeast this is one standard size yeast packet Activate and leaven the dough by producing carbon dioxide during fermentation; use one standard packet to reliably aerate the mixture and contribute to light, airy beignets.
- 1/3 cup granulated sugar Add sweetness to balance flavors and feed yeast slightly during fermentation; sugar also promotes browning in the fried beignets for an appealing crust.
- 2 eggs room temperature Enrich the dough with fat and structure, improving texture and tenderness; room-temperature eggs incorporate more evenly, aiding emulsification and binding.
- 1/2 cup whole milk room temperature Contribute moisture and richness to the dough while softening the crumb; whole milk at room temperature blends smoothly and supports browning during frying.
- 1/2 teaspoon vanilla Impart subtle aromatic sweetness to enhance overall flavor; use a measured amount to complement the sugar without overpowering the delicate beignet taste.
- 4 cups all-purpose flour have some extra for rolling if needed Form the bulk of the dough’s structure by supplying gluten-forming proteins; have extra on hand for dusting and rolling to prevent sticking.
- 3 tablespoons salted butter melted Add richness and tenderize the dough through fat content; melted salted butter mixes evenly and contributes a slightly savory note to balance sweetness.
- 4 -8 cups vegetable oil for frying Provide the cooking medium for frying to achieve a crisp, golden exterior and a light interior; using the proper amount ensures safe frying depth and consistent temperature control.
- 2 cups powdered sugar Finish the beignets with a sweet, powdery coating that adds immediate sweetness and visual appeal; dust generously after frying to create the classic presentation.
Instructions
- Pour warm (105-110 degrees F) water into a large bowl. Sprinkle on the yeast and sugar and then whisk together. Cover with a light towel or wrap – you do not need to seal it, just cover it to protect from drafts. Let sit for 5-10 minutes. It should become slightly foamy. If it does not foam, than the yeast may be bad, or the water was too hot and killed the yeast.: The water should feel like a warm bath on your wrist, not hot, and you should be able to see faint ripples as you pour. When you combine the water with the yeast and sugar , you will notice a slight change in viscosity as the sugar dissolves. Within minutes, a fresh, yeasty aroma should emerge if the temperature is correct. Watch closely for foaming, which looks like small bubbles and a cloudy surface. If the mixture remains flat, that is usually a sign the yeast was overheated or inactive, and the dough will not rise properly. Avoid using water that is too hot because it kills the yeast, leaving you with dense beignets. A common mistake here is rushing and using tap water that feels warm but is actually too hot, so I test with a thermometer for certainty.
- Add in eggs, milk and vanilla and whisk together. Mix in 1/2 of the flour, then the melted butter, then the rest of the flour.: After sprinkling, use a whisk to combine the components until the sugar mostly dissolves. The action releases a faint sweet scent and a very mild, tangy yeast note as the mixture begins to work. Whisking aerates the mix, giving the yeast the oxygen it needs to bloom. If you find clumps of dry yeast, press gently with the whisk to dislodge them, ensuring uniform activation. A top error is under-whisking, which can leave pockets of undissolved sugar or yeast and yield an inconsistent rise.
- Knead the mixture with your hands until the dough is smooth. If it is too sticky, you may want to add more flour, one tablespoon at a time. Place the dough into a lightly oiled bowl.: Covering traps warmth while still allowing a tiny amount of airflow, which aids blooming. You will notice the surface of the mixture become slightly frothy within 5 to 10 minutes, and the aroma will grow more pronounced. A flimsy towel works well because it prevents drafts that can cool the bowl. Do not tightly seal the bowl, because trapped steam may create a different environment than what the yeast prefers. One common slip is placing the bowl in a cold spot, which delays or prevents foaming, so find a warm corner instead.
- Cover the dough with plastic wrap or a warm damp towel, and leave it undisturbed in a warm, draft free place. Make sure you don’t sit it near a fan or an AC vent. Allow the dough to rise until doubled in size (1-2 hours).: During this rest, the bowl develops a bubbly foam cap if the yeast is healthy. The texture should look aerated, with small, uniform bubbles rather than huge gashes. If the mixture is entirely still, the yeast may be old or dead. I usually sniff the bowl too; a gentle yeasty scent means things are moving. Mistakes include waiting too little time and moving on when the yeast has not bloomed, which leads to a sluggish dough that will not rise well later.
- Roll out dough to 1/4 inch thick. Cut into 2 1/2 inch squares. A pizza cutter works well for this.: When you add the eggs , milk , and vanilla , the mixture becomes creamier and glossier. Whisk until you have a combined, homogeneous liquid. The scent becomes slightly richer, and the liquid will coat the whisk. This step integrates fats and proteins that give the dough elasticity and flavor. If the milk is cold, it can slow the yeast reaction, so bring it to room temperature beforehand. A mistake here is adding eggs straight from the fridge, which chills the mixture and extends rise time.
- Heat oil in a large pot to 370 degrees. You should have at least 2 inches of oil for the deep frying.: Adding flour in stages helps control the dough texture. As you incorporate the first half of the flour , the batter will thicken and become more dough like. When you pour in the melted butter , you will see the mixture glisten and feel silkier, which contributes to a tender crumb. Adding the remaining flour brings the dough together so it cleans the sides of the bowl but remains slightly tacky. If it becomes excessively stiff, you may have added too much flour , which makes the final beignets heavy. The common misstep is adding all the flour at once, which can lead to overworking the dough.
- Deep fry the beignets in batches, don’t crowd. They should pop up when you put them in the oil or the oil is not hot enough. Spoon the oil over the tops of the beignets as the bottoms are frying. Make sure to turn them over so they are golden (not brown) on both sides. It will only take 1-2 minutes per side.: As you knead, you will feel the dough transform from shaggy to elastic and slightly springy. The motion warms the dough and aligns gluten strands, giving structure and chew. I aim for a surface that is smooth and only slightly tacky. If the dough clings heavily, dust lightly with extra flour one tablespoon at a time to avoid toughness. A typical error is kneading too briefly, leaving a rough dough that tears instead of stretching during the rise.
- Drain on a plate lined with paper towels. Sprinkle generously with confectioners’ sugar and serve hot.: Coating the bowl with a thin sheen of oil prevents sticking while allowing the dough to expand. You'll notice the dough shine faintly where it contacts the oil. This little protection makes the dough easier to remove after rising. Avoid using too much oil, which can pool and change the dough's exterior texture. A mistake here is neglecting to oil the bowl, which causes the dough to stick and deflate when you try to remove it later.
- Cover the dough with plastic wrap or a warm damp towel and leave it undisturbed in a warm draft free place: During the rise you should see gradual expansion, and the dough will feel lighter when you gently press it. The top may show small bubbles and a soft, pillowy surface. Drafts will cool the dough and slow the yeast, so choose a cozy spot. Avoid placing it near an AC vent or fan which will chill it. If the dough is slow to double, confirm the ambient temperature; slightly warming the room helps.
- Allow the dough to rise until doubled in size 1 to 2 hours: The doubling is the visual cue that the gluten network is set and the yeast has created enough gas to make the beignets airy. The smell will shift toward a pleasantly fermented note. If it takes substantially longer, your room may be cool or the yeast weak. Resist the urge to rush this step, because under-risen dough results in dense beignets. One common pitfall is checking too often and letting heat escape, which prolongs the rise.
- Roll out dough to 1/4 inch thick: Rolling reveals the dough's developed elasticity as it stretches smoothly under the rolling pin. You want an even thickness so the beignets cook uniformly. The surface should feel soft and slightly tacky, and the edges should not tear. If the dough resists and springs back, let it rest for a few minutes to relax the gluten. Overrolling can compress the air pockets you worked to create, so handle gently.
- Cut into 2 1/2 inch squares: Using a cutter or a pizza cutter gives crisp edges that fry evenly. When you lift a cut piece, it should hold shape while still feeling light. If pieces are irregular, they will cook at different rates, so aim for consistent squares. A frequent mistake is cutting too large pieces, which extend frying time and risk an undercooked center.
- Heat oil in a large pot to 370 degrees: The oil should shimmer and gently ripple when ready, and a thermometer will confirm the steady 370 degrees. At this heat the beignets puff quickly and form a golden exterior while the interior cooks through. Oil that is cooler will soak in and make greasy beignets, while oil that is hotter can over brown the outside before the center is done. Using a reliable thermometer prevents those outcomes. Do not overcrowd the pot, because adding many pieces at once drops the temperature dramatically.
- You should have at least 2 inches of oil for the deep frying: The oil depth ensures the beignets float and rotate slightly as they fry, promoting even browning. You should hear a steady gentle sizzle as you add pieces, not a violent pop. If the oil splatters excessively, it may be too hot or there might be excess moisture on the dough pieces, so pat them lightly dry. A common mistake is using too shallow oil which causes uneven cooking and soggy bottoms.
- Deep fry the beignets in batches dont crowd: When the pieces hit the oil they should immediately begin to puff and rise, and you will see small bubbles clinging to the surface. Spoon hot oil over the tops to encourage puffing, and flip them so both sides reach a golden color rather than dark brown. Each side usually takes 1 to 2 minutes, and the exterior should be crisp while the center stays soft. Avoid crowding which cools the oil and results in greasy beignets. A typical error is frying too many at once, which reduces oil temperature and ruins texture.
- They should pop up when you put them in the oil or the oil is not hot enough: When beignets fail to rise in the oil, the likely culprit is an oil temperature that is too low or underproofed dough. The correct reaction is immediate and buoyant, causing pieces to float. If you notice flat results, check the thermometer and the dough's rise. Reheating the oil or allowing the dough a little more time to rest often fixes this. Avoid adding cold pieces from the refrigerator directly to oil, as that shock cools the surface and hinders puffing.
- Spoon the oil over the tops of the beignets as the bottoms are frying: This action helps the top expand and brown evenly, producing that classic puff. You will see steam escape from the dough and the surface acquire a light golden sheen. The sound is a consistent sizzle rather than a frantic crackle. Skipping this spooning can leave the top pale and undercooked, so I do it gently to encourage uniformity.
- Make sure to turn them over so they are golden not brown on both sides: Flip with tongs when the first side is golden, and watch as the second side browns quickly. The visual cue to aim for is a warm honey color, not a deep mahogany. If they brown too fast, the oil may be too hot, so reduce the heat slightly. A common oversight is leaving them too long on one side and getting overly dark edges with an undercooked interior.
- It will only take 1 to 2 minutes per side: Timing is brief, so stay focused and use a timer if helpful. You will hear a steady gentle sizzle and see a soft rise in the dough before removing. The smell will be pleasantly toasty and sweet, but not acrid. Overcooking dries out the interior, so quick turns are key. Avoid assuming they need more time because they look slightly pale; a pale interior may still be cooked if the exterior is golden.
- Drain on a plate lined with paper towels: Drain briefly to remove excess oil, then transfer to a clean plate for dusting. You will notice the surface lose a glossy sheen as oil drains, and the beignets will feel light rather than greasy. Leaving them on towels too long can cause steam softening, so transfer promptly to serving ware. A mistake is stacking them while hot which traps steam and makes the exterior soggy.
- Sprinkle generously with confectioners sugar and serve hot: The powdered sugar should cling to the warm surface, creating a snowy coating that melts slightly on contact. The aroma becomes sweet and inviting, and the contrast between the crisp shell and tender interior is immediate. Serve right away for the best textural contrast, because these are at their peak when warm. A final error to avoid is dusting too early if you plan to store them, because moisture can dissolve the sugar into a glaze instead of a powdery dusting.
Notes
- Storage tip Use an airtight container at room temperature for 2 to 3 days, but expect the texture to soften with time, so reheat briefly to refresh them.
- Freezing tip Freeze cooled beignets for 1 to 2 months, then reheat in a warm oven to restore some crispness before dusting with powdered sugar.
- Thermometer recommendation A candy or deep fry thermometer is worth the investment, it helps you hit the 105 to 110 degrees for the water and 370 degrees for the oil precisely.
- Oil selection Choose neutral vegetable oil for frying so the beignet flavor remains pure and the oil reaches high heat without imparting other flavors.
- Dusting technique Sprinkle powdered sugar generously immediately after frying while beignets are hot, so the sugar adheres and melts slightly into the crust.