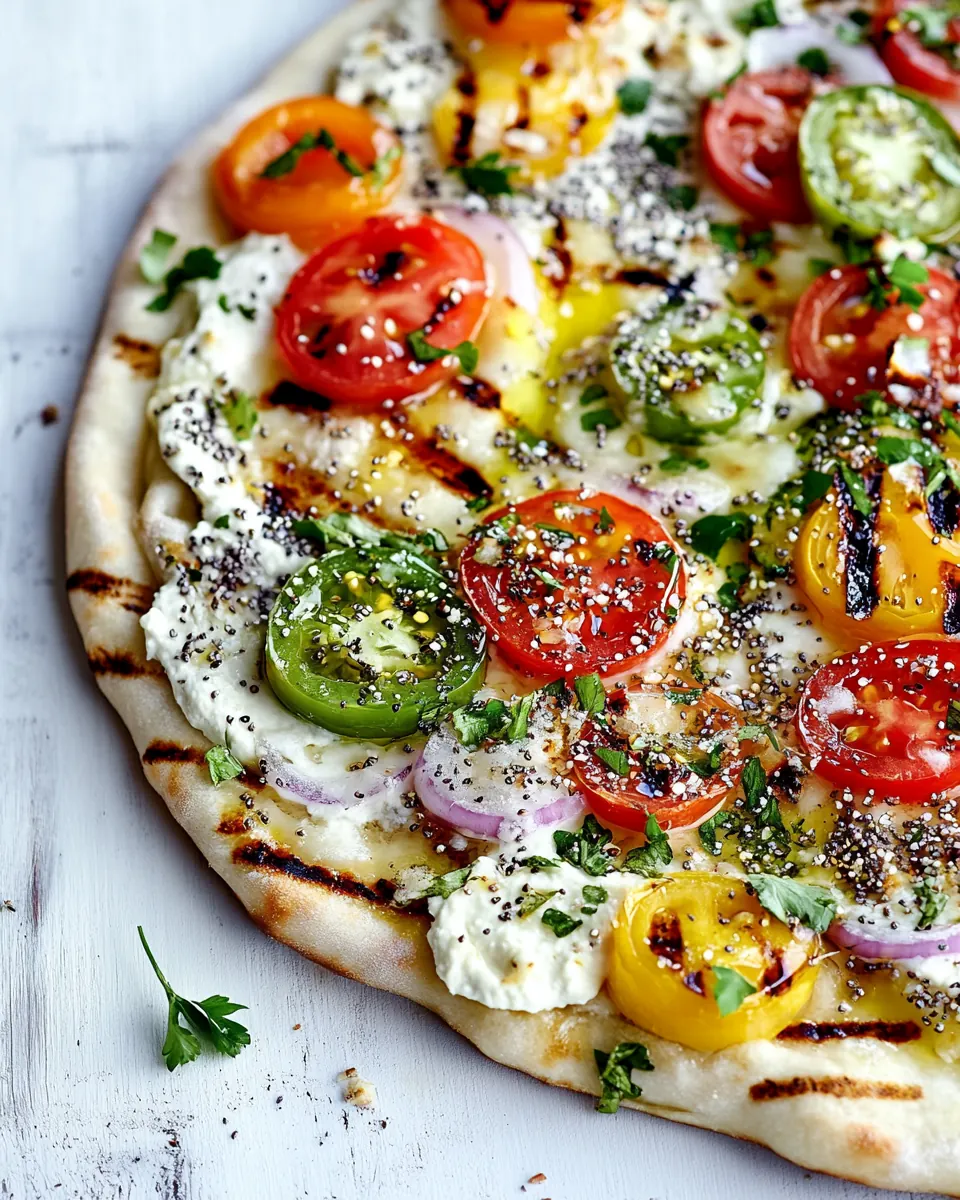
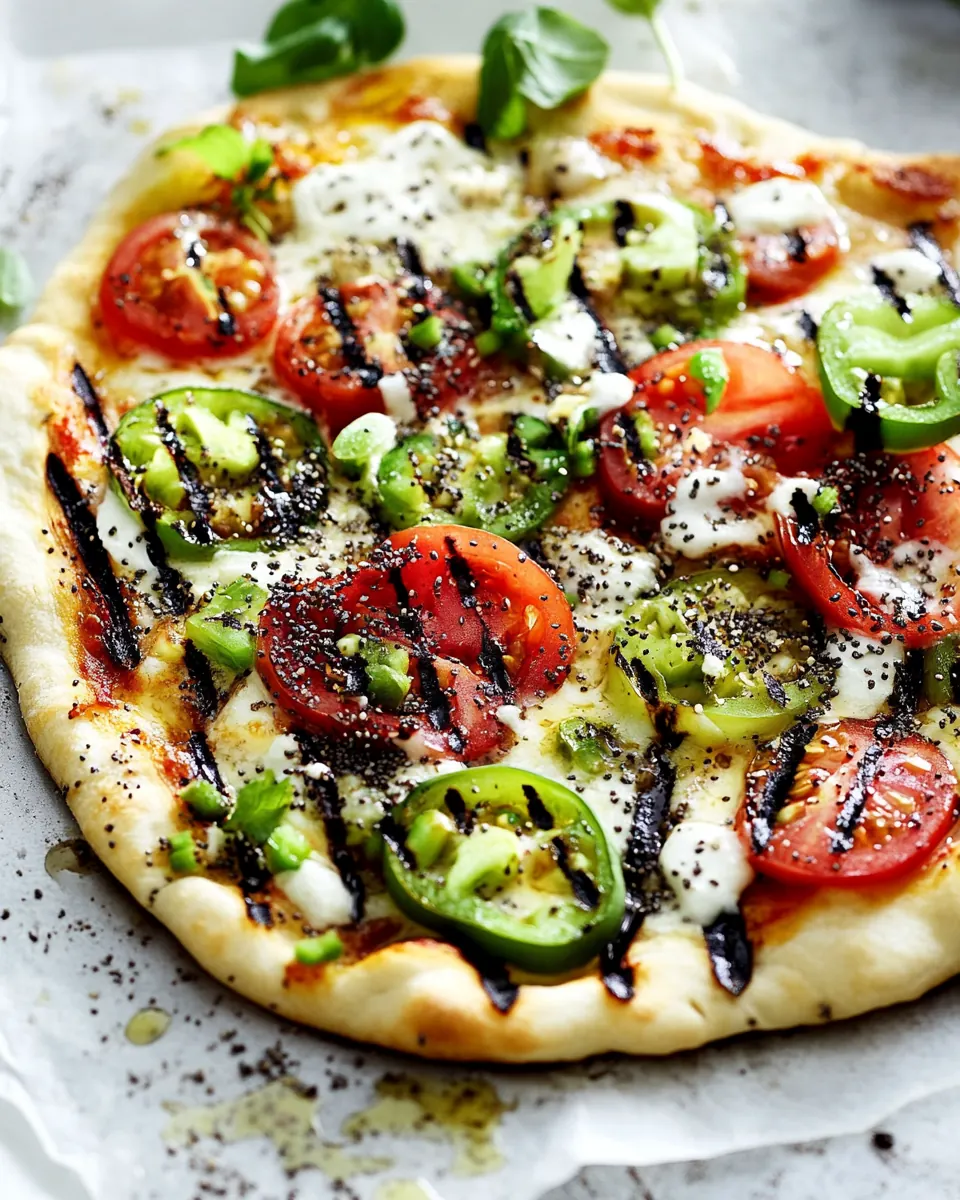
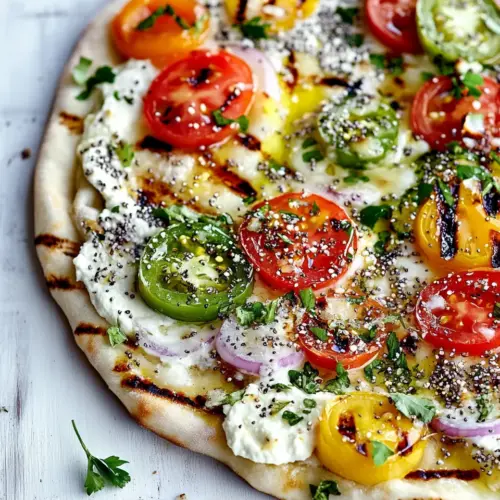
Grilled Everything Bagel Pizza
Grilled Everything Bagel Pizza came about on a humid summer evening when I wanted the bold flavors of a bagel with lox but also craved the playfulness of a pizza. I remember pulling together a few simple pantry staples, firing up the grill, and watching the dough bloom into a blistered, smoky canvas that begged for creamy and briny toppings. That first bite, warm crust giving way to cool cream cheese and silky lox, convinced me this mashup deserved repeat performances.
That night I learned how much personality a grill lends to otherwise familiar ingredients. The caramelized edges of grilled red onion added sweetness, while the charred tomato slices offered a concentrated brightness that contrasted the rich avocado. I scribbled notes, adjusted timing, and now I have a version that I reach for when friends drop by or when I want an easy, celebratory dinner that feels both elevated and approachable.
Recipe Snapshot
35 mins
15 mins
20 mins
Easy
450 kcal
American
Keto, Gluten-Free
Dinner
Grill, Grill brush, Spatula, Tongs, Baking sheet, Pizza peel or baking sheet for launch
What You’ll Enjoy About This Grilled Everything Bagel Pizza
Smoky, crisp, and refreshing all at once
I love how Grilled Everything Bagel Pizza delivers a crisp, grilled crust that carries smoky undertones, while the topping trio of cream cheese, lox, and capers keeps every bite bright. The contrast between warm bread and cool toppings is what hooks me every time.
Quick to assemble, impressive to serve
We can get this from dough to table in under an hour, and it looks like something special. I often bring this to casual gatherings because it eats like a pizza yet tastes unlike anything else on the buffet.
Layered textures and flavors
The grilled red onion softens and sweetens, the avocado offers creaminess, and the everything bagel seasoning adds that signature crunch and toasted sesame pop. I purposely keep the components simple so each note sings.
Flexible and forgiving
I like that the method tolerates slight timing variations. If the grill runs hotter, you can lift the pizza sooner. If the crust needs a bit more color, a minute or two more on the grate does the trick. That forgiving nature makes it a go to for weekend cooks like me.
Great for sharing or a solo treat
Whether we feed a small group or want a decadent solo dinner, this recipe scales easily. I often halve the dough for a personal pizza, or use a full package when friends are over. Either way, the result is always a crowd pleaser.
Ingredient List for Grilled Everything Bagel Pizza
These ingredients are tuned to create a balance of smoky, creamy, salty, and fresh. The crust acts as a neutral, warm base, while cream cheese and lox supply the signature bagel flavors. Grilling the vegetables concentrates natural sugars and adds char, making each bite layered and interesting.
- olive oil: Drizzle and lightly brush to help prevent sticking and promote even browning on the grill; also adds subtle Mediterranean flavor that complements toppings when used sparingly.
- 1 red onion, sliced 1/4 inch thick: Slice thin and layer to add sharp, sweet, and slightly pungent notes that caramelize gently on the grill; provides texture contrast and brightens overall flavor when distributed evenly.
- 1 firm avocado, peeled, pitted, sliced 1/4 inch thick: Peel and slice to contribute creamy, buttery richness and a cool counterpoint to smoky grilled crust; adds healthy fats and smooth mouthfeel when arranged over cream cheese or finished pizza.
- 2 firm Roma tomatoes, sliced 1/4 inch thick: Slice firm and layer for juicy, slightly acidic freshness that balances richness; holds shape when grilled and contributes vibrant color and light acidity to each bite.
- salt and pepper: Season lightly to enhance and balance flavors across toppings; use sparingly to avoid overpowering delicate elements while bringing out natural tastes.
- 1 package of store bought pizza dough or homemade: Stretch or roll and grill as the foundation that supports all toppings; provides structure, chew, and charred flavor when prepped according to package or recipe instructions.
- 1 cup cream cheese: Spread smoothly to create a tangy, creamy base that contrasts with salty and smoky toppings; helps toppings adhere while contributing rich, mellow dairy notes.
- 5 oz . lox: Arrange thin slices to impart smoky, salty, and savory umami that echoes classic bagel-and-lox combos; layer after cream cheese to preserve texture and flavor.
- 3 tablespoon s capers: Scatter sparingly to add briny bursts and small pops of acidity that cut through richness; distributes concentrated savory flavor and pairs well with fish and cream cheese.
- 1 2 tablespoons dill: Sprinkle freshly chopped or dried to lend aromatic, herbaceous notes that brighten the dish; use according to taste to add a fresh, slightly grassy finish.
- 1 tablespoon everything bagel seasoning: Dust liberally to introduce crunchy, toasty, and garlicky seeds and seasonings characteristic of an everything bagel; provides concentrated savory topping that defines the recipe.
Recipe Steps for Grilled Everything Bagel Pizza

Grilling pizza feels theatrical but it is straightforward once you get the timing down. Below I expand each direction into detailed, sensory rich guidance so you can replicate the same balanced result I get at home.
- To heat the grill: Preheat grill with the lid down to 500 degrees F for 15 minutes. Open the lid and use a stainless steel grill brush to remove any food particles from the cooking grates.: Preheat grill with the lid down to 500 degrees F for 15 minutes : You will smell the grill warming and maybe a faint metallic aroma as the grates heat. Getting the grill to a true 500 degrees F ensures a blistered, crisp bottom on the crust, which contrasts nicely with the cool toppings. A very hot grate gives quick color without drying the dough, which is why I always wait the full heating time. One common mistake is rushing this step, then finding the dough sticks or cooks unevenly, so be patient and use an oven thermometer or the grill's gauge to verify heat.
- Place the sliced red onions, avocado and tomato slices on a baking sheet and brush with olive oil. Sprinkle on salt and fresh cracked pepper to taste. Using a spatula, transfer onions onto the grates and grill for 8 -12 minutes with the lid down. Lift the lid and remove the onions and transfer to a baking sheet. Add the avocado and tomato slices onto the grates, grill for 2-3 minutes with the lid down. Lift the lid and remove the avocado and tomatoes and transfer to a baking sheet. Set aside.: After preheating, the grate will hiss slightly as residues char, and brushing clears the surface for clean contact with the dough and vegetables. This prevents flare ups and ensures an even sear, which is essential for that crisp texture. If you skip cleaning, old bits can burn and impart off flavors, so take a few extra strokes now.
- Cover the pizza peel or the back side of baking sheet with parchment paper. Work the pizza dough into your desired shape. Brush the top with olive oil. Flip the pizza dough onto the grill, oil side down, and peel back the parchment paper from the top side. Grill for 2 minutes with lid open. Using tongs, pull the pizza off the grate (at this point the dough will have enough structure from the grilled bottom it can easily be moved this way). Brush the top of the crust with olive oil and return it to the grill with the oil side down; grill for another 2-minutes.: Brushing each slice with olive oil gives a glossy sheen and promotes even browning on the grill. The oil will sizzle on contact and carry heat to the vegetables, encouraging caramelization. Be mindful not to overload with oil, which can cause flare ups. A light, even coat is what I aim for.
- Remove the crust from the grill to add the toppings. Spread cream cheese on top and layer with grilled onions, avocado, tomatoes, lox and cheese. If the bottom of the crust is well browned, place a piece of foil the size of the pizza onto the grates (this will prevent the bottom of the pizza from further browning). Transfer topped pizza back to the grill and close the lid. At this point you are just melting the cheese. Remove pizza from the grill, top with capers, dill and everything bagel seasoning. Serve immediately.: You will smell the pepper when you grind it freshly, and the modest salt will draw out the tomatoes juices slightly as they heat. Seasoning pre-grill helps build flavor depth, but remember the lox and capers are salty, so I err on the lighter side here. Over-salting early is a frequent misstep, as it can concentrate too strongly under heat.
- Using a spatula, transfer onions onto the grates and grill for 8 -12 minutes with the lid down: As the red onion sizzles, you will hear gentle popping and see edges darken to a deep brown, not black. The lid down creates a hotter environment, softening the onion while encouraging sweet Maillard notes. I watch for tenderness and char ribbons; if pieces char too quickly, move them to a cooler section. Avoid crowding the grate, which steams rather than chars.
- Lift the lid and remove the onions and transfer to a baking sheet: The onions will release a sweet, savory perfume when lifted off the heat. Moving them to a baking sheet halts cooking and preserves texture. Leaving them on the hot grate can overcaramelize them, so transfer promptly if you see deep dark edges forming.
- Add the avocado and tomato slices onto the grates, grill for 2-3 minutes with the lid down: Avocado and tomato will sizzle lightly and show quick, attractive grill marks in just a few minutes. The avocado softens and gains a smoky note while the tomato concentrates its juices. Because these are delicate, watch closely; overcooking causes collapse, which is a common error. Aim for light char, not mush.
- Lift the lid and remove the avocado and tomatoes and transfer to a baking sheet: You should see glossy, slightly shrunken tomato slices and warm, tender avocado . Cooling them briefly keeps them from breaking when you assemble the pizza. Leaving them on the hot grate risks losing shape and texture, so move them off promptly.
- Set aside: Let the grilled vegetables rest on the baking sheet while you work the dough; this pause allows juices to stabilize and prevents sogginess on the crust. Resting also concentrates aroma, which you will notice as a richer scent when you return to assemble. A frequent slip is assembling immediately while the toppings are piping hot, which can make spreading the cream cheese messy.
- Cover the pizza peel or the back side of baking sheet with parchment paper: The parchment creates a nonstick layer and helps you launch the dough onto the grill. You will feel the paper's smooth resistance as you slide the dough, and it peels away cleanly if you let the dough form some structure first. Skipping parchment can make the transfer fussy and increase tearing risk.
- Work the pizza dough into your desired shape: Gently stretching the dough by hand produces an irregular, artisan look, while rolling yields a more uniform circle. The dough should feel slightly tacky, not sticky, and you will see small bubbles form as you coax it. Overworking can toughen the crust, so handle it with light, confident stretches.
- Brush the top with olive oil: A thin coat of olive oil promotes browning and helps the crust resist sticking when flipped. The oil will glisten and, when it hits the hot grate, sparks a satisfying sizzle. Too much oil leads to greasy spots, so a modest brush is ideal.
- Flip the pizza dough onto the grill, oil side down, and peel back the parchment paper from the top side: The flip reveals the oiled side meeting the hot grates, and you will hear an immediate sear. Removing the parchment lets the dough make full contact with the heat for an even char. If the dough sticks during transfer, give it a moment to set then try again gently rather than forcing it, which can tear the crust.
- Grill for 2 minutes with lid open: Two minutes at high heat creates a bronzed underside and sets the dough so it has structure. You will see small blisters rise and feel the surface firm slightly. Keep the lid open so the top does not overproof, and watch closely because heat can vary widely across grills.
- Using tongs, pull the pizza off the grate: At this point the bottom will be set enough to move, and you will notice a crisp, golden tone. Using tongs to lift prevents burns and helps you flip or reposition with control. If the crust tears, it likely needed another 30 to 60 seconds on the heat to solidify bonds.
- Brush the top of the crust with olive oil and return it to the grill with the oil side down; grill for another 2-minutes: This second sear finishes the bottom and crisps edges, producing a satisfyingly crunchy bite. You will hear a deeper sizzle and see more blistering occur. Overdoing it causes an overly hard crust, so monitor closely and remove when richly browned.
- Remove the crust from the grill to add the toppings: The warm crust should feel slightly springy and smell toasty. Removing to a flat surface gives you control to spread toppings without slipping. If you add wet toppings to a piping hot crust, they can slide; let the surface cool for a minute if needed.
- Spread cream cheese on top and layer with grilled onions, avocado, tomatoes, lox and cheese: Starting with a creamy foundation, you will feel the spread glide and see a neat layering effect. The grilled pieces add smoky edges and the lox keeps its silky texture since it is not heated. A common mistake is piling too high, which makes slicing messy, so arrange toppings evenly.
- If the bottom of the crust is well browned, place a piece of foil the size of the pizza onto the grates: The foil acts as a heat shield to prevent further browning of the base while the toppings warm. You will notice a gentler heat under the foil, allowing cheese or spreads to soften without scorching the bottom. Neglecting this can lead to an overcooked base before toppings meld.
- Transfer topped pizza back to the grill and close the lid: With the lid closed you will hear a soft hush as the enclosed heat encourages melting and melding of flavors. This step is about gentle finishing rather than cooking. Check often to avoid overmelting or steaming the crust too much.
- At this point you are just melting the cheese: You will see the cream cheese relax and any softer elements soften slightly. The aroma will turn richer and more integrated. Avoid leaving it until the toppings run excessively, which can make the crust soggy.
- Remove pizza from the grill, top with capers, dill and everything bagel seasoning: The final scatter of capers , dill , and everything bagel seasoning adds bursts of brine, herb brightness, and crunchy texture. The contrast of warm and cool, smoky and salty, is most pronounced now. Add these last so they retain their texture and pop.
- Serve immediately: Serve while the crust is still warm and the toppings have just come together. You will notice the contrast between the toasty base and silky toppings, which is the heart of this recipe. Waiting too long diminishes that contrast, so aim to slice and enjoy right away.
Ways to Customize

You can tweak this pizza to match your pantry or mood. Below are practical, flavor-forward ideas to personalize the recipe while keeping the core identity intact.
- Swap the dough style: Use a thinner rolled dough for a crispier, cracker like base or a slightly thicker hand-stretched dough for a chewier bite.
- Adjust the acid: Add a squeeze of lemon over the finished pizza for brightening acid that complements the lox and capers.
- Play with herbs: If you prefer a stronger herbal note, increase the dill slightly or add a sprinkle of fresh chives at the end for oniony freshness.
- Control the salt: Because lox and capers are salty, begin with modest seasoning on the vegetables and taste before adding more.
- Make it personal size: Divide the dough into smaller rounds for individual pizzas so each person can top their own plate.
Serving Options for Grilled Everything Bagel Pizza
This dish works across occasions, from casual backyard dinners to a festive brunch. Below are concrete serving suggestions, storage ideas, and pairing notes to make the most of each slice.
- Serve warm with a crisp salad: A simple green salad dressed lightly balances the richness and adds a fresh contrast.
- Brunch presentation: Slice and arrange on a wooden board with lemon wedges and extra capers on the side for guests to add more briny pops.
- Casual dinner: Pair with chilled sparkling water or a light non alcoholic beverage to cut richness and refresh the palate.
- Storage tip: Leftovers keep best refrigerated in an airtight container for up to 2 days, though the crust will lose crispness; reheat briefly on a hot skillet to revive texture.
- Seasonal pairing: In summer, serve with ripe tomatoes and extra herbs; in cooler months, accent with a heartier side like roasted potatoes for a comforting meal.
FAQ
Conclusion
What makes this recipe special is the clever marriage of bagel flavors with the smoky, interactive process of grilling pizza. The contrast between a crisp, blistered crust and cool, creamy toppings like cream cheese and lox creates a memorable bite that feels both familiar and new. I encourage you to give it a try, whether you are feeding friends or treating yourself; the technique is forgiving and the results are reliably impressive, especially when you adjust small details to match your grill and taste preferences. Enjoy the process, and savor the combination of textures and bold flavors.
Grilled Everything Bagel Pizza
Equipment
- Grill
- Grill brush
- Spatula
- Tongs
- Baking Sheet
- Pizza peel or baking sheet for launch
Ingredients
- olive oil Drizzle and lightly brush to help prevent sticking and promote even browning on the grill; also adds subtle Mediterranean flavor that complements toppings when used sparingly.
- 1 red onion, sliced 1/4 inch thick Slice thin and layer to add sharp, sweet, and slightly pungent notes that caramelize gently on the grill; provides texture contrast and brightens overall flavor when distributed evenly.
- 1 firm avocado, peeled, pitted, sliced 1/4 inch thick Peel and slice to contribute creamy, buttery richness and a cool counterpoint to smoky grilled crust; adds healthy fats and smooth mouthfeel when arranged over cream cheese or finished pizza.
- 2 firm Roma tomatoes, sliced 1/4 inch thick Slice firm and layer for juicy, slightly acidic freshness that balances richness; holds shape when grilled and contributes vibrant color and light acidity to each bite.
- salt and pepper Season lightly to enhance and balance flavors across toppings; use sparingly to avoid overpowering delicate elements while bringing out natural tastes.
- 1 package of store bought pizza dough or homemade Stretch or roll and grill as the foundation that supports all toppings; provides structure, chew, and charred flavor when prepped according to package or recipe instructions.
- 1 cup cream cheese Spread smoothly to create a tangy, creamy base that contrasts with salty and smoky toppings; helps toppings adhere while contributing rich, mellow dairy notes.
- 5 oz . lox Arrange thin slices to impart smoky, salty, and savory umami that echoes classic bagel-and-lox combos; layer after cream cheese to preserve texture and flavor.
- 3 tablespoon s capers Scatter sparingly to add briny bursts and small pops of acidity that cut through richness; distributes concentrated savory flavor and pairs well with fish and cream cheese.
- 1 -2 tablespoons dill Sprinkle freshly chopped or dried to lend aromatic, herbaceous notes that brighten the dish; use according to taste to add a fresh, slightly grassy finish.
- 1 tablespoon everything bagel seasoning Dust liberally to introduce crunchy, toasty, and garlicky seeds and seasonings characteristic of an everything bagel; provides concentrated savory topping that defines the recipe.
Instructions
- To heat the grill: Preheat grill with the lid down to 500 degrees F for 15 minutes. Open the lid and use a stainless steel grill brush to remove any food particles from the cooking grates.: Preheat grill with the lid down to 500 degrees F for 15 minutes : You will smell the grill warming and maybe a faint metallic aroma as the grates heat. Getting the grill to a true 500 degrees F ensures a blistered, crisp bottom on the crust, which contrasts nicely with the cool toppings. A very hot grate gives quick color without drying the dough, which is why I always wait the full heating time. One common mistake is rushing this step, then finding the dough sticks or cooks unevenly, so be patient and use an oven thermometer or the grill's gauge to verify heat.
- Place the sliced red onions, avocado and tomato slices on a baking sheet and brush with olive oil. Sprinkle on salt and fresh cracked pepper to taste. Using a spatula, transfer onions onto the grates and grill for 8 -12 minutes with the lid down. Lift the lid and remove the onions and transfer to a baking sheet. Add the avocado and tomato slices onto the grates, grill for 2-3 minutes with the lid down. Lift the lid and remove the avocado and tomatoes and transfer to a baking sheet. Set aside.: After preheating, the grate will hiss slightly as residues char, and brushing clears the surface for clean contact with the dough and vegetables. This prevents flare ups and ensures an even sear, which is essential for that crisp texture. If you skip cleaning, old bits can burn and impart off flavors, so take a few extra strokes now.
- Cover the pizza peel or the back side of baking sheet with parchment paper. Work the pizza dough into your desired shape. Brush the top with olive oil. Flip the pizza dough onto the grill, oil side down, and peel back the parchment paper from the top side. Grill for 2 minutes with lid open. Using tongs, pull the pizza off the grate (at this point the dough will have enough structure from the grilled bottom it can easily be moved this way). Brush the top of the crust with olive oil and return it to the grill with the oil side down; grill for another 2-minutes.: Brushing each slice with olive oil gives a glossy sheen and promotes even browning on the grill. The oil will sizzle on contact and carry heat to the vegetables, encouraging caramelization. Be mindful not to overload with oil, which can cause flare ups. A light, even coat is what I aim for.
- Remove the crust from the grill to add the toppings. Spread cream cheese on top and layer with grilled onions, avocado, tomatoes, lox and cheese. If the bottom of the crust is well browned, place a piece of foil the size of the pizza onto the grates (this will prevent the bottom of the pizza from further browning). Transfer topped pizza back to the grill and close the lid. At this point you are just melting the cheese. Remove pizza from the grill, top with capers, dill and everything bagel seasoning. Serve immediately.: You will smell the pepper when you grind it freshly, and the modest salt will draw out the tomatoes juices slightly as they heat. Seasoning pre-grill helps build flavor depth, but remember the lox and capers are salty, so I err on the lighter side here. Over-salting early is a frequent misstep, as it can concentrate too strongly under heat.
- Using a spatula, transfer onions onto the grates and grill for 8 -12 minutes with the lid down: As the red onion sizzles, you will hear gentle popping and see edges darken to a deep brown, not black. The lid down creates a hotter environment, softening the onion while encouraging sweet Maillard notes. I watch for tenderness and char ribbons; if pieces char too quickly, move them to a cooler section. Avoid crowding the grate, which steams rather than chars.
- Lift the lid and remove the onions and transfer to a baking sheet: The onions will release a sweet, savory perfume when lifted off the heat. Moving them to a baking sheet halts cooking and preserves texture. Leaving them on the hot grate can overcaramelize them, so transfer promptly if you see deep dark edges forming.
- Add the avocado and tomato slices onto the grates, grill for 2-3 minutes with the lid down: Avocado and tomato will sizzle lightly and show quick, attractive grill marks in just a few minutes. The avocado softens and gains a smoky note while the tomato concentrates its juices. Because these are delicate, watch closely; overcooking causes collapse, which is a common error. Aim for light char, not mush.
- Lift the lid and remove the avocado and tomatoes and transfer to a baking sheet: You should see glossy, slightly shrunken tomato slices and warm, tender avocado . Cooling them briefly keeps them from breaking when you assemble the pizza. Leaving them on the hot grate risks losing shape and texture, so move them off promptly.
- Set aside: Let the grilled vegetables rest on the baking sheet while you work the dough; this pause allows juices to stabilize and prevents sogginess on the crust. Resting also concentrates aroma, which you will notice as a richer scent when you return to assemble. A frequent slip is assembling immediately while the toppings are piping hot, which can make spreading the cream cheese messy.
- Cover the pizza peel or the back side of baking sheet with parchment paper: The parchment creates a nonstick layer and helps you launch the dough onto the grill. You will feel the paper's smooth resistance as you slide the dough, and it peels away cleanly if you let the dough form some structure first. Skipping parchment can make the transfer fussy and increase tearing risk.
- Work the pizza dough into your desired shape: Gently stretching the dough by hand produces an irregular, artisan look, while rolling yields a more uniform circle. The dough should feel slightly tacky, not sticky, and you will see small bubbles form as you coax it. Overworking can toughen the crust, so handle it with light, confident stretches.
- Brush the top with olive oil: A thin coat of olive oil promotes browning and helps the crust resist sticking when flipped. The oil will glisten and, when it hits the hot grate, sparks a satisfying sizzle. Too much oil leads to greasy spots, so a modest brush is ideal.
- Flip the pizza dough onto the grill, oil side down, and peel back the parchment paper from the top side: The flip reveals the oiled side meeting the hot grates, and you will hear an immediate sear. Removing the parchment lets the dough make full contact with the heat for an even char. If the dough sticks during transfer, give it a moment to set then try again gently rather than forcing it, which can tear the crust.
- Grill for 2 minutes with lid open: Two minutes at high heat creates a bronzed underside and sets the dough so it has structure. You will see small blisters rise and feel the surface firm slightly. Keep the lid open so the top does not overproof, and watch closely because heat can vary widely across grills.
- Using tongs, pull the pizza off the grate: At this point the bottom will be set enough to move, and you will notice a crisp, golden tone. Using tongs to lift prevents burns and helps you flip or reposition with control. If the crust tears, it likely needed another 30 to 60 seconds on the heat to solidify bonds.
- Brush the top of the crust with olive oil and return it to the grill with the oil side down; grill for another 2-minutes: This second sear finishes the bottom and crisps edges, producing a satisfyingly crunchy bite. You will hear a deeper sizzle and see more blistering occur. Overdoing it causes an overly hard crust, so monitor closely and remove when richly browned.
- Remove the crust from the grill to add the toppings: The warm crust should feel slightly springy and smell toasty. Removing to a flat surface gives you control to spread toppings without slipping. If you add wet toppings to a piping hot crust, they can slide; let the surface cool for a minute if needed.
- Spread cream cheese on top and layer with grilled onions, avocado, tomatoes, lox and cheese: Starting with a creamy foundation, you will feel the spread glide and see a neat layering effect. The grilled pieces add smoky edges and the lox keeps its silky texture since it is not heated. A common mistake is piling too high, which makes slicing messy, so arrange toppings evenly.
- If the bottom of the crust is well browned, place a piece of foil the size of the pizza onto the grates: The foil acts as a heat shield to prevent further browning of the base while the toppings warm. You will notice a gentler heat under the foil, allowing cheese or spreads to soften without scorching the bottom. Neglecting this can lead to an overcooked base before toppings meld.
- Transfer topped pizza back to the grill and close the lid: With the lid closed you will hear a soft hush as the enclosed heat encourages melting and melding of flavors. This step is about gentle finishing rather than cooking. Check often to avoid overmelting or steaming the crust too much.
- At this point you are just melting the cheese: You will see the cream cheese relax and any softer elements soften slightly. The aroma will turn richer and more integrated. Avoid leaving it until the toppings run excessively, which can make the crust soggy.
- Remove pizza from the grill, top with capers, dill and everything bagel seasoning: The final scatter of capers , dill , and everything bagel seasoning adds bursts of brine, herb brightness, and crunchy texture. The contrast of warm and cool, smoky and salty, is most pronounced now. Add these last so they retain their texture and pop.
- Serve immediately: Serve while the crust is still warm and the toppings have just come together. You will notice the contrast between the toasty base and silky toppings, which is the heart of this recipe. Waiting too long diminishes that contrast, so aim to slice and enjoy right away.
Notes
- Swap the dough style: Use a thinner rolled dough for a crispier, cracker like base or a slightly thicker hand-stretched dough for a chewier bite.
- Adjust the acid: Add a squeeze of lemon over the finished pizza for brightening acid that complements the lox and capers.
- Play with herbs: If you prefer a stronger herbal note, increase the dill slightly or add a sprinkle of fresh chives at the end for oniony freshness.
- Control the salt: Because lox and capers are salty, begin with modest seasoning on the vegetables and taste before adding more.
- Make it personal size: Divide the dough into smaller rounds for individual pizzas so each person can top their own plate.