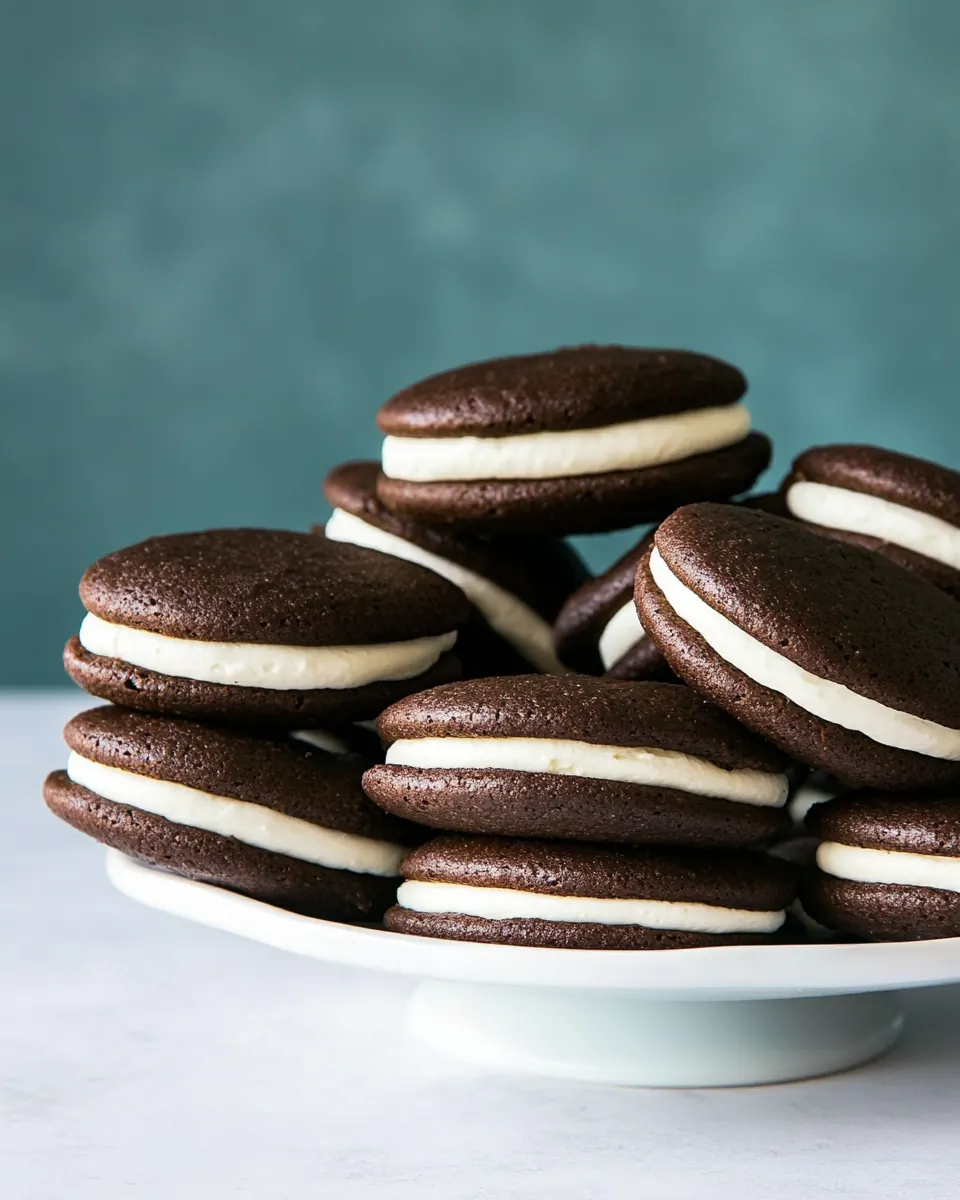
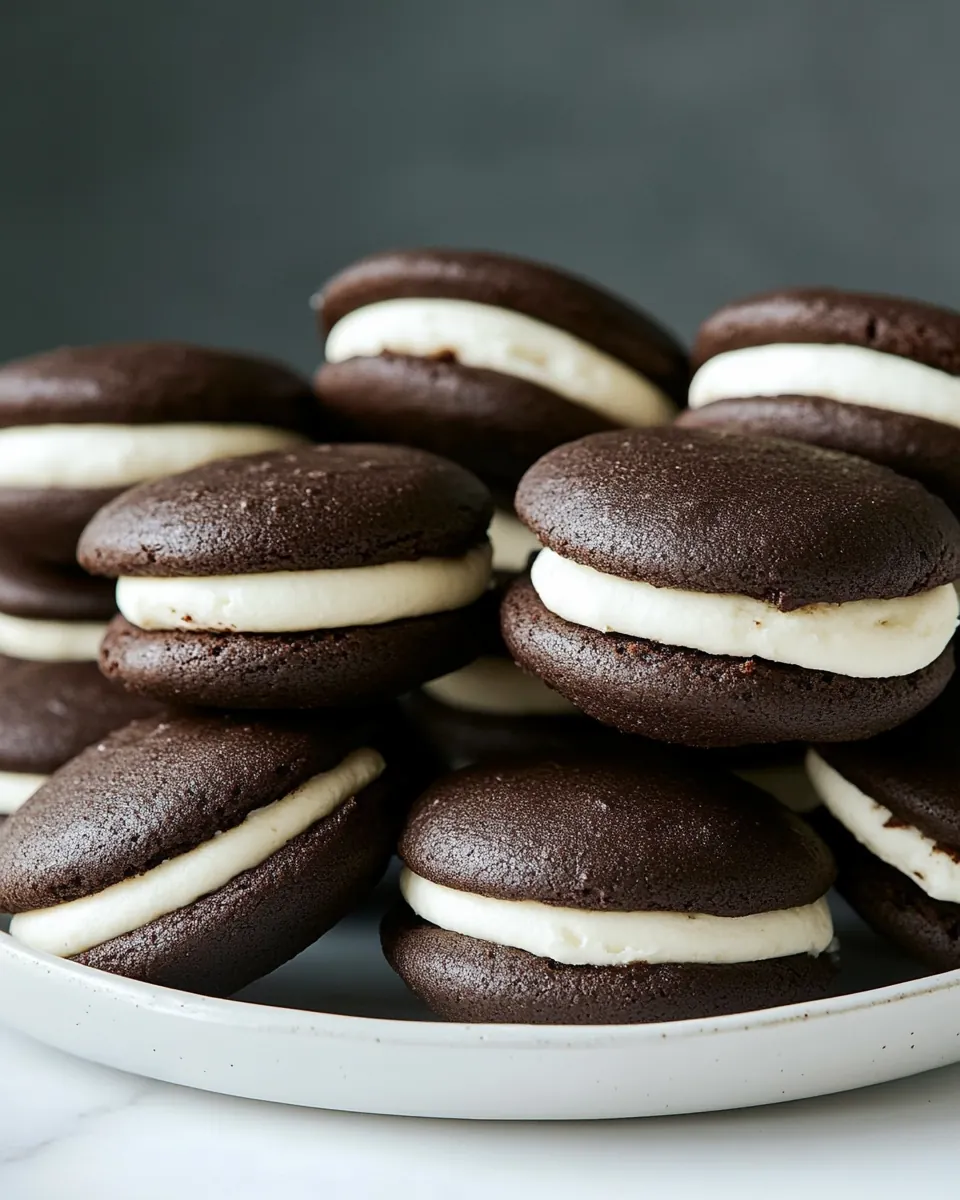
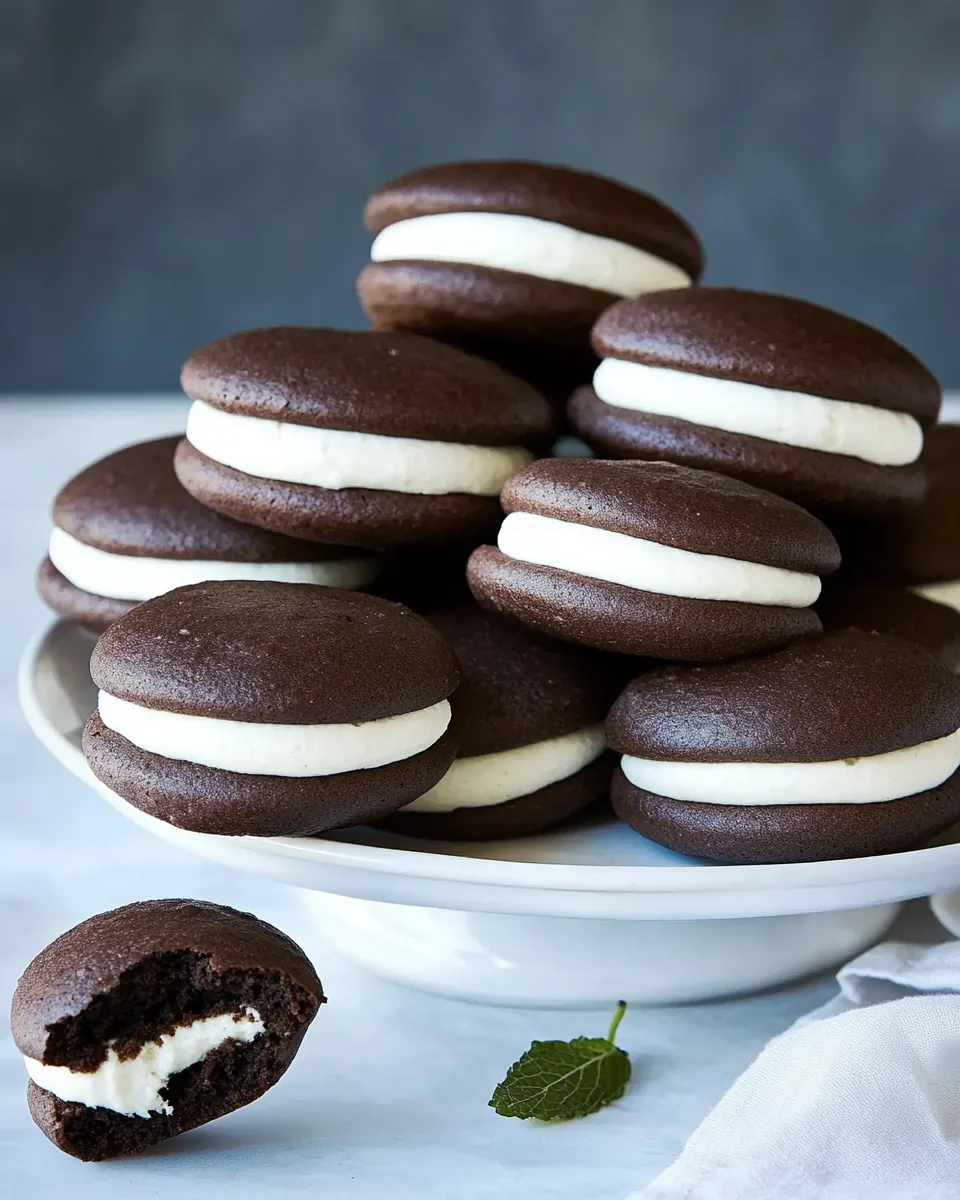
Whoopie Pies
Whoopie Pies have been my go to comfort bake for years, a treat that always sneaks into weekend baking plans when I crave something soft, chocolatey, and a little nostalgic.
I first fell for Whoopie Pies on a rainy afternoon when a neighbor knocked with a tin full of these sandwich cookies, still warm and slightly sticky from the filling. I remember the steam lifting off the cookies as I opened the tin, the smell of cocoa and brown sugar filling the hallway, and the instant urge to recreate that cozy moment in my own kitchen. That memory turned into experimenting with the batter and filling, learning how a touch more flour or a cooler filling temperature would change the bite.
Over time I learned to tweak the texture so the cookie tops are soft and pillowy yet hold up to a generous filling. I love making a big batch on a Saturday, spreading out the cooling racks, and piping the creamy center while a playlist hums in the background. Friends always ask for the recipe because the balance of chocolate cookie and marshmallow buttercream feels indulgent but approachable.
Whether you are packing them for a picnic or arranging them on a dessert platter, Whoopie Pies feel like a small celebration in each bite. I enjoy sharing tips about measuring flour properly and chilling the filling so it pipes neatly. Once you get the rhythm, the process becomes soothing, and you end up with a tray of treats that vanish fast.
Recipe Snapshot
48 mins
30 mins
18 mins
Medium
200 kcal
American
Gluten-Free, Low FODMAP
Desserts
Mixing bowls, Electric hand mixer, Stand mixer with paddle attachment, Wire rack, Piping bag, Large round piping tip, Baking sheets, Parchment paper
What Makes This Whoopie Pies Special
Classic Comfort Food That Travels Well
I adore how Whoopie Pies are essentially portable cake sandwiches, perfect for road trips, potlucks, or lunchbox surprises. The soft, cakey cookie holds up surprisingly well, and you can stack them for a picnic without worrying about crumbling. I often bring them to gatherings because they survive transport and still feel homey when you bite in.
Textural Play in Every Bite
The real joy for me is that contrast between a tender chocolate cookie and a fluffy filling made with marshmallow fluff and butter. I love how the cookie gives slightly under pressure and the filling yields, creating that signature whoopie mouthfeel. I tinker with chilling times and mixing speeds to dial in the perfect texture for both layers.
Flexible and Forgiving Recipe
This recipe is wonderfully forgiving, which is why I recommend it to novice bakers. A few simple adjustments, like scooping the batter consistently and chilling the filling, go a long way. I’ve learned that careful measuring of flour and using warm water in the batter helps the cookies rise and set properly, so you get consistent results every time.
Endless Flavor Options
While the classic marshmallow filling is heavenly, I love that you can experiment with extracts or different spreads to personalize each batch. I’ve tried subtle twists like adding espresso powder to the batter for depth, or rolling the filling edges in crushed candy for holiday flair. It’s a canvas for creativity while staying reliably delicious.
Great for Making Ahead
I often bake a big batch and refrigerate the sandwiches on parchment to keep them neat. They hold in the fridge for a few days, and they taste fresh when allowed to rest at room temperature before serving. That make ahead quality makes them my go to for parties where I want to minimize last minute fuss.
Essential Ingredients for Whoopie Pies
These ingredients come together to create a soft chocolate cookie and a pillowy, marshmallow enriched filling. The cookie relies on balanced ratios of flour, cocoa, and leavening to stay tender yet structured, while the filling uses a mix of salted and unsalted butter, confectioners sugar, and marshmallow fluff to achieve that spreadable, pipeable texture. Each element plays a clear role in texture, flavor, or structure.
- 2 cups (283 g) unbleached all-purpose flour *(scoop and level to measure): Sifted and measured to provide the primary structure and tender crumb for the whoopie pie cakes; adds bulk and absorbs liquids for proper dough consistency. Use unbleached all-purpose flour to ensure a neutral flavor and reliable gluten development during mixing and baking.
- 1/2 cup (45 g) unsweetened cocoa powder (scoop and level to measure): Measured and leveled to contribute deep chocolate flavor and a hint of dryness that balances the cake batter; helps intensify color and cocoa aroma. Choose an unsweetened cocoa powder for pure chocolate taste without added sugar or dairy.
- 1 tsp baking soda: Leavening agent that reacts with acidic buttermilk to produce carbon dioxide, giving the whoopie pies lift and a light, airy texture. Measure precisely to avoid over-rising and maintain a tender crumb.
- 1/2 tsp salt: Seasoning that enhances overall flavor by balancing sweetness and intensifying chocolate notes; also slightly strengthens gluten structure when used sparingly. Use measured salt to prevent any metallic or overly salty taste.
- 1 cup packed (200 g) light brown sugar, break up any clumps: Granulated brown sugar providing sweetness with added moisture and a subtle caramel-molasses depth that enriches cake flavor and tenderness. Pack lightly to get the indicated weight and break up clumps for even distribution in batter.
- 1/2 cup (120 ml) buttermilk (no buttermilk substitutes!): Acidic dairy liquid that reacts with baking soda to create leavening bubbles and contributes tenderness, tang, and moisture to the cakes. Use true buttermilk to deliver the intended acidity and texture; do not substitute.
- 1/2 cup (120 ml) vegetable oil: Neutral-flavored fat that adds moistness, keeps crumbs tender, and helps carry flavors in the cake batter without solidifying in the fridge. Use vegetable oil for consistent texture and a soft crumb.
- 1 large egg: Binder that provides structure and emulsification, helping to trap air and improve crumb stability while contributing richness. Use a large egg at room temperature for optimal incorporation and volume.
- 1 1/2 tsp vanilla extract: Aromatic extract that enhances and rounds out flavors in both the cake and filling by adding sweet, warm vanilla notes. Add measured vanilla to blend seamlessly into the batter.
- 1/2 cup (120 ml) hot water: Hot liquid used to bloom cocoa, thin the batter for proper drop consistency, and help dissolve sugar for a smoother crumb and deeper chocolate intensity. Add hot water gradually to integrate evenly without over-thinning.
- 8 tbsp (113 g) salted butter, at room temperature: Salted butter at room temperature that provides creamy richness, helps stabilize the marshmallow filling, and adds a slightly savory balance to the sweet frosting. Use softened butter for smooth creaming and spreadable texture.
- 6 tbsp (85 g) unsalted butter, at room temperature: Unsalted butter at room temperature used to precisely control salt levels in the filling and ensure a balanced, creamy consistency when creamed with powdered sugar and marshmallow fluff. Soften to room temperature for even incorporation.
- 2 1/4 cups (270 g) powdered sugar: Finely milled sugar that sweetens and stabilizes the filling, contributing to a smooth, pipeable frosting texture when sifted and creamed with butter. Measure by weight for accuracy and sift if lumpy.
- 1 tsp vanilla extract: Aromatic extract added to the filling to intensify sweet flavors and add warm, familiar vanilla notes that complement marshmallow and butter. Use measured vanilla to maintain balance and avoid overpowering the filling.
- 10 oz . marshmallow fluff (aka marshmallow creme, about one and half 7 oz. jars): Light, fluffy marshmallow creme that provides the signature sweet, pillowy center for whoopie pies, bringing chewiness and a glossy texture to the filling. Use the stated amount of marshmallow fluff for proper sweetness and filling consistency.
Cooking Instructions for Whoopie Pies

I find the best part of baking these is the rhythm: mixing the batter, scooping uniform rounds, and whipping the filling until it clouds up light and airy. Follow each step carefully for consistent cookies and a filling that pipes cleanly. Below are the cleaned directions written into detailed, sensory rich steps so you know what to watch for and how to troubleshoot.
- Set oven racks in upper and lower third of the oven and preheat oven to 375 degrees. Line 18 by 13-inch baking sheets with parchment paper, set aside.: When you preheat to 375 degrees you create the right initial heat so the cookies set on the edges while staying soft inside, producing that pillowy texture I love. As the oven warms you should notice a steady, faint hum and the smell of warm metal, a cue the environment is stabilizing. A common misstep is opening the oven too soon which drops temperature and yields uneven baking. Make sure your racks are positioned correctly first so you do not have to shift them once the oven is hot.
- In a medium mixing bowl whisk together flour, cocoa powder, baking soda and salt. Set aside.: Lining sheets ensures even browning and easy release, and the slightly textured surface of parchment helps cookies hold shape. While lining, run your fingers along the sheet to smooth any wrinkles that might cause batter to pool. A usual error is skipping parchment, which can cause spreading that sticks to the pan; consider double layering if your parchment slides.
- In a large mixing bowl using an electric hand mixer or in the bowl of a stand mixer fitted with the paddle attachment mix together brown sugar, buttermilk, vegetable oil, egg and vanilla extract until well blended.: Whisking blends dry components so pockets of leavening do not create uneven rise. The aroma of cocoa becomes more pronounced as you aerate the mix, and you should see a uniform dark color. Avoid over mixing which can develop gluten, leading to tougher cookies; whisk just until homogeneous.
- Add flour mixture and mix just until combined, then pour in hot water and mix just until combined.: As you beat these wet ingredients, the brown sugar should lose its clumps and the mixture will look glossy and slightly thick. The tang of buttermilk pairs with brown sugar to create a moist batter base. A common mistake is under mixing, which leaves streaks of sugar, or over mixing once the egg is added, which can incorporate too much air and change the cookie texture.
- Scoop batter out using a medium cookie scoop or 1 1/2 Tbsp at a time, and drop onto prepared baking sheets, spacing 2 inches apart.: After adding the dry mix, the batter will look shaggy and darker. The hot water helps bloom the cocoa , intensifying chocolate notes and loosening the batter to a scoopable consistency. Work briefly to avoid gluten development. If the batter feels overly stiff, the hot water should smooth it; if it seems too thin, check your flour measuring method as packed flour will cause runny batter issues.
- Bake first two sheets at once, rotating sheets halfway through baking, until cookies spring back when touched or toothpick inserted into center comes out clean, about 8 – 10 minutes total.: Scooping uniformly ensures even baking and matching cookie sizes for sandwiching. You should hear a slight slap as the batter lands on parchment and see rounded domes form. Avoid crowding the sheet, as they expand slightly in the heat; uneven spacing leads to cookies merging and misshapen rounds.
- Let cool about 5 minutes then use a spatula to transfer to a wire rack to cool completely. Bake remaining last sheet of cookies in center of the oven, about 8 – 10 minutes.: Baking two sheets simultaneously uses oven circulation for even heat. As they bake you might catch a chocolate aroma intensifying and notice the edges set while centers remain soft. Rotate the sheets to minimize hot spots. A mistake here is baking too long which dries them out; look for a gentle spring back and a clean toothpick to indicate doneness.
- In the bowl of an electric stand mixer fitted with the paddle attachment (or using a hand mixer) cream together salted butter, unsalted butter and powdered sugar on low speed until well combined.: Cooling on the pan a few minutes lets the cookies firm slightly so they transfer intact. You will feel a soft give initially, then gradual cooling to room temperature. If transferred too early they may break, so wait those five minutes. Conversely, waiting too long makes them stick to the paper, so balance the timing.
- Increase mixer speed to high and whip until light and fluffy, about 4 minutes. Blend in vanilla.: Baking the final sheet in the center avoids the differing temperature profiles of top and bottom thirds. The same visual cues apply, the edges should be set and the centers still yield slightly to a light press. A common error is forgetting to rotate based on your oven’s tendencies, which can cause uneven color between batches.
- Remove bowl from stand mixer, add marshmallow fluff and fold together using a rubber spatula just until combined.: Creaming at low speed prevents powdered sugar from puffing into clouds and ensures even incorporation of both kinds of butter . You will notice the mixture go from chunky to smoother and slightly glossy. Avoid starting on high which can send powder everywhere and create a grainy texture.
- Chill mixture about 20 minutes to thicken up then fold again. Transfer to a piping bag fitted with a large round tip and pipe over half of the cookies, sandwich a second cookie over the top.: As you whip the mixture at higher speed it will turn pale and airy, the beaters leaving soft peaks in the butter mass. This aeration is what makes the filling pipeable and delicate on the palate. Over whipping can overheat the butter and make the filling loose, so monitor texture closely.
- Store cookies in an airtight container set on parchment paper, in a single layer in the refrigerator up to 3 days. Let rest at room temperature about 30 minutes before serving.: Adding vanilla at this point lifts the aroma and provides a warm base note that complements the chocolate . Stir briefly until evenly distributed, and pause to scrape the bowl so nothing is left behind. A small mistake is adding too much liquid extract, which can thin the filling.
- Remove bowl from stand mixer, add marshmallow fluff and fold together using a rubber spatula just until combined: Folding in the marshmallow fluff preserves the air and lightness of the whipped butter and sugar, resulting in a pillowy filling. You will see glossy swirls as you fold and a slightly sticky, cloudlike texture. Overfolding will deflate the aeration and produce a denser filling, so stop as soon as it looks uniform.
- Chill mixture about 20 minutes to thicken up then fold again: Chilling firms the filling so it holds shape when piped, and you will notice it stiffen slightly and lose some shine. This step is essential if your kitchen is warm, as chilled texture prevents running. A typical error is skipping chill time which can lead to flattened sandwiches and messy edges.
- Transfer to a piping bag fitted with a large round tip and pipe over half of the cookies, sandwich a second cookie over the top: Piping creates neat, consistent filling amounts and an attractive presentation. As you press the bag you should feel gentle resistance and see the filling mound neatly on the cookie. Pressing too hard creates overflow and messy edges, while too little filling makes the sandwich seem scant, so aim for steady pressure.
- Store cookies in an airtight container set on parchment paper, in a single layer in the refrigerator up to 3 days: Refrigeration keeps the filling stable and extends freshness, though I let them rest at room temperature before serving to revive softness. Layering with parchment prevents sticking. A trap is stacking without protection which squashes the filling; always layer with parchment.
- Let rest at room temperature about 30 minutes before serving: Allowing them to warm slightly softens the filling and the cookie, bringing out flavors and easing the bite. You will notice the texture become more tender and the aroma intensify. Serving straight from the fridge can mute flavors and make the filling firmer than desired.
Pro Tips and Tweaks
These practical tips help you troubleshoot, vary the flavor, and get consistent results when making Whoopie Pies. Each one highlights a small adjustment that can make a big difference in texture and presentation.
- Measure by weight whenever possible, especially for the flour and cocoa, it reduces variability and keeps batter consistency reliable.
- Use room temperature ingredients like the egg and butter to help everything emulsify evenly and produce a smooth batter and filling.
- Sift the powdered sugar into the filling if it is lumpy, this prevents a gritty texture and helps the filling whip up silky and smooth.
- Add espresso powder to intensify the chocolate flavor without making the cookies taste like coffee, a pinch dissolved in the hot water does the trick.
- Pipe with a steady hand and use a large round tip for even dollops of filling, which makes sandwiches uniform and tidy.
- Try different fillings if you want variation, but keep the same ratios so the structural balance between cookie and filling remains intact.
- Allow cookies to cool completely before sandwiching, warmth can melt and flatten the filling leading to messy edges.
Serving This Whoopie Pies
These sandwiches are perfect for many occasions, from casual afternoons to festive gatherings. Present them thoughtfully to highlight their charm and make serving effortless.
- Casual gatherings: Arrange on a parchment lined platter for a relaxed dessert table, they are easy to grab and eat by hand.
- Picnics and potlucks: Pack in a single layer in an airtight container with parchment between layers to prevent sticking and maintain shape during transport.
- Holiday treats: Customize the filling edges with crushed candy for seasonal flair, the cookies pair well with warm beverages during cooler months.
- Make ahead strategy: Store in the refrigerator for up to three days, then let sit at room temperature for about 30 minutes before serving to soften the filling.
- Presentation tips: Pipe filling neatly and wipe any overflow with a damp cloth, serve on a decorative board or tiered stand for visual appeal.
- Serving size: Offer one or two per person depending on the crowd and other desserts available, they are rich so a smaller portion often satisfies.
- Storage advice: Freeze individually wrapped sandwiches for longer storage, then thaw in the fridge and rest to room temperature before serving.
FAQ
Conclusion
These Whoopie Pies are special because they pair a tender, chocolatey cookie with a cloud like marshmallow buttercream that feels both nostalgic and elevated. Give them a try if you want a make ahead dessert that travels well and delights a crowd. Baking these is a satisfying ritual, and once you master the measurements and piping rhythm you will find they vanish faster than you expect.
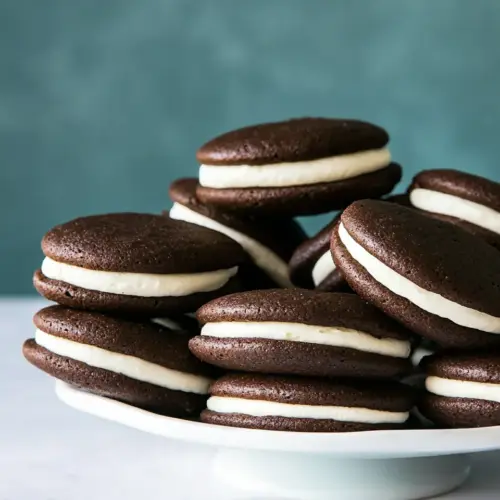
Whoopie Pies
Equipment
- Mixing Bowls
- electric hand mixer
- Stand mixer with paddle attachment
- Wire Rack
- Piping Bag
- Large round piping tip
- Baking Sheets
- Parchment Paper
Ingredients
- 2 cups (283 g) unbleached all-purpose flour *(scoop and level to measure) Sifted and measured to provide the primary structure and tender crumb for the whoopie pie cakes; adds bulk and absorbs liquids for proper dough consistency. Use unbleached all-purpose flour to ensure a neutral flavor and reliable gluten development during mixing and baking.
- 1/2 cup (45 g) unsweetened cocoa powder (scoop and level to measure) Measured and leveled to contribute deep chocolate flavor and a hint of dryness that balances the cake batter; helps intensify color and cocoa aroma. Choose an unsweetened cocoa powder for pure chocolate taste without added sugar or dairy.
- 1 tsp baking soda Leavening agent that reacts with acidic buttermilk to produce carbon dioxide, giving the whoopie pies lift and a light, airy texture. Measure precisely to avoid over-rising and maintain a tender crumb.
- 1/2 tsp salt Seasoning that enhances overall flavor by balancing sweetness and intensifying chocolate notes; also slightly strengthens gluten structure when used sparingly. Use measured salt to prevent any metallic or overly salty taste.
- 1 cup packed (200 g) light brown sugar, break up any clumps Granulated brown sugar providing sweetness with added moisture and a subtle caramel-molasses depth that enriches cake flavor and tenderness. Pack lightly to get the indicated weight and break up clumps for even distribution in batter.
- 1/2 cup (120 ml) buttermilk (no buttermilk substitutes!) Acidic dairy liquid that reacts with baking soda to create leavening bubbles and contributes tenderness, tang, and moisture to the cakes. Use true buttermilk to deliver the intended acidity and texture; do not substitute.
- 1/2 cup (120 ml) vegetable oil Neutral-flavored fat that adds moistness, keeps crumbs tender, and helps carry flavors in the cake batter without solidifying in the fridge. Use vegetable oil for consistent texture and a soft crumb.
- 1 large egg Binder that provides structure and emulsification, helping to trap air and improve crumb stability while contributing richness. Use a large egg at room temperature for optimal incorporation and volume.
- 1 1/2 tsp vanilla extract Aromatic extract that enhances and rounds out flavors in both the cake and filling by adding sweet, warm vanilla notes. Add measured vanilla to blend seamlessly into the batter.
- 1/2 cup (120 ml) hot water Hot liquid used to bloom cocoa, thin the batter for proper drop consistency, and help dissolve sugar for a smoother crumb and deeper chocolate intensity. Add hot water gradually to integrate evenly without over-thinning.
- 8 tbsp (113 g) salted butter, at room temperature Salted butter at room temperature that provides creamy richness, helps stabilize the marshmallow filling, and adds a slightly savory balance to the sweet frosting. Use softened butter for smooth creaming and spreadable texture.
- 6 tbsp (85 g) unsalted butter, at room temperature Unsalted butter at room temperature used to precisely control salt levels in the filling and ensure a balanced, creamy consistency when creamed with powdered sugar and marshmallow fluff. Soften to room temperature for even incorporation.
- 2 1/4 cups (270 g) powdered sugar Finely milled sugar that sweetens and stabilizes the filling, contributing to a smooth, pipeable frosting texture when sifted and creamed with butter. Measure by weight for accuracy and sift if lumpy.
- 1 tsp vanilla extract Aromatic extract added to the filling to intensify sweet flavors and add warm, familiar vanilla notes that complement marshmallow and butter. Use measured vanilla to maintain balance and avoid overpowering the filling.
- 10 oz . marshmallow fluff (aka marshmallow creme, about one and half 7 oz. jars) Light, fluffy marshmallow creme that provides the signature sweet, pillowy center for whoopie pies, bringing chewiness and a glossy texture to the filling. Use the stated amount of marshmallow fluff for proper sweetness and filling consistency.
Instructions
- Set oven racks in upper and lower third of the oven and preheat oven to 375 degrees. Line 18 by 13-inch baking sheets with parchment paper, set aside.: When you preheat to 375 degrees you create the right initial heat so the cookies set on the edges while staying soft inside, producing that pillowy texture I love. As the oven warms you should notice a steady, faint hum and the smell of warm metal, a cue the environment is stabilizing. A common misstep is opening the oven too soon which drops temperature and yields uneven baking. Make sure your racks are positioned correctly first so you do not have to shift them once the oven is hot.
- In a medium mixing bowl whisk together flour, cocoa powder, baking soda and salt. Set aside.: Lining sheets ensures even browning and easy release, and the slightly textured surface of parchment helps cookies hold shape. While lining, run your fingers along the sheet to smooth any wrinkles that might cause batter to pool. A usual error is skipping parchment, which can cause spreading that sticks to the pan; consider double layering if your parchment slides.
- In a large mixing bowl using an electric hand mixer or in the bowl of a stand mixer fitted with the paddle attachment mix together brown sugar, buttermilk, vegetable oil, egg and vanilla extract until well blended.: Whisking blends dry components so pockets of leavening do not create uneven rise. The aroma of cocoa becomes more pronounced as you aerate the mix, and you should see a uniform dark color. Avoid over mixing which can develop gluten, leading to tougher cookies; whisk just until homogeneous.
- Add flour mixture and mix just until combined, then pour in hot water and mix just until combined.: As you beat these wet ingredients, the brown sugar should lose its clumps and the mixture will look glossy and slightly thick. The tang of buttermilk pairs with brown sugar to create a moist batter base. A common mistake is under mixing, which leaves streaks of sugar, or over mixing once the egg is added, which can incorporate too much air and change the cookie texture.
- Scoop batter out using a medium cookie scoop or 1 1/2 Tbsp at a time, and drop onto prepared baking sheets, spacing 2 inches apart.: After adding the dry mix, the batter will look shaggy and darker. The hot water helps bloom the cocoa , intensifying chocolate notes and loosening the batter to a scoopable consistency. Work briefly to avoid gluten development. If the batter feels overly stiff, the hot water should smooth it; if it seems too thin, check your flour measuring method as packed flour will cause runny batter issues.
- Bake first two sheets at once, rotating sheets halfway through baking, until cookies spring back when touched or toothpick inserted into center comes out clean, about 8 - 10 minutes total.: Scooping uniformly ensures even baking and matching cookie sizes for sandwiching. You should hear a slight slap as the batter lands on parchment and see rounded domes form. Avoid crowding the sheet, as they expand slightly in the heat; uneven spacing leads to cookies merging and misshapen rounds.
- Let cool about 5 minutes then use a spatula to transfer to a wire rack to cool completely. Bake remaining last sheet of cookies in center of the oven, about 8 - 10 minutes.: Baking two sheets simultaneously uses oven circulation for even heat. As they bake you might catch a chocolate aroma intensifying and notice the edges set while centers remain soft. Rotate the sheets to minimize hot spots. A mistake here is baking too long which dries them out; look for a gentle spring back and a clean toothpick to indicate doneness.
- In the bowl of an electric stand mixer fitted with the paddle attachment (or using a hand mixer) cream together salted butter, unsalted butter and powdered sugar on low speed until well combined.: Cooling on the pan a few minutes lets the cookies firm slightly so they transfer intact. You will feel a soft give initially, then gradual cooling to room temperature. If transferred too early they may break, so wait those five minutes. Conversely, waiting too long makes them stick to the paper, so balance the timing.
- Increase mixer speed to high and whip until light and fluffy, about 4 minutes. Blend in vanilla.: Baking the final sheet in the center avoids the differing temperature profiles of top and bottom thirds. The same visual cues apply, the edges should be set and the centers still yield slightly to a light press. A common error is forgetting to rotate based on your oven’s tendencies, which can cause uneven color between batches.
- Remove bowl from stand mixer, add marshmallow fluff and fold together using a rubber spatula just until combined.: Creaming at low speed prevents powdered sugar from puffing into clouds and ensures even incorporation of both kinds of butter . You will notice the mixture go from chunky to smoother and slightly glossy. Avoid starting on high which can send powder everywhere and create a grainy texture.
- Chill mixture about 20 minutes to thicken up then fold again. Transfer to a piping bag fitted with a large round tip and pipe over half of the cookies, sandwich a second cookie over the top.: As you whip the mixture at higher speed it will turn pale and airy, the beaters leaving soft peaks in the butter mass. This aeration is what makes the filling pipeable and delicate on the palate. Over whipping can overheat the butter and make the filling loose, so monitor texture closely.
- Store cookies in an airtight container set on parchment paper, in a single layer in the refrigerator up to 3 days. Let rest at room temperature about 30 minutes before serving.: Adding vanilla at this point lifts the aroma and provides a warm base note that complements the chocolate . Stir briefly until evenly distributed, and pause to scrape the bowl so nothing is left behind. A small mistake is adding too much liquid extract, which can thin the filling.
- Remove bowl from stand mixer, add marshmallow fluff and fold together using a rubber spatula just until combined: Folding in the marshmallow fluff preserves the air and lightness of the whipped butter and sugar, resulting in a pillowy filling. You will see glossy swirls as you fold and a slightly sticky, cloudlike texture. Overfolding will deflate the aeration and produce a denser filling, so stop as soon as it looks uniform.
- Chill mixture about 20 minutes to thicken up then fold again: Chilling firms the filling so it holds shape when piped, and you will notice it stiffen slightly and lose some shine. This step is essential if your kitchen is warm, as chilled texture prevents running. A typical error is skipping chill time which can lead to flattened sandwiches and messy edges.
- Transfer to a piping bag fitted with a large round tip and pipe over half of the cookies, sandwich a second cookie over the top: Piping creates neat, consistent filling amounts and an attractive presentation. As you press the bag you should feel gentle resistance and see the filling mound neatly on the cookie. Pressing too hard creates overflow and messy edges, while too little filling makes the sandwich seem scant, so aim for steady pressure.
- Store cookies in an airtight container set on parchment paper, in a single layer in the refrigerator up to 3 days: Refrigeration keeps the filling stable and extends freshness, though I let them rest at room temperature before serving to revive softness. Layering with parchment prevents sticking. A trap is stacking without protection which squashes the filling; always layer with parchment.
- Let rest at room temperature about 30 minutes before serving: Allowing them to warm slightly softens the filling and the cookie, bringing out flavors and easing the bite. You will notice the texture become more tender and the aroma intensify. Serving straight from the fridge can mute flavors and make the filling firmer than desired.
Notes
- Measure by weight whenever possible, especially for the flour and cocoa, it reduces variability and keeps batter consistency reliable.
- Use room temperature ingredients like the egg and butter to help everything emulsify evenly and produce a smooth batter and filling.
- Sift the powdered sugar into the filling if it is lumpy, this prevents a gritty texture and helps the filling whip up silky and smooth.
- Add espresso powder to intensify the chocolate flavor without making the cookies taste like coffee, a pinch dissolved in the hot water does the trick.
- Pipe with a steady hand and use a large round tip for even dollops of filling, which makes sandwiches uniform and tidy.
- Try different fillings if you want variation, but keep the same ratios so the structural balance between cookie and filling remains intact.
- Allow cookies to cool completely before sandwiching, warmth can melt and flatten the filling leading to messy edges.