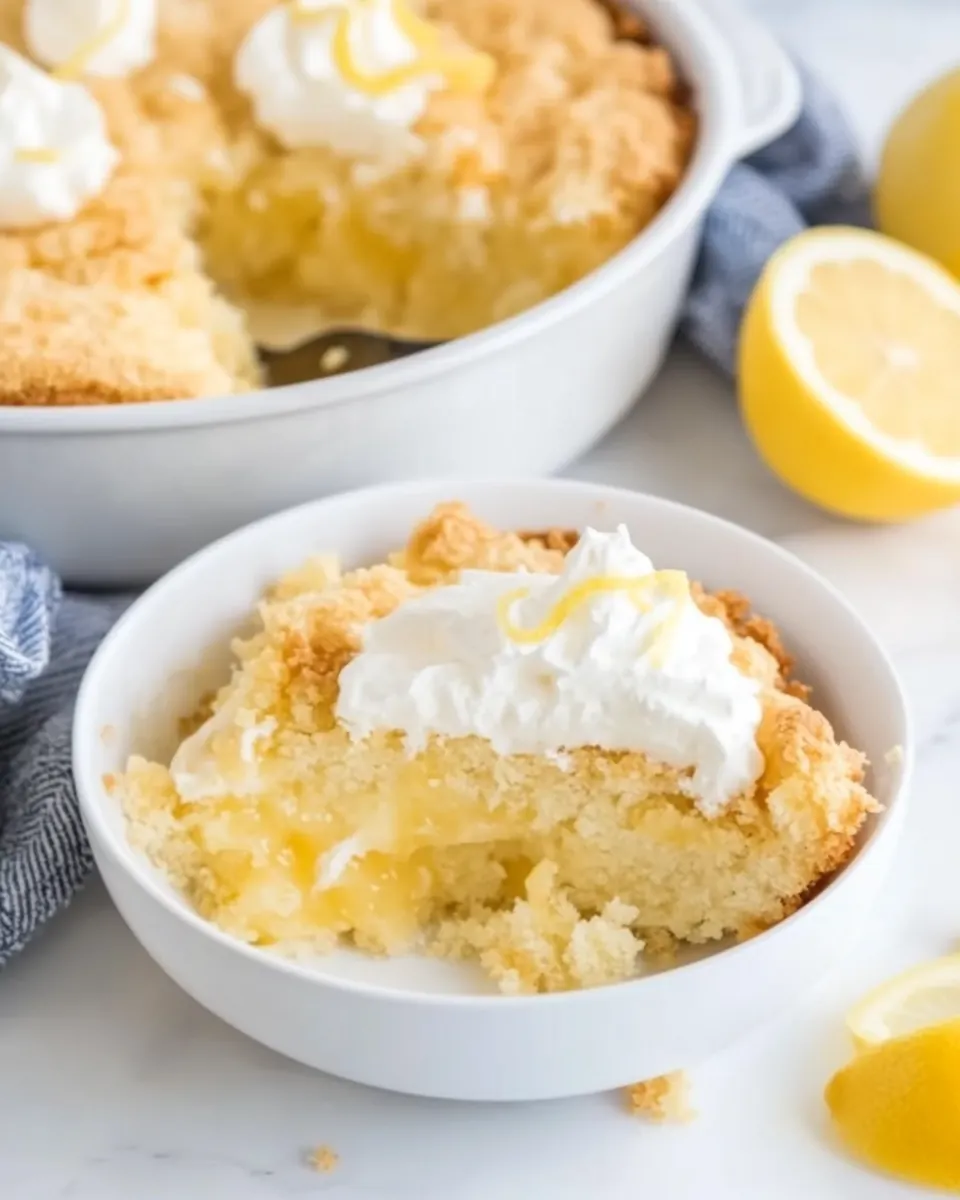
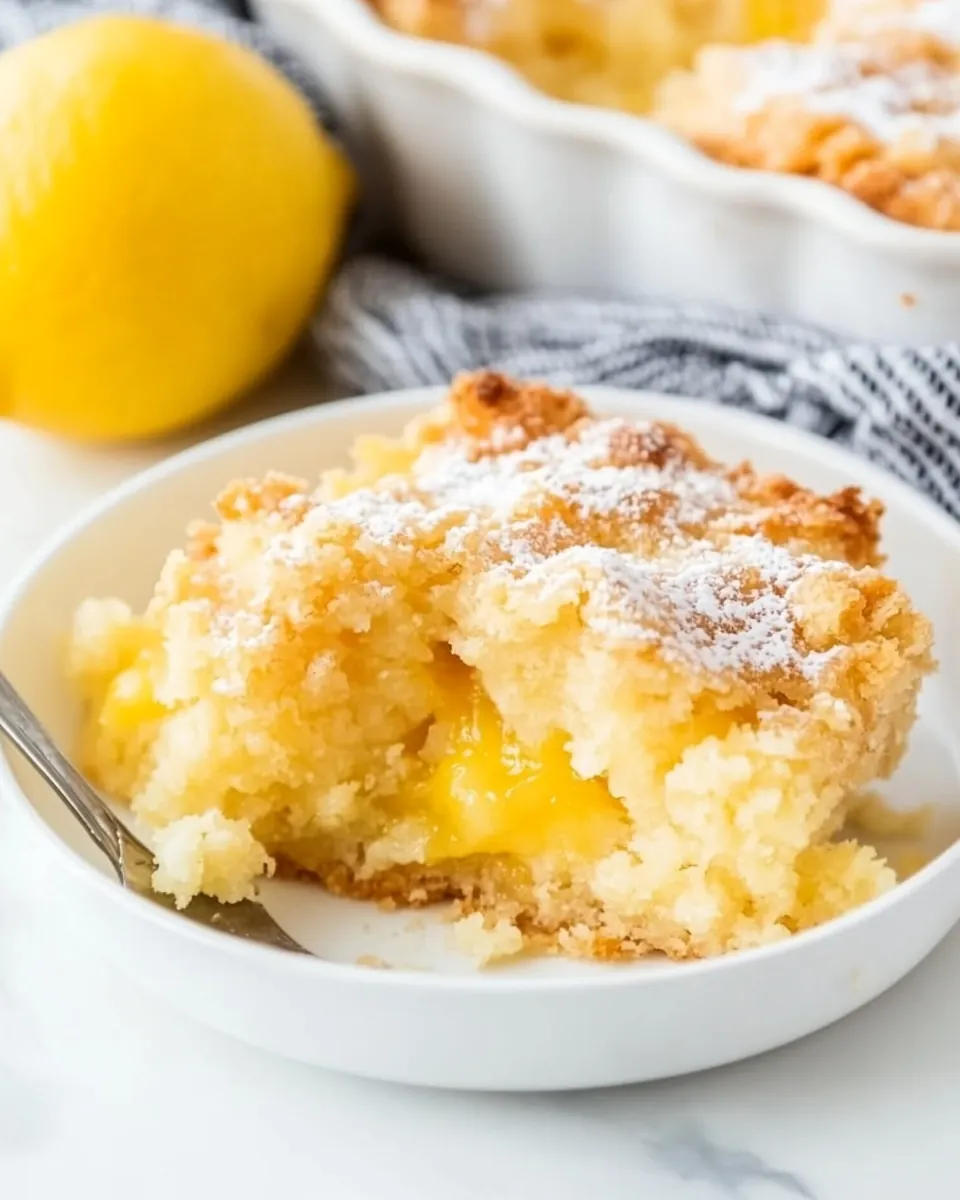
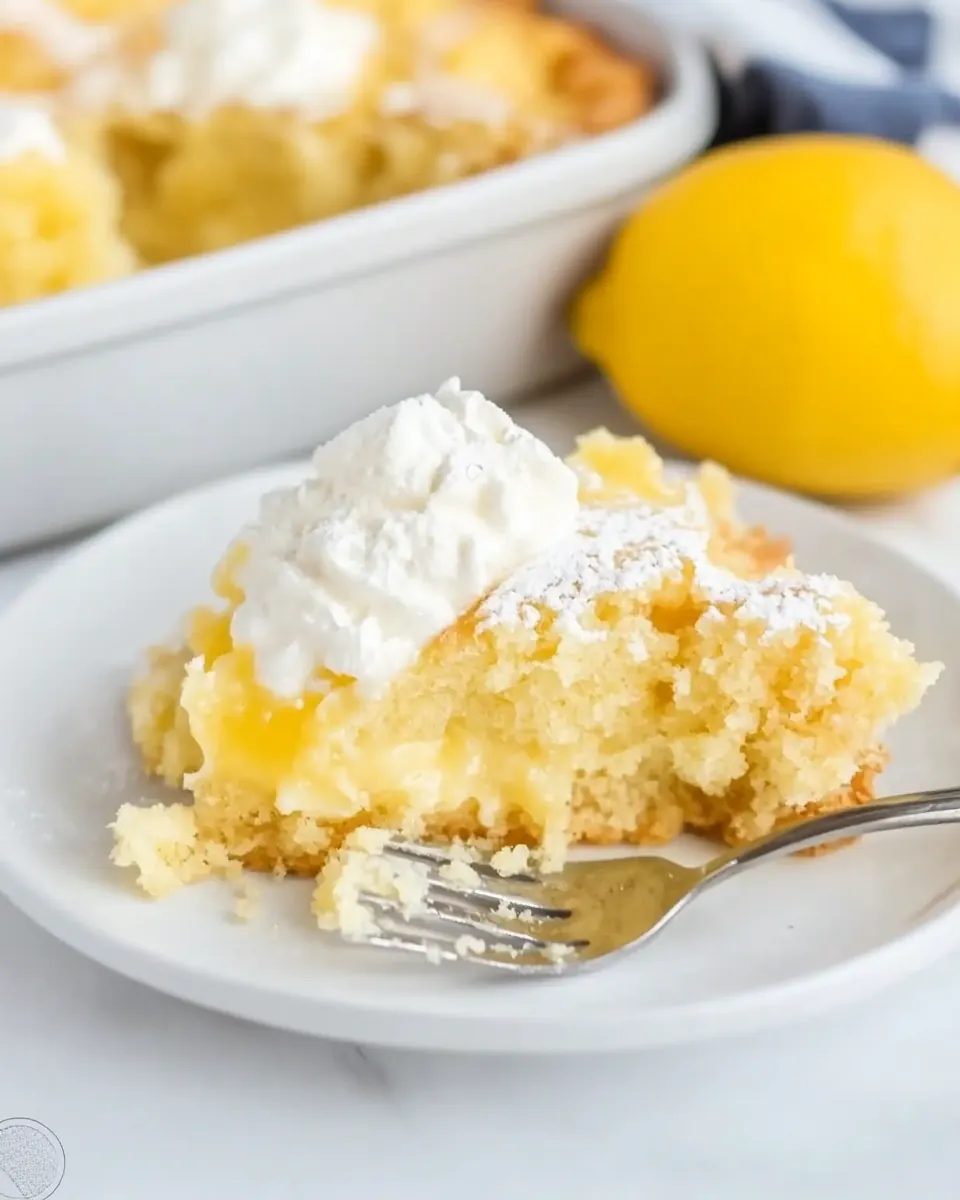
Easy Lemon Dump Cake
Easy Lemon Dump Cake is the kind of dessert I reach for when life gets delightfully chaotic and I still want something that tastes like sunshine. The first time I made this, I was hosting a last minute brunch and had exactly zero time for baking fuss. I grabbed a can of lemon pie filling, a box of yellow cake mix, and a couple of simple staples, and what came out of the oven was bright, buttery, and impossibly comforting. I remember the first spoonful, the tartness of the lemon meeting the soft, almost custardy cream cheese layer, and how everyone around the table went quiet, just long enough for dessert to steal the show.
There is something wonderfully forgiving about Easy Lemon Dump Cake. It tolerates substitutions and tiny timing slips, and it rewards you with minimal effort and maximum flavor. I like to think of it as a celebration shortcut, a dessert that makes hosts look like geniuses without the fuss. When I bring this to potlucks, people expect a complicated recipe when in fact I barely broke a sweat. That contrast between the simple prep and the impressive result is part of the charm that keeps me coming back to this recipe again and again.
Recipe Snapshot
60 mins
15 mins
45 mins
Medium
300 kcal
American
Gluten-Free, Low FODMAP
Desserts
9×13 baking pan, Mixer or mixing bowl, Spoon, Oven
Why This Easy Lemon Dump Cake Stands Out
Effortless assembly
I love how with Easy Lemon Dump Cake you get a layered dessert in minutes. The assembly is straightforward, which means I can focus on timing other dishes or greeting guests. There is no delicate folding or tempering involved, so I rarely feel nervous about making mistakes.
Bright citrus flavor
The brightness of canned lemon pie filling cuts through the richness of the cream cheese and butter, creating a balanced bite. I find that this contrast is what keeps people coming back for seconds, because it never feels overly sweet or heavy.
Comforting texture contrast
The soft, almost custard like center paired with a slightly crisped top from the yellow cake mix creates a delightful interplay of textures. Each forkful offers creamy and crumbly elements that feel both nostalgic and fresh at the same time.
Flexible and forgiving
I often swap in what I have on hand, and this recipe still shines. Whether your boxed cake mix is 13.25 ounces or 15.25 ounces, and whether you use whipped or regular cream cheese, the results remain dependable. That flexibility makes it my go to for unexpected company.
Great for gatherings
This dessert scales well and holds up on a buffet table, which is why I bring it to showers and casual dinners. It serves a crowd without much stress, and you can garnish with whipped cream for a pretty presentation. I enjoy how it looks like something I spent hours on, even when I did not.
What to Buy for Easy Lemon Dump Cake

This ingredient list is intentionally simple and strategic. Each component plays a clear role, from flavor to texture to ease of assembly. The canned lemon pie filling provides the tang and moisture, the cream cheese creates richness and a custard like layer, and the yellow cake mix offers structure and a crisp top once dotted with butter. Together they make a dessert that tastes layered and thoughtful, without hours of work.
- 21 ounces lemon pie filling canned: Provides bright citrus flavor and sweet-tart filling to form the cake’s moist base; spreads easily over the batter and bakes into a glossy, jam-like layer. Adds both moisture and concentrated lemon character that balances the cake mix sweetness, and helps keep the dessert tender during baking.
- 8 ounces whipped cream cheese: Offers creamy richness and a smooth, tangy component that blends into the batter when whipped or softened; contributes structure and a soft, velvety mouthfeel. Enhances overall creaminess and complements the lemon filling with mild acidity, helping to create a slightly dense, cheesecake-like texture in spots.
- 6 tablespoons white sugar: Adds crystalline sweetness and helps adjust overall sweetness level; dissolves when mixed with wet ingredients to provide consistent taste throughout. Also assists in browning and tenderizing by interacting with fats and eggs during baking.
- 2 large eggs: Provides binding, leavening support, and moisture to the batter while contributing to structure and richness; beaten eggs help emulsify fats for a uniform texture. Also adds protein that sets during baking, giving the cake stability and a tender crumb.
- 13.25 ounces yellow cake mix dry, can also use a 15.25 ounce cake mix: Supplies dry leavening mix, sugar, and flavor base that forms the bulk of the cake’s crumb; mixes with wet ingredients to create the cake texture. Can be swapped for a similarly sized package if needed, and its pre-mixed components ensure predictable rise and sweetness.
- 1/2 cup butter salted: Contributes fat for tenderness, moisture, and flavor while promoting browning and a richer mouthfeel; melts over the top to create a buttery crust when baked. Salted butter additionally adds a touch of savory balance that enhances the overall flavor profile.
- whipped cream , for serving, can also use Cool Whip (optional): Serves as an optional light, airy topping to finish the dessert and add visual appeal; provides a cool, creamy contrast to the warm cake. Can be spooned or piped on individually, with Cool Whip offering a convenient, stable alternative for serving.
Step by Step Instructions for Easy Lemon Dump Cake
These steps are relaxed and conversational, reflecting how I cook this dessert at home. I like to move deliberately, keeping an eye on visual cues and aromas rather than watching the clock. Below, each instruction includes sensory guidance and troubleshooting so you can feel confident from bowl to oven.
- Preheat the oven to 350 F. Spray a 9×13 pan with oil.: You should feel the kitchen begin to warm as the oven comes up to temperature, and a faint hot air scent will fill the room when the oven cycle starts. Preheating ensures the pan hits a consistent environment so the layers set evenly, preventing the center from remaining underdone while the edges overbake. If you skip preheating, the cake can bake unevenly, producing a dense, undercooked middle. Check your oven thermometer if you suspect temperature drift, because ovens can vary and that affects browning and baking time.
- Spread lemon pie filling over bottom of the pan evenly with a spoon.: The pan should feel slick to the touch after spraying, and the thin film of oil stops the dessert from sticking when you scoop it out. A light coating also encourages the edges to develop a subtle crust. Avoid using too much oil, which can make the bottom greasy; just a single, even spritz is sufficient. If you forget this step, the cake might cling to the pan sides, so run a knife gently around the edges after baking to help release it.
- In a medium bowl add cream cheese, sugar and eggs. Mix well until smooth.: As you spread the glossy lemon pie filling , watch for an even, shiny layer with no deep valleys, because those pockets can cause uneven baking. The filling's citrus aroma will be prominent, and the surface should reflect light slightly. If you leave thick pockets, the center may remain overly moist after baking. Use a flexible spoon to smooth the filling, working from the center out toward the edges for consistent coverage.
- Pour cream cheese mixture over lemon pie filling and spread evenly.: The mixture should turn into a silky, pale blend; its aroma will be richer and slightly tangy from the cream cheese . The sound of the mixer will be steady without splattering if you've brought the ingredients to room temperature. This step helps develop the custardy texture, so beat until completely lump free. A common mistake is under mixing, leaving small pockets of cream cheese that will bake into little dense bits, so scrape the bowl sides and check for smoothness.
- Sprinkle cake mix evenly over the cream cheese mixture in the pan. Gently break apart any large chunks of cake mix that may have clumped in the box.: When you pour, you will see the pale cream cheese cascade across the lemon layer, forming a contrast of color that helps guide your spreading. Aim for a thin, even layer that seals the lemon beneath, because this balance creates the signature custard like center. If you spread too vigorously you can disturb the lemon layer, causing blending rather than distinct layers, so use gentle, even strokes to maintain separation.
- Slice the butter into thin pieces and place evenly across the cake mix.: The dry yellow cake mix should form a sandy blanket over the cream cheese, and as the butter melts it will create golden pockets on top. Use your fingers to crumble any dense lumps, ensuring the mix distributes without compacting. If big chunks remain, they can sink or fail to crisp, so take a moment to flake them apart. Avoid compressing the mix into the filling, as it needs air to become the light, crisp topping you want.
- Place the pan in the oven. Bake for 45 minutes, until the top is lightly browned.: As you scatter thin slices of butter , listen for the slight clink against the pan, then watch as the pale yellow pieces dot the dry mix. These slices melt during baking and create pockets of moisture that turn into golden, slightly caramelized spots. If the butter is unevenly distributed, some areas will brown more than others, so aim for regular spacing. A mistake here is using large chunks of butter, which can pool and make soggy spots; thin slices melt more predictably.
- Let the lemon dump cake rest for about 10 minutes. Scoop and serve with optional whipped cream and enjoy!: As the pan slides into the heat, you may notice the oven tone shift and a warm steam begin to escape after a few minutes. During the bake, the top will start to brown and bubble softly, and the aroma of baked butter and citrus will become more pronounced. This step sets all the layers, transforming them into a cohesive dessert. Avoid opening the oven door frequently, because that causes temperature swings that can affect texture and baking time.
- Bake for 45 minutes until the top is lightly browned: Near the end of baking you should see a golden top with little bubbling spots where the butter has caramelized. The edges will be slightly firmer and the center gently set but not rock hard. The sound is quiet, mostly the oven hum, while the smell—warm butter and lemon—fills the kitchen. If the top browns too quickly, tent with foil to prevent burning. Underbaking yields a runny interior, so err on the side of a few extra minutes if the center still jiggles noticeably.
- Let the lemon dump cake rest for about 10 minutes: Resting allows the custard like center to finish setting, and the steam to settle so slices come out cleanly. You will notice the aroma mellow slightly and the surface become less shiny as it cools. Cutting too soon often results in sloppy slices, so patience pays off here. If you need to speed cooling, place the pan on a cooling rack to circulate air beneath, but do not refrigerate hot, as that can change textures.
- Scoop and serve with optional whipped cream and enjoy: When you scoop, the spoon should glide through layers, revealing the pale cream cheese core and the golden top. The contrast of warm cake and cool whipped cream is delightful, and the first bite should be bright, tangy, and slightly creamy. Avoid overloading the serving so the layers remain visible and balanced. If it seems too soft, a dollop of whipped cream helps stabilize each portion while adding a light finish.
Helpful Hints
This section collects practical tricks I rely on every time I make Easy Lemon Dump Cake. They focus on texture control, presentation, and small adjustments that lead to consistent success. These tips expand on the notes from the recipe and the boxed mix manufacturers, so you can bake confidently and serve a dessert that impresses without stress.
- Box size tolerance Many boxed cake mixes have changed sizes, but for this recipe either 13.25 ounce or 15.25 ounce yellow cake mix will work. I find the texture varies slightly but not enough to change the overall outcome, so use what you have and break up any clumps for even coverage.
- Cream cheese readiness If using regular cream cheese, cut into pieces and let sit ten to fifteen minutes to soften, then beat thoroughly until smooth. This prevents lumps and creates a silky custard texture when combined with the eggs and sugar.
- Whipped cream alternative You can top slices with freshly whipped whipped cream or Cool Whip. Fresh whipped cream gives a lighter mouthfeel and enhances the citrus, while Cool Whip offers convenience and stability on a buffet table.
- Don’t add boxed cake ingredients You do not need to include the eggs oil or water listed on the cake mix box for this recipe. The moisture from the lemon pie filling and melted butter provides enough hydration for the topping to bake properly.
- Even butter distribution Slice the butter thinly and space it evenly so it melts uniformly into the cake mix. This yields a nicely caramelized top without greasy spots.
- Monitor baking color Watch for a light golden brown top and small bubbling spots; if it browns too quickly, tent with foil to prevent overbrowning while the center finishes setting.
Perfect Pairings for Easy Lemon Dump Cake
I like serving Easy Lemon Dump Cake with simple pairings that complement its citrus brightness and creamy texture. These ideas cover casual family meals, brunch spreads, and small celebrations. Below you will find serving styles, storage suggestions, and occasions that match the dessert’s easy going spirit.
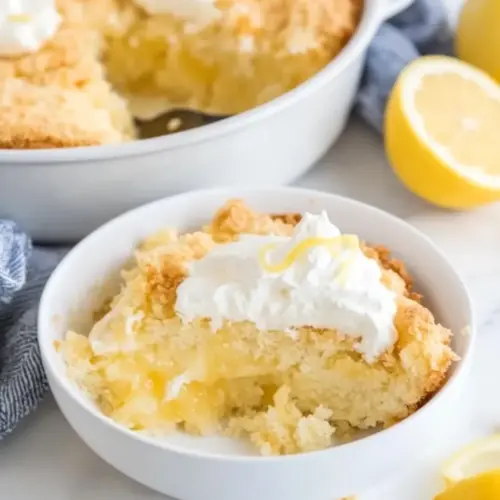
- Serve warm with whipped cream A scoop of whipped cream on a warm slice adds a cool, airy contrast and makes the presentation feel refined for brunch or a light dinner dessert.
- Potluck friendly This dessert travels well and holds up on a buffet table, so it is great for showers, office gatherings, or holiday tables where you want a crowd pleasing option that requires minimal last minute effort.
- Casual family dessert Pair a warm slice with coffee or tea for an everyday treat after dinner. The tart lemon and creamy center make it satisfying without feeling too heavy late in the evening.
- Make ahead and store Allow the pan to cool completely, cover tightly, and refrigerate for up to three days. Rewarm individual portions briefly in the oven or serve chilled with a spoonful of whipped cream for a different texture contrast.
- Seasonal pairing This dessert fits springtime menus beautifully due to its citrus notes, but it also brightens winter gatherings when you want a lighter finishing touch to heavier meals.
- Presentation tip Serve in the baking dish for a rustic feel, or slice and transfer to a platter for a more formal look. Garnish with a thin lemon twist if desired, keeping the focus on the cake’s vibrant flavor.
FAQ
Conclusion
What makes this recipe special is its uncanny ability to deliver bright lemon flavor and a creamy, layered texture with almost no fuss. It’s a straightforward dessert that feels impressive, which is why I reach for it when guests arrive unexpectedly or when I want something easy yet memorable. Give it a try the next time you want a quick, crowd friendly sweet that balances tang and richness, and enjoy the surprised smiles around the table.
Easy Lemon Dump Cake
Equipment
- 9×13 baking pan
- Mixer or mixing bowl
- Spoon
- Oven
Ingredients
- 21 ounces lemon pie filling canned Provides bright citrus flavor and sweet-tart filling to form the cake’s moist base; spreads easily over the batter and bakes into a glossy, jam-like layer. Adds both moisture and concentrated lemon character that balances the cake mix sweetness, and helps keep the dessert tender during baking.
- 8 ounces whipped cream cheese Offers creamy richness and a smooth, tangy component that blends into the batter when whipped or softened; contributes structure and a soft, velvety mouthfeel. Enhances overall creaminess and complements the lemon filling with mild acidity, helping to create a slightly dense, cheesecake-like texture in spots.
- 6 tablespoons white sugar Adds crystalline sweetness and helps adjust overall sweetness level; dissolves when mixed with wet ingredients to provide consistent taste throughout. Also assists in browning and tenderizing by interacting with fats and eggs during baking.
- 2 large eggs Provides binding, leavening support, and moisture to the batter while contributing to structure and richness; beaten eggs help emulsify fats for a uniform texture. Also adds protein that sets during baking, giving the cake stability and a tender crumb.
- 13.25 ounces yellow cake mix dry, can also use a 15.25 ounce cake mix Supplies dry leavening mix, sugar, and flavor base that forms the bulk of the cake’s crumb; mixes with wet ingredients to create the cake texture. Can be swapped for a similarly sized package if needed, and its pre-mixed components ensure predictable rise and sweetness.
- 1/2 cup butter salted Contributes fat for tenderness, moisture, and flavor while promoting browning and a richer mouthfeel; melts over the top to create a buttery crust when baked. Salted butter additionally adds a touch of savory balance that enhances the overall flavor profile.
- whipped cream optional, for serving, can also use Cool Whip Serves as an optional light, airy topping to finish the dessert and add visual appeal; provides a cool, creamy contrast to the warm cake. Can be spooned or piped on individually, with Cool Whip offering a convenient, stable alternative for serving.
Instructions
- Preheat the oven to 350 F. Spray a 9×13 pan with oil.: You should feel the kitchen begin to warm as the oven comes up to temperature, and a faint hot air scent will fill the room when the oven cycle starts. Preheating ensures the pan hits a consistent environment so the layers set evenly, preventing the center from remaining underdone while the edges overbake. If you skip preheating, the cake can bake unevenly, producing a dense, undercooked middle. Check your oven thermometer if you suspect temperature drift, because ovens can vary and that affects browning and baking time.
- Spread lemon pie filling over bottom of the pan evenly with a spoon.: The pan should feel slick to the touch after spraying, and the thin film of oil stops the dessert from sticking when you scoop it out. A light coating also encourages the edges to develop a subtle crust. Avoid using too much oil, which can make the bottom greasy; just a single, even spritz is sufficient. If you forget this step, the cake might cling to the pan sides, so run a knife gently around the edges after baking to help release it.
- In a medium bowl add cream cheese, sugar and eggs. Mix well until smooth.: As you spread the glossy lemon pie filling , watch for an even, shiny layer with no deep valleys, because those pockets can cause uneven baking. The filling's citrus aroma will be prominent, and the surface should reflect light slightly. If you leave thick pockets, the center may remain overly moist after baking. Use a flexible spoon to smooth the filling, working from the center out toward the edges for consistent coverage.
- Pour cream cheese mixture over lemon pie filling and spread evenly.: The mixture should turn into a silky, pale blend; its aroma will be richer and slightly tangy from the cream cheese . The sound of the mixer will be steady without splattering if you've brought the ingredients to room temperature. This step helps develop the custardy texture, so beat until completely lump free. A common mistake is under mixing, leaving small pockets of cream cheese that will bake into little dense bits, so scrape the bowl sides and check for smoothness.
- Sprinkle cake mix evenly over the cream cheese mixture in the pan. Gently break apart any large chunks of cake mix that may have clumped in the box.: When you pour, you will see the pale cream cheese cascade across the lemon layer, forming a contrast of color that helps guide your spreading. Aim for a thin, even layer that seals the lemon beneath, because this balance creates the signature custard like center. If you spread too vigorously you can disturb the lemon layer, causing blending rather than distinct layers, so use gentle, even strokes to maintain separation.
- Slice the butter into thin pieces and place evenly across the cake mix.: The dry yellow cake mix should form a sandy blanket over the cream cheese, and as the butter melts it will create golden pockets on top. Use your fingers to crumble any dense lumps, ensuring the mix distributes without compacting. If big chunks remain, they can sink or fail to crisp, so take a moment to flake them apart. Avoid compressing the mix into the filling, as it needs air to become the light, crisp topping you want.
- Place the pan in the oven. Bake for 45 minutes, until the top is lightly browned.: As you scatter thin slices of butter , listen for the slight clink against the pan, then watch as the pale yellow pieces dot the dry mix. These slices melt during baking and create pockets of moisture that turn into golden, slightly caramelized spots. If the butter is unevenly distributed, some areas will brown more than others, so aim for regular spacing. A mistake here is using large chunks of butter, which can pool and make soggy spots; thin slices melt more predictably.
- Let the lemon dump cake rest for about 10 minutes. Scoop and serve with optional whipped cream and enjoy!: As the pan slides into the heat, you may notice the oven tone shift and a warm steam begin to escape after a few minutes. During the bake, the top will start to brown and bubble softly, and the aroma of baked butter and citrus will become more pronounced. This step sets all the layers, transforming them into a cohesive dessert. Avoid opening the oven door frequently, because that causes temperature swings that can affect texture and baking time.
- Bake for 45 minutes until the top is lightly browned: Near the end of baking you should see a golden top with little bubbling spots where the butter has caramelized. The edges will be slightly firmer and the center gently set but not rock hard. The sound is quiet, mostly the oven hum, while the smell—warm butter and lemon—fills the kitchen. If the top browns too quickly, tent with foil to prevent burning. Underbaking yields a runny interior, so err on the side of a few extra minutes if the center still jiggles noticeably.
- Let the lemon dump cake rest for about 10 minutes: Resting allows the custard like center to finish setting, and the steam to settle so slices come out cleanly. You will notice the aroma mellow slightly and the surface become less shiny as it cools. Cutting too soon often results in sloppy slices, so patience pays off here. If you need to speed cooling, place the pan on a cooling rack to circulate air beneath, but do not refrigerate hot, as that can change textures.
- Scoop and serve with optional whipped cream and enjoy: When you scoop, the spoon should glide through layers, revealing the pale cream cheese core and the golden top. The contrast of warm cake and cool whipped cream is delightful, and the first bite should be bright, tangy, and slightly creamy. Avoid overloading the serving so the layers remain visible and balanced. If it seems too soft, a dollop of whipped cream helps stabilize each portion while adding a light finish.
Notes
- Box size tolerance Many boxed cake mixes have changed sizes, but for this recipe either 13.25 ounce or 15.25 ounce yellow cake mix will work. I find the texture varies slightly but not enough to change the overall outcome, so use what you have and break up any clumps for even coverage.
- Cream cheese readiness If using regular cream cheese, cut into pieces and let sit ten to fifteen minutes to soften, then beat thoroughly until smooth. This prevents lumps and creates a silky custard texture when combined with the eggs and sugar.
- Whipped cream alternative You can top slices with freshly whipped whipped cream or Cool Whip. Fresh whipped cream gives a lighter mouthfeel and enhances the citrus, while Cool Whip offers convenience and stability on a buffet table.
- Don’t add boxed cake ingredients You do not need to include the eggs oil or water listed on the cake mix box for this recipe. The moisture from the lemon pie filling and melted butter provides enough hydration for the topping to bake properly.
- Even butter distribution Slice the butter thinly and space it evenly so it melts uniformly into the cake mix. This yields a nicely caramelized top without greasy spots.
- Monitor baking color Watch for a light golden brown top and small bubbling spots; if it browns too quickly, tent with foil to prevent overbrowning while the center finishes setting.