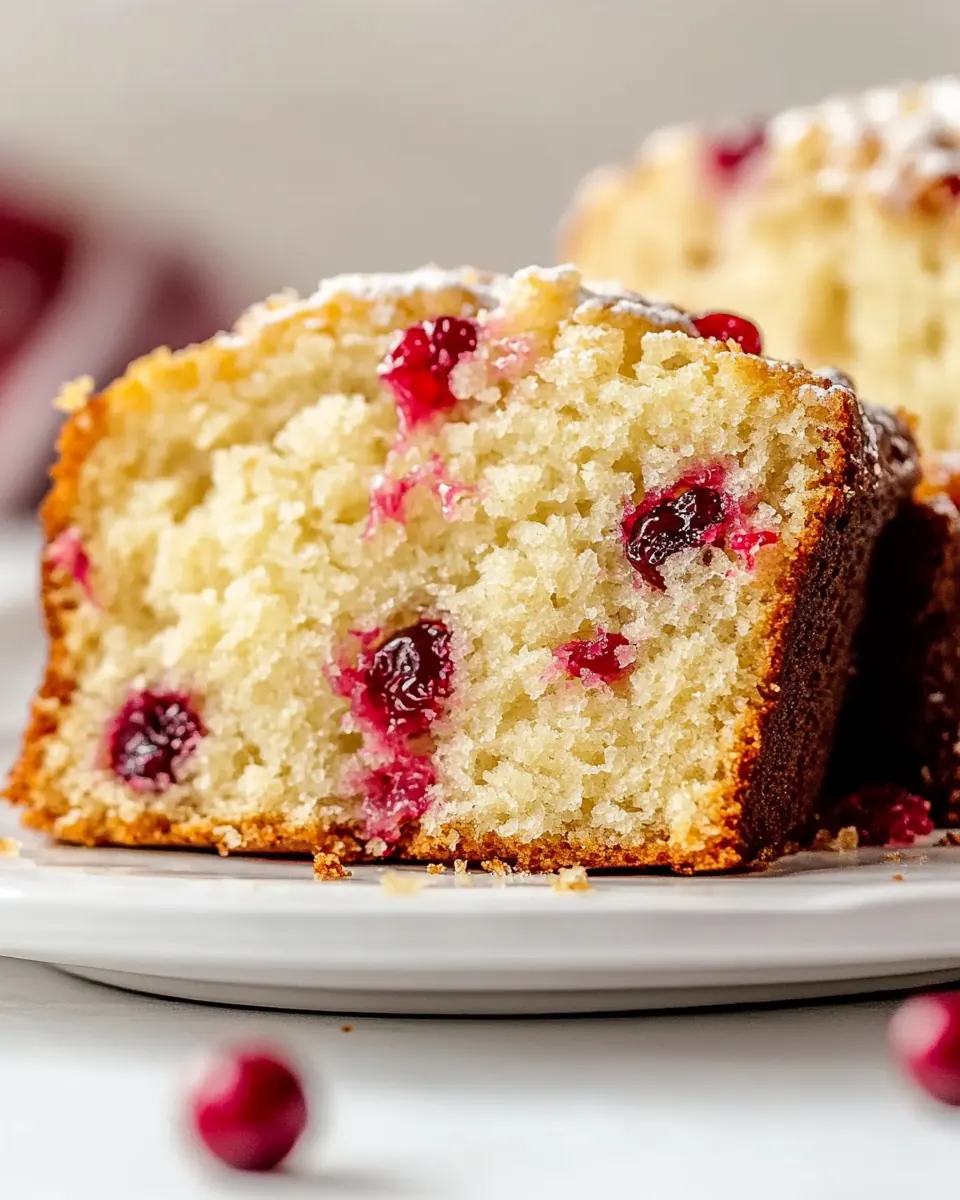
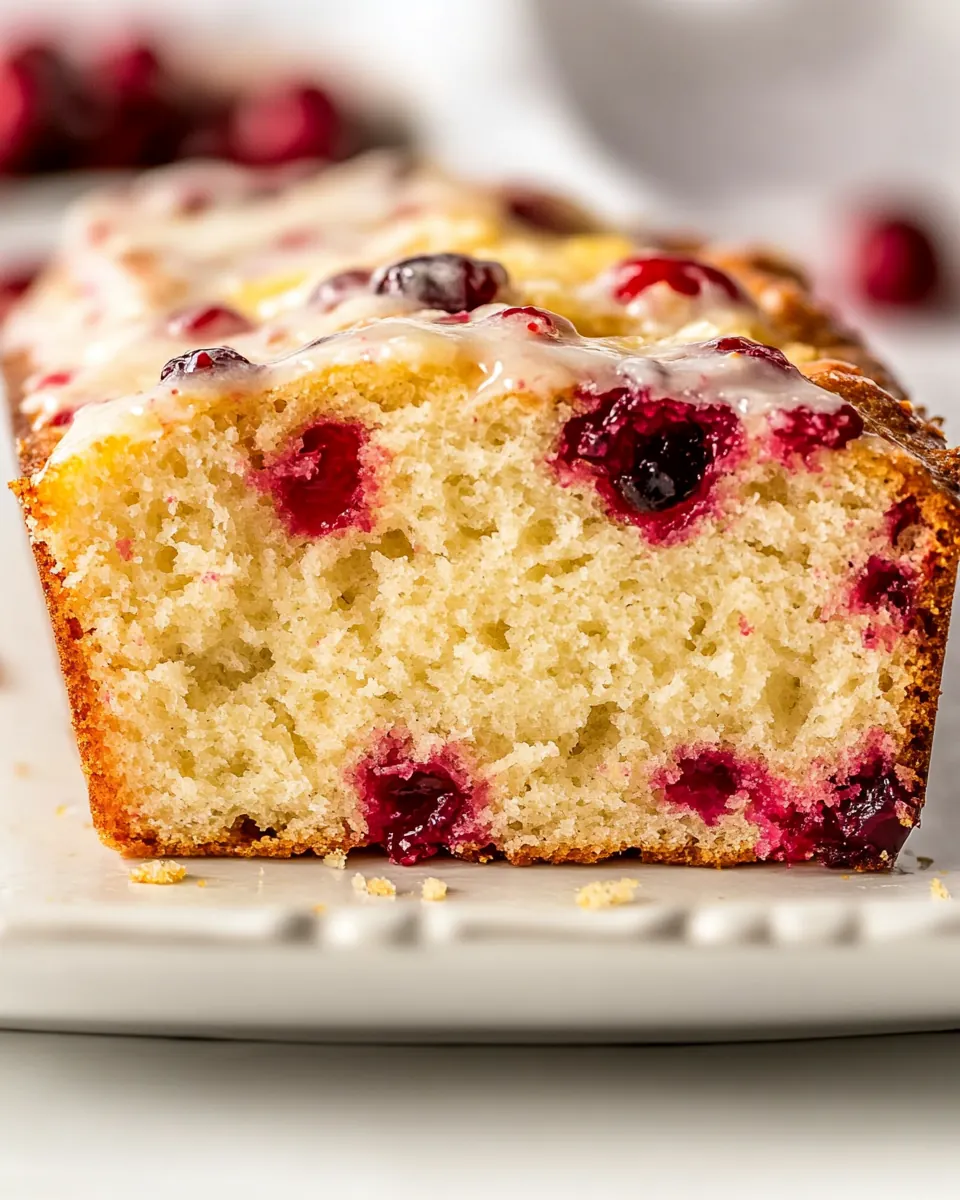
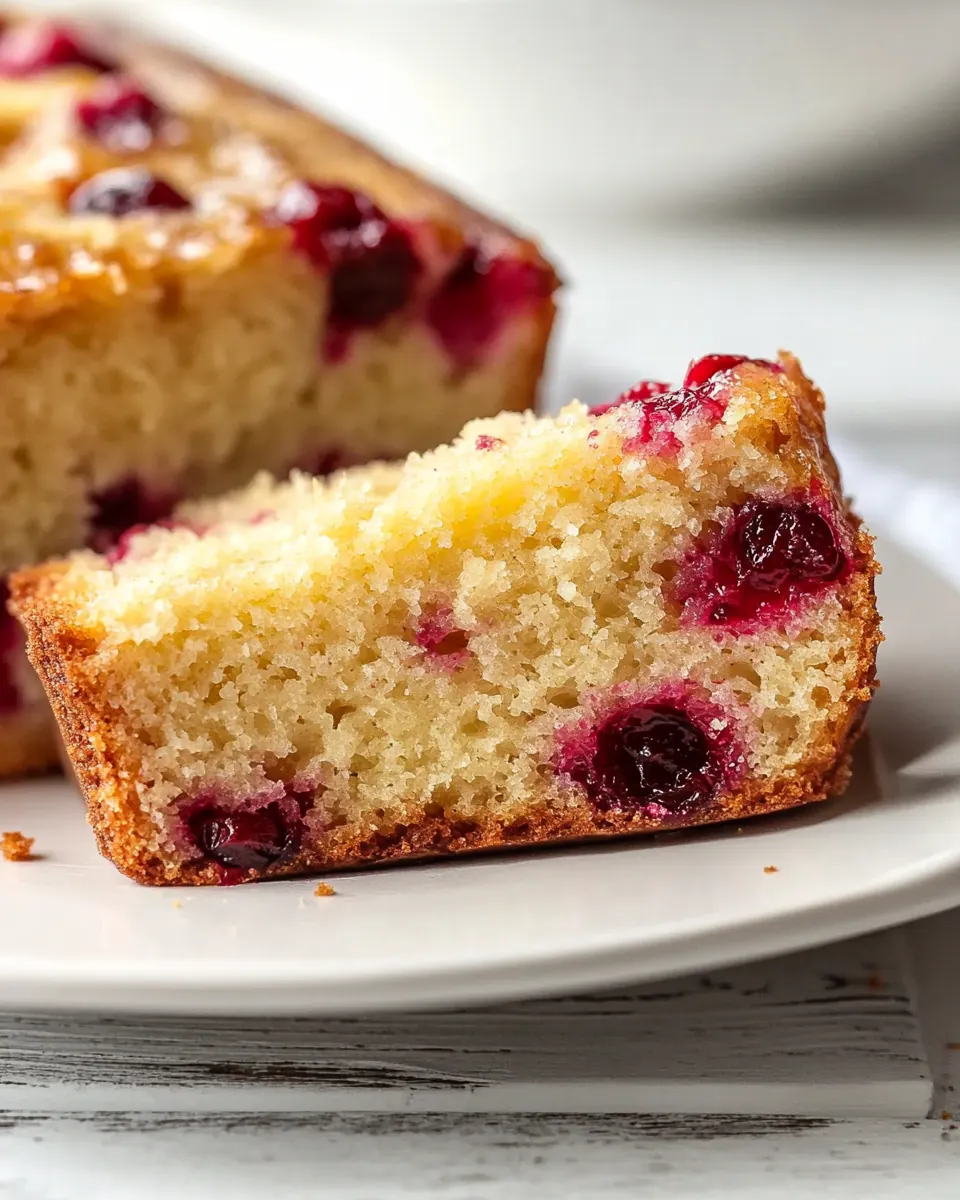
Glazed Lemon Cranberry Bread
Glazed Lemon Cranberry Bread has been one of those recipes that sneaks into my kitchen the moment the light changes and the air smells of apples and wood smoke. I first baked this loaf the week after a long road trip, arriving home with a bag of bright cranberries and a tired craving for something bright, tart, and comforting. The loaf smelled like a small celebration while it baked, and I remember cutting the first slice and watching the glaze bead along the crumb, thinking I had found the perfect balance of sweet and lively citrus.
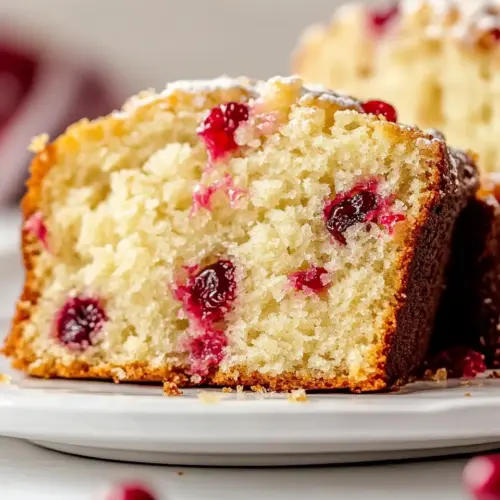
Over the years, I have made Glazed Lemon Cranberry Bread for casual coffee mornings, holiday brunches, and an unexpected guest who knocked while I was rinsing a bowl. Each time it has felt different but reliably welcoming. The tartness of the cranberries and the zing from the lemon make a combo that keeps people coming back for one more thin slice. I love how the loaf slices neatly yet still looks rustic and unpretentious on a wooden board with morning light.
Recipe Snapshot
1 hr 10 mins
15 mins
55 mins
Medium
250 kcal
American
Gluten-Free, Low FODMAP
Desserts
Kitchen Scale(optional), 9×5-inch loaf pan, Stand Mixer
Why Try This Glazed Lemon Cranberry Bread
Bright, Balanced Flavor
I adore how Glazed Lemon Cranberry Bread pairs sharp citrus with the gentle bite of cranberries. The lemon brightness cuts through the sweetness and keeps each bite lively, so you never feel weighed down by sugar. When I taste a slice warm, the glaze melts slightly into the crumb and releases a burst of lemon that wakes up the palate. This balance makes it great for breakfast and for an afternoon treat alike.
Simple Techniques, Reliable Results
I appreciate recipes that respect time and patience, and this loaf delivers. The method is straightforward yet forgiving. Creaming the butter and sugar until fluffy creates a tender crumb, and a gentle folding of the cranberries prevents streaks of color while ensuring even distribution. I’ve found that these modest steps pay off in a loaf that looks and tastes like you spent way more time on it than you did.
Seasonal and Festive
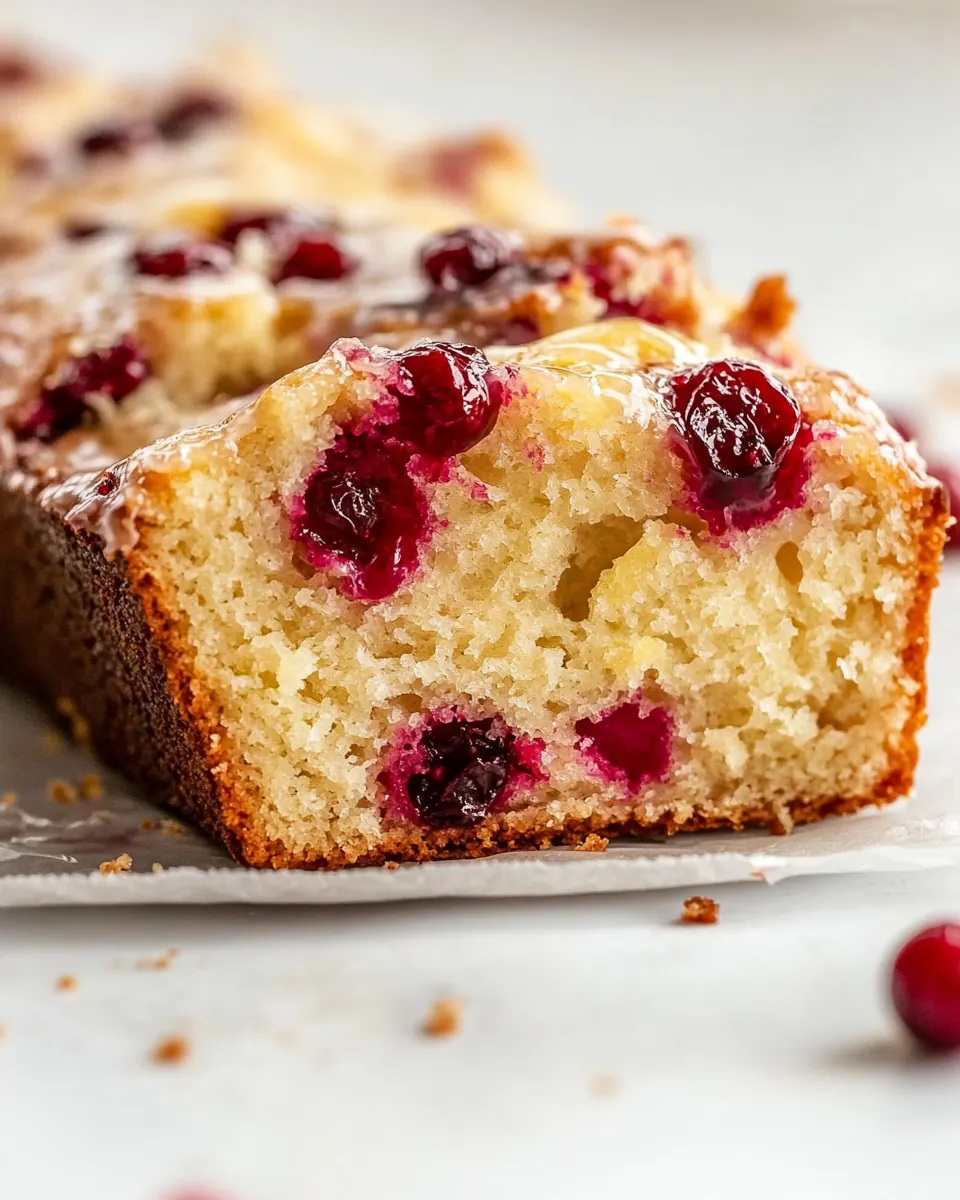
This bread feels right for the cooler months, and I often bring it to holiday gatherings. The red of the cranberries against pale yellow crumb makes a lovely festive presentation without any fuss. I like that it slots into Thanksgiving tables as a breakfast or dessert alternative, and it’s easy to double for a crowd. Guests often comment on the glaze first, which signals that extra layer of care.
Texture That Delivers
The loaf manages to be both moist and sliceable, thanks to the balance of milk, butter, and properly measured flour. The crumb is tender yet sturdy enough to hold a hearty smear of butter or a thin layer of cream cheese if you like. The occasional pop from a whole cranberry adds a pleasant contrast to the otherwise soft crumb. That little textural play keeps every bite interesting.
Adaptable and Approachable
Finally, I love how approachable Glazed Lemon Cranberry Bread feels. You do not need fanciest equipment to get it right, and the ingredient list is pantry friendly. I’ve tweaked the zest amount or used slightly different sugars at times, and the recipe still shines. It’s a brilliant go to when you want a homemade gift or to brighten a quiet morning.
Recipe Ingredients for Glazed Lemon Cranberry Bread
These ingredients are chosen to create a loaf that is bright, tender, and balanced. The key players are the cranberries for tartness, the lemon for aromatic lift, and the combination of butter, sugar, and eggs to build a rich, moist crumb. The dairy and measured flour ensure structure while the glaze adds a glossy finish that amplifies the citrus notes.
- 1 cup fresh cranberries: Add and scatter tartness and bright color throughout the loaf; cranberries provide bursts of sharp flavor that balance the sweet batter and add visual contrast. Use whole fresh berries to maintain a juicy texture and bite after baking. Gently fold them in to avoid breaking while ensuring even distribution.
- 1 2/3 cups all-purpose flour 200 grams (plus 1 tablespoon (8 grams) for dredging cranberries): Whisk together to create the structural base of the bread; all-purpose flour supplies gluten and starch that form the crumb and hold moisture. Measure and sift as needed for accuracy, and reserve the extra tablespoon for dredging cranberries so they don’t sink. Adjust technique to prevent overmixing, which can toughen the loaf.
- 1 1/2 teaspoons baking powder 6 grams: Leaven the batter by releasing carbon dioxide when heated; baking powder helps the bread rise and develop a tender, airy crumb. Ensure it is fresh for reliable lift, and distribute evenly with the dry ingredients to avoid pockets of metallic taste. Balance its amount with the wet ingredients to achieve proper texture.
- 1/2 teaspoon kosher salt: Enhance overall flavor by providing subtle savory contrast to the sweet elements; kosher salt brightens and rounds out the taste of the bread. Dissolve thoroughly in the batter to ensure even seasoning, and use the specified amount to avoid overpowering the other flavors. Consider kosher salt’s coarser grain when measuring by volume.
- 1/2 cup unsalted butter 113 grams, room temperature (1 stick): Cream until fluffy to incorporate fat and air; unsalted butter adds richness, moisture, and flavor depth to the loaf. Use room–temperature butter for easier creaming with sugar, which helps create a light crumb. Keep it unsalted so you control the overall salt level in the recipe.
- 1 cup granulated sugar 200 grams: Cream with butter to aerate the batter and contribute sweetness and structure; granulated sugar dissolves into the butter to create a tender texture and balanced sweetness. Measure accurately to maintain proper consistency and browning during baking. Adjust creaming time based on desired crumb and rise.
- 2 large eggs 100 grams, room temperature: Emulsify and bind the batter while adding richness; eggs contribute moisture, protein, and structure that help the loaf set. Use room–temperature eggs to blend smoothly with the butter–sugar mixture, promoting an even, stable emulsion. Beat in one at a time to maintain consistent texture.
- 1/2 cup milk 114 grams, at least 2%: Moisten and tenderize the crumb while contributing to proper batter consistency; milk adds liquid, fat (if using 2% or higher), and subtle dairy flavor. Warm slightly or use room temperature to prevent the butter from hardening when combined. Stir in gradually to achieve a smooth, cohesive batter.
- 1 tablespoon grated lemon zest from 1 lemon: Infuse bright citrus aroma and concentrated lemon flavor; grated lemon zest delivers essential oils that elevate the bread’s fragrance and freshness. Use fine grating to release more oils without adding bitter pith, and incorporate during mixing for even distribution. Pair with lemon juice for layered citrus notes.
- 1/4 cup granulated sugar 50 grams: Sweeten and balance tart elements when making the glaze; additional granulated sugar produces the glaze’s texture and sweetness to complement the lemon juice. Dissolve with lemon juice to form a smooth syrup that can be brushed over the warm loaf for shine and flavor. Adjust dissolution for desired glaze thickness.
- 1/4 cup freshly squeezed lemon juice 57 grams, from 2 lemons: Provide pronounced citrus acidity and flavor for the glaze; freshly squeezed lemon juice adds bright tang that cuts sweetness and enhances overall flavor. Strain if needed to remove seeds and pulp for a smooth finish, and combine with sugar to create a glossy, flavorful glaze. Use fresh lemons for the best aroma and acidity.
Glazed Lemon Cranberry Bread Instructions
These instructions are straightforward but rewarding. I approach them like a small ritual, setting out the stand mixer and measuring the dry ingredients first. The sequence of mixing and gentle folding gives the loaf its tender crumb and even distribution of cranberries. Read each step before you begin so you can enjoy the process and avoid common missteps.
- Preheat oven to 350°F and spray a 9×5-inch loaf pan with nonstick baking spray.: The kitchen fills with a warm, anticipatory scent as the oven warms, signaling the start of transformation. Ensuring the oven reaches a steady 350°F gives the loaf an even rise and consistent crumb color. Spraying the 9×5 inch loaf pan and perhaps lining it with a strip of parchment helps the loaf release cleanly, which makes slicing neater. A typical mistake is preheating for too little time, leading to an uneven dome or underbaked center. Tap the oven light a moment before you begin to check for steady heat, because a fluctuating temperature can alter baking time and texture.
- Toss the cranberries with 1 tablespoon of flour and set aside.: When you handle the cranberries , you will notice their glossy skins and tart aroma, which promise bright pockets of flavor in the finished loaf. Tossing them with that reserved tablespoon of flour creates a light coating that helps them suspend throughout the batter rather than sinking. This step also reduces bleeding of color into the surrounding crumb, preserving lovely specks of red. One common issue is using overly wet berries, which can soak the flour coating and cause sinking, so pat fresh berries dry if needed.
- In a medium bowl, whisk the rest of the flour, baking powder, and salt together.: The dry mixture should smell faintly nutty from the flour , and whisking ensures the baking powder and salt are evenly distributed, which prevents pockets of metallic or uneven rise. A uniform dry blend promotes consistent texture and avoids sudden flavor spikes. Overwhisking is not a concern here, but missing clumps can cause uneven leavening. Sift if your flour seems packed or clumpy for best results.
- In the bowl of a stand mixer fitted with the paddle attachment, cream the butter and sugar together on medium-high speed until fluffy and creamy. It takes about 1-2 minutes.: As you beat the butter and sugar , you will see them turn from matte to a lighter, softer texture that holds tiny air pockets, which contribute to a tender, open crumb. This creaming stage is tactile and aromatic, releasing that buttery scent that hints at richness to come. The right texture looks pale and airy, and it usually takes about one to two minutes. A trouble spot is working with butter that is too cold or too melty, either of which fails to capture air correctly, so adjust to room temperature before you start.
- Add the eggs and beat an additional 1 minute.: When the eggs join the creamed mixture, the batter becomes silkier and slightly more fluid, and you may notice a faint sheen. The eggs help bind the ingredients and contribute to structure, while their proteins set during baking for stability. Beating for about a minute ensures they are incorporated without creating an overly thin batter. A common error is adding cold eggs directly from the fridge, which can cause the butter to seize and look curdled; room temperature eggs are kinder to the emulsion.
- Add half of the flour mixture into the eggs mixture. Mix on low speed just until incorporated.: At this stage you will notice the batter begin to thicken and gain body, with dry flecks quickly disappearing. Adding the dry mix in halves reduces the need for vigorous mixing, which helps preserve a tender crumb. The low speed prevents overworking gluten , which would make the loaf chewy rather than delicate. Common mistakes include dumping all dry ingredients at once, which forces extended mixing and can tighten the crumb.
- Add 1/4 cup (half) of the milk and mix on low for 15 seconds.: Adding a measured portion of the milk introduces moisture that loosens the batter and improves its flow. Mixing briefly prevents overdevelopment of gluten , while ensuring the liquid is blended evenly so you do not get pockets of dry flour. You should notice the batter change from dense to silky within those few seconds. Using cold milk straight from the fridge may briefly firm the butter , so aim for a modestly cool rather than icy temperature.
- Add the remaining flour mixture and mix just until no flour is visible.: When the final dry portion is incorporated, the batter should look homogenous and slightly thick, with no streaks of raw flour . This gentle mixing is crucial because overbeating at this point creates a tougher loaf. You will still see body and slight peaks in the batter while it holds together, which is perfect for even rise. If you notice a rubbery texture, that means the batter has been overmixed and may bake dense.
- Add remaining 1/4 cup milk and mix until combined.: The final splash of milk balances moisture and helps achieve the ideal scoopable consistency. Once the milk is combined, the batter should fall slowly from a spoon in a thick ribbon. This liquidity level ensures the loaf bakes with tenderness without collapsing. A batter that is too thin will not support cranberries , and one that is too stiff may bake dry; adjust carefully with small additions if needed.
- Fold in the lemon zest and cranberries.: Folding by hand preserves the air in the batter while distributing the bright lemon zest and floured cranberries evenly. You will notice fragrant citrus oils and pops of red throughout the mixture, which promise lively bites after baking. The folding motion should be gentle and deliberate to avoid smashing the cranberries , which would stain the batter. Overenthusiastic stirring is a frequent misstep that leads to streaked color and lost texture contrasts.
- Pour the batter into the prepared loaf pan and bake at 350°F for 50-60 minutes or until a toothpick inserted in the middle comes out clean.: As the loaf bakes, the kitchen will fill with a warm lemon and butter aroma, and the top will slowly turn a golden hue. The time window accounts for oven differences, so start checking at about 50 minutes for the toothpick test. A clean toothpick or one with a few moist crumbs is the sign of doneness; wet batter means more time is needed. Avoid opening the oven too often during the first part of baking, which can cause uneven rising and a sunken center.
- Transfer the bread (in the pan) to a cooling rack and cool 15 minutes. After 15 minutes, remove the loaf from the pan, and set it upright.: Cooling briefly in the pan allows the crumb to set, which makes removal safer and prevents tearing. After fifteen minutes the loaf will have contracted slightly away from the pan edges and slide out more easily. Setting it upright helps the glaze absorb into the top without puddling around the loaf. Removing too soon can cause the loaf to collapse, while leaving it too long may make glazing less effective.
- In a small saucepan set over medium heat, combine the sugar and lemon juice. Bring to a boil and cook 30 seconds. Remove from the heat.: Heating the lemon juice with the reserved sugar dissolves crystals and concentrates flavor into a glossy glaze that soaks into the crumb. You will see the mixture go from cloudy to clear and glossy in a matter of moments, and the citrus scent intensifies. Boiling briefly reduces raw edge but do not overcook or you will caramelize the sugar and change the flavor profile. A common pitfall is boiling too long which thickens the syrup beyond ideal glaze consistency.
- Carefully pierce the top of the bread with a toothpick and use a pastry brush to evenly apply the warm lemon glaze over the top.: Piercing the loaf allows the warm glaze to sink into the crumb, adding moisture and a bright lemon note throughout. Brushing moves the glossy syrup into the surface, and you will see the top take on a sheen and slight translucence. Work gently so the loaf preserves its shape, and let the glaze cool before slicing for the cleanest cuts. Pouring a cold glaze onto a warm loaf can cause excessive runoff, so use the warm syrup as instructed for best absorption.
Ways to Adapt This Recipe
This loaf adapts well to small adjustments while keeping its character. Below are practical ways to tweak texture and presentation without changing the core technique. Each tip begins with a concise action for clarity.
- Use whole milk for a richer crumb If you prefer a slightly more indulgent texture substitute whole milk for the 2 percent called for. The extra fat adds creaminess and a softer mouthfeel, especially noticeable the day after baking. Watch the batter consistency, it will be only a touch silkier, and bake time remains the same.
- Double the glaze for a brighter finish If you like a more assertive lemon presence make the glaze twice and brush in two thin layers. The first layer soaks in, and the second adds sheen and a pronounced citrus kick. Apply while the loaf is warm to encourage absorption and avoid pooling at the base.
- Adjust lemon zest to taste For a subtler lemon note use half a tablespoon of zest, or increase to one and a half for extra aromatic lift. Zest packs essential oils, so small changes have big impact. Avoid including pith which adds bitterness.
- Swap the granulated sugar in the batter for a coarse sugar variant Using a slightly coarser sugar can create a more varied crumb texture and a domed top. It may affect browning, so watch the loaf in the final minutes to prevent overcoloring. The internal sweetness will remain balanced with the glaze.
- Make mini loaves for gifting Divide batter into smaller loaf pans to create attractive gifts or party portions. Reduce baking time and check doneness earlier, often around 25 to 35 minutes depending on pan size. Mini loaves cool faster and the glaze soaks in quickly, making them ideal for same day delivery.
Serve This Glazed Lemon Cranberry Bread With
This bread pairs nicely with simple accompaniments and suits a variety of occasions. Here are thoughtful serving ideas that highlight its brightness and seasonal charm. Use the suggestions below to build a small spread for brunch or a cozy afternoon tea.
- Serve warm with butter A thin spread of room temperature butter enhances the loafs richness while letting the lemon and cranberries shine. The butter melts slightly on warm slices for a comforting mouthfeel.
- Offer small bowls of jam A mild berry jam complements the tartness without competing with the lemon glaze. This is perfect for brunch gatherings where guests can customize each slice.
- Pair with coffee or tea Bright teas, or a medium roast coffee, balance the loafs citrus notes and make for a pleasant morning pairing. The tannins cut through sweetness and refresh the palate between bites.
- Bring to holiday brunch This loaf suits Thanksgiving mornings or festive brunch tables, where its crimson flecks add seasonal color and a bright alternative to heavier pastries.
- Storage tips Wrap cooled slices tightly or store the whole loaf in an airtight container at room temperature for up to three days, or freeze slices for longer keeping. Thaw gently at room temperature or briefly warm in a low oven for best texture.
FAQ
Conclusion
Glazed Lemon Cranberry Bread shines because it balances tart cranberries and bright lemon with a tender, sliceable crumb. Its simplicity and festive look make it a recipe I return to when I want something that feels special yet approachable. Give it a try on a chilly morning or bring it to a holiday gathering, you might be surprised how quickly it disappears. Enjoy the process and the warm kitchen memories that come with it.
Glazed Lemon Cranberry Bread
Equipment
- Kitchen Scale(optional)
- 9×5-inch loaf pan
- Stand mixer
Ingredients
- 1 cup fresh cranberries Add and scatter tartness and bright color throughout the loaf; cranberries provide bursts of sharp flavor that balance the sweet batter and add visual contrast. Use whole fresh berries to maintain a juicy texture and bite after baking. Gently fold them in to avoid breaking while ensuring even distribution.
- 1 2/3 cups all-purpose flour 200 grams (plus 1 tablespoon (8 grams) for dredging cranberries) Whisk together to create the structural base of the bread; all-purpose flour supplies gluten and starch that form the crumb and hold moisture. Measure and sift as needed for accuracy, and reserve the extra tablespoon for dredging cranberries so they don’t sink. Adjust technique to prevent overmixing, which can toughen the loaf.
- 1 1/2 teaspoons baking powder 6 grams Leaven the batter by releasing carbon dioxide when heated; baking powder helps the bread rise and develop a tender, airy crumb. Ensure it is fresh for reliable lift, and distribute evenly with the dry ingredients to avoid pockets of metallic taste. Balance its amount with the wet ingredients to achieve proper texture.
- 1/2 teaspoon kosher salt Enhance overall flavor by providing subtle savory contrast to the sweet elements; kosher salt brightens and rounds out the taste of the bread. Dissolve thoroughly in the batter to ensure even seasoning, and use the specified amount to avoid overpowering the other flavors. Consider kosher salt’s coarser grain when measuring by volume.
- 1/2 cup unsalted butter 113 grams, room temperature (1 stick) Cream until fluffy to incorporate fat and air; unsalted butter adds richness, moisture, and flavor depth to the loaf. Use room-temperature butter for easier creaming with sugar, which helps create a light crumb. Keep it unsalted so you control the overall salt level in the recipe.
- 1 cup granulated sugar 200 grams Cream with butter to aerate the batter and contribute sweetness and structure; granulated sugar dissolves into the butter to create a tender texture and balanced sweetness. Measure accurately to maintain proper consistency and browning during baking. Adjust creaming time based on desired crumb and rise.
- 2 large eggs 100 grams, room temperature Emulsify and bind the batter while adding richness; eggs contribute moisture, protein, and structure that help the loaf set. Use room-temperature eggs to blend smoothly with the butter-sugar mixture, promoting an even, stable emulsion. Beat in one at a time to maintain consistent texture.
- 1/2 cup milk 114 grams, at least 2% Moisten and tenderize the crumb while contributing to proper batter consistency; milk adds liquid, fat (if using 2% or higher), and subtle dairy flavor. Warm slightly or use room temperature to prevent the butter from hardening when combined. Stir in gradually to achieve a smooth, cohesive batter.
- 1 tablespoon grated lemon zest from 1 lemon Infuse bright citrus aroma and concentrated lemon flavor; grated lemon zest delivers essential oils that elevate the bread’s fragrance and freshness. Use fine grating to release more oils without adding bitter pith, and incorporate during mixing for even distribution. Pair with lemon juice for layered citrus notes.
- 1/4 cup granulated sugar 50 grams Sweeten and balance tart elements when making the glaze; additional granulated sugar produces the glaze’s texture and sweetness to complement the lemon juice. Dissolve with lemon juice to form a smooth syrup that can be brushed over the warm loaf for shine and flavor. Adjust dissolution for desired glaze thickness.
- 1/4 cup freshly squeezed lemon juice 57 grams, from 2 lemons Provide pronounced citrus acidity and flavor for the glaze; freshly squeezed lemon juice adds bright tang that cuts sweetness and enhances overall flavor. Strain if needed to remove seeds and pulp for a smooth finish, and combine with sugar to create a glossy, flavorful glaze. Use fresh lemons for the best aroma and acidity.
Instructions
- Preheat oven to 350°F and spray a 9×5-inch loaf pan with nonstick baking spray.: The kitchen fills with a warm, anticipatory scent as the oven warms, signaling the start of transformation. Ensuring the oven reaches a steady 350°F gives the loaf an even rise and consistent crumb color. Spraying the 9×5 inch loaf pan and perhaps lining it with a strip of parchment helps the loaf release cleanly, which makes slicing neater. A typical mistake is preheating for too little time, leading to an uneven dome or underbaked center. Tap the oven light a moment before you begin to check for steady heat, because a fluctuating temperature can alter baking time and texture.
- Toss the cranberries with 1 tablespoon of flour and set aside.: When you handle the cranberries , you will notice their glossy skins and tart aroma, which promise bright pockets of flavor in the finished loaf. Tossing them with that reserved tablespoon of flour creates a light coating that helps them suspend throughout the batter rather than sinking. This step also reduces bleeding of color into the surrounding crumb, preserving lovely specks of red. One common issue is using overly wet berries, which can soak the flour coating and cause sinking, so pat fresh berries dry if needed.
- In a medium bowl, whisk the rest of the flour, baking powder, and salt together.: The dry mixture should smell faintly nutty from the flour , and whisking ensures the baking powder and salt are evenly distributed, which prevents pockets of metallic or uneven rise. A uniform dry blend promotes consistent texture and avoids sudden flavor spikes. Overwhisking is not a concern here, but missing clumps can cause uneven leavening. Sift if your flour seems packed or clumpy for best results.
- In the bowl of a stand mixer fitted with the paddle attachment, cream the butter and sugar together on medium-high speed until fluffy and creamy. It takes about 1-2 minutes.: As you beat the butter and sugar , you will see them turn from matte to a lighter, softer texture that holds tiny air pockets, which contribute to a tender, open crumb. This creaming stage is tactile and aromatic, releasing that buttery scent that hints at richness to come. The right texture looks pale and airy, and it usually takes about one to two minutes. A trouble spot is working with butter that is too cold or too melty, either of which fails to capture air correctly, so adjust to room temperature before you start.
- Add the eggs and beat an additional 1 minute.: When the eggs join the creamed mixture, the batter becomes silkier and slightly more fluid, and you may notice a faint sheen. The eggs help bind the ingredients and contribute to structure, while their proteins set during baking for stability. Beating for about a minute ensures they are incorporated without creating an overly thin batter. A common error is adding cold eggs directly from the fridge, which can cause the butter to seize and look curdled; room temperature eggs are kinder to the emulsion.
- Add half of the flour mixture into the eggs mixture. Mix on low speed just until incorporated.: At this stage you will notice the batter begin to thicken and gain body, with dry flecks quickly disappearing. Adding the dry mix in halves reduces the need for vigorous mixing, which helps preserve a tender crumb. The low speed prevents overworking gluten , which would make the loaf chewy rather than delicate. Common mistakes include dumping all dry ingredients at once, which forces extended mixing and can tighten the crumb.
- Add 1/4 cup (half) of the milk and mix on low for 15 seconds.: Adding a measured portion of the milk introduces moisture that loosens the batter and improves its flow. Mixing briefly prevents overdevelopment of gluten , while ensuring the liquid is blended evenly so you do not get pockets of dry flour. You should notice the batter change from dense to silky within those few seconds. Using cold milk straight from the fridge may briefly firm the butter , so aim for a modestly cool rather than icy temperature.
- Add the remaining flour mixture and mix just until no flour is visible.: When the final dry portion is incorporated, the batter should look homogenous and slightly thick, with no streaks of raw flour . This gentle mixing is crucial because overbeating at this point creates a tougher loaf. You will still see body and slight peaks in the batter while it holds together, which is perfect for even rise. If you notice a rubbery texture, that means the batter has been overmixed and may bake dense.
- Add remaining 1/4 cup milk and mix until combined.: The final splash of milk balances moisture and helps achieve the ideal scoopable consistency. Once the milk is combined, the batter should fall slowly from a spoon in a thick ribbon. This liquidity level ensures the loaf bakes with tenderness without collapsing. A batter that is too thin will not support cranberries , and one that is too stiff may bake dry; adjust carefully with small additions if needed.
- Fold in the lemon zest and cranberries.: Folding by hand preserves the air in the batter while distributing the bright lemon zest and floured cranberries evenly. You will notice fragrant citrus oils and pops of red throughout the mixture, which promise lively bites after baking. The folding motion should be gentle and deliberate to avoid smashing the cranberries , which would stain the batter. Overenthusiastic stirring is a frequent misstep that leads to streaked color and lost texture contrasts.
- Pour the batter into the prepared loaf pan and bake at 350°F for 50-60 minutes or until a toothpick inserted in the middle comes out clean.: As the loaf bakes, the kitchen will fill with a warm lemon and butter aroma, and the top will slowly turn a golden hue. The time window accounts for oven differences, so start checking at about 50 minutes for the toothpick test. A clean toothpick or one with a few moist crumbs is the sign of doneness; wet batter means more time is needed. Avoid opening the oven too often during the first part of baking, which can cause uneven rising and a sunken center.
- Transfer the bread (in the pan) to a cooling rack and cool 15 minutes. After 15 minutes, remove the loaf from the pan, and set it upright.: Cooling briefly in the pan allows the crumb to set, which makes removal safer and prevents tearing. After fifteen minutes the loaf will have contracted slightly away from the pan edges and slide out more easily. Setting it upright helps the glaze absorb into the top without puddling around the loaf. Removing too soon can cause the loaf to collapse, while leaving it too long may make glazing less effective.
- In a small saucepan set over medium heat, combine the sugar and lemon juice. Bring to a boil and cook 30 seconds. Remove from the heat.: Heating the lemon juice with the reserved sugar dissolves crystals and concentrates flavor into a glossy glaze that soaks into the crumb. You will see the mixture go from cloudy to clear and glossy in a matter of moments, and the citrus scent intensifies. Boiling briefly reduces raw edge but do not overcook or you will caramelize the sugar and change the flavor profile. A common pitfall is boiling too long which thickens the syrup beyond ideal glaze consistency.
- Carefully pierce the top of the bread with a toothpick and use a pastry brush to evenly apply the warm lemon glaze over the top.: Piercing the loaf allows the warm glaze to sink into the crumb, adding moisture and a bright lemon note throughout. Brushing moves the glossy syrup into the surface, and you will see the top take on a sheen and slight translucence. Work gently so the loaf preserves its shape, and let the glaze cool before slicing for the cleanest cuts. Pouring a cold glaze onto a warm loaf can cause excessive runoff, so use the warm syrup as instructed for best absorption.
Notes
- Use whole milk for a richer crumb If you prefer a slightly more indulgent texture substitute whole milk for the 2 percent called for. The extra fat adds creaminess and a softer mouthfeel, especially noticeable the day after baking. Watch the batter consistency, it will be only a touch silkier, and bake time remains the same.
- Double the glaze for a brighter finish If you like a more assertive lemon presence make the glaze twice and brush in two thin layers. The first layer soaks in, and the second adds sheen and a pronounced citrus kick. Apply while the loaf is warm to encourage absorption and avoid pooling at the base.
- Adjust lemon zest to taste For a subtler lemon note use half a tablespoon of zest, or increase to one and a half for extra aromatic lift. Zest packs essential oils, so small changes have big impact. Avoid including pith which adds bitterness.
- Swap the granulated sugar in the batter for a coarse sugar variant Using a slightly coarser sugar can create a more varied crumb texture and a domed top. It may affect browning, so watch the loaf in the final minutes to prevent overcoloring. The internal sweetness will remain balanced with the glaze.
- Make mini loaves for gifting Divide batter into smaller loaf pans to create attractive gifts or party portions. Reduce baking time and check doneness earlier, often around 25 to 35 minutes depending on pan size. Mini loaves cool faster and the glaze soaks in quickly, making them ideal for same day delivery.