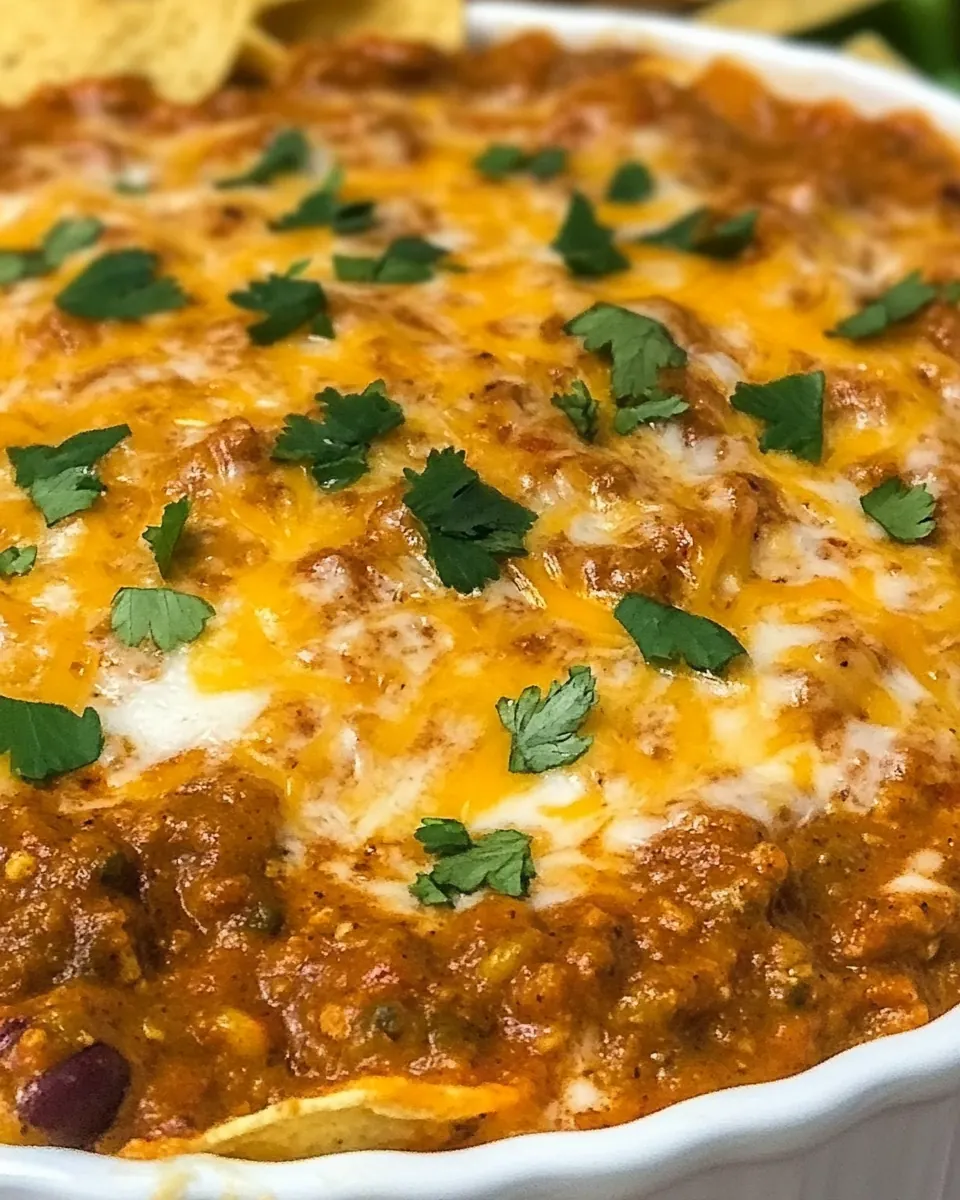
Easy Chili Cheese Dip
Easy Chili Cheese Dip is one of those recipes I reach for when guests arrive unexpectedly or when I want something comforting and bubbly on a low-effort night. The first time I made it, I was feeding a small crowd after a game, and the living room filled with that warm, cheesy aroma that makes everyone gather close. I remember thinking how a few simple cans and a block of cheese could make people so content, and that memory keeps me coming back to this dish whenever I want effortless crowd-pleasing food.
Years later I still tweak tiny things, like the ratio of cream cheese to chili or how long I let it bubble in the oven, based on who I am serving. Sometimes I make it extra mild for kids, other times I leave the spicy edge for friends who appreciate heat. No matter the variation, the heart of the recipe stays the same: creamy, cheesy, and reliably satisfying.
Recipe Snapshot
20 mins
5 mins
15 mins
Easy
180 kcal
Mexican
Gluten-Free, Low FODMAP
Appetizers
Oven, 9 inch pie plate
Why This Easy Chili Cheese Dip Works
Comforting and Familiar
I love how Easy Chili Cheese Dip brings an instant sense of home to any gathering. When I serve it, people slow down and lean in for another scoop, and that connection is why I keep this in rotation. The blend of cream cheese and shredded cheddar cheese creates a texture that is both creamy and slightly elastic, which makes it perfect for scooping with chips.
Ridiculously Simple
I can throw this together in minutes with pantry staples, and that simplicity is freeing. There are times I have only ten minutes to pull something together before guests arrive, and this recipe fits that window. The straightforward process means less worry and more time to enjoy company.
Versatile and Crowd Friendly
What I adore is how adaptable Easy Chili Cheese Dip is. It pairs equally well with tortilla chips, crusty bread, or vegetable sticks, so it fits many dietary preferences without complex swaps. I often bring it to potlucks because it travels well and always disappears quickly.
Balanced Flavor Profile
The mix of smooth cream cheese and the savory, slightly tangy notes from the canned chili give it an immediately appealing flavor. Adding shredded cheddar cheese on top for baking creates a golden, melty crown that adds texture and visual appeal. Those layers of flavor mean each bite is interesting, not flat.
Quick Win for Entertaining
I keep this recipe in my back pocket for last minute hosting because it is a reliable win. It gives me a delicious centerpiece without stealing the evening, and it invites conversation around simple pleasures. For casual nights when I want to focus on people, not complex technique, this dip is my go-to.
What Goes Into Easy Chili Cheese Dip

These ingredients are chosen for maximum flavor with minimal fuss. The key players are the cream cheese for smooth richness, the canned chili for savory complexity and optional beans, and shredded cheddar cheese for that irresistible melted topping. Together they form a creamy base with textured pockets of chili and an oozy, golden finish.
- 8 ounce s(226 g) Cream Cheese, softened: Soften to a spreadable texture and provide a rich, creamy base that binds other ingredients while adding tangy flavor; helps create smooth, melted consistency when heated and balances the spice from the chili.
- 115 ounce can chili (with or without beans), any brand/flavor: Add robust, savory flavor and bulk; supplies the primary chili taste, including spices and optional beans, contributing both warmth and hearty texture to the dip when combined and heated.
- 2 3 cups cheddar cheese, shredded: Shred to melt evenly and contribute sharp, creamy richness and stretch; offers a golden, cheesy topping that enhances flavor, creates a gooey finish, and adds pleasant saltiness and mouthfeel.
Putting Together Easy Chili Cheese Dip

Putting this dip together is quick and rewarding, and I like to think of it as assembly that rewards patience during baking. The steps are straightforward, but each one benefits from small attentions that elevate the final result.
- Preheat oven to 350°F.: Warmth in the oven creates that gorgeous bubbling and browning we want for a baked dip, and you will notice a faint oven hum as it comes up to temperature, which sets the scene for a cozy bite. Make sure the rack is in the center so heat circulates evenly. A common mistake is putting the dish too close to the top element, which can cause too much browning on the cheese without heating the center, so position carefully and preheat fully.
- Stir together cream cheese and chili until combined (mixture will be chunky). Stir in 1 cup shredded cheddar cheese.: As you stir the cream cheese and chili , you will see the creamy base soften and pockets of chili swirl through, producing a marbled, chunky texture that promises contrast in every scoop. The mixing releases small savory aromas from the chili and a gentle tang from the cream cheese. Avoid over mixing to keep pleasant chunks, and if the cream cheese feels too firm, let it rest a few more minutes at room temperature rather than forcefully beating it, which can create an overly thin texture.
- Spread mixture in the bottom of a 9-inch pie plate or similarly sized pan. Sprinkle with remaining shredded cheese.: Adding a cup of shredded cheddar cheese folds a salty, sharp note into the dip and helps the mixture bind while baking. The cheese melds into the cream cheese and mingles with the chili, producing a slightly thicker mixture that will bubble beautifully. If you skip this step, the dip can be less cohesive, so be sure to incorporate the cheese evenly to avoid pockets of dryness. A typical pitfall is packing the cheese in clumps; use a gentle fold to distribute it evenly.
- Bake until hot and cheese is melted, 10-15 minutes. Serve with tortilla chips.: Spreading the mixture creates an even layer that ensures uniform heating and consistent melty texture across the dish, and visually you want a flat surface for the topping to brown attractively. You may hear a gentle scraping sound as you level it, and the surface should look glossy and cohesive. Using a pan that is too deep can lengthen bake time and lead to a cold center, so choose a shallow, wide dish for best results.
- For a spicier dish, drizzle dip with hot sauce (to taste) after baking.: The final shred creates a golden crown that will crisp slightly at the edges and become irresistibly gooey in the center, giving the dip both texture and visual appeal. As the cheese melts it releases a nutty, toasted aroma that draws people in. Apply the cheese in an even layer to avoid overly browned hot spots, and beware of adding too much extra cheese which can overwhelm the base and make the dip greasy.
- Bake until hot and cheese is melted, 10 to 15 minutes.: During baking you will see the cheese bubble and turn a light golden brown, and the oven will fill with a savory scent reminiscent of classic comfort food. Check after ten minutes: the top should be bubbling and the center hot to the touch. If you underbake it, the center may be lukewarm and the texture gummy, while overbaking can cause the surface to become dry and cracked, so monitor closely and remove when it is uniformly hot and glossy.
- Serve with tortilla chips.: Serve the dip warm so each scoop delivers that contrast between crisp chip and molten cheese, and the tactile crunch paired with the creamy, savory filling is what makes this memorable. Arrange chips around the dish for easy sharing. A common error is serving it cold, which dulls flavors and makes scooping difficult; if it cools too much, a short blast in a warm oven or microwave restores its ideal texture.
- For a spicier dish, drizzle dip with hot sauce (to taste) after baking.: A few drops of hot sauce add a bright, acidic heat that cuts through the richness and wakes up the palate, and you will notice an immediate lift in flavor complexity. Drizzle sparingly and taste as you go to avoid overpowering the other notes. Overdoing the hot sauce is a frequent misstep, so start small and build to your preferred level of heat.
Helpful Notes about Easy Chili Cheese Dip
I like to keep these notes handy when I make Easy Chili Cheese Dip because small details make a big difference in taste and texture. Below are practical tips I use every time to ensure the dip is creamy, well seasoned, and perfectly melted.
- Room temperature cream cheese helps the base blend smoothly, preventing lumps and creating a silky texture that mixes easily with the chili.
- Even layer distribution ensures every scoop has the right balance of creamy base and melty cheddar cheese, so spread the mixture evenly in the pan before adding the topping.
- Watch the final minutes of baking; remove the dip when it is bubbling and lightly golden to avoid dryness and maintain a creamy center.
- Adjust cheese quantity to control richness; add 2 cups for a lighter finish, or 3 cups for a cheesier, more indulgent top.
- Choose your chips based on texture preferences, thicker tortilla chips hold up better for scooping and create a satisfying crunch against the creamy dip.
What Complements This Easy Chili Cheese Dip
This dip pairs well with a variety of sides and occasions, making it a flexible option for gatherings from casual game nights to family dinners. I often serve it with crunchy tortilla chips and simple vegetable sticks for a balance of textures and flavors. It also works well for potlucks and holiday appetizer spreads where guests graze throughout an evening.
- Tortilla chips are the classic accompaniment, providing the ideal crunch and shape for scooping melted cheese and hearty chili.
- Vegetable sticks like carrot and celery add a fresh contrast and lighten the plate visually and texturally, giving guests a crisp alternative to chips.
- Crusty bread slices offer a heartier vehicle for dipping, and toasting the bread briefly gives added texture and a warm base for the gooey mixture.
- Occasion flexibility: This dish suits game nights, casual dinners, potlucks, and snack spreads during holidays or gatherings, because it is shareable and low effort.
- Storage tips: Store leftovers in an airtight container in the refrigerator for up to three days, and reheat gently in the oven until bubbly or in the microwave in short bursts, stirring between intervals.
- Seasonal pairing: In cooler months I appreciate the warm, hearty nature of this dip for cozy indoor gatherings, and in milder seasons it still shines as a communal snack on a patio or balcony.
FAQ
Conclusion
This recipe shines because it transforms a handful of pantry items into a warm, comforting dip that brings people together. I encourage you to try Easy Chili Cheese Dip the next time you need a simple, satisfying appetizer that takes minimal effort and delivers maximum enjoyment. It is perfect for casual gatherings and busy nights when you want something shareable and delicious without fuss, so grab a bag of chips and enjoy the cozy, cheesy reward.

Easy Chili Cheese Dip
Equipment
- Oven
- 9-inch pie plate
Ingredients
- 8 ounce s(226 g) Cream Cheese, softened Soften to a spreadable texture and provide a rich, creamy base that binds other ingredients while adding tangy flavor; helps create smooth, melted consistency when heated and balances the spice from the chili.
- 115 ounce can chili (with or without beans), any brand/flavor Add robust, savory flavor and bulk; supplies the primary chili taste, including spices and optional beans, contributing both warmth and hearty texture to the dip when combined and heated.
- 2 -3 cups cheddar cheese, shredded Shred to melt evenly and contribute sharp, creamy richness and stretch; offers a golden, cheesy topping that enhances flavor, creates a gooey finish, and adds pleasant saltiness and mouthfeel.
Instructions
- Preheat oven to 350°F.: Warmth in the oven creates that gorgeous bubbling and browning we want for a baked dip, and you will notice a faint oven hum as it comes up to temperature, which sets the scene for a cozy bite. Make sure the rack is in the center so heat circulates evenly. A common mistake is putting the dish too close to the top element, which can cause too much browning on the cheese without heating the center, so position carefully and preheat fully.
- Stir together cream cheese and chili until combined (mixture will be chunky). Stir in 1 cup shredded cheddar cheese.: As you stir the cream cheese and chili , you will see the creamy base soften and pockets of chili swirl through, producing a marbled, chunky texture that promises contrast in every scoop. The mixing releases small savory aromas from the chili and a gentle tang from the cream cheese. Avoid over mixing to keep pleasant chunks, and if the cream cheese feels too firm, let it rest a few more minutes at room temperature rather than forcefully beating it, which can create an overly thin texture.
- Spread mixture in the bottom of a 9-inch pie plate or similarly sized pan. Sprinkle with remaining shredded cheese.: Adding a cup of shredded cheddar cheese folds a salty, sharp note into the dip and helps the mixture bind while baking. The cheese melds into the cream cheese and mingles with the chili, producing a slightly thicker mixture that will bubble beautifully. If you skip this step, the dip can be less cohesive, so be sure to incorporate the cheese evenly to avoid pockets of dryness. A typical pitfall is packing the cheese in clumps; use a gentle fold to distribute it evenly.
- Bake until hot and cheese is melted, 10-15 minutes. Serve with tortilla chips.: Spreading the mixture creates an even layer that ensures uniform heating and consistent melty texture across the dish, and visually you want a flat surface for the topping to brown attractively. You may hear a gentle scraping sound as you level it, and the surface should look glossy and cohesive. Using a pan that is too deep can lengthen bake time and lead to a cold center, so choose a shallow, wide dish for best results.
- For a spicier dish, drizzle dip with hot sauce (to taste) after baking.: The final shred creates a golden crown that will crisp slightly at the edges and become irresistibly gooey in the center, giving the dip both texture and visual appeal. As the cheese melts it releases a nutty, toasted aroma that draws people in. Apply the cheese in an even layer to avoid overly browned hot spots, and beware of adding too much extra cheese which can overwhelm the base and make the dip greasy.
- Bake until hot and cheese is melted, 10 to 15 minutes.: During baking you will see the cheese bubble and turn a light golden brown, and the oven will fill with a savory scent reminiscent of classic comfort food. Check after ten minutes: the top should be bubbling and the center hot to the touch. If you underbake it, the center may be lukewarm and the texture gummy, while overbaking can cause the surface to become dry and cracked, so monitor closely and remove when it is uniformly hot and glossy.
- Serve with tortilla chips.: Serve the dip warm so each scoop delivers that contrast between crisp chip and molten cheese, and the tactile crunch paired with the creamy, savory filling is what makes this memorable. Arrange chips around the dish for easy sharing. A common error is serving it cold, which dulls flavors and makes scooping difficult; if it cools too much, a short blast in a warm oven or microwave restores its ideal texture.
- For a spicier dish, drizzle dip with hot sauce (to taste) after baking.: A few drops of hot sauce add a bright, acidic heat that cuts through the richness and wakes up the palate, and you will notice an immediate lift in flavor complexity. Drizzle sparingly and taste as you go to avoid overpowering the other notes. Overdoing the hot sauce is a frequent misstep, so start small and build to your preferred level of heat.
Notes
- Room temperature cream cheese helps the base blend smoothly, preventing lumps and creating a silky texture that mixes easily with the chili.
- Even layer distribution ensures every scoop has the right balance of creamy base and melty cheddar cheese, so spread the mixture evenly in the pan before adding the topping.
- Watch the final minutes of baking; remove the dip when it is bubbling and lightly golden to avoid dryness and maintain a creamy center.
- Adjust cheese quantity to control richness; add 2 cups for a lighter finish, or 3 cups for a cheesier, more indulgent top.
- Choose your chips based on texture preferences, thicker tortilla chips hold up better for scooping and create a satisfying crunch against the creamy dip.