Easy Chicken Pot Pie
Easy Chicken Pot Pie is the kind of recipe I reach for when I want comfort food that feels like a warm hug from the inside out.
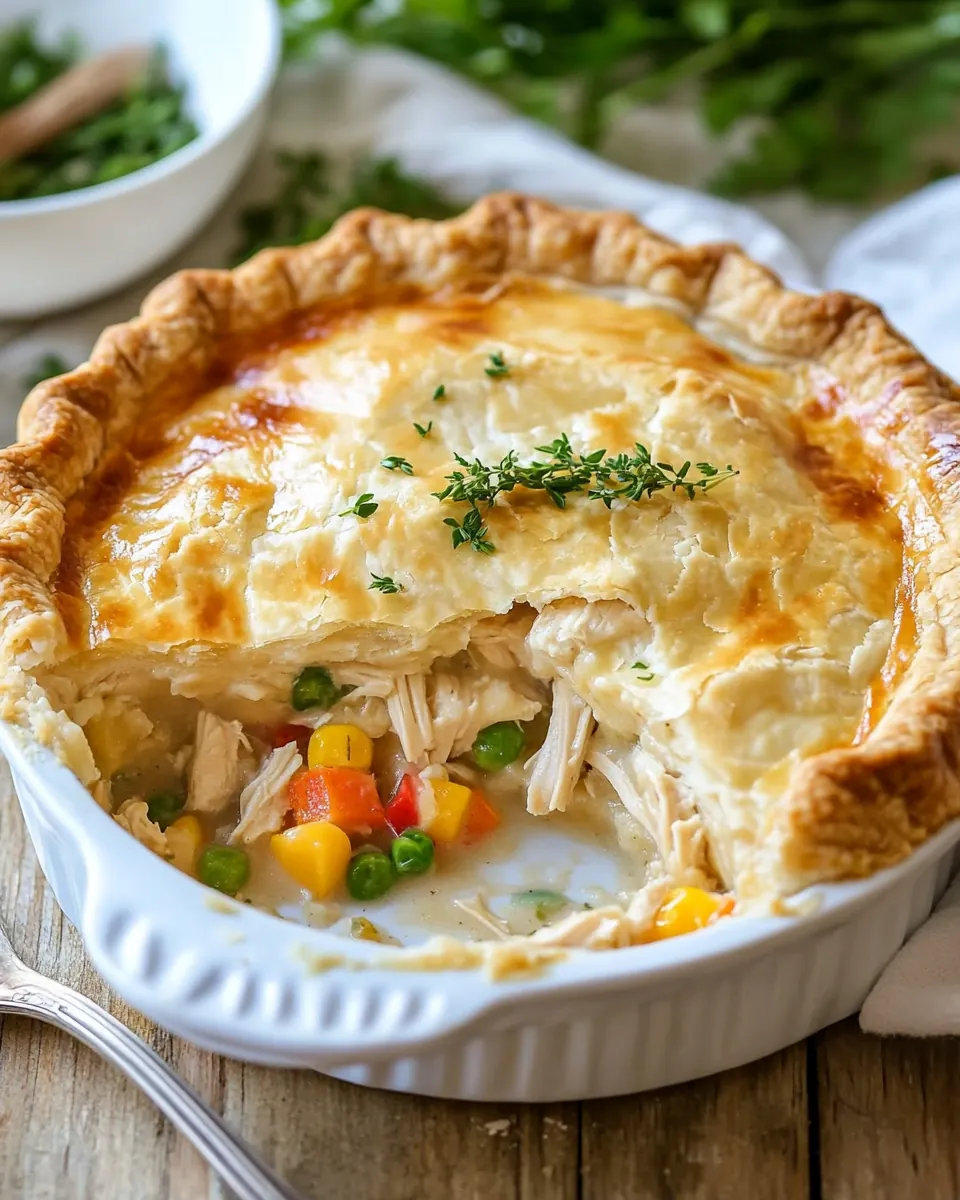
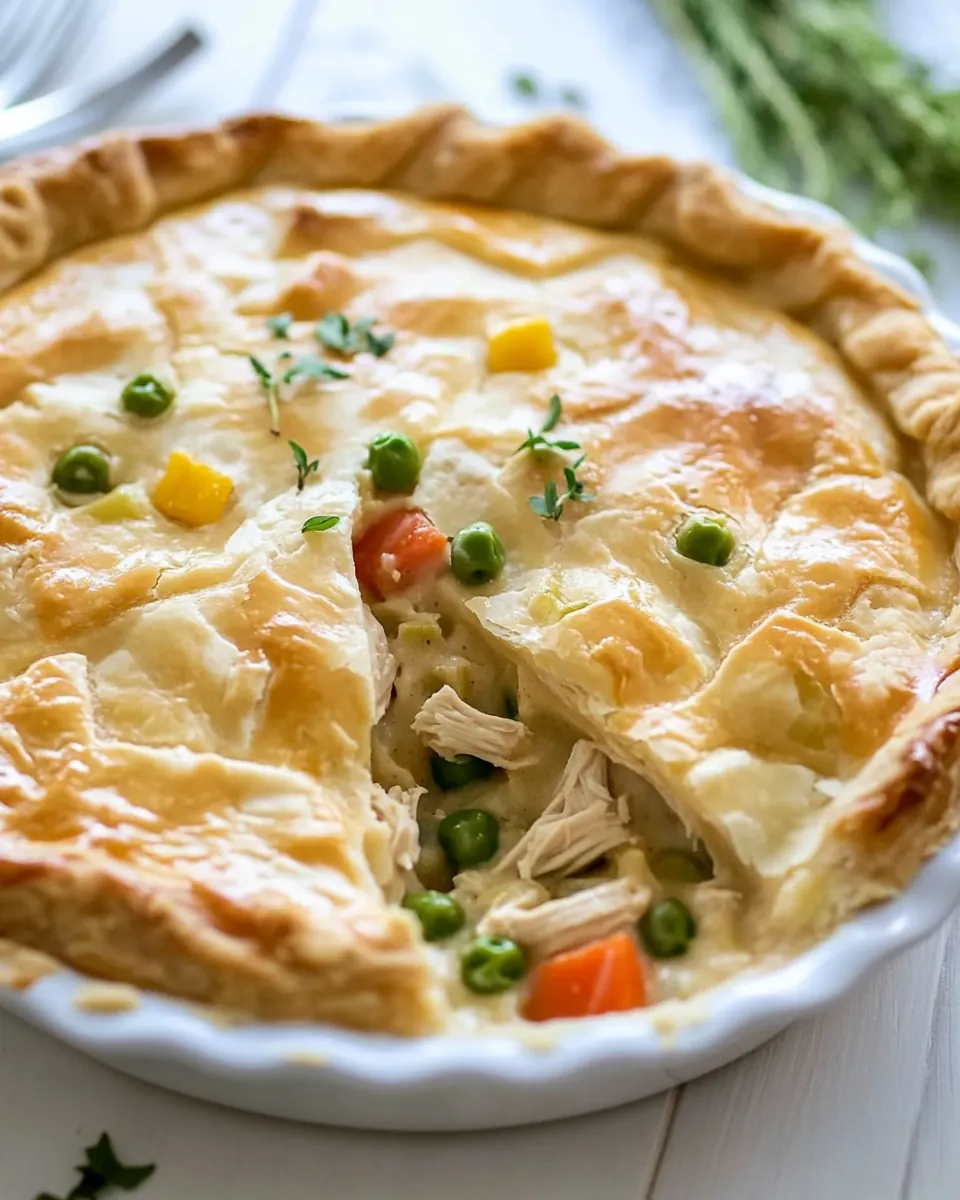
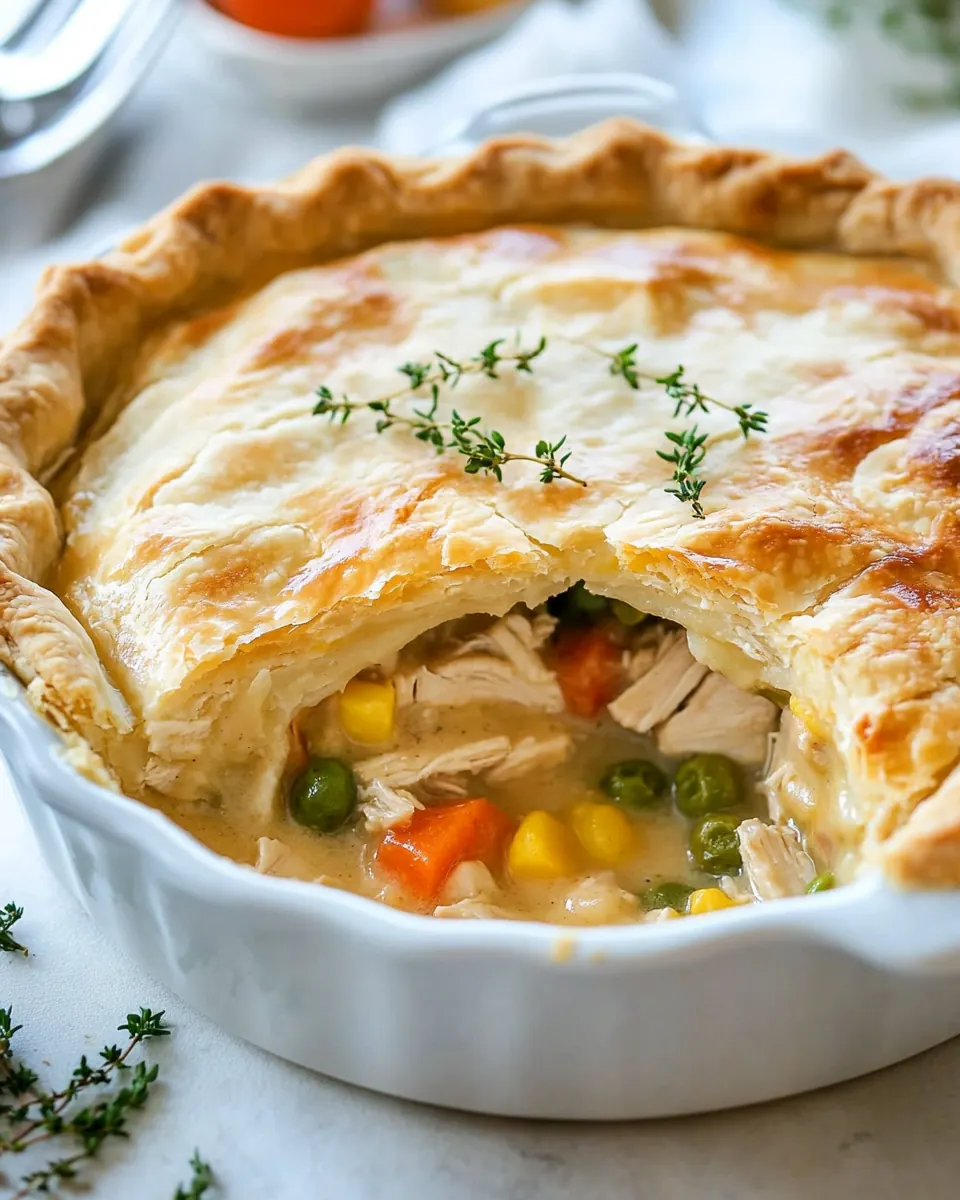
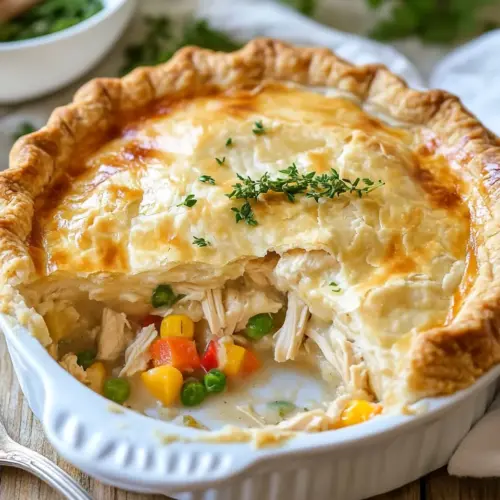
I remember the first time I baked this, the kitchen smelled of butter and savory gravy within minutes, and the house felt instantaneously cozier. I was juggling a hectic week, leftover rotisserie chicken in the fridge, and a craving for something homey without a long fuss. This version stacked pantry-friendly convenience with a flaky store bought crust to deliver a quick, satisfying dinner that everyone ate without complaint. The crust crackled as I slid a spatula beneath a steaming slice, the filling was creamy, and the vegetables kept a bright pop of texture.
Over the years I’ve tweaked little things, like browning the butter just a touch to add depth, and using half and half with a prepared gravy to achieve a silky sauce without endless stirring. Whether I’m feeding company after a long day, or making something simple for myself, this recipe shows up reliably. It’s the sort of dish that sparks conversation at the table and makes excellent leftovers the next day. You can make it with leftover turkey, or rotisserie chicken, and it will always feel both nostalgic and effortless.
Recipe Snapshot
50 mins
15 mins
35 mins
Medium
350 kcal
American
Gluten-Free, Low FODMAP
Dinner
Oven, 9 inch pie plate, Large skillet, Baking sheet, Whisk
Why This Easy Chicken Pot Pie Is a Winner
Comfort without complexity
I love that Easy Chicken Pot Pie delivers classic comfort without a long ingredient list or fancy techniques. Using refrigerated pie crusts and a prepared gravy keeps the process approachable, while still giving you that rich, creamy mouthfeel most pot pies aim for. I value recipes that are forgiving, and this one is very forgiving, which makes it perfect for busy weeknights when I want home cooked flavor without extra stress.
Balanced textures and flavors
This recipe balances flaky pastry with a silky, savory filling and tender vegetables. The contrast between a golden crust and the warm filling is what keeps me coming back. I often notice that the way ingredients interact here creates a satisfying bite where the filling clings to the chicken and veggies, and the herbs like rosemary and thyme add an aromatic lift that stops the dish from feeling one note.
Speed and versatility
I appreciate that you can adapt the dish to what you have on hand. Rotisserie chicken or leftover turkey both shine here. The gravy plus half and half shortcut gives you a luscious base in minutes, which is ideal for last minute dinners. Because I can swap the vegetables or use what’s frozen, I rarely need a special grocery trip, and that convenience is a huge reason I make this over and over.
Family friendly and crowd pleasing
Everyone seems to like this, from picky kids to adults who enjoy simple homestyle food. It reheats beautifully, so it’s great for leftovers or bringing to a potluck when you want something substantial. I’ve found that the familiar flavors often spark warm memories at the table, which makes serving it feel special even when it’s an ordinary evening.
Reliable outcome every time
Because the steps are straightforward and the methods tolerant, you can expect consistent results. I’ve done this recipe with different ovens and different brands of crust and still come away with a golden top and a creamy interior. That reliability makes it a go to when I want a no-fuss centerpiece that tastes like care and effort without requiring a day in the kitchen.
What You Need for Easy Chicken Pot Pie
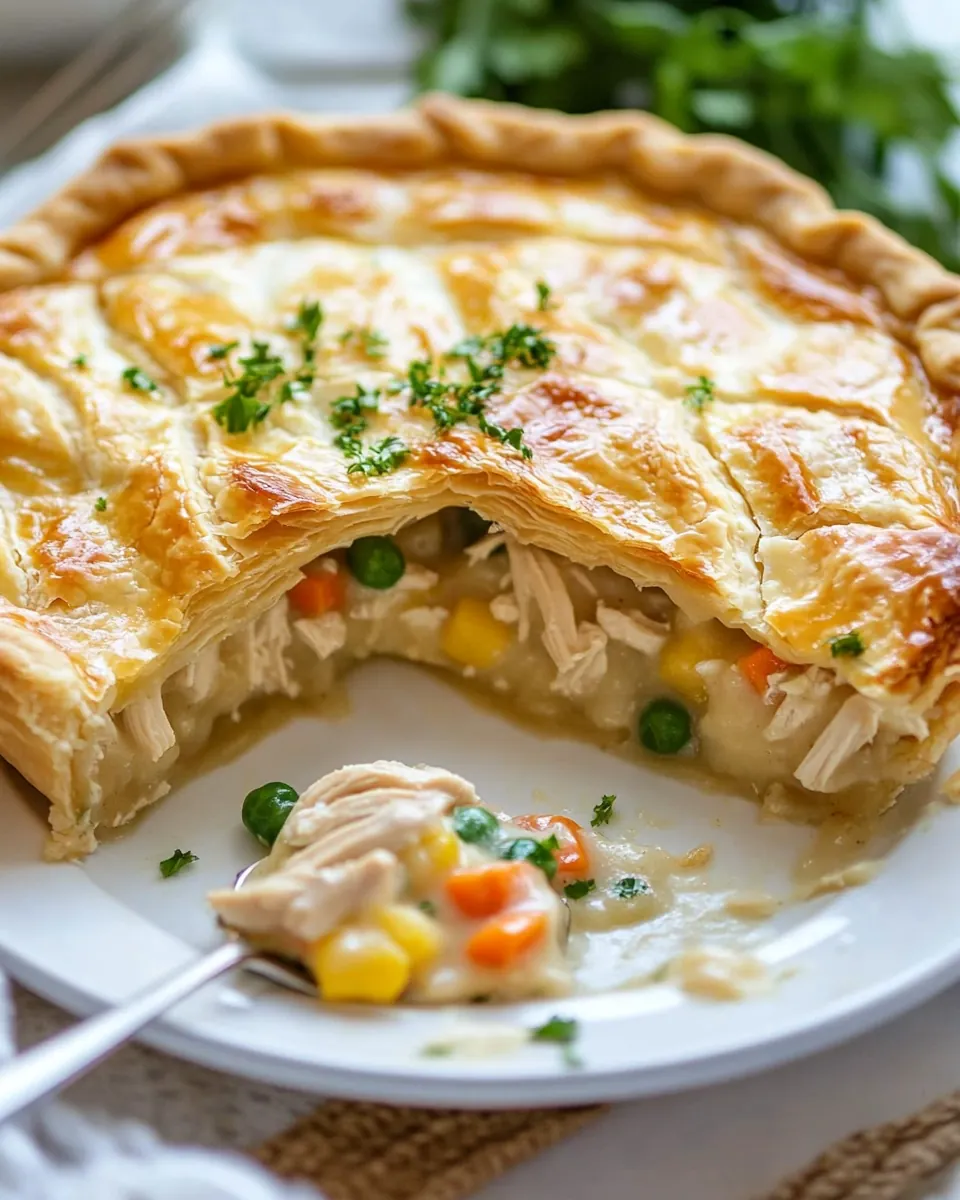
These ingredients are organized to create a classic, comforting pot pie texture and flavor. The key players are the flaky crust, the savory sauce built from butter, flour, half and half and gravy, and the hearty mix of chicken and vegetables. Together they produce a creamy filling that contrasts beautifully with a crisp, golden top. Each item plays a specific role, from thickening to seasoning, and they all work together to keep the filling rich, smooth, and satisfying.
- 1 (14.1 oz) pkg. refrigerated pie crusts (2 crusts): Provide a buttery, flaky crust that forms the top and bottom of the pie; used straight from the package to save time and ensure even baking. Roll or fit into the pie dish according to package instructions and crimp edges for a decorative finish. Keeps the filling enclosed and crisply browned when baked.
- 3 tbsp butter, diced into 1-Tbsp pieces: Add a rich, savory fat that melts into the pan to sauté aromatics and create a roux; cut into pieces for even melting. Use to brown the onion gently without burning, which enhances the depth of the filling. Contributes a creamy mouthfeel and glossy finish to the sauce.
- 3/4 cup finely chopped yellow onion: Offer a sweet, aromatic base flavor when finely chopped and sautéed until translucent; size ensures even cooking and distribution. Provide moisture and subtle sweetness that balances the savory gravy and herbs. Help build foundational savory notes for the pie filling.
- 2 1/2 tbsp all-purpose flour: Act as a thickening agent when cooked with butter and onion to form a roux; measure carefully to achieve the desired sauce consistency. Sprinkle in and cook briefly to remove raw flour taste before adding liquids. Control sauce thickness so the filling sets nicely without being runny.
- 1 cup half and half: Introduce creaminess and a rich dairy element that lightens and smooths the sauce; add gradually while stirring to incorporate with the roux. Use to adjust sauce body and silkiness, creating a luscious filling. Prevents the gravy from becoming overly heavy while adding subtle dairy flavor.
- 1 (12 oz) container McCormick® Simply Better Turkey Gravy (or Chicken Gravy): Provide concentrated savory seasoning and body to the filling with a convenient, ready-made gravy base; choose turkey or chicken gravy per preference. Stir into the cream and roux mixture to infuse a well-seasoned, cohesive flavor throughout. Simplifies preparation while delivering consistent taste and seasoning.
- 3 cups frozen mixed vegetables: Contribute a mix of vegetables for texture, color, and nutrition; frozen form offers convenience and year-round availability. Add directly to the sauce to heat through, releasing little extra moisture and maintaining bite. Supply sweet peas, carrots, corn, and beans (or similar) that complement the chicken and gravy.
- 2 cups (heaping) shredded rotisserie chicken or leftover turkey: Supply cooked protein that gives the pie its substantive, savory center; shredded rotisserie chicken or leftover turkey saves time and adds roasted flavor. Fold into the sauce and vegetables so each slice contains generous meat portions. Enhance richness and eatability while utilizing leftovers efficiently.
- 1/2 tsp dried rosemary, crushed: Impart a warm, piney herb note when crushed and sprinkled into the filling; dried form concentrates flavor so a small amount suffices. Mix into the sauce to complement poultry and vegetables without overpowering. Provide subtle aromatic complexity reminiscent of roasted poultry seasonings.
- 1/2 tsp dried thyme: Add an earthy, slightly floral herb flavor that pairs well with poultry and gravy; dried thyme disperses evenly through the filling. Stir into the sauce to round out savory notes and support other seasonings. Helps create a classic pot pie herb profile.
- Salt and freshly ground black pepper: Season to taste, balancing and enhancing all other flavors; use salt and freshly ground black pepper at the end of cooking. Adjust gradually, tasting to avoid oversalting given the pre-seasoned gravy and rotisserie chicken. Finish the filling for optimal flavor harmony before assembling and baking.
Step by Step Instructions for Easy Chicken Pot Pie
This is a hands on but straightforward recipe that rewards attention to sensory cues and timing. Below I expand each original direction into rich, tactile steps so you can follow along with confidence and know what to expect at every stage.
- Place a baking sheet in oven and preheat oven to 425 degrees. Prepare pie crusts as directed on package for two-crust pie using a 9-inch pie plate.: As the oven warms you should feel the heat gradually build, and hearing the faint click as it reaches temperature is a small reassurance. Preheating to 425 degrees ensures the bottom crust begins baking right away when the pie goes in, preventing a soggy base and encouraging a crisp, golden shell. This high heat also jump starts the browning on the top crust, producing that irresistible crunch. A common mistake is to skip preheating, which often yields a pale, undercooked bottom crust, so always give the oven time to reach the target temperature. If your oven door leaks heat, use an oven thermometer to confirm the actual temperature.
- Melt butter in a large skillet over medium heat. Add onion and saute until softened, about 5 minutes.: You will feel the dough soften as you unroll the pie crusts , and pressing it gently into the plate should produce a snug, even layer without tearing. Docking the bottom lightly where air pockets might form can prevent large bubbles under the crust. Handling the dough minimally keeps it tender and flaky, because overworking warms the fat and makes the crust tough. If the crust tears, press it together with a little water to seal, and patching is fine since it will bake up fine. Chill the crust briefly if it becomes too warm to maintain flakiness.
- Stir in flour and cook, stirring constantly, 1 minute. While whisking pour in half and half then pour in turkey gravy.: When the butter melts you will hear a soft sizzle and smell a rich dairy aroma that signals the start of flavor building. Keeping the heat at medium prevents the butter from browning too quickly, which would change the taste profile. The butter coats the skillet and carries flavor to the onion , creating the base for a smooth sauce. One common oversight is overheating, which causes the butter to brown or burn, adding a bitter note, so watch the pan and reduce heat if the butter darkens.
- Add in vegetables, chicken, rosemary, thyme, and season with salt and pepper to taste. Warm through.: As the onion sautés you will notice a sweet fragrance and translucence replacing raw sharpness. This softening releases sugars that deepen the filling flavor, and the gentle sizzling should be steady, not frantic. Stir every so often so the pieces color evenly and avoid scorching. The goal is tender, aromatic onion, not caramelized bits, so monitor closely; if it starts to brown too fast, lower the heat to keep the flavor clean and sweet rather than bitter.
- Pour mixture into prepared pie crust in pie plate. Top with second pie crust. Seal edges and flute if desired. Cut several slits in top of pie for steam to escape.: When you add the flour to the hot butter and onion , you will smell a toasty, biscuit like note as it cooks briefly. Stirring constantly is crucial to prevent lumps and to cook out the raw flour taste, which can otherwise leave a pasty finish. This step builds the roux that thickens the sauce, so keep a steady whisking motion to achieve a smooth base. A typical slip is not cooking the flour enough which may leave the finished sauce with a floury texture, so give it that minute of attention.
- Bake in preheated oven 30 to 35 minutes, or until crust is golden brown (tent edges with foil to prevent excessive browning if needed.: As the half and half hits the warm roux you will hear gentle bubbling and see the mixture smooth out, transforming into a creamy liquid. Whisking constantly prevents lumps and helps the dairy emulsify with the roux, producing a glossy sauce. Adding the prepared gravy brings concentrated savory flavor and seasoning; together they form a velvety sauce that will cling to the vegetables and chicken . If the sauce seems too thin, simmer a bit longer to reduce; if it becomes too thick, add small splashes of liquid. Avoid pouring all at once without whisking, as that can cause clumps.
- Let stand 5 minutes before slicing and serving.: As you stir in the frozen mixed vegetables and shredded chicken , the filling will cool slightly and start to thicken as it absorbs the sauce. The dried rosemary and thyme release fragrant notes, uplifting the savory base. Taste cautiously because the prepared gravy may already be seasoned; missing the right salt leaves the filling flat, while over-salting can overpower the herbs, so adjust in small increments. A frequent mistake is overcooking the vegetables in the pan, causing them to go mushy; aim to warm them through so they retain a pleasant bite after baking.
- Recipe source: Cooking Classy: Gently heating the assembled filling until steaming ensures everything is evenly hot and melded, and you will notice a unified aroma that signals readiness. This step lets flavors marry and helps the sauce reach a cohesive texture before filling the crust. Stir occasionally and keep it at a low simmer, because overheating can break down the cream and make the sauce separate. If you find the filling simmering too hard, reduce the heat to avoid evaporating too much liquid and drying the mixture.
- Pour mixture into prepared pie crust in pie plate: When you pour the filling into the lined pie plate you will hear a slight settling sound as the mixture nests into the base, and you should leave a little room under the rim so the top crust seals without overflow. Filling should be hot but not boiling, since an overly liquid filling can make the crust soggy. If the filling seems thin, allow it to cool briefly to thicken a bit before topping. Beware of overfilling which can cause spillover and uneven baking.
- Top with second pie crust: Draping the second pie crust over the filling creates the visual finale, and pressing the edges seals in the steam. Trimming excess and crimping or fluting the edge gives an attractive finish and helps hold juices inside. Make a few slits in the top to allow steam to escape, preventing a burst crust. If you skip vents the built up steam can push and crack the crust, so be sure to add them.
- Seal edges and flute if desired: Sealing creates that tidy rim which keeps the filling contained while baking, and a decorative flute adds charm. Press firmly along the edge to join the crusts; a dab of water helps them adhere. The sealed edge also protects the filling from evaporating excessively, keeping the interior moist. If the rim browns too quickly in the oven, tent it with foil to prevent burning, which is a useful fix often overlooked.
- Cut several slits in top of pie for steam to escape: These vents let steam escape so the filling sets without creating pockets under the crust, and you will see fragrant steam rise as the pie bakes. Proper venting allows the interior to thicken and stops the top from turning into a soggy dome. Without slits the trapped steam can cause the top crust to burst open unpredictably, so be deliberate and even with the cuts to encourage controlled release.
- Bake in preheated oven 30 to 35 minutes, or until crust is golden brown (tent edges with foil to prevent excessive browning if needed: As the pie bakes you will hear a soft crackle from the pastry and see the crust turn a warm golden hue, with juices bubbling gently through the vents. Baking at 425 degrees browns the top and sets the filling, delivering that classic contrast of flaky crust and creamy interior. If the edges brown faster than the center, tent them with foil to keep the top from burning while the center finishes. A common error is removing the pie too early which leaves the filling loose and overly runny; wait until bubbling and a golden crust confirm readiness.
- Let stand 5 minutes before slicing and serving: Allowing the pie to rest lets the filling thicken and settle, producing cleaner slices and a more cohesive texture. The steam inside will redistribute, and you will notice the aroma deepen as it cools slightly. Serving too soon often leads to a loose filling that spills out, so this short pause improves presentation and eating experience. Use a sharp knife and a sturdy spatula to lift slices, and enjoy the melded flavors.
- Recipe source: Cooking Classy : Acknowledging the recipe origin connects you to the inspiration behind the dish and its tested approach. Knowing the source can guide expectations about flavor and method, and it can be useful if you want to compare versions. Respecting provenance also helps you appreciate the subtle choices made in the recipe design.
Ways to Adapt This Recipe
This section covers approachable adaptations and practical adjustments to make Easy Chicken Pot Pie work for your pantry and preferences. Below I expand tips that help with texture, flavor, and timing so you can customize confidently.
- Use leftover poultry: Swap in leftover shredded rotisserie chicken or turkey to save time and add deep cooked flavor, making the dish economical and resourceful.
- Boost the veg texture: If you prefer firmer vegetables, stir in the frozen mix near the end of warming the sauce so they retain some bite through baking.
- Control salt: Because prepared gravy can be salty, taste the filling before sealing the pie and adjust with small pinches of salt and black pepper as needed to avoid over seasoning.
- Prevent soggy bottom: Preheat the baking sheet and use a hot oven so the bottom crust starts setting immediately, which helps it stay crisp under the moist filling.
- Herb balance: Crush dried rosemary between your fingers before adding to bloom the oils, and add thyme toward the end of warming to preserve its fresh aroma.
How to Serve Easy Chicken Pot Pie
This section explains serving ideas, pairings, and storage so you can present Easy Chicken Pot Pie beautifully and store it safely. The suggestions lean on practical, familiar combinations that complement the rich, savory pie.
- Serve warm with a simple green salad: A crisp tossed salad with a light vinaigrette refreshes the palate and contrasts the creamy filling.
- Offer seasonal sides: Roasted root vegetables or steamed green beans pair well, adding color and textural variety to the plate.
- Family dinner occasions: This pie is perfect for weeknight family dinners or casual Sunday meals when you want hearty comfort without fuss.
- Holiday use: It works well after big holiday meals, especially Thanksgiving, as a way to use leftover turkey and make a second warming main.
- Leftover storage: Cool to room temperature, then refrigerate in an airtight container for up to three days, or freeze slices wrapped tightly for up to three months.
- Reheating tips: Reheat in a moderate oven until warmed through to preserve crust crispness, rather than microwaving which can soften the pastry.
- Slice timing: Let the pie rest for about five minutes after baking so slices hold shape and the filling finishes setting.
- Plate presentation: Use a wide spatula for cleaner slices, and wipe edges of each plate for a neat serving look.
- Serve with pickled accents: A small side of pickled vegetables or a tangy relish can cut richness and brighten each bite.
- Portioning for guests: One nine inch pie generally serves about six to eight people depending on appetite, so plan accordingly for gatherings.
FAQ
Conclusion
Easy Chicken Pot Pie stands out because it combines shortcut convenience with the familiar comforts of a classic pot pie. The buttery crust, creamy gravy based filling, and tender chicken with vegetables create a satisfying meal that feels like tradition made simple. Give it a try the next time you want a reliable, cozy dinner that requires minimal fuss but delivers maximum warmth and flavor. I think you will find it becomes a go to for weeknights and holiday leftovers alike.
Easy Chicken Pot Pie
Equipment
- Oven
- 9-inch pie plate
- Large Skillet
- Baking Sheet
- Whisk
Ingredients
- 1 (14.1 oz) pkg. refrigerated pie crusts (2 crusts) Provide a buttery, flaky crust that forms the top and bottom of the pie; used straight from the package to save time and ensure even baking. Roll or fit into the pie dish according to package instructions and crimp edges for a decorative finish. Keeps the filling enclosed and crisply browned when baked.
- 3 tbsp butter, diced into 1-Tbsp pieces Add a rich, savory fat that melts into the pan to sauté aromatics and create a roux; cut into pieces for even melting. Use to brown the onion gently without burning, which enhances the depth of the filling. Contributes a creamy mouthfeel and glossy finish to the sauce.
- 3/4 cup finely chopped yellow onion Offer a sweet, aromatic base flavor when finely chopped and sautéed until translucent; size ensures even cooking and distribution. Provide moisture and subtle sweetness that balances the savory gravy and herbs. Help build foundational savory notes for the pie filling.
- 2 1/2 tbsp all-purpose flour Act as a thickening agent when cooked with butter and onion to form a roux; measure carefully to achieve the desired sauce consistency. Sprinkle in and cook briefly to remove raw flour taste before adding liquids. Control sauce thickness so the filling sets nicely without being runny.
- 1 cup half and half Introduce creaminess and a rich dairy element that lightens and smooths the sauce; add gradually while stirring to incorporate with the roux. Use to adjust sauce body and silkiness, creating a luscious filling. Prevents the gravy from becoming overly heavy while adding subtle dairy flavor.
- 1 (12 oz) container McCormick® Simply Better Turkey Gravy (or Chicken Gravy) Provide concentrated savory seasoning and body to the filling with a convenient, ready-made gravy base; choose turkey or chicken gravy per preference. Stir into the cream and roux mixture to infuse a well-seasoned, cohesive flavor throughout. Simplifies preparation while delivering consistent taste and seasoning.
- 3 cups frozen mixed vegetables Contribute a mix of vegetables for texture, color, and nutrition; frozen form offers convenience and year-round availability. Add directly to the sauce to heat through, releasing little extra moisture and maintaining bite. Supply sweet peas, carrots, corn, and beans (or similar) that complement the chicken and gravy.
- 2 cups (heaping) shredded rotisserie chicken or leftover turkey Supply cooked protein that gives the pie its substantive, savory center; shredded rotisserie chicken or leftover turkey saves time and adds roasted flavor. Fold into the sauce and vegetables so each slice contains generous meat portions. Enhance richness and eatability while utilizing leftovers efficiently.
- 1/2 tsp dried rosemary, crushed Impart a warm, piney herb note when crushed and sprinkled into the filling; dried form concentrates flavor so a small amount suffices. Mix into the sauce to complement poultry and vegetables without overpowering. Provide subtle aromatic complexity reminiscent of roasted poultry seasonings.
- 1/2 tsp dried thyme Add an earthy, slightly floral herb flavor that pairs well with poultry and gravy; dried thyme disperses evenly through the filling. Stir into the sauce to round out savory notes and support other seasonings. Helps create a classic pot pie herb profile.
- Salt and freshly ground black pepper Season to taste, balancing and enhancing all other flavors; use salt and freshly ground black pepper at the end of cooking. Adjust gradually, tasting to avoid oversalting given the pre-seasoned gravy and rotisserie chicken. Finish the filling for optimal flavor harmony before assembling and baking.
Instructions
- Place a baking sheet in oven and preheat oven to 425 degrees. Prepare pie crusts as directed on package for two-crust pie using a 9-inch pie plate.: As the oven warms you should feel the heat gradually build, and hearing the faint click as it reaches temperature is a small reassurance. Preheating to 425 degrees ensures the bottom crust begins baking right away when the pie goes in, preventing a soggy base and encouraging a crisp, golden shell. This high heat also jump starts the browning on the top crust, producing that irresistible crunch. A common mistake is to skip preheating, which often yields a pale, undercooked bottom crust, so always give the oven time to reach the target temperature. If your oven door leaks heat, use an oven thermometer to confirm the actual temperature.
- Melt butter in a large skillet over medium heat. Add onion and saute until softened, about 5 minutes.: You will feel the dough soften as you unroll the pie crusts , and pressing it gently into the plate should produce a snug, even layer without tearing. Docking the bottom lightly where air pockets might form can prevent large bubbles under the crust. Handling the dough minimally keeps it tender and flaky, because overworking warms the fat and makes the crust tough. If the crust tears, press it together with a little water to seal, and patching is fine since it will bake up fine. Chill the crust briefly if it becomes too warm to maintain flakiness.
- Stir in flour and cook, stirring constantly, 1 minute. While whisking pour in half and half then pour in turkey gravy.: When the butter melts you will hear a soft sizzle and smell a rich dairy aroma that signals the start of flavor building. Keeping the heat at medium prevents the butter from browning too quickly, which would change the taste profile. The butter coats the skillet and carries flavor to the onion , creating the base for a smooth sauce. One common oversight is overheating, which causes the butter to brown or burn, adding a bitter note, so watch the pan and reduce heat if the butter darkens.
- Add in vegetables, chicken, rosemary, thyme, and season with salt and pepper to taste. Warm through.: As the onion sautés you will notice a sweet fragrance and translucence replacing raw sharpness. This softening releases sugars that deepen the filling flavor, and the gentle sizzling should be steady, not frantic. Stir every so often so the pieces color evenly and avoid scorching. The goal is tender, aromatic onion, not caramelized bits, so monitor closely; if it starts to brown too fast, lower the heat to keep the flavor clean and sweet rather than bitter.
- Pour mixture into prepared pie crust in pie plate. Top with second pie crust. Seal edges and flute if desired. Cut several slits in top of pie for steam to escape.: When you add the flour to the hot butter and onion , you will smell a toasty, biscuit like note as it cooks briefly. Stirring constantly is crucial to prevent lumps and to cook out the raw flour taste, which can otherwise leave a pasty finish. This step builds the roux that thickens the sauce, so keep a steady whisking motion to achieve a smooth base. A typical slip is not cooking the flour enough which may leave the finished sauce with a floury texture, so give it that minute of attention.
- Bake in preheated oven 30 to 35 minutes, or until crust is golden brown (tent edges with foil to prevent excessive browning if needed.: As the half and half hits the warm roux you will hear gentle bubbling and see the mixture smooth out, transforming into a creamy liquid. Whisking constantly prevents lumps and helps the dairy emulsify with the roux, producing a glossy sauce. Adding the prepared gravy brings concentrated savory flavor and seasoning; together they form a velvety sauce that will cling to the vegetables and chicken . If the sauce seems too thin, simmer a bit longer to reduce; if it becomes too thick, add small splashes of liquid. Avoid pouring all at once without whisking, as that can cause clumps.
- Let stand 5 minutes before slicing and serving.: As you stir in the frozen mixed vegetables and shredded chicken , the filling will cool slightly and start to thicken as it absorbs the sauce. The dried rosemary and thyme release fragrant notes, uplifting the savory base. Taste cautiously because the prepared gravy may already be seasoned; missing the right salt leaves the filling flat, while over-salting can overpower the herbs, so adjust in small increments. A frequent mistake is overcooking the vegetables in the pan, causing them to go mushy; aim to warm them through so they retain a pleasant bite after baking.
- Recipe source: Cooking Classy: Gently heating the assembled filling until steaming ensures everything is evenly hot and melded, and you will notice a unified aroma that signals readiness. This step lets flavors marry and helps the sauce reach a cohesive texture before filling the crust. Stir occasionally and keep it at a low simmer, because overheating can break down the cream and make the sauce separate. If you find the filling simmering too hard, reduce the heat to avoid evaporating too much liquid and drying the mixture.
- Pour mixture into prepared pie crust in pie plate: When you pour the filling into the lined pie plate you will hear a slight settling sound as the mixture nests into the base, and you should leave a little room under the rim so the top crust seals without overflow. Filling should be hot but not boiling, since an overly liquid filling can make the crust soggy. If the filling seems thin, allow it to cool briefly to thicken a bit before topping. Beware of overfilling which can cause spillover and uneven baking.
- Top with second pie crust: Draping the second pie crust over the filling creates the visual finale, and pressing the edges seals in the steam. Trimming excess and crimping or fluting the edge gives an attractive finish and helps hold juices inside. Make a few slits in the top to allow steam to escape, preventing a burst crust. If you skip vents the built up steam can push and crack the crust, so be sure to add them.
- Seal edges and flute if desired: Sealing creates that tidy rim which keeps the filling contained while baking, and a decorative flute adds charm. Press firmly along the edge to join the crusts; a dab of water helps them adhere. The sealed edge also protects the filling from evaporating excessively, keeping the interior moist. If the rim browns too quickly in the oven, tent it with foil to prevent burning, which is a useful fix often overlooked.
- Cut several slits in top of pie for steam to escape: These vents let steam escape so the filling sets without creating pockets under the crust, and you will see fragrant steam rise as the pie bakes. Proper venting allows the interior to thicken and stops the top from turning into a soggy dome. Without slits the trapped steam can cause the top crust to burst open unpredictably, so be deliberate and even with the cuts to encourage controlled release.
- Bake in preheated oven 30 to 35 minutes, or until crust is golden brown (tent edges with foil to prevent excessive browning if needed: As the pie bakes you will hear a soft crackle from the pastry and see the crust turn a warm golden hue, with juices bubbling gently through the vents. Baking at 425 degrees browns the top and sets the filling, delivering that classic contrast of flaky crust and creamy interior. If the edges brown faster than the center, tent them with foil to keep the top from burning while the center finishes. A common error is removing the pie too early which leaves the filling loose and overly runny; wait until bubbling and a golden crust confirm readiness.
- Let stand 5 minutes before slicing and serving: Allowing the pie to rest lets the filling thicken and settle, producing cleaner slices and a more cohesive texture. The steam inside will redistribute, and you will notice the aroma deepen as it cools slightly. Serving too soon often leads to a loose filling that spills out, so this short pause improves presentation and eating experience. Use a sharp knife and a sturdy spatula to lift slices, and enjoy the melded flavors.
- Recipe source: Cooking Classy : Acknowledging the recipe origin connects you to the inspiration behind the dish and its tested approach. Knowing the source can guide expectations about flavor and method, and it can be useful if you want to compare versions. Respecting provenance also helps you appreciate the subtle choices made in the recipe design.
Notes
- Use leftover poultry: Swap in leftover shredded rotisserie chicken or turkey to save time and add deep cooked flavor, making the dish economical and resourceful.
- Boost the veg texture: If you prefer firmer vegetables, stir in the frozen mix near the end of warming the sauce so they retain some bite through baking.
- Control salt: Because prepared gravy can be salty, taste the filling before sealing the pie and adjust with small pinches of salt and black pepper as needed to avoid over seasoning.
- Prevent soggy bottom: Preheat the baking sheet and use a hot oven so the bottom crust starts setting immediately, which helps it stay crisp under the moist filling.
- Herb balance: Crush dried rosemary between your fingers before adding to bloom the oils, and add thyme toward the end of warming to preserve its fresh aroma.