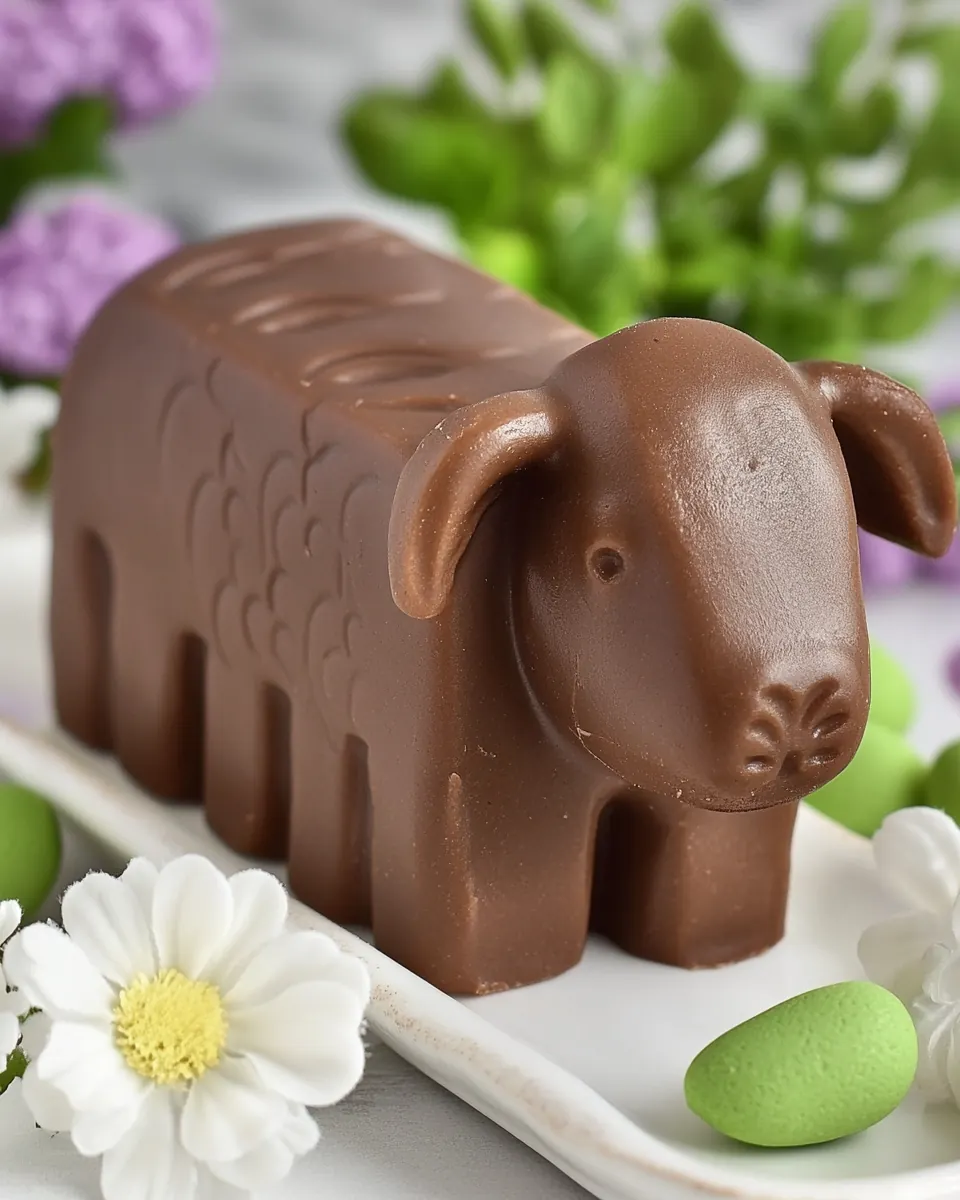
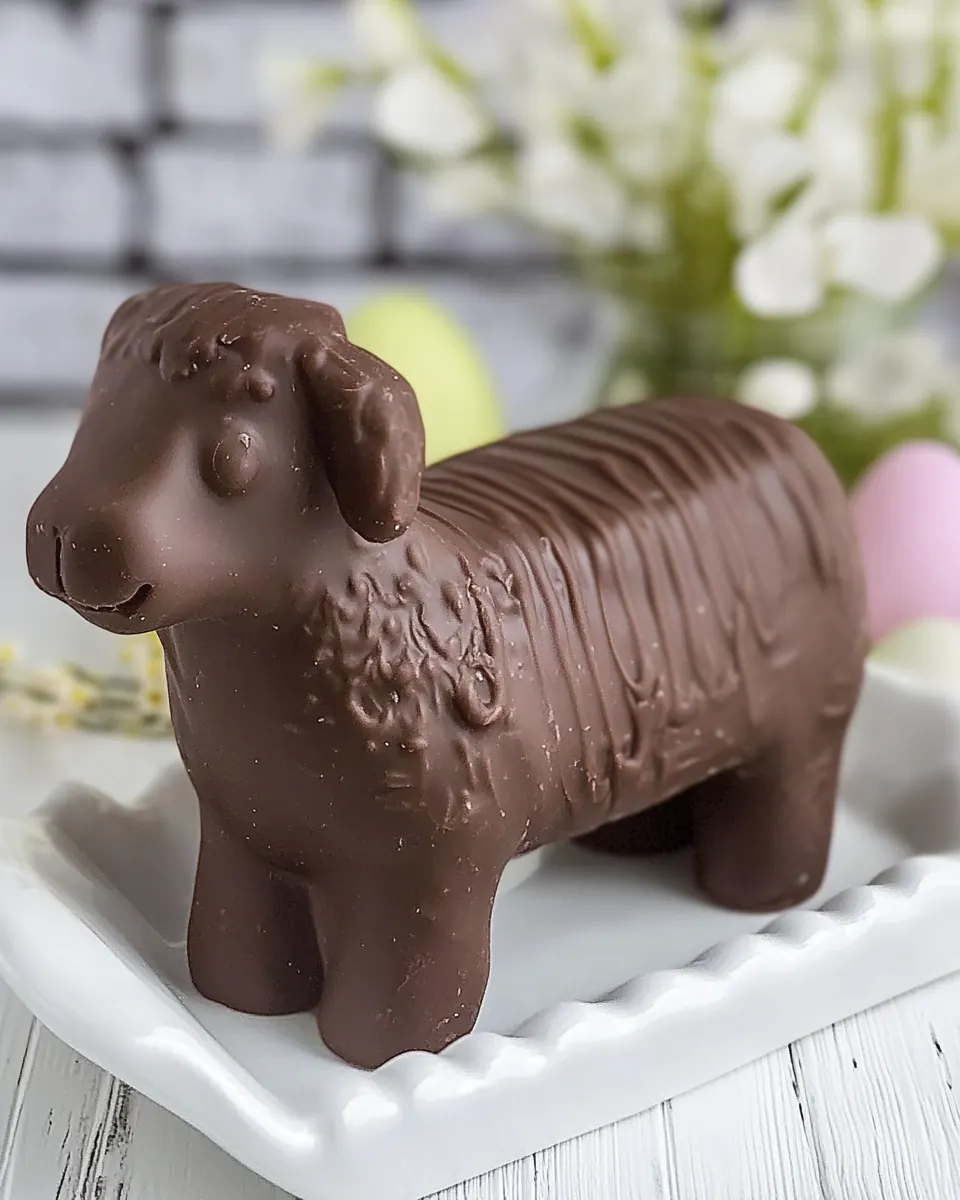
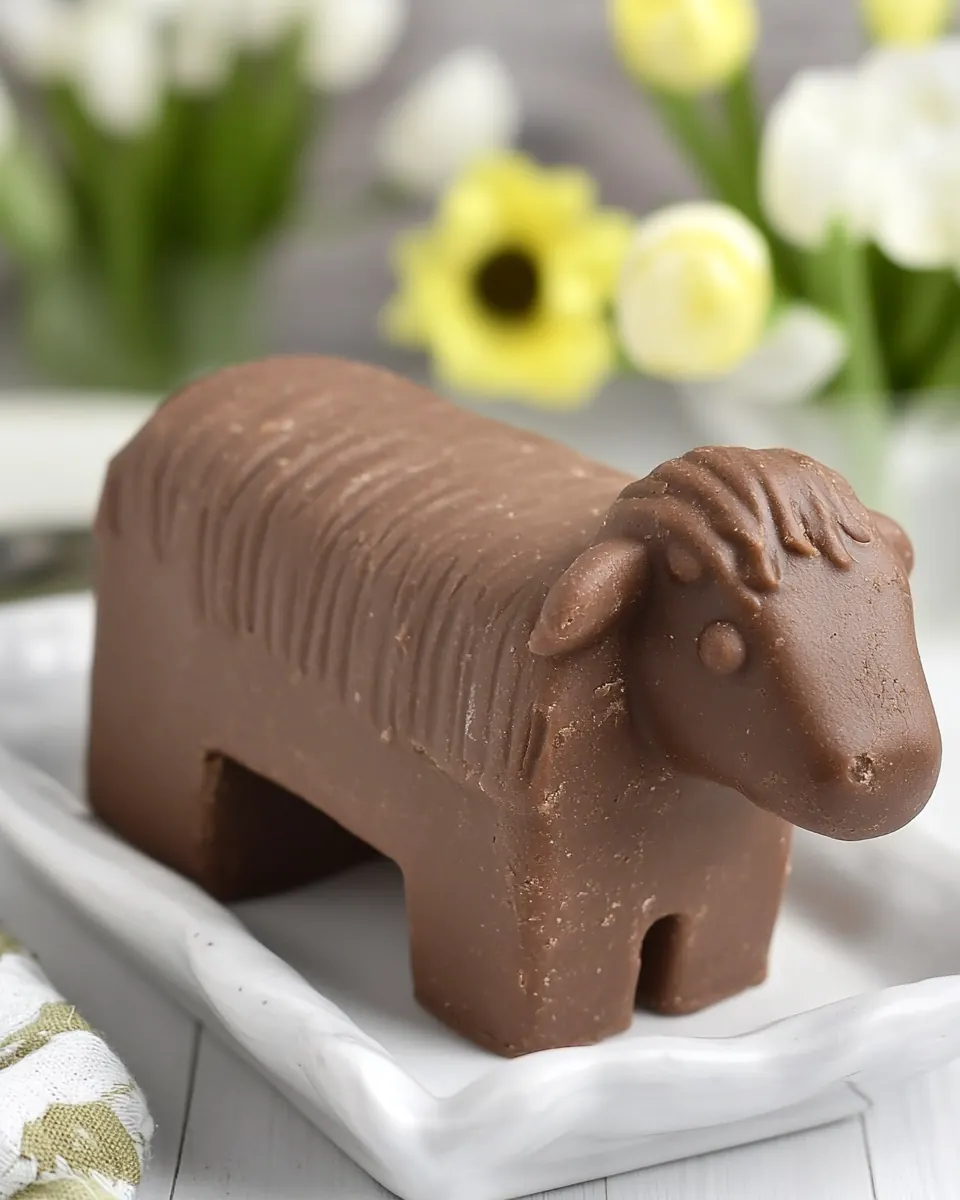
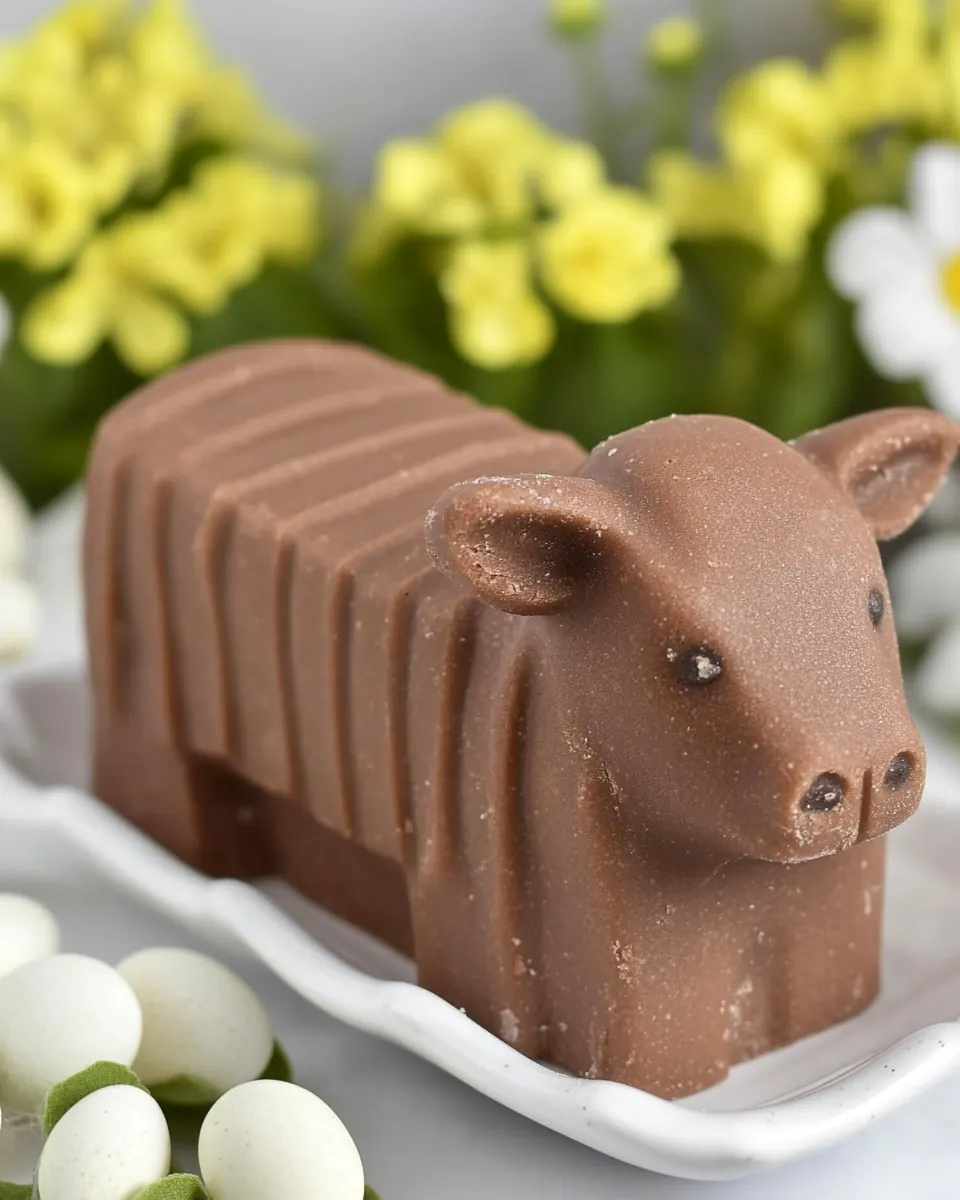
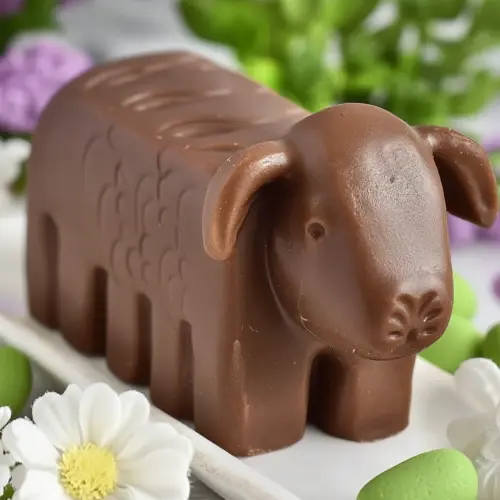
Easter Fudge Lamb
Easter Fudge Lamb has been one of those nostalgic treats that I reach for every spring, especially when I want a sugary project that feels festive and a little bit ceremonial.
I remember the first time I tried to make a molded candy for a holiday celebration, carefully lining a little lamb mold while my kitchen filled with the sweet smell of boiling sugar and butter. I felt equal parts nervous and excited, because making candy can be exacting, but the payoff is pure joy when the chocolate sets and the mold releases a smooth, glossy figure. Over time, I learned how small changes in heat, timing, and stirring can make the difference between grainy fudge and something decadently smooth, and that hands on experience has made me patient and confident whenever I tackle a candy mold.
These days I make Easter Fudge Lamb when I want a handmade gift that says I cared enough to stand by the stove. Kids love the lamb shape, and adults appreciate the creamy texture and familiar flavors of chocolate and marshmallow. I often let the children help pour the mixture into the mold, which turns the recipe into a memory as much as a dessert. There’s a rhythm to it: stirring until the thermometer hits the right temperature, folding in the chocolate and marshmallow, and then the satisfying moment of turning out the chilled lamb to reveal glossy sides and soft, sliceable fudge.
Recipe Snapshot
25 mins
10 mins
15 mins
Easy
200 kcal
American
Gluten-Free, Low FODMAP
Desserts
Heavy saucepan, Candy thermometer, Greased mold, Spatula
What Makes This Easter Fudge Lamb Special
Decadent, yet approachable
I love that Easter Fudge Lamb delivers rich, creamy chocolate flavor without requiring tempering or complex candy skills. The combination of sugar, butter, and evaporated milk forms a reliable candy base that almost always yields a smooth texture when handled with attention. It’s a recipe that welcomes home cooks of all levels, yet still feels special enough for holiday gifting.
Playful presentation
The lamb mold gives a whimsical, nostalgic presentation that transforms simple fudge into a centerpiece. I find that a molded sweet makes Easter brunch or dessert feel curated, and it’s an easy way to impress guests without overcomplicating the process. Kids light up when they see the lamb, and it makes hosting feel more intentional.
Textural balance
When the semi sweet chocolate chips melt into the cooked sugar mixture, the result is creamy and slightly dense, with a pleasant chew from the marshmallow crème. I appreciate how the marshmallow adds silkiness and stabilizes the fudge, preventing it from becoming too grainy. That textural harmony keeps each bite satisfying and prevents the sweetness from feeling one dimensional.
Reliable technique
The method relies on clear cues like boiling to a specific candy temperature and visual signs such as glossy, fully melted chocolate. I like that the recipe trains you to pay attention to sensory signals, which builds confidence for future candy projects. The steps are forgiving as long as you watch the heat and stir consistently.
Great for gifting and sharing
Finally, Easter Fudge Lamb is made to be shared. It stores well and slices nicely for little boxes or dessert plates. I often wrap wedges in parchment for friends, and it always feels like a thoughtful homemade treasure.
Easter Fudge Lamb Shopping List
These ingredients are simple, classic, and focused. I lean on familiar pantry staples that combine to create a stable candy base, while the chocolate and marshmallow provide flavor and texture. The key players are the sugar and butter for structure and richness, the evaporated milk to add creaminess without watering down the candy, and the semi sweet chocolate chips plus marshmallow creme for that unmistakable fudge profile.
- 3 cups sugar: Sweeten the fudge base with a substantial amount of granulated sugar, which dissolves into the milk and butter to create the classic candy texture. Cooked to the proper temperature, sugar crystallizes correctly to produce a smooth, set fudge rather than grainy candy. Balance sweetness with other ingredients so the final product is rich but not cloying.
- 3/4 cup butter: Provide richness and fat that create a creamy, smooth mouthfeel; butter also helps prevent sugar from crystallizing too quickly. Melted into the heated mixture, butter contributes flavor depth and a glossy sheen to the finished fudge. Use unsalted or adjust other seasonings if using salted butter for consistent taste.
- 2/3 cup evaporated milk: Add body and creaminess through evaporated milk, which intensifies dairy flavor and reduces water content compared with regular milk. Simmered with sugar and butter, evaporated milk helps achieve the correct texture and contributes to the fudge’s firmness once cooled. Its concentrated solids aid in achieving a stable, set confection.
- 2 cups (1 12-ounce bag) semi-sweet chocolate chips: Melt and flavor the fudge with semi–sweet chocolate chips, providing cocoa richness and structure as they blend into the warm mixture. Chocolate chips contribute both sweetness and slight bitterness to balance sugar and marshmallow, and their cocoa butter helps set the fudge as it cools. Choose high-quality chips for the best flavor and melt consistency.
- 1 7-ounce jar marshmallow creme: Introduce lightness and a creamy, marshmallow flavor from marshmallow creme, which adds chewiness and a softer texture to the fudge. Folded into the warm chocolate base, marshmallow creme helps stabilize the mixture and imparts a characteristic marshmallow sweetness and sheen. Use a full jar to ensure an even distribution of flavor and texture.
- 1 teaspoon vanilla: Enhance overall flavor with vanilla, which rounds out the chocolate and marshmallow notes and adds aromatic warmth. Stirred in at the end of cooking, vanilla heightens perceived sweetness and deepens complexity without adding extra sugar. Use pure vanilla extract for the most natural flavor enhancement.
How to Cook Easter Fudge Lamb
I enjoy the methodical rhythm of making this candy, from watching the sugar dissolve to stirring in the melted chocolate and marshmallow. With attention to temperature and steady stirring, the process becomes almost meditative, and the reward is a glossy, mold ready fudge.
- Combine sugar, butter, and milk in a heavy saucepan.: The initial aroma is simple and buttery, a quiet promise of the treat to come. Use a heavy saucepan so heat distributes evenly, which prevents hot spots that can scorch the mixture. As the sugar dissolves into the evaporated milk and butter , you'll notice a slightly syrupy sheen forming, and stirring will help break down any residual sugar grains. The reason this matters is even melting prevents future crystallization which leads to grainy fudge. One common mistake is rushing with high heat, which can burn the dairy and create off flavors.
- Bring to a boil stirring constantly. Continue boiling for about 5 minutes over medium heat, stirring until the candy thermometer reaches 234º.: As the mixture comes to a boil, the kitchen fills with a toffee like scent, and steady bubbling signals the water content evaporating to concentrate sugars. Stir constantly to avoid burning and to encourage even heating, and rely on the candy thermometer reading to know when you've reached the soft ball stage like 234º. This temperature ensures the fudge will set properly once cooled. If you skip stirring here or let it scorch, the final texture will suffer, becoming grainy or tough. Also avoid guessing time alone, because stove output varies and thermometer guidance is more reliable.
- Remove from heat, stir in chocolate till melted.: At this point, you'll notice the vigorous bubbling calming and the steam subsiding, creating a moment to work quickly and carefully. The residual heat will melt the semi sweet chocolate chips , and stirring gently creates a glossy, homogeneous chocolate pool. This step is crucial for smoothness, as fully melted chocolate integrates into the sugary matrix, preventing streaks or lumps. A common pitfall is adding chocolate too early while the mixture is still aggressively boiling, which can separate fats and dry out the texture.
- Add marshmallow crème and vanilla and mix till completely combined.: When you fold in the marshmallow creme , expect a fluffy, billowy texture to appear before it fully incorporates, and the aroma softens into a familiar sweet, vanilla kissed chocolate. Mixing thoroughly produces a uniform texture and makes slicing tidy when set. The marshmallow helps stabilize the fudge, reducing the chance of crystallization. Beware of under mixing, which can leave sticky pockets of marshmallow or uneven sweetness.
- To make a Fudge Lamb, pour into a greased mold. Allow to cool upside down.: Pouring the warm mixture into a greased mold should feel satisfying as it fills cavities and captures detail. The surface will look glossy and slightly warm to the touch. Letting it cool upside down helps eliminate trapped air and produces a clean release when unmolding, while chilling until fully set ensures firm, sliceable fudge. A common error is trying to unmold too soon, which yields a soft, misshapen lamb; patience yields a neat, firm shape and clean slices.
Helpful Hints
I like to keep a few organized tricks in my back pocket when preparing molded candies. These tips help troubleshoot common issues and elevate the texture and appearance of the final piece.
- Keep a clean pan: Residual grease or old sugar bits can cause uneven heating and crystallization, so start with a spotless heavy saucepan.
- Wipe sugar from the pan sides: Use a pastry brush dipped in water to wash down sugar crystals on the sides during heating, preventing unwanted crystal formation.
- Use a reliable thermometer: A candy thermometer provides the accuracy needed for consistent results, especially when working at precise temperatures like 234º.
- Temper your patience: Allow the mold to cool completely before unmolding and slicing, chilling in the refrigerator if your kitchen is warm.
- Warm the mold slightly if sticking: If the lamb is reluctant to release, warm the mold briefly with your hands or a warm towel to ease the process, rather than forcing it.
- Store properly: Keep the fudge in an airtight container at cool room temperature, or refrigerate for longer shelf life, to preserve texture and flavor.
What Complements This Easter Fudge Lamb
The Easter Fudge Lamb works beautifully as a holiday centerpiece, edible gift, or dessert after a light spring meal. Think about serving it with complementary textures and occasions in mind.
- Plate style: Serve thin slices on a small dessert plate, accompanied by a sprig of fresh mint for contrast in presentation. The smooth, chocolaty slices pair nicely with a crisp palate cleanser.
- Occasions: Ideal for Easter brunch, family gatherings, or as a handmade hostess gift. Its molded shape makes it especially fitting for seasonal celebrations and kid friendly events.
- Storage tips: Store slices in an airtight container at cool room temperature for short term, or refrigerate to extend freshness. Separate layers with parchment to prevent sticking and preserve appearance.
- Serving size: Present small slices as part of a dessert board, which allows guests to taste a variety of sweets without overindulging. The rich fudge is satisfying in modest portions.
- Seasonal pairing: Pair the lamb with light floral teas or decaf coffee for a spring afternoon, emphasizing the candy’s creamy texture without overpowering its chocolate notes.
- Gift presentation: Wrap wedges in parchment or place in small boxes tied with ribbon for a charming homemade gift that travels well.
FAQ
Conclusion
This recipe shines because it turns simple pantry ingredients into a festive, molded candy that looks special and tastes richly chocolatey. Try making an Easter Fudge Lamb for your next spring gathering to offer a handmade treat that doubles as a charming centerpiece. It’s approachable, reliably delicious, and makes a thoughtful gift that friends and family will appreciate. Whether you share slices at a brunch or tuck wedges into little boxes, this fudge recipe celebrates the season with warmth and sweetness.
Easter Fudge Lamb
Equipment
- Heavy saucepan
- Candy thermometer
- Greased mold
- Spatula
Ingredients
- 3 cups sugar Sweeten the fudge base with a substantial amount of granulated sugar, which dissolves into the milk and butter to create the classic candy texture. Cooked to the proper temperature, sugar crystallizes correctly to produce a smooth, set fudge rather than grainy candy. Balance sweetness with other ingredients so the final product is rich but not cloying.
- 3/4 cup butter Provide richness and fat that create a creamy, smooth mouthfeel; butter also helps prevent sugar from crystallizing too quickly. Melted into the heated mixture, butter contributes flavor depth and a glossy sheen to the finished fudge. Use unsalted or adjust other seasonings if using salted butter for consistent taste.
- 2/3 cup evaporated milk Add body and creaminess through evaporated milk, which intensifies dairy flavor and reduces water content compared with regular milk. Simmered with sugar and butter, evaporated milk helps achieve the correct texture and contributes to the fudge’s firmness once cooled. Its concentrated solids aid in achieving a stable, set confection.
- 2 cups (1 12-ounce bag) semi-sweet chocolate chips Melt and flavor the fudge with semi-sweet chocolate chips, providing cocoa richness and structure as they blend into the warm mixture. Chocolate chips contribute both sweetness and slight bitterness to balance sugar and marshmallow, and their cocoa butter helps set the fudge as it cools. Choose high-quality chips for the best flavor and melt consistency.
- 1 7-ounce jar marshmallow creme Introduce lightness and a creamy, marshmallow flavor from marshmallow creme, which adds chewiness and a softer texture to the fudge. Folded into the warm chocolate base, marshmallow creme helps stabilize the mixture and imparts a characteristic marshmallow sweetness and sheen. Use a full jar to ensure an even distribution of flavor and texture.
- 1 teaspoon vanilla Enhance overall flavor with vanilla, which rounds out the chocolate and marshmallow notes and adds aromatic warmth. Stirred in at the end of cooking, vanilla heightens perceived sweetness and deepens complexity without adding extra sugar. Use pure vanilla extract for the most natural flavor enhancement.
Instructions
- Combine sugar, butter, and milk in a heavy saucepan.: The initial aroma is simple and buttery, a quiet promise of the treat to come. Use a heavy saucepan so heat distributes evenly, which prevents hot spots that can scorch the mixture. As the sugar dissolves into the evaporated milk and butter , you'll notice a slightly syrupy sheen forming, and stirring will help break down any residual sugar grains. The reason this matters is even melting prevents future crystallization which leads to grainy fudge. One common mistake is rushing with high heat, which can burn the dairy and create off flavors.
- Bring to a boil stirring constantly. Continue boiling for about 5 minutes over medium heat, stirring until the candy thermometer reaches 234º.: As the mixture comes to a boil, the kitchen fills with a toffee like scent, and steady bubbling signals the water content evaporating to concentrate sugars. Stir constantly to avoid burning and to encourage even heating, and rely on the candy thermometer reading to know when you've reached the soft ball stage like 234º. This temperature ensures the fudge will set properly once cooled. If you skip stirring here or let it scorch, the final texture will suffer, becoming grainy or tough. Also avoid guessing time alone, because stove output varies and thermometer guidance is more reliable.
- Remove from heat, stir in chocolate till melted.: At this point, you'll notice the vigorous bubbling calming and the steam subsiding, creating a moment to work quickly and carefully. The residual heat will melt the semi sweet chocolate chips , and stirring gently creates a glossy, homogeneous chocolate pool. This step is crucial for smoothness, as fully melted chocolate integrates into the sugary matrix, preventing streaks or lumps. A common pitfall is adding chocolate too early while the mixture is still aggressively boiling, which can separate fats and dry out the texture.
- Add marshmallow crème and vanilla and mix till completely combined.: When you fold in the marshmallow creme , expect a fluffy, billowy texture to appear before it fully incorporates, and the aroma softens into a familiar sweet, vanilla kissed chocolate. Mixing thoroughly produces a uniform texture and makes slicing tidy when set. The marshmallow helps stabilize the fudge, reducing the chance of crystallization. Beware of under mixing, which can leave sticky pockets of marshmallow or uneven sweetness.
- To make a Fudge Lamb, pour into a greased mold. Allow to cool upside down.: Pouring the warm mixture into a greased mold should feel satisfying as it fills cavities and captures detail. The surface will look glossy and slightly warm to the touch. Letting it cool upside down helps eliminate trapped air and produces a clean release when unmolding, while chilling until fully set ensures firm, sliceable fudge. A common error is trying to unmold too soon, which yields a soft, misshapen lamb; patience yields a neat, firm shape and clean slices.
Notes
- Keep a clean pan: Residual grease or old sugar bits can cause uneven heating and crystallization, so start with a spotless heavy saucepan.
- Wipe sugar from the pan sides: Use a pastry brush dipped in water to wash down sugar crystals on the sides during heating, preventing unwanted crystal formation.
- Use a reliable thermometer: A candy thermometer provides the accuracy needed for consistent results, especially when working at precise temperatures like 234º.
- Temper your patience: Allow the mold to cool completely before unmolding and slicing, chilling in the refrigerator if your kitchen is warm.
- Warm the mold slightly if sticking: If the lamb is reluctant to release, warm the mold briefly with your hands or a warm towel to ease the process, rather than forcing it.
- Store properly: Keep the fudge in an airtight container at cool room temperature, or refrigerate for longer shelf life, to preserve texture and flavor.