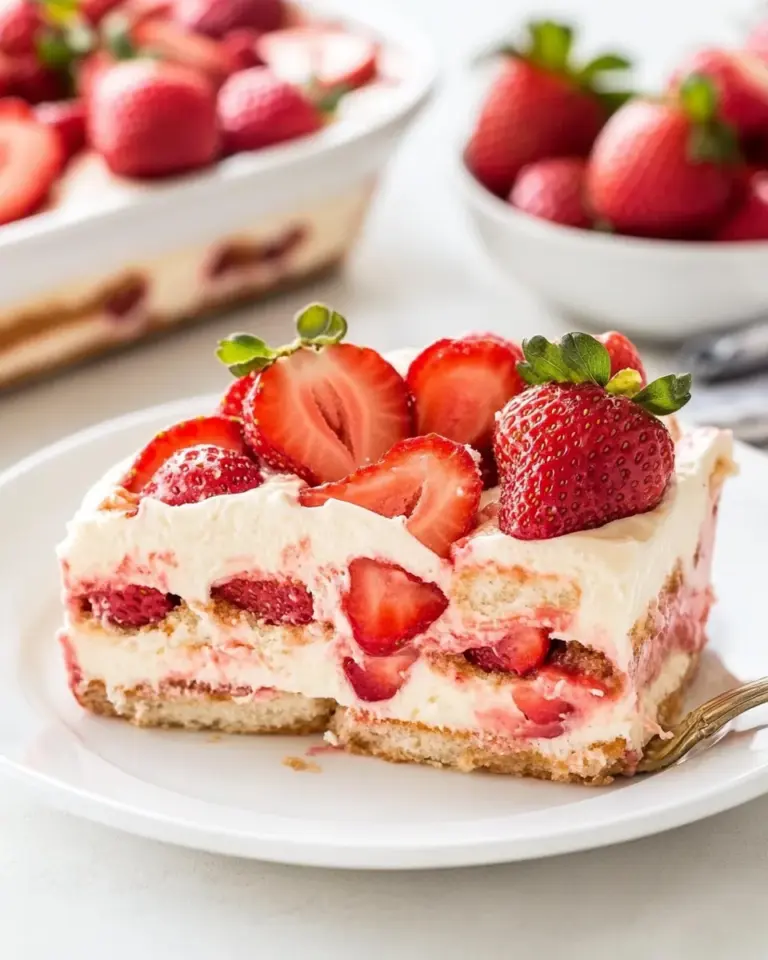
Dark Chocolate Chiffon Pie
Dark Chocolate Chiffon Pie has been my go to when I want a dessert that feels luxurious yet surprisingly light. The first time I made it I remember the way the kitchen filled with a deep, roasted aroma as I stirred the coconut milk and chopped the baking chocolate, and how everyone lingered at the table longer than they meant to. I love how this version balances intense chocolate with airy texture, and I still smile thinking about that first forkful that somehow tasted both indulgent and feather light.
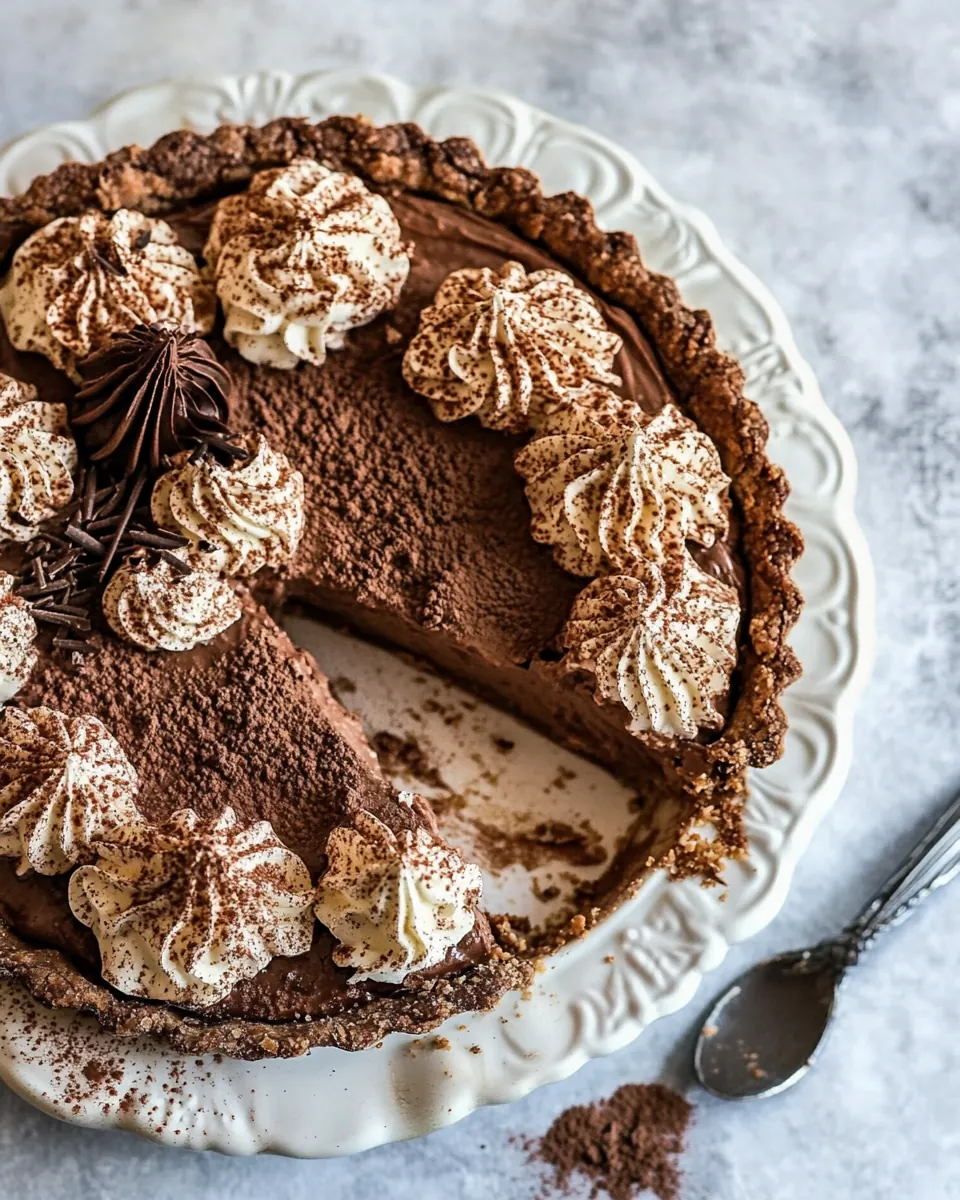
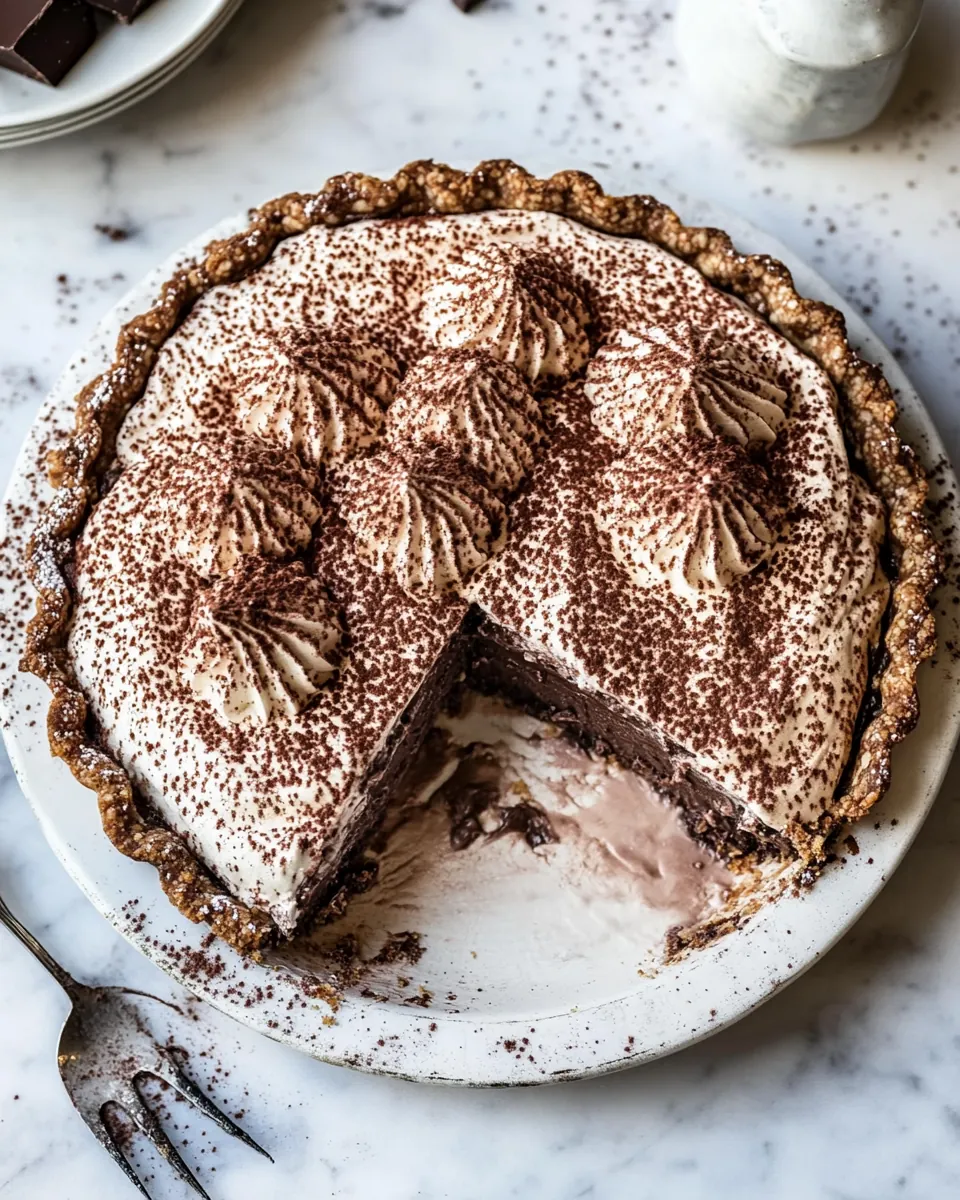
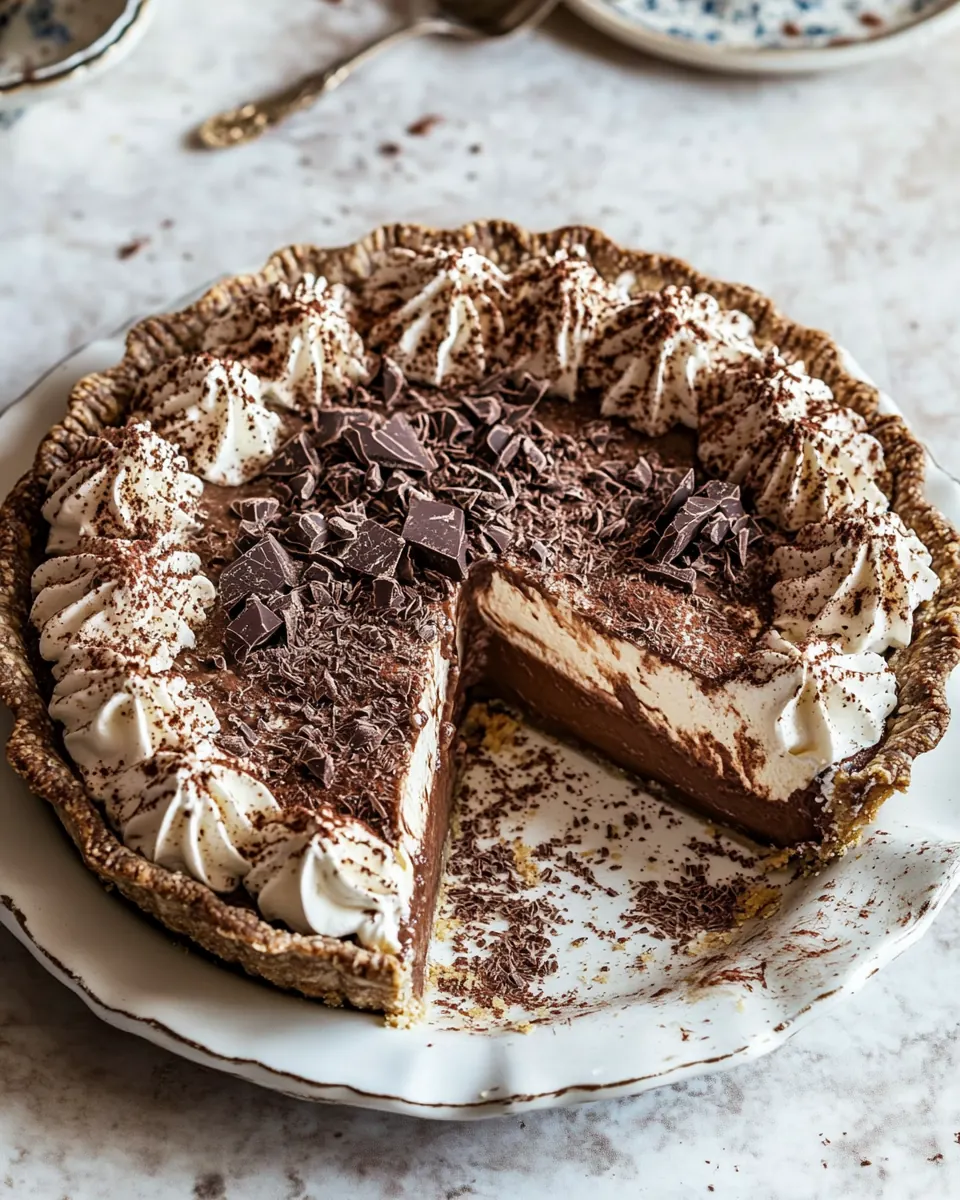
Over the years I have tweaked the recipe, learning little things about timing, temperature, and texture that turn a good pie into a memorable one. Some evenings I make it for small celebrations, other times it is the quiet reward after a long week. I enjoy telling guests that the base is made from nuts and date paste, because it feels honest and wholesome, yet the filling reads like a classic chocolate custard. You can see the glossy surface before it is topped with creamy coconut mousse, and it always prompts questions about how I achieved that perfect balance.
Recipe Snapshot
35 mins
20 mins
15 mins
Easy
350 kcal
American
Gluten-Free, Paleo
Desserts
Oven, Food processor, 9-inch pie pan, Saucepan, Whisk
Why This Dark Chocolate Chiffon Pie Stands Out
Silky yet airy texture
I adore how Dark Chocolate Chiffon Pie manages to be both lush and light. The combination of gelatin set custard folded with whipped coconut cream produces a mouthfeel that is cloud like, while still delivering the deep, cocoa forward punch that chocolate lovers crave. I find that achieving this balance keeps every bite interesting, and it prevents the richness from feeling cloying.
Clean, whole ingredient crust
The crust, made from brazil nuts or hazelnuts, date paste, and cacao powder, gives a toasty, slightly caramelized base that complements the filling. I like that it provides a textural contrast, a firm yet tender bite, and it pairs naturally with the coconut elements in the filling and topping. It also feels intuitive to make, so I recommend it when you want a delicious crust without fuss.
Perfect for different diets and occasions
I often bring this pie to gatherings because it reads special, yet it is approachable. Using coconut milk and coconut whipped cream keeps the pie dairy free, and the use of whole sweeteners like maple syrup and date paste gives it a more natural sweetness profile. I’ve found it works for many seasonal menus, and it’s elegant enough for celebrations without being intimidating to bake or transport.
Impressive but manageable techniques
From tempering the yolks to gently folding the whipped cream, the methods are classic but forgiving. I enjoy teaching these small techniques because they unlock big improvements in texture and stability. If you follow the sensory cues I describe later, you will nail the consistency, and you’ll be proud of how professional the finished pie looks and tastes.
Make ahead friendly
I like that Dark Chocolate Chiffon Pie improves after chilling. Refrigerating overnight lets the flavors mingle and the filling fully set, which makes planning easier when hosting. I usually make it a day ahead and top it just before serving, which gives me less to do on the day of an event and more time to enjoy company.
Dark Chocolate Chiffon Pie Ingredients
I believe in ingredient harmony more than complicated formulas. For this pie, each element has a job: the nuts and date paste form a flavorful, sturdy crust, the coconut milk and gelatin build a creamy glossy filling, and the whipped coconut cream tops everything with lightness. Together they create a balanced contrast between deep chocolate and airy cream, while the cacao layers echo through every bite.
- 1/4 cup coconut oil, melted, plus more for greasing: Melted and used to bind and grease the crust, adding a subtle coconut richness and tender texture to the pie; helps set the nut-based crust while keeping it pliable. Also used to grease pans to prevent sticking and contribute a smooth mouthfeel in the finished dessert.
- 2 1/4 cups brazil nuts or hazelnuts: Ground or blended to form the base of the crust, providing structure, natural oils, and a rich, nutty flavor; contributes crunch and body while holding together when combined with the coconut oil and date paste. Choose either nuts interchangeably to adjust flavor profile without changing texture or functionality.
- 3 tablespoons date paste: Sweet paste used to naturally bind the crust ingredients and add concentrated caramel-like sweetness; replaces refined sugars while helping the crust hold its shape. Adds chewiness and moisture to the nut mixture for easier pressing into the pan.
- 1/4 teaspoon Himalayan pink salt: Fine mineral salt used sparingly to enhance the overall flavors and balance sweetness; helps bring out the chocolate and nutty notes without overpowering. Sprinkle into crust or filling components to deepen taste and improve complexity.
- 1/2 cup 100% unsweetened cacao or cocoa powder: Bitter cocoa ingredient used to provide the deep chocolate flavor and color in the filling; contributes richness and intensity without added sugar. Incorporate into wet components to dissolve and evenly flavor the custard base.
- 3 cups full-fat canned coconut milk: Full-fat liquid offering creamy body and a tropical coconut flavor to the chocolate custard; supplies the fat needed for a silky texture and helps suspend cocoa and gelatin. Use the full-fat variety to ensure proper set and richness in the chiffon filling.
- 2 teaspoons gelatin powder: Powdered gelling agent used to set and stabilize the custard, giving the pie its airy yet firm chiffon texture; hydrates and dissolves to create a delicate structure for the filling. Bloom and gently heat as directed to incorporate fully without lumps.
- 4 large egg yolks: Egg yolks provide richness, natural emulsification, and a silky texture to the chocolate filling; help thicken the custard when tempered with hot liquid. Whisk thoroughly to ensure smooth incorporation and contribute a golden color and stability.
- 1/2 cup maple syrup: Liquid sweetener used to sweeten the filling while contributing a subtle maple character; balances the bitterness of unsweetened cocoa and bitterness of cacao. Adjust quantity cautiously to achieve desired sweetness and preserve chocolate intensity.
- 1 teaspoon vanilla extract: Aromatic flavoring added in small quantity to brighten and round out the chocolate filling; imparts a warm, familiar vanilla note that complements cocoa. Stir in after heating to preserve delicate aromatic compounds and enhance overall flavor complexity.
- 2 ounces 100% cacao unsweetened baking chocolate, roughly chopped: High-percentage unsweetened baking chocolate used for intense chocolate depth and glossy texture in the filling; melts into the custard to create a rich base and luxurious mouthfeel. Chop roughly to ensure even, rapid melting when combined with warm liquid.
- 2 tablespoons 100% unsweetened cacao or cocoa powder, plus more for topping: Additional cocoa powder used to intensify chocolate flavor and adjust thickness of the filling or topping; provides dry chocolate solids to boost color and taste. Reserve some for dusting the finished pie to add visual contrast and a concentrated chocolate bite.
- 1/4 teaspoon Himalayan pink salt: A second measure of fine mineral salt used to season and balance the topping or filling, amplifying chocolate and coconut flavors; ensures consistent seasoning across layers. Add carefully to avoid over-salting while enhancing overall flavor nuance.
- 4 cups coconut whipped cream: Light, airy coconut-based topping that provides volume and a creamy, dairy-free finish; adds contrasting texture and mild coconut sweetness to the rich chocolate filling. Whip to soft peaks and spread or pipe over the chilled pie for an elegant presentation.
- 2 cans (13.5 ounces) full fat canned coconut, refrigerated overnight: Canned full-fat coconut refrigerated to separate solids for making thick coconut cream; solid portion becomes the base for coconut whipped cream or a stabilizing layer. Chill overnight to ensure proper separation and maximum cream yield for whipping.
- 2 tablespoons maple syrup: Small amount of liquid sweetener used to gently sweeten the coconut cream without overpowering; balances the coconut's natural flavor and enhances overall sweetness control. Fold into chilled coconut solids before whipping to distribute sweetness evenly.
- 1 tablespoon vanilla extract: Concentrated flavoring added to the coconut cream to impart a warm vanilla note and round out the topping's sweetness; complements the chocolate and enhances aromatic appeal. Stir into the coconut solids prior to whipping to ensure even flavor distribution.
How to Prepare Dark Chocolate Chiffon Pie
These steps take you from toasty nut crust to glossy, set filling and finishing cloud like whipped coconut cream. Read the sensory cues carefully and work patiently, especially when tempering the yolks and melting the chocolate. You will be rewarded with a pie that slices cleanly and tastes layered and sophisticated.
- Preheat the oven to 350 degrees. Generously grease a 9-inch pie pan with coconut oil. To make the crust. Combine the nuts, coconut oil, date paste, salt, and cacao powder in a food processor and pulse until the mixture forms a ball. Press the dough into the pie pan and bake for 10-12 minutes, until fragrant and set. Set aside to cool.: You will notice a warm, dry heat build in the oven as it approaches 350 degrees , which is ideal for toasting and setting the nut crust without burning it. The smell of nuts will amplify once the crust goes in, becoming toasted and aromatic in about 10 to 12 minutes. Why this matters, the gentle bake firms the crust so it holds the filling without becoming rock hard, producing a crisp edge and tender crumb interior. Troubleshooting tip, if your oven runs hot check with an oven thermometer because overbaking will create a bitter, dry crust. Listen for a faint nutty aroma and watch the edges for a subtle deepening in color as cues.
- To make the filling. Pour the coconut milk into a small saucepan and sprinkle the gelatin on top. Set aside and allow the gelatin to soften for about 5 minutes. In a medium bowl, whisk together the egg yolks, maple syrup, and vanilla, set aside. Take the saucepan of coconut milk and gelatin and whisk over low heat until smooth and warm. Take 1 cup of the warm coconut/gelatin mixture and add it to the egg yolk mixture, stirring constantly. Pour the entire egg yolk mixture back into the saucepan and mix well. Add the chopped cacao, cacao powder, and salt. Whisking constantly, bring the mixture to a simmer and cook for 3 to 5 minutes, until thickened. Transfer the filling to a bowl and refrigerate until cool but not quite set, about 40 minutes. Fold 2 cups of the coconut whipped cream into the filling, then pour the filling into the crust and refrigerate overnight, or for at least 8 hours. Top with the remaining whipped coconut cream and sift cacao powder over the pie. Serve immediately or refrigerate for up to 2 days.: The glossy sheen of coconut oil ensures the crust releases easily and the pie keeps its shape. Greasing prevents sticking and helps the crust brown evenly. Use a pastry brush or paper towel to coat the pan so the oil covers all corners. Why this technique matters, even coverage avoids hot spots that can burn the crust or cause uneven browning. A common mistake is skimping on grease which makes it hard to unmold the pie cleanly; be generous but not puddled.
- Combine the nuts, coconut oil, date paste, salt, and cacao powder in a food processor and pulse until the mixture forms a ball: As you pulse, the mixture will transform from loose crumbs into a cohesive, slightly tacky dough that clumps when pressed. The brazil nuts or hazelnuts release oils that help bind the mass, and you will see a sheen as the paste incorporates. Why this matters, the right consistency ensures the crust will press smoothly and hold together after baking. Overprocessing is a typical error because it can yield oily paste instead of a firm dough; stop pulsing once the mixture comes together into a ball.
- Press the dough into the pie pan and bake for 10 to 12 minutes, until fragrant and set: Press the nut mixture evenly across the bottom and up the sides to about the same thickness so it bakes uniformly, and place it in the center of the oven. The visual cues are a dry surface that no longer looks tacky, and a fragrant toasted scent that fills the kitchen. Why this matters, even thickness prevents thin spots that can crack when sliced, and it creates a sturdy platform for the filling. A common misstep is uneven pressing, which leads to collapsing sides; take time to press firmly and evenly.
- Set aside to cool: Cooling allows the crust to firm further and prevents the hot filling from melting it when poured in. You will feel the crust take on a slightly firmer bite and a cooler temperature as it rests. Why this pause matters, pouring hot filling into a warm crust risks softening the base and making the slice messy. If you rush this step, you may end up with a soggy edge, so let the crust cool to near room temperature before filling.
- Pour the coconut milk into a small saucepan and sprinkle the gelatin on top: When you sprinkle gelatin powder over the top, it will look like a dusting floating on the surface before it hydrates. Allowing it to sit for about 5 minutes lets it bloom, becoming spongy and ready to dissolve smoothly. Why this matters, properly bloomed gelatin ensures a lump free incorporation and stable custard. A frequent mistake is skipping this rest, which can result in gritty gelatin pockets; be patient and let it swell first.
- Whisk together the egg yolks, maple syrup, and vanilla, set aside: The mixture will become slightly paler and glossy as you whisk, showing that the yolks have incorporated air and sugar. This premix will temper the hot milk and prevent curdling. Why this technique matters, pre mixing controls the temperature transition for the yolks so they thicken into a silky custard rather than scramble. If you rush the next step and add hot liquid too quickly, you risk tiny cooked bits in the filling.
- Whisk over low heat until smooth and warm: As you heat the coconut milk with the gelatin, you will see the gelatin dissolve and the mixture become uniformly glossy and slightly steamy, but not boiling. Keeping the heat low protects the delicate milk from scorching. Why this matters, a smooth, warm base integrates with the yolk mixture without shocking it. The usual error here is overheating; boiling will break down coconut milk and create unpleasant texture.
- Take 1 cup of the warm coconut gelatin mixture and add it to the egg yolk mixture, stirring constantly: When you slowly add the warm liquid, the egg yolks will adjust to the new temperature and the mixture will become silkier and warmer with each pour. This tempering step prevents scrambling. Why this matters, gradual incorporation maintains a smooth custard. A common mistake is dumping hot liquid fast, which cooks the yolks into curds; stir continuously and add slowly.
- Pour the entire egg yolk mixture back into the saucepan and mix well: Returning the blended yolk mixture to the saucepan creates a unified custard base that will thicken gently as you heat it. You will notice the mixture becoming more viscous and glossy as proteins engage. Why this matters, even heating and mixing ensures a velvety texture that will set properly with the gelatin. Avoid high heat which can cause separation or over thickening.
- Add the chopped cacao, cacao powder, and salt: As the baking chocolate melts and the cacao powder dissolves, the mixture will turn a deep, glossy chocolate color and the aroma will intensify. Stir until the texture is entirely smooth and homogeneous. Why this matters, fully melted chocolate prevents grainy texture and integrates intense flavor. A typical mistake is insufficient stirring, which leaves unmelted flecks of chocolate that affect mouthfeel.
- Whisking constantly, bring the mixture to a simmer and cook for 3 to 5 minutes, until thickened: You will see the custard cling slightly to the whisk and a slow stream will fall back, indicating proper thickness. The simmer will also concentrate flavors, making the chocolate deeper and more complex. Why this matters, this controlled thickening develops the right body so the filling sets while remaining creamy. Overcooking can over thicken or curdle the custard, so watch closely and keep stirring.
- Transfer the filling to a bowl and refrigerate until cool but not quite set, about 40 minutes: Cooling gives the flavors time to mellow and the gelatin to begin working. The surface will lose heat and the filling will thicken slightly, moving from pourable to spoonable. Why this matters, pouring overly warm filling into the crust can cause slippage, while fully set filling will not allow you to fold in whipped cream. A common error is impatience; give the filling the time it needs to reach the ideal texture.
- Fold 2 cups of the coconut whipped cream into the filling, then pour the filling into the crust and refrigerate overnight, or for at least 8 hours: Folding creates ribbons of cloud like cream that lighten the dense custard, and the visual cue is streaks of cream that slowly disappear as you work. Gently fold to preserve the air and softness of the coconut whipped cream . Why this matters, over mixing will deflate the cream and yield a heavy filling. A pitfall is vigorous stirring which flattens the texture; use gentle motions and stop when evenly incorporated.
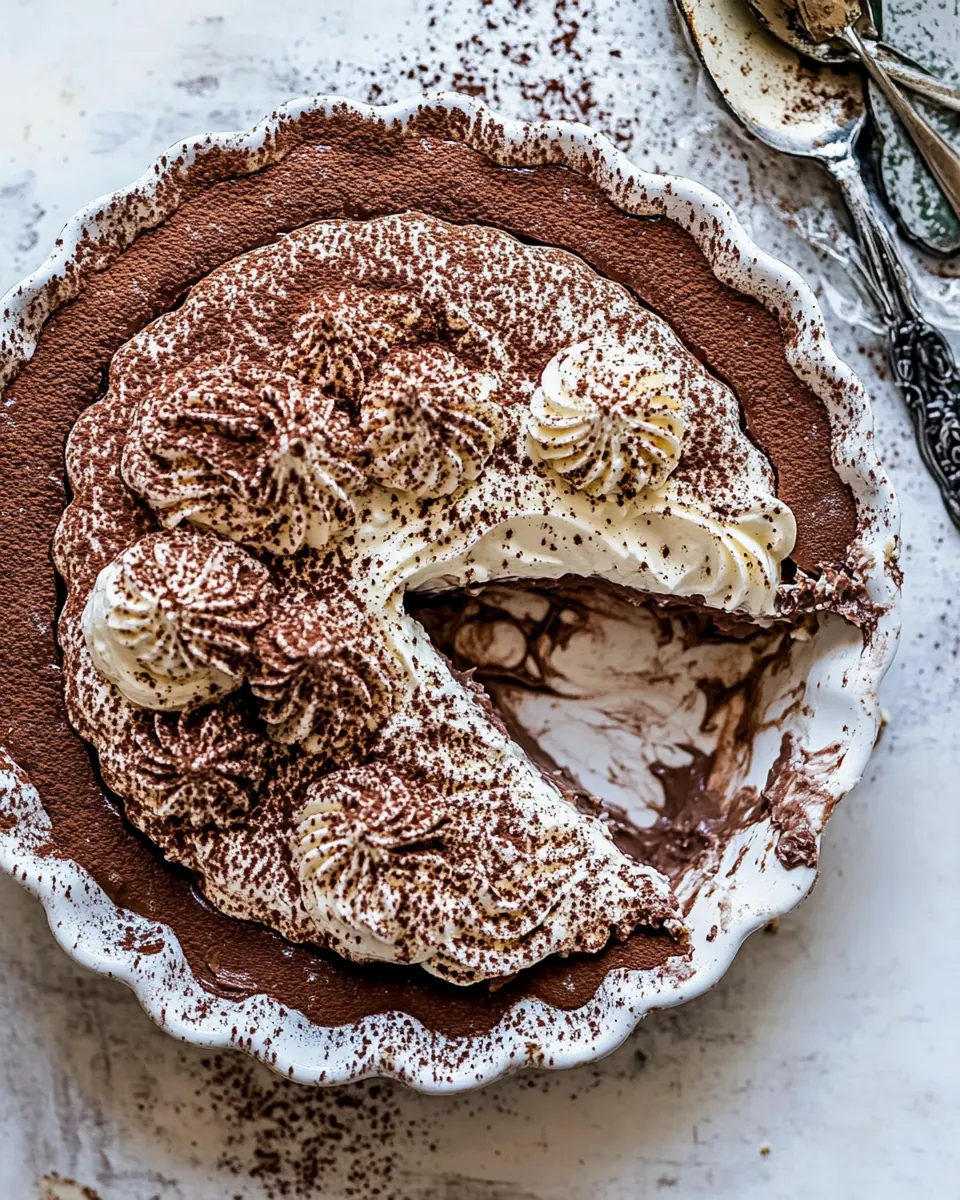
- Top with the remaining whipped coconut cream and sift cacao powder over the pie: The final topping should be billowy and set into soft peaks, providing a cool contrast to the rich filling. Sifting a light dust of cacao powder adds a bitter, aromatic finish and handsome presentation. Why this matters, the topping balances sweetness and creates a professional look. Avoid piling too much cream which can overwhelm the slice and hide the pie layers.
- Serve immediately or refrigerate for up to 2 days: When you slice the pie you will see clean layers of crust, glossy chocolate filling, and cloud like cream. The flavor is freshest within the first two days; beyond that the crust may soften slightly. Why this matters, serving within this window keeps the best texture and flavor. A mistake is leaving it too long at room temperature which can make the filling loose; keep refrigerated until serving.
Pro Tips and Tweaks
A few practical adjustments can elevate your pie from very good to unforgettable. Below are focused tips that address texture, flavor, and presentation so you can adapt the recipe to your kitchen and preferences.
- Choose the right nuts, brazil nuts yield a creamier, milder base while hazelnuts give a more aromatic, toasted note; either will toast beautifully in the oven.
- Bloom gelatin properly, sprinkle it over the coconut milk and let it sit for at least five minutes to hydrate so it dissolves smoothly when warmed.
- Temper slowly, when combining warm milk with egg yolks always add one ladle at a time while whisking to prevent scrambled bits and ensure a silky custard.
- Chill coconut cans overnight, cold cans separate into thick cream and watery liquid, allowing you to scoop up stable cream for whipping.
- Fold with care, use gentle, lifting motions to combine whipped coconut cream into the filling to keep the airy texture intact.
Perfect Matches for Dark Chocolate Chiffon Pie
This pie is versatile enough to be the centerpiece of dessert courses, yet subtle enough to follow a refined meal. Below are serving ideas, pairings, and storage notes to help you present it beautifully.
- After a rich dinner, serve a modest slice to let the deep chocolate finish the meal without feeling heavy, pairing it with strong black coffee for balance.
- For holiday gatherings, present the pie alongside light fruit salads or citrus segments to contrast the chocolate and refresh the palate between bites.
- Make ahead convenience, refrigerate overnight after filling so you can top the pie just before serving and reduce last minute prep.
- Storage tip, keep covered in the refrigerator for up to two days to maintain topping structure and filling stability; the crust may soften slightly with time.
- Occasion fit, ideal for celebrations, dinner parties, and when you want a dessert that feels special yet is manageable to make the day before.
- Seasonal pairing, works well year round; in warmer months serve chilled slices with a mint sprig, and in cooler months accent with spiced nuts.
FAQ
Conclusion
Dark Chocolate Chiffon Pie stands out because it balances intense chocolate with an airy, cloud like texture and a toasty nut crust. The combination of 100 percent cacao, full fat coconut elements, and careful technique yields a dessert that feels both indulgent and light. I encourage you to give it a try, follow the gentle tempering and chilling steps, and enjoy the way the flavors deepen overnight. When you slice into that glossy filling and airy topping, you will see why this has become a favorite for celebrations and quiet evenings alike.

Dark Chocolate Chiffon Pie
Equipment
- Oven
- Food Processor
- 9-inch pie pan
- Saucepan
- Whisk
Ingredients
- 1/4 cup coconut oil, melted, plus more for greasing Melted and used to bind and grease the crust, adding a subtle coconut richness and tender texture to the pie; helps set the nut-based crust while keeping it pliable. Also used to grease pans to prevent sticking and contribute a smooth mouthfeel in the finished dessert.
- 2 1/4 cups brazil nuts or hazelnuts Ground or blended to form the base of the crust, providing structure, natural oils, and a rich, nutty flavor; contributes crunch and body while holding together when combined with the coconut oil and date paste. Choose either nuts interchangeably to adjust flavor profile without changing texture or functionality.
- 3 tablespoons date paste Sweet paste used to naturally bind the crust ingredients and add concentrated caramel-like sweetness; replaces refined sugars while helping the crust hold its shape. Adds chewiness and moisture to the nut mixture for easier pressing into the pan.
- 1/4 teaspoon Himalayan pink salt Fine mineral salt used sparingly to enhance the overall flavors and balance sweetness; helps bring out the chocolate and nutty notes without overpowering. Sprinkle into crust or filling components to deepen taste and improve complexity.
- 1/2 cup 100% unsweetened cacao or cocoa powder Bitter cocoa ingredient used to provide the deep chocolate flavor and color in the filling; contributes richness and intensity without added sugar. Incorporate into wet components to dissolve and evenly flavor the custard base.
- 3 cups full-fat canned coconut milk Full-fat liquid offering creamy body and a tropical coconut flavor to the chocolate custard; supplies the fat needed for a silky texture and helps suspend cocoa and gelatin. Use the full-fat variety to ensure proper set and richness in the chiffon filling.
- 2 teaspoons gelatin powder Powdered gelling agent used to set and stabilize the custard, giving the pie its airy yet firm chiffon texture; hydrates and dissolves to create a delicate structure for the filling. Bloom and gently heat as directed to incorporate fully without lumps.
- 4 large egg yolks Egg yolks provide richness, natural emulsification, and a silky texture to the chocolate filling; help thicken the custard when tempered with hot liquid. Whisk thoroughly to ensure smooth incorporation and contribute a golden color and stability.
- 1/2 cup maple syrup Liquid sweetener used to sweeten the filling while contributing a subtle maple character; balances the bitterness of unsweetened cocoa and bitterness of cacao. Adjust quantity cautiously to achieve desired sweetness and preserve chocolate intensity.
- 1 teaspoon vanilla extract Aromatic flavoring added in small quantity to brighten and round out the chocolate filling; imparts a warm, familiar vanilla note that complements cocoa. Stir in after heating to preserve delicate aromatic compounds and enhance overall flavor complexity.
- 2 ounces 100% cacao unsweetened baking chocolate, roughly chopped High-percentage unsweetened baking chocolate used for intense chocolate depth and glossy texture in the filling; melts into the custard to create a rich base and luxurious mouthfeel. Chop roughly to ensure even, rapid melting when combined with warm liquid.
- 2 tablespoons 100% unsweetened cacao or cocoa powder, plus more for topping Additional cocoa powder used to intensify chocolate flavor and adjust thickness of the filling or topping; provides dry chocolate solids to boost color and taste. Reserve some for dusting the finished pie to add visual contrast and a concentrated chocolate bite.
- 1/4 teaspoon Himalayan pink salt A second measure of fine mineral salt used to season and balance the topping or filling, amplifying chocolate and coconut flavors; ensures consistent seasoning across layers. Add carefully to avoid over-salting while enhancing overall flavor nuance.
- 4 cups coconut whipped cream Light, airy coconut-based topping that provides volume and a creamy, dairy-free finish; adds contrasting texture and mild coconut sweetness to the rich chocolate filling. Whip to soft peaks and spread or pipe over the chilled pie for an elegant presentation.
- 2 cans (13.5 ounces) full fat canned coconut, refrigerated overnight Canned full-fat coconut refrigerated to separate solids for making thick coconut cream; solid portion becomes the base for coconut whipped cream or a stabilizing layer. Chill overnight to ensure proper separation and maximum cream yield for whipping.
- 2 tablespoons maple syrup Small amount of liquid sweetener used to gently sweeten the coconut cream without overpowering; balances the coconut's natural flavor and enhances overall sweetness control. Fold into chilled coconut solids before whipping to distribute sweetness evenly.
- 1 tablespoon vanilla extract Concentrated flavoring added to the coconut cream to impart a warm vanilla note and round out the topping's sweetness; complements the chocolate and enhances aromatic appeal. Stir into the coconut solids prior to whipping to ensure even flavor distribution.
Instructions
- Preheat the oven to 350 degrees. Generously grease a 9-inch pie pan with coconut oil. To make the crust. Combine the nuts, coconut oil, date paste, salt, and cacao powder in a food processor and pulse until the mixture forms a ball. Press the dough into the pie pan and bake for 10-12 minutes, until fragrant and set. Set aside to cool.: You will notice a warm, dry heat build in the oven as it approaches 350 degrees , which is ideal for toasting and setting the nut crust without burning it. The smell of nuts will amplify once the crust goes in, becoming toasted and aromatic in about 10 to 12 minutes. Why this matters, the gentle bake firms the crust so it holds the filling without becoming rock hard, producing a crisp edge and tender crumb interior. Troubleshooting tip, if your oven runs hot check with an oven thermometer because overbaking will create a bitter, dry crust. Listen for a faint nutty aroma and watch the edges for a subtle deepening in color as cues.
- To make the filling. Pour the coconut milk into a small saucepan and sprinkle the gelatin on top. Set aside and allow the gelatin to soften for about 5 minutes. In a medium bowl, whisk together the egg yolks, maple syrup, and vanilla, set aside. Take the saucepan of coconut milk and gelatin and whisk over low heat until smooth and warm. Take 1 cup of the warm coconut/gelatin mixture and add it to the egg yolk mixture, stirring constantly. Pour the entire egg yolk mixture back into the saucepan and mix well. Add the chopped cacao, cacao powder, and salt. Whisking constantly, bring the mixture to a simmer and cook for 3 to 5 minutes, until thickened. Transfer the filling to a bowl and refrigerate until cool but not quite set, about 40 minutes. Fold 2 cups of the coconut whipped cream into the filling, then pour the filling into the crust and refrigerate overnight, or for at least 8 hours. Top with the remaining whipped coconut cream and sift cacao powder over the pie. Serve immediately or refrigerate for up to 2 days.: The glossy sheen of coconut oil ensures the crust releases easily and the pie keeps its shape. Greasing prevents sticking and helps the crust brown evenly. Use a pastry brush or paper towel to coat the pan so the oil covers all corners. Why this technique matters, even coverage avoids hot spots that can burn the crust or cause uneven browning. A common mistake is skimping on grease which makes it hard to unmold the pie cleanly; be generous but not puddled.
- Combine the nuts, coconut oil, date paste, salt, and cacao powder in a food processor and pulse until the mixture forms a ball: As you pulse, the mixture will transform from loose crumbs into a cohesive, slightly tacky dough that clumps when pressed. The brazil nuts or hazelnuts release oils that help bind the mass, and you will see a sheen as the paste incorporates. Why this matters, the right consistency ensures the crust will press smoothly and hold together after baking. Overprocessing is a typical error because it can yield oily paste instead of a firm dough; stop pulsing once the mixture comes together into a ball.
- Press the dough into the pie pan and bake for 10 to 12 minutes, until fragrant and set: Press the nut mixture evenly across the bottom and up the sides to about the same thickness so it bakes uniformly, and place it in the center of the oven. The visual cues are a dry surface that no longer looks tacky, and a fragrant toasted scent that fills the kitchen. Why this matters, even thickness prevents thin spots that can crack when sliced, and it creates a sturdy platform for the filling. A common misstep is uneven pressing, which leads to collapsing sides; take time to press firmly and evenly.
- Set aside to cool: Cooling allows the crust to firm further and prevents the hot filling from melting it when poured in. You will feel the crust take on a slightly firmer bite and a cooler temperature as it rests. Why this pause matters, pouring hot filling into a warm crust risks softening the base and making the slice messy. If you rush this step, you may end up with a soggy edge, so let the crust cool to near room temperature before filling.
- Pour the coconut milk into a small saucepan and sprinkle the gelatin on top: When you sprinkle gelatin powder over the top, it will look like a dusting floating on the surface before it hydrates. Allowing it to sit for about 5 minutes lets it bloom, becoming spongy and ready to dissolve smoothly. Why this matters, properly bloomed gelatin ensures a lump free incorporation and stable custard. A frequent mistake is skipping this rest, which can result in gritty gelatin pockets; be patient and let it swell first.
- Whisk together the egg yolks, maple syrup, and vanilla, set aside: The mixture will become slightly paler and glossy as you whisk, showing that the yolks have incorporated air and sugar. This premix will temper the hot milk and prevent curdling. Why this technique matters, pre mixing controls the temperature transition for the yolks so they thicken into a silky custard rather than scramble. If you rush the next step and add hot liquid too quickly, you risk tiny cooked bits in the filling.
- Whisk over low heat until smooth and warm: As you heat the coconut milk with the gelatin, you will see the gelatin dissolve and the mixture become uniformly glossy and slightly steamy, but not boiling. Keeping the heat low protects the delicate milk from scorching. Why this matters, a smooth, warm base integrates with the yolk mixture without shocking it. The usual error here is overheating; boiling will break down coconut milk and create unpleasant texture.
- Take 1 cup of the warm coconut gelatin mixture and add it to the egg yolk mixture, stirring constantly: When you slowly add the warm liquid, the egg yolks will adjust to the new temperature and the mixture will become silkier and warmer with each pour. This tempering step prevents scrambling. Why this matters, gradual incorporation maintains a smooth custard. A common mistake is dumping hot liquid fast, which cooks the yolks into curds; stir continuously and add slowly.
- Pour the entire egg yolk mixture back into the saucepan and mix well: Returning the blended yolk mixture to the saucepan creates a unified custard base that will thicken gently as you heat it. You will notice the mixture becoming more viscous and glossy as proteins engage. Why this matters, even heating and mixing ensures a velvety texture that will set properly with the gelatin. Avoid high heat which can cause separation or over thickening.
- Add the chopped cacao, cacao powder, and salt: As the baking chocolate melts and the cacao powder dissolves, the mixture will turn a deep, glossy chocolate color and the aroma will intensify. Stir until the texture is entirely smooth and homogeneous. Why this matters, fully melted chocolate prevents grainy texture and integrates intense flavor. A typical mistake is insufficient stirring, which leaves unmelted flecks of chocolate that affect mouthfeel.
- Whisking constantly, bring the mixture to a simmer and cook for 3 to 5 minutes, until thickened: You will see the custard cling slightly to the whisk and a slow stream will fall back, indicating proper thickness. The simmer will also concentrate flavors, making the chocolate deeper and more complex. Why this matters, this controlled thickening develops the right body so the filling sets while remaining creamy. Overcooking can over thicken or curdle the custard, so watch closely and keep stirring.
- Transfer the filling to a bowl and refrigerate until cool but not quite set, about 40 minutes: Cooling gives the flavors time to mellow and the gelatin to begin working. The surface will lose heat and the filling will thicken slightly, moving from pourable to spoonable. Why this matters, pouring overly warm filling into the crust can cause slippage, while fully set filling will not allow you to fold in whipped cream. A common error is impatience; give the filling the time it needs to reach the ideal texture.
- Fold 2 cups of the coconut whipped cream into the filling, then pour the filling into the crust and refrigerate overnight, or for at least 8 hours: Folding creates ribbons of cloud like cream that lighten the dense custard, and the visual cue is streaks of cream that slowly disappear as you work. Gently fold to preserve the air and softness of the coconut whipped cream . Why this matters, over mixing will deflate the cream and yield a heavy filling. A pitfall is vigorous stirring which flattens the texture; use gentle motions and stop when evenly incorporated.
- Top with the remaining whipped coconut cream and sift cacao powder over the pie: The final topping should be billowy and set into soft peaks, providing a cool contrast to the rich filling. Sifting a light dust of cacao powder adds a bitter, aromatic finish and handsome presentation. Why this matters, the topping balances sweetness and creates a professional look. Avoid piling too much cream which can overwhelm the slice and hide the pie layers.
- Serve immediately or refrigerate for up to 2 days: When you slice the pie you will see clean layers of crust, glossy chocolate filling, and cloud like cream. The flavor is freshest within the first two days; beyond that the crust may soften slightly. Why this matters, serving within this window keeps the best texture and flavor. A mistake is leaving it too long at room temperature which can make the filling loose; keep refrigerated until serving.
Notes
- Choose the right nuts, brazil nuts yield a creamier, milder base while hazelnuts give a more aromatic, toasted note; either will toast beautifully in the oven.
- Bloom gelatin properly, sprinkle it over the coconut milk and let it sit for at least five minutes to hydrate so it dissolves smoothly when warmed.
- Temper slowly, when combining warm milk with egg yolks always add one ladle at a time while whisking to prevent scrambled bits and ensure a silky custard.
- Chill coconut cans overnight, cold cans separate into thick cream and watery liquid, allowing you to scoop up stable cream for whipping.
- Fold with care, use gentle, lifting motions to combine whipped coconut cream into the filling to keep the airy texture intact.