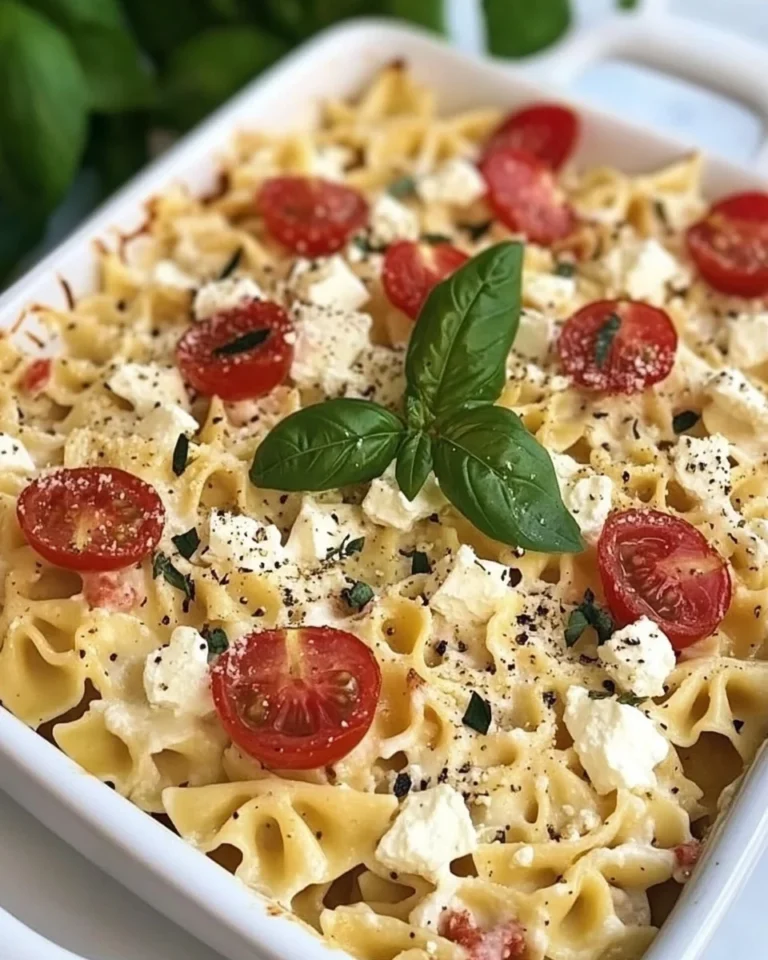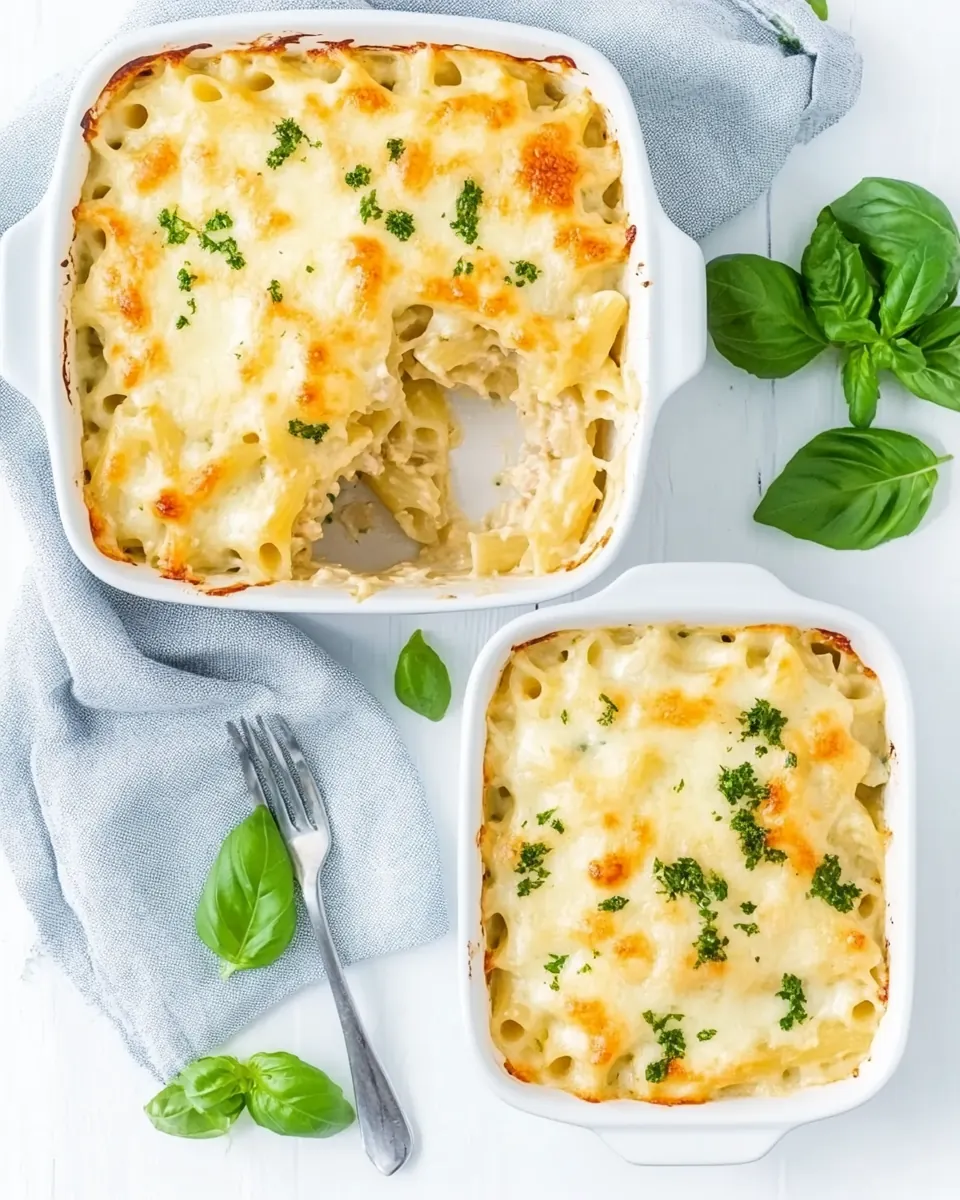
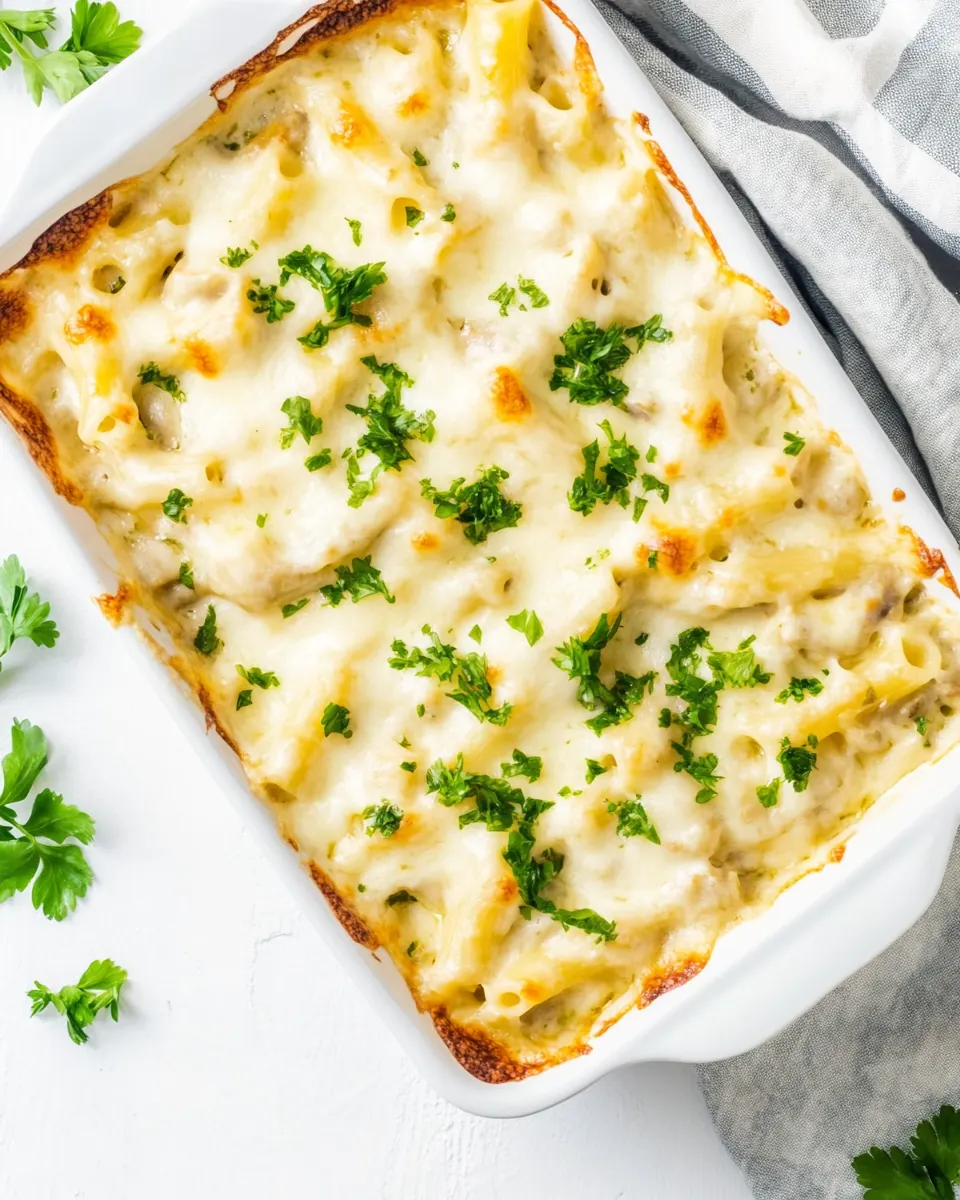
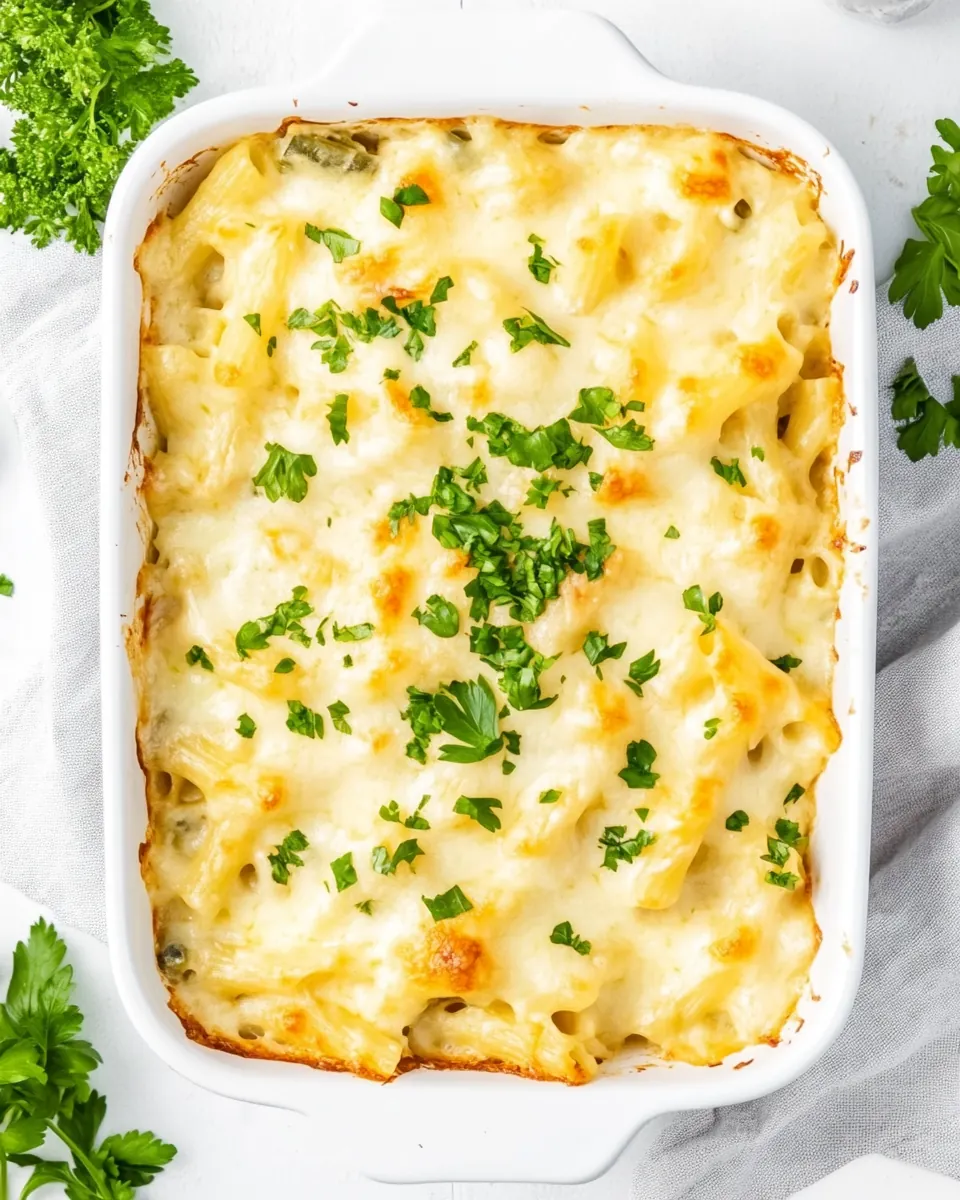
Creamy Tuna Pasta Bake
Creamy Tuna Pasta Bake is the kind of dish I turn to when I want comfort without a fuss. The first time I made it, I remember juggling a work call while the kitchen filled with a warm, milky aroma, and by the time I hung up the house smelled like a small neighborhood bakery meets a cozy diner. That savory, cheesy scent hooked me immediately, and the way the pasta held pockets of creamy sauce felt like a hug on a plate.
I have a soft spot for recipes that reward a little patience with big flavor, and this Creamy Tuna Pasta Bake does exactly that. I often make it on a rainy afternoon when I want something reliable, or when friends drop by unexpectedly because it scales up so nicely. I still smile thinking about the first forkful, where the salty tang of tuna met the sweet burst of sweetcorn, and the creamy sauce threaded everything together.
Over the years I have tweaked timing and texture, and I always come back to the same basics: good pasta cooked to stubbornly firm al dente, a velvety white sauce, and a crisp golden topping. I like to sprinkle a <strong>handfulstrong> of <strong>choppedstrong> parsley at the end to brighten the dish, and sometimes I tuck the baking dish under the grill for a couple of minutes to get those irresistible brown spots. You will find that this recipe is forgiving, practical, and deeply satisfying, whether served for a family dinner or portioned into containers for quick lunches.
Recipe Snapshot
30 mins
5 mins
25 mins
Medium
450 kcal
Italian
Gluten-Free, Low FODMAP
Dinner
Oven, Large pan, Saucepan, Baking dish, Colander
Why We Love This Creamy Tuna Pasta Bake
Comforting and Familiar
I love how Creamy Tuna Pasta Bake hits that universal comfort note. The combination of tender rigatoni pasta and a lush white sauce feels nostalgic, and I often serve it when I want to recreate that homey, stick to your ribs feeling. It’s an easy reach for anyone who grew up on simple baked pasta dishes, and it rarely fails to satisfy hungry guests.
Fast, Yet Impressive
What excites me is how quickly the dish comes together. With just a little prep and a short bake, you get a meal that tastes like it took longer. I use <strong>warmedstrong> milk when making the sauce because it shortens the thickening time and keeps the sauce silky, so you end up with something that feels restaurant worthy without the effort.
Balanced Textures
The contrast between the creamy sauce and the occasional crunchy top layer is something I always aim for. The cheddar and Parmesan cheese melt into the sauce, while a quick stint under the grill gives you golden, slightly crisp patches. I find that this textural play makes every bite interesting, and it encourages people to go back for seconds.
Adaptable and Practical
I’m fond of dishes that adapt easily to what’s on hand, and this bake does just that. Whether you’re using jarred tuna or <strong>cannedstrong> <strong>chunksstrong>, throwing in frozen peas and sweetcorn makes it a one dish meal with color and nutrition. It stores and reheats well, which means leftovers become effortless lunches.
Family Friendly
Finally, this recipe is a dependable crowd pleaser. Kids tend to love its creamy nature, while adults appreciate the savory notes from the cheeses and tuna. I often double the batch for gatherings, because it’s one of those dishes that disappears fast, every time.
Ingredients to Make <strong>Creamy Tuna Pasta Bakestrong>
These ingredients are chosen to create a balanced, creamy bake that is both rich and approachable. The pasta is the workhorse, holding pockets of sauce, while the roux based white sauce brings a smooth, velvety texture. The cheeses provide savory depth and a golden crust when baked, and the frozen vegetables add sweetness and color without extra fuss. The tuna offers protein and a salty, briny counterpoint that keeps the dish from feeling one dimensional.
- 400 g rigatoni pasta: Boil until al dente to provide a sturdy base for holding sauce and mix-ins throughout the bake; drain and toss with a little <strong>butterstrong> to prevent sticking before combining with sauce and toppings.
- 50 g butter: Melt gently to create the fat component of the roux and add richness to the sauce; use to sauté if desired and to enrich the béchamel for a creamy texture.
- 50 g all-purpose flour: Whisk into the melted <strong>butterstrong> to form a roux that thickens the milk into a smooth béchamel; cook briefly to remove raw flour taste but avoid browning to keep sauce pale.
- 600 ml fresh whole milk, warmed: Heat slowly while whisking into the roux to create a silky béchamel base; warming prevents lumps and helps achieve a smooth, creamy sauce that clings to the pasta.
- Sea salt and freshly cracked black pepper, to taste: Season gradually while cooking and adjust at the end to enhance all flavors; use both sea salt and <strong>freshlystrong> <strong>crackedstrong> black <strong>pepperstrong> to balance creaminess and cut through richness.
- a generous pinch of freshly grated nutmeg: Grate and add a pinch to the béchamel to introduce warm, aromatic undertones; <strong>nutmegstrong> complements dairy and elevates the overall depth of the creamy sauce.
- 125 g strong cheddar, grated: Stir into the hot béchamel to melt and create a sharp, creamy backbone for the pasta bake; strong <strong>cheddarstrong> contributes flavor, body, and a golden finish when baked.
- 125 g Parmesan cheese, grated: Fold into the sauce or sprinkle over the top to add umami, nuttiness, and a gratin-like crust when melted and browned under heat.
- 220 g tuna fillets in jars (or canned tuna chunks), drained and flaked: Drain and flake into pieces to distribute protein and a savory, briny flavor throughout the dish; incorporate gently to preserve texture without becoming dry.
- 200 g frozen sweetcorn drained: Thaw and drain before folding in to add sweet, crisp pops of texture and color; <strong>sweetcornstrong> pairs with tuna and <strong>cheesestrong> for balanced sweetness in each bite.
- 200 g frozen peas: Add thawed peas to introduce fresh, slightly sweet flavor and tender bursts that contrast creamy sauce; stir in near the end of cooking to retain their color and texture.
- handful fresh parsley, chopped: Chop and scatter over the finished bake to provide a fresh, herbaceous finish and a bright contrast to the rich, cheesy sauce.
Preparation Steps for <strong>Creamy Tuna Pasta Bakestrong>
These steps will walk you through achieving a silky sauce, perfectly textured pasta, and a golden baked top. I like to work methodically and taste as I go, because small adjustments make a big difference in the final balance of flavors.
- Heat the oven to 180°C/160°C (fan) or gas mark 4.: The kitchen fills with warmth and a faint oven hum when you preheat, and doing this early ensures the dish goes in as soon as it is assembled. Preheating is important because it guarantees an even bake, and a cold oven will lengthen cooking time and change the texture of the sauce on top. A common mistake is skipping preheat, which causes uneven browning. If your oven runs hot, reduce the temperature slightly and check early to avoid over browning.
- Place a large pan of water over high heat and bring to a boil. Lightly season with sea salt, then add the pasta and cook for about 7-9 minutes.: You will hear a lively rolling boil and see tiny bubbles racing, that is when the pasta will move freely and cook evenly. Salting the water seasons the <strong><strong>rigatonistrong> pastastrong> from the inside out, which is crucial because the bake will not absorb much external seasoning. The sound changes as the pasta softens, and the surface will look plumper. Watch the pot closely so it does not foam over, and stir occasionally to keep the pasta from sticking together.
- Look at the instructions on your pasta packaging. See how long it tells you to boil the rigatoni for, and drain the pasta three minutes before this time.: Trusting package timing helps you hit perfect al dente, but pulling the pasta three minutes early is key to preserve texture after baking. The pasta will continue to cook in the sauce and oven, so this avoids a mushy final result. A helpful test is to bite a piece and notice a small white center, which means it is just firm enough. Overcooking here is the most common mistake, so set a timer and test a minute earlier than you think.
- For the white sauce, melt the butter in your saucepan and stir in the plain flour to make a "roux", which is basically the base of the sauce.: The sizzling sound when the <strong>butterstrong> meets the pan is your cue that the roux will form correctly, and once you add the all <strong>purposestrong> flour it should look like a smooth paste. Cook it briefly to remove the raw flour taste, stirring constantly so it does not brown. This step controls the final sauce texture, because a well made roux thickens evenly. If the roux browns, it will alter the sauce color and flavor, so keep the heat moderate.
- Once you have cooked the roux for a minute (don’t let it brown), slowly stir in 600 ml of milk, and stir, gently but continuously, until the sauce thickens, about 5-7 minutes.: When you begin to add the <strong>warmedstrong> fresh whole milk it may hiss softly, and you should whisk steadily to create a smooth emulsion. Over several minutes the sauce will transform from thin and glossy to silky and coating the back of a spoon. Patience matters here because adding milk too fast invites lumps. If lumps appear, lift the pan off heat and whisk vigorously to break them up, or pass the sauce through a fine sieve.
- If the sauce starts bubbling, turn the heat to low and continue to stir until the sauce has reached a silky creamy consistency.: Gentle simmering shows as tiny, consistent bubbles and the sauce will deepen in aroma, smelling milky and slightly toasty. Keeping the heat low preserves the silky mouthfeel and prevents the sauce from tightening or splitting. It will cling to the spoon and form a ribbon when lifted. Avoid high heat which can cause the proteins to seize and the sauce to become grainy.
- Turn the heat off and season with sea salt, freshly cracked black pepper and freshly grated nutmeg to taste.: Once off the heat, the sauce settles and the aroma opens up, making it easier to judge seasoning. Start modestly with sea salt because the cheeses and tuna will add salinity later. The <strong>freshlystrong> <strong>crackedstrong> black <strong>pepperstrong> adds a bright bite, while the <strong>freshlystrong> grated <strong>nutmegstrong> gives a subtle warmth that rounds the dairy notes. Over seasoning is common, so taste and adjust gradually.
- Once the white sauce is ready, stir in 2/3 of the cheddar and 2/3 of the parmesan cheese, and set the sauce aside.: Adding the grated <strong>cheddarstrong> and <strong>Parmesanstrong> <strong>cheesestrong> off heat preserves their texture and prevents them from turning stringy. The cheeses melt into the sauce, lending depth and that irresistible savory character, while the reserved third is for a golden finish. If the sauce seems thicker after <strong>cheesestrong>, a splash of warm milk will loosen it gently. Don’t add the remaining <strong>cheesestrong> yet, because you want a mix of melty interior and browned top.
- By this time, your rigatoni should be ready and super al dente.: The <strong><strong>rigatonistrong> pastastrong> will be firm with a slight resistance at the center, and it will have a fuller mouthfeel than overcooked pasta. Drain it quickly to stop cooking, and avoid rinsing so the sauce can cling to the surface. A common trap is leaving it in the colander too long, which can cool it down and make it stiffer to mix; toss it into the bowl while still warm for best integration.
- Drain and transfer the pasta into a large bowl, add in the tuna, sweetcorn and peas.: When you mix the warm pasta with the tuna , <strong>sweetcornstrong> , and peas , steam rises and helps bring the frozen vegetables to life. Breaking up the tuna into flakes while combining makes distribution easier and ensures every forkful has protein. Stir gently so you do not mash the vegetables or make the pasta gluey; a light hand preserves texture. If the mixture feels dry, don’t add more sauce yet, just proceed to the next step where you fold everything together.
- Stir in 1/2 of the white sauce and mix until combined. You can also add some chopped parsley if you like.: The first addition of the velvety sauce brings silkiness and helps coat each piece of <strong><strong>rigatonistrong> pastastrong> . Mixing now allows you to check seasoning and texture before committing to the baking dish. The steam will carry aromas of <strong>cheesestrong> and <strong>nutmegstrong>, and the <strong>parsleystrong> adds a fresh green note. A common mistake is adding all the sauce at once, which can lead to an overly wet bake; reserve some sauce for topping so the surface browns beautifully.
- Transfer the ingredients in a 6 x 8 inches baking dish, and top with the remaining white sauce.: Moving the mixture into the baking dish releases a soft, warm scent and you will see pockets of sauce settle between the pasta tubes. Topping with the reserved sauce ensures a luscious, even surface for browning. Press lightly so the top is level, but avoid compacting which can make the bake dense. If the dish looks soupy, check that the reserved sauce was not overly thin; a short simmer will thicken it slightly.
- Sprinkle the remaining cheddar and parmesan cheese on top, and your pasta is ready to hit the oven.: The grated <strong>cheddarstrong> and <strong>Parmesanstrong> <strong>cheesestrong> will melt into a golden, savory crust, smelling irresistibly cheesy as it bakes. Even distribution helps create an even brown color and those tempting crisp spots. Avoid piling too much <strong>cheesestrong> in one area which can over brown; aim for a balanced layer so each serving has a bit of crispy top.
- Bake for around 15-20 minutes, or until the cheese on top is golden brown. If you want some nice crunchy brown spots, set the baking dish under the grill for 2-3 minutes extra.: During baking you will notice the sauce bubbling gently at the edges and the top turning a warm golden brown, which signals readiness. The short grill finish creates focused caramelized patches that add delightful texture. Watch closely under the grill because it can go from golden to burnt quickly; remove as soon as you see even brown spots and allow the dish to rest a few minutes before serving to let the sauce settle.
Pro Tips and Tweaks

I like to keep a few practical tweaks up my sleeve to make this dish shine every time. These tips help with texture, storage, and flavor balance so you get consistent results whether you are cooking for two or doubling the batch.
- Drain and flake the tuna well. Excess liquid from the tuna will make the bake watery, so press lightly with a spoon or paper towel to remove moisture before adding. Flaking the fish into small pieces ensures it distributes evenly through the pasta, giving every bite a balance of fish and sauce.
- Use warmed milk for a silky sauce. Adding room temperature or <strong>warmedstrong> fresh whole milk prevents the sauce from seizing and reduces the time it takes to thicken. It also helps you achieve a satin texture that clings to the rigatoni pasta, rather than pooling around it.
- Reserve some cheese for topping. Keeping a third of the grated cheddar and Parmesan cheese back for the top yields a better golden crust, while the rest enriches the interior. This approach gives you both creamy melt and crunchy browned bites.
- Don’t overcook the pasta. Pulling the pasta three minutes early ensures it finishes perfectly in the oven. Overcooked pasta turns mushy after baking, which robs the dish of its satisfying texture.
- Let it rest before serving. Allow the bake to sit for a few minutes out of the oven so the sauce thickens slightly and the slices hold together. This also cools it to a comfortable eating temperature and concentrates the flavors.
Great Combinations for <strong>Creamy Tuna Pasta Bakestrong>
This bake pairs well with bright, simple sides and makes a comforting main for many occasions. Below are serving ideas, storage guidance, and pairing suggestions to help you plan meals around it. These combinations cover casual weeknight dinners as well as relaxed weekend gatherings.
- Simple green salad: A crisp salad with a light vinaigrette balances the creamy richness, offering a refreshing contrast that cleanses the palate between bites.
- Steamed green vegetables: Lightly steamed peas or green beans bring freshness and a tender snap, complementing the soft textures of the bake.
- Family dinner: Serve this Creamy Tuna Pasta Bake for a cozy family meal, paired with warm bread for mopping up any leftover sauce.
- Meal prep option: Portion into individual containers once cooled for grab and go lunches; reheat in the oven briefly to recover crispness on top.
- Storage tips: Keep leftovers in an airtight container in the refrigerator for a couple of days, or freeze in single portions for up to one month to maintain quality.
- Seasonal pairing: This works beautifully in colder months like winter when you want something warming and satisfying, though it is welcome year round.
FAQ
Conclusion
This recipe stands out for its creamy sauce, melty cheese, and the comforting mix of tuna with sweetcorn and peas. It’s an approachable bake that delivers big flavor while being simple to prepare, making it ideal for busy weeknights or casual gatherings. Give it a try and you might find it becomes one of your go to meals for feeding a few or saving as make ahead portions. The balance of texture, warmth, and savory notes makes it easy to love, and once you taste that golden top and silky interior, you will likely return to this recipe again and again.

Creamy Tuna Pasta Bake
Equipment
- Oven
- Large Pan
- Saucepan
- Baking Dish
- Colander
Ingredients
- 400 g rigatoni pasta Boil until al dente to provide a sturdy base for holding sauce and mix-ins throughout the bake; drain and toss with a little butter to prevent sticking before combining with sauce and toppings.
- 50 g butter Melt gently to create the fat component of the roux and add richness to the sauce; use to sauté if desired and to enrich the béchamel for a creamy texture.
- 50 g all-purpose flour Whisk into the melted butter to form a roux that thickens the milk into a smooth béchamel; cook briefly to remove raw flour taste but avoid browning to keep sauce pale.
- 600 ml fresh whole milk, warmed Heat slowly while whisking into the roux to create a silky béchamel base; warming prevents lumps and helps achieve a smooth, creamy sauce that clings to the pasta.
- Sea salt and freshly cracked black pepper, to taste Season gradually while cooking and adjust at the end to enhance all flavors; use both sea salt and freshly cracked black pepper to balance creaminess and cut through richness.
- a generous pinch of freshly grated nutmeg Grate and add a pinch to the béchamel to introduce warm, aromatic undertones; nutmeg complements dairy and elevates the overall depth of the creamy sauce.
- 125 g strong cheddar, grated Stir into the hot béchamel to melt and create a sharp, creamy backbone for the pasta bake; strong cheddar contributes flavor, body, and a golden finish when baked.
- 125 g Parmesan cheese, grated Fold into the sauce or sprinkle over the top to add umami, nuttiness, and a gratin-like crust when melted and browned under heat.
- 220 g tuna fillets in jars (or canned tuna chunks), drained and flaked Drain and flake into pieces to distribute protein and a savory, briny flavor throughout the dish; incorporate gently to preserve texture without becoming dry.
- 200 g frozen sweetcorn drained Thaw and drain before folding in to add sweet, crisp pops of texture and color; sweetcorn pairs with tuna and cheese for balanced sweetness in each bite.
- 200 g frozen peas Add thawed peas to introduce fresh, slightly sweet flavor and tender bursts that contrast creamy sauce; stir in near the end of cooking to retain their color and texture.
- handful fresh parsley, chopped Chop and scatter over the finished bake to provide a fresh, herbaceous finish and a bright contrast to the rich, cheesy sauce.
Instructions
- Heat the oven to 180°C/160°C (fan) or gas mark 4.: The kitchen fills with warmth and a faint oven hum when you preheat, and doing this early ensures the dish goes in as soon as it is assembled. Preheating is important because it guarantees an even bake, and a cold oven will lengthen cooking time and change the texture of the sauce on top. A common mistake is skipping preheat, which causes uneven browning. If your oven runs hot, reduce the temperature slightly and check early to avoid over browning.
- Place a large pan of water over high heat and bring to a boil. Lightly season with sea salt, then add the pasta and cook for about 7-9 minutes.: You will hear a lively rolling boil and see tiny bubbles racing, that is when the pasta will move freely and cook evenly. Salting the water seasons the rigatoni pasta from the inside out, which is crucial because the bake will not absorb much external seasoning. The sound changes as the pasta softens, and the surface will look plumper. Watch the pot closely so it does not foam over, and stir occasionally to keep the pasta from sticking together.
- Look at the instructions on your pasta packaging. See how long it tells you to boil the rigatoni for, and drain the pasta three minutes before this time.: Trusting package timing helps you hit perfect al dente, but pulling the pasta three minutes early is key to preserve texture after baking. The pasta will continue to cook in the sauce and oven, so this avoids a mushy final result. A helpful test is to bite a piece and notice a small white center, which means it is just firm enough. Overcooking here is the most common mistake, so set a timer and test a minute earlier than you think.
- For the white sauce, melt the butter in your saucepan and stir in the plain flour to make a "roux", which is basically the base of the sauce.: The sizzling sound when the butter meets the pan is your cue that the roux will form correctly, and once you add the all purpose flour it should look like a smooth paste. Cook it briefly to remove the raw flour taste, stirring constantly so it does not brown. This step controls the final sauce texture, because a well made roux thickens evenly. If the roux browns, it will alter the sauce color and flavor, so keep the heat moderate.
- Once you have cooked the roux for a minute (don’t let it brown), slowly stir in 600 ml of milk, and stir, gently but continuously, until the sauce thickens, about 5-7 minutes.: When you begin to add the warmed fresh whole milk it may hiss softly, and you should whisk steadily to create a smooth emulsion. Over several minutes the sauce will transform from thin and glossy to silky and coating the back of a spoon. Patience matters here because adding milk too fast invites lumps. If lumps appear, lift the pan off heat and whisk vigorously to break them up, or pass the sauce through a fine sieve.
- If the sauce starts bubbling, turn the heat to low and continue to stir until the sauce has reached a silky creamy consistency.: Gentle simmering shows as tiny, consistent bubbles and the sauce will deepen in aroma, smelling milky and slightly toasty. Keeping the heat low preserves the silky mouthfeel and prevents the sauce from tightening or splitting. It will cling to the spoon and form a ribbon when lifted. Avoid high heat which can cause the proteins to seize and the sauce to become grainy.
- Turn the heat off and season with sea salt, freshly cracked black pepper and freshly grated nutmeg to taste.: Once off the heat, the sauce settles and the aroma opens up, making it easier to judge seasoning. Start modestly with sea salt because the cheeses and tuna will add salinity later. The freshly cracked black pepper adds a bright bite, while the freshly grated nutmeg gives a subtle warmth that rounds the dairy notes. Over seasoning is common, so taste and adjust gradually.
- Once the white sauce is ready, stir in 2/3 of the cheddar and 2/3 of the parmesan cheese, and set the sauce aside.: Adding the grated cheddar and Parmesan cheese off heat preserves their texture and prevents them from turning stringy. The cheeses melt into the sauce, lending depth and that irresistible savory character, while the reserved third is for a golden finish. If the sauce seems thicker after cheese, a splash of warm milk will loosen it gently. Don’t add the remaining cheese yet, because you want a mix of melty interior and browned top.
- By this time, your rigatoni should be ready and super al dente.: The rigatoni pasta will be firm with a slight resistance at the center, and it will have a fuller mouthfeel than overcooked pasta. Drain it quickly to stop cooking, and avoid rinsing so the sauce can cling to the surface. A common trap is leaving it in the colander too long, which can cool it down and make it stiffer to mix; toss it into the bowl while still warm for best integration.
- Drain and transfer the pasta into a large bowl, add in the tuna, sweetcorn and peas.: When you mix the warm pasta with the tuna , sweetcorn , and peas , steam rises and helps bring the frozen vegetables to life. Breaking up the tuna into flakes while combining makes distribution easier and ensures every forkful has protein. Stir gently so you do not mash the vegetables or make the pasta gluey; a light hand preserves texture. If the mixture feels dry, don’t add more sauce yet, just proceed to the next step where you fold everything together.
- Stir in 1/2 of the white sauce and mix until combined. You can also add some chopped parsley if you like.: The first addition of the velvety sauce brings silkiness and helps coat each piece of rigatoni pasta . Mixing now allows you to check seasoning and texture before committing to the baking dish. The steam will carry aromas of cheese and nutmeg, and the parsley adds a fresh green note. A common mistake is adding all the sauce at once, which can lead to an overly wet bake; reserve some sauce for topping so the surface browns beautifully.
- Transfer the ingredients in a 6 x 8 inches baking dish, and top with the remaining white sauce.: Moving the mixture into the baking dish releases a soft, warm scent and you will see pockets of sauce settle between the pasta tubes. Topping with the reserved sauce ensures a luscious, even surface for browning. Press lightly so the top is level, but avoid compacting which can make the bake dense. If the dish looks soupy, check that the reserved sauce was not overly thin; a short simmer will thicken it slightly.
- Sprinkle the remaining cheddar and parmesan cheese on top, and your pasta is ready to hit the oven.: The grated cheddar and Parmesan cheese will melt into a golden, savory crust, smelling irresistibly cheesy as it bakes. Even distribution helps create an even brown color and those tempting crisp spots. Avoid piling too much cheese in one area which can over brown; aim for a balanced layer so each serving has a bit of crispy top.
- Bake for around 15-20 minutes, or until the cheese on top is golden brown. If you want some nice crunchy brown spots, set the baking dish under the grill for 2-3 minutes extra.: During baking you will notice the sauce bubbling gently at the edges and the top turning a warm golden brown, which signals readiness. The short grill finish creates focused caramelized patches that add delightful texture. Watch closely under the grill because it can go from golden to burnt quickly; remove as soon as you see even brown spots and allow the dish to rest a few minutes before serving to let the sauce settle.
Notes
- Drain and flake the tuna well. Excess liquid from the tuna will make the bake watery, so press lightly with a spoon or paper towel to remove moisture before adding. Flaking the fish into small pieces ensures it distributes evenly through the pasta, giving every bite a balance of fish and sauce.
- Use warmed milk for a silky sauce. Adding room temperature or warmed fresh whole milk prevents the sauce from seizing and reduces the time it takes to thicken. It also helps you achieve a satin texture that clings to the rigatoni pasta, rather than pooling around it.
- Reserve some cheese for topping. Keeping a third of the grated cheddar and Parmesan cheese back for the top yields a better golden crust, while the rest enriches the interior. This approach gives you both creamy melt and crunchy browned bites.
- Don’t overcook the pasta. Pulling the pasta three minutes early ensures it finishes perfectly in the oven. Overcooked pasta turns mushy after baking, which robs the dish of its satisfying texture.
- Let it rest before serving. Allow the bake to sit for a few minutes out of the oven so the sauce thickens slightly and the slices hold together. This also cools it to a comfortable eating temperature and concentrates the flavors.