Christmas Tree Pretzels
Christmas Tree Pretzels are the kind of small, joyful treat I reach for when I want something festive and fuss free. The very first time I made them I was rushing between wrapping gifts and stirring a pot, but these pretzels let me carve out a tiny moment of creativity. I remember lining up a row of crunchy pretzel sticks and thinking about how a few pipes of melted candy could turn each one into a miniature holiday ornament.
That day I put on a playlist, set a mug of tea beside me, and made a production line of dipping, piping, and sprinkling. The house smelled faintly of cocoa, the candy clicked softly as it cooled, and my kids insisted on taste testing each tiny tree. Making Christmas Tree Pretzels became our little ritual, a way to slow down even when the season was hectic. I loved how quick the project was, and how the results looked like something from a bakery even though they were made on my kitchen counter.
Recipe Snapshot
7 mins
5 mins
2 mins
Easy
150 kcal
American
Gluten-Free, Vegan
Desserts
Microwave-safe bowl, Piping bag, Baking sheet, Parchment paper
The Magic of This Christmas Tree Pretzels
They are impossibly simple
I adore recipes that do not require a long commitment, and Christmas Tree Pretzels fit that bill. You can assemble dozens in about an hour including setting time, so they are perfect for last minute holiday entertainments. I often make a double batch when guests are expected, because they disappear quickly.
Great for all ages
These treats are a hit with kids and grown ups alike. Children love the decorating portion, and I enjoy watching their creativity run wild with Rainbow and Christmas sprinkles and Candy stars. The activity doubles as a bonding exercise, and I find it becomes a party centerpiece where everyone pitches in.
Visually festive, yet versatile
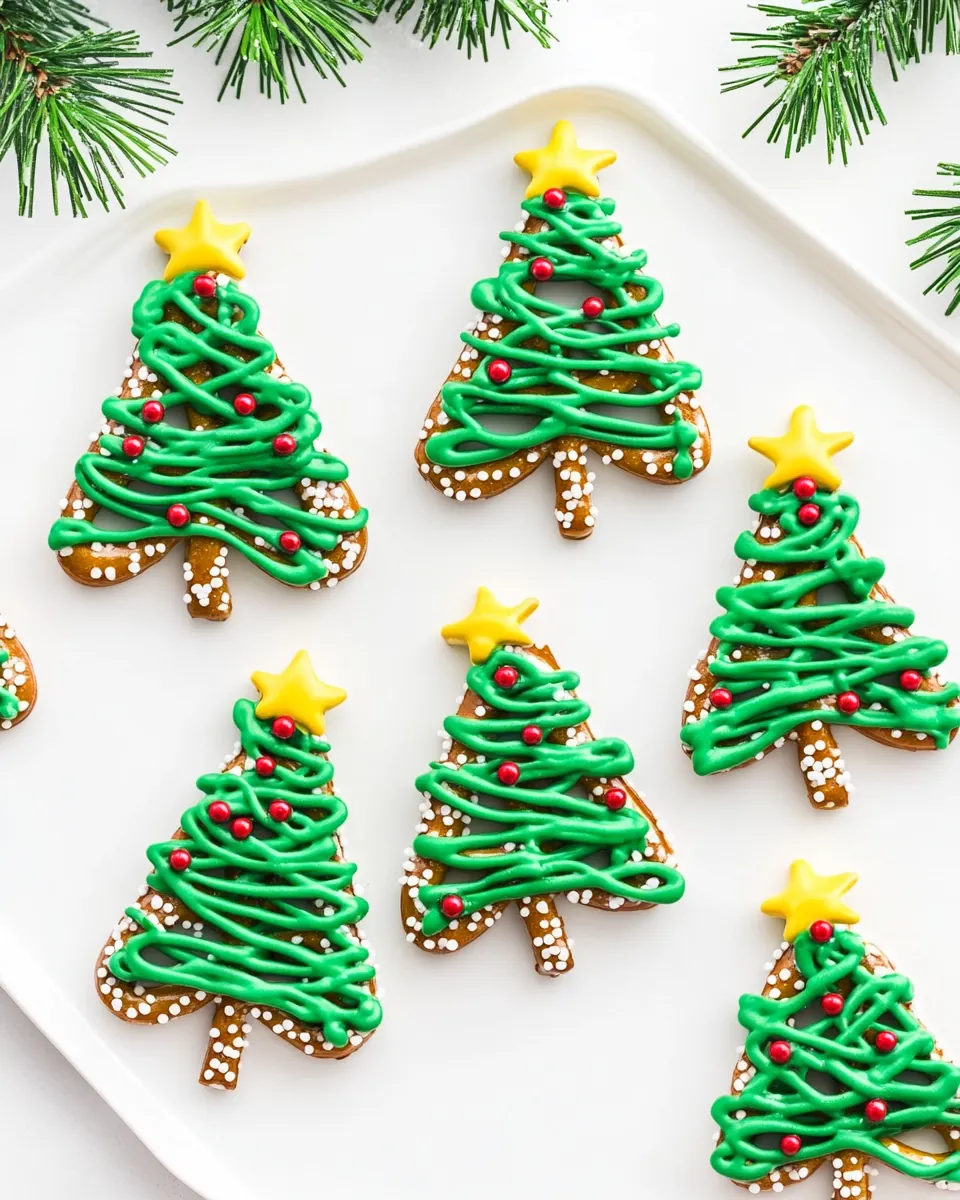
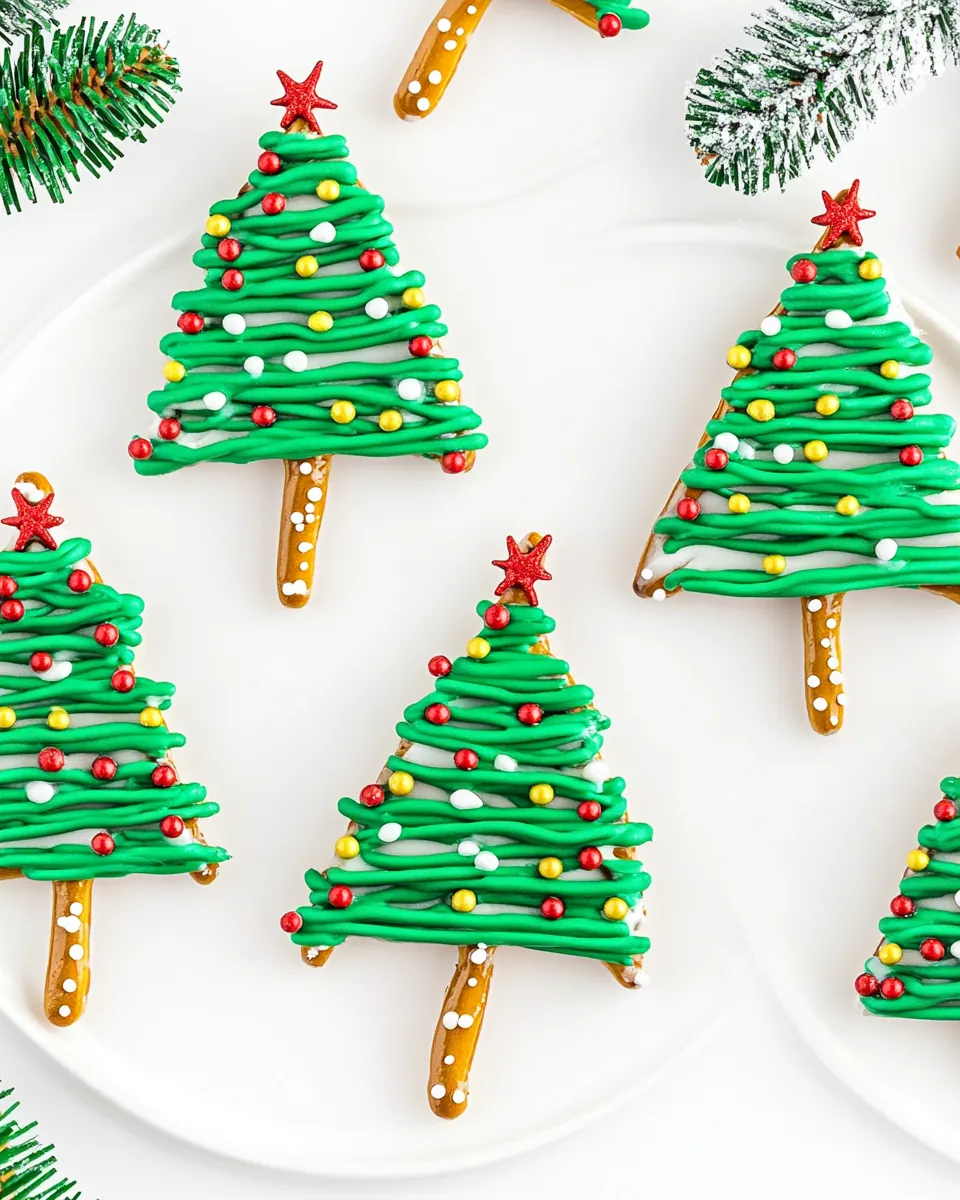
The vivid green of the dark green candy melts makes each pretzel look like a tiny decorated pine tree, without any complicated techniques. You can change colors and decorations to suit a theme, and they still hold together well for gifting. I sometimes swap sprinkles to match a color scheme and the transformation is immediate.
Textural contrast that satisfies
One big reason I come back to this recipe is the contrast between the crunchy pretzel sticks and the smooth, crisped candy coating. That snap when you bite in is so satisfying, and the small salt hit from the pretzel balances the sweet candy beautifully. I appreciate desserts that feel balanced rather than cloying.
Easy to scale and gift
If I am making favors, these scale up without any drama. I can prepare a few trays while chatting with friends, then box them in a sturdy container for giving. They also travel well at room temperature when packed carefully, which makes them a reliable choice when I need edible gifts fast.
Key Ingredients for Christmas Tree Pretzels
These ingredients are minimal and purposeful. Each item plays a clear role; the dark green candy melts supply color and the candy shell, the pretzel sticks provide a crunchy base and trunk, and the Rainbow and Christmas sprinkles plus Candy stars add festive texture and visual appeal. Together they create a treat that is both decorative and delicious.
- 12 ounces dark green candy melts: Melted provides the rich, festive coating for shaping and coloring the pretzel trees; melt gently and temper if needed to keep a glossy finish. Works as the primary adhesive to hold sprinkles and stars in place while adding sweet chocolate flavor.
- 30 pretzel sticks: Used as the structural trunk to support the tree-shaped treats and give a crunchy, salty contrast to the sweet coating. Holds the melted coating and decorations together, creating an easy-to-hold snack for serving.
- Rainbow and Christmas sprinkles: Adds colorful, festive texture and visual interest when sprinkled over the coated pretzels; apply immediately after dipping so they adhere properly. Enhances holiday appearance and contributes a slight crunchy bite without overpowering the other flavors.
- Candy stars: Provides a decorative focal point for the treetop when pressed into the coating while still tacky; choose sizes that sit neatly atop the pretzel trees. Adds a whimsical finishing touch and a bit of extra sweetness to each treat.
Making This Christmas Tree Pretzels
Follow these steps in order and allow your senses to guide you through the process. The rhythm of piping and sprinkling becomes almost meditative, and the visual payoff is immediate. Keep your tools ready and work in batches so the candy stays fluid and easy to pipe.
- Prepare a large baking sheet with parchment paper.: The first thing you'll notice when you lay down the parchment is how it takes the anxiety out of cleanup, and it gives the candy something smooth to cool against. A properly lined sheet prevents sticking and helps you move the batch easily when set. Make sure the sheet is completely flat to avoid pools of candy gathering. A common mistake here is skipping parchment, which can make removal frustrating and break the delicate pretzel trees.
- Place the pretzels about 3 inches apart on the baking sheet. Line them up in rows, leaving equal distance in between.: Spacing matters for appearance and cooling. When you leave about 3 inches between each pretzel, you give yourself room to pipe the tree shape without touching adjacent trees. The visual cue of evenly spaced rows also helps you work quickly and methodically. If the pretzels are too close, the candy can merge during setting, so resist crowding the sheet.
- Place candy melts in a microwave-safe bowl and melt at 50% power for 1 minute. Stir and melt at 100% power for an additional 30 seconds until melted.: When you heat the candy gradually, you preserve its smooth texture and avoid burning, which would create a grainy mouthfeel. After the first burst at lower power, stirring helps distribute heat and melt any stubborn pockets. The final short burst at full power usually finishes the job, but stir until glossy and lump free. Overheating is the usual pitfall here, which can lead to thickened or seized candy, so take short bursts and stir often.
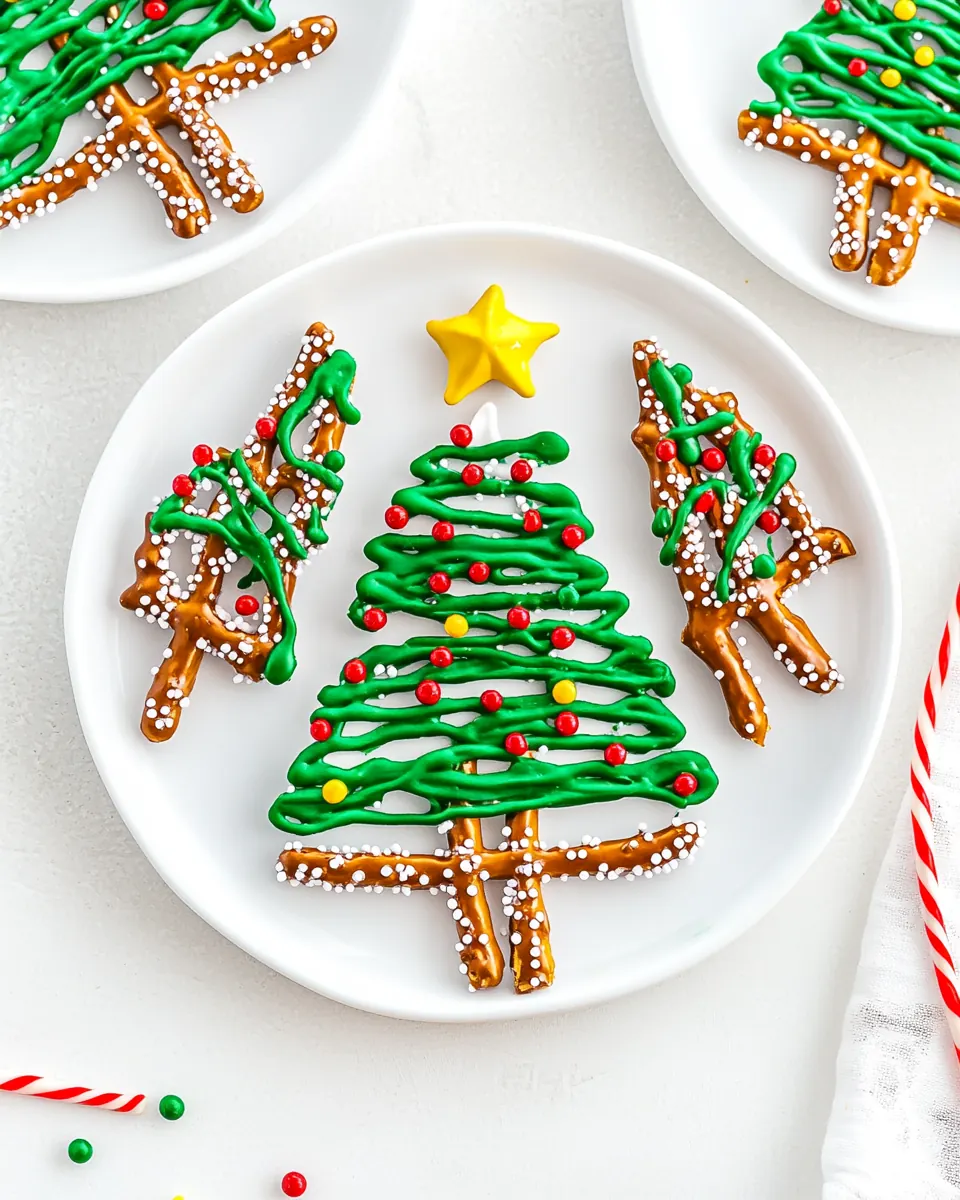
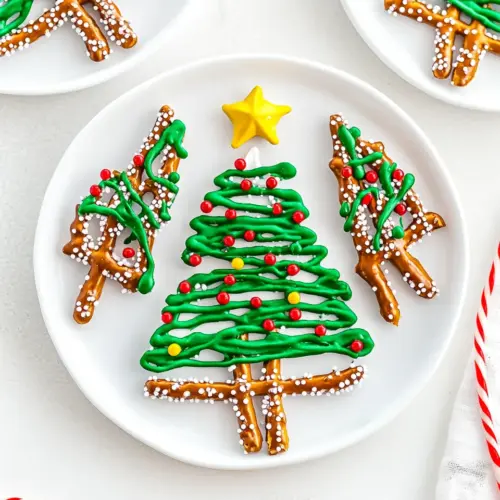
- Place the melted candy into a piping bag. Cut a small hole in the end. Pipe a zigzag pattern across each pretzel stick. Start with a small zigzag at the top and continue to graduate until you reach the bottom to make the effect of a pine tree. Be sure to leave about 1/4 of the pretzel uncovered for the tree trunk.: As you pipe, notice how the candy flows and how the zigzag builds the triangular tree silhouette. The sound is quiet, a soft glop and drag as you guide the bag, and visually the lines should taper wider toward the base. Temperature affects flow, so if the candy starts to thicken, reheat briefly in the microwave and stir. Avoid cutting too large a hole in the bag, which will result in chunky lines rather than neat branches.
- Decorate with sprinkles and place a star at the top of each tree. Allow to harden for at least 60 minutes. Carefully remove from parchment and place on your favorite serving tray.: The final decorating step adds personality, and you should work quickly while the candy is still tacky. Lightly scatter the Rainbow and Christmas sprinkles and press the Candy stars into the peak so they hold. You'll hear a faint clicking as the sprinkles settle into the candy, and the surface will lose its shine as it sets. Patience is key at this stage, because removing them too early risks smudging. A typical error is trying to move them before fully hardened, which can ruin the finish and cause breakage.
Making Adjustments
I like to think of this section as how to customize without losing the essence of the treat. These tips help you adapt quantities, decorate for themes, and store the finished product properly. Below are practical adjustments that have stood the test of holiday chaos and curious kids.
- Swap candy melt colors: If you want a different palette, choose other candy melt colors while keeping the same melting method, which preserves texture and set time.
- Adjust spacing for different sizes: If your pretzel sticks are longer or shorter, increase or decrease spacing so the decorations do not touch while setting.
- Prevent sweating: Store at room temperature in an airtight container rather than refrigerating, to avoid condensation that makes candy bloom.
- Packaging for gifting: Use a rigid tin or box with dividers to keep trees from bumping into each other and breaking during transport.
- Make-ahead strategy: You can prepare these up to five days in advance following the storage recommendations, keeping them crisp and intact for events.
Serving Ideas for Christmas Tree Pretzels
These little trees are versatile at parties and easy to pair with other snacks. Below I outline serving suggestions, occasions, and storage guidance to help you present them beautifully and keep them tasting their best.
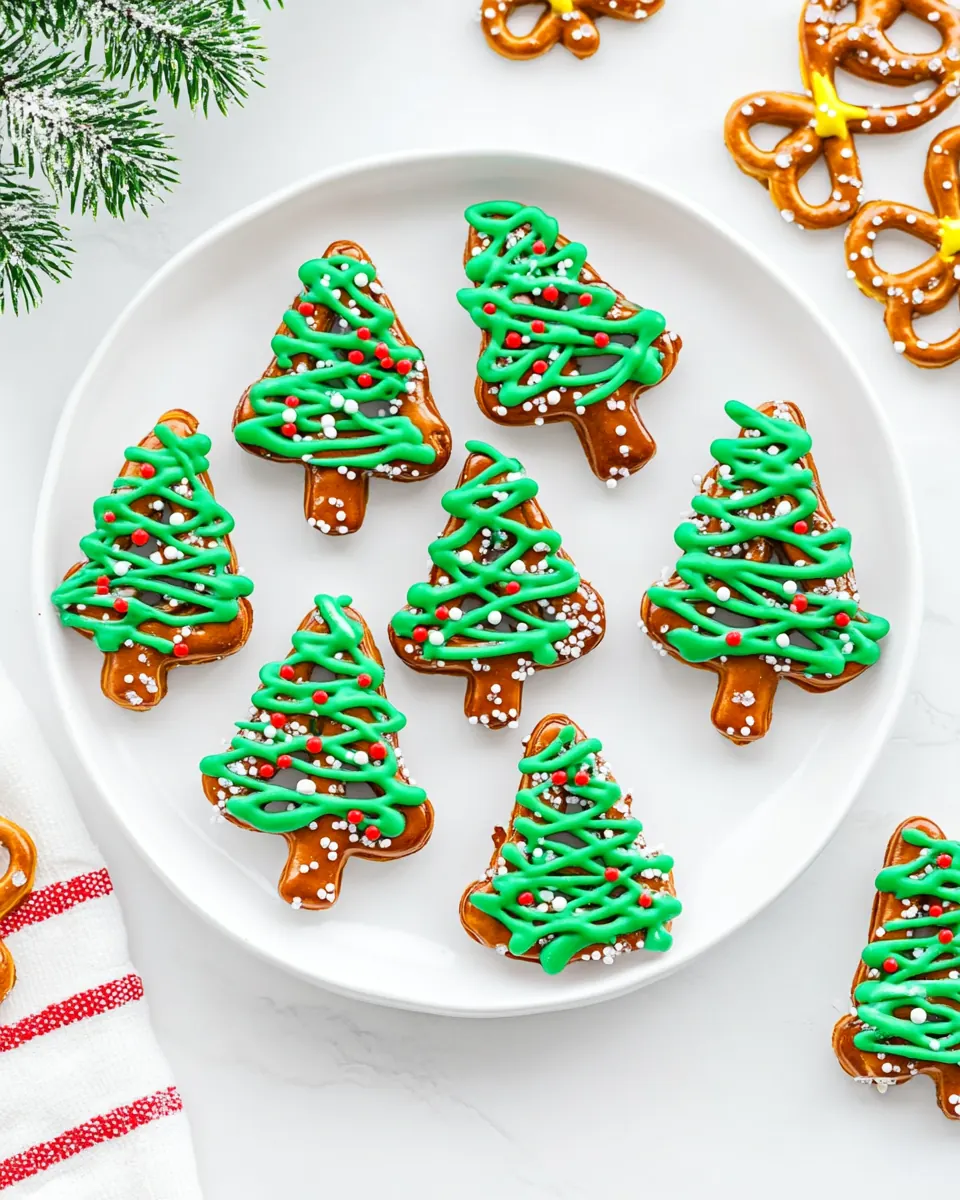
- Party platter centerpiece: Arrange the pretzels upright in a shallow vase or lay them flat on a tray surrounded by nuts and dried fruit for a festive snack table.
- Gift boxes: Pack a dozen in a sturdy box with tissue paper for neighbor gifts or teacher presents, labeling with the date and a short note.
- Holiday cookie exchange: Include them as a crunchy option among cookies and bars, offering textural contrast to softer sweets.
- Kids activity: Set up a decorating station with extra sprinkles and stars for a hands-on family project during a holiday gathering.
- Storage tips: Keep at room temperature in a single layer if possible, or separate layers with parchment to avoid sticking, and consume within five days for best texture.
- Seasonal pairing: Pair with warm cocoa or spiced tea for a cozy treat, highlighting the sweet and salty balance of the snack.
FAQ
Conclusion
What makes this recipe special is how quickly humble ingredients transform into charming, shareable treats that feel festive and handmade. The balance of crunchy pretzel and crisp candy, combined with colorful decorations, gives you a snack that is both fun to make and delightful to serve. Try a batch when you need a last minute party favor or a simple family activity, because they are forgiving, fast, and always well received. Enjoy the process of decorating, and don’t worry about perfection; the homemade charm is what guests love.
Christmas Tree Pretzels
Equipment
- Microwave-safe Bowl
- Piping Bag
- Baking Sheet
- Parchment Paper
Ingredients
- 12 ounces dark green candy melts Melted provides the rich, festive coating for shaping and coloring the pretzel trees; melt gently and temper if needed to keep a glossy finish. Works as the primary adhesive to hold sprinkles and stars in place while adding sweet chocolate flavor.
- 30 pretzel sticks Used as the structural trunk to support the tree-shaped treats and give a crunchy, salty contrast to the sweet coating. Holds the melted coating and decorations together, creating an easy-to-hold snack for serving.
- Rainbow and Christmas sprinkles Adds colorful, festive texture and visual interest when sprinkled over the coated pretzels; apply immediately after dipping so they adhere properly. Enhances holiday appearance and contributes a slight crunchy bite without overpowering the other flavors.
- Candy stars Provides a decorative focal point for the treetop when pressed into the coating while still tacky; choose sizes that sit neatly atop the pretzel trees. Adds a whimsical finishing touch and a bit of extra sweetness to each treat.
Instructions
- Prepare a large baking sheet with parchment paper.: The first thing you'll notice when you lay down the parchment is how it takes the anxiety out of cleanup, and it gives the candy something smooth to cool against. A properly lined sheet prevents sticking and helps you move the batch easily when set. Make sure the sheet is completely flat to avoid pools of candy gathering. A common mistake here is skipping parchment, which can make removal frustrating and break the delicate pretzel trees.
- Place the pretzels about 3 inches apart on the baking sheet. Line them up in rows, leaving equal distance in between.: Spacing matters for appearance and cooling. When you leave about 3 inches between each pretzel, you give yourself room to pipe the tree shape without touching adjacent trees. The visual cue of evenly spaced rows also helps you work quickly and methodically. If the pretzels are too close, the candy can merge during setting, so resist crowding the sheet.
- Place candy melts in a microwave-safe bowl and melt at 50% power for 1 minute. Stir and melt at 100% power for an additional 30 seconds until melted.: When you heat the candy gradually, you preserve its smooth texture and avoid burning, which would create a grainy mouthfeel. After the first burst at lower power, stirring helps distribute heat and melt any stubborn pockets. The final short burst at full power usually finishes the job, but stir until glossy and lump free. Overheating is the usual pitfall here, which can lead to thickened or seized candy, so take short bursts and stir often.
- Place the melted candy into a piping bag. Cut a small hole in the end. Pipe a zigzag pattern across each pretzel stick. Start with a small zigzag at the top and continue to graduate until you reach the bottom to make the effect of a pine tree. Be sure to leave about 1/4 of the pretzel uncovered for the tree trunk.: As you pipe, notice how the candy flows and how the zigzag builds the triangular tree silhouette. The sound is quiet, a soft glop and drag as you guide the bag, and visually the lines should taper wider toward the base. Temperature affects flow, so if the candy starts to thicken, reheat briefly in the microwave and stir. Avoid cutting too large a hole in the bag, which will result in chunky lines rather than neat branches.
- Decorate with sprinkles and place a star at the top of each tree. Allow to harden for at least 60 minutes. Carefully remove from parchment and place on your favorite serving tray.: The final decorating step adds personality, and you should work quickly while the candy is still tacky. Lightly scatter the Rainbow and Christmas sprinkles and press the Candy stars into the peak so they hold. You'll hear a faint clicking as the sprinkles settle into the candy, and the surface will lose its shine as it sets. Patience is key at this stage, because removing them too early risks smudging. A typical error is trying to move them before fully hardened, which can ruin the finish and cause breakage.
Notes
- Swap candy melt colors: If you want a different palette, choose other candy melt colors while keeping the same melting method, which preserves texture and set time.
- Adjust spacing for different sizes: If your pretzel sticks are longer or shorter, increase or decrease spacing so the decorations do not touch while setting.
- Prevent sweating: Store at room temperature in an airtight container rather than refrigerating, to avoid condensation that makes candy bloom.
- Packaging for gifting: Use a rigid tin or box with dividers to keep trees from bumping into each other and breaking during transport.
- Make-ahead strategy: You can prepare these up to five days in advance following the storage recommendations, keeping them crisp and intact for events.