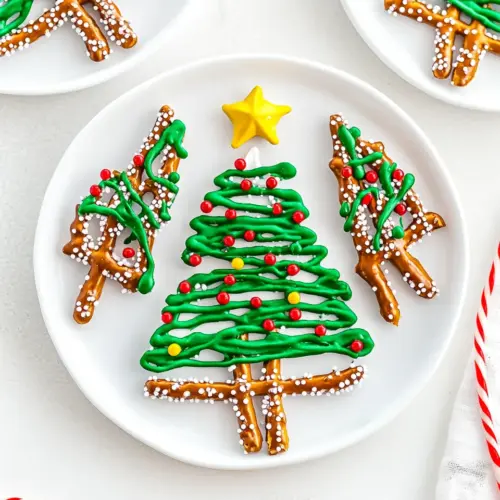
Christmas Tree Pretzels
Christmas Tree Pretzels are quick, crispy, and visually festive. These easy to assemble treats pair crunchy pretzel sticks with smooth, colorful dark green candy melts and playful sprinkles, making them an ideal easy weeknight treat or party favor. They are perfect for holiday gatherings and gifting because they travel well and look delightful on a platter.
Equipment
- Microwave-safe Bowl
- Piping Bag
- Baking Sheet
- Parchment Paper
Ingredients
- 12 ounces dark green candy melts Melted provides the rich, festive coating for shaping and coloring the pretzel trees; melt gently and temper if needed to keep a glossy finish. Works as the primary adhesive to hold sprinkles and stars in place while adding sweet chocolate flavor.
- 30 pretzel sticks Used as the structural trunk to support the tree-shaped treats and give a crunchy, salty contrast to the sweet coating. Holds the melted coating and decorations together, creating an easy-to-hold snack for serving.
- Rainbow and Christmas sprinkles Adds colorful, festive texture and visual interest when sprinkled over the coated pretzels; apply immediately after dipping so they adhere properly. Enhances holiday appearance and contributes a slight crunchy bite without overpowering the other flavors.
- Candy stars Provides a decorative focal point for the treetop when pressed into the coating while still tacky; choose sizes that sit neatly atop the pretzel trees. Adds a whimsical finishing touch and a bit of extra sweetness to each treat.
Instructions
- Prepare a large baking sheet with parchment paper.: The first thing you'll notice when you lay down the parchment is how it takes the anxiety out of cleanup, and it gives the candy something smooth to cool against. A properly lined sheet prevents sticking and helps you move the batch easily when set. Make sure the sheet is completely flat to avoid pools of candy gathering. A common mistake here is skipping parchment, which can make removal frustrating and break the delicate pretzel trees.
- Place the pretzels about 3 inches apart on the baking sheet. Line them up in rows, leaving equal distance in between.: Spacing matters for appearance and cooling. When you leave about 3 inches between each pretzel, you give yourself room to pipe the tree shape without touching adjacent trees. The visual cue of evenly spaced rows also helps you work quickly and methodically. If the pretzels are too close, the candy can merge during setting, so resist crowding the sheet.
- Place candy melts in a microwave-safe bowl and melt at 50% power for 1 minute. Stir and melt at 100% power for an additional 30 seconds until melted.: When you heat the candy gradually, you preserve its smooth texture and avoid burning, which would create a grainy mouthfeel. After the first burst at lower power, stirring helps distribute heat and melt any stubborn pockets. The final short burst at full power usually finishes the job, but stir until glossy and lump free. Overheating is the usual pitfall here, which can lead to thickened or seized candy, so take short bursts and stir often.
- Place the melted candy into a piping bag. Cut a small hole in the end. Pipe a zigzag pattern across each pretzel stick. Start with a small zigzag at the top and continue to graduate until you reach the bottom to make the effect of a pine tree. Be sure to leave about 1/4 of the pretzel uncovered for the tree trunk.: As you pipe, notice how the candy flows and how the zigzag builds the triangular tree silhouette. The sound is quiet, a soft glop and drag as you guide the bag, and visually the lines should taper wider toward the base. Temperature affects flow, so if the candy starts to thicken, reheat briefly in the microwave and stir. Avoid cutting too large a hole in the bag, which will result in chunky lines rather than neat branches.
- Decorate with sprinkles and place a star at the top of each tree. Allow to harden for at least 60 minutes. Carefully remove from parchment and place on your favorite serving tray.: The final decorating step adds personality, and you should work quickly while the candy is still tacky. Lightly scatter the Rainbow and Christmas sprinkles and press the Candy stars into the peak so they hold. You'll hear a faint clicking as the sprinkles settle into the candy, and the surface will lose its shine as it sets. Patience is key at this stage, because removing them too early risks smudging. A typical error is trying to move them before fully hardened, which can ruin the finish and cause breakage.
Notes
- Swap candy melt colors: If you want a different palette, choose other candy melt colors while keeping the same melting method, which preserves texture and set time.
- Adjust spacing for different sizes: If your pretzel sticks are longer or shorter, increase or decrease spacing so the decorations do not touch while setting.
- Prevent sweating: Store at room temperature in an airtight container rather than refrigerating, to avoid condensation that makes candy bloom.
- Packaging for gifting: Use a rigid tin or box with dividers to keep trees from bumping into each other and breaking during transport.
- Make-ahead strategy: You can prepare these up to five days in advance following the storage recommendations, keeping them crisp and intact for events.