Chips and Cheese Chili Casserole
Chips and Cheese Chili Casserole has been my ultimate go to when I need a feeding a crowd dish that feels cozy and a little indulgent.
Years ago I made this for a last minute game night, pulling together pantry cans and a bag of chips while my friends trickled in. The smell of baking cheese and tomatoey chili filled the kitchen, and everyone kept hovering as I assembled the layers right in the pan. I loved how the crunchy chips softened just enough under the hot, bubbling filling to create a tender yet textured bite.
Over time I tweaked the order of assembly and the amount of sour cream so the top stayed creamy rather than weeping, and now it reliably comes out rich and slightly crispy. I always appreciate recipes that are forgiving, and this one lets you use whichever canned beans or salsa you have on hand without losing its soul. It’s the sort of dish you can riff on, but still return to the base steps when you want dependable comfort food.
Recipe Snapshot
40 mins
10 mins
30 mins
Easy
350 kcal
Mexican
Gluten-Free, Low FODMAP
Dinner
9 by 9 inch baking pan, Aluminum foil, Large mixing bowl, Wooden spoon
The Appeal of This Chips and Cheese Chili Casserole
Comfort food that feels nostalgic
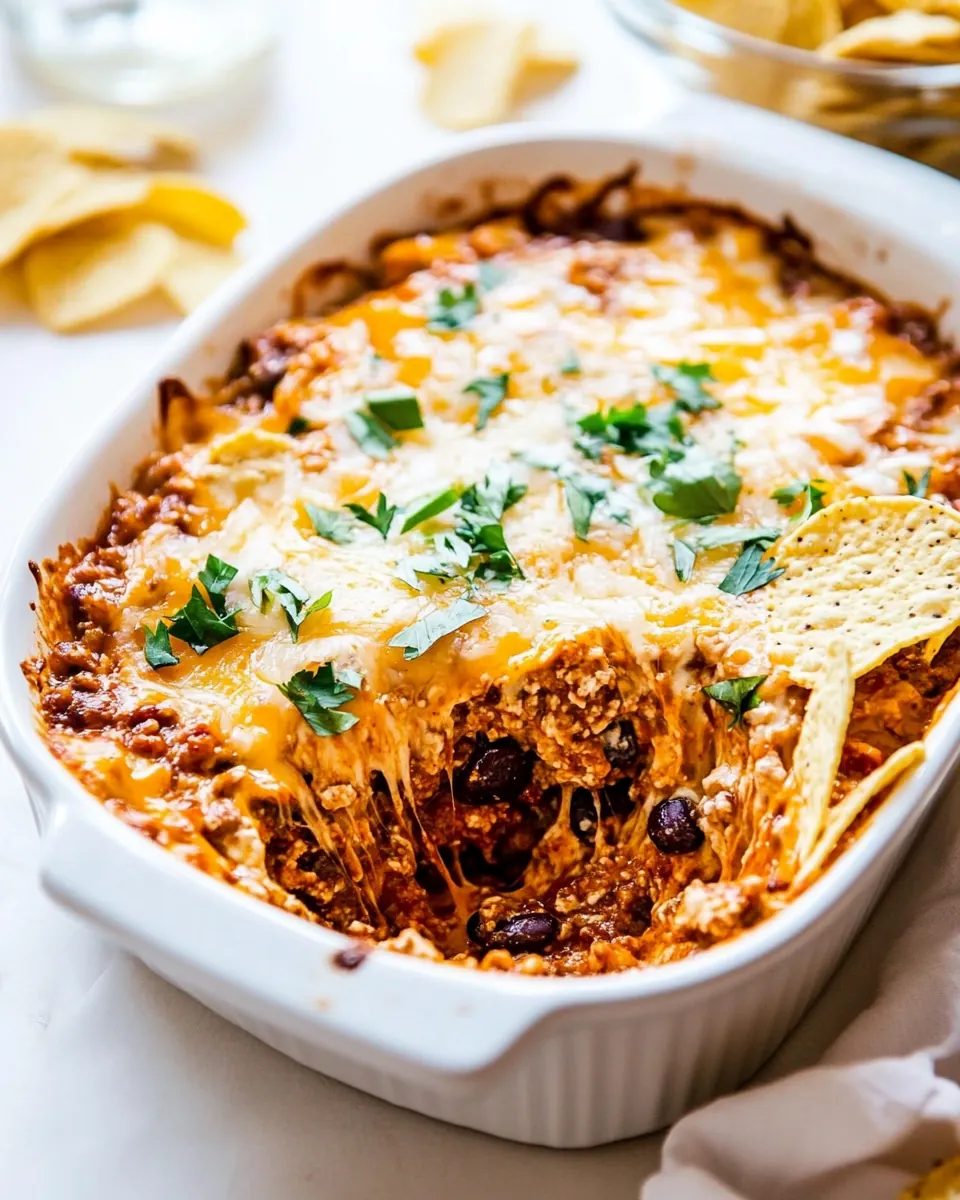
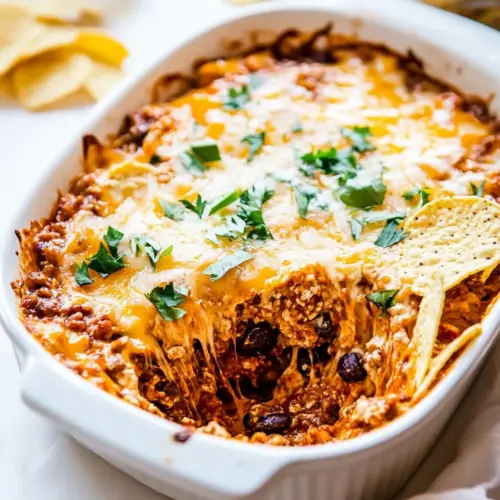
I love how Chips and Cheese Chili Casserole channels classic potluck flavors all in one pan. The layered texture, with crunchy chips turning tender beneath a saucy, cheesy filling, gives me flashbacks to family gatherings. There is something deeply satisfying about a single casserole that produces crispy edges and gooey middles at once.
Pantry friendly and budget conscious
This recipe shines because it leans on canned staples, like canned chili, beans, and jarred salsa. I often keep those items on hand, so whipping this up is fast and inexpensive. It’s a go to when I want a crowd pleaser without a big grocery run.
Customizable without losing structure
One reason I recommend this dish is how easy it is to adapt. You can change the bean mix or the jarred sauce intensity, and the casserole still holds together. I encourage small swaps, just be mindful of the wetness, because that affects baking time and final texture.
Kid friendly and party ready
Kids generally love the crunchy to creamy contrast, and adults appreciate the comfort factor. It reheats well, so I’ll often bake and then bring it to a gathering, or warm single portions for lunches. The top gets that toasty, browned finish that makes everyone reach for a serving.
Easy assembly with big payoff
I always admire recipes that hide complexity behind simple steps. This casserole comes together quickly, and the oven does most of the work. That hands off time gives me room to prepare salads or set the table while the kitchen fills with that irresistible baked cheese aroma.
Shopping List for Chips and Cheese Chili Casserole
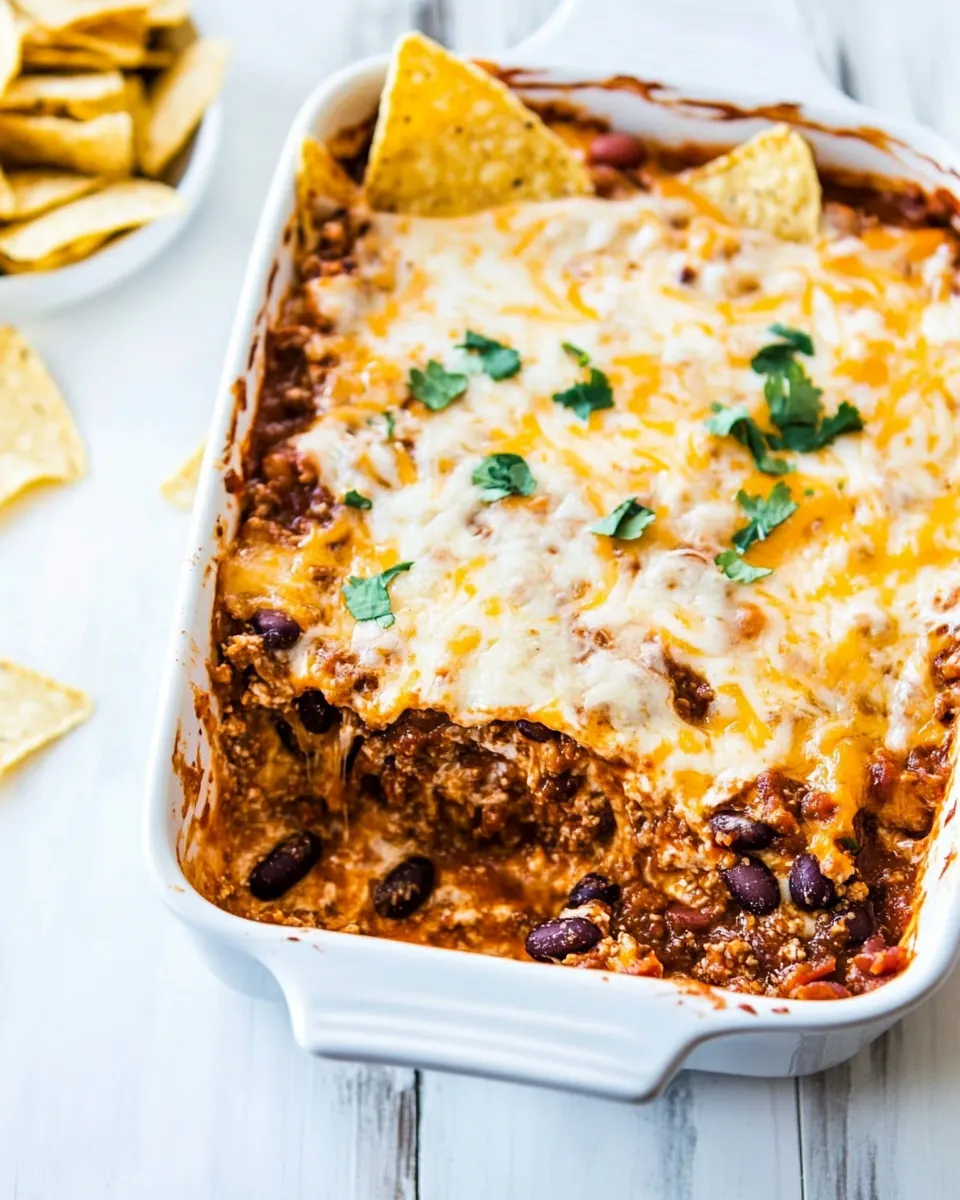
This ingredient list is deliberately simple and pantry driven. The cast of characters centers on crunchy chips, canned chili and beans, a jar of salsa or sauce, plenty of shredded cheese, and a creamy layer of sour cream. Together they build a balance of texture and flavor, where the chips provide a crunchy framework, the canned mixtures bring savory, spiced depth, and the cheese melts everything into a cohesive, comforting casserole.
- 5 1/2 cups whole corn chips, crushed (about 2 1/2 cups after crushing to the size of a dime): Provide a crunchy base and textural contrast for the casserole; when crushed to dime–size pieces they create layers that absorb sauces and flavors while retaining some crispness. Use the specified volume to ensure proper structure and to prevent the dish from becoming soggy, and distribute evenly between layers for consistent bite.
- one 10-ounce can chili: Add a seasoned meat-and-bean component that contributes savory depth and heat; a canned chili brings ready-made spices, meat, and sauce that meld with other ingredients during baking. Drain slightly if excessively saucy to avoid oversaturation of the chip layers, and warm before assembling if desired to improve integration.
- one 10-ounce can black beans, red beans, refried beans, bean medleys: Supply additional protein, fiber, and varying bean textures depending on the variety chosen; canned beans add heartiness and a contrasting mouthfeel to the chili and chips. Rinse and drain if packing liquid is thick or salty, and scatter evenly so each serving gets balanced bean distribution.
- one 10-ounce jar salsa or tomato sauce: Introduce acidity, tang, and tomato flavor to bind the layers; salsa or tomato sauce brightens the casserole and adds moisture for cohesive baking. Choose a salsa for spicier, chunkier results or tomato sauce for smoother consistency, adjusting amount to maintain proper moisture levels.
- one 8-ounce package shredded cheese blend such as Mexican-style or similar, both store-brand and name-brand packages will say '2 cups' on the package: Provide melted, creamy richness and a savory finish; shredded cheese blends like Mexican–style offer flavor complexity and help hold the casserole together when baked. Sprinkle evenly over and between layers as directed, and allow sufficient baking time for full melting and slight browning on top.
- 1 1/4 cups sour cream: Contribute creaminess, tang, and cooling contrast to the spicy, savory elements; sour cream also helps create a smoother mouthfeel and can be layered or dolloped before baking or serving. Temper or fold into other dairy elements if needed to prevent curdling, and use measured amount to balance moisture and richness.
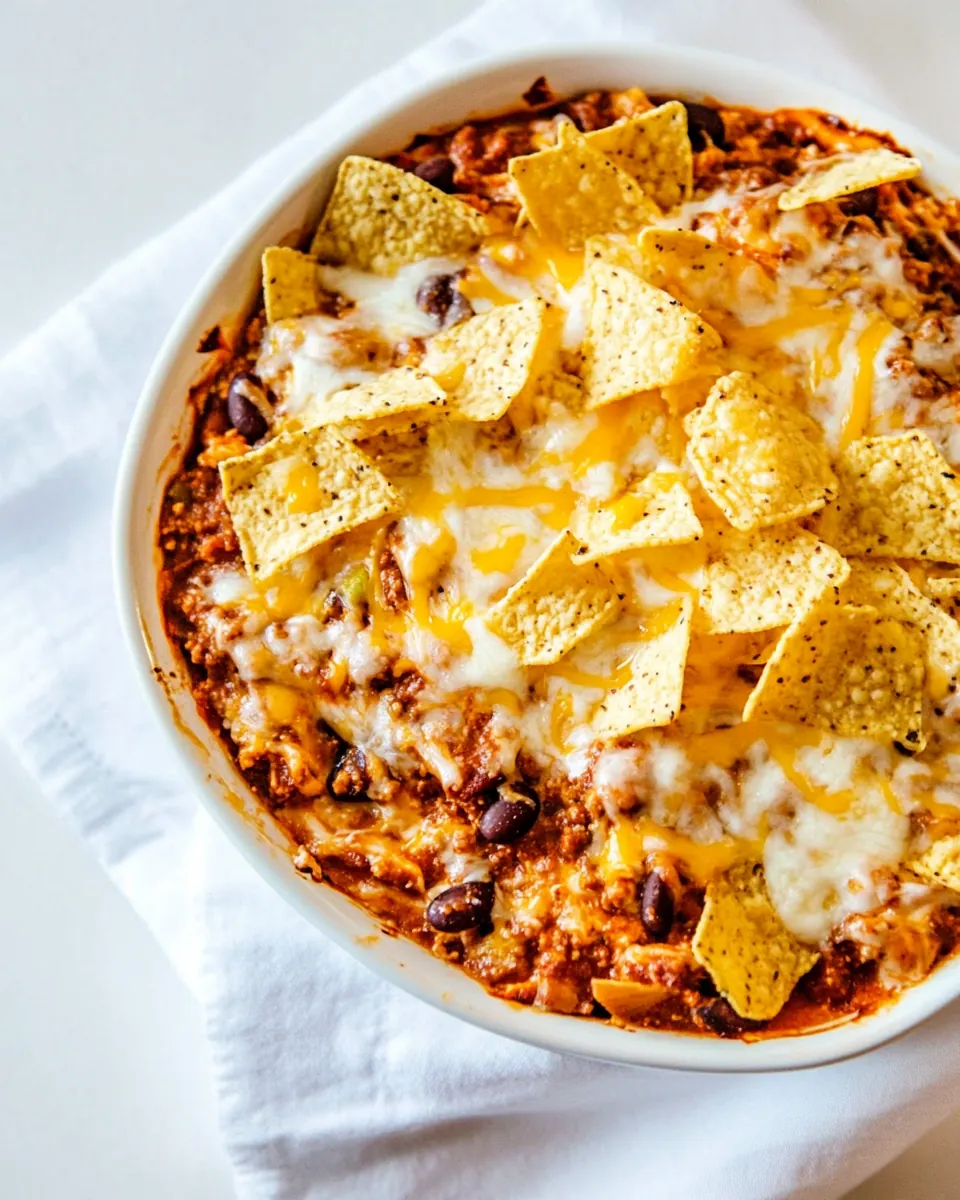
- 2 1/2 cups whole corn chips, crushed (about 1 to 1 1/2 cups after crushing to the size of a dime): Offer a final crunchy topping and additional structural element for the casserole; crushed corn chips added near the end create a crisp layer that contrasts with the creamy interior. Reserve this portion for topping so it browns nicely in the oven rather than becoming fully saturated.
Directions for Chips and Cheese Chili Casserole
I like to think of the directions as a rhythm, where crushing, mixing, and layering each play a role in the final texture. Read the whole set before you start, and have your baking pan lined and prepped so assembly is smooth.
- Preheat oven to 375 F. Line a 9-by-9-inch baking pan with aluminum foil, spray with cooking spray, and set aside. In a large mixing bowl, add 5 to 6 cups chips (about 5 big handful of chips from the bag) and with a wooden spoon or similar, poke and crush the chips to the size of a dime. You don’t want powder, but make them small. Add the chili, beans, salsa, 2 loosely-packed cups cheese (about two-thirds of the package), and stir to combine. Pour mixture into prepared pan and bake for 20 minutes.: The kitchen fills with warm notes when the oven comes on, a small reassuring hum that signals the beginning of a baking ritual. You should feel a slight increase in room warmth, and the air will carry a faint metal scent from the racks. Getting the oven fully to 375 F ensures the casserole bakes evenly, allowing the interior to heat through while the top crisps; if you underheat the oven the dish may end up soggy rather than set. A common mistake is starting with a slightly lower temp and then increasing it midway, which can cause uneven browning, so wait until the oven indicates it has reached temperature before putting the pan in.
- After 20 minutes, remove pan from oven and spread sour cream in an even, flat layer over the casserole. Sprinkle 1 to 1 1/2 cups loosely packed cheese (the remaining cheese in the package) evenly over the top of the sour cream. Sprinkle 1 to 1 1/4 cups crushed corn chips over the top and bake for 9 to 12 minutes, or until top is browned to desired level.: The shiny foil makes cleanup effortless and helps lift the casserole from the pan, while the cooking spray prevents sticking. As you press the foil into the corners you will notice a faint crinkle sound, and the pan will look clean and ready. This step is important to preserve the crisp edges and to make serving simpler, because the foil keeps the bottom intact when you lift it out. Avoid skipping the spray, some cheeses can adhere to the foil and tear the final slice when removed.
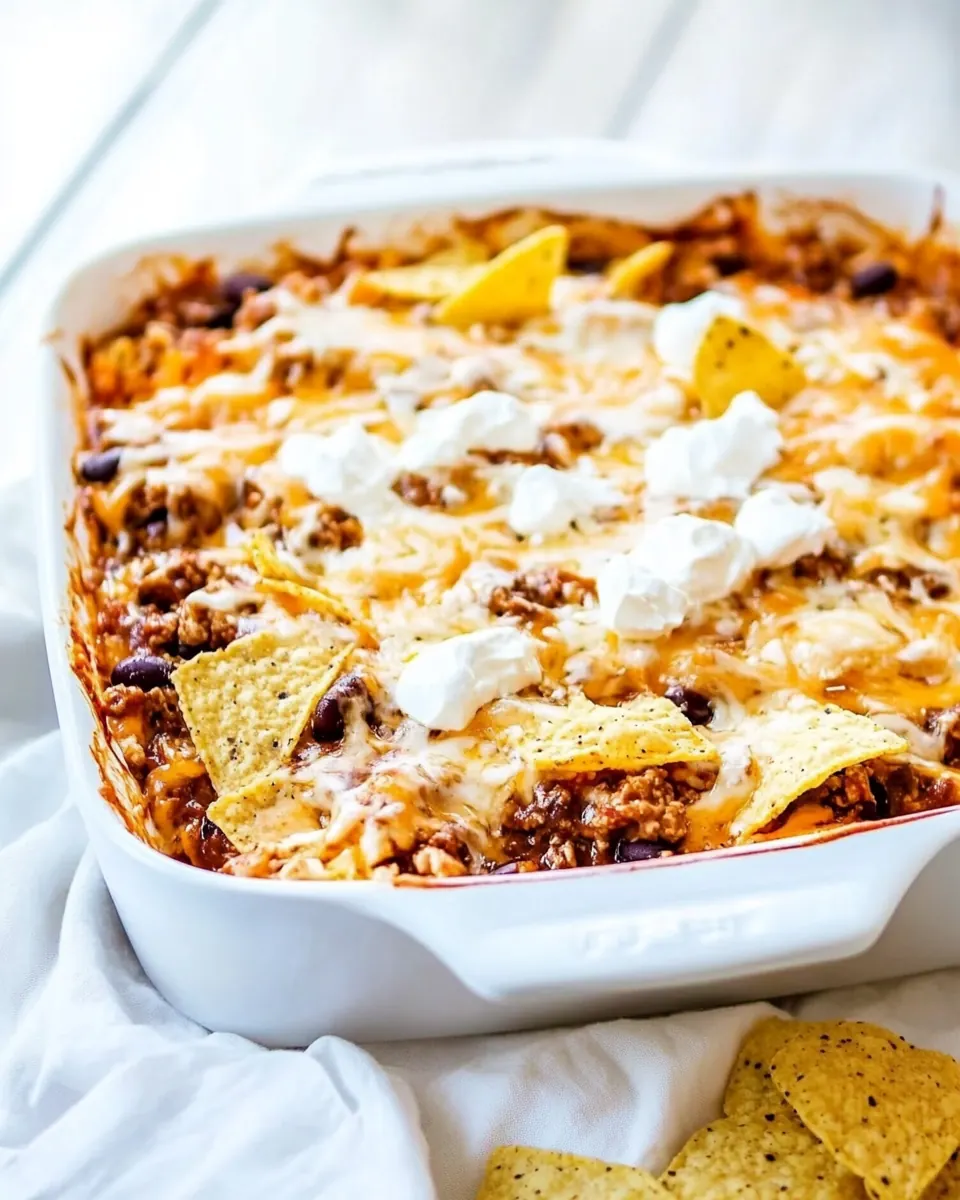
- Serve immediately. Optionally, garnish with a dollop of sour cream, a sprinkling of cheese, or a pinch of chopped cilantro or onion. Store leftovers in a Glad Freezerware container or similar airtight container in the refrigerator for up to 5 days or in the freezer for up to 3 months.: Crushing creates a bed that soaks up sauce and loses the large, unwieldy shards that make slicing difficult. As you press the chips , you will hear a brittle crunch and see small fragments accumulate, like coarse breadcrumbs. Making them dime sized gives pockets that hold sauce while still providing texture; too fine and the base will be pasty, too large and the casserole will fall apart. A very common slip is pulverizing them into dust, which results in a heavy, glue like base instead of a structured layer.
- Add the chili, beans, salsa, 2 loosely packed cups cheese, and stir to combine: When the canned chili , beans , and salsa meet the crushed chips , you will notice steam rising slightly if the canned items are warm, and the mixture will take on a cohesive, chunky appearance. Stirring with a spoon distributes the flavors and the initial two cups of shredded cheese fold in to add pockets of melty richness. This mixture should be moist but not soupy; if it seems too wet the casserole will struggle to set. Avoid over stirring which can crush the beans and lead to a paste like texture.
- Pour mixture into prepared pan and bake for 20 minutes: As the pan slides into the oven you will hear a faint ceramic or metal shift, and soon the kitchen will be scented with warming tomato and melting cheese . After 20 minutes the edges should look set and the center warm and bubbling slightly. This initial bake gives time for the moisture to distribute and the chips in the base to hydrate just enough. Do not open the oven often during this phase, as temperature loss can prevent proper setting and lengthen cooking time.
- After 20 minutes, remove pan from oven and spread sour cream in an even flat layer over the casserole: The heat will be evident as you slide the rack out, and the surface will have small bubbles where the mixture has released steam. Spreading the sour cream creates a cooling creamy veil that moderates spice and allows the top cheese to brown evenly. Work gently to avoid breaking the set base; if you push too hard you can create divots that concentrate moisture and prevent even browning later.
- Sprinkle 1 to 1 1/2 cups loosely packed cheese evenly over the top of the sour cream: The second layer of shredded cheese should be scattered so it melts into a golden blanket. You will see distinct shreds pool together and then begin to gloss as they warm. This layer is what gives the casserole its signature gooey finish and browned top, so distribute it evenly for uniform color and texture. Adding too much here can overwhelm the balance and make the top oily as it melts.
- Sprinkle 1 to 1 1/4 cups crushed corn chips over the top and bake for 9 to 12 minutes or until top is browned to desired level: The final chips create a crunchy crown that toasts in the oven, providing contrast to the creamy middle. Listen for the faint sizzle as the top warms, and watch the color change from pale to amber to golden brown. Because ovens vary, start checking at nine minutes to avoid burning; a single minute can shift the result from perfectly toasted to overly dark. If you notice uneven browning, rotate the pan carefully to promote an even finish.
- Serve immediately: A fresh slice will be warm and slightly gooey with a crisp top, releasing a savory aroma that invites immediate bites. Serving hot maintains the contrast between the crunchy top and soft center, while cooling will firm the casserole. A typical error is letting it sit too long before slicing, which can cool the cheese and make the texture dense rather than tender and flowing.
- Optionally garnish with a dollop of sour cream or a sprinkling of cheese: A final spoonful of sour cream or an extra pinch of shredded cheese adds visual appeal and a fresh creamy note. The garnish introduces a cool counterpoint to the heat and can refresh the first bite. Avoid over garnishing, which can mask the carefully balanced flavors baked into the casserole.
- Store leftovers in an airtight container in the refrigerator for up to 5 days or in the freezer for up to 3 months: Proper storage preserves texture and flavor, and the cooled casserole should be sealed tightly to prevent drying and odor transfer. When reheating from the fridge, warm gently to restore the creamy texture without burning the edges; from frozen, thaw in the fridge overnight first for best results. A mistake is microwaving from fully frozen, which can heat unevenly and create soggy patches.
Ways to Adapt This Recipe
This casserole is a forgiving platform for variations. The notes from the original CSV suggest many swap ideas, so here I expand those into practical adaptations you can use based on pantry availability and dietary needs.
- Stretch with extra vegetables: Add canned corn or diced bell peppers to the filling to increase volume and add brightness without changing the method, keeping the overall wet ingredient balance similar so baking time remains consistent.
- Use a milder sauce: Swap jarred salsa for a smoother tomato sauce if you prefer less texture and spice, which will yield a gentler flavor profile while maintaining moisture for the chips.
- Make it vegan: Replace the dairy cheese and sour cream with plant based alternatives labeled for melting and thickening, ensuring you select products that tolerate heat to avoid separation.
- Adjust bean mix: Use one type of canned bean or a medley, depending on desired texture; denser refried beans make the casserole firmer, while whole beans give bite and contrast.
- Bulk it up with protein: If you want more heft, add crumbled tofu or tempeh to the filling, which soaks up flavors and increases satiety without changing assembly steps.
- Control spice level: Choose a mild or hot jarred salsa to manage heat, and remember the sour cream layer will soften spice on the palate.
What to Pair With Chips and Cheese Chili Casserole
This casserole is hearty and satisfying on its own, yet pairs beautifully with light sides and fresh accents. For gatherings, I like to offer a crisp salad and a simple vegetable to balance the richness. It works for casual lunches or cozy dinners, and stores well for leftover meals during a busy week.
- Fresh green salad: A crisp lettuce salad with a bright vinaigrette cuts through the richness and adds refreshing texture contrast.
- Pickled vegetables: Quick pickles or a tangy slaw offer acidity that balances the creamy layers and highlights the salty crunch of the chips.
- Light soups: A simple broth based soup served before the casserole makes for a comforting multi course meal without overloading guests.
- Occasion fit: This dish is excellent for game nights, potlucks, or casual family dinners, and scales well for feeding a crowd.
- Storage tips: Store leftovers in an airtight container in the refrigerator for up to five days, or freeze for up to three months; thaw overnight and reheat gently to preserve texture.
- Seasonal pairings: In cooler months the casserole works well with roasted winter vegetables, while in fall you can serve it with a warm grain salad for added heartiness.
FAQ
Conclusion
This casserole stands out because it turns simple pantry cans and a bag of chips into a rich, comforting meal with minimal fuss. The combination of a slightly crunchy base, a savory bean and chili filling, and a bubbly, browned cheese top makes it reliably satisfying. Give it a try when you need a crowd pleasing dish that comes together quickly, and don’t be afraid to adapt it based on what you have in your pantry. It’s the kind of hands off bake that rewards you with warm, homey flavors and easy leftovers for the week.
Chips and Cheese Chili Casserole
Equipment
- 9 by 9 inch baking pan
- Aluminum Foil
- Large Mixing Bowl
- Wooden Spoon
Ingredients
- 5 1/2 cups whole corn chips, crushed (about 2 1/2 cups after crushing to the size of a dime) Provide a crunchy base and textural contrast for the casserole; when crushed to dime-size pieces they create layers that absorb sauces and flavors while retaining some crispness. Use the specified volume to ensure proper structure and to prevent the dish from becoming soggy, and distribute evenly between layers for consistent bite.
- one 10-ounce can chili Add a seasoned meat-and-bean component that contributes savory depth and heat; a canned chili brings ready-made spices, meat, and sauce that meld with other ingredients during baking. Drain slightly if excessively saucy to avoid oversaturation of the chip layers, and warm before assembling if desired to improve integration.
- one 10-ounce can black beans, red beans, refried beans, bean medleys Supply additional protein, fiber, and varying bean textures depending on the variety chosen; canned beans add heartiness and a contrasting mouthfeel to the chili and chips. Rinse and drain if packing liquid is thick or salty, and scatter evenly so each serving gets balanced bean distribution.
- one 10-ounce jar salsa or tomato sauce Introduce acidity, tang, and tomato flavor to bind the layers; salsa or tomato sauce brightens the casserole and adds moisture for cohesive baking. Choose a salsa for spicier, chunkier results or tomato sauce for smoother consistency, adjusting amount to maintain proper moisture levels.
- one 8-ounce package shredded cheese blend such as Mexican-style or similar, both store-brand and name-brand packages will say '2 cups' on the package Provide melted, creamy richness and a savory finish; shredded cheese blends like Mexican-style offer flavor complexity and help hold the casserole together when baked. Sprinkle evenly over and between layers as directed, and allow sufficient baking time for full melting and slight browning on top.
- 1 1/4 cups sour cream Contribute creaminess, tang, and cooling contrast to the spicy, savory elements; sour cream also helps create a smoother mouthfeel and can be layered or dolloped before baking or serving. Temper or fold into other dairy elements if needed to prevent curdling, and use measured amount to balance moisture and richness.
- 2 1/2 cups whole corn chips, crushed (about 1 to 1 1/2 cups after crushing to the size of a dime) Offer a final crunchy topping and additional structural element for the casserole; crushed corn chips added near the end create a crisp layer that contrasts with the creamy interior. Reserve this portion for topping so it browns nicely in the oven rather than becoming fully saturated.
Instructions
- Preheat oven to 375 F. Line a 9-by-9-inch baking pan with aluminum foil, spray with cooking spray, and set aside. In a large mixing bowl, add 5 to 6 cups chips (about 5 big handful of chips from the bag) and with a wooden spoon or similar, poke and crush the chips to the size of a dime. You don’t want powder, but make them small. Add the chili, beans, salsa, 2 loosely-packed cups cheese (about two-thirds of the package), and stir to combine. Pour mixture into prepared pan and bake for 20 minutes.: The kitchen fills with warm notes when the oven comes on, a small reassuring hum that signals the beginning of a baking ritual. You should feel a slight increase in room warmth, and the air will carry a faint metal scent from the racks. Getting the oven fully to 375 F ensures the casserole bakes evenly, allowing the interior to heat through while the top crisps; if you underheat the oven the dish may end up soggy rather than set. A common mistake is starting with a slightly lower temp and then increasing it midway, which can cause uneven browning, so wait until the oven indicates it has reached temperature before putting the pan in.
- After 20 minutes, remove pan from oven and spread sour cream in an even, flat layer over the casserole. Sprinkle 1 to 1 1/2 cups loosely packed cheese (the remaining cheese in the package) evenly over the top of the sour cream. Sprinkle 1 to 1 1/4 cups crushed corn chips over the top and bake for 9 to 12 minutes, or until top is browned to desired level.: The shiny foil makes cleanup effortless and helps lift the casserole from the pan, while the cooking spray prevents sticking. As you press the foil into the corners you will notice a faint crinkle sound, and the pan will look clean and ready. This step is important to preserve the crisp edges and to make serving simpler, because the foil keeps the bottom intact when you lift it out. Avoid skipping the spray, some cheeses can adhere to the foil and tear the final slice when removed.
- Serve immediately. Optionally, garnish with a dollop of sour cream, a sprinkling of cheese, or a pinch of chopped cilantro or onion. Store leftovers in a Glad Freezerware container or similar airtight container in the refrigerator for up to 5 days or in the freezer for up to 3 months.: Crushing creates a bed that soaks up sauce and loses the large, unwieldy shards that make slicing difficult. As you press the chips , you will hear a brittle crunch and see small fragments accumulate, like coarse breadcrumbs. Making them dime sized gives pockets that hold sauce while still providing texture; too fine and the base will be pasty, too large and the casserole will fall apart. A very common slip is pulverizing them into dust, which results in a heavy, glue like base instead of a structured layer.
- Add the chili, beans, salsa, 2 loosely packed cups cheese, and stir to combine: When the canned chili , beans , and salsa meet the crushed chips , you will notice steam rising slightly if the canned items are warm, and the mixture will take on a cohesive, chunky appearance. Stirring with a spoon distributes the flavors and the initial two cups of shredded cheese fold in to add pockets of melty richness. This mixture should be moist but not soupy; if it seems too wet the casserole will struggle to set. Avoid over stirring which can crush the beans and lead to a paste like texture.
- Pour mixture into prepared pan and bake for 20 minutes: As the pan slides into the oven you will hear a faint ceramic or metal shift, and soon the kitchen will be scented with warming tomato and melting cheese . After 20 minutes the edges should look set and the center warm and bubbling slightly. This initial bake gives time for the moisture to distribute and the chips in the base to hydrate just enough. Do not open the oven often during this phase, as temperature loss can prevent proper setting and lengthen cooking time.
- After 20 minutes, remove pan from oven and spread sour cream in an even flat layer over the casserole: The heat will be evident as you slide the rack out, and the surface will have small bubbles where the mixture has released steam. Spreading the sour cream creates a cooling creamy veil that moderates spice and allows the top cheese to brown evenly. Work gently to avoid breaking the set base; if you push too hard you can create divots that concentrate moisture and prevent even browning later.
- Sprinkle 1 to 1 1/2 cups loosely packed cheese evenly over the top of the sour cream: The second layer of shredded cheese should be scattered so it melts into a golden blanket. You will see distinct shreds pool together and then begin to gloss as they warm. This layer is what gives the casserole its signature gooey finish and browned top, so distribute it evenly for uniform color and texture. Adding too much here can overwhelm the balance and make the top oily as it melts.
- Sprinkle 1 to 1 1/4 cups crushed corn chips over the top and bake for 9 to 12 minutes or until top is browned to desired level: The final chips create a crunchy crown that toasts in the oven, providing contrast to the creamy middle. Listen for the faint sizzle as the top warms, and watch the color change from pale to amber to golden brown. Because ovens vary, start checking at nine minutes to avoid burning; a single minute can shift the result from perfectly toasted to overly dark. If you notice uneven browning, rotate the pan carefully to promote an even finish.
- Serve immediately: A fresh slice will be warm and slightly gooey with a crisp top, releasing a savory aroma that invites immediate bites. Serving hot maintains the contrast between the crunchy top and soft center, while cooling will firm the casserole. A typical error is letting it sit too long before slicing, which can cool the cheese and make the texture dense rather than tender and flowing.
- Optionally garnish with a dollop of sour cream or a sprinkling of cheese: A final spoonful of sour cream or an extra pinch of shredded cheese adds visual appeal and a fresh creamy note. The garnish introduces a cool counterpoint to the heat and can refresh the first bite. Avoid over garnishing, which can mask the carefully balanced flavors baked into the casserole.
- Store leftovers in an airtight container in the refrigerator for up to 5 days or in the freezer for up to 3 months: Proper storage preserves texture and flavor, and the cooled casserole should be sealed tightly to prevent drying and odor transfer. When reheating from the fridge, warm gently to restore the creamy texture without burning the edges; from frozen, thaw in the fridge overnight first for best results. A mistake is microwaving from fully frozen, which can heat unevenly and create soggy patches.
Notes
- Stretch with extra vegetables: Add canned corn or diced bell peppers to the filling to increase volume and add brightness without changing the method, keeping the overall wet ingredient balance similar so baking time remains consistent.
- Use a milder sauce: Swap jarred salsa for a smoother tomato sauce if you prefer less texture and spice, which will yield a gentler flavor profile while maintaining moisture for the chips.
- Make it vegan: Replace the dairy cheese and sour cream with plant based alternatives labeled for melting and thickening, ensuring you select products that tolerate heat to avoid separation.
- Adjust bean mix: Use one type of canned bean or a medley, depending on desired texture; denser refried beans make the casserole firmer, while whole beans give bite and contrast.
- Bulk it up with protein: If you want more heft, add crumbled tofu or tempeh to the filling, which soaks up flavors and increases satiety without changing assembly steps.
- Control spice level: Choose a mild or hot jarred salsa to manage heat, and remember the sour cream layer will soften spice on the palate.