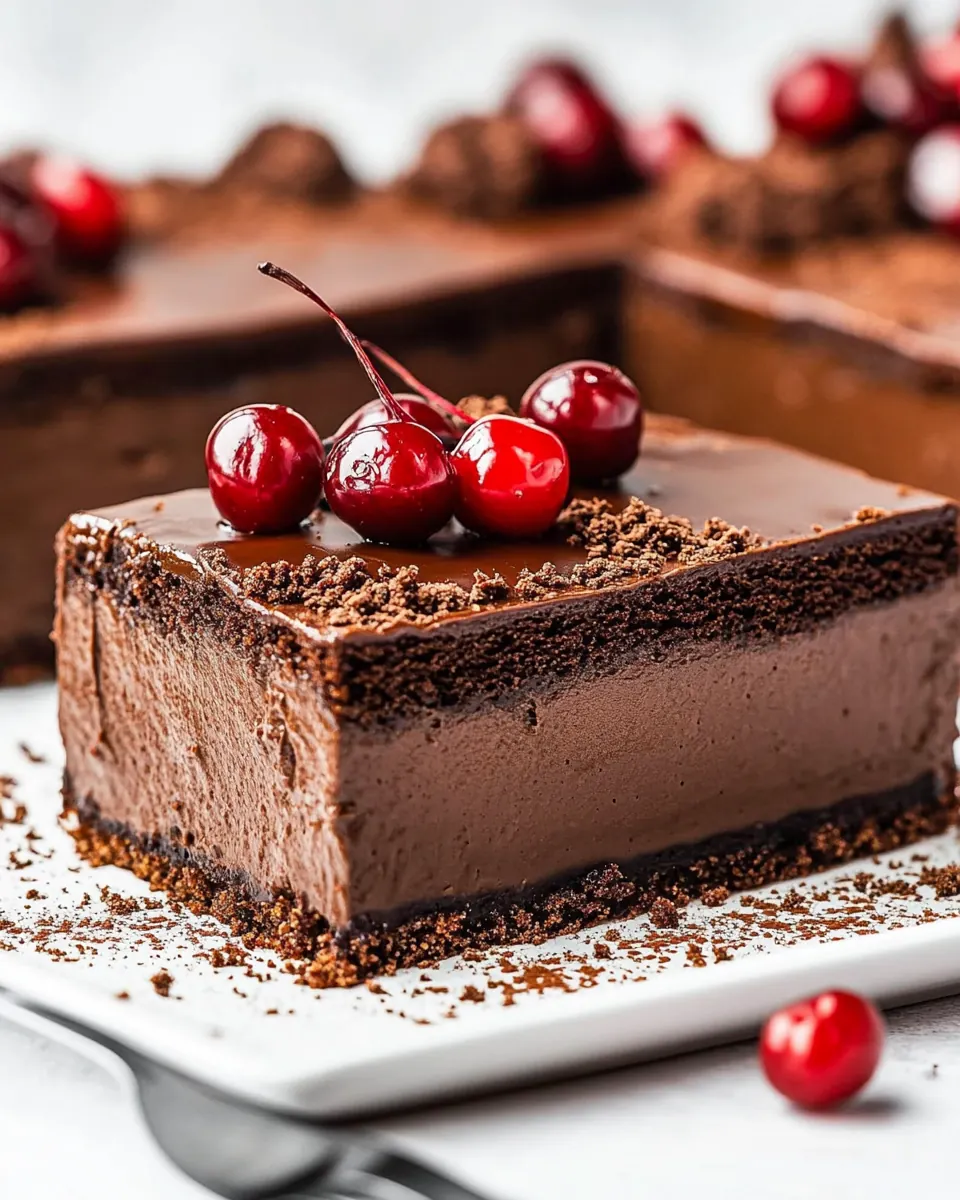
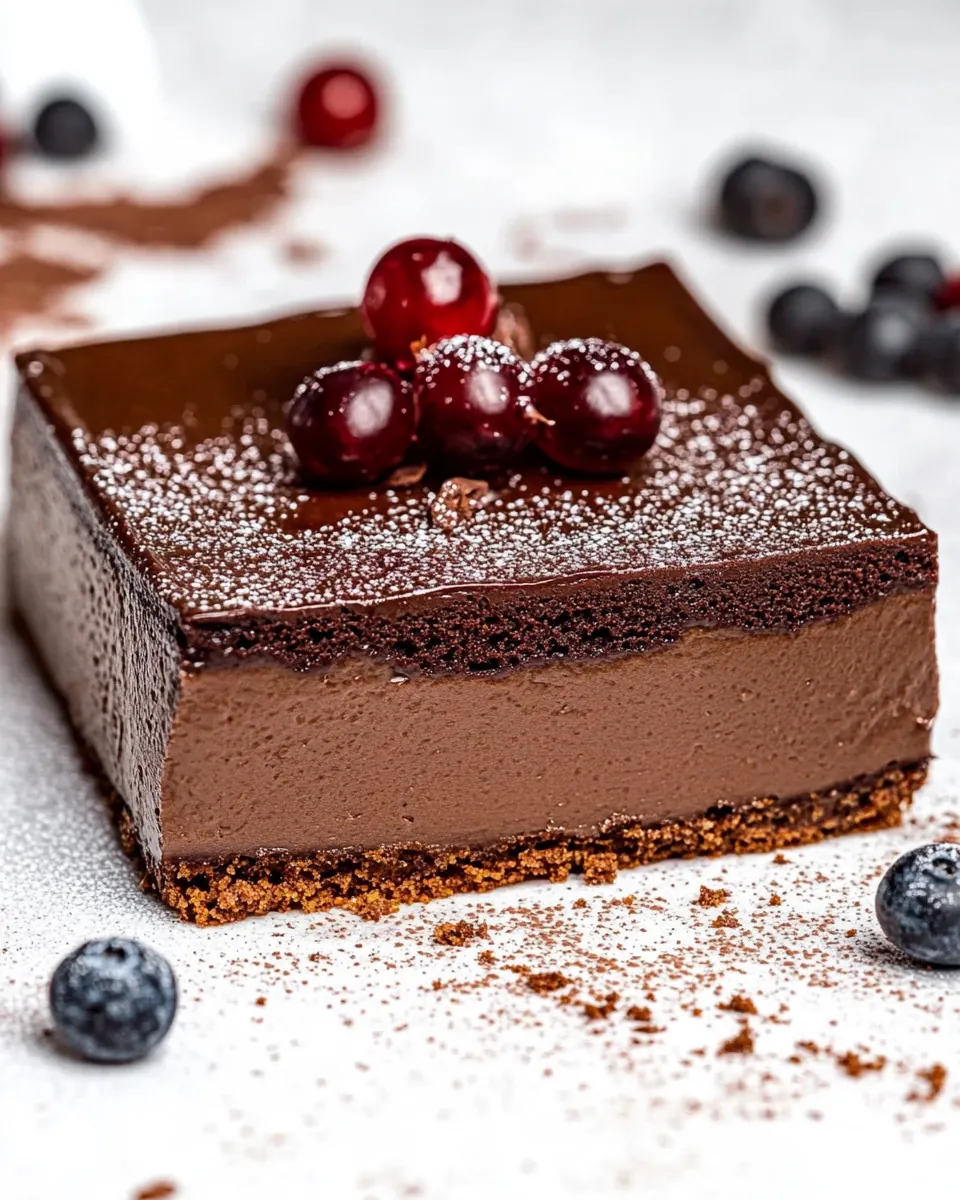
Chocolate Magic Cake
Chocolate Magic Cake came into my life on a rainy afternoon when I needed something that felt both nostalgic and a little bit wondrous, and that first bite convinced me it was worth every minute of the fuss. I remember cracking the eggs and watching the batter transform in ways that felt almost like science, and that tactile curiosity kept me by the oven until the kitchen filled with warm cocoa steam. For me, this recipe is less about showy frosting and more about the soft, custardy middle that surprises you with its delicate set.
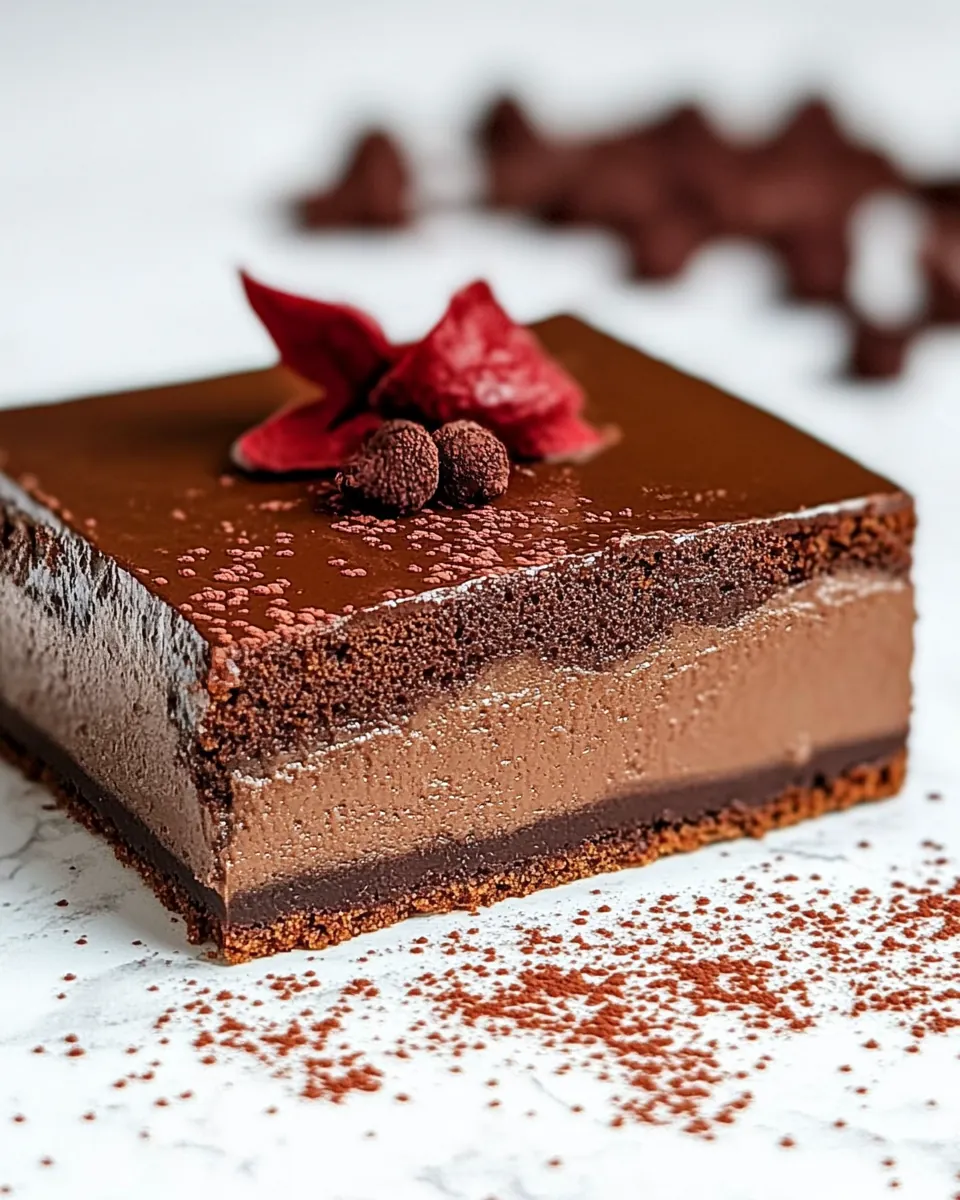
I still laugh thinking about the first time I served Chocolate Magic Cake to friends who expected a dense, fudgy slice and instead got three distinct layers: a thin, tender top, a silky custard center, and a light cake base. Their faces said it all, and that moment turned this recipe into a staple whenever I want to impress without fuss. Each stage of the batter and each whisk of the egg whites feels like a small revelation, and I love watching home cooks pause in that same way I once did.
There is a comfort in how straightforward the technique is, while the result feels almost magical. I often bring Chocolate Magic Cake to potlucks and family gatherings because it travels well after chilling, and the contrast between the slightly set top and the custard center draws compliments every time. Over the years I have learned little tricks that make the texture more consistent, and sharing those tips has become one of my favorite parts of cooking this cake for others.
Recipe Snapshot
1 hr 20 mins
20 mins
60 mins
Medium
250 kcal
American
Gluten-Free, Low FODMAP
Desserts
8-inch Square Cake Pan, Parchment Paper, Glass Mixing Bowl Set (3 piece), KitchenAid Hand Mixer, 6-Inch Stainless Steel Whisk
The Charm of This Chocolate Magic Cake
Layered Texture with No Fuss
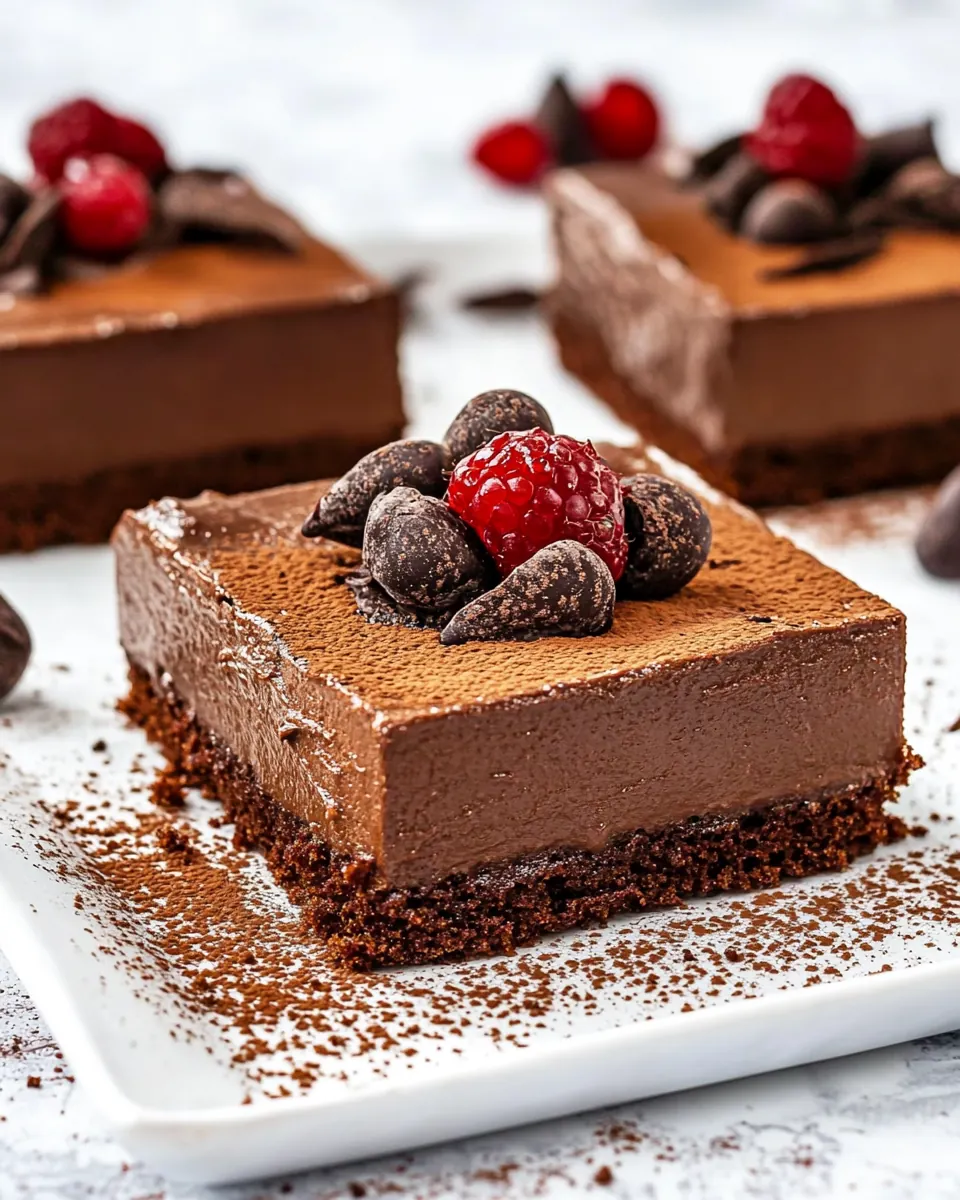
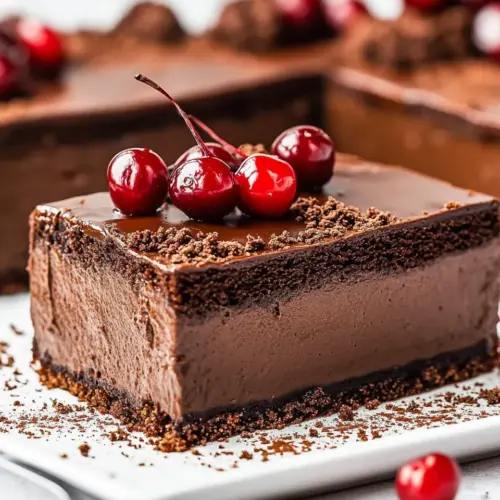
I adore how Chocolate Magic Cake delivers three textures from a single batter. The top is delicate and tender, the middle almost custardy, and the base provides enough structure to hold slices. I think this contrast keeps people coming back for seconds, and it works beautifully without complicated steps. When you serve it chilled, those layers are unmistakable, and I love how it feels special even when made on a weekday morning.
Surprising Yet Simple Technique
One of the reasons I champion this recipe is its clever method. You separate eggs and whip the whites to airy peaks, which creates lift, while the yolk mixture yields richness. That combination produces a textured cake that tastes sophisticated but is accessible to most home bakers. I always remind friends that patience with the egg whites pays off in texture, and once you master that step, this cake becomes reliably rewarding.
Accessible Ingredients
The ingredient list for Chocolate Magic Cake reads like pantry staples, which is something I truly appreciate. Items like all purpose flour, cocoa powder, and milk are usually on hand, so it’s easy to throw this together on impulse. I often tell people that the best recipes are the ones you can make without a special shopping trip, and this cake fits that bill perfectly.
Impressive Presentation
Even though the technique is unassuming, the finished cake looks refined. After chilling, the slices reveal that distinct layered appearance that always prompts compliments. I’ve served it at afternoon tea and casual dinners, and it always feels like a thoughtful ending to a meal. For me, that wow factor with minimal effort is a big reason to love this recipe.
Flexible and Crowd Friendly
This cake scales well for small gatherings, and the simple ingredient proportions make it easy to double or halve as needed. I enjoy that flexibility when planning menus, and the cake’s ability to be made ahead and chilled is a genuine convenience. When company arrives unexpectedly, having this recipe at the ready feels like a secret superpower.
Shopping List for Chocolate Magic Cake
The ingredients for Chocolate Magic Cake are deliberately simple, each playing a clear role in creating the unique triple layered texture. The egg whites provide lift and airiness, the yolks add richness, and the combination of all purpose flour and cocoa powder creates structure and chocolate flavor. The warm milk helps melt the butter slightly and blends the batter into a silky consistency. Together these parts produce a cake that sets into a custardy middle with a tender top, while remaining approachable for everyday baking.
- 4 large eggs (at room temperature and separated): Separate and whisk egg whites and yolks to provide structure and leavening; yolks add richness while whipped whites create lift and the cake's characteristic custardy and airy layers when folded in carefully.
- 1 tablespoon water: Add to egg whites to stabilize foam and slightly thin the mixture; water helps achieve optimal consistency for whipping and contributes to even incorporation of ingredients.
- 3/4 cups sugar: Sweeten the batter and help tenderize the crumb while contributing to moisture and caramelization; sugar also helps stabilize whipped egg whites and balances cocoa bitterness.
- 8 tablespoons butter (unsalted and melted, 1 stick): Melt and incorporate for fat and richness; butter adds moisture, flavor depth, and a smooth mouthfeel while aiding in browning and tenderizing the cake crumb.
- 1 teaspoon vanilla extract: Flavor the batter with warm aromatics; vanilla enhances chocolate notes and rounds out the overall taste without overpowering other components.
- 1/8 teaspoons salt: Enhance overall flavor balance and strengthen structure slightly; a pinch of salt heightens chocolate flavor and offsets sweetness for a more complex profile.
- 6 1/2 tablespoons all-purpose flour: Provide light bulk and structure while absorbing moisture; all-purpose flour contributes gluten for body but is used sparingly to keep the cake delicate and custard-like.
- 6 tablespoons cocoa powder: Impart chocolate flavor and color while contributing dry structure; cocoa powder delivers intense chocolate notes and slight astringency that sugar and milk balance.
- 2 cups milk (warmed up to about 95°F): Warm and hydrate the batter while contributing to the custardy texture; warm milk helps dissolve dry ingredients and promotes even mixing and a tender crumb.
- 1 teaspoon vinegar (regular white vinegar): React with milk and batter acidity to tenderize and slightly leaven; vinegar ensures a balanced pH that helps achieve the magic cake's distinct layered texture.
Instructions for Chocolate Magic Cake
This recipe rewards careful technique, and I find that taking your time with each stage yields the truest magic. Read through the steps first so you know what sensory cues to watch for, then move with purpose. Keep your bowls clean and dry, and remember that temperature matters for the egg whites and for integrating the butter and milk.
- Prep: Preheat oven to 325°F. Line a 8×8 inch baking dish with parchment paper.: Preheat oven to 325°F. Line a 8×8 inch baking dish with parchment paper. : The air in a preheated oven smells faintly of warm metal and dry heat, and that steady heat is essential to set the layers slowly so the custard center forms without overbaking. Make sure the oven reaches the full 325°F before you slide the pan in, because starting in a cooler oven changes the bake time and texture. A common mistake is not lining the pan properly, which can cause sticking or tearing when you remove the cake after chilling.
- Mix the yolks with water and sugar: Separate the eggs and add the egg yolks to the bowl of a mixer. Add a tbsp of water and the sugar. Beat this at high speed until are eggs are light and pale in color.: Separate the eggs and add the egg yolks to the bowl of a mixer. Add a tbsp of water and the sugar. Beat this at high speed until are eggs are light and pale in color. : As you beat the yolks with water and sugar , you'll notice the mixture lighten to a pale yellow and develop an airy, ribbon like quality when the whisk is lifted. This visual cue means air has been incorporated, which contributes to the cake's tender top. Be patient, and scrape the bowl occasionally to ensure even mixing. One pitfall is stopping too early, leaving the mixture dense and darker, which reduces the delicate lift of the final bake.
- Drizzle in melted butter, vanilla and add salt: Add melted butter, vanilla extract and salt to the yolk mixture and continue beating until butter is fully incorporated and the mixture is light.: Add melted butter, vanilla extract and salt to the yolk mixture and continue beating until butter is fully incorporated and the mixture is light. : When the cooled, melted butter is added slowly, the batter becomes silkier and emits a faint buttery aroma, signaling richness. Keep the mixer running at moderate speed so the butter disperses evenly without breaking the emulsion. If the butter is added too hot, it can curdle the yolk mixture, producing an oily texture that undermines the final cake.
- Stir in the dry ingredients: Add the flour and cocoa powder to the bowl and mix thoroughly, scraping down the side and bottom of the bowl as needed.: Add the flour and cocoa powder to the bowl and mix thoroughly, scraping down the side and bottom of the bowl as needed. : Folding in the sifted flour and cocoa powder creates a chocolate scented batter that should be smooth and free of pockets of dry powder. Use a spatula to scrape the bowl and ensure even incorporation, watching for any streaks of dry flour. Overmixing here can develop gluten and make the base tougher, so stop as soon as everything is combined and uniform.
- Add milk: Add the milk a bit at a time and mix. The milk should be warm so not to cool the butter. Make sure the milk has been mixed in thoroughly. The mixture should be pretty wet, so don't get scared.: Add the milk a bit at a time and mix. The milk should be warm so not to cool the butter. Make sure the milk has been mixed in thoroughly. The mixture should be pretty wet, so don't get scared. : Pouring warm milk gradually tempers the batter and results in a glossy, pourable consistency that may look thinner than a typical cake batter, which is exactly right. The smell of warm milk and chocolate becomes comforting and hints at the custardy interior forming. If the milk is too cold the butter can re solidify and make lumps, so always aim for about 95°F when you add it.
- Whisk the egg whites: If using a handheld mixer, clean the beaters and pour the egg whites in a large clean bowl. If using a stand mixer, wash the mixing bowl and whisk attachment and make sure you dry them out. Add egg whites to mixing bowl and the vinegar and mix until egg whites are stiff.: If using a handheld mixer, clean the beaters and pour the egg whites in a large clean bowl. If using a stand mixer, wash the mixing bowl and whisk attachment and make sure you dry them out. Add egg whites to mixing bowl and the vinegar and mix until egg whites are stiff. : As you whip the egg whites with the vinegar , listen for the change in sound from watery to thick and glossy, and watch the peaks transform from soft to firm, holding their shape. The bowl should feel cooler to the touch as the whites take on air. One common error is any trace of yolk or grease in the bowl, which will prevent the whites from reaching full stiffness and compromise lift.
- Add the egg whites to cake batter: Add a bit of the egg whites to the chocolate mixture and gently mix using a whisk. Next you're going to reverse and add a bit of the chocolate mixture to the egg whites. This way it will be easier to mix everything together. Repeat until everything is mixed together and the mixture should be quite thin. Make sure to leave a distinct layer of fluffy egg white lumps at the top of the batter, so do not overmix.: Add a bit of the egg whites to the chocolate mixture and gently mix using a whisk. Next you're going to reverse and add a bit of the chocolate mixture to the egg whites. This way it will be easier to mix everything together. Repeat until everything is mixed together and the mixture should be quite thin. Make sure to leave a distinct layer of fluffy egg white lumps at the top of the batter, so do not overmix. : When combining the airy whites and the denser chocolate batter, aim for gentle motions that preserve air, and you should be able to see white flecks floating atop a thin, chocolate liquid. The sound is quieter now, just soft scraping as you fold, and the smell remains chocolaty and soft. Resist the urge to fully homogenize, because those white pockets are the secret to the three layers; overmixing will give you a uniform texture and lose the magic effect.
- Bake, chill and serve: Pour the batter in the prepared baking dish and bake for roughly 60 minutes or until done. The cake will still jiggle in the middle when you take it out, so that's normal. Let it cool completely, chill for about 4 hours letting the cake set, then cut into squares and serve.: Pour the batter in the prepared baking dish and bake for roughly 60 minutes or until done. The cake will still jiggle in the middle when you take it out, so that's normal. Let it cool completely, chill for about 4 hours letting the cake set, then cut into squares and serve. : Sliding the pan into the preheated oven starts a quiet transformation, the kitchen fills with a deep chocolate aroma and the surface will begin to brown gently. The edges will firm first while the center remains softly jiggly, which is the right cue to remove it and avoid overbaking. Cooling brings those layers together, and chilling is essential to let the custard fully set so slices hold. A frequent misstep is slicing too soon, which yields messy portions rather than the clean, layered pieces you want.
Substitutions and Tips
I like to offer practical options so you can adapt the recipe to what you have on hand, while still honoring the structure that creates the cake’s magic layers. Below are careful tips and substitutions that preserve texture and flavor. Each suggestion focuses on the why so you can make informed choices and still end up with a beautiful result.
- Room Temperature Eggs: If you forget to bring eggs to room temp, submerge them in warm tap water for 10 to 15 minutes to speed up the process without affecting volume.
- Butter Temperature: Use melted but slightly cooled butter to avoid cooking the yolks, and if it looks too hot, let it sit until it feels just warm when tested on your wrist.
- Milk Warmth: Keep the milk near 95°F so it integrates smoothly; if it cools too much, warm gently and check with a fingertip for warmth, not heat.
- Cocoa Quality: Use a decent unsweetened cocoa powder for deep flavor; Dutch processed will taste different than natural, so choose based on desired chocolate intensity.
- Measuring Flour: Spoon and level the all purpose flour rather than scooping to avoid packing and a dense base, which can ruin the custardy balance.
- Whipping Whites: Add the teaspoon of vinegar to stabilize the egg whites, and avoid overbeating which can make them dry and hard to incorporate gently.
Serving Suggestions
Serving Chocolate Magic Cake is a joyful moment, and how you present it can enhance the experience. This cake shines when sliced chilled, and simple accompaniments let the layered texture take center stage. Below I share ideas for occasions, pairings, and storage that help you keep the cake tasting its best.
- Slice chilled for clean pieces: Refrigerate for at least four hours so the custard layer firms and you get neat, elegant squares.
- Light dusting for presentation: A fine dust of cocoa powder over the top adds a refined look without overpowering the flavor.
- Serve with fresh fruit: Bright berries pair well to cut through the richness, offering a fresh contrast to the custardy center.
- Occasion friendly: Bring this to afternoon tea, casual dinner, or a holiday gathering where a make ahead dessert is appreciated.
- Storage tips: Keep in an airtight container in the refrigerator for up to three days, and freeze wrapped portions for up to one month if needed.
FAQ
Conclusion
This recipe’s charm lies in its surprising triple layers from one simple batter, making Chocolate Magic Cake a delightful blend of elegance and comfort. If you enjoy desserts that feel special without elaborate steps, give this cake a try and take your time with the whipping and chilling stages. You’ll likely find it becomes a favorite for occasions where you want to impress quietly, and its ease will encourage you to make it again and again.
Chocolate Magic Cake
Equipment
- 8-inch Square Cake Pan
- Parchment Paper
- Glass Mixing Bowl Set (3 piece)
- KitchenAid Hand Mixer
- 6-Inch Stainless Steel Whisk
Ingredients
- 4 large eggs (at room temperature and separated) Separate and whisk egg whites and yolks to provide structure and leavening; yolks add richness while whipped whites create lift and the cake's characteristic custardy and airy layers when folded in carefully.
- 1 tablespoon water Add to egg whites to stabilize foam and slightly thin the mixture; water helps achieve optimal consistency for whipping and contributes to even incorporation of ingredients.
- 3/4 cups sugar Sweeten the batter and help tenderize the crumb while contributing to moisture and caramelization; sugar also helps stabilize whipped egg whites and balances cocoa bitterness.
- 8 tablespoons butter (unsalted and melted, 1 stick) Melt and incorporate for fat and richness; butter adds moisture, flavor depth, and a smooth mouthfeel while aiding in browning and tenderizing the cake crumb.
- 1 teaspoon vanilla extract Flavor the batter with warm aromatics; vanilla enhances chocolate notes and rounds out the overall taste without overpowering other components.
- 1/8 teaspoons salt Enhance overall flavor balance and strengthen structure slightly; a pinch of salt heightens chocolate flavor and offsets sweetness for a more complex profile.
- 6 1/2 tablespoons all-purpose flour Provide light bulk and structure while absorbing moisture; all-purpose flour contributes gluten for body but is used sparingly to keep the cake delicate and custard-like.
- 6 tablespoons cocoa powder Impart chocolate flavor and color while contributing dry structure; cocoa powder delivers intense chocolate notes and slight astringency that sugar and milk balance.
- 2 cups milk (warmed up to about 95°F) Warm and hydrate the batter while contributing to the custardy texture; warm milk helps dissolve dry ingredients and promotes even mixing and a tender crumb.
- 1 teaspoon vinegar (regular white vinegar) React with milk and batter acidity to tenderize and slightly leaven; vinegar ensures a balanced pH that helps achieve the magic cake's distinct layered texture.
Instructions
- Prep: Preheat oven to 325°F. Line a 8×8 inch baking dish with parchment paper.: Preheat oven to 325°F. Line a 8×8 inch baking dish with parchment paper. : The air in a preheated oven smells faintly of warm metal and dry heat, and that steady heat is essential to set the layers slowly so the custard center forms without overbaking. Make sure the oven reaches the full 325°F before you slide the pan in, because starting in a cooler oven changes the bake time and texture. A common mistake is not lining the pan properly, which can cause sticking or tearing when you remove the cake after chilling.
- Mix the yolks with water and sugar: Separate the eggs and add the egg yolks to the bowl of a mixer. Add a tbsp of water and the sugar. Beat this at high speed until are eggs are light and pale in color.: Separate the eggs and add the egg yolks to the bowl of a mixer. Add a tbsp of water and the sugar. Beat this at high speed until are eggs are light and pale in color. : As you beat the yolks with water and sugar , you'll notice the mixture lighten to a pale yellow and develop an airy, ribbon like quality when the whisk is lifted. This visual cue means air has been incorporated, which contributes to the cake's tender top. Be patient, and scrape the bowl occasionally to ensure even mixing. One pitfall is stopping too early, leaving the mixture dense and darker, which reduces the delicate lift of the final bake.
- Drizzle in melted butter, vanilla and add salt: Add melted butter, vanilla extract and salt to the yolk mixture and continue beating until butter is fully incorporated and the mixture is light.: Add melted butter, vanilla extract and salt to the yolk mixture and continue beating until butter is fully incorporated and the mixture is light. : When the cooled, melted butter is added slowly, the batter becomes silkier and emits a faint buttery aroma, signaling richness. Keep the mixer running at moderate speed so the butter disperses evenly without breaking the emulsion. If the butter is added too hot, it can curdle the yolk mixture, producing an oily texture that undermines the final cake.
- Stir in the dry ingredients: Add the flour and cocoa powder to the bowl and mix thoroughly, scraping down the side and bottom of the bowl as needed.: Add the flour and cocoa powder to the bowl and mix thoroughly, scraping down the side and bottom of the bowl as needed. : Folding in the sifted flour and cocoa powder creates a chocolate scented batter that should be smooth and free of pockets of dry powder. Use a spatula to scrape the bowl and ensure even incorporation, watching for any streaks of dry flour. Overmixing here can develop gluten and make the base tougher, so stop as soon as everything is combined and uniform.
- Add milk: Add the milk a bit at a time and mix. The milk should be warm so not to cool the butter. Make sure the milk has been mixed in thoroughly. The mixture should be pretty wet, so don't get scared.: Add the milk a bit at a time and mix. The milk should be warm so not to cool the butter. Make sure the milk has been mixed in thoroughly. The mixture should be pretty wet, so don't get scared. : Pouring warm milk gradually tempers the batter and results in a glossy, pourable consistency that may look thinner than a typical cake batter, which is exactly right. The smell of warm milk and chocolate becomes comforting and hints at the custardy interior forming. If the milk is too cold the butter can re solidify and make lumps, so always aim for about 95°F when you add it.
- Whisk the egg whites: If using a handheld mixer, clean the beaters and pour the egg whites in a large clean bowl. If using a stand mixer, wash the mixing bowl and whisk attachment and make sure you dry them out. Add egg whites to mixing bowl and the vinegar and mix until egg whites are stiff.: If using a handheld mixer, clean the beaters and pour the egg whites in a large clean bowl. If using a stand mixer, wash the mixing bowl and whisk attachment and make sure you dry them out. Add egg whites to mixing bowl and the vinegar and mix until egg whites are stiff. : As you whip the egg whites with the vinegar , listen for the change in sound from watery to thick and glossy, and watch the peaks transform from soft to firm, holding their shape. The bowl should feel cooler to the touch as the whites take on air. One common error is any trace of yolk or grease in the bowl, which will prevent the whites from reaching full stiffness and compromise lift.
- Add the egg whites to cake batter: Add a bit of the egg whites to the chocolate mixture and gently mix using a whisk. Next you're going to reverse and add a bit of the chocolate mixture to the egg whites. This way it will be easier to mix everything together. Repeat until everything is mixed together and the mixture should be quite thin. Make sure to leave a distinct layer of fluffy egg white lumps at the top of the batter, so do not overmix.: Add a bit of the egg whites to the chocolate mixture and gently mix using a whisk. Next you're going to reverse and add a bit of the chocolate mixture to the egg whites. This way it will be easier to mix everything together. Repeat until everything is mixed together and the mixture should be quite thin. Make sure to leave a distinct layer of fluffy egg white lumps at the top of the batter, so do not overmix. : When combining the airy whites and the denser chocolate batter, aim for gentle motions that preserve air, and you should be able to see white flecks floating atop a thin, chocolate liquid. The sound is quieter now, just soft scraping as you fold, and the smell remains chocolaty and soft. Resist the urge to fully homogenize, because those white pockets are the secret to the three layers; overmixing will give you a uniform texture and lose the magic effect.
- Bake, chill and serve: Pour the batter in the prepared baking dish and bake for roughly 60 minutes or until done. The cake will still jiggle in the middle when you take it out, so that's normal. Let it cool completely, chill for about 4 hours letting the cake set, then cut into squares and serve.: Pour the batter in the prepared baking dish and bake for roughly 60 minutes or until done. The cake will still jiggle in the middle when you take it out, so that's normal. Let it cool completely, chill for about 4 hours letting the cake set, then cut into squares and serve. : Sliding the pan into the preheated oven starts a quiet transformation, the kitchen fills with a deep chocolate aroma and the surface will begin to brown gently. The edges will firm first while the center remains softly jiggly, which is the right cue to remove it and avoid overbaking. Cooling brings those layers together, and chilling is essential to let the custard fully set so slices hold. A frequent misstep is slicing too soon, which yields messy portions rather than the clean, layered pieces you want.
Notes
- Room Temperature Eggs: If you forget to bring eggs to room temp, submerge them in warm tap water for 10 to 15 minutes to speed up the process without affecting volume.
- Butter Temperature: Use melted but slightly cooled butter to avoid cooking the yolks, and if it looks too hot, let it sit until it feels just warm when tested on your wrist.
- Milk Warmth: Keep the milk near 95°F so it integrates smoothly; if it cools too much, warm gently and check with a fingertip for warmth, not heat.
- Cocoa Quality: Use a decent unsweetened cocoa powder for deep flavor; Dutch processed will taste different than natural, so choose based on desired chocolate intensity.
- Measuring Flour: Spoon and level the all purpose flour rather than scooping to avoid packing and a dense base, which can ruin the custardy balance.
- Whipping Whites: Add the teaspoon of vinegar to stabilize the egg whites, and avoid overbeating which can make them dry and hard to incorporate gently.