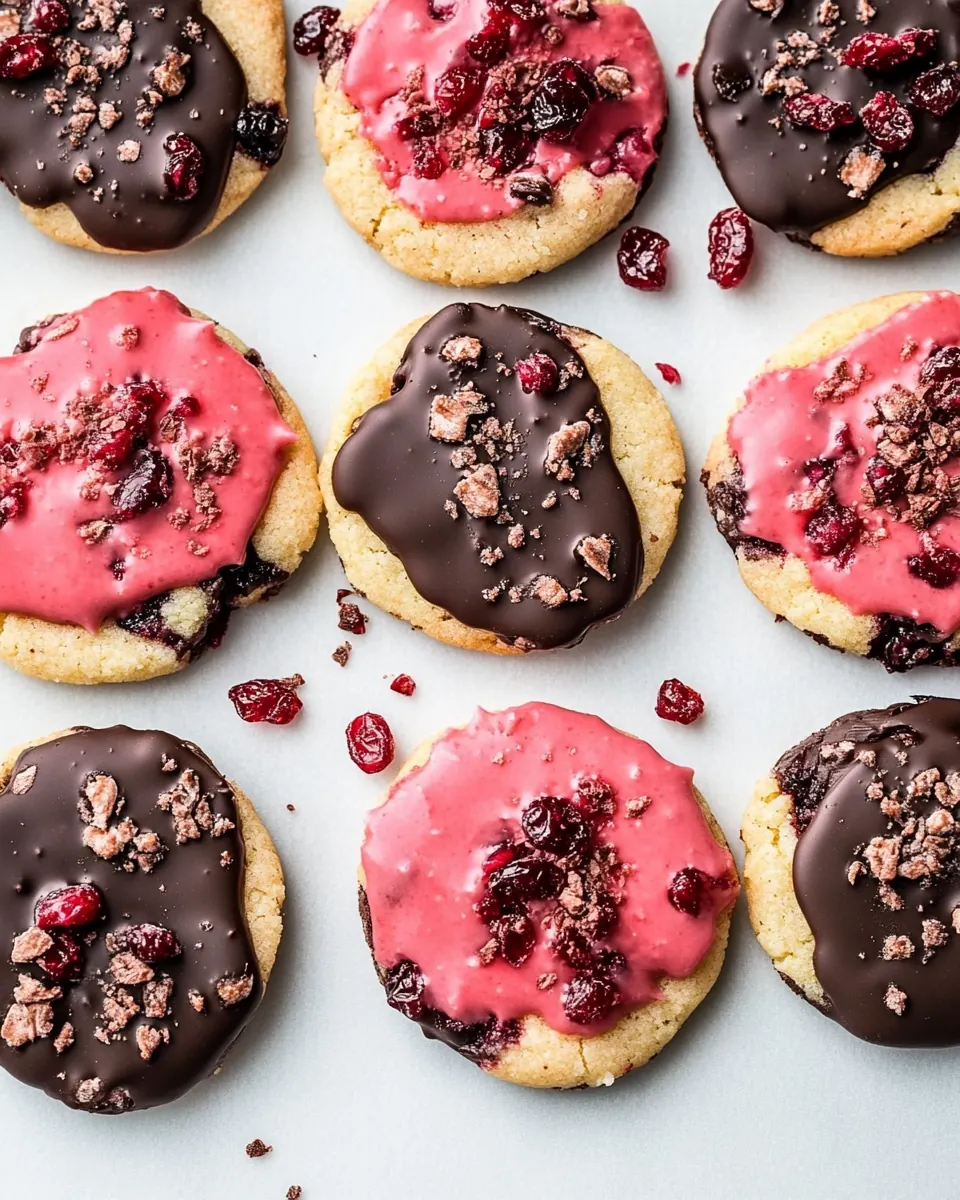
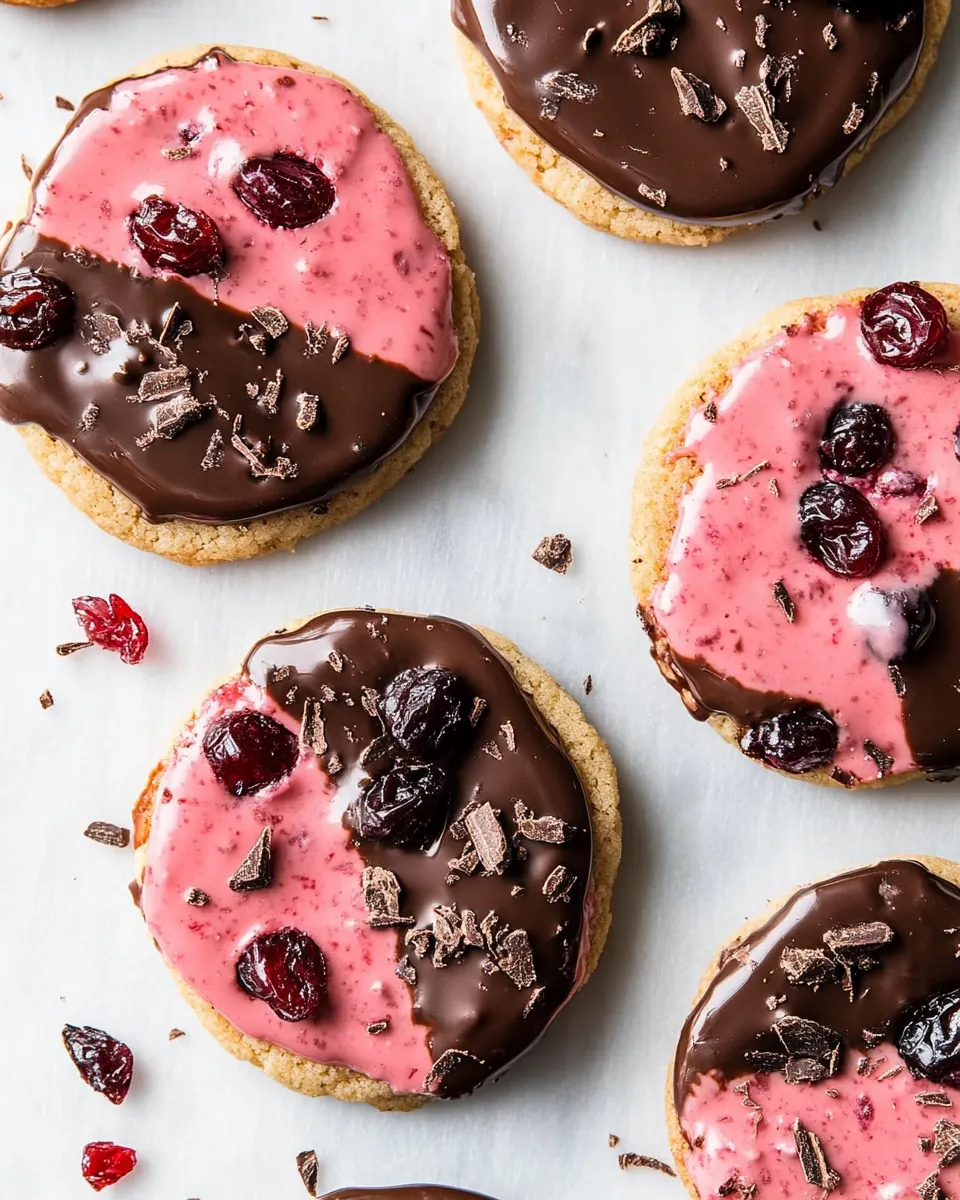
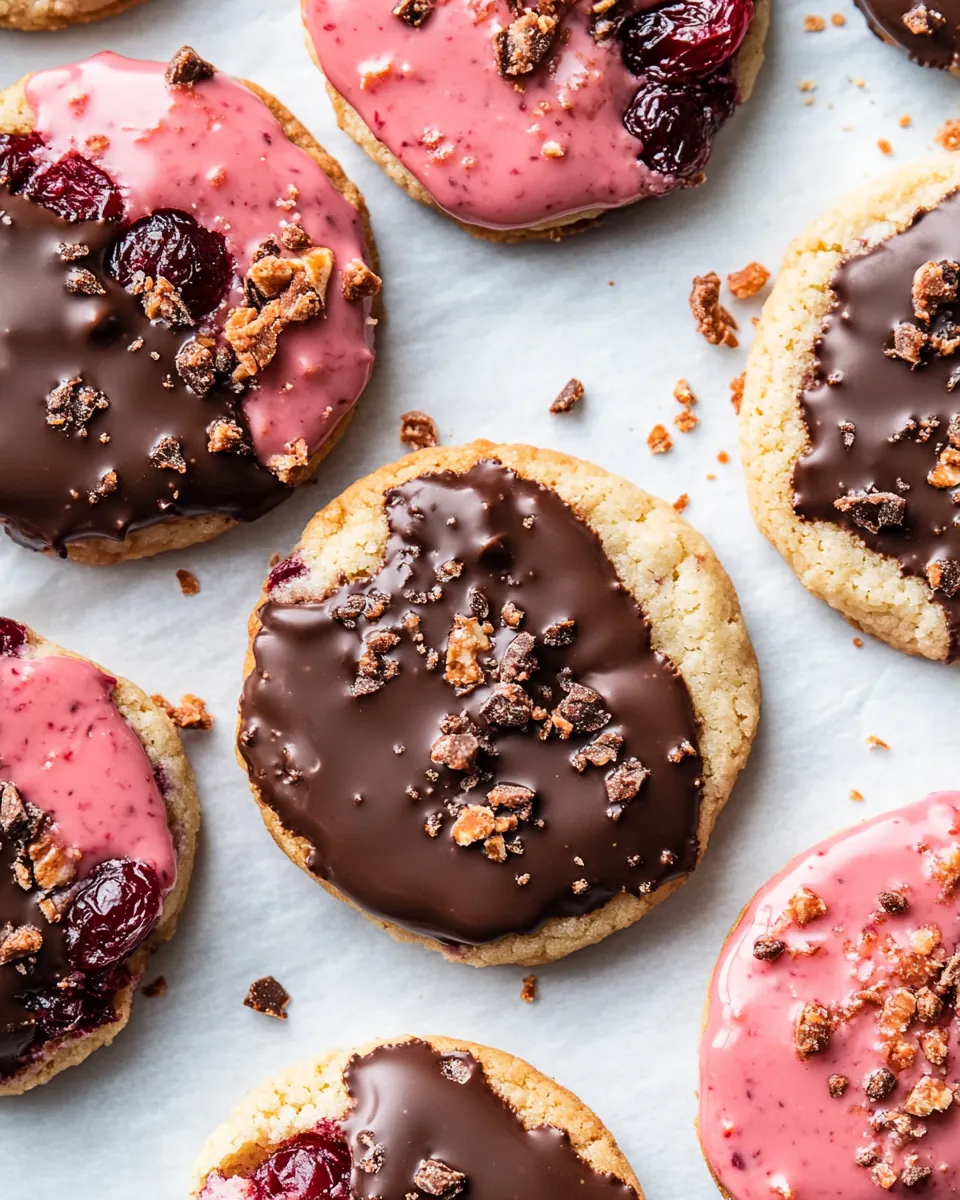
Chocolate Dipped Cranberry Cookies
Chocolate Dipped Cranberry Cookies came into my kitchen on a busy autumn afternoon when I wanted something festive but unfussy to bring to a neighborhood cookie swap. I remember pulling out a jar of dried cranberries and a bar of semi sweet chocolate, thinking I could marry bright tart fruit with rich, glossy chocolate in a way that felt both nostalgic and a little grown up. The first bite was all texture, the chew of dried cranberries meeting a tender cookie crumb, and the chocolate added that familiar, soothing finish that made mouths smile.
I find that these cookies are the kind I reach for when I want a make ahead treat that still feels special. I mixed the dough with the radio on, stirring in orange zest to lift the flavors, and I’ll admit I sampled a slightly warm cookie straight from the rack because restraint is not my strongest suit. Baking them became a small ritual, and the simple step of dipping half of each cookie in chocolate turned each one into a tiny hand decorated gift.
Recipe Snapshot
60 mins
30 mins
30 mins
Medium
180 kcal
American
Gluten-Free, Low FODMAP
Desserts
Electric stand mixer, Mixing bowls, Paddle attachment, Baking sheets, Silicone baking mats or parchment paper, Wire rack, Medium mixing bowl for melting chocolate, Refrigerator
What Sets This Chocolate Dipped Cranberry Cookies Apart
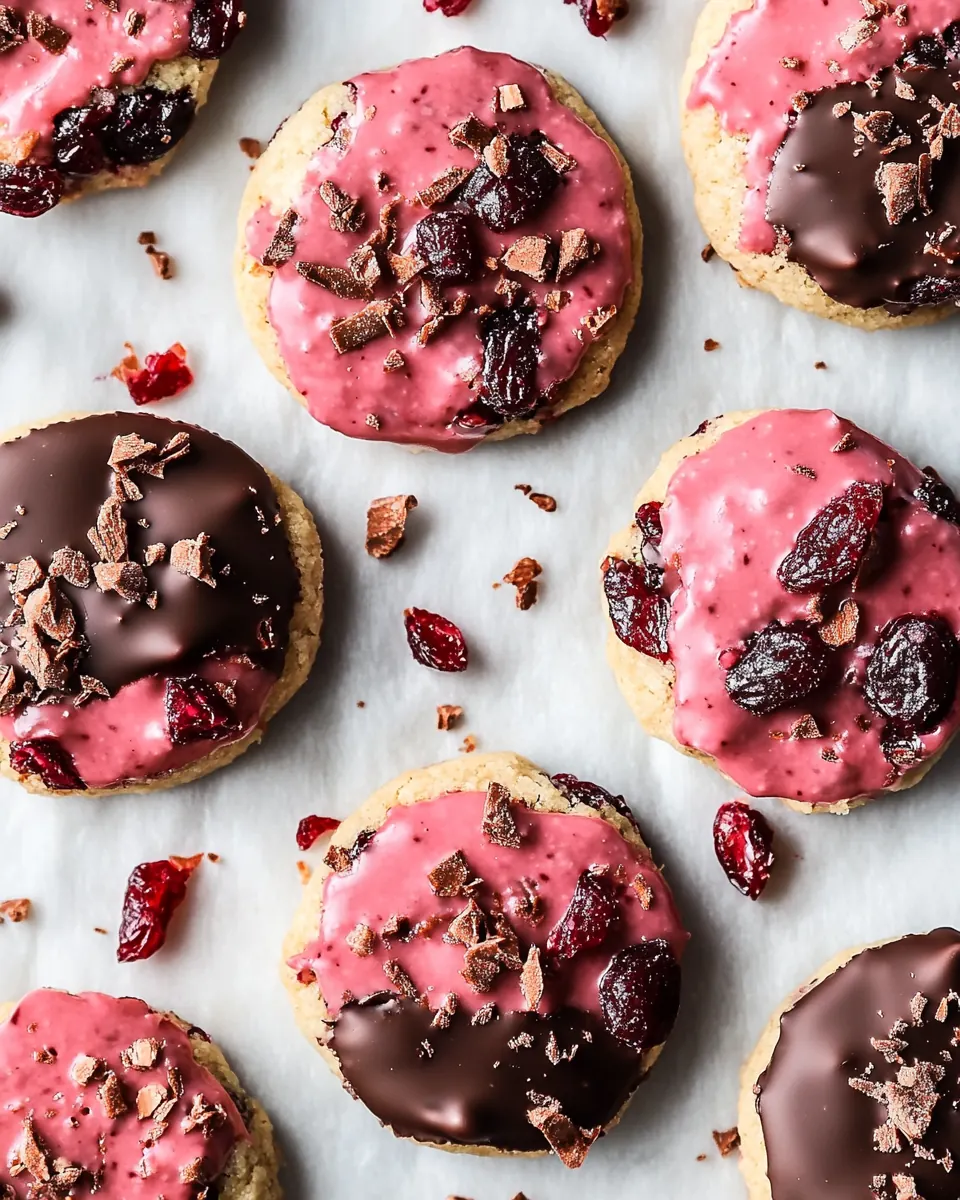
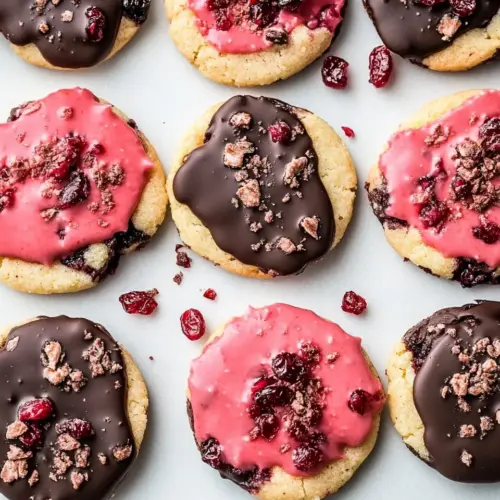
Bright cranberry contrast
I love how the tart cranberries cut through the sweet cookie base, giving every bite a lively pop. When I bake these, that fruitiness prevents the cookie from feeling heavy, and it keeps the flavor profile interesting across a whole plate.
Chocolate finish for texture and flavor
The semi sweet chocolate coating gives a luxurious snap and adds a bitter sweet balance that complements the granulated sugar in the dough. I often linger with my finger along the rim of the bowl to remove excess chocolate, it feels like a tiny chefly flourish.
Make ahead and gift friendly
These cookies are forgiving for baking in batches, and they travel well. I usually chill them briefly so the chocolate sets solid before stacking, which helps them survive a ride across town. When I give them away, people appreciate the homemade look and thoughtful taste.
Texture play
The combination of slightly firm, buttery dough and chewy chopped cranberries creates a pleasing contrast. If you add the optional chopped walnuts, you introduce a nutty crunch that makes the experience even more layered.
Accessible technique
You do not need advanced tools to make these, just basic mixing and a little patience while dipping the cookies. I like that the recipe rewards small attentions like warming the chocolate gradually so it melts smoothly, resulting in a glossy finish you can be proud of.
Recipe Ingredients for Chocolate Dipped Cranberry Cookies
I assemble these ingredients to build a cookie that is tender, slightly chewy, and full of bright notes. The dough forms the foundation, while the cranberries and chocolate provide personality. Each item plays a role from structure to flavor lift, and together they create a cookie that feels holiday ready yet simple enough for weekday baking.
- 2 1/3 cups (330 g) all-purpose flour: Provides the primary dry structure and bulk for the cookie dough, contributing gluten that gives chew and holds other ingredients together; lightly spoon and level when measuring for accuracy and consistent texture.
- 3/4 tsp baking soda: Acts as a leavening agent to create lightness and slight lift in the cookies by producing carbon dioxide when reacting with acids or heat; use the measured amount to avoid an overly cake-like crumb.
- 1/2 tsp salt: Balances flavor by enhancing sweetness and suppressing bitterness while also strengthening gluten development slightly; ensure even distribution with the dry ingredients for consistent seasoning.
- 1/2 tsp cream of tartar: Adds mild acidity that reacts with baking soda to promote gentle leavening while also giving a subtle tang that brightens the cookie flavor; measure carefully to avoid a metallic aftertaste.
- 1 1/4 cups (250 g) granulated sugar: Supplies sweetness and contributes to the cookie's spread, texture, and color through caramelization; creaming with butter helps incorporate air for a lighter bite and even browning.
- 1 cup (226 g) unsalted butter, softened but still slightly firm: Provides fat for richness, tenderness, and flavor while affecting spread and mouthfeel; keep slightly firm for proper creaming so the dough aerates without becoming greasy.
- 1 tsp orange zest: Imparts bright citrus aroma and a subtle floral brightness that complements cranberries and chocolate; finely grate zest without including bitter pith for best flavor.
- 1 large egg: Adds moisture, structure, and emulsification while contributing to lift and color; use at room temperature to incorporate smoothly into the creamed butter and sugar.
- 1 large egg yolk: Enhances richness, improves texture, and increases tenderness by adding fat and emulsifying properties; incorporate with the egg for a silkier, more stable dough.
- Red food coloring () (optional): Provides optional color enhancement for a festive appearance when used sparingly; add a few drops to reach the desired hue without altering flavor or texture.
- 1 tsp vanilla extract: Contributes aromatic depth and rounds out sweet and fruity notes, enhancing overall flavor harmony; add with the wet ingredients to distribute the aroma evenly.
- 1 1/3 cups cherry flavor dried cranberries, chopped into small bits: Introduces concentrated cranberry flavor, chewy texture, and tart-sweet contrast; chop into small bits to ensure even distribution and pleasant bites throughout the cookies.
- 12 oz . chopped semi-sweet chocolate: Supplies intense chocolate flavor and melting pockets that create contrast with the chewy dough; use chopped semi–sweet chocolate for balanced sweetness and melt-in-mouth texture.
- 1/2 cup chopped walnuts () (optional): Adds crunchy texture and a toasty, nutty flavor that complements cranberries and chocolate; include only if desired and chop to similar size as other mix-ins for even bites.
Instructions for Chocolate Dipped Cranberry Cookies
These directions guide you from bowl to beautiful chocolate dipped finish with clear sensory cues and small troubleshooting notes. I like to narrate what I watch for at each step so you can trust your instincts while baking. Keep your workspace organized and taste as you go when appropriate.
- Preheat oven to 350 degrees. Line baking sheets with silicone baking mats or parchment paper, set aside.: You will notice the warm air as the oven comes up to temperature, and this steady heat is what encourages even spread and gentle browning on the cookie edges. A properly preheated oven ensures consistent bake time and texture, so avoid sliding cookies in while the oven is still warming. Common mistake to avoid, placing cold baking sheets into an oven that is not fully preheated, which can cause uneven baking.
- In a medium mixing bowl whisk together flour, baking soda, salt and cream of tartar for 20 seconds, set aside.: As you whisk, watch the dry ingredients blend into a uniform pale mixture, and inhale that faint wheaty scent which signals even distribution. This step matters because it prevents clumps and ensures the leavening is evenly dispersed, promoting uniform rise and texture. One pitfall to watch for is over measuring flour into the whisked mix, which can alter the dough, so spoon and level carefully.
- In the bowl of an electric stand mixer fitted with the paddle attachment cream together sugar, butter and orange zest until well blended.: The mixture will turn lighter in color and become fluffy, with tiny specks of bright orange zest releasing aroma as you beat. Creaming incorporates air which yields a lighter cookie crumb, so take the time to reach the right texture. If the butter is too soft you will see greasy separation, a common misstep, so chill briefly before resuming if needed.
- Mix in egg then mix in egg yolk, coloring (approx. 12- 15 drops) and vanilla extract.: When you add the egg and yolk, the batter will glossy and smooth, and the aroma will round out with vanilla and citrus. Adding food coloring is optional, and it will tint the dough if you choose. Avoid over mixing once the eggs are added, or the dough can become dense from excess gluten development.
- Add in flour mixture then mix until nearly combined then add in cranberries and mix until combined.: The dough will start to pull away from the bowl and feel soft but manageable, studded with chewy cranberries . Mixing until nearly combined before adding fruit prevents overworking the dough while ensuring even distribution. A frequent mistake is continuing to mix beyond the point of cohesion, which can produce tougher cookies.
- Scoop dough out and shape into 2 Tbsp balls. Space 2 inches apart on prepared baking sheets.: You will feel the cool, slightly tacky dough in your hands as you form neat rounds, and the uniform size helps them bake evenly. I use a cookie scoop for consistency, which also keeps the dough cold from handling excessively. If dough becomes too warm and sticky, pop it into the fridge for a few minutes to firm up before shaping.
- Flatten cookies slightly, bake one sheet at a time in preheated oven, 9 – 11 minutes (cookies should appear slightly under-baked).: As you place the dough on the lined sheets, leave room for spread so edges do not merge, and the cookies can brown properly. The visual cue is small domes set on a clean surface; they will flatten slightly as they bake. Crowding the pan is a common error that results in misshapen cookies.
- Let cool on pan several minutes then transfer to a wire rack to cool completely.: During baking, you will hear a quiet hush from the oven as steam rises, and the tops will lose their glossy sheen and set while the edges gain a hint of gold. Taking them out when they look slightly under baked ensures a tender center after cooling, because residual heat continues to finish the job. Beware of overbaking, which will dry the cookies and eliminate that soft chew.
- Melt chocolate in a medium mixing bowl on 50% power in 20 second increments, stirring between intervals, until melted and smooth.: As the cookies rest on the warm sheet, the aroma intensifies, and they firm up sufficiently to move. Transferring to a wire rack prevents a soggy bottom and allows air to circulate for even cooling. A frequent slip up is leaving them on the hot pan too long, which can lead to overbaking from carryover heat.
- Line baking sheets with parchment paper.: Watch the chocolate transform from glossy chunks to a satin flow, stirring to ensure even melting and to avoid hot spots. Melting slowly preserves texture and prevents scorching, delivering a glossy dip. A common mistake is rushing the schedule and overheating the chocolate, which can seize into grainy lumps; stir patiently and use short bursts.
- Once cookies are cool dip half of each cookie in chocolate, gently shake and let excess chocolate run off (I also like to run the bottom of the cookie across the rim of the bowl to remove some), then transfer to parchment paper.: The paper offers a clean, nonstick surface for chocolates to set and for decorated cookies to rest. The smooth parchment also aids transfer to the refrigerator, and visually it keeps the cookies pristine. Skipping this step can cause sticking and mess when the chocolate hardens.
- Sprinkle with walnuts if desired.: As you dip, the chocolate clings and drapes, creating a glossy shell that catches the light. Gently tapping or running the cookie across the bowl rim removes drips and yields a neat edge. If the chocolate seems thick, warm slightly; if it is too thin, it will pool and look messy, so adjust carefully.
- Transfer to refrigerator and let chill until chocolate sets, about 15 minutes. Store cookies in an airtight container at room temperature.: The small crunch of chopped walnuts adds a toasted contrast to the smooth chocolate and chewy cranberries . Sprinkle right after dipping so the nuts adhere, and consider lightly toasting them first for deeper flavor. Avoid waiting too long to add nuts, or they will not stick to the set chocolate.
- Recipe source: Cooking Classy: The cold will firm the chocolate quickly, producing a crisp snap and preventing smudges when stacked. Watch for condensation, and do not leave them too long in humid conditions which can dull the sheen. A common issue is storing them warm too soon, which will soften the chocolate and ruin the finish.
- Store cookies in an airtight container at room temperature: Once set, the cookies keep well and remain tender when stored away from heat. Layer with parchment to prevent sticking, and consume within several days for best texture. Leaving them exposed or near a heat source will soften the chocolate and degrade the cookie crunch.
- Recipe source: Cooking Classy : This attribution reminds me of the inspiration behind the recipe, and I often revisit a trusted source for proportions and technique. Acknowledge sources when you borrow ideas, and use them as a springboard for personal touches.
Helpful Notes about Chocolate Dipped Cranberry Cookies
These notes offer practical advice I use every time I make these cookies. They cover small adjustments and serving ideas that make the process more enjoyable and the final result consistently pleasing.
- Butter temperature matters, keep the unsalted butter softened but slightly firm to achieve the right creamed texture; too soft will make the dough greasy and too cold will prevent proper aeration.
- Measure flour by weight, using the provided gram measurement ensures consistent texture and avoids dense cookies from packing flour tightly in a cup.
- Use chopped chocolate for dipping, larger pieces melt more evenly than chips and create a glossier finish that sets with a smooth snap.
- Chill briefly if dough gets warm, if the dough becomes sticky from handling, refrigerate for 10 to 20 minutes so you can shape neat balls without overworking.
- Store at room temperature, layered with parchment to prevent sticking, and keep away from direct heat to preserve the chocolate shell.
What to Serve Alongside Chocolate Dipped Cranberry Cookies
These cookies pair well with light beverages and make a lovely addition to seasonal dessert spreads. They suit festive gatherings and casual coffee meet ups alike, and are portable for cookie swaps or small gifts. Below are serving ideas and contextual suggestions to enhance how you present them.
- Afternoon tea setup, arrange the cookies on a tiered tray with simple cookies and tea sandwiches for a cozy gathering, highlighting the bright notes of the cranberries alongside delicate pastries.
- Holiday cookie platter, combine with other soft and crisp cookies to offer a variety, and label each type so guests know which ones have nuts, like the optional chopped walnuts.
- Gift packaging, stack cookies in a box with parchment layers and a ribbon for neighborly gifts during festive seasons such as Christmas, ensuring the chocolate is fully set before wrapping.
- Occasion pairing, perfect for cookie swaps, potlucks, or after dinner treats, serve on a simple platter with small forks for those who like to avoid chocolate smudges on fingers.
- Storage suggestions, keep at room temperature in an airtight container for several days, or freeze uncoated dough balls for later baking to enjoy fresh cookies on demand.
FAQ
Conclusion
These Chocolate Dipped Cranberry Cookies stand out for their pleasing texture contrasts and festive flavor pairing of tart fruit and glossy chocolate. They are approachable to make and gift ready, offering a small but thoughtful treat for gatherings or cozy afternoons. Give them a try when you want a cheerful bake that is both comforting and a little bit elegant, and enjoy the process from mixing to the satisfying snap of set chocolate.
Chocolate Dipped Cranberry Cookies
Equipment
- Electric Stand Mixer
- Mixing Bowls
- Paddle attachment
- Baking Sheets
- Silicone baking mats or parchment paper
- Wire Rack
- Medium mixing bowl for melting chocolate
- Refrigerator
Ingredients
- 2 1/3 cups (330 g) all-purpose flour Provides the primary dry structure and bulk for the cookie dough, contributing gluten that gives chew and holds other ingredients together; lightly spoon and level when measuring for accuracy and consistent texture.
- 3/4 tsp baking soda Acts as a leavening agent to create lightness and slight lift in the cookies by producing carbon dioxide when reacting with acids or heat; use the measured amount to avoid an overly cake-like crumb.
- 1/2 tsp salt Balances flavor by enhancing sweetness and suppressing bitterness while also strengthening gluten development slightly; ensure even distribution with the dry ingredients for consistent seasoning.
- 1/2 tsp cream of tartar Adds mild acidity that reacts with baking soda to promote gentle leavening while also giving a subtle tang that brightens the cookie flavor; measure carefully to avoid a metallic aftertaste.
- 1 1/4 cups (250 g) granulated sugar Supplies sweetness and contributes to the cookie's spread, texture, and color through caramelization; creaming with butter helps incorporate air for a lighter bite and even browning.
- 1 cup (226 g) unsalted butter, softened but still slightly firm Provides fat for richness, tenderness, and flavor while affecting spread and mouthfeel; keep slightly firm for proper creaming so the dough aerates without becoming greasy.
- 1 tsp orange zest Imparts bright citrus aroma and a subtle floral brightness that complements cranberries and chocolate; finely grate zest without including bitter pith for best flavor.
- 1 large egg Adds moisture, structure, and emulsification while contributing to lift and color; use at room temperature to incorporate smoothly into the creamed butter and sugar.
- 1 large egg yolk Enhances richness, improves texture, and increases tenderness by adding fat and emulsifying properties; incorporate with the egg for a silkier, more stable dough.
- Red food coloring (optional) Provides optional color enhancement for a festive appearance when used sparingly; add a few drops to reach the desired hue without altering flavor or texture.
- 1 tsp vanilla extract Contributes aromatic depth and rounds out sweet and fruity notes, enhancing overall flavor harmony; add with the wet ingredients to distribute the aroma evenly.
- 1 1/3 cups cherry flavor dried cranberries, chopped into small bits Introduces concentrated cranberry flavor, chewy texture, and tart-sweet contrast; chop into small bits to ensure even distribution and pleasant bites throughout the cookies.
- 12 oz . chopped semi-sweet chocolate Supplies intense chocolate flavor and melting pockets that create contrast with the chewy dough; use chopped semi-sweet chocolate for balanced sweetness and melt-in-mouth texture.
- 1/2 cup chopped walnuts (optional) Adds crunchy texture and a toasty, nutty flavor that complements cranberries and chocolate; include only if desired and chop to similar size as other mix-ins for even bites.
Instructions
- Preheat oven to 350 degrees. Line baking sheets with silicone baking mats or parchment paper, set aside.: You will notice the warm air as the oven comes up to temperature, and this steady heat is what encourages even spread and gentle browning on the cookie edges. A properly preheated oven ensures consistent bake time and texture, so avoid sliding cookies in while the oven is still warming. Common mistake to avoid, placing cold baking sheets into an oven that is not fully preheated, which can cause uneven baking.
- In a medium mixing bowl whisk together flour, baking soda, salt and cream of tartar for 20 seconds, set aside.: As you whisk, watch the dry ingredients blend into a uniform pale mixture, and inhale that faint wheaty scent which signals even distribution. This step matters because it prevents clumps and ensures the leavening is evenly dispersed, promoting uniform rise and texture. One pitfall to watch for is over measuring flour into the whisked mix, which can alter the dough, so spoon and level carefully.
- In the bowl of an electric stand mixer fitted with the paddle attachment cream together sugar, butter and orange zest until well blended.: The mixture will turn lighter in color and become fluffy, with tiny specks of bright orange zest releasing aroma as you beat. Creaming incorporates air which yields a lighter cookie crumb, so take the time to reach the right texture. If the butter is too soft you will see greasy separation, a common misstep, so chill briefly before resuming if needed.
- Mix in egg then mix in egg yolk, coloring (approx. 12- 15 drops) and vanilla extract.: When you add the egg and yolk, the batter will glossy and smooth, and the aroma will round out with vanilla and citrus. Adding food coloring is optional, and it will tint the dough if you choose. Avoid over mixing once the eggs are added, or the dough can become dense from excess gluten development.
- Add in flour mixture then mix until nearly combined then add in cranberries and mix until combined.: The dough will start to pull away from the bowl and feel soft but manageable, studded with chewy cranberries . Mixing until nearly combined before adding fruit prevents overworking the dough while ensuring even distribution. A frequent mistake is continuing to mix beyond the point of cohesion, which can produce tougher cookies.
- Scoop dough out and shape into 2 Tbsp balls. Space 2 inches apart on prepared baking sheets.: You will feel the cool, slightly tacky dough in your hands as you form neat rounds, and the uniform size helps them bake evenly. I use a cookie scoop for consistency, which also keeps the dough cold from handling excessively. If dough becomes too warm and sticky, pop it into the fridge for a few minutes to firm up before shaping.
- Flatten cookies slightly, bake one sheet at a time in preheated oven, 9 - 11 minutes (cookies should appear slightly under-baked).: As you place the dough on the lined sheets, leave room for spread so edges do not merge, and the cookies can brown properly. The visual cue is small domes set on a clean surface; they will flatten slightly as they bake. Crowding the pan is a common error that results in misshapen cookies.
- Let cool on pan several minutes then transfer to a wire rack to cool completely.: During baking, you will hear a quiet hush from the oven as steam rises, and the tops will lose their glossy sheen and set while the edges gain a hint of gold. Taking them out when they look slightly under baked ensures a tender center after cooling, because residual heat continues to finish the job. Beware of overbaking, which will dry the cookies and eliminate that soft chew.
- Melt chocolate in a medium mixing bowl on 50% power in 20 second increments, stirring between intervals, until melted and smooth.: As the cookies rest on the warm sheet, the aroma intensifies, and they firm up sufficiently to move. Transferring to a wire rack prevents a soggy bottom and allows air to circulate for even cooling. A frequent slip up is leaving them on the hot pan too long, which can lead to overbaking from carryover heat.
- Line baking sheets with parchment paper.: Watch the chocolate transform from glossy chunks to a satin flow, stirring to ensure even melting and to avoid hot spots. Melting slowly preserves texture and prevents scorching, delivering a glossy dip. A common mistake is rushing the schedule and overheating the chocolate, which can seize into grainy lumps; stir patiently and use short bursts.
- Once cookies are cool dip half of each cookie in chocolate, gently shake and let excess chocolate run off (I also like to run the bottom of the cookie across the rim of the bowl to remove some), then transfer to parchment paper.: The paper offers a clean, nonstick surface for chocolates to set and for decorated cookies to rest. The smooth parchment also aids transfer to the refrigerator, and visually it keeps the cookies pristine. Skipping this step can cause sticking and mess when the chocolate hardens.
- Sprinkle with walnuts if desired.: As you dip, the chocolate clings and drapes, creating a glossy shell that catches the light. Gently tapping or running the cookie across the bowl rim removes drips and yields a neat edge. If the chocolate seems thick, warm slightly; if it is too thin, it will pool and look messy, so adjust carefully.
- Transfer to refrigerator and let chill until chocolate sets, about 15 minutes. Store cookies in an airtight container at room temperature.: The small crunch of chopped walnuts adds a toasted contrast to the smooth chocolate and chewy cranberries . Sprinkle right after dipping so the nuts adhere, and consider lightly toasting them first for deeper flavor. Avoid waiting too long to add nuts, or they will not stick to the set chocolate.
- Recipe source: Cooking Classy: The cold will firm the chocolate quickly, producing a crisp snap and preventing smudges when stacked. Watch for condensation, and do not leave them too long in humid conditions which can dull the sheen. A common issue is storing them warm too soon, which will soften the chocolate and ruin the finish.
- Store cookies in an airtight container at room temperature: Once set, the cookies keep well and remain tender when stored away from heat. Layer with parchment to prevent sticking, and consume within several days for best texture. Leaving them exposed or near a heat source will soften the chocolate and degrade the cookie crunch.
- Recipe source: Cooking Classy : This attribution reminds me of the inspiration behind the recipe, and I often revisit a trusted source for proportions and technique. Acknowledge sources when you borrow ideas, and use them as a springboard for personal touches.
Notes
- Butter temperature matters, keep the unsalted butter softened but slightly firm to achieve the right creamed texture; too soft will make the dough greasy and too cold will prevent proper aeration.
- Measure flour by weight, using the provided gram measurement ensures consistent texture and avoids dense cookies from packing flour tightly in a cup.
- Use chopped chocolate for dipping, larger pieces melt more evenly than chips and create a glossier finish that sets with a smooth snap.
- Chill briefly if dough gets warm, if the dough becomes sticky from handling, refrigerate for 10 to 20 minutes so you can shape neat balls without overworking.
- Store at room temperature, layered with parchment to prevent sticking, and keep away from direct heat to preserve the chocolate shell.