7 Layer Dip
7 Layer Dip is the kind of recipe that turns any gathering upside down in the best way, and I still remember the first time I brought it to a neighborhood potluck.
Back then I was juggling a stack of paper plates, a too-large serving spoon, and a chorus of requests for the recipe. I learned quickly that this dish is equal parts practicality and showmanship, because each layer adds personality and color, and people love digging in together. Over the years I have tweaked the balance between creamy and bright so every spoonful feels balanced and exciting. It’s one of those recipes I reach for when I want a no fuss, crowd pleasing option that still looks thoughtful on the table.
What I also love is how forgiving 7 Layer Dip is. I’ve made it in small baking dishes for casual nights in, and in large platters for big celebrations. Sometimes I’ll assemble it and let it sit so the flavors marry, other times I build it at the last minute so the textures stay extra vivid and crisp. Each approach yields a slightly different experience, and both have their moments. I’ve seen this dip lead to conversations between people who had never met before, and I’ve watched kids discover layers they adore while adults sneak extra scoops with the chips.
Recipe Snapshot
20 mins
20 mins
Easy
250 kcal
Mexican
Gluten-Free, Low FODMAP
Appetizers
Large serving dish, Spoon, Mixing bowl, Offset spatula
Why This 7 Layer Dip Hits Different
Layered texture that everyone understands
I love how 7 Layer Dip offers an unmistakable textural parade, every bite moving from creamy to chunky to salty. The contrast keeps interest high, and it means you can please a wide range of tastes in one dish. I often tell guests that the layers let them build a perfect chip bite, and that variety is why this dip disappears fast.
Flexible for any occasion
This recipe works for backyard barbecues, game nights, and casual weekday hangs. I appreciate that it requires almost no hands on cooking, so I can focus on greeting people rather than babysitting a stovetop. When I need something that travels well, I assemble it in a shallow dish that fits easily into a cooler and transport it without stress.
Simple pantry friendly ingredients
What stands out to me is how accessible the ingredients are. You can often pull them from the pantry or refrigerator without special shopping, which is a major win when plans pop up last minute. I keep the basics on hand so I can throw this together in under half an hour if I need to.
Customizable without losing identity
I adore recipes that bend to preference while keeping their core soul intact. With 7 Layer Dip you can lean into creaminess, add brightness, or make it heartier and the base idea still sings. That flexibility encourages creativity, and I enjoy watching friends make small changes that become their signature touch.
Perfect balance of flavor
The real reason I come back to this recipe is the harmony of savory, tangy, and fresh notes in each bite. The creaminess cools the acidity from the lime and salsa, while the cheese and olives add pockets of savory umami. It’s a flavor lesson that’s also incredibly satisfying.
Everything You Need for 7 Layer Dip
The philosophy behind these ingredients is simple: layer distinct textures and flavors so each bite is balanced. The recipe leans on creamy elements, bright acidic notes, salty accents, and a crunchy vessel to scoop it all up. The key players are the refried beans for body, the avocados for silkiness, and the sour cream to tie flavors together.
- 16 ounces refried beans: Provide a creamy, hearty base layer that helps bind other layers together and adds a savory, slightly spiced texture; spread evenly to form the foundation of the dip. Pair well with toppings and hold up under reheating or transport for gatherings.
- 3 ripe avocados (mashed): Add a rich, buttery texture and fresh flavor when mashed, creating a smooth guacamole-like layer; season well for brightness and creaminess. Use ripe avocados to ensure a silky consistency that contrasts with firmer layers.
- 1 lime (juiced): Brighten the avocado layer with fresh citrus acidity that prevents browning and balances richness; squeeze evenly and taste to avoid over-acidifying. Fresh lime juice enhances overall flavor and lifts heavier components.
- salt and pepper (to taste): Season layers to taste, imparting balance and depth while enhancing natural flavors across the dip; apply sparingly and adjust as needed. Salt brings out savory notes while pepper adds a gentle heat and complexity.
- 1 cup sour cream: Provide a cool, tangy creaminess that contrasts with warm or spicy layers and adds a luscious mouthfeel; spread smoothly to create a distinct white layer. Sour cream also helps mellow strong spices and ties flavors together.
- 1 tablespoon taco seasoning: Introduce concentrated southwestern seasoning that infuses the sour cream with smoky, savory, and slightly spicy notes; mix thoroughly to distribute flavor evenly. Taco seasoning streamlines seasoning and complements other Mexican-inspired components.
- 1 cup salsa: Contribute a zesty, chunky tomato-based layer with herbs and spices that adds moisture, acidity, and texture; spoon gently to avoid mixing into other layers. Salsa acts as a bright, flavorful contrast to creamy and cheesy elements.
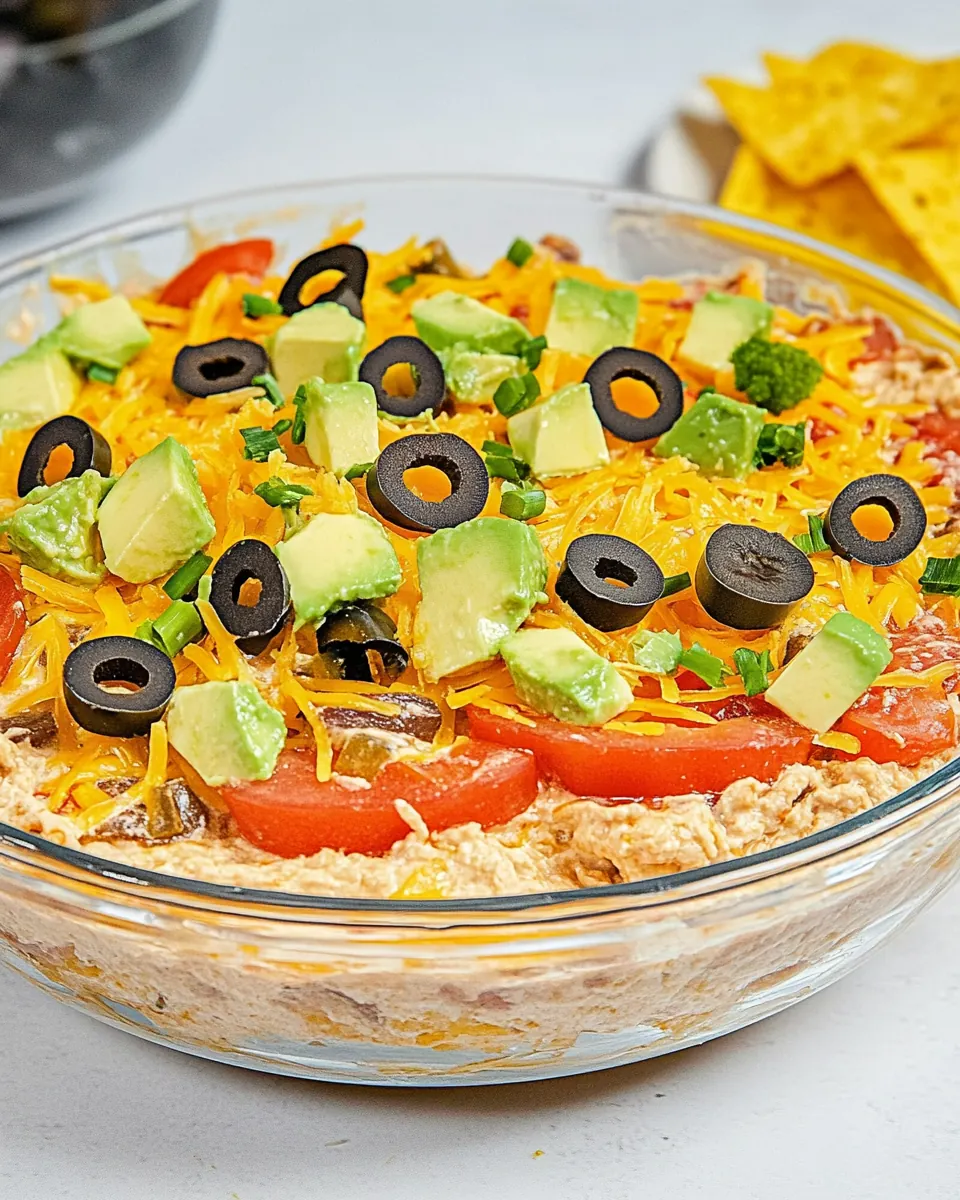
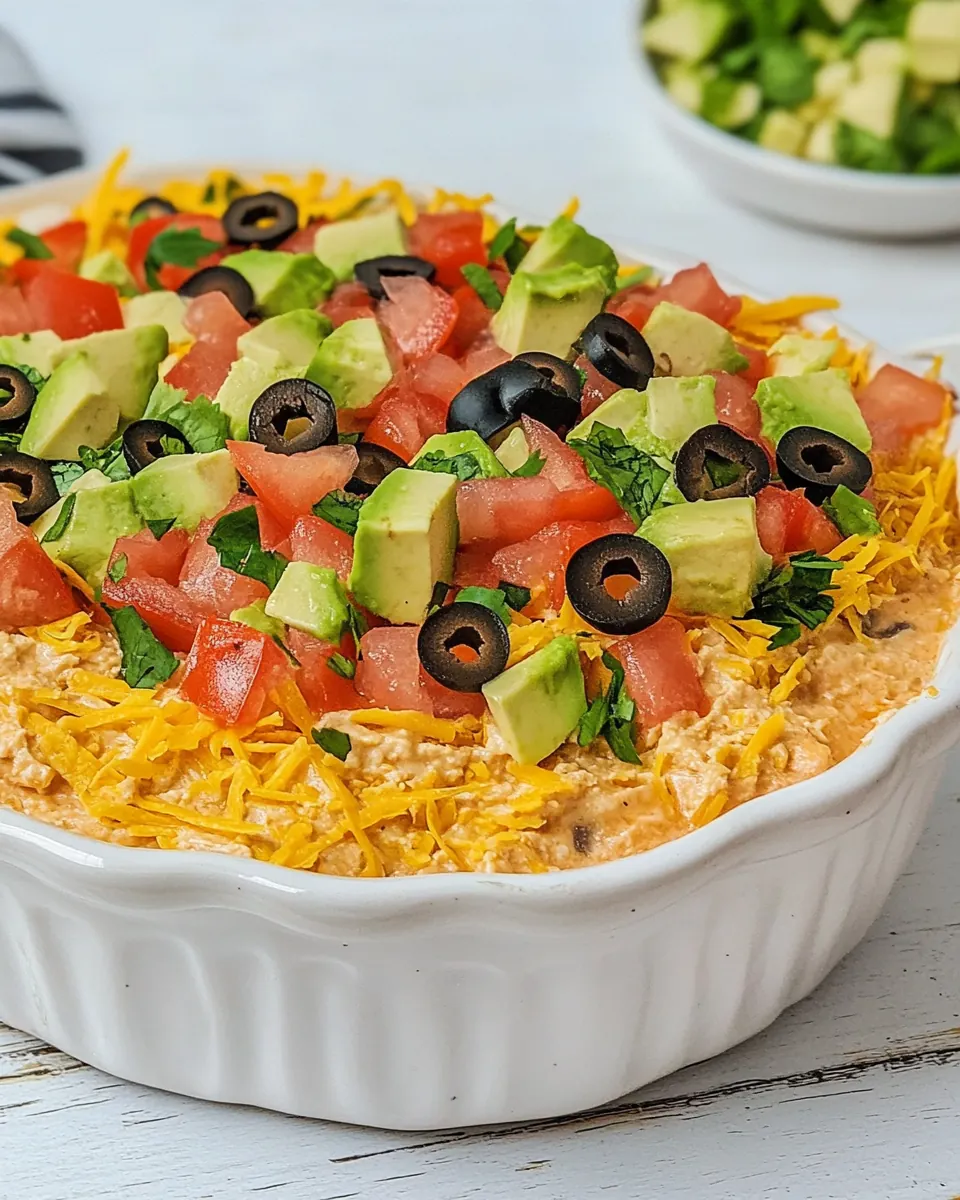
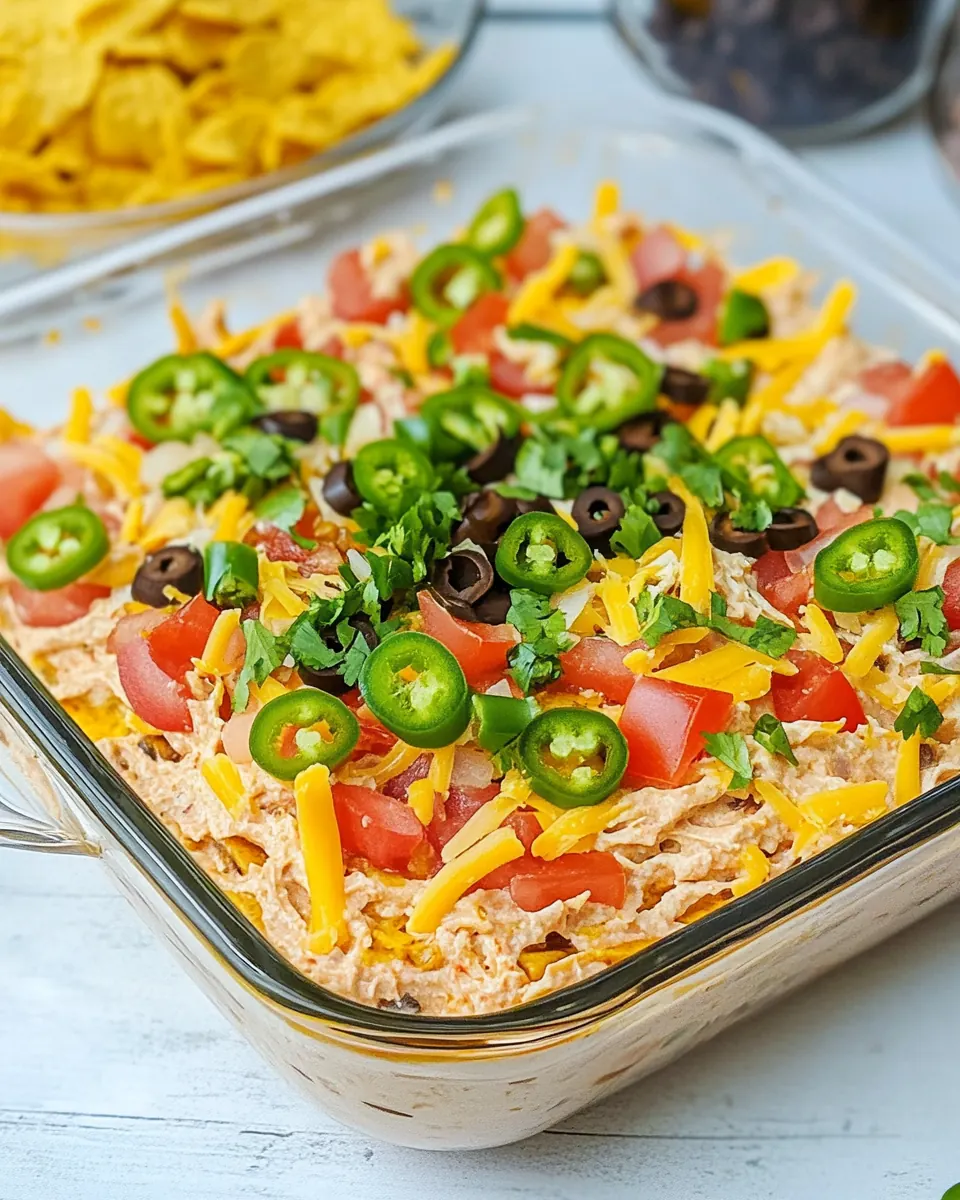
- 1 cup cheddar cheese (shredded, or Mexican blend): Add a rich, melty, salty layer that provides sharpness and textural contrast when sprinkled on top; choose finely shredded cheese for even coverage. Cheddar or Mexican blend enhances savory depth and complements the salsa and beans.
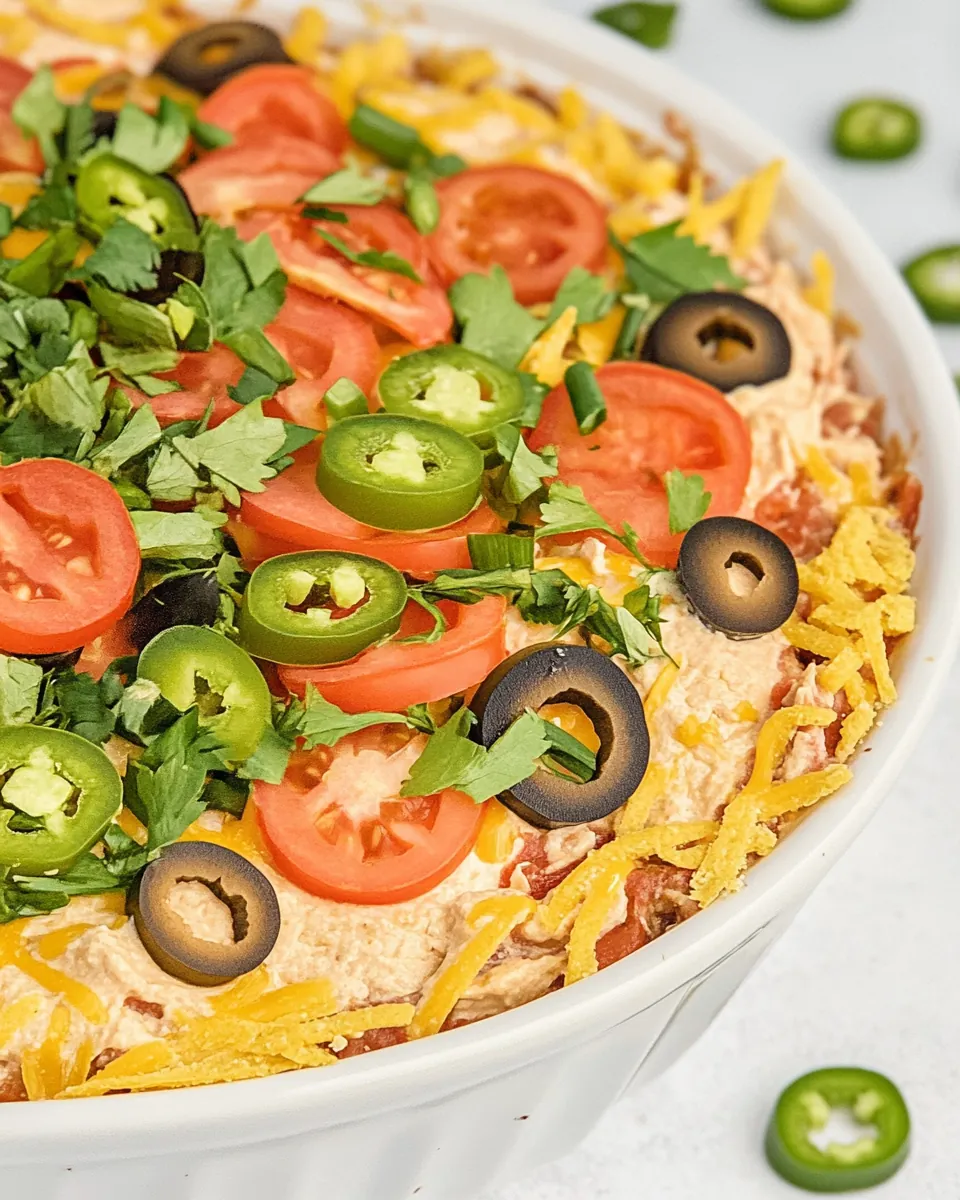
- 1/2 cup black olives (sliced): Provide a briny, slightly salty garnish that adds small bursts of umami and a tender texture contrast when scattered over the cheese. Sliced olives contribute visually and flavorfully as a classic topping element.
- 1/2 cup green onions (chopped): Offer a mild, fresh oniony crunch and subtle bite when chopped finely and sprinkled as the final fresh layer; distribute evenly for color and flavor balance. Green onions refresh the palate and brighten heavier layers.
- tortilla chips (to serve): Serve as the crunchy vehicle for enjoying the dip, providing saltiness and a sturdy scoop for layered bites; choose robust chips to prevent breaking. Tortilla chips complete the dish by adding texture and making the dip shareable.
Step by Step Instructions for 7 Layer Dip
These directions walk you through assembly so each layer stays distinct and flavorful. I like to work steadily from bottom to top, preparing small bowls for quick spreading. Keep a damp cloth nearby to wipe any drips as you go, and try to build the dip on a flat platter for even scooping.
- Spread refried beans as the first layer in a large serving dish. An 8-inch square glass dish is perfect here.: When you press the spoon into the refried beans , you should feel a dense, slightly sticky texture that smooths out under gentle pressure. This base anchors the dip, so spread it evenly to create a level surface for the remaining layers. Use the back of a spoon or an offset spatula to get clean edges, and listen for the soft sliding sound as the beans settle. The reason this matters is stability, a flat layer makes scooping consistent and prevents the dip from collapsing. If the beans are too stiff to spread, stir in a teaspoon of warm water until they glide. A common error is leaving them lumpy, which makes later layers uneven and can cause chips to snag and break.
- Mash the avocados and mix with lime juice, salt, and pepper. Layer this over the beans.: The mashed avocados should feel creamy and slightly airy when you fold in the lime juice, with little flecks of green showing. As you spread the guacamole over the beans, aim for a thin, even coat that contrasts visually with the darker bean layer. The bright citrus scent should lift as you work, signaling the acid is active. This layer prevents the beans from tasting flat and adds a cooling richness. If the avocado seems dry, a splash more lime helps, but too much will make it tangy. Avoid browning by finishing this step and moving on quickly, and do not over mash so you retain some texture in the bite.
- Combine the sour cream with taco seasoning. Spread this over the guacamole layer.: Mixing the sour cream with the taco seasoning creates a fragrant, creamy layer with subtle savory notes. Whisk until the spices are fully incorporated and the mixture is silky, then spoon gently onto the guacamole. You should feel a cool, velvety texture as it spreads, and the seasoned aroma will be noticeable but not overpowering. This layer provides a palate cleanser between the rich avocado and the bright salsa. If the sour cream is too thick to spread smoothly, let it sit at room temperature for a few minutes. One trap is spreading too forcefully and mixing into the guacamole, which blurs the layers, so be gentle and patient.
- Carefully spread the salsa over the sour cream layer. Sprinkle the shredded cheese evenly over the salsa.: As you spoon the salsa across the top, aim to keep the flow controlled to avoid breaking into the sour cream . The salsa should glisten and release an herbal tomato scent, and you will notice tiny pools where it settles. Immediately follow with an even dusting of shredded cheddar cheese so the cheese adheres to the salsa and creates a cohesive surface. This combination introduces acidity and melty texture, and it makes the top visually appealing. If the salsa is watery, drain it briefly so the dip does not become soggy. A frequent mistake is using a salsa that is too chunky, which can make the layer uneven and hard to scoop.
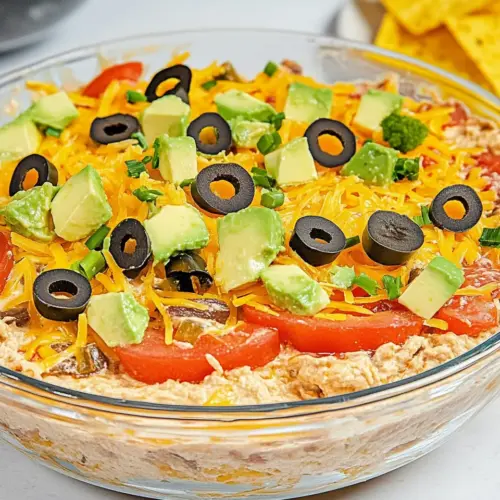
- Scatter the sliced olives and then the green onions over the cheese.: Placing the black olives and chopped green onions last adds contrast and final visual detail. The olives give a mellow briny note, and the onions contribute a sharp, fresh counterpoint. As you scatter them, watch for color balance so no area is overloaded. The slight rustle as you sprinkle the toppings signals the dip is ready to serve. This step matters because those small accents create bursts of flavor in each bite. Be careful not to pile them too thickly, or they will overwhelm the cheesy layer below.
- Serve with tortilla chips.: Serve the assembled 7 Layer Dip with sturdy tortilla chips arranged around the platter for easy access. You should hear the satisfying crunch when guests scoop, and the chips should hold their shape under weight. Serving immediately preserves peak texture, though chilling briefly can meld flavors. If the chips are too thin they will snap and make serving frustrating, so choose heartier varieties when feeding a crowd.
Ways to Customize
This 7 Layer Dip is wonderfully adaptable, and small swaps can personalize it without losing what makes it great. Below are practical customizations and ideas to suit tastes, dietary needs, and occasions.
- Meatier version Add a layer of cooked seasoned ground beef or shredded chicken between the beans and avocado for extra protein and a heartier bite.
- Cheese choices Swap the cheddar cheese for Monterey Jack or pepper jack for a milder or spicier finish, depending on preference.
- Dairy free option Use dairy free sour cream and a plant based cheese to make the dip suitable for those avoiding dairy.
- Spice it up Mix a pinch of chipotle powder into the refried beans or choose a spicier salsa to add heat without changing texture.
- Fresh herbs Fold chopped cilantro into the avocados for an herby lift, but add it sparingly if you are unsure guests like cilantro.
- Presentation twist Layer the dip in individual small bowls or cups for single serving portions that are great for parties and easy to hand out.
What Complements This 7 Layer Dip
7 Layer Dip pairs well with casual, shareable foods and bright, simple sides that do not compete with its layered flavor. Below are ideas for accompaniments, serving contexts, storage tips, and seasonal pairings presented as a list so you can plan your spread effortlessly.
- Best chip pairings Serve with sturdy tortilla chips for scooping, and include a mix of salted and unsalted to accommodate different palates.
- Veggie options Offer sliced vegetables like bell pepper strips and cucumber rounds as alternative scooping vehicles for a lighter option.
- Occasion pairings This dip shines at game day gatherings, backyard barbecues, casual potlucks, and informal holiday parties where guests graze.
- Storage tips Cover tightly and refrigerate up to two days; note the top will lose its fresh crunch over time, so chips are best served separately.
- Make ahead guidance Assemble up to an hour in advance for optimal texture; if making further ahead, keep the avocado layer separate and add it just before serving.
- Seasonal notes In summer use peak salsa and ripest avocados for the brightest results, while in winter you can rely on jarred salsas and still achieve great flavor.
- Occasions Great for casual lunches, game day spreads, potlucks, and family gatherings like Ramadan if you want a shareable appetizer after Iftar.
FAQ
Conclusion
This 7 Layer Dip stands out for its layered textures and balanced flavors that satisfy a crowd. I encourage you to try it at your next gathering because it’s quick to assemble, visually impressive, and endlessly adaptable. Whether you keep it classic or make small swaps, it reliably brings people together and disappears fast, which is always a sign of success in my book.
7 Layer Dip
Equipment
- Large serving dish
- Spoon
- Mixing Bowl
- Offset Spatula
Ingredients
- 16 ounces refried beans Provide a creamy, hearty base layer that helps bind other layers together and adds a savory, slightly spiced texture; spread evenly to form the foundation of the dip. Pair well with toppings and hold up under reheating or transport for gatherings.
- 3 ripe avocados (mashed) Add a rich, buttery texture and fresh flavor when mashed, creating a smooth guacamole-like layer; season well for brightness and creaminess. Use ripe avocados to ensure a silky consistency that contrasts with firmer layers.
- 1 lime (juiced) Brighten the avocado layer with fresh citrus acidity that prevents browning and balances richness; squeeze evenly and taste to avoid over-acidifying. Fresh lime juice enhances overall flavor and lifts heavier components.
- salt and pepper (to taste) Season layers to taste, imparting balance and depth while enhancing natural flavors across the dip; apply sparingly and adjust as needed. Salt brings out savory notes while pepper adds a gentle heat and complexity.
- 1 cup sour cream Provide a cool, tangy creaminess that contrasts with warm or spicy layers and adds a luscious mouthfeel; spread smoothly to create a distinct white layer. Sour cream also helps mellow strong spices and ties flavors together.
- 1 tablespoon taco seasoning Introduce concentrated southwestern seasoning that infuses the sour cream with smoky, savory, and slightly spicy notes; mix thoroughly to distribute flavor evenly. Taco seasoning streamlines seasoning and complements other Mexican-inspired components.
- 1 cup salsa Contribute a zesty, chunky tomato-based layer with herbs and spices that adds moisture, acidity, and texture; spoon gently to avoid mixing into other layers. Salsa acts as a bright, flavorful contrast to creamy and cheesy elements.
- 1 cup cheddar cheese (shredded, or Mexican blend) Add a rich, melty, salty layer that provides sharpness and textural contrast when sprinkled on top; choose finely shredded cheese for even coverage. Cheddar or Mexican blend enhances savory depth and complements the salsa and beans.
- 1/2 cup black olives (sliced) Provide a briny, slightly salty garnish that adds small bursts of umami and a tender texture contrast when scattered over the cheese. Sliced olives contribute visually and flavorfully as a classic topping element.
- 1/2 cup green onions (chopped) Offer a mild, fresh oniony crunch and subtle bite when chopped finely and sprinkled as the final fresh layer; distribute evenly for color and flavor balance. Green onions refresh the palate and brighten heavier layers.
- tortilla chips (to serve) Serve as the crunchy vehicle for enjoying the dip, providing saltiness and a sturdy scoop for layered bites; choose robust chips to prevent breaking. Tortilla chips complete the dish by adding texture and making the dip shareable.
Instructions
- Spread refried beans as the first layer in a large serving dish. An 8-inch square glass dish is perfect here.: When you press the spoon into the refried beans , you should feel a dense, slightly sticky texture that smooths out under gentle pressure. This base anchors the dip, so spread it evenly to create a level surface for the remaining layers. Use the back of a spoon or an offset spatula to get clean edges, and listen for the soft sliding sound as the beans settle. The reason this matters is stability, a flat layer makes scooping consistent and prevents the dip from collapsing. If the beans are too stiff to spread, stir in a teaspoon of warm water until they glide. A common error is leaving them lumpy, which makes later layers uneven and can cause chips to snag and break.
- Mash the avocados and mix with lime juice, salt, and pepper. Layer this over the beans.: The mashed avocados should feel creamy and slightly airy when you fold in the lime juice, with little flecks of green showing. As you spread the guacamole over the beans, aim for a thin, even coat that contrasts visually with the darker bean layer. The bright citrus scent should lift as you work, signaling the acid is active. This layer prevents the beans from tasting flat and adds a cooling richness. If the avocado seems dry, a splash more lime helps, but too much will make it tangy. Avoid browning by finishing this step and moving on quickly, and do not over mash so you retain some texture in the bite.
- Combine the sour cream with taco seasoning. Spread this over the guacamole layer.: Mixing the sour cream with the taco seasoning creates a fragrant, creamy layer with subtle savory notes. Whisk until the spices are fully incorporated and the mixture is silky, then spoon gently onto the guacamole. You should feel a cool, velvety texture as it spreads, and the seasoned aroma will be noticeable but not overpowering. This layer provides a palate cleanser between the rich avocado and the bright salsa. If the sour cream is too thick to spread smoothly, let it sit at room temperature for a few minutes. One trap is spreading too forcefully and mixing into the guacamole, which blurs the layers, so be gentle and patient.
- Carefully spread the salsa over the sour cream layer. Sprinkle the shredded cheese evenly over the salsa.: As you spoon the salsa across the top, aim to keep the flow controlled to avoid breaking into the sour cream . The salsa should glisten and release an herbal tomato scent, and you will notice tiny pools where it settles. Immediately follow with an even dusting of shredded cheddar cheese so the cheese adheres to the salsa and creates a cohesive surface. This combination introduces acidity and melty texture, and it makes the top visually appealing. If the salsa is watery, drain it briefly so the dip does not become soggy. A frequent mistake is using a salsa that is too chunky, which can make the layer uneven and hard to scoop.
- Scatter the sliced olives and then the green onions over the cheese.: Placing the black olives and chopped green onions last adds contrast and final visual detail. The olives give a mellow briny note, and the onions contribute a sharp, fresh counterpoint. As you scatter them, watch for color balance so no area is overloaded. The slight rustle as you sprinkle the toppings signals the dip is ready to serve. This step matters because those small accents create bursts of flavor in each bite. Be careful not to pile them too thickly, or they will overwhelm the cheesy layer below.
- Serve with tortilla chips.: Serve the assembled 7 Layer Dip with sturdy tortilla chips arranged around the platter for easy access. You should hear the satisfying crunch when guests scoop, and the chips should hold their shape under weight. Serving immediately preserves peak texture, though chilling briefly can meld flavors. If the chips are too thin they will snap and make serving frustrating, so choose heartier varieties when feeding a crowd.
Notes
- Meatier version Add a layer of cooked seasoned ground beef or shredded chicken between the beans and avocado for extra protein and a heartier bite.
- Cheese choices Swap the cheddar cheese for Monterey Jack or pepper jack for a milder or spicier finish, depending on preference.
- Dairy free option Use dairy free sour cream and a plant based cheese to make the dip suitable for those avoiding dairy.
- Spice it up Mix a pinch of chipotle powder into the refried beans or choose a spicier salsa to add heat without changing texture.
- Fresh herbs Fold chopped cilantro into the avocados for an herby lift, but add it sparingly if you are unsure guests like cilantro.
- Presentation twist Layer the dip in individual small bowls or cups for single serving portions that are great for parties and easy to hand out.