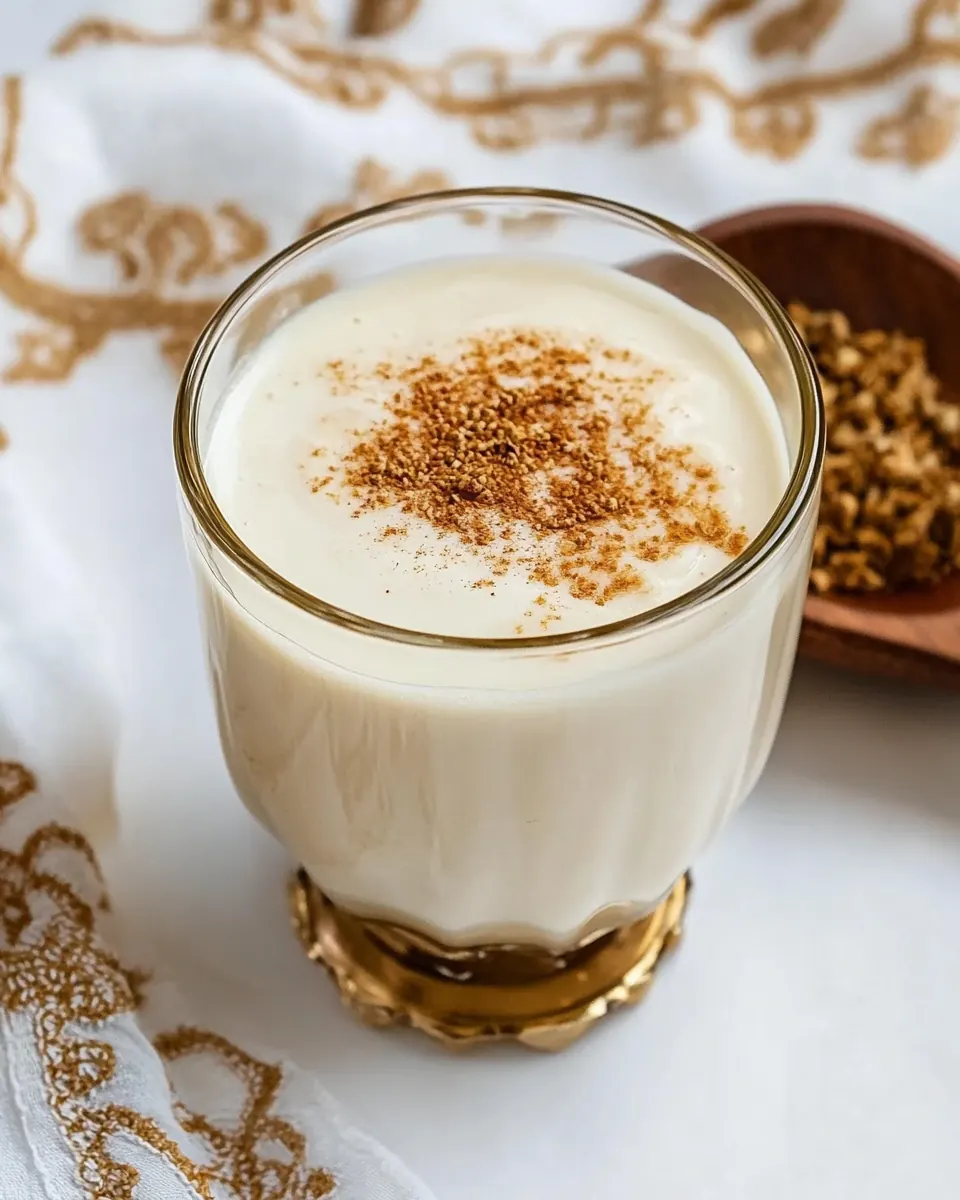
Turkish Boza
Turkish Boza has been one of those comfort drinks that followed me through cold nights and neighborhood stories ever since I first tasted it at a bustling winter stall years ago.
That first sip taught me how a simple blend of grains and patience can feel like a warm memory in a glass. I still recall the gentle chill on my fingers as I held a small cup, the tang of fermentation playing against a soft sweetness, and the unexpected crunch of roasted yellow chickpeas on top. Over the years I have played with water ratios and fermentation spaces, learning how minor shifts in temperature and time change the personality of the brew.
When I make Turkish Boza at home now I look for the quiet moments, the slow simmer and the close attention while blending and straining. Each batch becomes part science, part ritual. I love that it asks for time, patience, and small acts like stirring once a day, so the result feels earned. Friends who visit always ask for the recipe after the first taste, and I enjoy telling the story of how the texture can range from silky to pudding like, depending on how long you reduce and how much water you add.
Recipe Snapshot
1 hr 10 mins
10 mins
60 mins
Medium
250 kcal
Turkish
Vegan, Low FODMAP
Desserts
Large pot, Hand blender, Fine sieve, Mixing jar
The Appeal of This Turkish Boza
A warming, soulful tradition
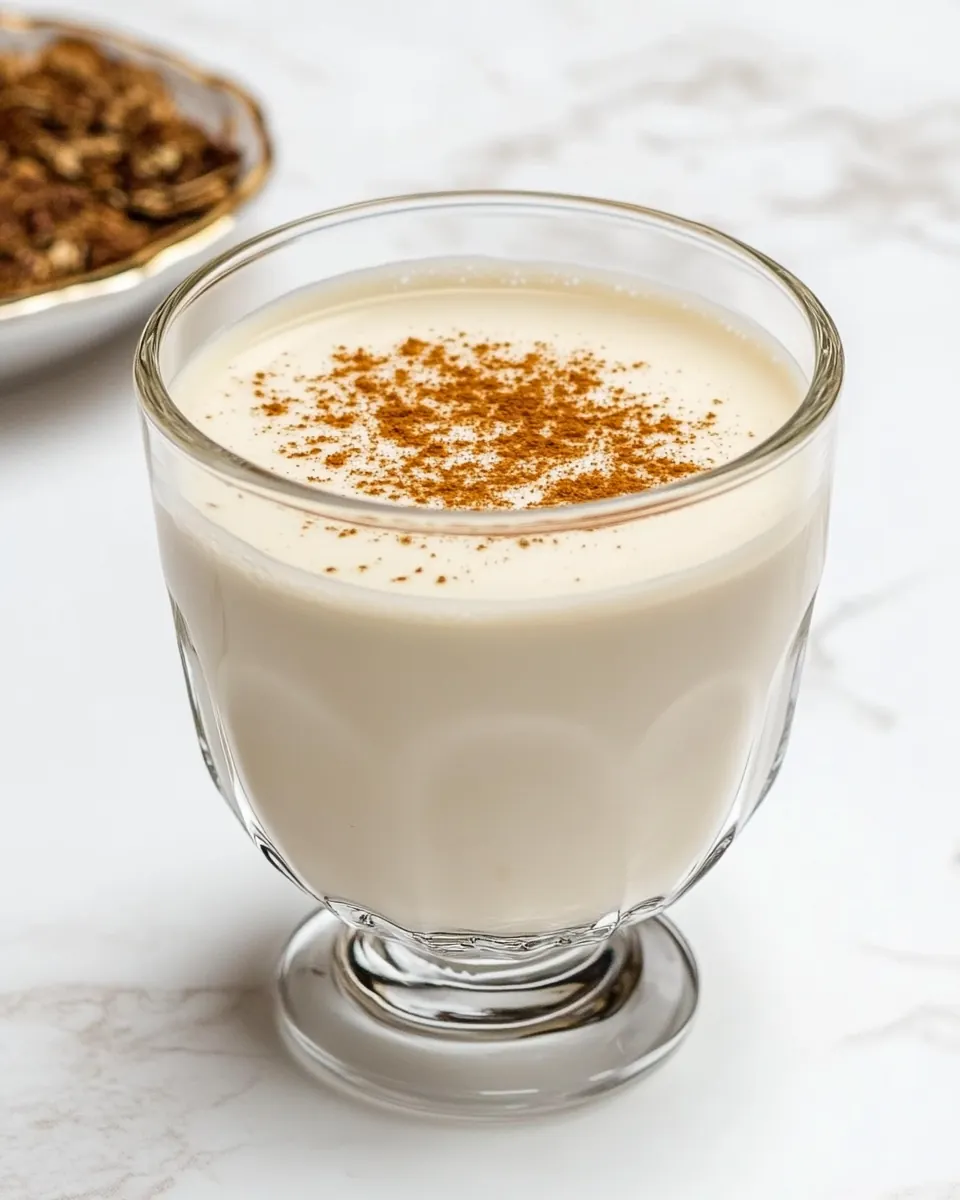
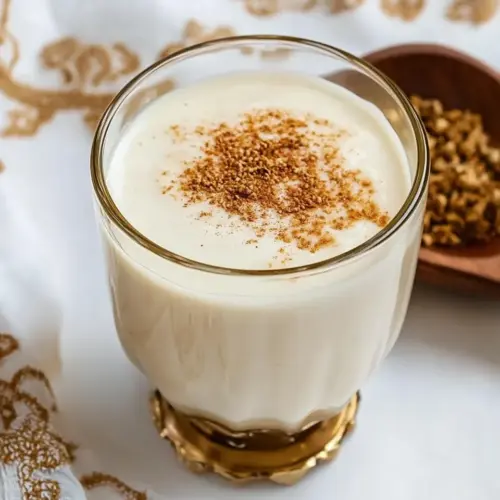
I love how Turkish Boza carries history in every spoonful. It is not just a drink, it is a cultural hug during cold months. The fermented note is gentle, not sharp, and it pairs beautifully with crunchy roasted yellow chickpeas and the aroma of ground cinnamon. For me, serving this feels like sharing a family heirloom rather than a mere recipe.
Flexible and forgiving process
One of the reasons I keep returning to Turkish Boza is how flexible the method is. You can use millet or bulgur for different flavor directions, and rice is optional to adjust texture. Whether you opt for a short yeast fermentation or a slower natural one, the drink still ends up soulful and satisfying. That adaptability makes it practical for home cooks with varying timelines.
Layered textures and contrasts
I find the contrast between the velvety fermented base and the crunchy roasted yellow chickpeas irresistible. Adding a sprinkle of ground cinnamon gives a warm perfume that lifts the tangy sweetness. This interplay of textures and aromas is why I recommend making boza when you want something comforting yet interesting.
Sweetness control and palate play
What really excites me is how you can dial sweetness in stages. Mixing some sugar early and tasting after fermentation lets you steer the final balance. I often adjust the second addition of 1 cup sugar to suit company or mood. That control keeps the drink approachable for many palates, from mildly tangy to pleasantly sweet.
Great for gatherings and quiet nights
I serve Turkish Boza for small winter gatherings or when I want a restorative solo cup. It stores well for several days in the fridge, so you can make it ahead and let the flavors deepen. I like that it invites conversation, comfort, and a little culinary curiosity all at once.
Everything You Need for Turkish Boza
The ingredients for Turkish Boza are deliberately simple, and that is part of their charm. Each element plays a clear role: the grains supply starch and body, the water gives volume, sugar fuels fermentation and sweetness, and the toppings bring texture and aroma. Treat the grains as the star, let the sugar steer fermentation and taste, and use the optional yeast to speed up the tangy development when you need results faster.
- 1 cup millet or bulgur for a different flavor: Provide a starchy base and fermentation substrate for boza; millet or bulgur imparts a nutty, slightly earthy flavor and thicker texture. Soak and cook thoroughly to release starches that feed the yeast and create the characteristic creamy body. Adjust grind or breakage for desired smoothness and mouthfeel.
- 1/2 cup rice (optional): Contribute additional starch and light creaminess when used; rice mellows the flavor and helps suspend the fermented solids. Cook until very soft to release its starches, then blend or mash for a smooth consistency. Use as an optional component to balance texture and sweetness.
- 7 8 cups water: Act as the cooking medium and dilution agent to hydrate grains and control final consistency. Start with several cups and adjust during cooking to achieve the desired thickness; more water yields a thinner boza. Use simmering to extract starches and tenderize the grains evenly.
- 1 1/2 cups sugar: Deliver fermentable sugars that feed yeast and create the sweet backbone and balanced acidity of boza. Add during or after fermentation according to recipe timing to control final sweetness and fermentation rate. Dissolve fully to integrate flavor without gritty texture.
- 1/4 tsp instant yeast (optional): Provide a controlled source of fermentation microbes when used; instant yeast speeds up and stabilizes fermentation for more predictable results. Use sparingly and only if a quicker, more uniform fermentation is desired; traditional boza may rely on wild fermentation instead. Rehydrate or sprinkle as directed for best performance.
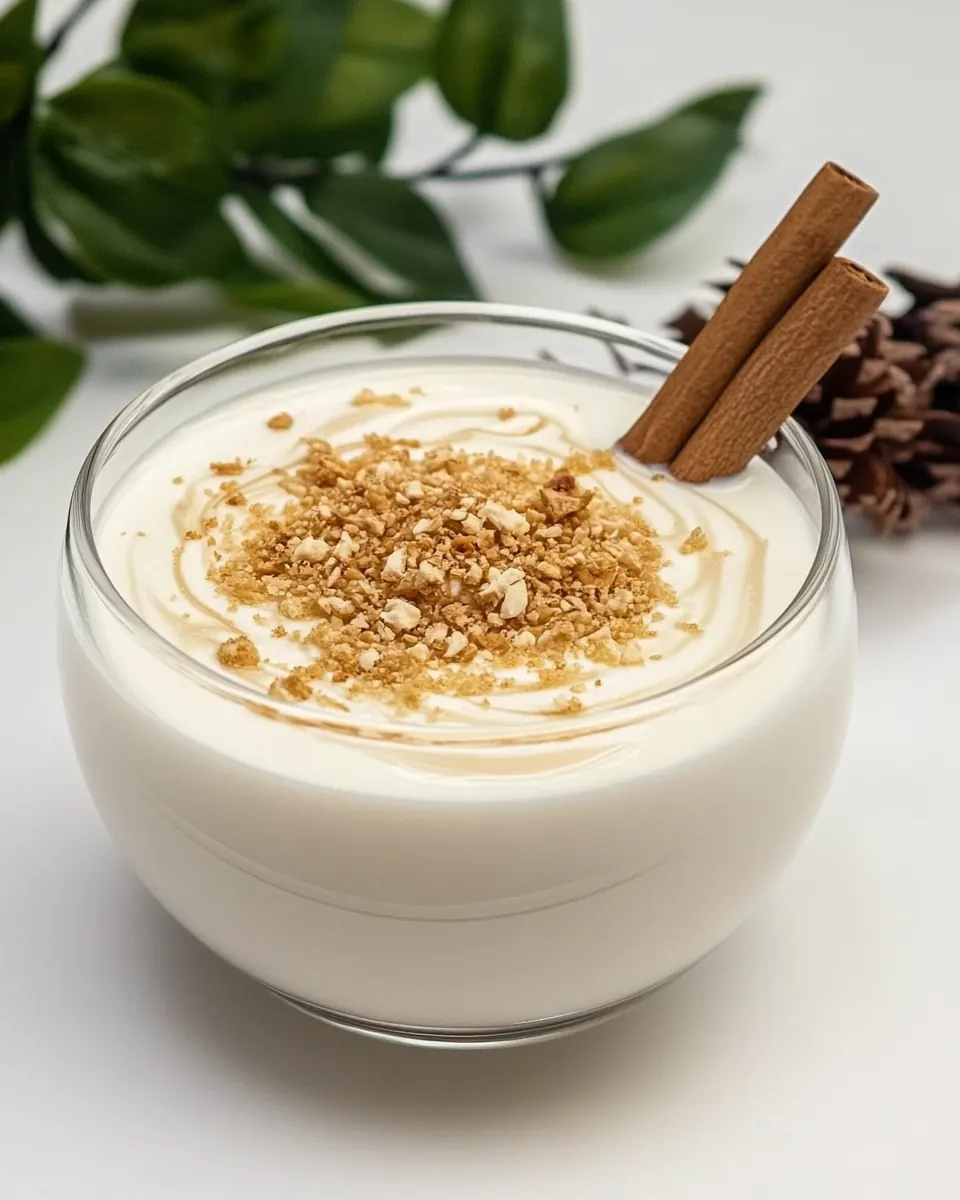
- roasted yellow chickpeas: Offer a crunchy, nutty garnish traditionally served with boza; roasted yellow chickpeas add texture contrast and a toasty flavor. Sprinkle on top just before serving to preserve their crispness and provide a traditional visual and taste accent. Use in moderation to complement the sweet, fermented drink.
- ground cinnamon: Add warm, aromatic spice that enhances the sweet and sour notes of boza; ground cinnamon complements fermentation flavors and adds depth. Dust lightly over individual servings to avoid overpowering the delicate fermented profile. Choose fresh-ground cinnamon for best aroma.
- 1 cup sugar: Provide additional sweetness for recipes that call for extra sugar; this can be used to adjust taste after fermentation is complete. Dissolve fully to prevent graininess and taste-verify to avoid over-sweetening. Store separately and add incrementally to reach desired balance.
Recipe Steps for Turkish Boza
The following steps walk you through the long, rewarding process of turning grains into a fermented winter drink. Each stage requires attention to texture and timing, so move with patience. You will notice changes in aroma and thickness at each turn, and those sensory cues tell you when to proceed.
- Wash and soak the millet (or bulgur) and rice (if using) for about 1 hour.: When you first rinse and soak the grains, you will smell a faint earthy scent and feel the grains plump as they absorb water, which helps them break down faster during simmering. This soaking reduces cooking time and softens the texture, making later blending smoother. A common mistake is skipping the soak, which forces a much longer simmer and can leave gritty bits in the final drink. If water clouds up heavily while rinsing, change it a couple of times to remove surface starches for a cleaner flavor.
- Drain the soaked grains and add them to a large pot with water.: As you transfer the softened millet , bulgur , and optional rice into the pot, notice the grains settle and release a gentle grainy perfume. Use the measured 7 to 8 cups of water to control thickness, starting conservatively if you prefer a thicker finish. Stir to combine so no grains stick to the bottom, which prevents scorching. Avoid overcrowding a small pot, because uneven heating will make some bits overcooked while others stay raw.
- Bring to a boil and simmer until the grains are soft and mushy about 45-60 minutes.: As the pot heats and then simmers, listen for a soft rolling bubble and watch the mixture thicken and become cloudy, releasing a toasty, comforting aroma. The grains will collapse into a porridge like consistency, which is the cue to blend later. Simmering too violently can foam up and spill, plus it can break down flavor, so keep heat low to moderate. If you end the simmer too early, the final texture will be less smooth and more grainy.
- Remove from heat and blend the mixture with a hand blender until smooth.: When you use the hand blender, you will see the mixture transform from coarse to silky, and the kitchen will fill with a warm, cooked grain smell. Blending creates a uniform body that is essential for a creamy boza. Hold the blender steady and pulse to avoid splashing hot liquid. A frequent error is insufficient blending, which leaves gritty bits that are unpleasant in the drink.
- Strain the mixture through a fine sieve, pressing with a spatula to extract as much liquid as possible. Discard the solids.: As you press the blended mash through a fine sieve, you will coax out glossy, velvety liquid while leaving fibrous solids behind. The action yields a smoother mouthfeel and maximizes yield. Use a spatula or the back of a spoon to press firmly but steadily. Avoid forcing solids through the mesh, because that can cloud the liquid with tiny particles; instead be patient and press in batches.
- Transfer the strained liquid to a clean jar.: Moving the pale, creamy liquid into a sanitized jar keeps the environment controlled for fermentation and prevents unwanted microbes. The jar should be roomy enough to allow some expansion if fermentation becomes active and frothy. Wipe the rim clean before sealing loosely. A typical slip up is using a dirty container, which can introduce off flavors; always sterilize jars or pour boiling water through them first.
- Add 1 cup (200 g) of sugar and mix well until dissolved.: Stirring the first sugar addition dissolves and sweetens the base, giving fermenting yeast or natural microbes fuel to work on for flavor development. The aroma will shift toward warm sweetness and the surface may gleam when sugar is fully dissolved. Ensure the sugar is fully incorporated by stirring until no granules remain. Undissolved sugar can sink and create uneven sweetness in the finished drink.
- If using yeast: Dissolve 1 tablespoon of sugar and the instant yeast in 1 cup (250 ml) of warm water. Let it sit for about 10 minutes until frothy, then add to the strained mixture. Cover with a lid and let it ferment in a cool place for about 20 hours, stirring occasionally.: Dissolve 1 tablespoon of sugar and the instant yeast in 1 cup (250 ml) of warm water : When you dissolve the yeast in warm water, look for a bubbly froth after about 10 minutes which signals an active starter, producing a reliable fermentation. This step shortens the waiting time and leads to a more predictable tang. Keep the water comfortably warm; if it is too hot you will kill the yeast, and if it is too cold the yeast will remain inactive. A common error is skipping the proofing check, which can result in no fermentation activity if the yeast is old or water temperature wrong.
- If not using yeast: Simply cover the sweetened mixture and let it sit at room temperature, away from direct sunlight, for about 3 days. Stir once a day with a wooden spoon.: After the yeast froths, stirring it into the strained boza base creates an immediate impression of life as tiny bubbles begin forming. The mixture will slowly show more activity during fermentation, producing subtle effervescence and a pleasant sour note. Mix gently to incorporate without introducing excessive oxygen which can speed fermentation unevenly. If no froth appeared in the proofing, do not add it—start over with fresh yeast to avoid a flat result.
- After the fermentation period, add the remaining 1/2 cup of sugar (100 g) (or to taste) and mix well.: During this restful period you will notice a faint tang emerging and small bubbles appearing on the surface, the smells shifting from purely sweet to mildly sour. Stirring occasionally distributes natural yeasts and helps develop uniform fermentation. Choose a cool, dark spot, as excessive heat can over ferment and spoil the gentle balance. A frequent mistake is leaving it in direct sun or a hot kitchen, which can accelerate fermentation too fast and create unpleasant off flavors.
- Transfer the boza to a bottle and refrigerate for an additional 1-2 days to allow the flavors to develop further.: Simply cover the sweetened mixture and let it sit at room temperature away from direct sunlight for about 3 days : Natural fermentation is quieter and slower, and you will observe gradual bubble formation and a mellow tang over several days, a process that deepens complexity. Stir once daily with a wooden spoon to redistribute floras and to prevent surface scum. Avoid placing the jar in a very warm spot, which can lead to over fermentation or spoilage; cool room temperature is ideal. Impatience is the common error here, trying to rush natural fermentation; let time do the work.
- Serve chilled, topped with roasted yellow chickpeas and a sprinkle of ground cinnamon.: Adding the second portion of sugar after fermentation allows you to balance tang and sweetness precisely, and you will notice how the flavor brightens and rounds out with this adjustment. Dissolve the sugar fully and taste to make small corrections. Over sweetening at this stage can hide the fermented notes, so add gradually. Not tasting before the final sugar addition is a typical oversight, resulting in an overly sweet end product.
- Refrigeration: Store boza in an airtight container in the refrigerator for up to 1 week. Serve chilled.: Chilling calms fermentation and lets flavors meld; the cold also enhances the refreshing aspect when served. After refrigeration the boza will taste smoother and smell more integrated. Seal the bottle but leave a little headroom, since fermentation can produce mild pressure. A common slip is bottling while warm and sealing tightly, which can cause pressure build up; cool it first if possible.
- Freezing is not recommended as it can affect the texture.: When you ladle a chilled glass, note the creamy texture and the interplay of tang and sweetness. The crunch of roasted yellow chickpeas and the perfume of ground cinnamon create an inviting contrast that completes the experience. Serve in small cups to appreciate the flavor layers. Skipping the toppings loses a key textural counterpoint, so don’t omit them if you want the full traditional feel.
- Refrigeration Store boza in an airtight container in the refrigerator for up to 1 week Serve chilled: Proper cold storage preserves flavor and slows fermentation so the drink remains stable for several days; always shake or stir before serving because it can settle. Keep it sealed and consume within a week for best taste. Freezing is not recommended as it alters texture, so avoid it. Leaving it out too long after opening can over ferment or spoil, so return it to the fridge promptly.
Pro Tips and Tweaks
I like to think of these tips as small adjustments that make a big difference. They help you control texture, sweetness, and fermentation activity so each batch of Turkish Boza feels intentional. Read them before you begin and refer back while you cook.
- Precise soaking: Soak the grains for about 1 hour to soften them thoroughly; this short step reduces simmer time and helps produce a creamier final texture.
- Control the water: Start with 7 cups of water for a thicker boza and add up to 8 if you want it thinner; adjusting early gives you better control than watering down later.
- Gentle simmer: Keep the pot at a low simmer to prevent scorching and ensure an even breakdown of the grains; a rolling boil can ruin texture.
- Fine straining: Use a fine sieve or cheesecloth and press with a spatula to extract as much liquid as possible for a silky mouthfeel.
- Stage the sugar: Add part of the sugar before fermentation and finish after tasting to hit the perfect balance between tang and sweetness.
- Yeast vs natural: Use a small amount of instant yeast if you want a quicker, reliable fermentation; opt for natural fermentation if you prefer a more nuanced, traditional profile.
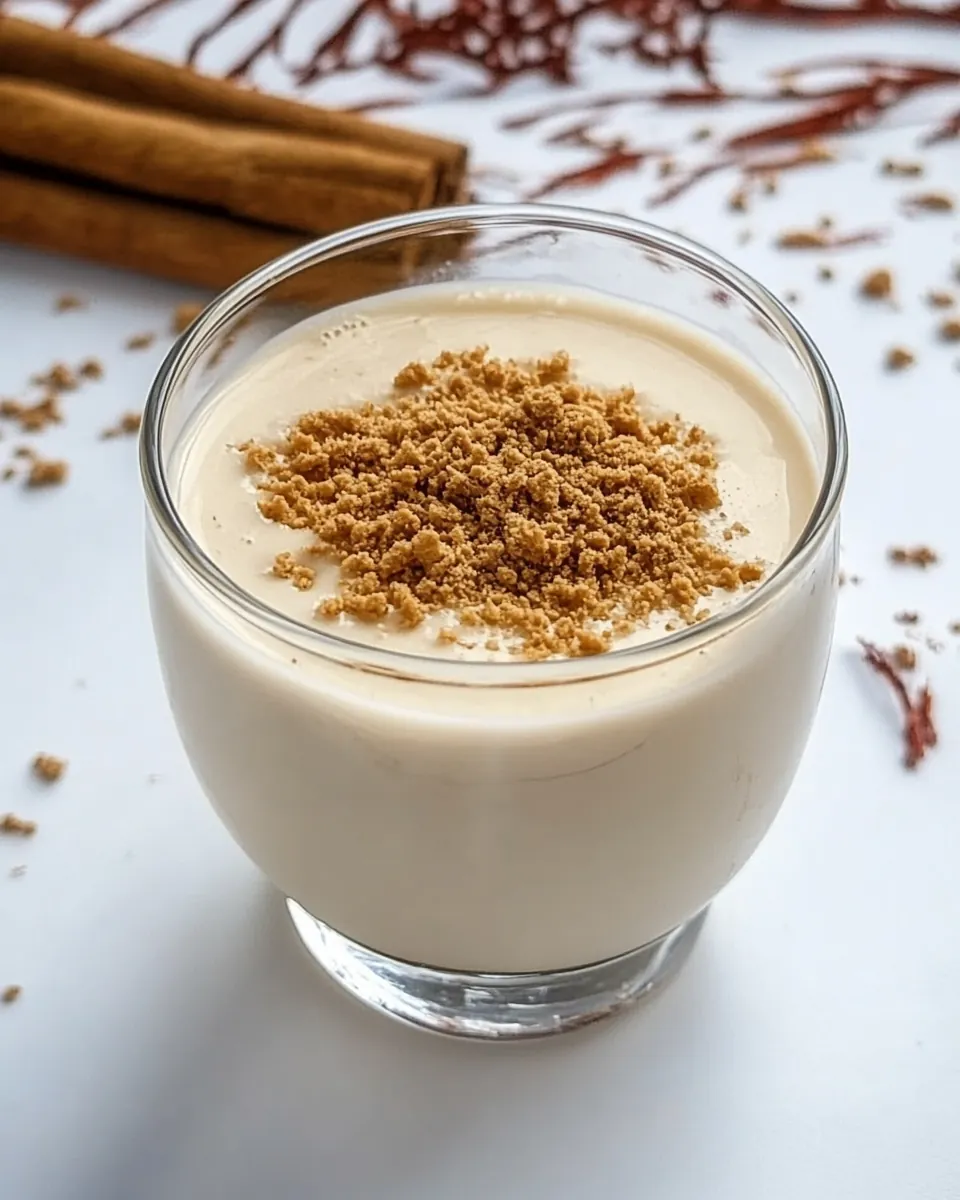
- Toppings matter: Always top with roasted yellow chickpeas and a dusting of ground cinnamon for the classic contrast of texture and warmth.
Serving This Turkish Boza
Turkish Boza is best enjoyed chilled and in small servings, because its fermented tang is concentrated and delicious. Serve it as a warm winter beverage or a unique palate cleanser at a casual gathering. Below are thoughtful serving ideas and practical storage tips.
- Small cups for sipping: Serve boza in small cups to showcase its rich, tangy flavor without overwhelming the palate; it’s traditionally enjoyed in small portions.
- Winter evenings: Offer Turkish Boza during cold evenings or after a walk in chilly weather; its comforting warmth in memory and chilled serving make it versatile for winter menus.
- Ramadan and gatherings: This drink works well for Ramadan nights as a gentle, slightly sweet option to enjoy before or after meals; it can be a conversation starter at any casual gathering.
- Storage tips: Refrigerate in airtight bottles for up to 1 week; shake before serving because settling is normal and the texture can separate over time.
- Seasonal pairing: Highlight boza in winter menus with spiced desserts or savory snacks; its tang and sweetness contrast nicely with richer, spiced foods.
- Serving style: Garnish each cup with roasted yellow chickpeas and a light sprinkle of ground cinnamon for aroma, texture, and visual appeal.
FAQ
Conclusion
Turkish Boza stands out because it transforms humble grains into a warm layered beverage that is both comforting and intriguing. Its gentle fermentation, creamy texture, and the interplay of tang, sweetness, and crunchy roasted yellow chickpeas create a memorable drinking experience. I encourage you to give it a try, whether you opt for quick yeast fermentation or a slower natural method. Making boza is a patient, rewarding ritual that invites you to slow down and enjoy a taste of tradition, and the payoff is a cup that warms more than just your hands.
Turkish Boza
Equipment
- Large Pot
- Hand Blender
- Fine sieve
- Mixing jar
Ingredients
- 1 cup millet or bulgur for a different flavor Provide a starchy base and fermentation substrate for boza; millet or bulgur imparts a nutty, slightly earthy flavor and thicker texture. Soak and cook thoroughly to release starches that feed the yeast and create the characteristic creamy body. Adjust grind or breakage for desired smoothness and mouthfeel.
- 1/2 cup rice optional Contribute additional starch and light creaminess when used; rice mellows the flavor and helps suspend the fermented solids. Cook until very soft to release its starches, then blend or mash for a smooth consistency. Use as an optional component to balance texture and sweetness.
- 7 -8 cups water Act as the cooking medium and dilution agent to hydrate grains and control final consistency. Start with several cups and adjust during cooking to achieve the desired thickness; more water yields a thinner boza. Use simmering to extract starches and tenderize the grains evenly.
- 1 1/2 cups sugar Deliver fermentable sugars that feed yeast and create the sweet backbone and balanced acidity of boza. Add during or after fermentation according to recipe timing to control final sweetness and fermentation rate. Dissolve fully to integrate flavor without gritty texture.
- 1/4 tsp instant yeast optional Provide a controlled source of fermentation microbes when used; instant yeast speeds up and stabilizes fermentation for more predictable results. Use sparingly and only if a quicker, more uniform fermentation is desired; traditional boza may rely on wild fermentation instead. Rehydrate or sprinkle as directed for best performance.
- roasted yellow chickpeas Offer a crunchy, nutty garnish traditionally served with boza; roasted yellow chickpeas add texture contrast and a toasty flavor. Sprinkle on top just before serving to preserve their crispness and provide a traditional visual and taste accent. Use in moderation to complement the sweet, fermented drink.
- ground cinnamon Add warm, aromatic spice that enhances the sweet and sour notes of boza; ground cinnamon complements fermentation flavors and adds depth. Dust lightly over individual servings to avoid overpowering the delicate fermented profile. Choose fresh-ground cinnamon for best aroma.
- 1 cup sugar Provide additional sweetness for recipes that call for extra sugar; this can be used to adjust taste after fermentation is complete. Dissolve fully to prevent graininess and taste-verify to avoid over-sweetening. Store separately and add incrementally to reach desired balance.
Instructions
- Wash and soak the millet (or bulgur) and rice (if using) for about 1 hour.: When you first rinse and soak the grains, you will smell a faint earthy scent and feel the grains plump as they absorb water, which helps them break down faster during simmering. This soaking reduces cooking time and softens the texture, making later blending smoother. A common mistake is skipping the soak, which forces a much longer simmer and can leave gritty bits in the final drink. If water clouds up heavily while rinsing, change it a couple of times to remove surface starches for a cleaner flavor.
- Drain the soaked grains and add them to a large pot with water.: As you transfer the softened millet , bulgur , and optional rice into the pot, notice the grains settle and release a gentle grainy perfume. Use the measured 7 to 8 cups of water to control thickness, starting conservatively if you prefer a thicker finish. Stir to combine so no grains stick to the bottom, which prevents scorching. Avoid overcrowding a small pot, because uneven heating will make some bits overcooked while others stay raw.
- Bring to a boil and simmer until the grains are soft and mushy about 45-60 minutes.: As the pot heats and then simmers, listen for a soft rolling bubble and watch the mixture thicken and become cloudy, releasing a toasty, comforting aroma. The grains will collapse into a porridge like consistency, which is the cue to blend later. Simmering too violently can foam up and spill, plus it can break down flavor, so keep heat low to moderate. If you end the simmer too early, the final texture will be less smooth and more grainy.
- Remove from heat and blend the mixture with a hand blender until smooth.: When you use the hand blender, you will see the mixture transform from coarse to silky, and the kitchen will fill with a warm, cooked grain smell. Blending creates a uniform body that is essential for a creamy boza. Hold the blender steady and pulse to avoid splashing hot liquid. A frequent error is insufficient blending, which leaves gritty bits that are unpleasant in the drink.
- Strain the mixture through a fine sieve, pressing with a spatula to extract as much liquid as possible. Discard the solids.: As you press the blended mash through a fine sieve, you will coax out glossy, velvety liquid while leaving fibrous solids behind. The action yields a smoother mouthfeel and maximizes yield. Use a spatula or the back of a spoon to press firmly but steadily. Avoid forcing solids through the mesh, because that can cloud the liquid with tiny particles; instead be patient and press in batches.
- Transfer the strained liquid to a clean jar.: Moving the pale, creamy liquid into a sanitized jar keeps the environment controlled for fermentation and prevents unwanted microbes. The jar should be roomy enough to allow some expansion if fermentation becomes active and frothy. Wipe the rim clean before sealing loosely. A typical slip up is using a dirty container, which can introduce off flavors; always sterilize jars or pour boiling water through them first.
- Add 1 cup (200 g) of sugar and mix well until dissolved.: Stirring the first sugar addition dissolves and sweetens the base, giving fermenting yeast or natural microbes fuel to work on for flavor development. The aroma will shift toward warm sweetness and the surface may gleam when sugar is fully dissolved. Ensure the sugar is fully incorporated by stirring until no granules remain. Undissolved sugar can sink and create uneven sweetness in the finished drink.
- If using yeast: Dissolve 1 tablespoon of sugar and the instant yeast in 1 cup (250 ml) of warm water. Let it sit for about 10 minutes until frothy, then add to the strained mixture. Cover with a lid and let it ferment in a cool place for about 20 hours, stirring occasionally.: Dissolve 1 tablespoon of sugar and the instant yeast in 1 cup (250 ml) of warm water : When you dissolve the yeast in warm water, look for a bubbly froth after about 10 minutes which signals an active starter, producing a reliable fermentation. This step shortens the waiting time and leads to a more predictable tang. Keep the water comfortably warm; if it is too hot you will kill the yeast, and if it is too cold the yeast will remain inactive. A common error is skipping the proofing check, which can result in no fermentation activity if the yeast is old or water temperature wrong.
- If not using yeast: Simply cover the sweetened mixture and let it sit at room temperature, away from direct sunlight, for about 3 days. Stir once a day with a wooden spoon.: After the yeast froths, stirring it into the strained boza base creates an immediate impression of life as tiny bubbles begin forming. The mixture will slowly show more activity during fermentation, producing subtle effervescence and a pleasant sour note. Mix gently to incorporate without introducing excessive oxygen which can speed fermentation unevenly. If no froth appeared in the proofing, do not add it—start over with fresh yeast to avoid a flat result.
- After the fermentation period, add the remaining 1/2 cup of sugar (100 g) (or to taste) and mix well.: During this restful period you will notice a faint tang emerging and small bubbles appearing on the surface, the smells shifting from purely sweet to mildly sour. Stirring occasionally distributes natural yeasts and helps develop uniform fermentation. Choose a cool, dark spot, as excessive heat can over ferment and spoil the gentle balance. A frequent mistake is leaving it in direct sun or a hot kitchen, which can accelerate fermentation too fast and create unpleasant off flavors.
- Transfer the boza to a bottle and refrigerate for an additional 1-2 days to allow the flavors to develop further.: Simply cover the sweetened mixture and let it sit at room temperature away from direct sunlight for about 3 days : Natural fermentation is quieter and slower, and you will observe gradual bubble formation and a mellow tang over several days, a process that deepens complexity. Stir once daily with a wooden spoon to redistribute floras and to prevent surface scum. Avoid placing the jar in a very warm spot, which can lead to over fermentation or spoilage; cool room temperature is ideal. Impatience is the common error here, trying to rush natural fermentation; let time do the work.
- Serve chilled, topped with roasted yellow chickpeas and a sprinkle of ground cinnamon.: Adding the second portion of sugar after fermentation allows you to balance tang and sweetness precisely, and you will notice how the flavor brightens and rounds out with this adjustment. Dissolve the sugar fully and taste to make small corrections. Over sweetening at this stage can hide the fermented notes, so add gradually. Not tasting before the final sugar addition is a typical oversight, resulting in an overly sweet end product.
- Refrigeration: Store boza in an airtight container in the refrigerator for up to 1 week. Serve chilled.: Chilling calms fermentation and lets flavors meld; the cold also enhances the refreshing aspect when served. After refrigeration the boza will taste smoother and smell more integrated. Seal the bottle but leave a little headroom, since fermentation can produce mild pressure. A common slip is bottling while warm and sealing tightly, which can cause pressure build up; cool it first if possible.
- Freezing is not recommended as it can affect the texture.: When you ladle a chilled glass, note the creamy texture and the interplay of tang and sweetness. The crunch of roasted yellow chickpeas and the perfume of ground cinnamon create an inviting contrast that completes the experience. Serve in small cups to appreciate the flavor layers. Skipping the toppings loses a key textural counterpoint, so don’t omit them if you want the full traditional feel.
- Refrigeration Store boza in an airtight container in the refrigerator for up to 1 week Serve chilled: Proper cold storage preserves flavor and slows fermentation so the drink remains stable for several days; always shake or stir before serving because it can settle. Keep it sealed and consume within a week for best taste. Freezing is not recommended as it alters texture, so avoid it. Leaving it out too long after opening can over ferment or spoil, so return it to the fridge promptly.
Notes
- Precise soaking: Soak the grains for about 1 hour to soften them thoroughly; this short step reduces simmer time and helps produce a creamier final texture.
- Control the water: Start with 7 cups of water for a thicker boza and add up to 8 if you want it thinner; adjusting early gives you better control than watering down later.
- Gentle simmer: Keep the pot at a low simmer to prevent scorching and ensure an even breakdown of the grains; a rolling boil can ruin texture.
- Fine straining: Use a fine sieve or cheesecloth and press with a spatula to extract as much liquid as possible for a silky mouthfeel.
- Stage the sugar: Add part of the sugar before fermentation and finish after tasting to hit the perfect balance between tang and sweetness.
- Yeast vs natural: Use a small amount of instant yeast if you want a quicker, reliable fermentation; opt for natural fermentation if you prefer a more nuanced, traditional profile.
- Toppings matter: Always top with roasted yellow chickpeas and a dusting of ground cinnamon for the classic contrast of texture and warmth.