Turkey Burrito Bowl
Turkey Burrito Bowl has been my go to weeknight rescue when life gets busy but I still want something hearty, bright, and satisfying on the table. The first time I made this bowl I was juggling grocery store detours and a late afternoon meeting, and the way the kitchen filled with the warm scent of cumin and smoked paprika felt like permission to relax for a moment. I loved how the savory ground turkey paired with zingy lime juice and fresh cilantro, making each spoonful pleasantly complex without a lot of fuss.
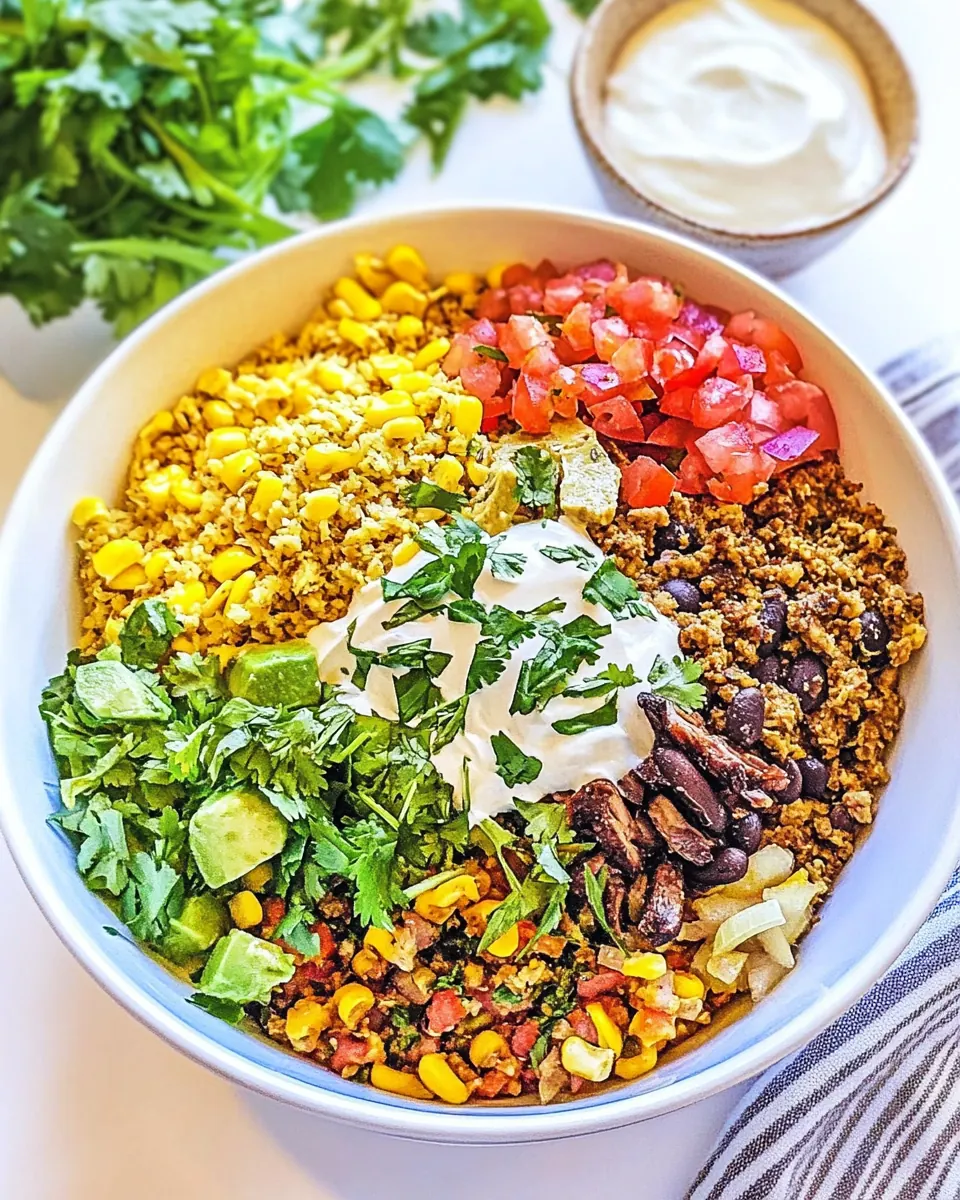
I remember assembling bowls for friends on a spontaneous weeknight gathering, everyone customizing their plates with romaine lettuce, roasted corn salsa, and a sprinkle of Colby Jack cheese. Watching people take that first bite and nod with approval convinced me that this is the kind of recipe worth keeping on repeat. There is comfort here, yet the components stay lively and bright. I often make extra rice and beans, because leftovers reheat beautifully, and you can change the meal by swapping salsas or adding a squeeze more lime juice.
Over the years I refined little techniques that save time without sacrificing flavor, like toasting spices briefly to release aroma, or simmering beans with a splash of broth so they stay plump and saucy. I enjoy that the bowls are modular, which makes them perfect for feeding a family or a small crowd. You can prepare most components ahead, then assemble just before serving for the freshest textures. When I want something fast yet satisfying, this Turkey Burrito Bowl delivers every time.
Recipe Snapshot
2 hr
30 mins
90 mins
Medium
550 kcal
Mexican
Gluten-Free, Low FODMAP
Dinner
Large skillet, Wooden spoon, Medium saucepan with lid, Small saucepan
Why This Turkey Burrito Bowl Hits Different
Flavor Built on Layers
I love how each component brings a different note to the bowl. The ground turkey carries warm, savory spices and a meaty richness, while the brown rice adds earthiness and substance. The salsas and lime juice cut through with acidity, and fresh cilantro lifts the whole bowl with herbaceous brightness. I always toast spices a bit in the pan to unlock a deeper aroma before they meet the meat, it changes everything.
Flexible and Make Ahead Friendly
One of the best parts about this recipe is that you can prep parts ahead. I often cook the rice and simmer the beans a day ahead, then refrigerate separately. When guests arrive I reheat gently and everything comes together quickly. This makes the dish perfect for busy weeks or for meal planning, I find it saves time without compromising quality.
Balanced Nutrition Without Fuss
This bowl is satisfying and well rounded. The ground turkey is lean and protein forward, the brown rice supplies whole grain energy, and the beans bring extra protein and fiber. I like that the textures vary from soft rice to crisp romaine lettuce and creamy sour cream, which keeps each bite interesting and filling.
Customizable to Taste
I appreciate how forgiving the recipe is. If you prefer milder heat you can skip the jalapeños, or if you want more brightness add extra lime juice. Swap salsas or add more cheese for a richer profile. I often hand guests a bowl of toppings and let them personalize; it turns dinner into something playful.
Comfort That Travels Well
Leftovers are a strong suit. I’ve packed these bowls for lunches and they travel well when components are kept separate. Reheating the turkey and rice gently preserves texture, and adding fresh cilantro at the end revives the flavors. This reliability is one reason I keep this recipe in my regular rotation.
Ingredient List for Turkey Burrito Bowl
These ingredients are chosen to create contrasting textures and complementary flavors. The key players are the savory ground turkey, the nutty brown rice, and the creamy, tangy elements like Colby Jack cheese and sour cream. Spices and broths knit everything together to make a cohesive bowl where each component does a clear job.
- 1 tablespoon olive oil: Use to sauté aromatics and brown turkey; adds a fruity, slightly peppery fat that helps prevent sticking and builds flavor when heated. Measure carefully to avoid greasiness and add at the start of cooking for even heat distribution. Works well at medium-high heat to coax out savory notes from onions and garlic.
- 1 medium onion chopped: Chop finely to create a sweet, savory base that softens and caramelizes when cooked; provides moisture and depth to the filling. Cook until translucent to release sugars that balance spices and tomato-based components. Adds texture contrast to the finished bowl when combined with other ingredients.
- 3 cloves garlic minced: Mince and add near the beginning of cooking to release pungent, aromatic oils that enhance savory flavors; helps season the turkey and rice. Use freshly minced garlic for brighter, sharper taste and be careful not to burn it to avoid bitterness. Complements onion and spices to build a layered flavor profile.
- 1 lb ground turkey 93% lean: Brown over medium-high heat to develop savory, meaty depth while absorbing seasonings; lean turkey keeps the dish lighter but can dry out if overcooked. Break into small pieces while cooking for even distribution and combine with spices and broth for sauciness. Finish cooking to safe internal temperature while maintaining juiciness.
- 2 teaspoon chili powder: Sprinkle into the turkey and rice to provide warm, earthy heat with subtle fruity undertones; acts as a primary Mexican-inspired seasoning. Toast briefly in the pan to intensify aroma before adding liquids. Adjust amount to taste for mild to moderate spice levels.
- 1 teaspoon ground cumin: Add to bring warm, nutty, slightly bitter cumin notes that complement chili powder and deepen savory complexity. Stir into the meat and rice mixture to evenly distribute its aromatic, earthy character. Works well combined with oregano and paprika for a cohesive spice blend.
- 1 teaspoon oregano: Include to lend slightly minty, mild herbal flavor that brightens the overall spice mix and adds Mediterranean warmth. Crumble between fingers before adding to release essential oils for better integration. Balances richer spices and helps lighten the palate.
- 1 teaspoon smoked paprika: Use smoked paprika to impart deep, sweet smoky flavor and red color; enhances grilled or roasted profile without needing actual smoke. Stir into spice mix to build a complex background note that plays well with cumin and chili powder. Adds visual appeal and rounded flavor.
- 1 teaspoon garlic powder: Add to reinforce garlicky flavor in dried, mellow form; helps maintain consistent garlic presence across the dish. Mix into spice blend to ensure uniform seasoning throughout the meat and rice. Useful when fresh garlic is limited or for more controlled intensity.
- 1 teaspoon onion powder: Use to support savory, slightly sweet onion flavor in powdered form; rounds out the seasoning blend and enhances umami. Mix with other dried spices for consistent distribution without altering moisture. Complements fresh onion by intensifying its presence.
- 1 teaspoon Kosher salt: Season to elevate overall taste balance and enhance other flavors; kosher salt dissolves quickly for even seasoning in cooked components. Add gradually and taste as you go to avoid over-salting, especially with broths and canned ingredients. Essential for unlocking the full profile of spices and proteins.
- 1/2 teaspoon black pepper ground: Grind over food to add sharp, spicy warmth and subtle aromatics; black pepper provides slight heat and complexity. Use freshly ground for maximum flavor and sprinkle sparingly to avoid overpowering delicate components. Balances richness of turkey and creaminess of cheese.
- 1 tablespoon all-purpose flour: Stir in as a thickening agent to bind pan juices into a light gravy and give a silky mouthfeel to the turkey mixture. Whisk with a bit of broth before adding to prevent lumps and cook briefly to remove raw flour taste. Helps the mixture cling to rice and beans for a cohesive bowl.
- 1 cup chicken broth low-sodium: Pour in to deglaze the pan and create a flavorful base liquid; low-sodium chicken broth contributes savory depth without excessive salt. Use to dissolve browned bits and let flavors meld with spices and flour for a cohesive sauce. Adjust quantity depending on desired sauciness.
- 1 1/4 cup long-grain brown rice: Rinse and cook to provide nutty, chewy grains that serve as the hearty base of the bowl; long–grain brown rice offers fiber and whole-grain texture. Simmer with specified liquid and aromatics until tender for a wholesome foundation. Fluffs when done and complements saucy turkey and toppings.
- 1 2/3 cup water or broth: Combine with rice and simmer to properly cook grains; water or broth hydrates the rice and carries flavor into each kernel. Use broth for added savory notes or water for a neutral base; measure accurately to ensure correct rice texture. Simmer gently to prevent sticking or burning.
- 1 bay leaf: Add whole while simmering rice to infuse subtle herbal depth and a slightly floral note that enhances overall aroma. Remove before serving as it’s not meant to be eaten but imparts background complexity. Place in pot at the start of rice cooking for best infusion.
- 1/4 cup cilantro fresh, chopped: Chop and mix in at the end to add fresh, citrusy, herbaceous brightness that lifts rich components; cilantro provides vibrant green flavor. Scatter over bowls before serving for a fresh finish and slight textural contrast. Use leaves and tender stems for best taste.
- 1 tablespoon lime juice usually from half of a lime: Squeeze in to brighten flavors and add zesty acidity that balances richness from turkey, cheese, and sour cream; provides a clean, citrus lift. Measure to taste and add just prior to serving to preserve fresh lime aroma. Enhances interplay between spicy and creamy elements.
- 1 teaspoon olive oil (optional): Drizzle optionally to add a touch of fruitiness and help coat herbs or dressings; a small amount softens sharp edges without overwhelming other flavors. Use to toss lettuce or finish vegetables for subtle sheen and mouthfeel. Can be omitted for an oil-free variation.
- 1/2 teaspoon salt: Season separately or with other components to ensure the salad and toppings are balanced; additional salt layers flavors in lettuce, beans, or salsas. Add sparingly and taste before serving because broths, cheeses, and canned ingredients may already contain sodium. Helps bring out natural tastes in produce.
- 1 15 oz can red kidney beans drained and rinsed: Drain and rinse to remove excess sodium and packing liquid, then fold into the bowl for protein, fiber, and creamy texture. Heat briefly with spices or add cold for a chunkier contrast; kidney beans contribute earthy flavor and substance. Offer as a vegetarian-friendly protein boost within the bowl.
- 1/4 cup chicken broth low-sodium: Pour in as needed to moisten beans or finish a saucy mixture; low-sodium chicken broth adds gentle savory flavor without extra salt. Use a small amount to loosen textures or to reheat components while preserving overall seasoning balance. Keeps beans tender and integrates flavors.
- 1/2 teaspoon chili powder: Sprinkle to add a mild smoky heat and continuity with the main spice blend; a reduced amount seasons beans or salsas without overpowering other components. Mix into bean or salsa layers for a hint of chili warmth. Allows subtle layering of spice throughout the bowl.
- 1/4 teaspoon ground cumin: Dust lightly to echo cumin notes used earlier and tie flavors together; small measure seasons beans or rice without dominating the profile. Stir into warm components so the spice hydrates and disperses evenly. Enhances earthy undertones already present in the dish.
- 1/4 teaspoon Kosher salt: Add a small amount to control saltiness of side components and ensure balanced seasoning across the bowl; kosher salt at this step fine-tunes flavor. Incorporate gradually and taste components like beans, rice, and salsas before final seasoning. Prevents a flat-tasting mixture.
- 2 cups romaine lettuce chopped: Toss to create a crisp, refreshing bed for toppings and fillings; chopped romaine provides crunch and a cool contrast to warm, savory elements. Keep chilled and add just before serving to preserve texture. Works as a lighter alternative to tortillas or as an extra fresh layer.
- 2 cups roasted corn salsa: Spoon in for sweet, smoky, and slightly charred corn flavor that adds bright kernels and textural contrast; roasted corn salsa contributes both sweetness and acidity. Use as a topping to introduce vegetable brightness and pop of color. Balances richness of turkey and cheese with fresh vegetal notes.
- 3/4 cup Colby Jack cheese grated: Sprinkle shredded cheese to introduce creamy, mild, melting richness that binds warm ingredients and adds indulgence; Colby Jack offers buttery, slightly tangy flavor. Distribute over hot components to melt slightly, creating a cohesive bite with rice and meat. Adjust amount for desired cheesiness.
- 1 cup pico de gallo: Spoon over or serve alongside to add fresh, tomato–onion–pepper brightness and tangy moisture; pico de gallo gives acidity and crisp vegetable texture. Use chilled to contrast warm bowl elements and provide a vibrant, zesty accent. Offers herbaceous notes from cilantro and lime.
- 1 cup roasted tomato salsa: Add roasted tomato salsa for smoky, concentrated tomato depth and saucy moisture that complements the turkey mixture; enhances umami and adds silky texture. Spoon as a savory topping to unify components and introduce roasted flavor. Layer with pico for varied salsa profiles.
- jalapeños sliced, fresh or pickled: Slice and offer Raw or pickled to introduce varying heat levels and crunchy texture; jalapeños bring bright, vegetal spice and optional tang. Add sparingly to control heat, or remove seeds for milder flavor; excellent for customizing spice per diner. Complements creamy elements like sour cream.
- cilantro fresh, chopped: Chop and use as an extra fresh herb garnish to amplify citrusy, slightly peppery herbal notes; cilantro pairs with lime to brighten the bowl. Scatter over finished plates for color and aroma, and use tender leaves for the best texture. Works well mixed into salsas or sprinkled on top.
- sour cream: Spoon as a cool, tangy, and creamy condiment to mellow heat and add lush mouthfeel; sour cream provides acidity and smoothness. Dollop on top of each bowl to balance spicy and smoky components and offer a creamy counterpoint to grains and beans. Can be thinned with lime for a dressing-like drizzle.
Preparation Steps for Turkey Burrito Bowl
These steps are written to guide you through building each component with sensory cues so you know you are on the right track. Take your time when browning, simmering, and seasoning, and taste as you go so the bowl stays balanced.
- Heat the oil in a large skillet over medium heat. Add the onions and sauté until soft, about 5 minutes. Stir in the garlic and sauté for another 30 seconds.: Right away you should smell a gentle olive aroma as the olive oil warms, signaling the pan is ready for the onion . The sound will be a soft sizzle when the chopped onion hits the surface, and visually the pieces will turn translucent within a few minutes. This step matters because gentle heat softens the onion and releases sweetness that forms the aromatic base for the rest of the dish. A common mistake is overheating the oil which can scorch the onion , so keep the temperature steady and stir occasionally to ensure even softening.
- Add the ground turkey and break it up with a wooden spoon or spatula. Cook, stirring often, until no longer pink. If excess grease has rendered, soak it up with a paper towel, or tilt the skillet and spoon it off (discard safely).: As the onion sizzles, you will notice the edges turning glossy and the pan starting to pick up browned bits, which add flavor. Stirring every minute helps prevent sticking and builds an even color. The reason we soften the onion first is that it provides a mellow sweetness that balances the savory turkey later on. Avoid rushing by raising the heat too high, because that can create bitter char instead of the desired gentle caramelization.
- Stir in the chili powder, cumin, oregano, paprika, garlic powder, onion powder, salt, and pepper. Stir and cook until the meat is fully coated and aromatic, about 1 minute. Stir in the flour and cook for another minute.: When you add the minced garlic the aroma will bloom rapidly, offering an immediate savory lift. Watch closely, the garlic browns in seconds and that golden hue indicates it has mellowed; if it turns dark it will taste bitter. This brief sauté is important so the garlic infuses the oil and melds into the base flavors without overpowering them. A frequent error is leaving the garlic unattended, so keep a close eye and stir constantly.
- Stir in the broth and simmer until most of the liquid has evaporated but not dry, usually about 10 minutes. Cover and set aside.: As you add the ground turkey you should hear a steady sizzle and see the meat begin to brown at the contact points. Breaking it up into small pieces helps it cook evenly and develop little browned bits, which are full of flavor. Browning concentrates savory notes and adds texture contrast to the bowl. Be careful not to crowd the pan, because if the meat steams it will not brown properly; if needed, cook in batches or increase heat slightly to promote browning.
- Add the rice, water, and bay leaf into a medium-sized saucepan (with a lid). Bring to a boil. Stir and lower the heat to LOW. Cover and simmer until the rice is tender, about 40 to 50 minutes. Check the rice after 20 minutes, and add a little more water if needed. Continue this process until the rice is fluffy and soft. Remove from the heat and remove the bay leaf.: The turkey will shift from pink to pale beige and then develop small browned patches, giving off a roasted aroma. Stirring keeps the pieces uniform and ensures all sides get contact with the hot surface. This step is essential for safety and flavor, as thorough cooking removes raw notes and creates texture. A common slip up is undercooking the center of larger clumps, so break pieces apart and test by cutting a larger piece to confirm there is no pink inside.
- Stir in the cilantro, lime juice, olive oil, and salt. Cover and set aside.: When you see a shimmer of fat pooling, carefully tilt the pan and spoon off the excess, or blot with a folded paper towel held with tongs. Removing surplus grease prevents the final mixture from feeling oily, and it concentrates the seasoning on the meat. This matters for mouthfeel and to help the spices cling. Avoid leaving too much fat which can make the bowl heavy, but do not remove every bit if the turkey is very lean, or the meat may become dry.
- In a small saucepan, add the rinsed beans, broth, chili powder, cumin, and salt. Bring to a simmer and cook, stirring occasionally for about 5 minutes. Cover and set aside.: As the dry spices hit the hot pan you will smell a sudden lift of aroma, like a warm spice market. The heat briefly toasts them, unlocking volatile oils that deepen the overall profile, and these flavors bind to the meat surface. This blending is crucial so each bite of the turkey is well seasoned. The main mistake is adding spices too late or in too high heat which can burn them, so add evenly and stir quickly to distribute without scorching.
- Scoop about 1/3 cup of the rice into individual serving bowls. Top with turkey taco meat, seasoned beans, and other desired toppings. Serve at once.: A short minute of stirring lets the spices adhere and bloom without losing brightness. You should see the meat take on a uniform color and the pan release a fragrant steam. This moment is when the seasoning and meat integrate, producing complex savory notes. Avoid letting the pan go dry in this step, because the spices can toast too aggressively; if needed, add a splash of the broth to loosen the mixture.
- Stir in the flour and cook for another minute: The all-purpose flour will absorb residual fat and start to thicken juices, creating a slight roux that helps the broth cling to the meat. After a minute you will notice the mixture gain a bit of body and a sheen. This technique matters because it prevents the meat from becoming watery when liquid is added, ensuring a clingy, flavorful sauce. A typical error is adding too much flour which can cause pasty texture, so measure carefully and cook it briefly to remove raw taste.
- Stir in the broth and simmer until most of the liquid has evaporated but not dry, usually about 10 minutes: When the low sodium chicken broth hits the pan it will deglaze and lift the browned bits, creating a glossy sauce. Simmering concentrates flavor and melds the spices into the meat. You will hear a soft bubbling and see the sauce reduce to a thicker coating on the turkey . This step improves mouthfeel and ensures the meat is juicy rather than dry. Avoid boiling vigorously for too long which can evaporate too much liquid and make the meat tough.
- Cover and set aside: Once the meat is saucy and aromatic, covering helps retain heat while you finish other components. The residual steam will settle flavors gently. This resting also allows the spices to deepen without overcooking. A common oversight is leaving the pan uncovered and allowing the meat to cool too quickly, which makes it less pleasant to serve.
- Add the rice, water, and bay leaf into a medium-sized saucepan: As the brown rice , water , and bay leaf go into the pot you will catch a faint herb scent from the leaf and the rice will glisten with hydration. Bringing them together in one pot ensures the grain cooks evenly and absorbs the aromatic infusion. This setup matters because the rice anchors the bowl and provides the chewy texture that balances the soft meat and creamy toppings. Avoid skipping the bay leaf if you want that subtle aromatic note.
- Bring to a boil: When the liquid reaches a rolling boil you will see vigorous bubbles and hear a lively sound, signaling that the temperature is right to shift to gentle simmer. This rapid heat jump is needed to start the cooking process and ensure the grains absorb heat uniformly. The mistake to avoid is leaving it uncovered at this stage which can lead to uneven cooking or evaporation.
- Stir and lower the heat to LOW: After a short stir, reduce to low so the rice cooks gently with small, steady bubbles. You should see just a whisper of steam rising, and the surface should show occasional tiny bubbles rather than aggressive boiling. Low heat prevents the grains from breaking and turning mushy, preserving the ideal chew. A common error is using high heat, which can scorch the bottom and leave the center undercooked.
- Cover and simmer until the rice is tender, about 40 to 50 minutes: Over the simmering time the brown rice will swell and soften, releasing a deep, nutty scent. Check after 20 minutes to gauge moisture; if the pot looks dry and grains still firm, add a splash more water . The right texture is tender yet slightly chewy, not gluey. Avoid stirring frequently, as that can release starch and make the rice gummy.
- Check the rice after 20 minutes, and add a little more water if needed: This check prevents the pot from drying out prematurely and ensures even doneness. You will see whether the grains are absorbing liquid steadily, and topping up a bit helps them finish properly. The why here is simple, even moisture creates consistent texture. Do not overdo the water addition or the rice may become soggy.
- Continue this process until the rice is fluffy and soft: When the rice reaches the right point it will separate into distinct grains with a pleasant chew and a faint nutty aroma. Remove the bay leaf to avoid an overly pungent herb note. Fluffy rice is crucial because it soaks up sauces and toppings rather than becoming a paste. A common mistake is skipping the final fluff with a fork, which helps separate grains and improve mouthfeel.
- Remove from the heat and remove the bay leaf: Taking the pot off the heat stops carryover cooking and keeps the grains from over-softening, while removing the bay leaf eliminates any chance of an overpowering herbal pocket. Fluff the rice gently to release steam and maintain texture. Leaving the leaf in can create an off aroma in some bites, so be sure to fish it out.
- Stir in the cilantro, lime juice, olive oil, and salt: Folding these fresh elements into the warm rice releases a bright, citrusy scent and coats the grains with a light herbaceous finish. The olive oil adds sheen while the salt balances flavors. This finishing touch elevates the rice from a neutral base to a component that contributes aroma and lift. A frequent mistake is adding acid too early, which can make the rice gluey; add it at the end for best texture.
- Cover and set aside: Letting the seasoned rice rest covered keeps it warm and allows flavors to marry without losing moisture. It also ensures that when you assemble bowls, the rice stays tender and slightly separated. Avoid leaving it uncovered where it can form a crust on top.
- In a small saucepan, add the rinsed beans, broth, chili powder, cumin, and salt: When the red kidney beans hit the saucepan with the spices and a splash of chicken broth , you will see gentle bubbling and smell the spices coaxing the beans into flavor. Simmering briefly lets the beans absorb the seasoning so they contribute a cohesive note in the final bowl. This matters because unseasoned beans can taste flat; a short simmer dresses them nicely. Avoid boiling too hard which can break the beans apart.
- Bring to a simmer and cook, stirring occasionally for about 5 minutes: As the beans warm, they will soften further and the broth will reduce slightly, creating a saucy consistency that clings to a spoon. This short simmer integrates the spices without turning the beans mushy. Stir occasionally to prevent sticking and to check texture. A common mistake is overcooking which makes beans mealy.
- Cover and set aside: Holding the seasoned beans warm keeps them plump and ready to top the bowl. The residual heat preserves their silkiness until assembly. Do not oversteep them in hot liquid which can break down the structure.
- Scoop about 1/3 cup of the rice into individual serving bowls: The visual of a neat rice mound gives structure to the bowl, and the warm rice will emit a gentle steam signaling readiness. The rice forms a base that soaks up sauces and provides a neutral canvas for the bold toppings. Measure so portions remain balanced and avoid packing it too tightly which can make the mouthfeel heavy.
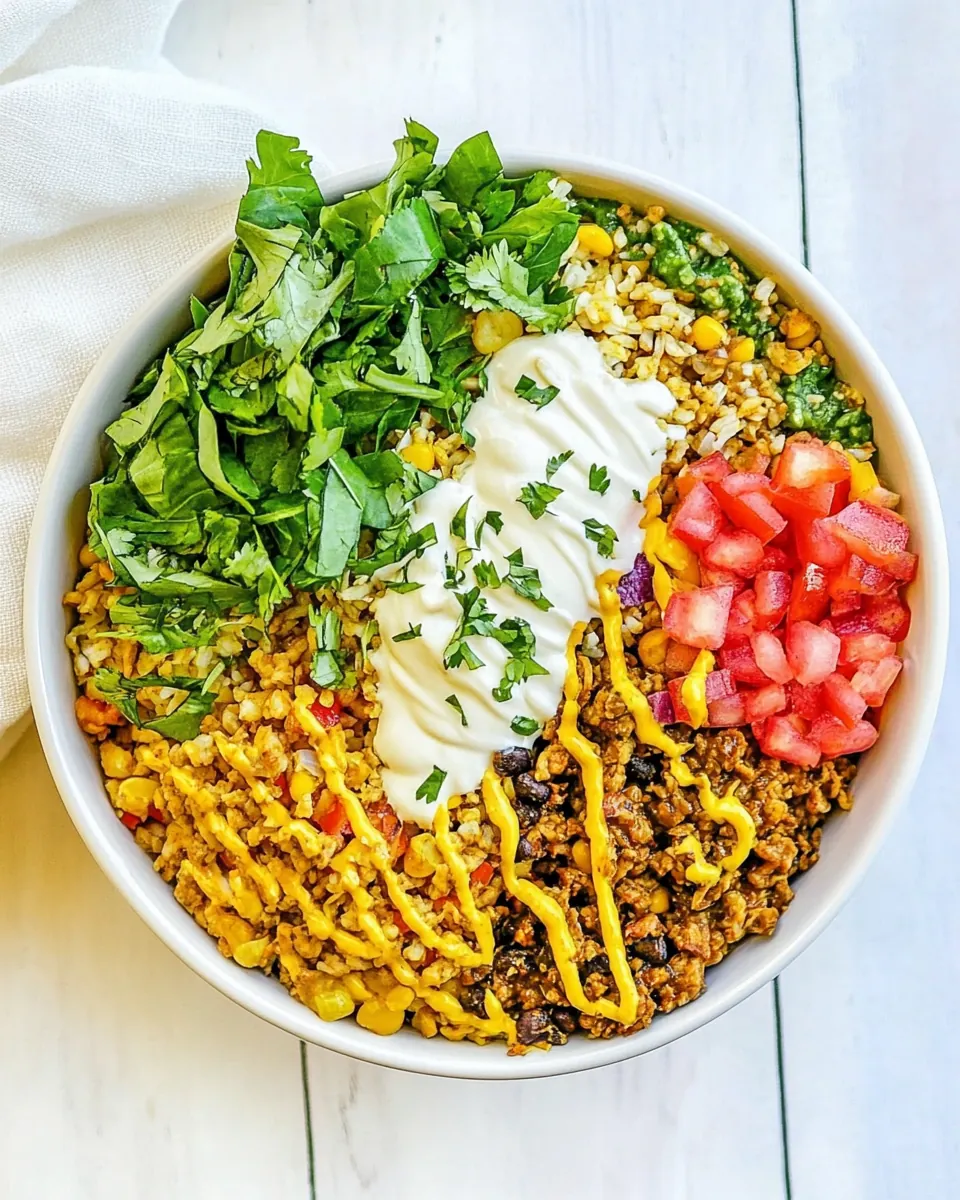
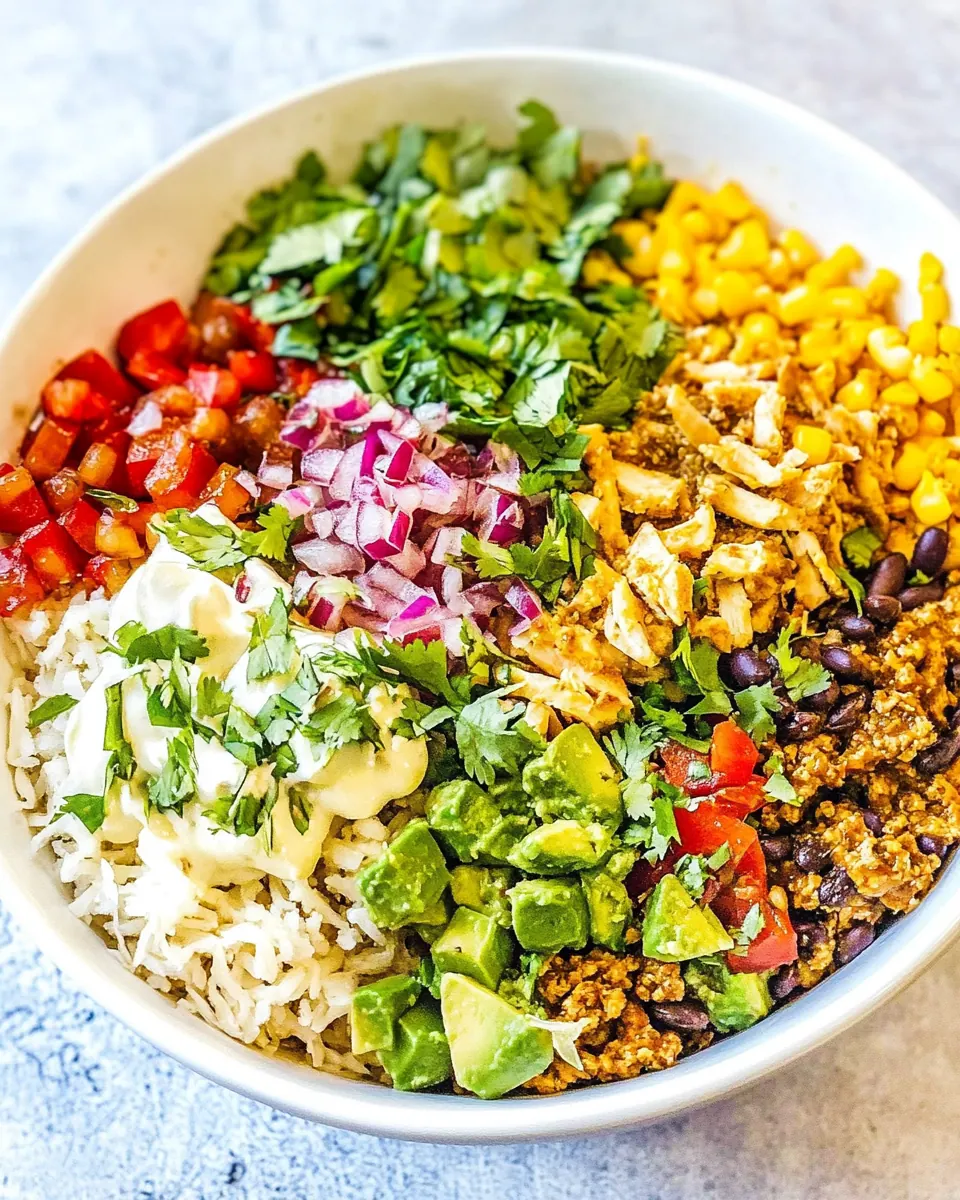
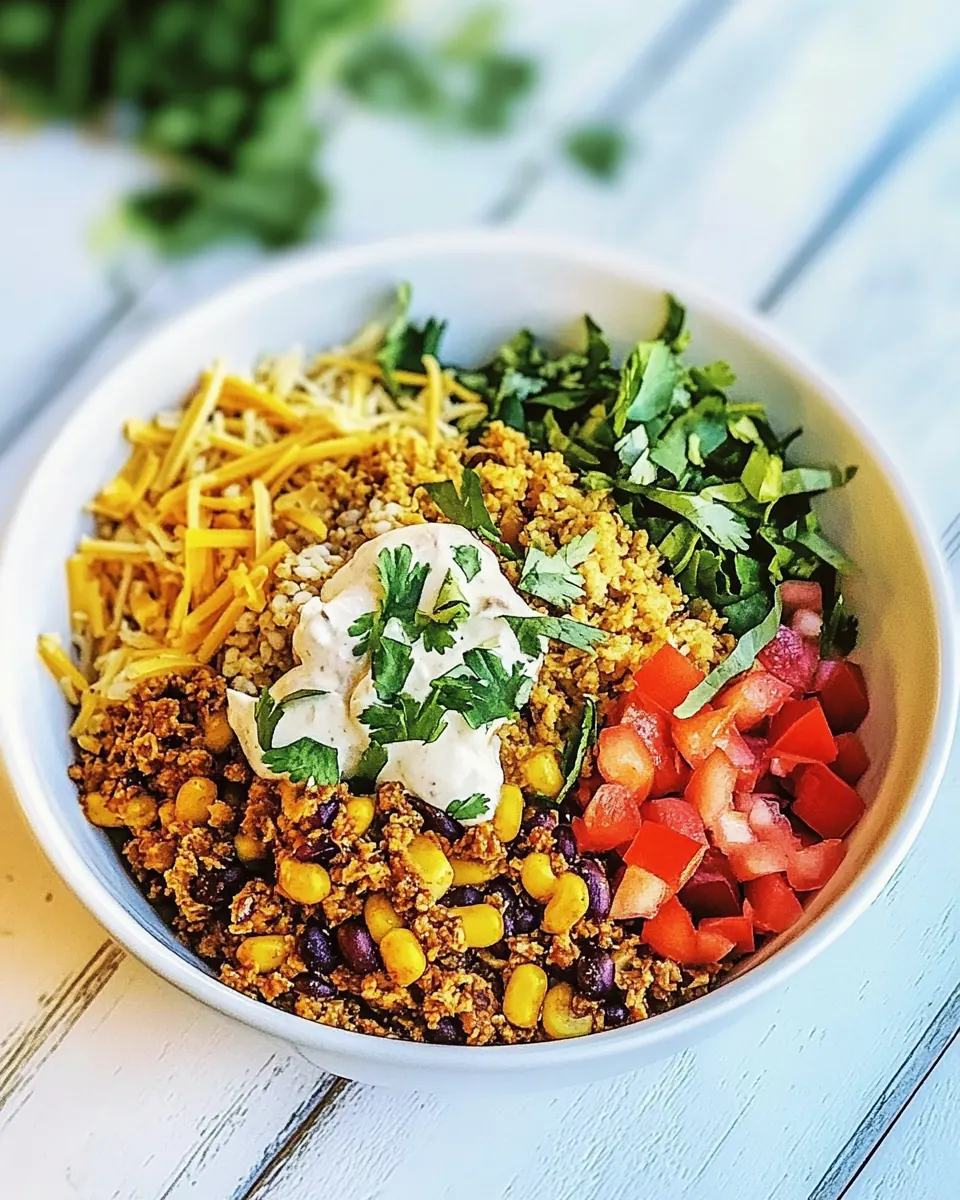
- Top with turkey taco meat, seasoned beans, and other desired toppings: Layer the warm turkey and saucy beans over the rice, then add crisp romaine lettuce , roasted corn salsa , pico de gallo , shredded Colby Jack cheese , roasted tomato salsa, sliced jalapeños , extra cilantro , and a dollop of sour cream as you like. The contrast in temperatures and textures is what makes each bite interesting. Take care not to overload the bowl so flavors remain balanced.
- Serve at once: Serve while the warm components are still cozy and the fresh elements are crisp, this contrast is part of the appeal. Encourage diners to mix as they eat so each spoonful has a bit of everything. The biggest mistake is letting the warm elements sit too long with the lettuce, which can wilt; assemble just before serving.
Tips for Success
These tips help you maximize flavor and streamline prep so your bowls come together effortlessly. I recommend prepping toppings ahead and adjusting seasoning as you assemble. Below are expanded notes from the original recipe notes to help you through each stage.
- Watch the video guidance: The video referenced in the notes offers visual cues for texture and doneness that are invaluable if you are unsure about visual signs like rice fluffiness or how browned the ground turkey should be.
- Make components ahead: You can prepare the rice, turkey, and salsas up to two days early. Store separately in airtight containers and reheat gently when ready to serve to preserve texture and freshness.
- Monitor sodium levels: Since multiple components use broth or canned beans, taste as you go and use low sodium broths. Adjust salt at the end rather than during early stages to avoid oversalting.
- Reheat gently: Warm the turkey and rice on the stove over low heat or in short bursts in the microwave, stirring occasionally to avoid drying out or uneven heating.
- Store leftovers properly: Consolidate components sensibly and refrigerate. The assembled bowl can last up to five days when kept chilled, and salsas often keep longer if stored separately.
Serving Options for Turkey Burrito Bowl
This dish works across occasions from casual lunches to hearty family dinners. Below you will find serving suggestions, side pairings, and storage tips organized so you can adapt the bowl to gatherings or meal prep.
- Family dinner: Serve bowls family style by laying out warm rice, saucy turkey, seasoned beans, and the full range of toppings so everyone builds their ideal plate.
- Meal prep lunches: Pack components separately in meal containers with the dressing or sour cream in small cups. Reheat turkey and rice and add fresh romaine lettuce and salsas at the last minute for vibrant texture.
- Casual gatherings: Arrange a topping bar with shredded Colby Jack cheese, pico de gallo, roasted corn salsa, jalapeños, and extra cilantro so guests can customize their bowls.
- Seasonal pairings: This bowl is great all year, but I especially like it in warmer months with bright salsas and extra lime. In cooler months, offer a warm roasted vegetable side that complements the spices.
- Storage tips: Keep salsas and lettuce separate from warm items to avoid wilting. Leftovers will keep in the fridge for up to five days if stored properly, and salsas can last longer when refrigerated.
- Occasions: Suitable for casual weeknight dinners, meal planning, potlucks, and Ramadan if you need nourishing and easy to serve options after fasting.
FAQ
Conclusion
This Turkey Burrito Bowl stands out because it combines lean, spiced ground turkey with nutty brown rice, saucy beans, and vibrant fresh toppings for a balanced, satisfying meal. Try it because it is flexible, make ahead friendly, and easy to adapt to your familys tastes while still delivering bold flavors. I hope you enjoy assembling and customizing these bowls as much as I do, and that it becomes a reliable favorite for busy weeknights or casual entertaining.

Turkey Burrito Bowl
Equipment
- Large Skillet
- Wooden Spoon
- Medium saucepan with lid
- Small Saucepan
Ingredients
- 1 tablespoon olive oil Use to sauté aromatics and brown turkey; adds a fruity, slightly peppery fat that helps prevent sticking and builds flavor when heated. Measure carefully to avoid greasiness and add at the start of cooking for even heat distribution. Works well at medium-high heat to coax out savory notes from onions and garlic.
- 1 medium onion chopped Chop finely to create a sweet, savory base that softens and caramelizes when cooked; provides moisture and depth to the filling. Cook until translucent to release sugars that balance spices and tomato-based components. Adds texture contrast to the finished bowl when combined with other ingredients.
- 3 cloves garlic minced Mince and add near the beginning of cooking to release pungent, aromatic oils that enhance savory flavors; helps season the turkey and rice. Use freshly minced garlic for brighter, sharper taste and be careful not to burn it to avoid bitterness. Complements onion and spices to build a layered flavor profile.
- 1 lb ground turkey 93% lean Brown over medium-high heat to develop savory, meaty depth while absorbing seasonings; lean turkey keeps the dish lighter but can dry out if overcooked. Break into small pieces while cooking for even distribution and combine with spices and broth for sauciness. Finish cooking to safe internal temperature while maintaining juiciness.
- 2 teaspoon chili powder Sprinkle into the turkey and rice to provide warm, earthy heat with subtle fruity undertones; acts as a primary Mexican-inspired seasoning. Toast briefly in the pan to intensify aroma before adding liquids. Adjust amount to taste for mild to moderate spice levels.
- 1 teaspoon ground cumin Add to bring warm, nutty, slightly bitter cumin notes that complement chili powder and deepen savory complexity. Stir into the meat and rice mixture to evenly distribute its aromatic, earthy character. Works well combined with oregano and paprika for a cohesive spice blend.
- 1 teaspoon oregano Include to lend slightly minty, mild herbal flavor that brightens the overall spice mix and adds Mediterranean warmth. Crumble between fingers before adding to release essential oils for better integration. Balances richer spices and helps lighten the palate.
- 1 teaspoon smoked paprika Use smoked paprika to impart deep, sweet smoky flavor and red color; enhances grilled or roasted profile without needing actual smoke. Stir into spice mix to build a complex background note that plays well with cumin and chili powder. Adds visual appeal and rounded flavor.
- 1 teaspoon garlic powder Add to reinforce garlicky flavor in dried, mellow form; helps maintain consistent garlic presence across the dish. Mix into spice blend to ensure uniform seasoning throughout the meat and rice. Useful when fresh garlic is limited or for more controlled intensity.
- 1 teaspoon onion powder Use to support savory, slightly sweet onion flavor in powdered form; rounds out the seasoning blend and enhances umami. Mix with other dried spices for consistent distribution without altering moisture. Complements fresh onion by intensifying its presence.
- 1 teaspoon Kosher salt Season to elevate overall taste balance and enhance other flavors; kosher salt dissolves quickly for even seasoning in cooked components. Add gradually and taste as you go to avoid over-salting, especially with broths and canned ingredients. Essential for unlocking the full profile of spices and proteins.
- 1/2 teaspoon black pepper ground Grind over food to add sharp, spicy warmth and subtle aromatics; black pepper provides slight heat and complexity. Use freshly ground for maximum flavor and sprinkle sparingly to avoid overpowering delicate components. Balances richness of turkey and creaminess of cheese.
- 1 tablespoon all-purpose flour Stir in as a thickening agent to bind pan juices into a light gravy and give a silky mouthfeel to the turkey mixture. Whisk with a bit of broth before adding to prevent lumps and cook briefly to remove raw flour taste. Helps the mixture cling to rice and beans for a cohesive bowl.
- 1 cup chicken broth low-sodium Pour in to deglaze the pan and create a flavorful base liquid; low-sodium chicken broth contributes savory depth without excessive salt. Use to dissolve browned bits and let flavors meld with spices and flour for a cohesive sauce. Adjust quantity depending on desired sauciness.
- 1 1/4 cup long-grain brown rice Rinse and cook to provide nutty, chewy grains that serve as the hearty base of the bowl; long-grain brown rice offers fiber and whole-grain texture. Simmer with specified liquid and aromatics until tender for a wholesome foundation. Fluffs when done and complements saucy turkey and toppings.
- 1 2/3 cup water or broth Combine with rice and simmer to properly cook grains; water or broth hydrates the rice and carries flavor into each kernel. Use broth for added savory notes or water for a neutral base; measure accurately to ensure correct rice texture. Simmer gently to prevent sticking or burning.
- 1 bay leaf Add whole while simmering rice to infuse subtle herbal depth and a slightly floral note that enhances overall aroma. Remove before serving as it’s not meant to be eaten but imparts background complexity. Place in pot at the start of rice cooking for best infusion.
- 1/4 cup cilantro fresh, chopped Chop and mix in at the end to add fresh, citrusy, herbaceous brightness that lifts rich components; cilantro provides vibrant green flavor. Scatter over bowls before serving for a fresh finish and slight textural contrast. Use leaves and tender stems for best taste.
- 1 tablespoon lime juice usually from half of a lime Squeeze in to brighten flavors and add zesty acidity that balances richness from turkey, cheese, and sour cream; provides a clean, citrus lift. Measure to taste and add just prior to serving to preserve fresh lime aroma. Enhances interplay between spicy and creamy elements.
- 1 teaspoon olive oil optional Drizzle optionally to add a touch of fruitiness and help coat herbs or dressings; a small amount softens sharp edges without overwhelming other flavors. Use to toss lettuce or finish vegetables for subtle sheen and mouthfeel. Can be omitted for an oil-free variation.
- 1/2 teaspoon salt Season separately or with other components to ensure the salad and toppings are balanced; additional salt layers flavors in lettuce, beans, or salsas. Add sparingly and taste before serving because broths, cheeses, and canned ingredients may already contain sodium. Helps bring out natural tastes in produce.
- 1 15 oz can red kidney beans drained and rinsed Drain and rinse to remove excess sodium and packing liquid, then fold into the bowl for protein, fiber, and creamy texture. Heat briefly with spices or add cold for a chunkier contrast; kidney beans contribute earthy flavor and substance. Offer as a vegetarian-friendly protein boost within the bowl.
- 1/4 cup chicken broth low-sodium Pour in as needed to moisten beans or finish a saucy mixture; low-sodium chicken broth adds gentle savory flavor without extra salt. Use a small amount to loosen textures or to reheat components while preserving overall seasoning balance. Keeps beans tender and integrates flavors.
- 1/2 teaspoon chili powder Sprinkle to add a mild smoky heat and continuity with the main spice blend; a reduced amount seasons beans or salsas without overpowering other components. Mix into bean or salsa layers for a hint of chili warmth. Allows subtle layering of spice throughout the bowl.
- 1/4 teaspoon ground cumin Dust lightly to echo cumin notes used earlier and tie flavors together; small measure seasons beans or rice without dominating the profile. Stir into warm components so the spice hydrates and disperses evenly. Enhances earthy undertones already present in the dish.
- 1/4 teaspoon Kosher salt Add a small amount to control saltiness of side components and ensure balanced seasoning across the bowl; kosher salt at this step fine-tunes flavor. Incorporate gradually and taste components like beans, rice, and salsas before final seasoning. Prevents a flat-tasting mixture.
- 2 cups romaine lettuce chopped Toss to create a crisp, refreshing bed for toppings and fillings; chopped romaine provides crunch and a cool contrast to warm, savory elements. Keep chilled and add just before serving to preserve texture. Works as a lighter alternative to tortillas or as an extra fresh layer.
- 2 cups roasted corn salsa Spoon in for sweet, smoky, and slightly charred corn flavor that adds bright kernels and textural contrast; roasted corn salsa contributes both sweetness and acidity. Use as a topping to introduce vegetable brightness and pop of color. Balances richness of turkey and cheese with fresh vegetal notes.
- 3/4 cup Colby Jack cheese grated Sprinkle shredded cheese to introduce creamy, mild, melting richness that binds warm ingredients and adds indulgence; Colby Jack offers buttery, slightly tangy flavor. Distribute over hot components to melt slightly, creating a cohesive bite with rice and meat. Adjust amount for desired cheesiness.
- 1 cup pico de gallo Spoon over or serve alongside to add fresh, tomato-onion-pepper brightness and tangy moisture; pico de gallo gives acidity and crisp vegetable texture. Use chilled to contrast warm bowl elements and provide a vibrant, zesty accent. Offers herbaceous notes from cilantro and lime.
- 1 cup roasted tomato salsa Add roasted tomato salsa for smoky, concentrated tomato depth and saucy moisture that complements the turkey mixture; enhances umami and adds silky texture. Spoon as a savory topping to unify components and introduce roasted flavor. Layer with pico for varied salsa profiles.
- jalapeños sliced, fresh or pickled Slice and offer Raw or pickled to introduce varying heat levels and crunchy texture; jalapeños bring bright, vegetal spice and optional tang. Add sparingly to control heat, or remove seeds for milder flavor; excellent for customizing spice per diner. Complements creamy elements like sour cream.
- cilantro fresh, chopped Chop and use as an extra fresh herb garnish to amplify citrusy, slightly peppery herbal notes; cilantro pairs with lime to brighten the bowl. Scatter over finished plates for color and aroma, and use tender leaves for the best texture. Works well mixed into salsas or sprinkled on top.
- sour cream Spoon as a cool, tangy, and creamy condiment to mellow heat and add lush mouthfeel; sour cream provides acidity and smoothness. Dollop on top of each bowl to balance spicy and smoky components and offer a creamy counterpoint to grains and beans. Can be thinned with lime for a dressing-like drizzle.
Instructions
- Heat the oil in a large skillet over medium heat. Add the onions and sauté until soft, about 5 minutes. Stir in the garlic and sauté for another 30 seconds.: Right away you should smell a gentle olive aroma as the olive oil warms, signaling the pan is ready for the onion . The sound will be a soft sizzle when the chopped onion hits the surface, and visually the pieces will turn translucent within a few minutes. This step matters because gentle heat softens the onion and releases sweetness that forms the aromatic base for the rest of the dish. A common mistake is overheating the oil which can scorch the onion , so keep the temperature steady and stir occasionally to ensure even softening.
- Add the ground turkey and break it up with a wooden spoon or spatula. Cook, stirring often, until no longer pink. If excess grease has rendered, soak it up with a paper towel, or tilt the skillet and spoon it off (discard safely).: As the onion sizzles, you will notice the edges turning glossy and the pan starting to pick up browned bits, which add flavor. Stirring every minute helps prevent sticking and builds an even color. The reason we soften the onion first is that it provides a mellow sweetness that balances the savory turkey later on. Avoid rushing by raising the heat too high, because that can create bitter char instead of the desired gentle caramelization.
- Stir in the chili powder, cumin, oregano, paprika, garlic powder, onion powder, salt, and pepper. Stir and cook until the meat is fully coated and aromatic, about 1 minute. Stir in the flour and cook for another minute.: When you add the minced garlic the aroma will bloom rapidly, offering an immediate savory lift. Watch closely, the garlic browns in seconds and that golden hue indicates it has mellowed; if it turns dark it will taste bitter. This brief sauté is important so the garlic infuses the oil and melds into the base flavors without overpowering them. A frequent error is leaving the garlic unattended, so keep a close eye and stir constantly.
- Stir in the broth and simmer until most of the liquid has evaporated but not dry, usually about 10 minutes. Cover and set aside.: As you add the ground turkey you should hear a steady sizzle and see the meat begin to brown at the contact points. Breaking it up into small pieces helps it cook evenly and develop little browned bits, which are full of flavor. Browning concentrates savory notes and adds texture contrast to the bowl. Be careful not to crowd the pan, because if the meat steams it will not brown properly; if needed, cook in batches or increase heat slightly to promote browning.
- Add the rice, water, and bay leaf into a medium-sized saucepan (with a lid). Bring to a boil. Stir and lower the heat to LOW. Cover and simmer until the rice is tender, about 40 to 50 minutes. Check the rice after 20 minutes, and add a little more water if needed. Continue this process until the rice is fluffy and soft. Remove from the heat and remove the bay leaf.: The turkey will shift from pink to pale beige and then develop small browned patches, giving off a roasted aroma. Stirring keeps the pieces uniform and ensures all sides get contact with the hot surface. This step is essential for safety and flavor, as thorough cooking removes raw notes and creates texture. A common slip up is undercooking the center of larger clumps, so break pieces apart and test by cutting a larger piece to confirm there is no pink inside.
- Stir in the cilantro, lime juice, olive oil, and salt. Cover and set aside.: When you see a shimmer of fat pooling, carefully tilt the pan and spoon off the excess, or blot with a folded paper towel held with tongs. Removing surplus grease prevents the final mixture from feeling oily, and it concentrates the seasoning on the meat. This matters for mouthfeel and to help the spices cling. Avoid leaving too much fat which can make the bowl heavy, but do not remove every bit if the turkey is very lean, or the meat may become dry.
- In a small saucepan, add the rinsed beans, broth, chili powder, cumin, and salt. Bring to a simmer and cook, stirring occasionally for about 5 minutes. Cover and set aside.: As the dry spices hit the hot pan you will smell a sudden lift of aroma, like a warm spice market. The heat briefly toasts them, unlocking volatile oils that deepen the overall profile, and these flavors bind to the meat surface. This blending is crucial so each bite of the turkey is well seasoned. The main mistake is adding spices too late or in too high heat which can burn them, so add evenly and stir quickly to distribute without scorching.
- Scoop about 1/3 cup of the rice into individual serving bowls. Top with turkey taco meat, seasoned beans, and other desired toppings. Serve at once.: A short minute of stirring lets the spices adhere and bloom without losing brightness. You should see the meat take on a uniform color and the pan release a fragrant steam. This moment is when the seasoning and meat integrate, producing complex savory notes. Avoid letting the pan go dry in this step, because the spices can toast too aggressively; if needed, add a splash of the broth to loosen the mixture.
- Stir in the flour and cook for another minute: The all-purpose flour will absorb residual fat and start to thicken juices, creating a slight roux that helps the broth cling to the meat. After a minute you will notice the mixture gain a bit of body and a sheen. This technique matters because it prevents the meat from becoming watery when liquid is added, ensuring a clingy, flavorful sauce. A typical error is adding too much flour which can cause pasty texture, so measure carefully and cook it briefly to remove raw taste.
- Stir in the broth and simmer until most of the liquid has evaporated but not dry, usually about 10 minutes: When the low sodium chicken broth hits the pan it will deglaze and lift the browned bits, creating a glossy sauce. Simmering concentrates flavor and melds the spices into the meat. You will hear a soft bubbling and see the sauce reduce to a thicker coating on the turkey . This step improves mouthfeel and ensures the meat is juicy rather than dry. Avoid boiling vigorously for too long which can evaporate too much liquid and make the meat tough.
- Cover and set aside: Once the meat is saucy and aromatic, covering helps retain heat while you finish other components. The residual steam will settle flavors gently. This resting also allows the spices to deepen without overcooking. A common oversight is leaving the pan uncovered and allowing the meat to cool too quickly, which makes it less pleasant to serve.
- Add the rice, water, and bay leaf into a medium-sized saucepan: As the brown rice , water , and bay leaf go into the pot you will catch a faint herb scent from the leaf and the rice will glisten with hydration. Bringing them together in one pot ensures the grain cooks evenly and absorbs the aromatic infusion. This setup matters because the rice anchors the bowl and provides the chewy texture that balances the soft meat and creamy toppings. Avoid skipping the bay leaf if you want that subtle aromatic note.
- Bring to a boil: When the liquid reaches a rolling boil you will see vigorous bubbles and hear a lively sound, signaling that the temperature is right to shift to gentle simmer. This rapid heat jump is needed to start the cooking process and ensure the grains absorb heat uniformly. The mistake to avoid is leaving it uncovered at this stage which can lead to uneven cooking or evaporation.
- Stir and lower the heat to LOW: After a short stir, reduce to low so the rice cooks gently with small, steady bubbles. You should see just a whisper of steam rising, and the surface should show occasional tiny bubbles rather than aggressive boiling. Low heat prevents the grains from breaking and turning mushy, preserving the ideal chew. A common error is using high heat, which can scorch the bottom and leave the center undercooked.
- Cover and simmer until the rice is tender, about 40 to 50 minutes: Over the simmering time the brown rice will swell and soften, releasing a deep, nutty scent. Check after 20 minutes to gauge moisture; if the pot looks dry and grains still firm, add a splash more water . The right texture is tender yet slightly chewy, not gluey. Avoid stirring frequently, as that can release starch and make the rice gummy.
- Check the rice after 20 minutes, and add a little more water if needed: This check prevents the pot from drying out prematurely and ensures even doneness. You will see whether the grains are absorbing liquid steadily, and topping up a bit helps them finish properly. The why here is simple, even moisture creates consistent texture. Do not overdo the water addition or the rice may become soggy.
- Continue this process until the rice is fluffy and soft: When the rice reaches the right point it will separate into distinct grains with a pleasant chew and a faint nutty aroma. Remove the bay leaf to avoid an overly pungent herb note. Fluffy rice is crucial because it soaks up sauces and toppings rather than becoming a paste. A common mistake is skipping the final fluff with a fork, which helps separate grains and improve mouthfeel.
- Remove from the heat and remove the bay leaf: Taking the pot off the heat stops carryover cooking and keeps the grains from over-softening, while removing the bay leaf eliminates any chance of an overpowering herbal pocket. Fluff the rice gently to release steam and maintain texture. Leaving the leaf in can create an off aroma in some bites, so be sure to fish it out.
- Stir in the cilantro, lime juice, olive oil, and salt: Folding these fresh elements into the warm rice releases a bright, citrusy scent and coats the grains with a light herbaceous finish. The olive oil adds sheen while the salt balances flavors. This finishing touch elevates the rice from a neutral base to a component that contributes aroma and lift. A frequent mistake is adding acid too early, which can make the rice gluey; add it at the end for best texture.
- Cover and set aside: Letting the seasoned rice rest covered keeps it warm and allows flavors to marry without losing moisture. It also ensures that when you assemble bowls, the rice stays tender and slightly separated. Avoid leaving it uncovered where it can form a crust on top.
- In a small saucepan, add the rinsed beans, broth, chili powder, cumin, and salt: When the red kidney beans hit the saucepan with the spices and a splash of chicken broth , you will see gentle bubbling and smell the spices coaxing the beans into flavor. Simmering briefly lets the beans absorb the seasoning so they contribute a cohesive note in the final bowl. This matters because unseasoned beans can taste flat; a short simmer dresses them nicely. Avoid boiling too hard which can break the beans apart.
- Bring to a simmer and cook, stirring occasionally for about 5 minutes: As the beans warm, they will soften further and the broth will reduce slightly, creating a saucy consistency that clings to a spoon. This short simmer integrates the spices without turning the beans mushy. Stir occasionally to prevent sticking and to check texture. A common mistake is overcooking which makes beans mealy.
- Cover and set aside: Holding the seasoned beans warm keeps them plump and ready to top the bowl. The residual heat preserves their silkiness until assembly. Do not oversteep them in hot liquid which can break down the structure.
- Scoop about 1/3 cup of the rice into individual serving bowls: The visual of a neat rice mound gives structure to the bowl, and the warm rice will emit a gentle steam signaling readiness. The rice forms a base that soaks up sauces and provides a neutral canvas for the bold toppings. Measure so portions remain balanced and avoid packing it too tightly which can make the mouthfeel heavy.
- Top with turkey taco meat, seasoned beans, and other desired toppings: Layer the warm turkey and saucy beans over the rice, then add crisp romaine lettuce , roasted corn salsa , pico de gallo , shredded Colby Jack cheese , roasted tomato salsa, sliced jalapeños , extra cilantro , and a dollop of sour cream as you like. The contrast in temperatures and textures is what makes each bite interesting. Take care not to overload the bowl so flavors remain balanced.
- Serve at once: Serve while the warm components are still cozy and the fresh elements are crisp, this contrast is part of the appeal. Encourage diners to mix as they eat so each spoonful has a bit of everything. The biggest mistake is letting the warm elements sit too long with the lettuce, which can wilt; assemble just before serving.
Notes
- Watch the video guidance: The video referenced in the notes offers visual cues for texture and doneness that are invaluable if you are unsure about visual signs like rice fluffiness or how browned the ground turkey should be.
- Make components ahead: You can prepare the rice, turkey, and salsas up to two days early. Store separately in airtight containers and reheat gently when ready to serve to preserve texture and freshness.
- Monitor sodium levels: Since multiple components use broth or canned beans, taste as you go and use low sodium broths. Adjust salt at the end rather than during early stages to avoid oversalting.
- Reheat gently: Warm the turkey and rice on the stove over low heat or in short bursts in the microwave, stirring occasionally to avoid drying out or uneven heating.
- Store leftovers properly: Consolidate components sensibly and refrigerate. The assembled bowl can last up to five days when kept chilled, and salsas often keep longer if stored separately.