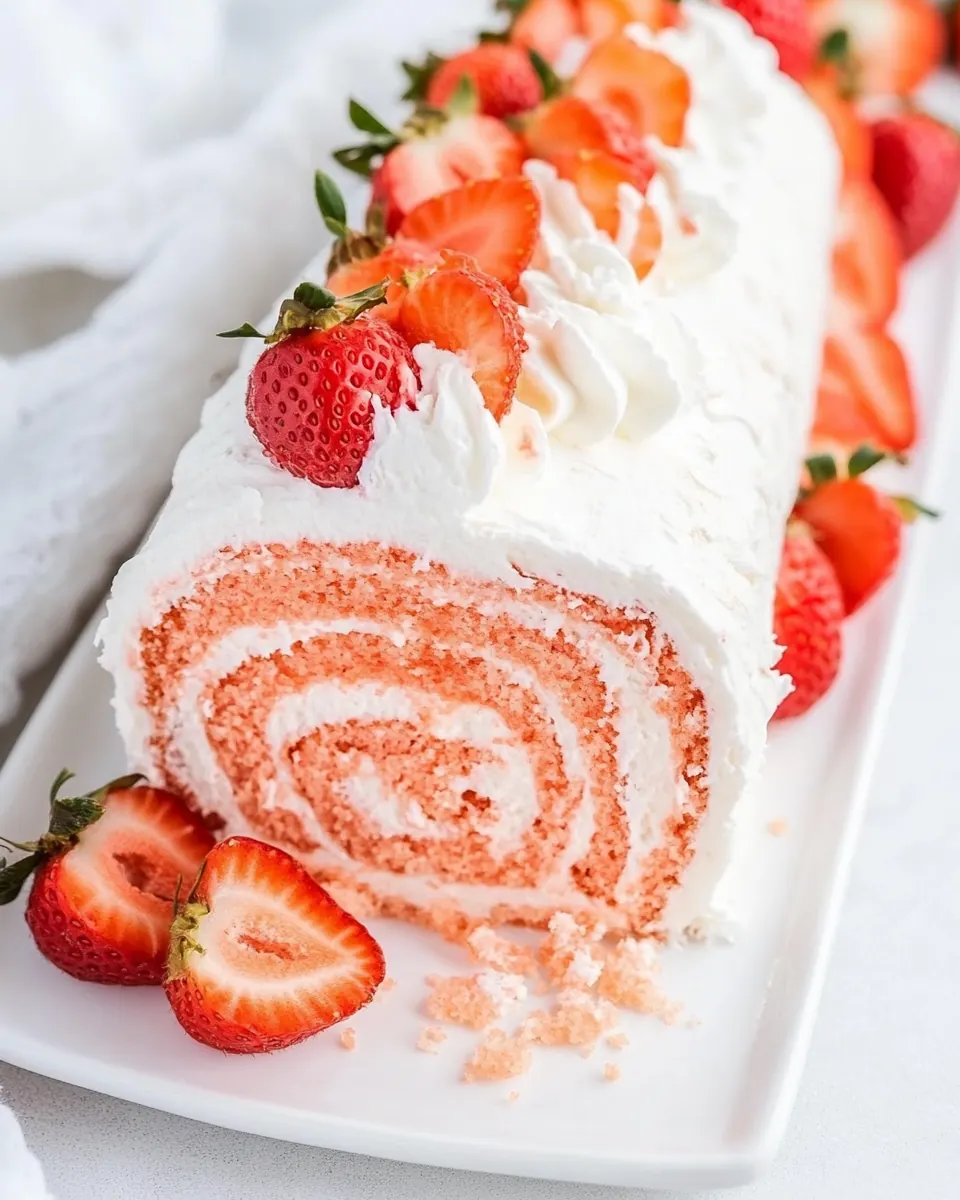
Strawberry Roll Cake
Strawberry Roll Cake has been one of my go to treats for light gatherings ever since I taught myself how to roll sponge without cracking. The first time I made it, I remember standing at the counter with flour on my sleeves and a towel dusted in powdered sugar, feeling both nervous and excited as I flipped a warm, fragrant sponge onto the towel. That nervousness turned into quiet triumph the moment I began to roll, and the soft strawberry scent filled the kitchen like a small celebration.
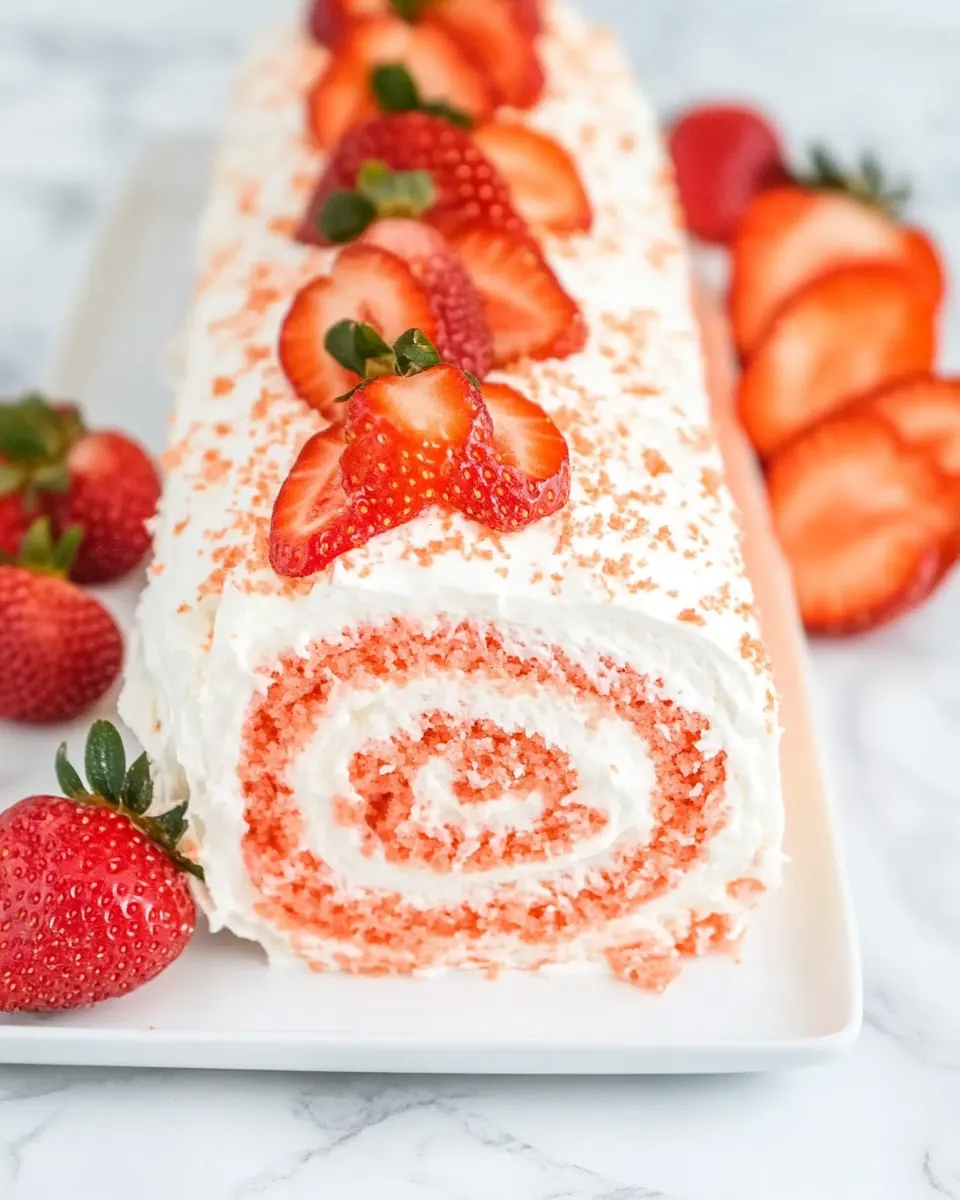
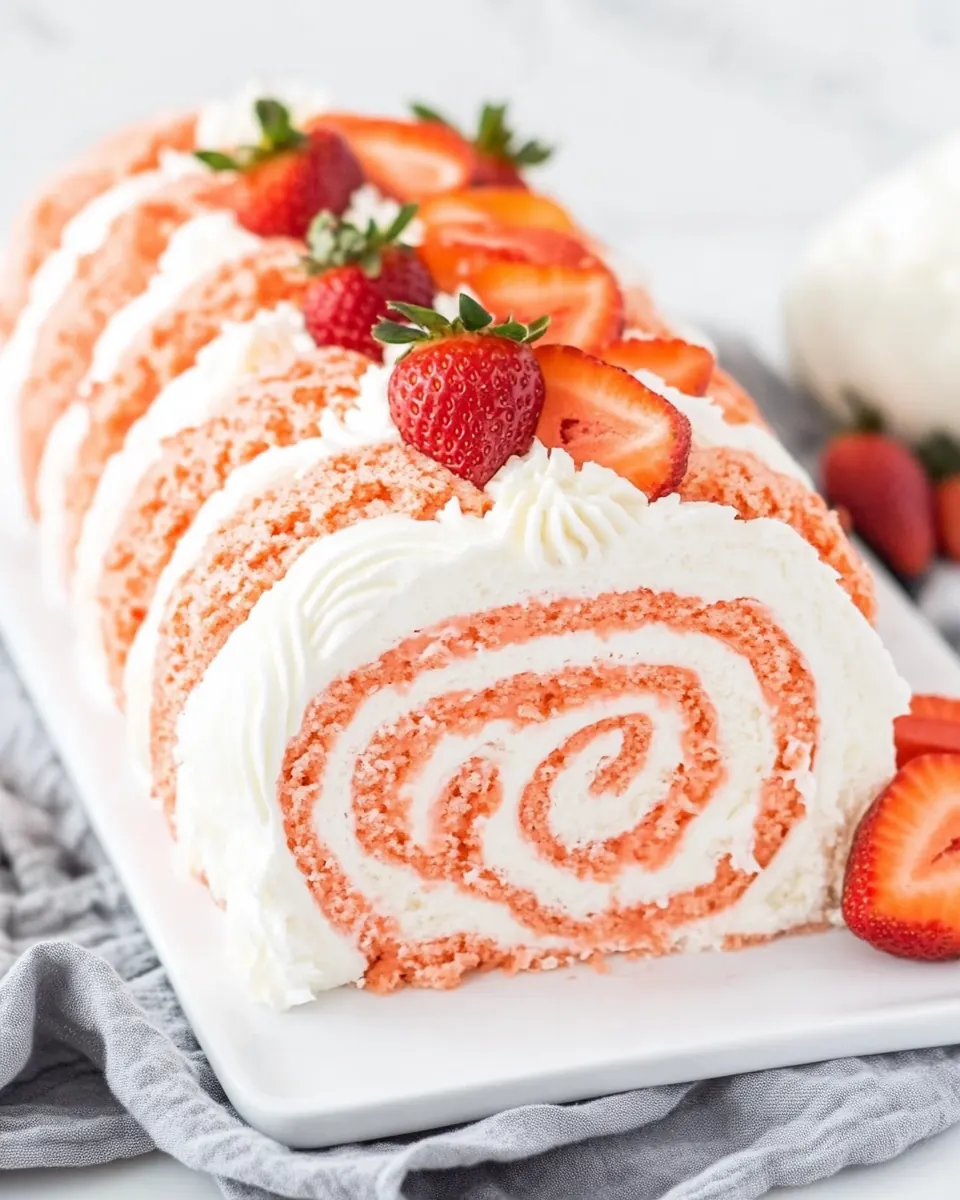
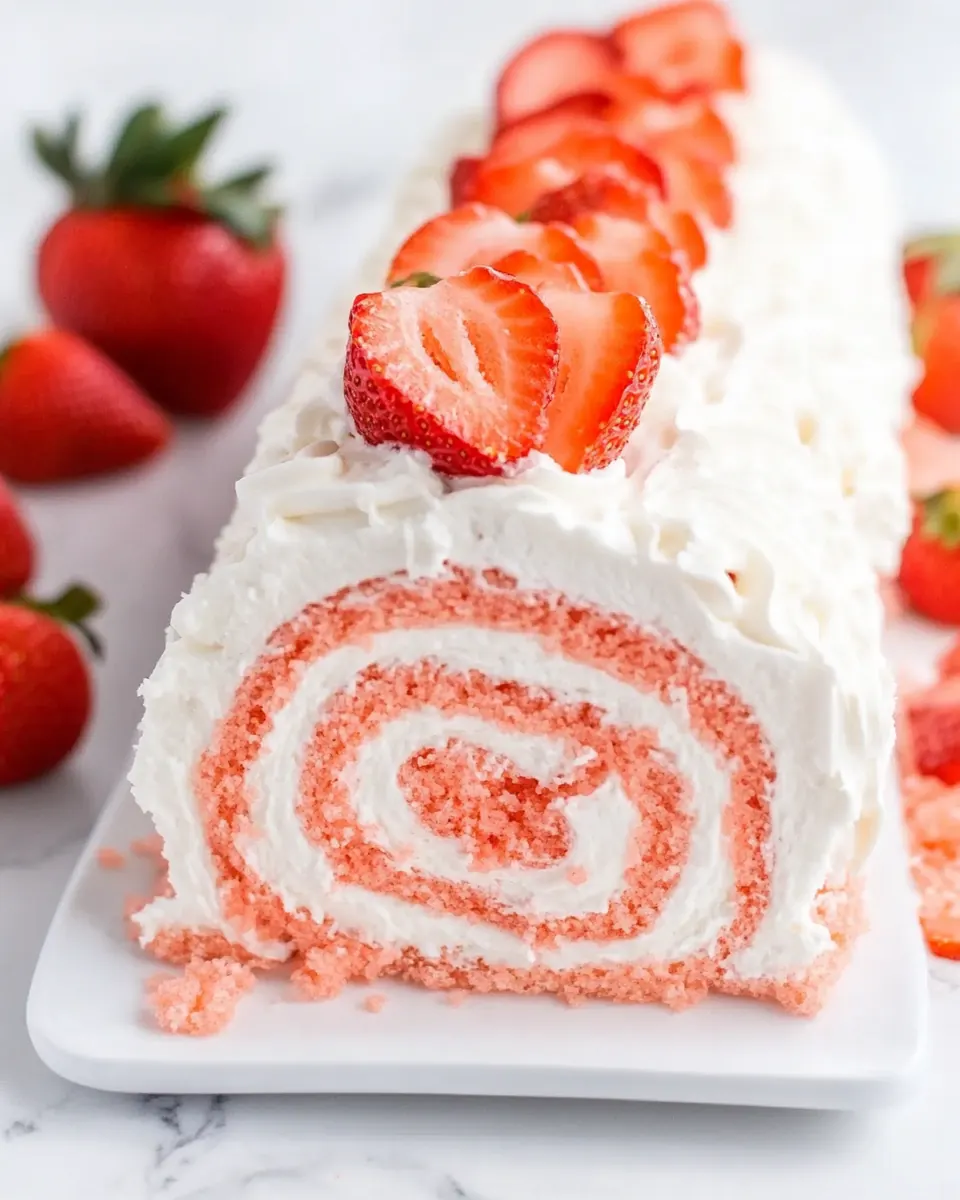
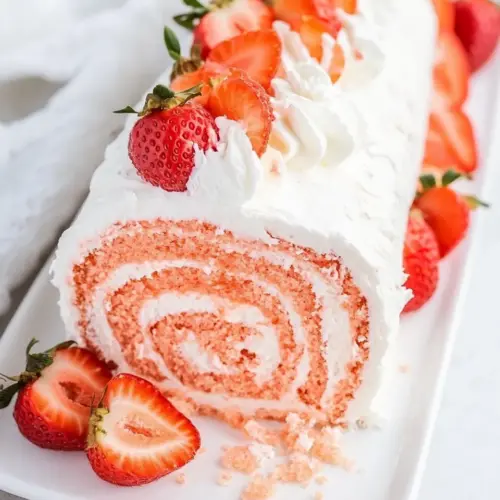
Months later, this Strawberry Roll Cake still shows up when I want something that reads elegant but is actually forgiving to make. I love how the thin sponge gives way to a creamy filling, and how bright, halved strawberry pieces on top add a fresh pop. Friends often ask for the recipe because it looks fancy yet disappears fast from the platter. I’ll admit, there is something deeply satisfying about that first clean slice, a spiral of cake and filling, each layer soft and tender.
Recipe Snapshot
32 mins
20 mins
12 mins
Hard
250 kcal
American
Gluten-Free, Low FODMAP
Desserts
15 x 10 x 1-inch jelly roll pan, Parchment paper, Stand mixer or handheld mixer, Mixing bowls, Rubber spatula, Offset spatula, Plastic wrap, Pastry bag or Ziploc bag, Serrated knife
Why We Love This Strawberry Roll Cake
Light and airy sponge that pleases every crowd
I adore the feather light sponge in this Strawberry Roll Cake. When I whisk the eggs until they are frothy and pale, I know the cake will be tender instead of dense. That texture means the roll is easy to shape, and the result is impressively delicate without needing complicated techniques. I often find guests surprised it is so soft, and I think that instant likeability is a big reason I keep making it.
Balanced sweetness and bright fruit notes
The combination of granulated sugar in the batter and the lightly sweetened cream cheese filling gives a balanced sweetness that does not overpower the fresh strawberry garnish. I like that each bite has a little tang from the filling and a fresh burst from the fruit, so it never feels cloying. That balance makes it a perfect dessert for a late spring lunch, when you want something sweet but not overwhelming.
Visual appeal with minimal effort
I will always recommend this recipe to people who want a show stopping dessert with modest effort. Rolling the cake creates a beautiful spiral that looks like you spent hours on presentation, when really it is the technique that does the work. Topping the roll with piped whipped topping and halved strawberry pieces gives that editorial finish that guests notice first.
Flexible timing that fits weeknight baking
Because the bake time is short and the cake chills while you tidy up, this is a great recipe for a weekday treat. I like that you can make the sponge, prepare the filling, and then let the roll chill while finishing other things. The refrigeration step solidifies the roll so slicing is neat, and it also deepens the flavors a bit, which I appreciate when I want to serve it later the same day.
Beginner friendly, with room for small adjustments
I’ve guided friends through this recipe who were nervous about rolling and they were always surprised at how forgiving it is. If small cracks appear during unrolling, the filling hides them and the final presentation still looks lovely. That forgiving quality makes this a confidence builder for novice bakers, and I keep a little extra powdered sugar on hand to cover any blemishes.
What You’ll Need for Strawberry Roll Cake
These ingredients work together to create a thin, flexible sponge and a creamy filling that holds its shape. The sponge relies on whipped eggs and a small amount of all purpose flour to stay light, while the filling blends cream cheese with whipped topping for silkiness. Powdered sugar is used to dust and help the sponge release cleanly, and the fresh strawberry garnish adds brightness.
- 3/4 cup all-purpose flour: Provides a light, tender structure to the cake by contributing gluten and bulk; sifts for even texture and to remove lumps. Balances moisture absorption with eggs and liquids to create a delicate sponge.
- 1 teaspoon baking powder: Leavens the batter by releasing carbon dioxide when heated, helping the cake rise gently; use fresh powder for reliable lift. Works with whipped eggs to ensure an even, airy crumb.
- 1/4 teaspoons salt: Enhances overall flavor by providing a subtle savory balance and strengthens gluten networks slightly; measure carefully to avoid over-salting. Helps accentuate the sweetness of the cake and fillings when used sparingly.
- 3 large eggs: Incorporates air and provides structure, richness, and moisture when beaten with sugar; separates or whips whole eggs depending on technique. Acts as the primary binding agent that sets during baking to form the sponge.
- 1/2 cup granulated sugar: Sweetens and stabilizes the whipped egg mixture, helping to create volume and a tender crumb when beaten into eggs. Also contributes to browning and flavor development in the finished cake.
- 2 teaspoons strawberry flavoring: Adds concentrated strawberry aroma and flavor without extra moisture; enhances overall fruitiness and complements fresh strawberries. Use sparingly to avoid artificial intensity while maintaining consistent taste.
- 3 to 5 drops red liquid food coloring: Introduces vivid color to the batter for an appealing pink hue; a few drops achieve visual effect without altering texture. Choose a red liquid food coloring compatible with recipes to prevent streaking.
- 1 tablespoon vegetable oil: Contributes a small amount of fat to tenderize the sponge and improve mouthfeel, helping to keep the cake pliable for rolling. Also helps emulsify the batter for a smoother crumb.
- 1/2 to 2/3 cup powdered sugar (for dusting): Provides a light dusting to prevent the cake from sticking and to add a touch of sweetness and visual polish; sift evenly over a towel before rolling. Can slightly sweeten the surface while keeping the sponge from drying out.
- 4 ounces cream cheese (softened): Creates a tangy, creamy filling base when softened and whipped, adding richness and stability to the frosting layer. Balances sweetness from sugar and whipped topping while supplying body for spreading.
- 1/2 cup granulated sugar: Sweetens and stabilizes the cream cheese filling, adjusting the sweetness level to complement the tartness of the cheese. Dissolves into the softened cheese to create a smooth, spreadable consistency.
- 1/2 teaspoon vanilla extract: Adds warm aromatic notes that enhance the cream cheese and overall filling flavor; stir in to taste to avoid overpowering. Works with vanilla-flavored whipped topping to round out the dessert profile.
- 1 cup whipped topping: Provides lightness and volume to the filling while adding a neutral, creamy texture that keeps the cake moist. Stabilized whipped topping helps maintain structure and ease of spreading during assembly.
- 1 1/2 cups whipped topping: Supplies extra fluffy volume for a richer, more substantial filling when folded into cream cheese; balances sweetness and stabilizes the cream. Adds creaminess and loft that helps the roll hold its shape.
- 6 strawberries (washed, dried, and cut in half): Adds fresh fruit flavor, texture, and visual appeal when halved and arranged inside the roll; contributes mild acidity and juiciness. Use evenly sized berries for consistent bites and a balanced filling.
How to Prepare Strawberry Roll Cake
This is where the baking rhythm matters more than speed. Follow the sequence, pay attention to visual cues, and be gentle when folding. Rolling while the cake is warm is the key moment, and chilling afterward helps everything set so you can slice tidy rounds.
- Preheat the oven to 375°F. Line a 15 x 10 x 1-inch jelly roll pan with parchment paper and spray with nonstick spray. Set it aside.: As you warm the oven, you will notice a faint dry warmth in the kitchen, which primes the atmosphere for baking. Having the pan lined with parchment and sprayed ensures the sponge releases smoothly; the tactile feeling of parchment under your fingers is reassuring because it reduces sticking risk. If the pan is not prepared properly, you may struggle to remove the sponge intact, resulting in rips that show in the final roll. A common mistake is using the wrong pan size, which changes bake time and sponge thickness.
- In a medium-sized mixing bowl, whisk together the flour, baking powder, and salt. Set it aside.: Mixing dry all purpose flour with baking powder and salt creates an even foundation for the batter. The faint scent of flour will be present, and the dry mixture should look uniform with no visible streaks of leavening. Sifting if needed gives a feather light blend. If you skip thorough whisking, pockets of baking powder may cause uneven rise, leaving small bumps in the sponge.
- Using a stand mixer, or a medium-sized mixing bowl and a handheld mixer on high, beat the eggs for 5 minutes until the eggs are a light yellow frothy texture.: As you beat the eggs , they will transform from glossy and viscous to pale, frothy ribbons that hold a little structure. This step is audible, with a steady whipping whir and the bowl warming slightly under the motion. The increased volume is what keeps the sponge delicate, so patience here is rewarded. Under beating leads to a dense cake that may not roll cleanly.
- Add the sugar, strawberry flavoring, red food coloring, and vegetable oil, then continue beating until well incorporated.: When you stream in granulated sugar , add the strawberry flavoring and a few drops of red liquid food coloring , the batter will become glossy and uniformly tinted. The vegetable oil adds a satin sheen. Continue beating until the sugar is dissolved and the color is even, looking smooth rather than grainy. If ingredients are added too quickly, the air whipped into the eggs can collapse, yielding less lift.
- Fold the flour mixture into the wet ingredients.: Folding must be gentle and deliberate so the air captured in the eggs remains. As you fold, you will see streaks of all purpose flour disappear, and the batter will take on a slightly denser but still airy look. Use a rubber spatula and sweep around the bowl, lifting and turning. Over folding will deflate the batter and create a heavier sponge that resists rolling.
- Evenly pour and spread the cake batter into the prepared pan. Bake for 10 to 12 minutes.: Spreading the batter to an even thickness helps it bake uniformly; you should see a glossy surface that flattens slightly during baking. The oven will emit a light sweet aroma as the sugars caramelize. Look for a pale golden top that springs back when gently touched. Leaving it in too long dries the sponge and increases the chance of cracking when you roll it.
- Remove the cake from the oven. Using a sharp knife, carefully run the tip along the sides not covered by parchment paper.: As you lift the hot pan, steam escapes and the cake gives off a warm, vanilla strawberry fragrance. Running a knife along the exposed edges frees any cake that stuck to the pan rim. Be cautious since the pan is hot, and use protective mitts. Rushing this step can tear the cake when you flip it for the towel dusting.
- Heavily dust the top of a tea towel with powdered sugar.: The granulated texture of powdered sugar on the towel creates a barrier so the cake will not cling. The dusting should look like a soft white blanket over the towel surface. If the towel is not well dusted, the cake may stick and tear when you flip it. Ensure the towel is lint free to avoid stray fibers on the cake.
- Immediately place the powdered tea towel powdered side down on top of the cake.: Placing the towel down transfers the powdered layer to the cake and cools the surface slightly, creating traction that prevents sticking. The sensation of warmth under the towel is a cue to move carefully. If you delay, the cake may cool unevenly and become harder to roll, so act while it is still pliable.
- Lay the cutting board on top of the tea towel. The cake pan will still be hot, so you will need to be very careful to protect your hands. Quickly flip the cake over so that the cake is lying on top of the dusted towel.: Flipping reveals the cake surface now dusted and ready to be peeled away from parchment. You will feel a slight release as the parchment pulls free. Protecting your hands is important because the pan retains heat. If the flip is hesitant, the cake can fold or stick; practice quick, decisive motion for a clean turn.
- Carefully and slowly, peel the parchment paper off the cake and heavily dust the top of the cake with powdered sugar.: Removing parchment should uncover a smooth underside that is lightly steamed from baking, and dusting again adds a barrier for rolling. The cake should feel springy and even. If the parchment resists, pull slowly and angle it to avoid ripping the sponge, which is a common issue if the paper adheres too tightly.
- Flip one end of the tea towel over one of the short ends of the cake. Carefully begin to roll one end towards the other. Once rolled, set it aside to cool completely.: Rolling while warm trains the sponge into its spiral shape. You will notice a gentle steam and the cake hugging itself as you roll, which sets the curve. Allow it to cool fully to maintain the shape. Rushing cooling leads to an unsteady roll that can unspool when filled.
- Using a medium-sized mixing bowl and a handheld mixer set on medium-high, beat the cream cheese, granulated sugar, and vanilla extract for 1 to 1 1/2 minutes, or until smooth.: The mixture should become glossy and silky as the cream cheese and granulated sugar combine; aromatic notes from vanilla extract should be noticeable. Smooth texture is essential to avoid lumps in the filling. If your cream cheese is too cold, you will end up with lumps that are hard to smooth out later.
- Fold in the whipped topping. Set it aside.: Folding in the 1 cup of whipped topping lightens the filling into a spreadable cream. You will see a billowy texture that holds some shape but is easily spreadable. Over stirring can make it loose and watery, so stop once it looks homogenous and soft.
- Once the cake completely cools, slowly unroll the cake. If there are a few small cracks, it will be okay.: The cooled sponge will feel firmer to the touch and cooler in temperature. As you unroll, the surface should not cling or tear; small cracks are cosmetic and will be hidden by the filling. Forcing the unroll too quickly can create larger splits, which are harder to conceal during filling.
- Using a silicone spatula or an offset spatula, spread the filling over the top of the cake, avoiding the edges.: Spreading the filling should be a gentle sweep, leaving a small border so the filling does not squeeze out when rolled. The creamy filling will glisten slightly and resist dragging as you smooth it. Overfilling can cause leakage and messy sides when you reroll.
- Slowly, with gentle even pressure, carefully roll the cake back into a 'roll'. Tightly wrap the cake roll in plastic wrap to ensure it holds its shape. Allow the cake to chill in the refrigerator for at least 1 hour to overnight. When you are ready to serve, carefully remove the plastic wrap encasing the cake roll.: Rolling with even pressure avoids air pockets and creates a tidy spiral. Wrapping in plastic helps the roll firm up and keeps moisture in. The chill time lets the filling set; slicing before it is chilled risks squashed slices. A common error is under chilling, which leads to messy slices.
- Fill either a decorator's bag or a quart-sized Ziploc with a corner snipped off, with the 1 1/2 cups of whipped topping.: When you fill the bag, the whipped topping should be cool and slightly firm so it pipes with clean ridges. The sound of the plastic bag squeezing is oddly satisfying as the topping glides into place. If the topping is too warm, it will slump and not hold piping detail.
- You can pipe the whipped topping down the length of the top of the cake roll. Hold the tip of the bag 1/2 inch above the cake and pipe the whipped topping. Place the halved strawberries on top of the whipped topping.: Piping creates a decorative ridge that catches the light, and adding halved strawberry pieces adds color and a fresh note. Hold the bag steady to create even dollops, and press gently to avoid hollow centers. Wet berry surfaces can make the topping slide if not dried first.
- Slice 1/2-inch wide servings.: Use a sharp serrated knife and a gentle sawing motion to produce clean 1/2 inch slices that display the spiral. The slices should show alternating layers of cake and filling, and the cut will release a sweet strawberry aroma. Pressing too hard can flatten the roll and smear the filling.
Ways to Customize
You can adapt this Strawberry Roll Cake in small ways that make a big visual and flavor impact. Below are thoughtful suggestions I use depending on the season and the occasion.
- Swap the flavoring carefully Use natural strawberry flavor or a tiny amount of concentrated puree for a fresher taste, but balance liquids so the sponge remains thin and rollable.
- Adjust the color subtly Add only a few drops of red liquid food coloring to achieve a soft pink rather than bright red, which keeps the finished cake looking natural.
- Control fill sweetness If you prefer a less sweet finish, reduce the granulated sugar in the filling by a tablespoon or two, relying on the fresh strawberry halves to add natural sweetness.
- Pipe for polish Chill the whipped topping slightly before piping so the decorative edge holds and the strawberry halves sit neatly on top.
- Make ahead routine You can bake and roll the sponge the day before, keep it wrapped in the fridge, and fill the next day for a relaxed serving schedule that still tastes fresh.
What to Serve With Strawberry Roll Cake
This Strawberry Roll Cake pairs well with light beverages and seasonal sides that echo its freshness. For springtime gatherings I often set it alongside herbal teas or chilled fruit salads. The cake works at brunch, afternoon tea, or as a gentle finish to a celebratory dinner.
- Serve with simple tea or coffee A small pot of mild black tea or a light roast coffee highlights the cake without overpowering the delicate strawberry notes.
- Add a fresh fruit bowl A medley of sliced berries and citrus segments complements the strawberry garnish and adds contrast in texture and acidity.
- Pair with a citrus sorbet A scoop of lemon or lime sorbet on the side cuts through the sweetness and refreshes the palate between slices.
- Seasonal occasion styling For spring gatherings, decorate the serving platter with edible flowers or mint sprigs to emphasize the seasonal feel.
- Storage tips Keep any leftovers tightly wrapped in plastic wrap and refrigerated for up to three days, as the filling will soften if left at room temperature too long.
- Serving size guidance Slice into 1/2 inch servings for compact, party friendly portions that let guests sample other desserts as well.
FAQ
Conclusion
This Strawberry Roll Cake stands out for its light sponge, creamy filling, and fresh fruity finish, all achieved with approachable techniques. Give it a try and you may find it becomes your reliable go to dessert for spring gatherings and casual celebrations. It rewards attention to a few key moments, like proper egg whipping and rolling while warm, and delivers a result that looks much more complex than the work involved. I hope you enjoy the process and the smiles when you slice into that perfect spiral.
Strawberry Roll Cake
Equipment
- 15 x 10 x 1-inch jelly roll pan
- Parchment Paper
- Stand mixer or handheld mixer
- Mixing Bowls
- Rubber spatula
- Offset Spatula
- Plastic Wrap
- Pastry bag or Ziploc bag
- Serrated Knife
Ingredients
- 3/4 cup all-purpose flour Provides a light, tender structure to the cake by contributing gluten and bulk; sifts for even texture and to remove lumps. Balances moisture absorption with eggs and liquids to create a delicate sponge.
- 1 teaspoon baking powder Leavens the batter by releasing carbon dioxide when heated, helping the cake rise gently; use fresh powder for reliable lift. Works with whipped eggs to ensure an even, airy crumb.
- 1/4 teaspoons salt Enhances overall flavor by providing a subtle savory balance and strengthens gluten networks slightly; measure carefully to avoid over-salting. Helps accentuate the sweetness of the cake and fillings when used sparingly.
- 3 large eggs Incorporates air and provides structure, richness, and moisture when beaten with sugar; separates or whips whole eggs depending on technique. Acts as the primary binding agent that sets during baking to form the sponge.
- 1/2 cup granulated sugar Sweetens and stabilizes the whipped egg mixture, helping to create volume and a tender crumb when beaten into eggs. Also contributes to browning and flavor development in the finished cake.
- 2 teaspoons strawberry flavoring Adds concentrated strawberry aroma and flavor without extra moisture; enhances overall fruitiness and complements fresh strawberries. Use sparingly to avoid artificial intensity while maintaining consistent taste.
- 3 to 5 drops red liquid food coloring Introduces vivid color to the batter for an appealing pink hue; a few drops achieve visual effect without altering texture. Choose a red liquid food coloring compatible with recipes to prevent streaking.
- 1 tablespoon vegetable oil Contributes a small amount of fat to tenderize the sponge and improve mouthfeel, helping to keep the cake pliable for rolling. Also helps emulsify the batter for a smoother crumb.
- 1/2 to 2/3 cup powdered sugar (for dusting) Provides a light dusting to prevent the cake from sticking and to add a touch of sweetness and visual polish; sift evenly over a towel before rolling. Can slightly sweeten the surface while keeping the sponge from drying out.
- 4 ounces cream cheese (softened) Creates a tangy, creamy filling base when softened and whipped, adding richness and stability to the frosting layer. Balances sweetness from sugar and whipped topping while supplying body for spreading.
- 1/2 cup granulated sugar Sweetens and stabilizes the cream cheese filling, adjusting the sweetness level to complement the tartness of the cheese. Dissolves into the softened cheese to create a smooth, spreadable consistency.
- 1/2 teaspoon vanilla extract Adds warm aromatic notes that enhance the cream cheese and overall filling flavor; stir in to taste to avoid overpowering. Works with vanilla-flavored whipped topping to round out the dessert profile.
- 1 cup whipped topping Provides lightness and volume to the filling while adding a neutral, creamy texture that keeps the cake moist. Stabilized whipped topping helps maintain structure and ease of spreading during assembly.
- 1 1/2 cups whipped topping Supplies extra fluffy volume for a richer, more substantial filling when folded into cream cheese; balances sweetness and stabilizes the cream. Adds creaminess and loft that helps the roll hold its shape.
- 6 strawberries (washed, dried, and cut in half) Adds fresh fruit flavor, texture, and visual appeal when halved and arranged inside the roll; contributes mild acidity and juiciness. Use evenly sized berries for consistent bites and a balanced filling.
Instructions
- Preheat the oven to 375°F. Line a 15 x 10 x 1-inch jelly roll pan with parchment paper and spray with nonstick spray. Set it aside.: As you warm the oven, you will notice a faint dry warmth in the kitchen, which primes the atmosphere for baking. Having the pan lined with parchment and sprayed ensures the sponge releases smoothly; the tactile feeling of parchment under your fingers is reassuring because it reduces sticking risk. If the pan is not prepared properly, you may struggle to remove the sponge intact, resulting in rips that show in the final roll. A common mistake is using the wrong pan size, which changes bake time and sponge thickness.
- In a medium-sized mixing bowl, whisk together the flour, baking powder, and salt. Set it aside.: Mixing dry all purpose flour with baking powder and salt creates an even foundation for the batter. The faint scent of flour will be present, and the dry mixture should look uniform with no visible streaks of leavening. Sifting if needed gives a feather light blend. If you skip thorough whisking, pockets of baking powder may cause uneven rise, leaving small bumps in the sponge.
- Using a stand mixer, or a medium-sized mixing bowl and a handheld mixer on high, beat the eggs for 5 minutes until the eggs are a light yellow frothy texture.: As you beat the eggs , they will transform from glossy and viscous to pale, frothy ribbons that hold a little structure. This step is audible, with a steady whipping whir and the bowl warming slightly under the motion. The increased volume is what keeps the sponge delicate, so patience here is rewarded. Under beating leads to a dense cake that may not roll cleanly.
- Add the sugar, strawberry flavoring, red food coloring, and vegetable oil, then continue beating until well incorporated.: When you stream in granulated sugar , add the strawberry flavoring and a few drops of red liquid food coloring , the batter will become glossy and uniformly tinted. The vegetable oil adds a satin sheen. Continue beating until the sugar is dissolved and the color is even, looking smooth rather than grainy. If ingredients are added too quickly, the air whipped into the eggs can collapse, yielding less lift.
- Fold the flour mixture into the wet ingredients.: Folding must be gentle and deliberate so the air captured in the eggs remains. As you fold, you will see streaks of all purpose flour disappear, and the batter will take on a slightly denser but still airy look. Use a rubber spatula and sweep around the bowl, lifting and turning. Over folding will deflate the batter and create a heavier sponge that resists rolling.
- Evenly pour and spread the cake batter into the prepared pan. Bake for 10 to 12 minutes.: Spreading the batter to an even thickness helps it bake uniformly; you should see a glossy surface that flattens slightly during baking. The oven will emit a light sweet aroma as the sugars caramelize. Look for a pale golden top that springs back when gently touched. Leaving it in too long dries the sponge and increases the chance of cracking when you roll it.
- Remove the cake from the oven. Using a sharp knife, carefully run the tip along the sides not covered by parchment paper.: As you lift the hot pan, steam escapes and the cake gives off a warm, vanilla strawberry fragrance. Running a knife along the exposed edges frees any cake that stuck to the pan rim. Be cautious since the pan is hot, and use protective mitts. Rushing this step can tear the cake when you flip it for the towel dusting.
- Heavily dust the top of a tea towel with powdered sugar.: The granulated texture of powdered sugar on the towel creates a barrier so the cake will not cling. The dusting should look like a soft white blanket over the towel surface. If the towel is not well dusted, the cake may stick and tear when you flip it. Ensure the towel is lint free to avoid stray fibers on the cake.
- Immediately place the powdered tea towel powdered side down on top of the cake.: Placing the towel down transfers the powdered layer to the cake and cools the surface slightly, creating traction that prevents sticking. The sensation of warmth under the towel is a cue to move carefully. If you delay, the cake may cool unevenly and become harder to roll, so act while it is still pliable.
- Lay the cutting board on top of the tea towel. The cake pan will still be hot, so you will need to be very careful to protect your hands. Quickly flip the cake over so that the cake is lying on top of the dusted towel.: Flipping reveals the cake surface now dusted and ready to be peeled away from parchment. You will feel a slight release as the parchment pulls free. Protecting your hands is important because the pan retains heat. If the flip is hesitant, the cake can fold or stick; practice quick, decisive motion for a clean turn.
- Carefully and slowly, peel the parchment paper off the cake and heavily dust the top of the cake with powdered sugar.: Removing parchment should uncover a smooth underside that is lightly steamed from baking, and dusting again adds a barrier for rolling. The cake should feel springy and even. If the parchment resists, pull slowly and angle it to avoid ripping the sponge, which is a common issue if the paper adheres too tightly.
- Flip one end of the tea towel over one of the short ends of the cake. Carefully begin to roll one end towards the other. Once rolled, set it aside to cool completely.: Rolling while warm trains the sponge into its spiral shape. You will notice a gentle steam and the cake hugging itself as you roll, which sets the curve. Allow it to cool fully to maintain the shape. Rushing cooling leads to an unsteady roll that can unspool when filled.
- Using a medium-sized mixing bowl and a handheld mixer set on medium-high, beat the cream cheese, granulated sugar, and vanilla extract for 1 to 1 1/2 minutes, or until smooth.: The mixture should become glossy and silky as the cream cheese and granulated sugar combine; aromatic notes from vanilla extract should be noticeable. Smooth texture is essential to avoid lumps in the filling. If your cream cheese is too cold, you will end up with lumps that are hard to smooth out later.
- Fold in the whipped topping. Set it aside.: Folding in the 1 cup of whipped topping lightens the filling into a spreadable cream. You will see a billowy texture that holds some shape but is easily spreadable. Over stirring can make it loose and watery, so stop once it looks homogenous and soft.
- Once the cake completely cools, slowly unroll the cake. If there are a few small cracks, it will be okay.: The cooled sponge will feel firmer to the touch and cooler in temperature. As you unroll, the surface should not cling or tear; small cracks are cosmetic and will be hidden by the filling. Forcing the unroll too quickly can create larger splits, which are harder to conceal during filling.
- Using a silicone spatula or an offset spatula, spread the filling over the top of the cake, avoiding the edges.: Spreading the filling should be a gentle sweep, leaving a small border so the filling does not squeeze out when rolled. The creamy filling will glisten slightly and resist dragging as you smooth it. Overfilling can cause leakage and messy sides when you reroll.
- Slowly, with gentle even pressure, carefully roll the cake back into a 'roll'. Tightly wrap the cake roll in plastic wrap to ensure it holds its shape. Allow the cake to chill in the refrigerator for at least 1 hour to overnight. When you are ready to serve, carefully remove the plastic wrap encasing the cake roll.: Rolling with even pressure avoids air pockets and creates a tidy spiral. Wrapping in plastic helps the roll firm up and keeps moisture in. The chill time lets the filling set; slicing before it is chilled risks squashed slices. A common error is under chilling, which leads to messy slices.
- Fill either a decorator's bag or a quart-sized Ziploc with a corner snipped off, with the 1 1/2 cups of whipped topping.: When you fill the bag, the whipped topping should be cool and slightly firm so it pipes with clean ridges. The sound of the plastic bag squeezing is oddly satisfying as the topping glides into place. If the topping is too warm, it will slump and not hold piping detail.
- You can pipe the whipped topping down the length of the top of the cake roll. Hold the tip of the bag 1/2 inch above the cake and pipe the whipped topping. Place the halved strawberries on top of the whipped topping.: Piping creates a decorative ridge that catches the light, and adding halved strawberry pieces adds color and a fresh note. Hold the bag steady to create even dollops, and press gently to avoid hollow centers. Wet berry surfaces can make the topping slide if not dried first.
- Slice 1/2-inch wide servings.: Use a sharp serrated knife and a gentle sawing motion to produce clean 1/2 inch slices that display the spiral. The slices should show alternating layers of cake and filling, and the cut will release a sweet strawberry aroma. Pressing too hard can flatten the roll and smear the filling.
Notes
- Swap the flavoring carefully Use natural strawberry flavor or a tiny amount of concentrated puree for a fresher taste, but balance liquids so the sponge remains thin and rollable.
- Adjust the color subtly Add only a few drops of red liquid food coloring to achieve a soft pink rather than bright red, which keeps the finished cake looking natural.
- Control fill sweetness If you prefer a less sweet finish, reduce the granulated sugar in the filling by a tablespoon or two, relying on the fresh strawberry halves to add natural sweetness.
- Pipe for polish Chill the whipped topping slightly before piping so the decorative edge holds and the strawberry halves sit neatly on top.
- Make ahead routine You can bake and roll the sponge the day before, keep it wrapped in the fridge, and fill the next day for a relaxed serving schedule that still tastes fresh.