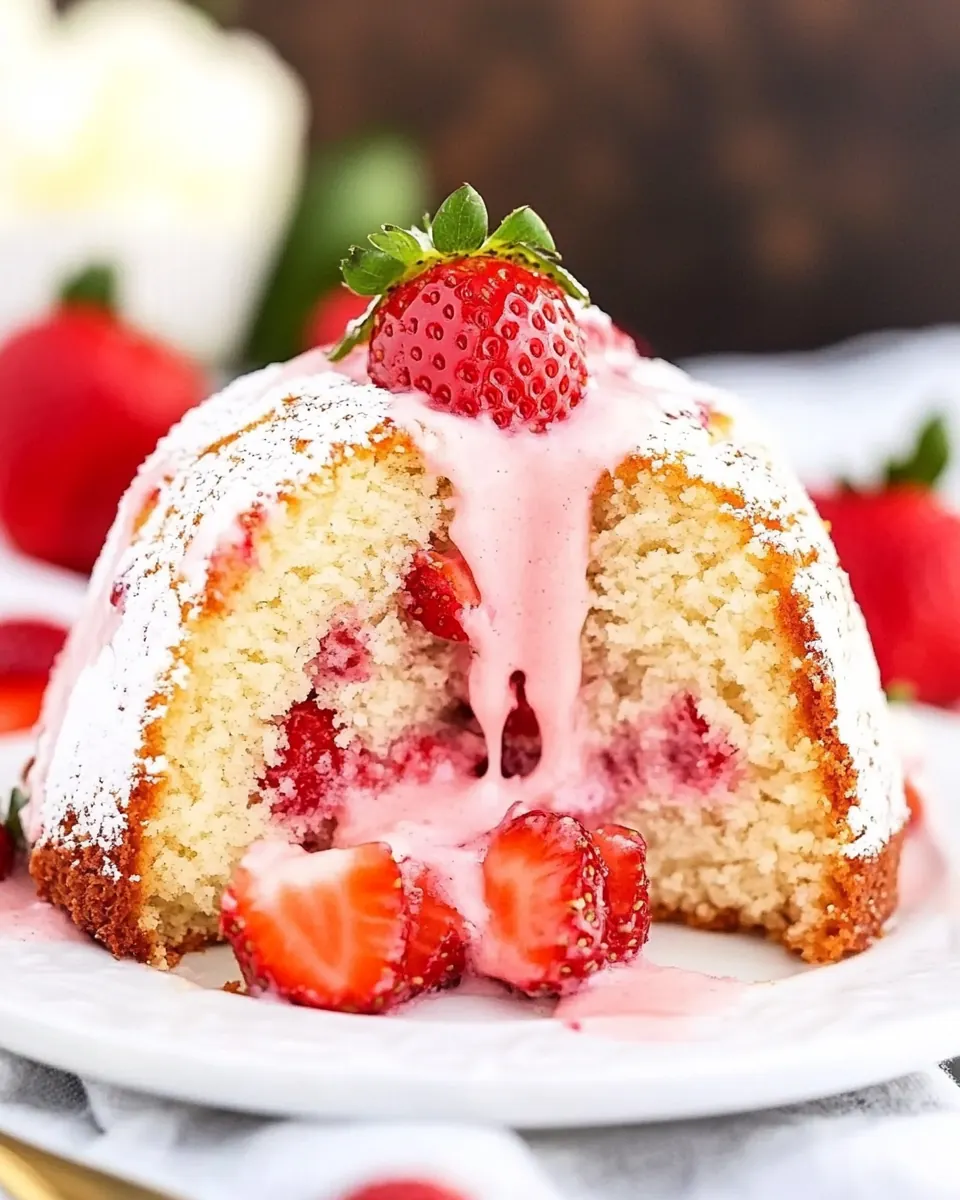
Strawberry Pound Cake
Strawberry Pound Cake is one of those recipes I reach for when I need a dessert that feels both nostalgic and a little bit celebratory. The first time I made this cake, it was after a long spring morning of errands, and the house smelled like warm sugar and strawberries within minutes of the batter hitting the oven. I remember pausing to breathe it in, thinking how a simple loaf can turn an ordinary afternoon into something quietly special.
Over the years I have tweaked how I fold the fruit, how I cream the butter, and how I time the bake so the crumb stays tender while the exterior develops a thin, light crust. When friends come over for coffee, I almost always have a slice waiting, because this is the kind of cake that slices well, travels well, and pairs beautifully with tea or a scoop of ice cream. Each bite brings a soft strawberry note across a rich, buttery base that sings of home baking.
Recipe Snapshot
1 hr 25 mins
10 mins
75 mins
Medium
350 kcal
American
Gluten-Free, Low FODMAP
Desserts
Tube Cake Pan, Bundt Cake Pan
What We Adore About This Strawberry Pound Cake
Classic comfort with a spring twist
I love Strawberry Pound Cake because it marries old fashioned pound cake richness with bright fruit flavor. The box of strawberry gelatin folded into the batter gives the crumb a subtle strawberry lift that feels modern yet familiar. I often tell friends this is a cake that reads like tradition with a fresh update.
Reliable texture every time
The method creates a tight but tender crumb that slices cleanly, so you get those neat, even pieces that look lovely on a dessert plate. I praise the technique here because I have seen bakers rush the creaming stage and end up with dense results. Taking the time to beat the butter, sugar, and strawberry jello until light helps trap air and keeps the cake soft.
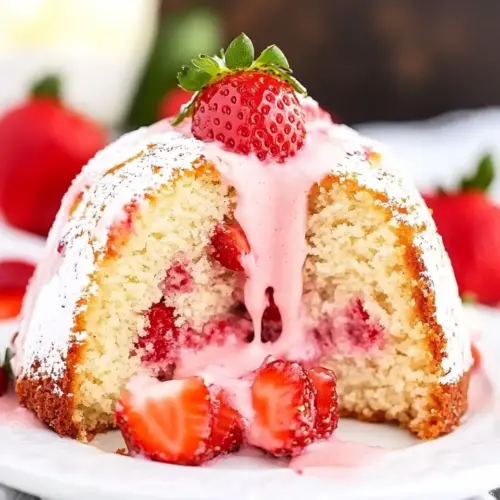
Fruit throughout, not just on top
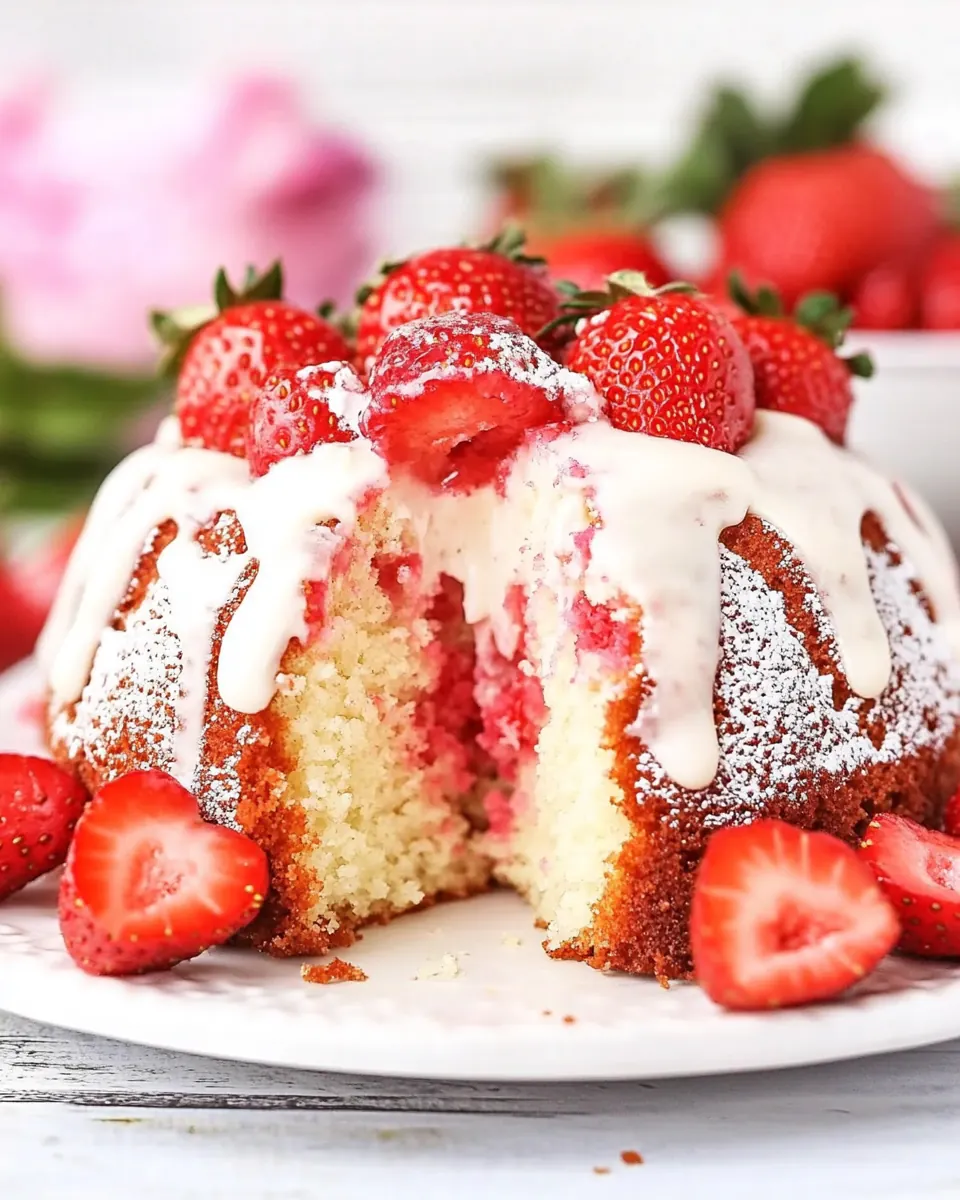
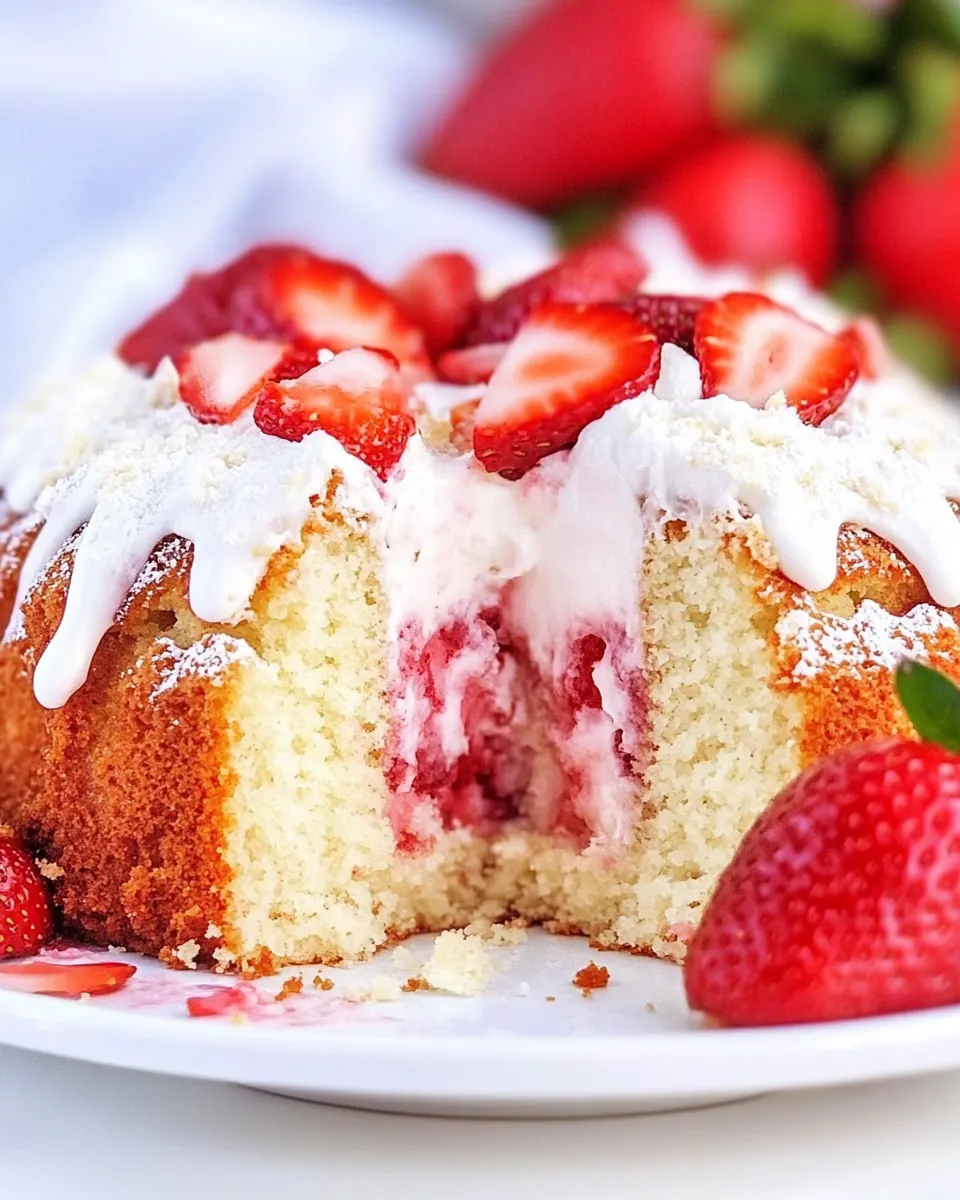
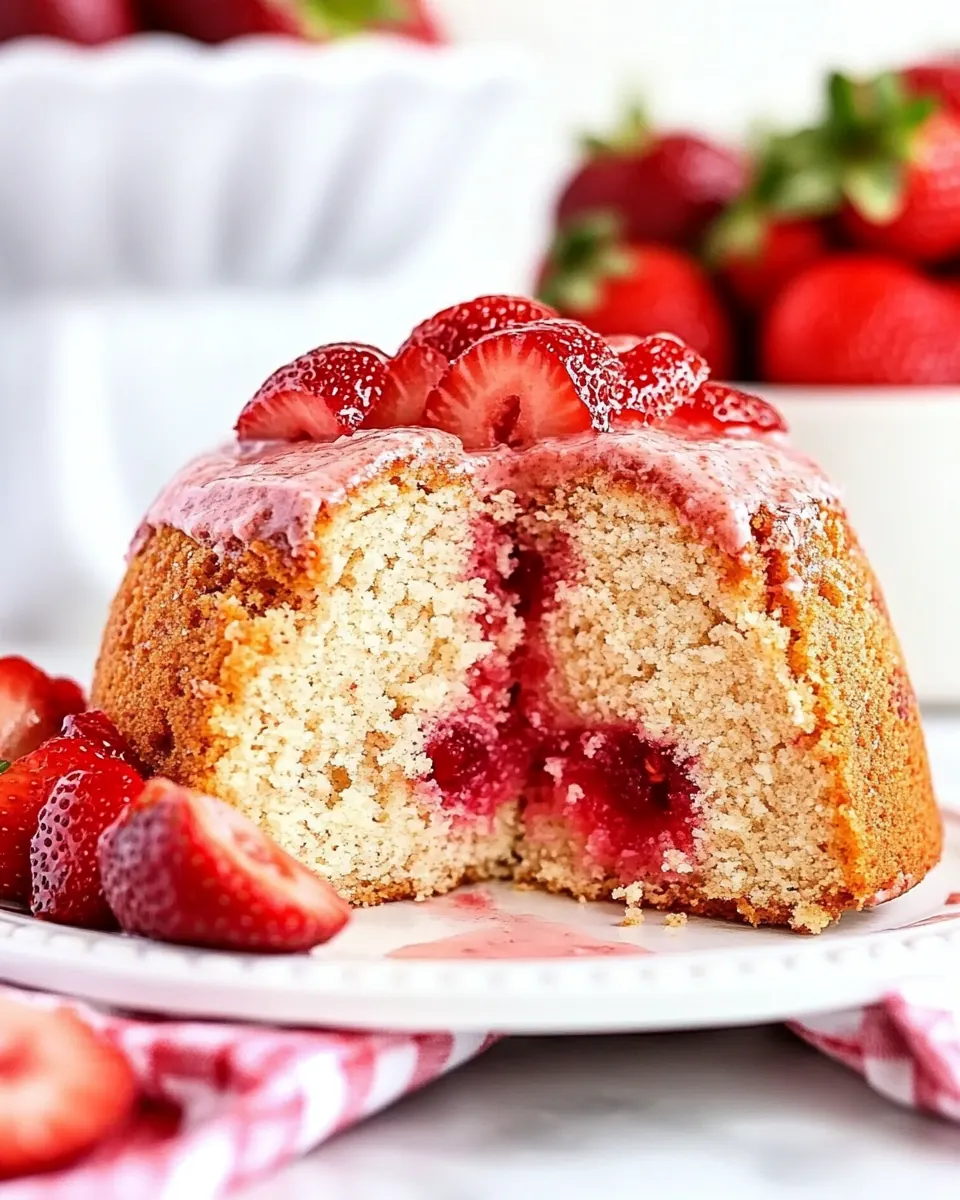
I adore that the recipe folds in thawed sliced strawberries rather than just glazing the top. This means every forkful carries real fruit, which brightens the butter and sugar base and makes the cake feel more balanced. You can taste fruit in both texture and aroma, which is a big reason I serve it often in spring.
Unexpected simplicity
Even though the cake tastes like something you might buy at a bakery, it uses pantry friendly ingredients and straightforward techniques. That makes it a great option when you want to impress without fuss. I like keeping recipes like this in rotation for busy weekends when I still want something homemade.
Versatility for serving
This cake is wonderful at brunch, as a tea time treat, or as a light dessert after dinner. It pairs well with a dollop of whipped cream or a scoop of ice cream, though it also stands beautifully on its own. I find guests comment on the strawberry flavor first, then on the buttery crumb, which is always satisfying to hear.
Shopping List for Strawberry Pound Cake
These ingredients work together in a straightforward, classic way. The base is simple flour and leavening for structure, while butter and sugar supply richness and tenderness. The strawberry components, both the gelatin and the thawed strawberries, bring aroma and flecks of fruit, making the cake sing of spring without overwhelming the texture.
- 3 cups all-purpose flour: Provides structure and bulk to the cake batter; all-purpose flour develops gluten when mixed with liquids, creating a tender crumb if not overworked. Balances moisture absorption and supports leavening for an even rise throughout baking.
- 1 tsp baking powder: Acts as a chemical leavening agent to help the cake rise; baking powder releases carbon dioxide when heated, creating lightness in the crumb. Ensures a finer texture when evenly distributed through the dry ingredients.
- 1/2 tsp salt: Enhances flavor and strengthens gluten network slightly; salt balances sweetness and amplifies other flavors in the cake. Controls yeast and chemical reactions marginally, improving overall taste and texture.
- 1 cup butter, softened: Contributes richness, moisture, and tenderness to the cake; softened butter cremates with sugar to incorporate air for a lighter loaf. Adds buttery flavor and helps create a velvety mouthfeel in the finished pound cake.
- 2 cups sugar: Sweetens the batter and aids in creaming with butter to trap air for leavening; sugar also tenderizes by competing with flour for liquid. Promotes browning via caramelization and contributes to moistness and shelf life.
- 1 (3-oz) box strawberry jello: Infuses concentrated strawberry flavor and color while adding soluble gelatinizing agents; strawberry Jell-O enhances aroma and intensifies the dessert’s fruit profile. Dissolves readily in batter, distributing a uniform fruity taste.
- 4 eggs: Provides structure, moisture, and emulsification; eggs bind ingredients, trap air during mixing, and set as they coagulate during baking. Contribute to richness, color, and stability of the cake’s crumb.
- 1 cup milk: Adds liquid for proper batter consistency and contributes to tenderness; milk hydrates dry ingredients and helps dissolve sugar and gelatin from the jello. Supplies mild dairy richness and assists with browning during baking.
- 1 tsp vanilla extract: Imparts aromatic sweetness and rounds out flavor profile; vanilla extract enhances the perception of other flavors and complements the strawberry notes. Small amounts boost overall complexity and balance in the cake.
- 1 (16-oz) container frozen sliced strawberries in sugar, thawed: Delivers real strawberry pieces and concentrated fruitiness while adding moisture and texture; thawed frozen strawberries in sugar provide both fruit flavor and syrupy juices that incorporate into the batter. Offers bursts of fresh berry flavor and visual appeal when distributed through the cake.
Preparation Steps for Strawberry Pound Cake
Baking this cake is a comforting, predictable process if you take your time with each stage. I like to organize my ingredients, preheat the oven, and line up my pans before I start mixing. Below, each original direction is preserved as the core step, followed by a rich description to guide your senses and avoid common pitfalls.
- Preheat oven to 325ºF. Grease and flour a 10-inch bundt or tube pan.: As the oven warms to 325ºF , you will notice a gentle, warming air that promises browning rather than rapid crusting. Greasing and flouring the tube pan or bundt pan ensures the cake releases cleanly, maintaining its shape and decorative edges. The smell of warm metal and the slight hum of the oven settling in tells you it is ready. Why this matters, I have learned, is that a steady moderate oven temperature bakes the dense pound cake evenly so the center sets without overbrowning the exterior. A common mistake is skipping the flour, which causes sticking, or greasing too heavily with butter which can make the outer crust greasy; use a thin, even coat of shortening or pan release and dust with flour, tapping out the excess.
- Combine flour, baking powder and salt. Set aside.: As you whisk together flour , baking powder , and salt , the dry mixture should look uniform and pale. This step distributes the leavening and seasoning so pockets of rising agent do not create uneven texture during baking. The sound here is soft, a rustling as the dry ingredients mingle, and the visual cue is a light, consistent color. Why this matters is that proper distribution prevents dense spots and helps the cake rise evenly. A common error is skipping sifting or failing to break up lumps, which leads to pockets of baking powder; take a moment to whisk until smooth.
- In the bowl of a stand mixer, beat together butter, sugar and strawberry jello until light and fluffy – about 2 minutes.: When you cream butter , sugar , and strawberry jello , the mixture will transform from satin to pale, and you will feel the resistance change under the paddle as air is incorporated. This stage creates a ribbon like texture that is vital for lift and tenderness, and you will notice a soft, sweet strawberry aroma lifting from the bowl. Doing this too briefly leaves the batter dense, while overbeating can break down the emulsion. Watch for a noticeably lighter color and airy texture after about two minutes on medium speed. A typical mistake is starting with cold butter, which prevents proper creaming and yields a grainy texture, so be sure the butter is softened but not melted.
- Add eggs one at a time, mixing until yolk disappears.: Adding each egg individually and allowing it to incorporate produces a silky, emulsified batter that holds air and keeps the crumb even. You will see the batter smooth out after each addition, and the sound will be a quieter, smoother mixing as the mixture stabilizes. This technique matters because rushing in multiple eggs can cause the mixture to separate or curdle, harming texture. A frequent misstep is adding cold eggs straight from the fridge, which can seize the creamed butter; let them warm to room temperature briefly before adding.
- Add dry ingredients in three additions to butter mixture alternately with milk, beginning and ending with flour mixture. Beat at low speed just until blended after each addition.: Alternating flour and milk in three parts keeps the batter smooth and prevents overworking the gluten. When you fold in the dry and wet parts gradually, you preserve the air pockets created earlier and maintain a tender crumb. Visually, the batter will become thicker yet homogeneous, and you will hear the mixer ease as the batter reaches a velvety consistency. This method matters because adding everything at once risks a lumpy, overmixed batter. A common mistake is mixing at high speed between additions, which can make the cake tough; keep the mixer on low and stop as soon as the streaks disappear.
- Stir in vanilla and sliced strawberries.: As you fold in the vanilla and the thawed sliced strawberries , the batter will pick up tiny pink flecks and a fresh fruity scent. The berries add moisture and uneven pockets of flavor, which become delightful surprises in each slice. Gently folding preserves the berry shape, so you get texture rather than a uniformly colored batter. This matters for both appearance and mouthfeel. One mistake to avoid is overmixing at this point, which can burst the strawberries and create a streaky, wet batter that sinks in the center; fold just until evenly distributed.
- Pour into prepared pan.: Pouring the batter into the prepared pan should feel substantial, the batter moving in a thick ribbon as it falls. Tap the pan lightly once on the counter to release any large air bubbles and to settle the batter into the crevices. The visual cue is a smooth, level surface with no large air pockets. Getting this right ensures even baking and a uniform final shape. Avoid the mistake of overfilling the pan, which can cause batter to overflow and bake unevenly; the pan should be no more than about two thirds full.
- Bake for 70 to 75 minutes, until a wooden pick inserted into the center of the pan comes out clean.: During baking, the kitchen fills with a warm strawberry and butter aroma, and the surface will set to a pale golden color. A slow, steady bake at this duration allows the interior to cook fully without drying the edges. The key test is the wooden pick; it should come out clean or with a few moist crumbs, not wet batter. This matters because underbaking yields a gummy center, while overbaking dries the crumb. A common oversight is not rotating the pan in the oven, which can lead to uneven browning; rotate once midway if your oven has hot spots.
- Cool in pan for 10 minutes. Remove from pan and place on a wire rack to cool completely.: As the cake rests in the pan , it will slightly pull away from the sides, and the internal steam will redistribute, making slicing easier. After ten minutes, invert onto a wire rack so air circulates and the bottom does not sweat, which keeps the crust crisp and the crumb stable. Cooling completely preserves clean slices and prevents a gummy center. Avoid the mistake of trying to remove the cake too soon, which can cause it to break apart; wait the full ten minutes before unmolding.
Variations to Try
These variations let you adapt the cake for different occasions while keeping the heart of the recipe intact. I like to consider texture, presentation, and how the fruit is showcased when choosing a variation.
- Strawberry Swirl: Gently fold half the batter with a few spoonfuls of pureed thawed strawberries and dollop into the pan in alternating spoonfuls with plain batter for a marbled effect that adds visual interest and concentrated fruit pockets.
- Extra Fruit Chunks: Toss additional sliced strawberries in a light dusting of flour before folding in to help them remain suspended in the batter rather than sinking to the bottom during baking.
- Glazed Finish: Make a simple glaze from reserved syrup of thawed strawberries reduced slightly with a touch of sugar, then brush over the warm cake for a glossy, flavorful exterior that keeps the crumb moist.
- Mini Bundts: Divide batter into greased mini bundt pans for individual servings, adjusting baking time down and checking early with a pick to avoid overbaking the smaller molds.
- Layered Cake: Bake the batter in two round pans and use a light whipped topping between layers along with sliced strawberries for a celebratory presentation that turns the pound cake into a party centerpiece.
Perfect Pairings for Strawberry Pound Cake
Serving this cake can be as simple or as dressed up as you like. I often choose a pairing that balances the cake’s buttery richness with something light and slightly acidic to lift the flavors. Below are ideas that work for different occasions and storage advice to keep leftovers tasting fresh.
- Afternoon tea: Serve slices of Strawberry Pound Cake with a pot of black or herbal tea, letting the tea cleanse the palate between bites and highlight the delicate strawberry notes.
- Brunch centerpiece: Place the cake on a platter with fresh sliced strawberries and a bowl of whipped cream available for guests to add, making the cake feel like a light celebratory brunch option.
- Dessert for a casual dinner: Pair single slices with a small scoop of vanilla ice cream or a spoonful of lightly sweetened whipped cream, offering a cool contrast to the warm buttery crumb.
- Seasonal occasions: Because the recipe emphasizes fresh fruit flavor, I lean on it for spring gatherings, outdoor picnics, and baby showers where its appearance and taste feel on theme.
- Storage tips: Keep leftover slices wrapped tightly in plastic wrap or stored in an airtight container at room temperature for up to two days, or freeze individual slices for longer storage; thaw slowly to maintain texture.
- Presentation ideas: Dust the top lightly with powdered sugar just before serving or add a few thawed strawberries for a simple, elegant finish that signals the cake’s flavor profile.
FAQ
Conclusion
This Strawberry Pound Cake shines because it balances a rich, buttery base with genuine bursts of strawberry, resulting in a loaf that feels both comforting and fresh. I encourage you to give it a try on a relaxed afternoon or when guests are coming over, because it slices beautifully and makes the kitchen smell wonderful while baking. It is forgiving, approachable, and rewarding to make, and once you get the technique down you will find yourself turning to it whenever you want a simple, beloved dessert that reads like spring in every bite.
Strawberry Pound Cake
Equipment
- Tube Cake Pan
- Bundt Cake Pan
Ingredients
- 3 cups all-purpose flour Provides structure and bulk to the cake batter; all-purpose flour develops gluten when mixed with liquids, creating a tender crumb if not overworked. Balances moisture absorption and supports leavening for an even rise throughout baking.
- 1 tsp baking powder Acts as a chemical leavening agent to help the cake rise; baking powder releases carbon dioxide when heated, creating lightness in the crumb. Ensures a finer texture when evenly distributed through the dry ingredients.
- 1/2 tsp salt Enhances flavor and strengthens gluten network slightly; salt balances sweetness and amplifies other flavors in the cake. Controls yeast and chemical reactions marginally, improving overall taste and texture.
- 1 cup butter, softened Contributes richness, moisture, and tenderness to the cake; softened butter cremates with sugar to incorporate air for a lighter loaf. Adds buttery flavor and helps create a velvety mouthfeel in the finished pound cake.
- 2 cups sugar Sweetens the batter and aids in creaming with butter to trap air for leavening; sugar also tenderizes by competing with flour for liquid. Promotes browning via caramelization and contributes to moistness and shelf life.
- 1 (3-oz) box strawberry jello Infuses concentrated strawberry flavor and color while adding soluble gelatinizing agents; strawberry Jell-O enhances aroma and intensifies the dessert’s fruit profile. Dissolves readily in batter, distributing a uniform fruity taste.
- 4 eggs Provides structure, moisture, and emulsification; eggs bind ingredients, trap air during mixing, and set as they coagulate during baking. Contribute to richness, color, and stability of the cake’s crumb.
- 1 cup milk Adds liquid for proper batter consistency and contributes to tenderness; milk hydrates dry ingredients and helps dissolve sugar and gelatin from the jello. Supplies mild dairy richness and assists with browning during baking.
- 1 tsp vanilla extract Imparts aromatic sweetness and rounds out flavor profile; vanilla extract enhances the perception of other flavors and complements the strawberry notes. Small amounts boost overall complexity and balance in the cake.
- 1 (16-oz) container frozen sliced strawberries in sugar, thawed Delivers real strawberry pieces and concentrated fruitiness while adding moisture and texture; thawed frozen strawberries in sugar provide both fruit flavor and syrupy juices that incorporate into the batter. Offers bursts of fresh berry flavor and visual appeal when distributed through the cake.
Instructions
- Preheat oven to 325ºF. Grease and flour a 10-inch bundt or tube pan.: As the oven warms to 325ºF , you will notice a gentle, warming air that promises browning rather than rapid crusting. Greasing and flouring the tube pan or bundt pan ensures the cake releases cleanly, maintaining its shape and decorative edges. The smell of warm metal and the slight hum of the oven settling in tells you it is ready. Why this matters, I have learned, is that a steady moderate oven temperature bakes the dense pound cake evenly so the center sets without overbrowning the exterior. A common mistake is skipping the flour, which causes sticking, or greasing too heavily with butter which can make the outer crust greasy; use a thin, even coat of shortening or pan release and dust with flour, tapping out the excess.
- Combine flour, baking powder and salt. Set aside.: As you whisk together flour , baking powder , and salt , the dry mixture should look uniform and pale. This step distributes the leavening and seasoning so pockets of rising agent do not create uneven texture during baking. The sound here is soft, a rustling as the dry ingredients mingle, and the visual cue is a light, consistent color. Why this matters is that proper distribution prevents dense spots and helps the cake rise evenly. A common error is skipping sifting or failing to break up lumps, which leads to pockets of baking powder; take a moment to whisk until smooth.
- In the bowl of a stand mixer, beat together butter, sugar and strawberry jello until light and fluffy – about 2 minutes.: When you cream butter , sugar , and strawberry jello , the mixture will transform from satin to pale, and you will feel the resistance change under the paddle as air is incorporated. This stage creates a ribbon like texture that is vital for lift and tenderness, and you will notice a soft, sweet strawberry aroma lifting from the bowl. Doing this too briefly leaves the batter dense, while overbeating can break down the emulsion. Watch for a noticeably lighter color and airy texture after about two minutes on medium speed. A typical mistake is starting with cold butter, which prevents proper creaming and yields a grainy texture, so be sure the butter is softened but not melted.
- Add eggs one at a time, mixing until yolk disappears.: Adding each egg individually and allowing it to incorporate produces a silky, emulsified batter that holds air and keeps the crumb even. You will see the batter smooth out after each addition, and the sound will be a quieter, smoother mixing as the mixture stabilizes. This technique matters because rushing in multiple eggs can cause the mixture to separate or curdle, harming texture. A frequent misstep is adding cold eggs straight from the fridge, which can seize the creamed butter; let them warm to room temperature briefly before adding.
- Add dry ingredients in three additions to butter mixture alternately with milk, beginning and ending with flour mixture. Beat at low speed just until blended after each addition.: Alternating flour and milk in three parts keeps the batter smooth and prevents overworking the gluten. When you fold in the dry and wet parts gradually, you preserve the air pockets created earlier and maintain a tender crumb. Visually, the batter will become thicker yet homogeneous, and you will hear the mixer ease as the batter reaches a velvety consistency. This method matters because adding everything at once risks a lumpy, overmixed batter. A common mistake is mixing at high speed between additions, which can make the cake tough; keep the mixer on low and stop as soon as the streaks disappear.
- Stir in vanilla and sliced strawberries.: As you fold in the vanilla and the thawed sliced strawberries , the batter will pick up tiny pink flecks and a fresh fruity scent. The berries add moisture and uneven pockets of flavor, which become delightful surprises in each slice. Gently folding preserves the berry shape, so you get texture rather than a uniformly colored batter. This matters for both appearance and mouthfeel. One mistake to avoid is overmixing at this point, which can burst the strawberries and create a streaky, wet batter that sinks in the center; fold just until evenly distributed.
- Pour into prepared pan.: Pouring the batter into the prepared pan should feel substantial, the batter moving in a thick ribbon as it falls. Tap the pan lightly once on the counter to release any large air bubbles and to settle the batter into the crevices. The visual cue is a smooth, level surface with no large air pockets. Getting this right ensures even baking and a uniform final shape. Avoid the mistake of overfilling the pan, which can cause batter to overflow and bake unevenly; the pan should be no more than about two thirds full.
- Bake for 70 to 75 minutes, until a wooden pick inserted into the center of the pan comes out clean.: During baking, the kitchen fills with a warm strawberry and butter aroma, and the surface will set to a pale golden color. A slow, steady bake at this duration allows the interior to cook fully without drying the edges. The key test is the wooden pick; it should come out clean or with a few moist crumbs, not wet batter. This matters because underbaking yields a gummy center, while overbaking dries the crumb. A common oversight is not rotating the pan in the oven, which can lead to uneven browning; rotate once midway if your oven has hot spots.
- Cool in pan for 10 minutes. Remove from pan and place on a wire rack to cool completely.: As the cake rests in the pan , it will slightly pull away from the sides, and the internal steam will redistribute, making slicing easier. After ten minutes, invert onto a wire rack so air circulates and the bottom does not sweat, which keeps the crust crisp and the crumb stable. Cooling completely preserves clean slices and prevents a gummy center. Avoid the mistake of trying to remove the cake too soon, which can cause it to break apart; wait the full ten minutes before unmolding.
Notes
- Strawberry Swirl: Gently fold half the batter with a few spoonfuls of pureed thawed strawberries and dollop into the pan in alternating spoonfuls with plain batter for a marbled effect that adds visual interest and concentrated fruit pockets.
- Extra Fruit Chunks: Toss additional sliced strawberries in a light dusting of flour before folding in to help them remain suspended in the batter rather than sinking to the bottom during baking.
- Glazed Finish: Make a simple glaze from reserved syrup of thawed strawberries reduced slightly with a touch of sugar, then brush over the warm cake for a glossy, flavorful exterior that keeps the crumb moist.
- Mini Bundts: Divide batter into greased mini bundt pans for individual servings, adjusting baking time down and checking early with a pick to avoid overbaking the smaller molds.
- Layered Cake: Bake the batter in two round pans and use a light whipped topping between layers along with sliced strawberries for a celebratory presentation that turns the pound cake into a party centerpiece.