Strawberry Cheesecake Crescent Ring
Strawberry Cheesecake Crescent Ring is one of those recipes that instantly transports me back to neighborhood potlucks and sunny spring afternoons. The first time I made this, I brought it to a friend who had just moved into a new apartment, and watching everyone lean in to take the first pull-apart slice felt like a tiny celebration. I still remember the warm, slightly yeasty aroma of the baked crescent rolls mingling with the sweet tang of the strawberry pie filling, and how the creamy cream cheese filling softened into a luscious contrast that begged to be shared.
Over the years I have tweaked nothing about the core idea, because it is perfect in its simplicity. I like that it looks fancy on a table, yet comes together with pantry friendly items and straightforward steps. When I make this for casual brunches, guests are always surprised by how elegant the ring looks, and how fun it is to pull apart each wedge. It is the sort of recipe that makes people gather closer, chat more, and reach for seconds.
What keeps me coming back to this Strawberry Cheesecake Crescent Ring is how forgiving it is. Even if the center filling is a bit runny or the seams need extra pressing, a quick gentle tuck and a few extra minutes in the oven fixes everything. I often assemble it while my kettle is boiling and a playlist hums in the background, turning baking into a mini ritual rather than a chore. You will find that the combination of buttery crescent rolls, sweet strawberry pie filling, and silky cream cheese makes a striking balance between comfort and celebration.
Recipe Snapshot
40 mins
15 mins
25 mins
Easy
250 kcal
American
Gluten-Free, Low FODMAP
Desserts
14 inch pizza pan, Mixing bowl, Spatula, Electric mixer
The Magic of This Strawberry Cheesecake Crescent Ring
It pulls apart like a dream
I love how the Strawberry Cheesecake Crescent Ring becomes a communal dessert, not just a plated sweet. When you bring it to the table, everyone instinctively reaches for a wedge. The tear apart texture of the baked crescent rolls gives a satisfying tactile experience, and it makes serving effortless.
Minimal fuss, maximum wow
One thing I keep repeating to friends is that this recipe looks elaborate but uses simple techniques. The assembly is intuitive, and the ingredients are common. Because of that, I often make it on short notice when guests drop by, and it never fails to garner compliments.
Bold contrasts that sing together
The interplay between the sweet strawberry pie filling and the tangy cream cheese keeps every bite interesting. The powdered sugar drizzle adds a gentle sweetness and a glossy finish, creating textural and flavor layers that make each mouthful memorable.
Kid friendly and crowd pleasing
Children and adults alike enjoy the approachable sweetness and fun presentation. I frequently bring this to family events because it travels well and holds up during social gatherings. It is sturdy enough to transport without losing its look or taste.
Quick to assemble
From unrolling the dough to tucking the points, assembly moves quickly, which I appreciate on busy mornings or when planning last minute desserts. The bake time is short, so you get a warm, fresh dessert on the table in under an hour, which makes it perfect for impromptu celebrations.
Recipe Ingredients for Strawberry Cheesecake Crescent Ring
These ingredients are intentionally straightforward, built around three key players: the buttery crescent rolls that form the structure, the sweet strawberry pie filling that provides bright fruit flavor, and the creamy cream cheese filling that adds richness and tang. Each component complements the others, creating a balance of texture and taste that is both comforting and festive.
- 2 tubes crescent rolls (8 oz each): Provide a buttery, flaky base and top to form the ring shape; unroll and arrange the dough to create pockets for the filling. Bake until golden to give structure and a tender, slightly crisp contrast to the creamy center. Use both tubes to ensure enough layers and coverage for a complete ring that holds the filling without leaking.
- 21 oz can strawberry pie filling: Add a glossy, fruity centerpiece that delivers bright strawberry flavor and a jam-like texture that complements the cream cheese. Spoon into the assembled ring so the filling creates a sweet, slightly tart contrast and a visually appealing red swirl on top after baking.
- 8 oz cream cheese softened: Soften to a spreadable, creamy consistency to create the cheesecake layer that balances the sweet filling and pastry. Beat until smooth to eliminate lumps and provide richness and tang that gives the dessert its classic cheesecake mouthfeel. Chill briefly if needed to maintain structure while assembling.
- 1/2 c. white sugar: Sweeten and stabilize the cream cheese layer while rounding out flavors for balanced richness. Dissolve into the softened cream cheese by beating until smooth so the filling holds its shape and has a pleasant, even sweetness. Adjust slightly to taste to counteract tartness from the strawberries.
- 1/2 tsp almond extract: Enhance the cream cheese mixture with a subtle, nutty floral note that brightens the overall flavor profile. Add sparingly and stir in to avoid overpowering the strawberry and cheesecake components while lending a bakery-like aroma.
- 1/2 c. powdered sugar: Provide a smooth sweet glaze element to finish the ring and tie flavors together; sifted powdered sugar ensures a lump-free drizzle or dusting. Whisk with milk until desired consistency is reached to create a delicate icing that adds sweetness and a slight sheen.
- 2 3 tsp milk: Adjust the glaze to a pourable consistency that allows it to coat the ring without running off completely. Add gradually to the powdered sugar to achieve a balanced thickness for drizzling, which helps the dessert look finished and adds a touch of moisture and sweetness.
Preparation Steps for Strawberry Cheesecake Crescent Ring
This recipe is friendly and conversational, and a little planning makes the assembly smooth. Follow the cleaned directions below, and I will walk you through sensory cues and troubleshooting at each stage so your ring comes out beautifully golden and satisfying.
- Preheat oven to 350 degrees.: When the oven warms to 350 degrees , you will notice a dry, hot air that helps the crescent rolls puff and brown. The preheat ensures even baking from the moment the ring goes in, preventing undercooked centers. Place the rack in the center so heat circulates evenly. A common mistake is not waiting for full preheat, which can lead to uneven color and dough that takes longer to set.
- Unroll crescent dough and separate into triangles. Arrange triangles on a 14 inch greased pizza pan with points toward the outside and wide ends overlapping at the center, leaving a 4 inch opening in the center. Press overlapping dough to seal.: You'll feel the slightly tacky surface of the unrolled dough and hear a faint peel as seams separate. As you lay the triangles on the greased pan, overlap the wide ends so the center becomes a secure base, and press firmly where they meet to prevent filling leaks. The visual cue is a continuous ring with a clean four inch hole in the middle. If seams are not sealed well, filling can ooze out during baking, so take an extra second to press each overlap firmly.
- In a medium sized mixing bowl cream the cream cheese, sugar and almond extract until smooth.: As you whip the cream cheese with the white sugar and almond extract , the texture should transform from slightly lumpy to velvety and glossy. Use a spatula or electric mixer on low to medium speed; you will hear a steady, smooth sound as pockets of air incorporate. The mixture should hold soft peaks and spread easily. If the cream cheese is still cold, you risk lumps, so ensure it is well softened before starting.
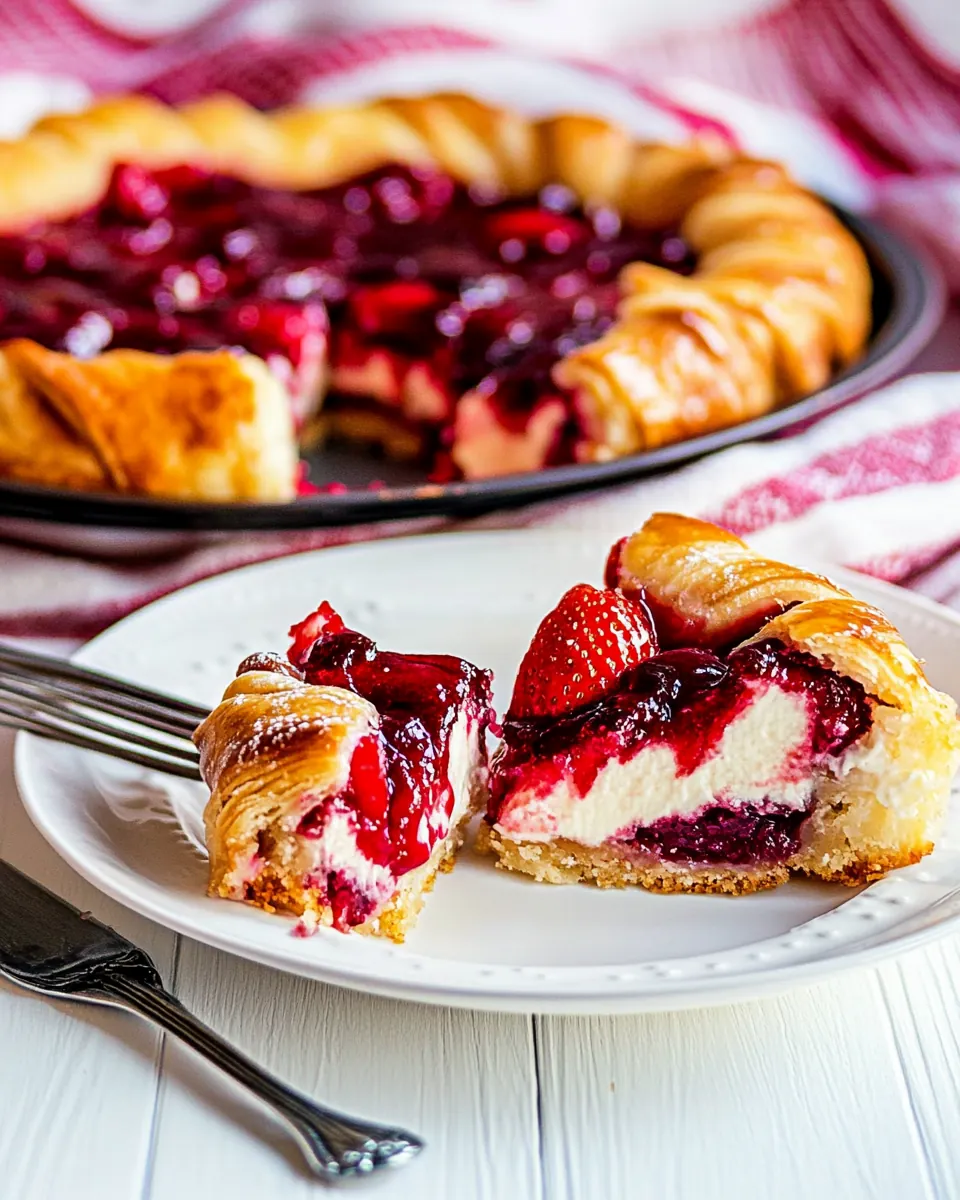
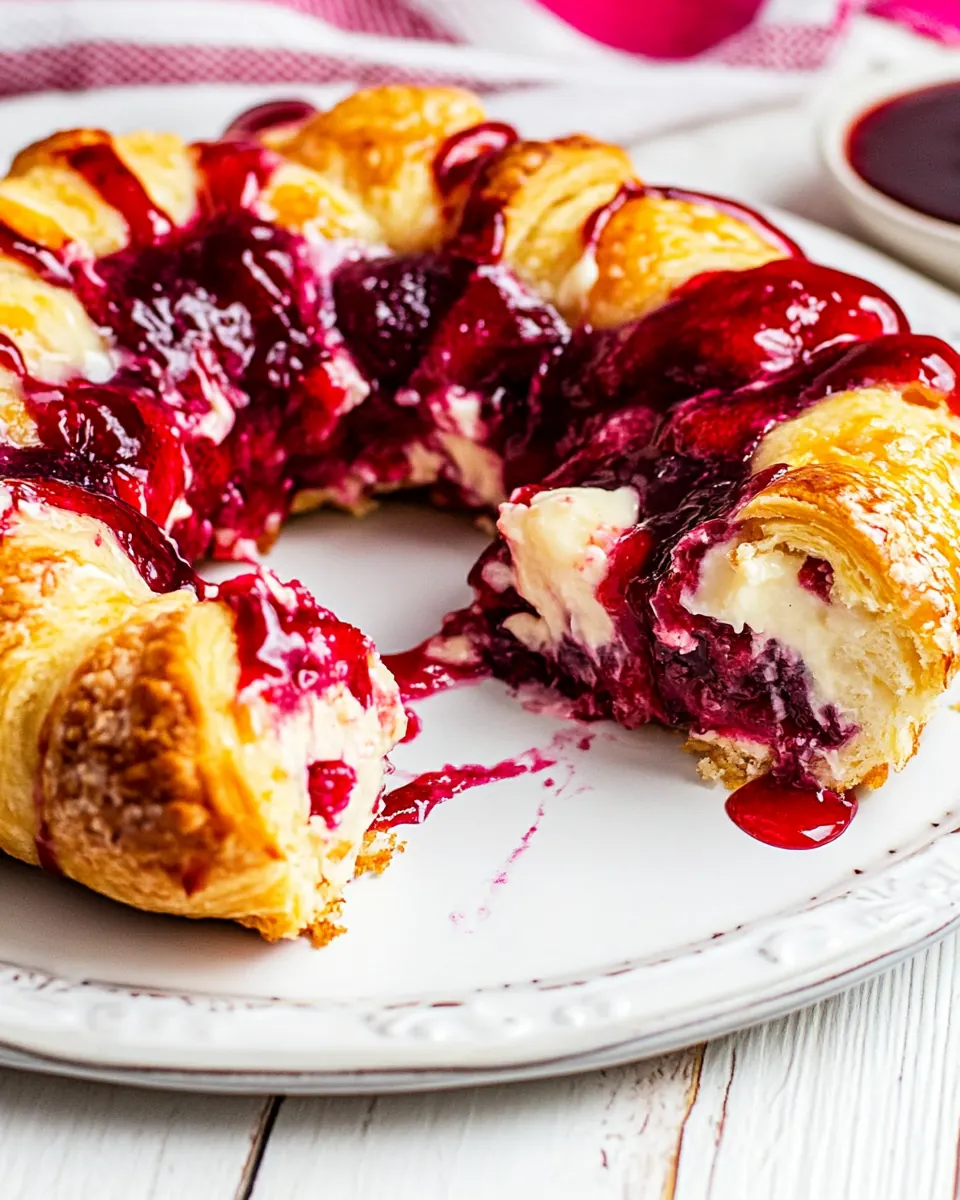
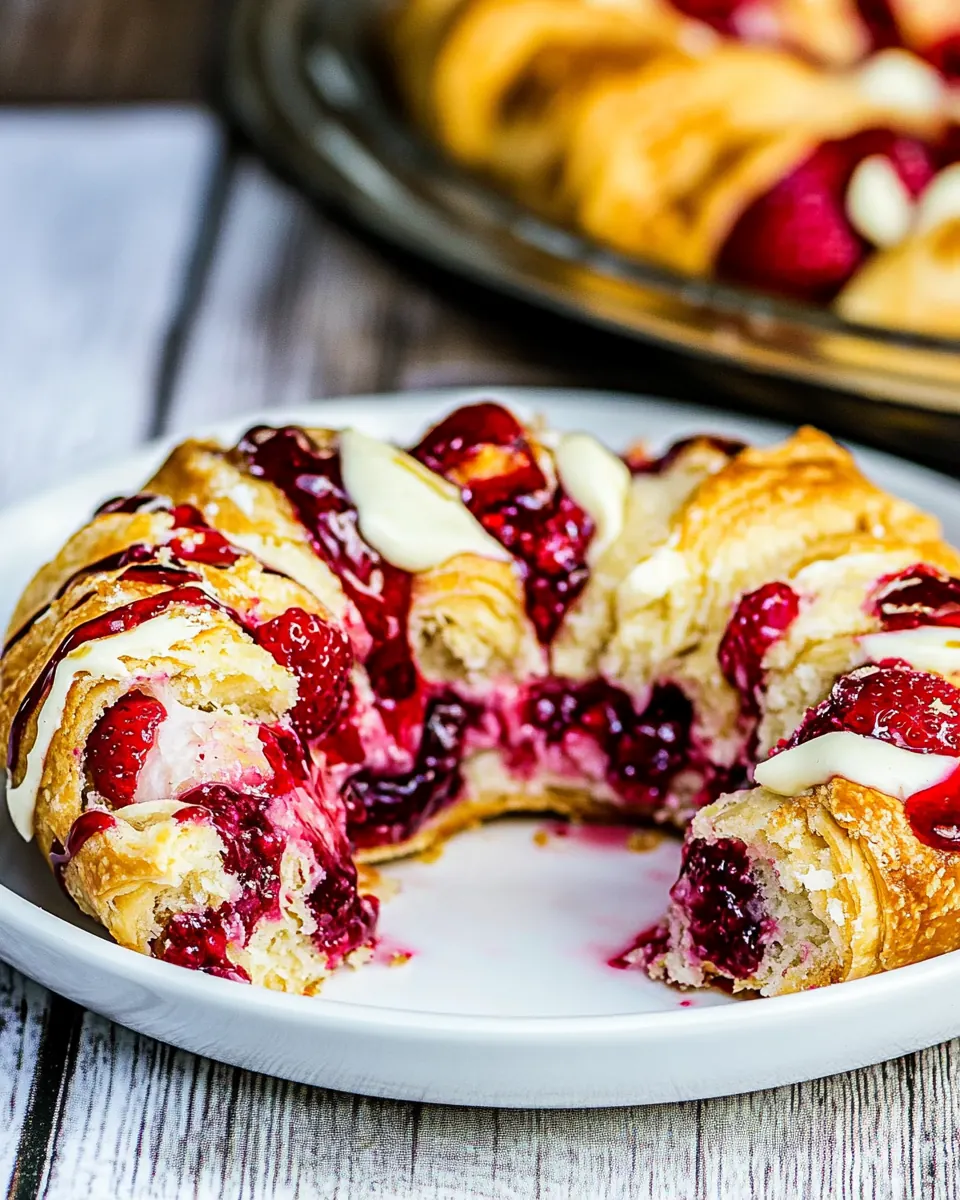
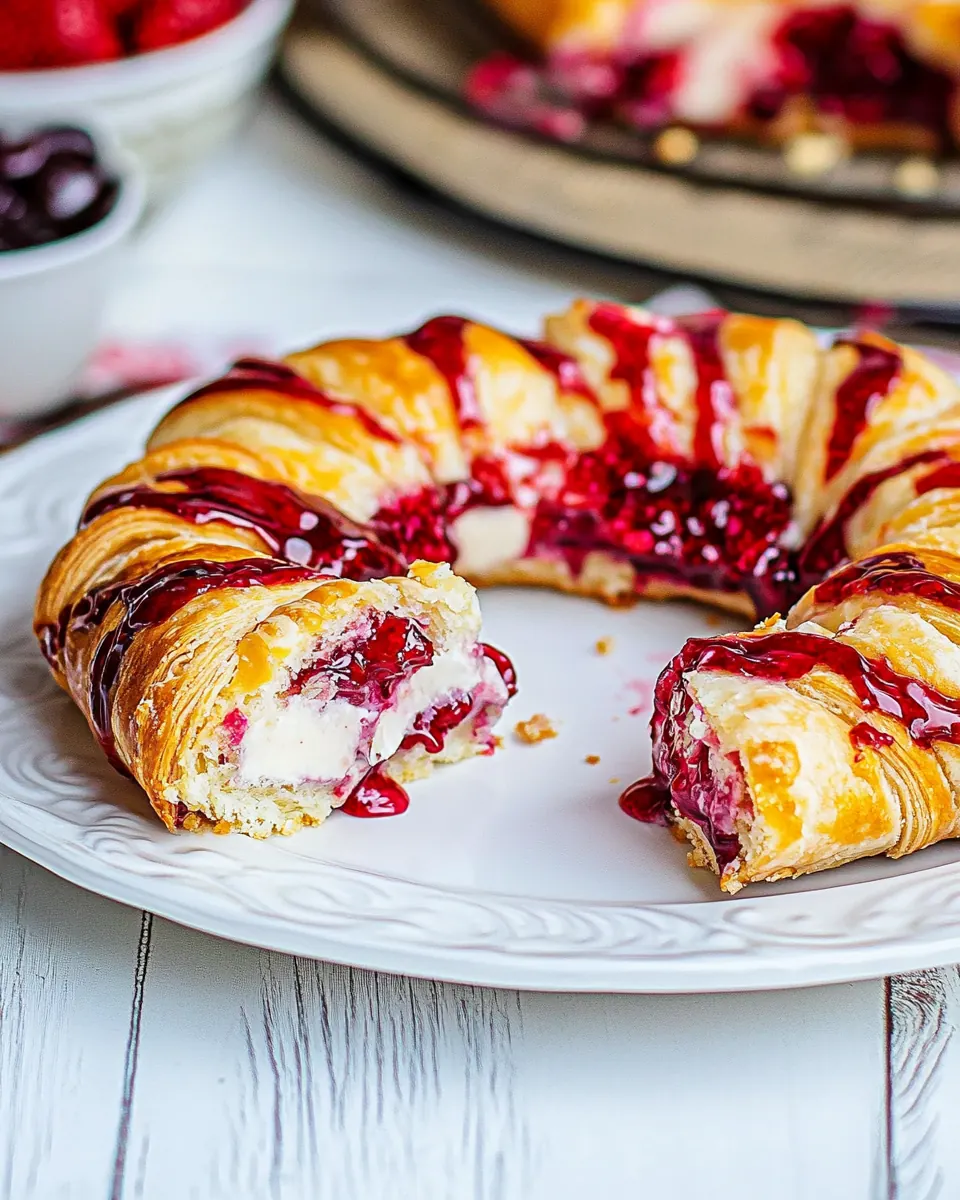
- Spoon strawberry pie filling over the wide ends of the crescent rolls. Top strawberry pie filling with cream cheese mixture. Fold pointed ends of triangles over filling, tucking points under to form a ring. The filling will be visible.: The bright red of the strawberry pie filling against pale dough creates an inviting contrast. Spoon even dollops onto each wide end, then add a layer of the creamy mixture so each slice will have both components. When you fold the pointed ends over, tuck them under the base so they stay put while baking. You should see a peek of filling at the edges which signals a good ratio of filling to dough. Avoid overfilling a single section, which can cause spillage and uneven baking.
- Bake for 20-25 minutes or until the crescents are golden brown. Cool 5 minutes.: During baking you will smell buttery notes and a sweet fruit aroma, and the surface will turn a warm golden brown with slightly darker edges. The ring should feel set to the touch and not doughy in the center. Letting it cool for about five minutes helps the filling settle so it does not run when you slice. A common slip is removing it too soon, which can cause the filling to be too loose, so give it that brief rest.
- Meanwhile mix powdered sugar and milk together, drizzle over crescent ring. Serve.: The glaze should be smooth and pour slowly off a spoon, creating thin ribbons across the warm ring. The powdered sugar will add a glossy finish and a delicate initial sweetness. If the glaze is too thin it will pool, so add milk sparingly to reach the desired thickness. After drizzling, the contrast between the shiny glaze and the golden crust is what makes the presentation sing. Serve while slightly warm for the best texture and flavor balance.
Change It Up
If you are looking to vary the presentation or tweak textures, small changes can make a big difference. Below are practical, creative tips that preserve the spirit of the Strawberry Cheesecake Crescent Ring while offering new ways to enjoy it. Each tip starts with a bold lead so you can scan quickly and pick an approach that fits your occasion.
- Make ahead option Prepare the ring assembly up to the point of baking, then cover and refrigerate for up to 24 hours. Chilling helps the seams set, and you can bake it straight from the fridge, adding a couple of extra minutes to the bake time so the center heats through. This is perfect for hosting when you want to reduce last minute prep.
- Texture boost Sprinkle a few finely chopped toasted nuts over the glaze for crunch. The nuts contrast the soft interior and glossy glaze, adding a nutty aroma and a pleasing bite. Add them just after drizzling the glaze so they stick.
- Flavor swap Replace the almond extract with a tiny pinch of lemon zest for a citrus lift. Lemon brightens the strawberry pie filling and adds a fresh edge that pairs beautifully with the creamy filling. Use zest sparingly to avoid bitterness.
- Serving temperature Serve slightly warm rather than piping hot for the best texture contrast. Warm makes the filling soft and inviting, while a short cool down helps the slices hold together when pulled apart.
- Glaze variations For a heavier finish, make a thicker glaze with less milk, or add a teaspoon of fruit syrup to tint it. Thicker glaze creates a more decadent look and will remain visible on top without running into the crevices.
- Presentation idea Place the ring on a decorative platter and garnish the center with fresh sliced strawberries for color and freshness. The fresh fruit echoes the pie filling and adds a fresh note against the baked components.
How to Serve Strawberry Cheesecake Crescent Ring
This ring is wonderfully versatile and makes a statement for many occasions. It is ideal for brunches, afternoon teas, baby showers, or casual gatherings where finger friendly food shines. Below are serving suggestions, storage guidance, and pairing ideas to help you present it with confidence.
- Brunch centerpiece Pair the Strawberry Cheesecake Crescent Ring with a selection of fresh fruit and a carafe of coffee for an inviting brunch spread. The ring serves as the sweet centerpiece while fruit adds brightness and balance.
- Casual dessert Serve warm wedges with small bowls of extra strawberry pie filling on the side for guests who prefer more fruit. This keeps the plate interactive and lets each person customize their slice.
- Party platter Arrange the ring on a large platter and surround it with small bowls of whipped cream or citrus marmalade for variety. Guests can mix and match to create their preferred flavor profile.
- Storage suggestion Store leftovers covered at room temperature for up to 24 hours, or refrigerate in an airtight container for up to three days. Bring to room temperature or gently warm before serving to restore that soft, pull apart texture.
- Occasion fit This recipe works beautifully for spring gatherings, afternoon tea, or festive brunches. Its shareable nature makes it ideal for any social meal where people graze and chat.
- Make ahead tip Assemble the ring and refrigerate unbaked for up to 24 hours, then bake before serving to ensure a freshly baked aroma and golden crust.
FAQ
Conclusion
This recipe stands out because it turns simple store bought ingredients into a shareable, elegant dessert with minimal effort. The combination of flaky crescent rolls, sweet strawberry pie filling, and tangy cream cheese makes for a memorable texture and flavor contrast. Give it a try at your next gathering, and you will likely see guests reach for seconds as I always do. It is warm, comforting, and just the right kind of celebratory without being complicated.

Strawberry Cheesecake Crescent Ring
Equipment
- 14 inch pizza pan
- Mixing Bowl
- Spatula
- Electric Mixer
Ingredients
- 2 tubes crescent rolls (8 oz each) Provide a buttery, flaky base and top to form the ring shape; unroll and arrange the dough to create pockets for the filling. Bake until golden to give structure and a tender, slightly crisp contrast to the creamy center. Use both tubes to ensure enough layers and coverage for a complete ring that holds the filling without leaking.
- 21 oz can strawberry pie filling Add a glossy, fruity centerpiece that delivers bright strawberry flavor and a jam-like texture that complements the cream cheese. Spoon into the assembled ring so the filling creates a sweet, slightly tart contrast and a visually appealing red swirl on top after baking.
- 8 oz cream cheese softened Soften to a spreadable, creamy consistency to create the cheesecake layer that balances the sweet filling and pastry. Beat until smooth to eliminate lumps and provide richness and tang that gives the dessert its classic cheesecake mouthfeel. Chill briefly if needed to maintain structure while assembling.
- 1/2 c. white sugar Sweeten and stabilize the cream cheese layer while rounding out flavors for balanced richness. Dissolve into the softened cream cheese by beating until smooth so the filling holds its shape and has a pleasant, even sweetness. Adjust slightly to taste to counteract tartness from the strawberries.
- 1/2 tsp almond extract Enhance the cream cheese mixture with a subtle, nutty floral note that brightens the overall flavor profile. Add sparingly and stir in to avoid overpowering the strawberry and cheesecake components while lending a bakery-like aroma.
- 1/2 c. powdered sugar Provide a smooth sweet glaze element to finish the ring and tie flavors together; sifted powdered sugar ensures a lump-free drizzle or dusting. Whisk with milk until desired consistency is reached to create a delicate icing that adds sweetness and a slight sheen.
- 2 -3 tsp milk Adjust the glaze to a pourable consistency that allows it to coat the ring without running off completely. Add gradually to the powdered sugar to achieve a balanced thickness for drizzling, which helps the dessert look finished and adds a touch of moisture and sweetness.
Instructions
- Preheat oven to 350 degrees.: When the oven warms to 350 degrees , you will notice a dry, hot air that helps the crescent rolls puff and brown. The preheat ensures even baking from the moment the ring goes in, preventing undercooked centers. Place the rack in the center so heat circulates evenly. A common mistake is not waiting for full preheat, which can lead to uneven color and dough that takes longer to set.
- Unroll crescent dough and separate into triangles. Arrange triangles on a 14 inch greased pizza pan with points toward the outside and wide ends overlapping at the center, leaving a 4 inch opening in the center. Press overlapping dough to seal.: You'll feel the slightly tacky surface of the unrolled dough and hear a faint peel as seams separate. As you lay the triangles on the greased pan, overlap the wide ends so the center becomes a secure base, and press firmly where they meet to prevent filling leaks. The visual cue is a continuous ring with a clean four inch hole in the middle. If seams are not sealed well, filling can ooze out during baking, so take an extra second to press each overlap firmly.
- In a medium sized mixing bowl cream the cream cheese, sugar and almond extract until smooth.: As you whip the cream cheese with the white sugar and almond extract , the texture should transform from slightly lumpy to velvety and glossy. Use a spatula or electric mixer on low to medium speed; you will hear a steady, smooth sound as pockets of air incorporate. The mixture should hold soft peaks and spread easily. If the cream cheese is still cold, you risk lumps, so ensure it is well softened before starting.
- Spoon strawberry pie filling over the wide ends of the crescent rolls. Top strawberry pie filling with cream cheese mixture. Fold pointed ends of triangles over filling, tucking points under to form a ring. The filling will be visible.: The bright red of the strawberry pie filling against pale dough creates an inviting contrast. Spoon even dollops onto each wide end, then add a layer of the creamy mixture so each slice will have both components. When you fold the pointed ends over, tuck them under the base so they stay put while baking. You should see a peek of filling at the edges which signals a good ratio of filling to dough. Avoid overfilling a single section, which can cause spillage and uneven baking.
- Bake for 20-25 minutes or until the crescents are golden brown. Cool 5 minutes.: During baking you will smell buttery notes and a sweet fruit aroma, and the surface will turn a warm golden brown with slightly darker edges. The ring should feel set to the touch and not doughy in the center. Letting it cool for about five minutes helps the filling settle so it does not run when you slice. A common slip is removing it too soon, which can cause the filling to be too loose, so give it that brief rest.
- Meanwhile mix powdered sugar and milk together, drizzle over crescent ring. Serve.: The glaze should be smooth and pour slowly off a spoon, creating thin ribbons across the warm ring. The powdered sugar will add a glossy finish and a delicate initial sweetness. If the glaze is too thin it will pool, so add milk sparingly to reach the desired thickness. After drizzling, the contrast between the shiny glaze and the golden crust is what makes the presentation sing. Serve while slightly warm for the best texture and flavor balance.
Notes
- Make ahead option Prepare the ring assembly up to the point of baking, then cover and refrigerate for up to 24 hours. Chilling helps the seams set, and you can bake it straight from the fridge, adding a couple of extra minutes to the bake time so the center heats through. This is perfect for hosting when you want to reduce last minute prep.
- Texture boost Sprinkle a few finely chopped toasted nuts over the glaze for crunch. The nuts contrast the soft interior and glossy glaze, adding a nutty aroma and a pleasing bite. Add them just after drizzling the glaze so they stick.
- Flavor swap Replace the almond extract with a tiny pinch of lemon zest for a citrus lift. Lemon brightens the strawberry pie filling and adds a fresh edge that pairs beautifully with the creamy filling. Use zest sparingly to avoid bitterness.
- Serving temperature Serve slightly warm rather than piping hot for the best texture contrast. Warm makes the filling soft and inviting, while a short cool down helps the slices hold together when pulled apart.
- Glaze variations For a heavier finish, make a thicker glaze with less milk, or add a teaspoon of fruit syrup to tint it. Thicker glaze creates a more decadent look and will remain visible on top without running into the crevices.
- Presentation idea Place the ring on a decorative platter and garnish the center with fresh sliced strawberries for color and freshness. The fresh fruit echoes the pie filling and adds a fresh note against the baked components.