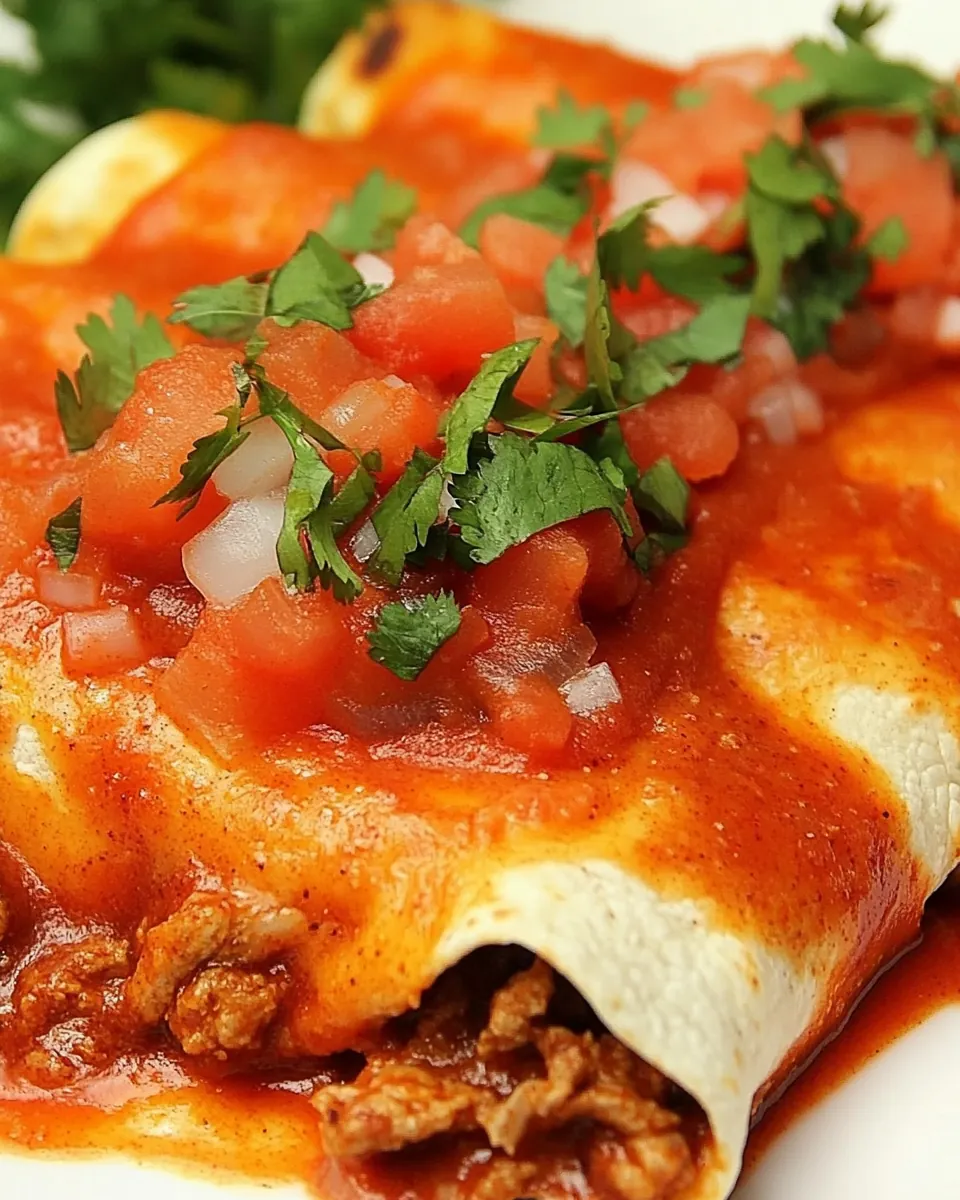
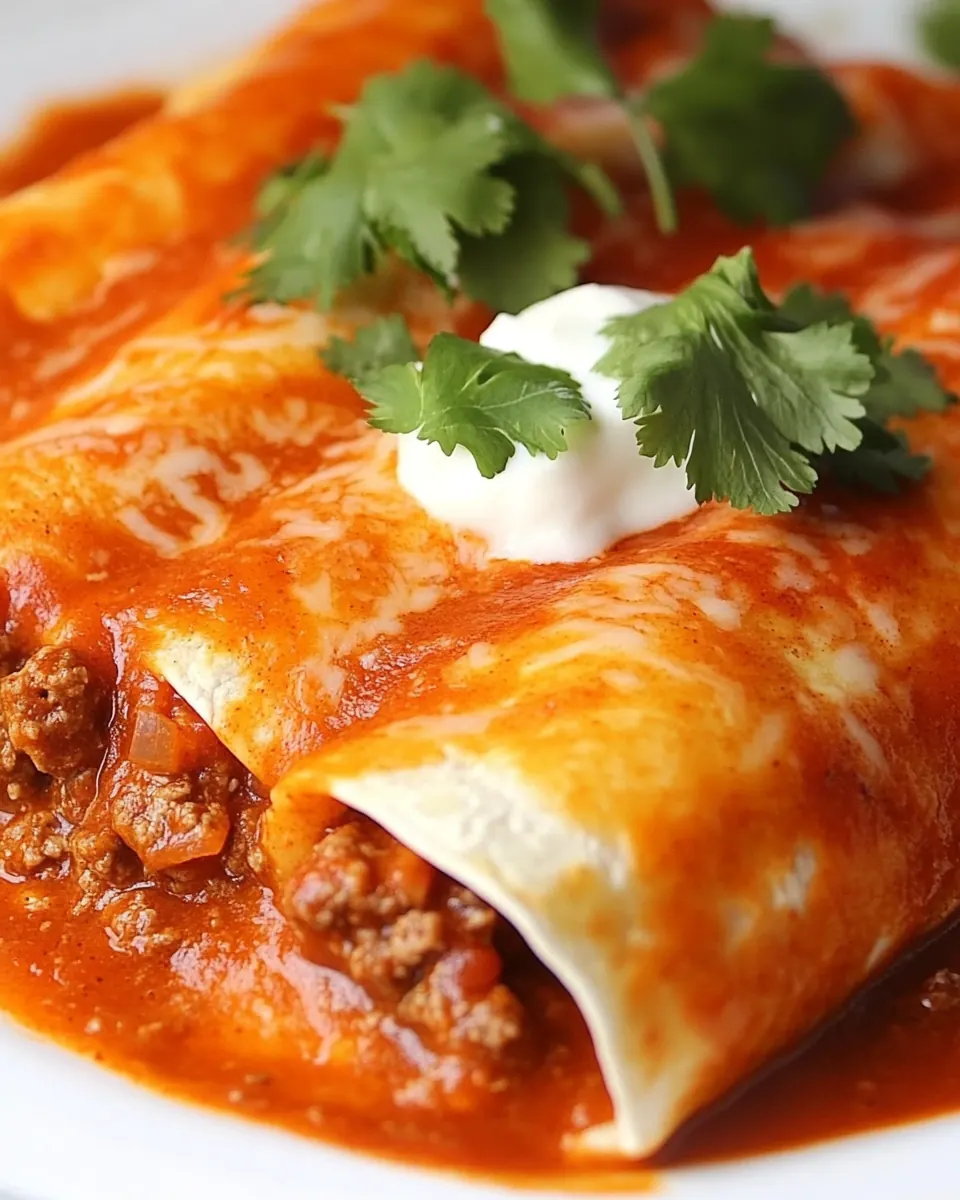
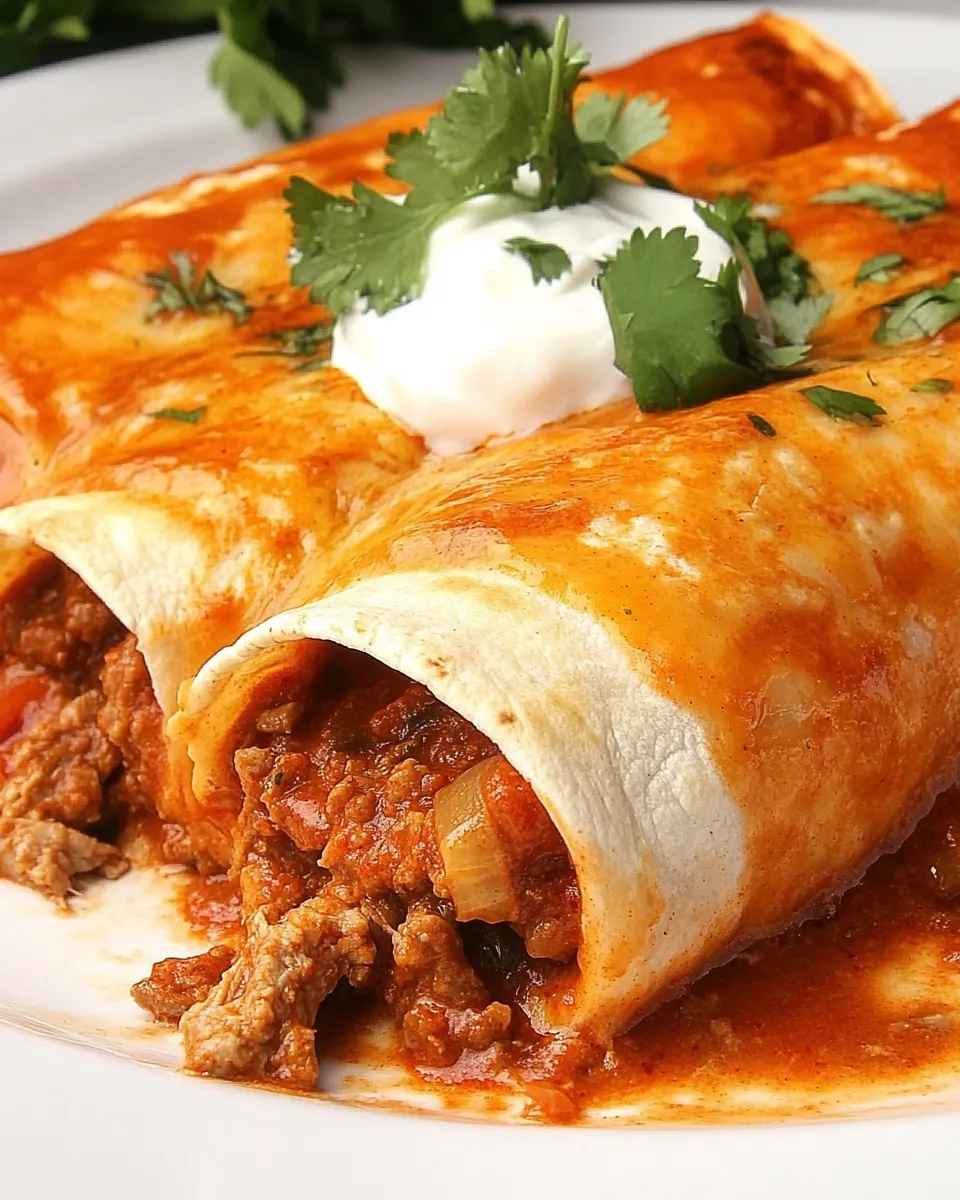
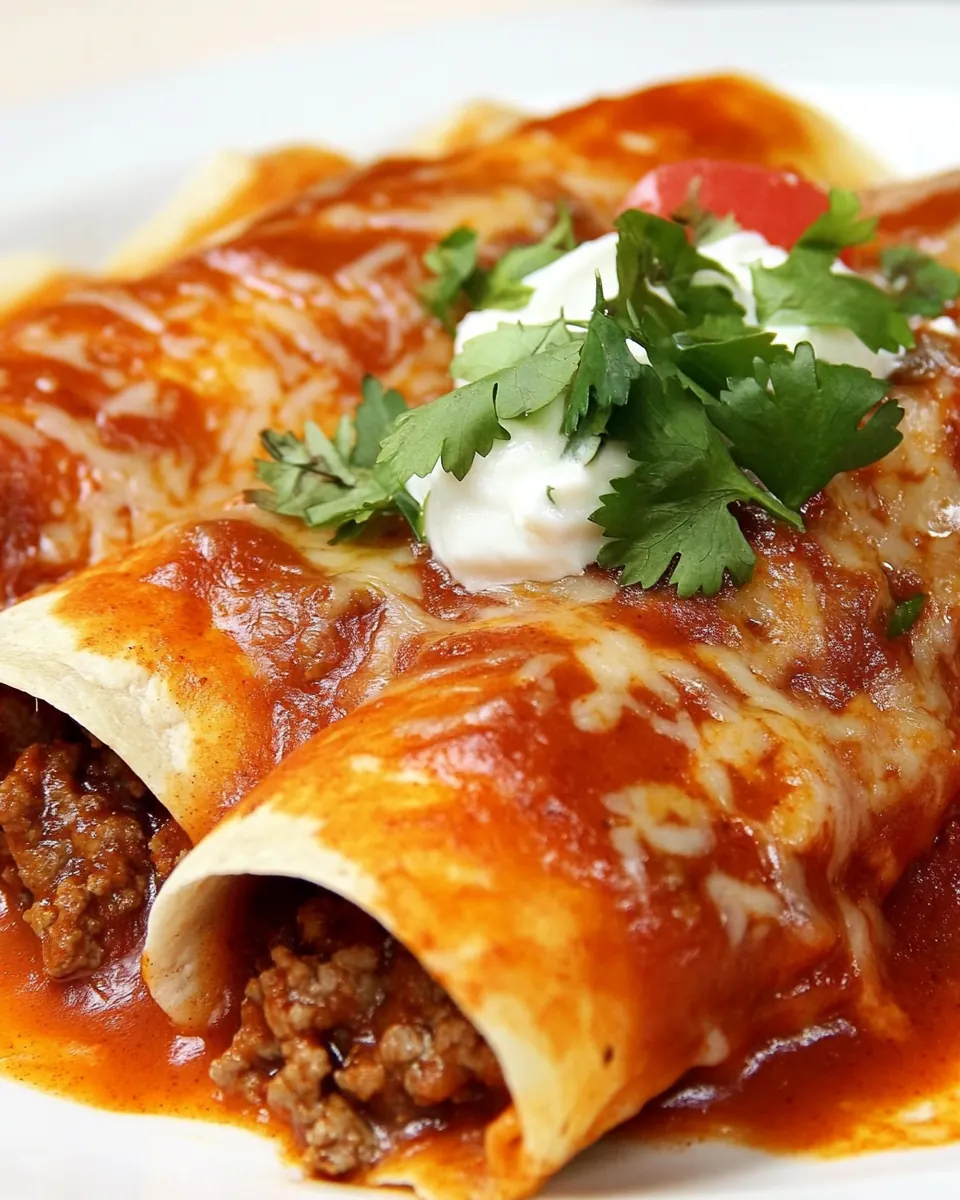
Slow Cooker Beefed Up Enchiladas
Slow Cooker Beefed Up Enchiladas has been my go to when I want something comforting, hands off, and full of personality on a chilly evening.
I remember the first time I made these enchiladas for a small group of friends during a snowfall, and the warm, savory aroma filled the house while we sipped tea and traded stories. The combination of ground beef, tangy enchilada sauce, and creamy sour cream created layers of flavor that felt familiar and a little indulgent, in the best possible way. I loved how the slow cooker did the heavy lifting, letting the spices meld together slowly so every bite tasted cohesive. Over time I tuned the spices and textures so the filling stayed juicy without getting soupy, and I swapped in whole wheat tortillas for a heartier bite.
When I make Slow Cooker Beefed Up Enchiladas on weeknights, I prep the filling in minutes and let the slow cooker transform it into something almost miraculous. I often tell friends this is ‘comfort with minimal fuss’ because the assembly is forgiving, and the result always feels like a special dinner. There is a simple pleasure in cutting into warm enchiladas and watching the cheddar cheese pull away in gooey strings, a little messy and very satisfying. Whether you’re feeding a crowd or saving leftovers, the dish holds up well, and the flavors deepen after a day in the fridge.
Recipe Snapshot
4 hr 15 mins
15 mins
240 mins
Hard
450 kcal
Mexican
Gluten-Free, Low FODMAP
Dinner
Large Skillet, Mixing Bowl, Slow Cooker, Large Casserole Dish, Spatula
The Beauty of This Slow Cooker Beefed Up Enchiladas
Layered Flavor from Slow Heat
I love that Slow Cooker Beefed Up Enchiladas rely on gentle, sustained heat, which lets the spices bloom without burning. The long cook time softens the filling and allows the enchilada sauce to infuse every tortilla, giving consistent, savory flavor in each bite. I often notice a richer aroma after a few hours in the cooker, and that steady development is why I reach for this method when I want deep comfort food notes.
Flexible and Approachable
One reason I keep this recipe in heavy rotation is its flexibility. Using ground beef as the main protein makes the filling hearty, but the directions allow easy swaps if you prefer. You can adapt quantities or tip in extra heat with more green chile peppers and still end up with a dependable, crowd pleasing dish. This approachability makes the recipe a favorite for potlucks and family dinners.
Minimal Hands On Time
I can’t overstate the convenience of assembling these enchiladas and letting the slow cooker do the work. The hands on part is mostly browning the ground beef and mixing the filling, then arranging the tortillas. That small time investment rewards you with hours of hands off cooking, which is perfect when I have other tasks or guests to entertain.
Textural Contrast
The contrast between creamy elements like sour cream and melty cheddar cheese, combined with soft, tender tortillas, creates a satisfying mouthfeel. The recipe balances moisture and structure so the enchiladas hold together when sliced, yet remain juicy and rich. I always aim for that moment when a fork slides through and the filling is warm and cohesive, not runny.
Comfort Food That Scales
Finally, I adore how this dish scales effortlessly. Whether I make a double batch for a gathering or a single pan for dinner, it maintains its flavor integrity. The slow cooker makes heating consistent and forgiving, and leftovers reheat beautifully, which is ideal when life gets busy.
Ingredients Overview for Slow Cooker Beefed Up Enchiladas
These ingredients are chosen to build a layered, well balanced filling that stands up to slow cooking. The key players are the protein and the sauces, which provide body and moisture, while the spices add warmth and depth. The cheddar cheese and sour cream supply creaminess that binds everything together and keeps each enchilada luscious instead of dry. The tortillas act as vehicles for the filling and should be sturdy enough to hold up during slow cooking.
- 1 pound lean ground beef , ground turkey (optional): Brown and crumble to provide a hearty, protein-rich base that absorbs flavors and gives structure to the enchiladas.
- 16 ounces red enchilada sauce no sugar added or salsa (); Recipe for Quick & Easy Enchilada Sauce (optional): Pour over the filling and into the slow cooker to add depth, moisture, and a tangy, savory sauce that keeps the dish saucy.
- 4 ounces green chile peppers can: Drain and fold into the filling to contribute mild heat and a slightly fruity, bright flavor that complements the enchilada sauce.
- 1/2 teaspoon garlic powder: Sprinkle in to add a mellow, savory garlic note that enhances overall flavor without overpowering the other spices.
- 1 teaspoon cumin: Measure and mix in to provide warm, earthy undertones and a traditional Mexican spice profile that ties the filling together.
- 1 teaspoon chili powder: Stir in to contribute smoky, slightly spicy flavor and complexity that enhances the overall chili character of the dish.
- 1/2 teaspoon black pepper: Season with to balance and accentuate other flavors, bringing mild heat and a subtle bite without overwhelming the dish.
- 1 1/2 cups cheddar cheese reduced fat, shredded: Layer and melt over the assembled enchiladas to add creamy, sharp cheesiness and a satisfying, gooey texture when heated.
- 8 ounces sour cream container, reduced-fat (, Greek yogurt) (optional): Spoon or dollop into the finished dish to lend creaminess, tang, and a cooling contrast to the spiced, saucy filling.
- 6 whole-wheat tortillas medium, low-sodium if possible (corn tortillas are not recommended as they tend to fall apart): Warm and wrap around the filling to hold everything together; use sturdy whole–wheat tortillas for fiber and structure.
Instructions for Slow Cooker Beefed Up Enchiladas
I like to think of these steps as a short choreography where browning, seasoning, and slow finishing each play their role. Take your time with the initial browning to develop flavor, then enjoy the relaxed pace while the slow cooker harmonizes everything. The following steps expand the original directions into sensory cues, troubleshooting notes, and explanations so you know exactly what to expect.
- In a large skillet, cook ground beef over medium heat, breaking up while cooking. Cook beef until pink color is gone, drain off any fat.: Warmth and a faint sizzle should greet you as the ground beef hits the hot pan, releasing savory aromas that hint at the deep flavor to come, and you will see small beads of fat collect around the edges as proteins brown. Browning creates Maillard reactions which translate into complexity in the final dish, so allow the meat to develop specks of golden brown rather than rushing it. I press the meat gently with a spatula to increase contact with the pan, which increases those browned bits and intensifies aroma. If you notice the skillet steaming more than sizzling, it is likely overcrowded or the heat is too low; correct this by using a larger pan or raising the heat slightly. Avoid undercooking as pink areas mean the texture and safety are off, and avoid burning by stirring occasionally. The correct visual cue is evenly browned crumbles with a rich, roasted scent.
- In a medium mixing bowl, add cooked ground meat, garlic powder, cumin, chili powder, black pepper and salt to taste. Add to seasoned meat, green chile peppers, 1/2 cup of enchilada sauce, 1/2 cup sour cream and 1 cup cheese, mix well.: As the ground beef finishes, the juices will run clear and the overall color will shift to brown, signaling readiness; you may also notice a toasted, nutty scent from the rendered bits. Draining off excess fat prevents the filling from becoming greasy and preserves a balanced mouthfeel, which is especially important when using additional creamy ingredients like sour cream and cheddar cheese . I tip the pan into a heatproof bowl lined with a sieve or use a slotted spoon to transfer meat, which helps retain the browned fragments while removing most of the fat. A common mistake is leaving all the fat in the mixture, which can lead to a heavy, slick final texture; if you prefer more richness, reserve a tablespoon rather than all of it. The ideal result is moist but not oily crumbles, with a toasty aroma and clear cooking juices.
- Place 1/2 cup beef mixture in the center of each tortilla, leave about 2” at the bottom without filling and fold up the tortilla. Continue until all tortillas are filled.: When the warm ground beef meets the spices, the heat will coax their scents forward so you will smell warm cumin and bright chili powder as you stir. This stage is about achieving a balanced seasoning scaffold that the sauce and dairy will build upon, and gentle mixing helps the spices cling to the meat evenly. I always season gradually, tasting a small spoonful to calibrate salt and heat, because once the enchiladas cook together, the flavors concentrate. One slip to avoid is over salting at this point, especially if your enchilada sauce is already salty. The correct sensory cue is an evenly coated, fragrant meat mixture that smells inviting and layered.
- Lightly spray the bottom and sides of the slow cooker with nonstick cooking spray. Lay enchiladas seam side down in the slow cooker, add a little of the sauce to each layer as you stack them. There should be 2 layers of 3 or 3 layers of 2, depending on the size of your slow cooker.: As you fold in the green chile peppers , enchilada sauce , sour cream , and part of the cheddar cheese , you will notice the mixture gain a glossy, cohesive texture and a slightly tangy perfume from the dairy. The partial sauce addition seasons the interior while keeping the filling thick enough to stay inside the tortillas. Stir until the cheese begins to meld and the mixture pulls together, producing a moist, spoonable filling with flecks of green from the chiles. If the filling seems too runny, resist the urge to add more sauce at this stage; instead, add a touch more cheese or chill briefly to firm up. The right result feels creamy but structured, with a balanced tang and spice.
- Combine the remaining enchilada sauce and 1/2 cup sour cream. Pour over the enchiladas, cover and cook on low 3-4 hours, or until hot and bubbly. Cut between each enchilada and carefully remove, one at a time, with a large spatula. Pour liquid from slow cooker over enchiladas and sprinkle with remaining cheese. Garnish with diced tomatoes and shredded lettuce.: When you portion about half a cup of filling into warmed tortillas, you will feel how pliable they are and see the filling mound slightly in the center, steaming gently if hot. Leaving a clean strip at the bottom helps you roll neatly and prevents spillage when stacking in the slow cooker, which keeps the presentation tidy and aids even heating. I hold the tortilla edges and tuck the bottom over the filling before rolling to create a compact seam, which keeps each enchilada intact during cooking. A frequent error is overstuffing, causing the tortilla to burst open; if that happens, reduce the filling slightly. The visual cue is a snugly rolled enchilada with a sealed seam and no filling oozing out.
- Preheat oven to 375 degrees. In a large casserole dish, place stuffed enchiladas seam side down in a single layer. Combine the remaining enchilada sauce and 1/2 cup sour cream, spread over enchiladas. Sprinkle remaining cheese over enchiladas, cover loosely with foil and bake until hot and bubbly, approximately 30 minutes. Remove from oven and, if desired, garnish with diced tomatoes and shredded lettuce.: A thin coating of nonstick spray prevents the enchiladas from sticking to the cooker and makes removal easier after cooking, while also protecting the slow cooker from burnt residues. I make sure to spray the sides as well, because sauce can bubble up and adhere during cooking. If you skip this step, you risk tearing enchiladas when lifting them out, and the cleanup becomes more laborious. The tactile cue is a lightly slick surface that the tortillas glide against without resistance.
- Lay enchiladas seam side down in the slow cooker, add a little of the sauce to each layer as you stack them: As you arrange the enchiladas, position them snugly so they support each other and maintain shape; you should hear a soft settling sound as the tortillas nestle. Drizzling a bit of enchilada sauce between layers keeps the tortillas from drying and encourages even saucing, resulting in a harmonious flavor throughout. I stagger the layers so steam circulates and each roll receives some sauce, which prevents drying on top. A mistake to avoid is piling them too high without sauce, which can leave the interior ones under heated; the correct sensory cue is a saucy, evenly arranged stack with a faint steam when you lift the lid.
- There should be 2 layers of 3 or 3 layers of 2, depending on the size of your slow cooker: Adjusting the layering to your slow cooker size ensures even heat distribution and avoids overcrowding, which can cause inconsistent cooking. When done right, the enchiladas will steam gently and the sauce will bubble quietly, showing that heat is permeating every layer. If the cooker is too full, the center may remain cooler longer, so arrange to allow slight airflow and sauce coverage. The visual indicator of success is consistent bubbling around the edges and warm steam rising when you crack the lid.
- Combine the remaining enchilada sauce and 1/2 cup sour cream: Mixing the leftover enchilada sauce with additional sour cream creates a tangy, creamy topping that mellows acidity and yields a luscious finish over the rolled tortillas. The mixture should be smooth and pourable, with a pale, slightly rosy hue from blending the sauce and dairy. This step balances the overall flavor profile and prevents the top from drying out during the slow cook. If the sauce looks separated, whisk vigorously to emulsify before pouring. The correct texture is glossy and smooth, ready to coat evenly.
- Pour over the enchiladas, cover and cook on low 3 to 4 hours, or until hot and bubbly: As the sauce warms, it will begin to bubble softly and emit a concentrated chili aroma, signaling that the flavors have married and the dish is nearing readiness. Cooking low and slow lets the juices settle and the cheese melt into a cohesive blanket, giving each slice that inviting, molten pull. Resist lifting the lid frequently, because doing so lets heat escape and extends the cooking time; instead, rely on time and the gentle bubbling at the edges as your cue. Avoid cooking on high, which can overcook the tortillas and dry out the filling. A successful result will be evenly hot enchiladas with bubbling sauce and a creamy, integrated filling.
- Cut between each enchilada and carefully remove, one at a time, with a large spatula: After the cooking finishes and the aroma fills the kitchen, you will see a thin liquid at the bottom; pour some over the enchiladas as you lift them to keep servings moist. Use a wide spatula to support the roll as you slide it out to prevent tearing, and serve immediately while the cheese is still gooey and warm. A typical mistake is trying to lift multiple enchiladas at once which can cause breakage; remove them one by one for best presentation. The sensory reward is warm, slightly saucy enchiladas with a glossy top and melty cheese strings.
- Pour liquid from slow cooker over enchiladas and sprinkle with remaining cheese: Spoon the reserved buttery juices over each serving to amplify moisture and flavor, then add the remaining cheddar cheese so it melts into a finished, golden top. The combined juices and cheese create an appealing finish, giving each portion a saucy, indulgent mouthfeel. If the liquid seems excessive, drizzle sparingly rather than soaking the tortillas, which can make them soggy. Visual cues include a glossy sheen, some bubbling where cheese meets sauce, and steam carrying the scent of melded spices.
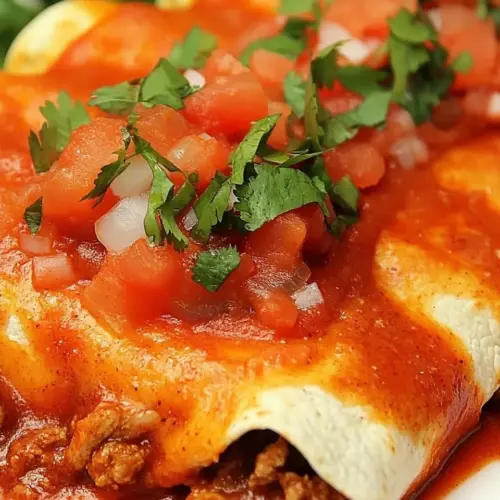
- Garnish with diced tomatoes and shredded lettuce: Bright garnishes like diced tomatoes and shredded lettuce add contrast in texture and temperature, offering fresh crunch against the warm, creamy interior. The tomatoes provide a pop of acidity that cuts through richness, while lettuce contributes a crisp note that keeps the dish from feeling one dimensional. Add them just before serving to preserve their freshness; adding earlier will wilt them from residual heat. Look for vibrant color contrast and a pleasant chill against the hot enchiladas.
- Preheat oven to 375 degrees: If you prefer a baked finish, heating the oven to 375 degrees creates a consistent environment to crisp the top and meld the sauce with cheese. The oven’s dry heat encourages the surface to set and can add a slight toasty edge to the tortillas. A common oversight is not preheating, which lengthens bake time and affects texture. The correct cue is a preheated oven ready to transform the casserole to bubbling perfection.
- In a large casserole dish, place stuffed enchiladas seam side down in a single layer: For oven finishing, arranging enchiladas in a single layer helps them heat evenly and allows the sauce to cover every roll uniformly, producing a consistent, hot, and slightly crisp top. The seam down placement preserves presentation when serving. A pitfall is stacking or crowding, which prevents even browning; give each roll a little room. The right sign is an evenly sauced tray that bubbles at the edges after baking.
- Combine the remaining enchilada sauce and 1/2 cup sour cream, spread over enchiladas: Spread the creamy sauce mixture so every tortilla is coated, which ensures moisture and flavor penetrate each roll during baking, creating uniform richness. The surface should glisten under the sauce and look evenly covered. If pooling occurs, gently spread to avoid soggy spots. The correct visual is a smooth, glossy coating ready for cheese.
- Sprinkle remaining cheese over enchiladas, cover loosely with foil and bake until hot and bubbly, approximately 30 minutes: As the casserole bakes, you will hear faint bubbling and smell a concentrated, toasty aroma, while the cheese melts into a golden layer that hints at crisp edges under the foil. Baking melts and slightly browns the cheese for a pleasing texture contrast, and the foil prevents overbrowning while trapping moisture. A mistake is removing the foil too early which can brown the top unevenly; aim for bubbling and uniform heat throughout. The finished cue is a bubbling surface and a warm, slightly firm top.
- Remove from oven and, if desired, garnish with diced tomatoes and shredded lettuce: After baking, let the dish rest briefly so the filling sets slightly, then add fresh garnishes to provide brightness and textural contrast. The final presentation should show vibrant garnishes against a warmly sauced and cheesy backdrop. Avoid cutting immediately into the hot casserole as it may fall apart; a short rest results in cleaner slices. The reward is a hot, integrated dish with fresh finishing touches.
Tips and Variations
I like offering practical variations so you can adapt Slow Cooker Beefed Up Enchiladas to your pantry and preferences. Below are detailed tips that expand on the recipe, covering make ahead, swaps, and finishing ideas so you can tweak texture and flavor with confidence.
- Make Ahead: Prepare the filling up to a day in advance and store it in the refrigerator; this deepens flavors and saves time on the day you cook. When assembling later, warm the filling slightly so it is easier to portion and less likely to cool the tortillas and slow cooker. Be mindful of moisture; if the filling thickens after chilling, stir in a splash of sauce before rolling. This approach is great for busy evenings because it minimizes hands on work and still delivers a freshly cooked finish.
- Swap Protein: Although ground beef is the base here, you can swap in lean ground turkey if you want a lighter profile without changing technique; cook it similarly until no pink remains. Seasoning adjustments may be needed because turkey has less inherent fat and flavor, so a touch more cumin or chili powder can help. Watch for dryness with very lean meat and consider keeping a tablespoon of reserved fat or a splash of sauce to maintain juiciness.
- Tortilla Tips: Use medium whole wheat tortillas and warm them briefly in a dry skillet or microwave to make them pliable, which prevents tearing during rolling. Avoid corn tortillas here as they tend to break down in prolonged moist cooking, causing a mushy texture. If your tortillas are refrigerated, bring them to room temperature before rolling for best flexibility.
- Sauce Consistency: If your enchilada sauce is very thin, reduce the amount slightly when assembling, or simmer it briefly to thicken before mixing with sour cream. A thicker sauce ensures the filling stays cohesive and the finished enchiladas hold their shape. Conversely, if the sauce is thick, thin it with a splash of broth for easier spreading and to help the slow cooker circulate heat evenly.
- Cheese Strategy: Reserve part of the cheddar cheese for topping and mix the rest into the filling; this guarantees gooey interior pockets and a melty exterior finish. Grating your own cheese often melts more smoothly than pre shredded cheese, which can contain anti clumping agents that affect texture. Sprinkle the reserved cheese during the last 15 minutes of cooking for a fresh melted top.
- Garnish Right Before Serving: Add diced tomatoes and shredded lettuce just before serving to keep them crisp and colorful; their fresh bite contrasts the warm, creamy interior. If you add them too early they will wilt and lose textural interest. I also like a squeeze of lime for bright acidity when serving, though that is optional and not in the ingredient list.
Serve This Slow Cooker Beefed Up Enchiladas With
These serving suggestions help you present Slow Cooker Beefed Up Enchiladas at their best. Think about contrasts in texture and temperature to balance the warm, creamy enchiladas with bright, crisp sides. The following ideas cover occasions, storage, and pairing notes so you can tailor the meal to the moment.
- Casual Weeknight Dinner: Plate one or two enchiladas with a small side salad made of crisp greens and diced tomatoes to add freshness and cut through the richness. This combination keeps the meal grounded and approachable for everyday dining.
- Family Style Gathering: Serve the slow cooker or baked casserole in the center of the table with a set of serving utensils so guests can help themselves; provide extra bowls of warm sauce and shredded cheddar cheese so people can customize their portions. This relaxed approach encourages sharing and keeps the meal convivial.
- Meal Prep and Leftovers: Cool leftover enchiladas completely before refrigerating in an airtight container for up to three days; reheat gently in a moderate oven until hot and bubbly to restore texture. For single servings, microwave covered for short intervals, stirring or flipping to ensure even heating. Proper storage preserves flavor for easy lunches or dinners later in the week.
- Occasions and Seasons: I reach for this dish during colder months because the slow cooked warmth feels comforting for winter dinners, but it also works for spring gatherings when paired with bright sides. The recipe scales to feed a crowd, making it well suited to potlucks and casual celebrations.
- Presentation Tips: Garnish each serving with a small mound of diced tomatoes and shredded lettuce to introduce color and crunch; serve on warm plates so the enchiladas stay cozy longer at the table. This simple finish elevates the look without changing the flavors.
- Storage Advice: Refrigerate leftovers within two hours of cooking and seal tightly; for longer storage freeze portions in sealed containers and thaw overnight in the fridge before reheating. Label containers with the date to keep track of freshness.
FAQ
Conclusion
Slow Cooker Beefed Up Enchiladas stand out because they combine deep slow cooked flavor with simple assembly and a creamy, comforting finish. I encourage you to give them a try, especially on nights when you want a satisfying meal without standing over the stove. This recipe rewards patience and small, thoughtful steps, and it often becomes a welcome centerpiece for family dinners and casual gatherings.
Slow Cooker Beefed Up Enchiladas
Equipment
- Large Skillet
- Mixing Bowl
- Slow Cooker
- Large Casserole Dish
- Spatula
Ingredients
- 1 pound lean ground beef optional, ground turkey Brown and crumble to provide a hearty, protein-rich base that absorbs flavors and gives structure to the enchiladas.
- 16 ounces red enchilada sauce no sugar added or salsa (optional); Recipe for Quick & Easy Enchilada Sauce Pour over the filling and into the slow cooker to add depth, moisture, and a tangy, savory sauce that keeps the dish saucy.
- 4 ounces green chile peppers can Drain and fold into the filling to contribute mild heat and a slightly fruity, bright flavor that complements the enchilada sauce.
- 1/2 teaspoon garlic powder Sprinkle in to add a mellow, savory garlic note that enhances overall flavor without overpowering the other spices.
- 1 teaspoon cumin Measure and mix in to provide warm, earthy undertones and a traditional Mexican spice profile that ties the filling together.
- 1 teaspoon chili powder Stir in to contribute smoky, slightly spicy flavor and complexity that enhances the overall chili character of the dish.
- 1/2 teaspoon black pepper Season with to balance and accentuate other flavors, bringing mild heat and a subtle bite without overwhelming the dish.
- 1 1/2 cups cheddar cheese reduced fat, shredded Layer and melt over the assembled enchiladas to add creamy, sharp cheesiness and a satisfying, gooey texture when heated.
- 8 ounces sour cream container, reduced-fat (optional, Greek yogurt) Spoon or dollop into the finished dish to lend creaminess, tang, and a cooling contrast to the spiced, saucy filling.
- 6 whole-wheat tortillas medium, low-sodium if possible (corn tortillas are not recommended as they tend to fall apart) Warm and wrap around the filling to hold everything together; use sturdy whole-wheat tortillas for fiber and structure.
Instructions
- In a large skillet, cook ground beef over medium heat, breaking up while cooking. Cook beef until pink color is gone, drain off any fat.: Warmth and a faint sizzle should greet you as the ground beef hits the hot pan, releasing savory aromas that hint at the deep flavor to come, and you will see small beads of fat collect around the edges as proteins brown. Browning creates Maillard reactions which translate into complexity in the final dish, so allow the meat to develop specks of golden brown rather than rushing it. I press the meat gently with a spatula to increase contact with the pan, which increases those browned bits and intensifies aroma. If you notice the skillet steaming more than sizzling, it is likely overcrowded or the heat is too low; correct this by using a larger pan or raising the heat slightly. Avoid undercooking as pink areas mean the texture and safety are off, and avoid burning by stirring occasionally. The correct visual cue is evenly browned crumbles with a rich, roasted scent.
- In a medium mixing bowl, add cooked ground meat, garlic powder, cumin, chili powder, black pepper and salt to taste. Add to seasoned meat, green chile peppers, 1/2 cup of enchilada sauce, 1/2 cup sour cream and 1 cup cheese, mix well.: As the ground beef finishes, the juices will run clear and the overall color will shift to brown, signaling readiness; you may also notice a toasted, nutty scent from the rendered bits. Draining off excess fat prevents the filling from becoming greasy and preserves a balanced mouthfeel, which is especially important when using additional creamy ingredients like sour cream and cheddar cheese . I tip the pan into a heatproof bowl lined with a sieve or use a slotted spoon to transfer meat, which helps retain the browned fragments while removing most of the fat. A common mistake is leaving all the fat in the mixture, which can lead to a heavy, slick final texture; if you prefer more richness, reserve a tablespoon rather than all of it. The ideal result is moist but not oily crumbles, with a toasty aroma and clear cooking juices.
- Place 1/2 cup beef mixture in the center of each tortilla, leave about 2” at the bottom without filling and fold up the tortilla. Continue until all tortillas are filled.: When the warm ground beef meets the spices, the heat will coax their scents forward so you will smell warm cumin and bright chili powder as you stir. This stage is about achieving a balanced seasoning scaffold that the sauce and dairy will build upon, and gentle mixing helps the spices cling to the meat evenly. I always season gradually, tasting a small spoonful to calibrate salt and heat, because once the enchiladas cook together, the flavors concentrate. One slip to avoid is over salting at this point, especially if your enchilada sauce is already salty. The correct sensory cue is an evenly coated, fragrant meat mixture that smells inviting and layered.
- Lightly spray the bottom and sides of the slow cooker with nonstick cooking spray. Lay enchiladas seam side down in the slow cooker, add a little of the sauce to each layer as you stack them. There should be 2 layers of 3 or 3 layers of 2, depending on the size of your slow cooker.: As you fold in the green chile peppers , enchilada sauce , sour cream , and part of the cheddar cheese , you will notice the mixture gain a glossy, cohesive texture and a slightly tangy perfume from the dairy. The partial sauce addition seasons the interior while keeping the filling thick enough to stay inside the tortillas. Stir until the cheese begins to meld and the mixture pulls together, producing a moist, spoonable filling with flecks of green from the chiles. If the filling seems too runny, resist the urge to add more sauce at this stage; instead, add a touch more cheese or chill briefly to firm up. The right result feels creamy but structured, with a balanced tang and spice.
- Combine the remaining enchilada sauce and 1/2 cup sour cream. Pour over the enchiladas, cover and cook on low 3-4 hours, or until hot and bubbly. Cut between each enchilada and carefully remove, one at a time, with a large spatula. Pour liquid from slow cooker over enchiladas and sprinkle with remaining cheese. Garnish with diced tomatoes and shredded lettuce.: When you portion about half a cup of filling into warmed tortillas, you will feel how pliable they are and see the filling mound slightly in the center, steaming gently if hot. Leaving a clean strip at the bottom helps you roll neatly and prevents spillage when stacking in the slow cooker, which keeps the presentation tidy and aids even heating. I hold the tortilla edges and tuck the bottom over the filling before rolling to create a compact seam, which keeps each enchilada intact during cooking. A frequent error is overstuffing, causing the tortilla to burst open; if that happens, reduce the filling slightly. The visual cue is a snugly rolled enchilada with a sealed seam and no filling oozing out.
- Preheat oven to 375 degrees. In a large casserole dish, place stuffed enchiladas seam side down in a single layer. Combine the remaining enchilada sauce and 1/2 cup sour cream, spread over enchiladas. Sprinkle remaining cheese over enchiladas, cover loosely with foil and bake until hot and bubbly, approximately 30 minutes. Remove from oven and, if desired, garnish with diced tomatoes and shredded lettuce.: A thin coating of nonstick spray prevents the enchiladas from sticking to the cooker and makes removal easier after cooking, while also protecting the slow cooker from burnt residues. I make sure to spray the sides as well, because sauce can bubble up and adhere during cooking. If you skip this step, you risk tearing enchiladas when lifting them out, and the cleanup becomes more laborious. The tactile cue is a lightly slick surface that the tortillas glide against without resistance.
- Lay enchiladas seam side down in the slow cooker, add a little of the sauce to each layer as you stack them: As you arrange the enchiladas, position them snugly so they support each other and maintain shape; you should hear a soft settling sound as the tortillas nestle. Drizzling a bit of enchilada sauce between layers keeps the tortillas from drying and encourages even saucing, resulting in a harmonious flavor throughout. I stagger the layers so steam circulates and each roll receives some sauce, which prevents drying on top. A mistake to avoid is piling them too high without sauce, which can leave the interior ones under heated; the correct sensory cue is a saucy, evenly arranged stack with a faint steam when you lift the lid.
- There should be 2 layers of 3 or 3 layers of 2, depending on the size of your slow cooker: Adjusting the layering to your slow cooker size ensures even heat distribution and avoids overcrowding, which can cause inconsistent cooking. When done right, the enchiladas will steam gently and the sauce will bubble quietly, showing that heat is permeating every layer. If the cooker is too full, the center may remain cooler longer, so arrange to allow slight airflow and sauce coverage. The visual indicator of success is consistent bubbling around the edges and warm steam rising when you crack the lid.
- Combine the remaining enchilada sauce and 1/2 cup sour cream: Mixing the leftover enchilada sauce with additional sour cream creates a tangy, creamy topping that mellows acidity and yields a luscious finish over the rolled tortillas. The mixture should be smooth and pourable, with a pale, slightly rosy hue from blending the sauce and dairy. This step balances the overall flavor profile and prevents the top from drying out during the slow cook. If the sauce looks separated, whisk vigorously to emulsify before pouring. The correct texture is glossy and smooth, ready to coat evenly.
- Pour over the enchiladas, cover and cook on low 3 to 4 hours, or until hot and bubbly: As the sauce warms, it will begin to bubble softly and emit a concentrated chili aroma, signaling that the flavors have married and the dish is nearing readiness. Cooking low and slow lets the juices settle and the cheese melt into a cohesive blanket, giving each slice that inviting, molten pull. Resist lifting the lid frequently, because doing so lets heat escape and extends the cooking time; instead, rely on time and the gentle bubbling at the edges as your cue. Avoid cooking on high, which can overcook the tortillas and dry out the filling. A successful result will be evenly hot enchiladas with bubbling sauce and a creamy, integrated filling.
- Cut between each enchilada and carefully remove, one at a time, with a large spatula: After the cooking finishes and the aroma fills the kitchen, you will see a thin liquid at the bottom; pour some over the enchiladas as you lift them to keep servings moist. Use a wide spatula to support the roll as you slide it out to prevent tearing, and serve immediately while the cheese is still gooey and warm. A typical mistake is trying to lift multiple enchiladas at once which can cause breakage; remove them one by one for best presentation. The sensory reward is warm, slightly saucy enchiladas with a glossy top and melty cheese strings.
- Pour liquid from slow cooker over enchiladas and sprinkle with remaining cheese: Spoon the reserved buttery juices over each serving to amplify moisture and flavor, then add the remaining cheddar cheese so it melts into a finished, golden top. The combined juices and cheese create an appealing finish, giving each portion a saucy, indulgent mouthfeel. If the liquid seems excessive, drizzle sparingly rather than soaking the tortillas, which can make them soggy. Visual cues include a glossy sheen, some bubbling where cheese meets sauce, and steam carrying the scent of melded spices.
- Garnish with diced tomatoes and shredded lettuce: Bright garnishes like diced tomatoes and shredded lettuce add contrast in texture and temperature, offering fresh crunch against the warm, creamy interior. The tomatoes provide a pop of acidity that cuts through richness, while lettuce contributes a crisp note that keeps the dish from feeling one dimensional. Add them just before serving to preserve their freshness; adding earlier will wilt them from residual heat. Look for vibrant color contrast and a pleasant chill against the hot enchiladas.
- Preheat oven to 375 degrees: If you prefer a baked finish, heating the oven to 375 degrees creates a consistent environment to crisp the top and meld the sauce with cheese. The oven’s dry heat encourages the surface to set and can add a slight toasty edge to the tortillas. A common oversight is not preheating, which lengthens bake time and affects texture. The correct cue is a preheated oven ready to transform the casserole to bubbling perfection.
- In a large casserole dish, place stuffed enchiladas seam side down in a single layer: For oven finishing, arranging enchiladas in a single layer helps them heat evenly and allows the sauce to cover every roll uniformly, producing a consistent, hot, and slightly crisp top. The seam down placement preserves presentation when serving. A pitfall is stacking or crowding, which prevents even browning; give each roll a little room. The right sign is an evenly sauced tray that bubbles at the edges after baking.
- Combine the remaining enchilada sauce and 1/2 cup sour cream, spread over enchiladas: Spread the creamy sauce mixture so every tortilla is coated, which ensures moisture and flavor penetrate each roll during baking, creating uniform richness. The surface should glisten under the sauce and look evenly covered. If pooling occurs, gently spread to avoid soggy spots. The correct visual is a smooth, glossy coating ready for cheese.
- Sprinkle remaining cheese over enchiladas, cover loosely with foil and bake until hot and bubbly, approximately 30 minutes: As the casserole bakes, you will hear faint bubbling and smell a concentrated, toasty aroma, while the cheese melts into a golden layer that hints at crisp edges under the foil. Baking melts and slightly browns the cheese for a pleasing texture contrast, and the foil prevents overbrowning while trapping moisture. A mistake is removing the foil too early which can brown the top unevenly; aim for bubbling and uniform heat throughout. The finished cue is a bubbling surface and a warm, slightly firm top.
- Remove from oven and, if desired, garnish with diced tomatoes and shredded lettuce: After baking, let the dish rest briefly so the filling sets slightly, then add fresh garnishes to provide brightness and textural contrast. The final presentation should show vibrant garnishes against a warmly sauced and cheesy backdrop. Avoid cutting immediately into the hot casserole as it may fall apart; a short rest results in cleaner slices. The reward is a hot, integrated dish with fresh finishing touches.
Notes
- Make Ahead: Prepare the filling up to a day in advance and store it in the refrigerator; this deepens flavors and saves time on the day you cook. When assembling later, warm the filling slightly so it is easier to portion and less likely to cool the tortillas and slow cooker. Be mindful of moisture; if the filling thickens after chilling, stir in a splash of sauce before rolling. This approach is great for busy evenings because it minimizes hands on work and still delivers a freshly cooked finish.
- Swap Protein: Although ground beef is the base here, you can swap in lean ground turkey if you want a lighter profile without changing technique; cook it similarly until no pink remains. Seasoning adjustments may be needed because turkey has less inherent fat and flavor, so a touch more cumin or chili powder can help. Watch for dryness with very lean meat and consider keeping a tablespoon of reserved fat or a splash of sauce to maintain juiciness.
- Tortilla Tips: Use medium whole wheat tortillas and warm them briefly in a dry skillet or microwave to make them pliable, which prevents tearing during rolling. Avoid corn tortillas here as they tend to break down in prolonged moist cooking, causing a mushy texture. If your tortillas are refrigerated, bring them to room temperature before rolling for best flexibility.
- Sauce Consistency: If your enchilada sauce is very thin, reduce the amount slightly when assembling, or simmer it briefly to thicken before mixing with sour cream. A thicker sauce ensures the filling stays cohesive and the finished enchiladas hold their shape. Conversely, if the sauce is thick, thin it with a splash of broth for easier spreading and to help the slow cooker circulate heat evenly.
- Cheese Strategy: Reserve part of the cheddar cheese for topping and mix the rest into the filling; this guarantees gooey interior pockets and a melty exterior finish. Grating your own cheese often melts more smoothly than pre shredded cheese, which can contain anti clumping agents that affect texture. Sprinkle the reserved cheese during the last 15 minutes of cooking for a fresh melted top.
- Garnish Right Before Serving: Add diced tomatoes and shredded lettuce just before serving to keep them crisp and colorful; their fresh bite contrasts the warm, creamy interior. If you add them too early they will wilt and lose textural interest. I also like a squeeze of lime for bright acidity when serving, though that is optional and not in the ingredient list.