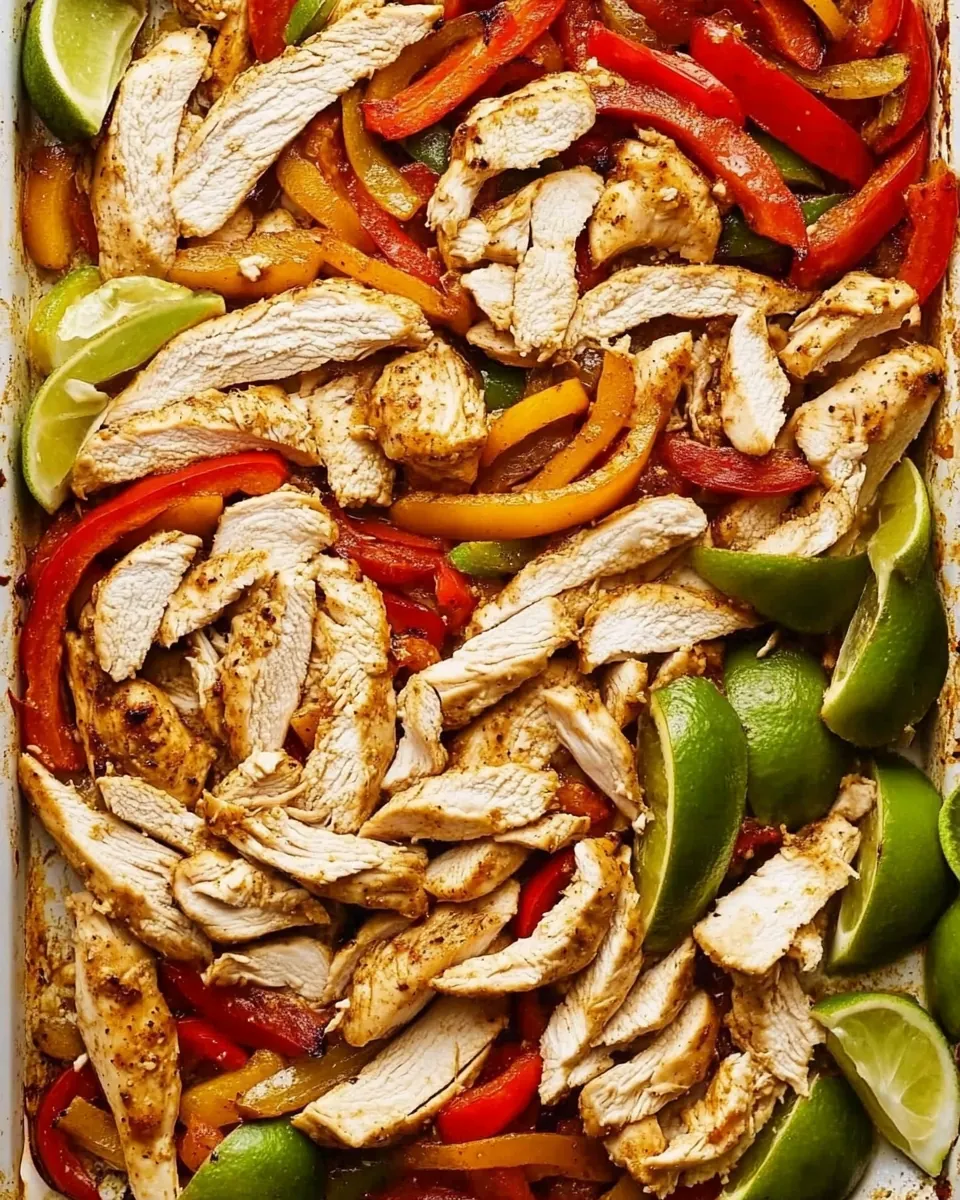
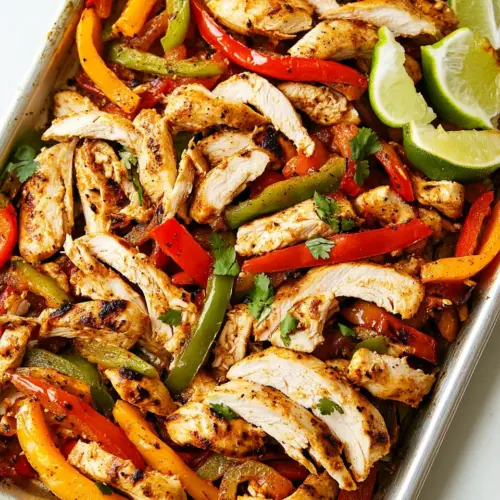
Sheet Pan Chicken Fajitas
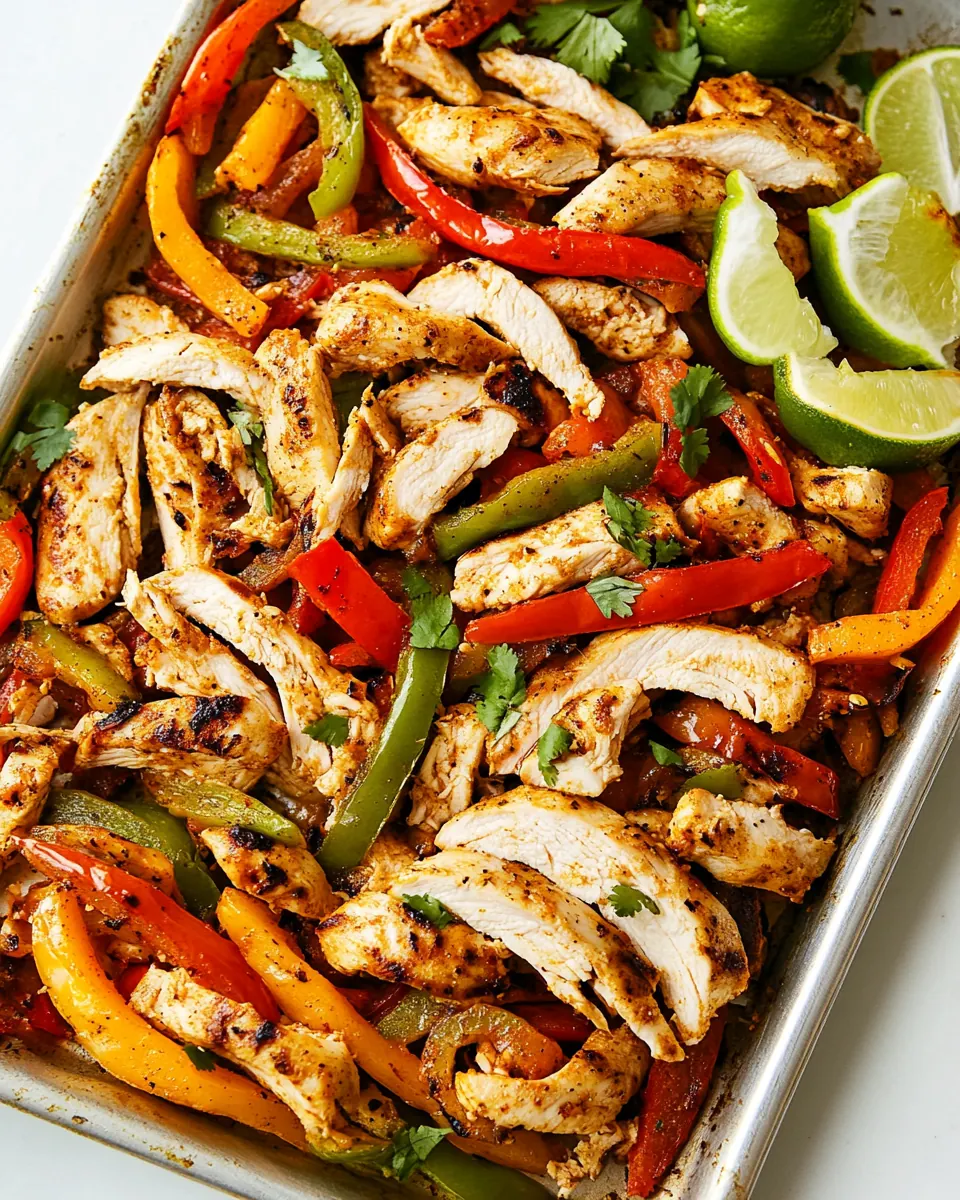
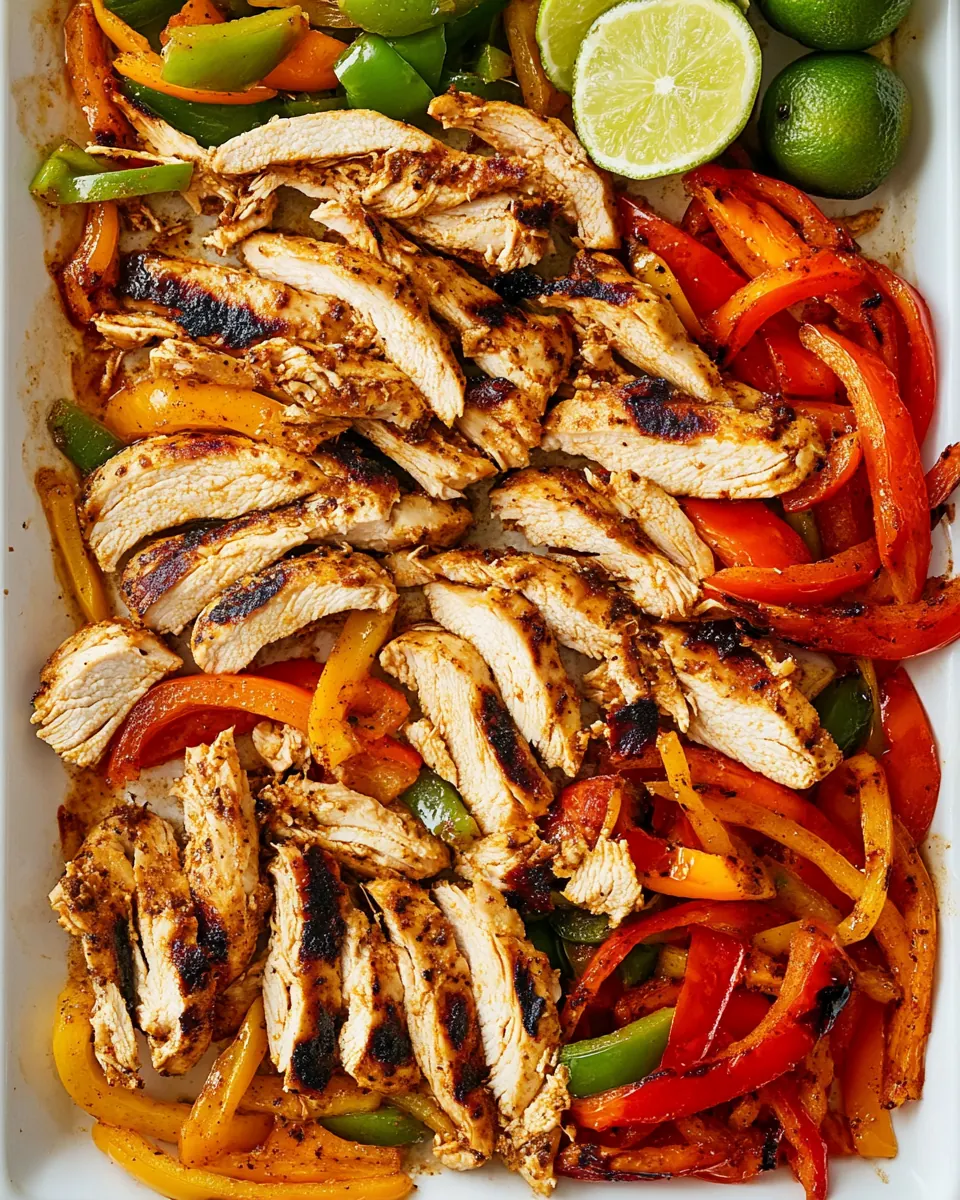
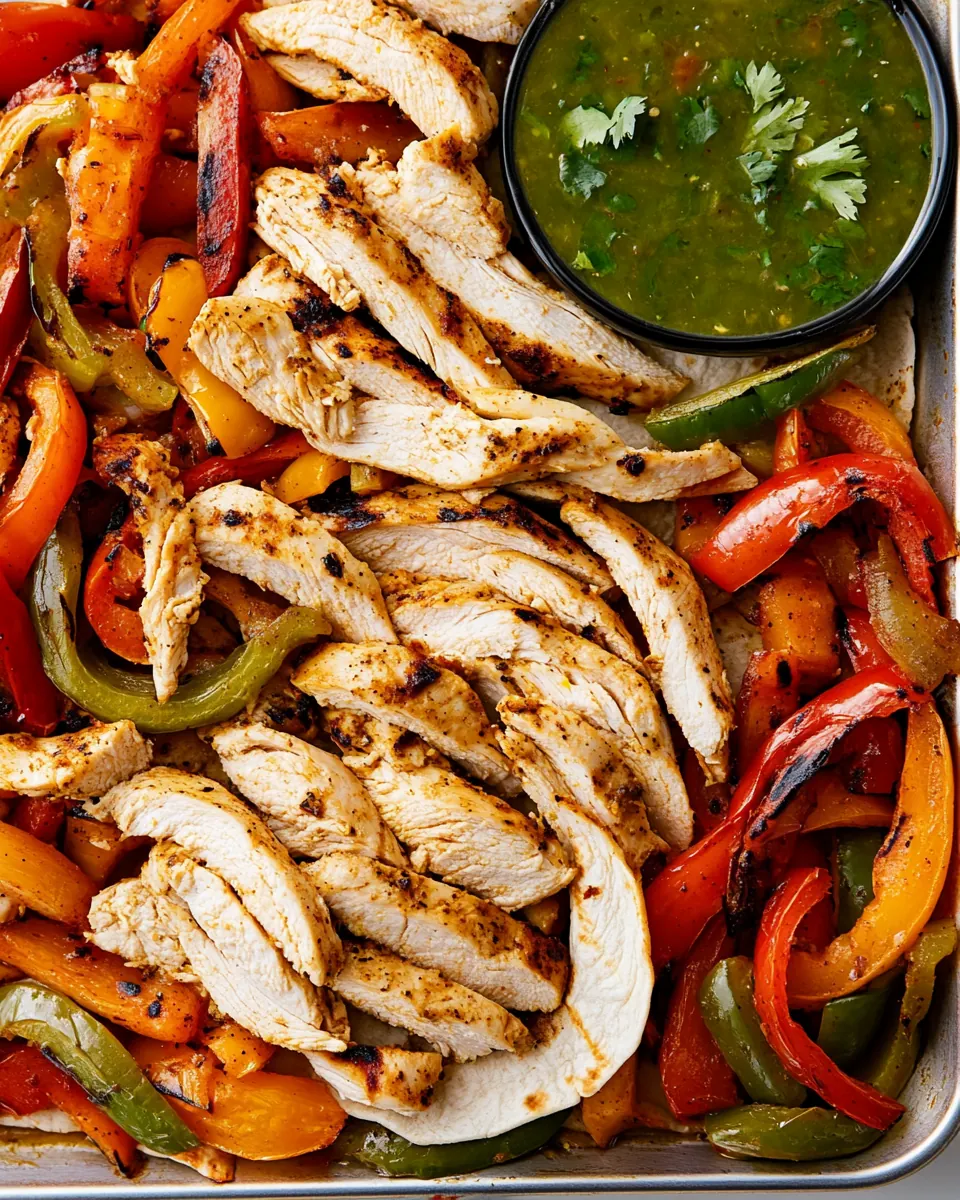
Sheet Pan Chicken Fajitas are the kind of weeknight hero I turn to when life is busy and I want something bold without fuss. The first time I made this, I was juggling work calls and a hungry family, and the way chicken and roasted peppers filled the kitchen with warm, smoky aroma convinced everyone to clear their plates before dessert was even considered. I love how this recipe feels both effortless and intentionally flavorful, a dependable dinner that still seems special.
There is something about the simplicity of tossing chicken, sliced red bell pepper, green bell pepper, and onion with a quick spice blend, and then letting a single pan do the rest. I often double the spice mix and keep it in a jar so I can recreate that same charred, slightly sweet, slightly spicy edge on busy evenings. When I serve these, the table becomes lively fast, with everyone customizing tortillas and scooping on lime and sour cream.
Recipe Snapshot
35 mins
10 mins
25 mins
Easy
350 kcal
Mexican
Gluten-Free, Paleo
Dinner
Baking sheet, Aluminum foil, Mixing bowl, Tongs, Instant read thermometer
What’s Great About This Sheet Pan Chicken Fajitas
Fast and Foolproof
I adore that Sheet Pan Chicken Fajitas take almost all the decision fatigue out of dinner. With one pan to roast, cleanup is minimal, and the method reliably produces juicy chicken with nicely caramelized veggies. I remember nights when I had barely thirty minutes, and this came together every time.
Big Flavor from a Tiny Effort
The spice mix in this recipe is small but mighty. The combination of chili powder, smoked paprika, and cumin gives the dish warmth and depth while the onion powder and garlic powder round it out. I love how a simple rub transforms plain chicken into something vibrant, and you do not need hours or fancy equipment to get there.
Highly Customizable
I value recipes that welcome improvisation, and these fajitas do just that. Serve them with tortillas and lime wedges for a quick family meal, or pile them into bowls with guacamole and sour cream for a lighter option. I often adapt toppings depending on what is in the fridge, and the base recipe still shines.
Perfect for Sharing
Because everything cooks together, Sheet Pan Chicken Fajitas are ideal for feeding a group. I love spreading the food out on the table and letting everyone build their own tacos. It makes dinner feel social, which is a big reason this has become a go to for casual gatherings in my home.
Great Texture Contrast
The high oven heat gives the edges of the peppers and onion a sweet char while keeping the centers tender, and the chicken stays moist when you let it rest. That contrast between slightly crisped veggies and juicy chicken is what keeps me coming back to this method.
Key Ingredients for Sheet Pan Chicken Fajitas
These ingredients are chosen to work as a tight team. The spice blend provides smoky warmth and savory depth, the vegetables offer sweetness and crunch, and the chicken brings protein and satisfying heft. Together they roast quickly on one pan, creating complementary textures and layered flavors that make assembly and serving a breeze.
- 1 tablespoon chili powder: Season generously to build the foundational fajita spice blend; adds warmth, color, and mild heat that ties the other spices together. Sprinkle evenly over chicken and vegetables to infuse robust chili flavor during baking.
- 1 teaspoon smoked paprika: Provide a subtle smoky note that enhances the overall depth of the seasoning blend; helps mimic grilled fajitas when using a sheet pan. Use sparingly to avoid overpowering the mix and complement the chili powder.
- 1 teaspoon ground cumin: Add earthy, slightly citrusy warmth that complements the chili powder and paprika; helps create authentic Mexican-inspired flavor. Mix thoroughly with the other spices so the cumin penetrates the chicken and veggies.
- 1 teaspoon garlic powder: Deliver savory, aromatic garlic flavor in a convenient powdered form; ensures even distribution without chopping fresh garlic. Combine with other dry seasonings so garlic essence infuses the entire sheet pan during roasting.
- 1 teaspoon onion powder: Bring sweet, savory onion flavor and mild umami without added moisture; helps round out the dry spice mixture. Toss with chicken and peppers to ensure balanced flavor in every bite.
- 1 teaspoon dried oregano: Lend herbaceous, slightly bitter Mediterranean notes that enhance the savory profile; pairs well with cumin and paprika to add complexity. Sprinkle into the spice mixture to brighten the overall seasoning.
- 1 teaspoon salt: Enhance all flavors by increasing overall taste perception and balancing sweetness; necessary for seasoning both chicken and vegetables. Adjust amount as needed but start with the listed measurement for well-seasoned fajitas.
- 1/2 teaspoon black pepper or to taste: Add mild heat and sharpness to balance the seasoning blend; helps accentuate other spices and brighten the profile. Grind freshly if possible and adjust to taste before roasting.
- 4 chicken breasts boneless skinless: Provide the primary protein and bulk of the dish with lean, tender meat that cooks quickly; slices easily for serving in tortillas. Pound or slice uniformly so pieces cook evenly on the sheet pan and absorb the spice blend.
- 1 red bell pepper sliced: Contribute sweet, crisp texture and vibrant color; softens and caramelizes while roasting to add contrast to the chicken. Slice into even strips so they cook at the same rate as the peppers and onions.
- 1 green bell pepper sliced: Offer grassy, slightly bitter crunch and bright color that complements the red pepper; becomes tender and slightly charred in the oven. Slice into strips to match the red pepper for even roasting and presentation.
- 1 medium onion sliced: Impart mild sweetness and aromatic depth that caramelizes beautifully; provides savory-sweet balance to the peppers and chicken. Slice into wedges or strips to ensure even cooking alongside the other vegetables.
- 3 tablespoons olive oil: Coat proteins and vegetables to help spices adhere and promote roasting; adds a subtle fruity base flavor and helps with browning. Drizzle over the chicken and veggies before tossing with the spice mixture.
- For serving: tortillas, lime wedges, sour cream, guacamole, etc , to taste (optional): Serve as optional accompaniments to complete the meal with texture, acidity, and creaminess; tortillas hold the filling while lime and sauces brighten and cool the dish. Offer in bowls so diners can assemble fajitas to taste.
Sheet Pan Chicken Fajitas Instructions
These instructions will walk you through every moment from the oven preheat to slicing and serving. I like to keep the rhythm relaxed, focusing on sensory cues and simple checkpoints so you can follow along confidently. Read through once, then follow the steps while enjoying the aromas as they build.
- Preheat your oven to 450 F and move the rack to the top third of the oven.: When the oven comes up to a high, steady heat, you will notice a faint warm, dry smell and steady fan or element glow if you have a modern range, and that intense heat is what creates quick browning on the edges of the vegetables and chicken . The top third placement encourages the tops of the peppers and chicken to sear and color fast, which gives you those desirable charred spots. Why this matters, the rapid surface browning amplifies the aromatic compounds in the spice mix, releasing scent that makes the whole kitchen lively. A common mistake here is not preheating long enough, leading to steaming rather than roasting, so wait until the oven has fully reached 450 F before sliding the pan in.
- Line a baking sheet with foil. I use a baker's half sheet, but a full-size sheet will work too if you want everything spread out a bit more for better browning.: The foil reflects heat and eases cleanup, and choosing a half or full sheet affects how crowded the food sits, which changes how it browns. When ingredients are too close together they steam, losing that crisp edge, while a single layer with air between pieces produces distinct, caramelized surfaces. The sizzle is less about sound here and more about the visual cue of browning, so arrange items so air can circulate. Avoid overpacking the pan, because crowded pans trap moisture and prevent proper caramelization.
- Add the chili powder, smoked paprika, cumin, garlic powder, onion powder, oregano, and salt & pepper to a small bowl and mix together.: Mixing the spices dry unlocks a fragrant bouquet as the individual aromas mingle, giving you a harmonious rub. When you break open the jars and stir, you will notice the smoky, earthy, and slightly pungent scents combining, and that blended smell is what you will taste on the finished chicken and vegetables. Making the mix evenly ensures consistent seasoning in every bite. A common oversight is stirring too roughly and letting moisture from the air clump the powders, so keep the bowl dry and use a spoon to whisk thoroughly.
- Place the chicken breasts and veggies onto the baking sheet and drizzle the olive oil over top. Toss until everything is nicely coated in the oil, and then sprinkle the spice mixture on top and use your hands to rub the spice mixture all over both sides of the chicken and the veggies.: The first sensory cue here is the slick, shiny coating that develops on the surface of the ingredients when they are properly oiled. The oil conducts heat and encourages the Maillard reaction on both the chicken and vegetables, producing toasty aromas and richer color. Tossing by hand lets you feel if every piece is coated, which is better than guessing visually. A mistake to avoid is using too little oil, which can cause dry edges and uneven browning, or too much oil, which can lead to greasy results.
- Bake, uncovered, for 20-25 minutes (25 minutes for larger pieces of chicken) or until the chicken breasts are cooked (165 F) and the veggies are tender.: The tactile step of massaging the rub in is where flavor sinks into the surfaces, and you will smell the spices coming alive as you work. Rubbing ensures adhesion so the seasoning does not simply fall off into the pan during roasting. You may notice the texture of the chicken change slightly as the spices and oil cling to it, creating a light crust once it roasts. One pitfall is overhandling the chicken , which can cause it to tear or compress; be firm but gentle.
- Let the chicken rest for 5 minutes before cutting it into strips, and then serve as desired.: As the pan roasts, you will hear gentle crackles and the kitchen will fill with a warm, spiced fragrance. The vegetables will begin to wrinkle and the edges will darken, while the chicken will transition from pale to a warm, opaque color, and juices should run clear when the interior is probed. Hitting 165 F is crucial for safety and ensures the chicken is cooked through but still moist, and the timing window accounts for piece size. A frequent error is leaving the chicken in for too long which dries it out, so remove it as soon as the internal temperature reads correctly.
- Let the chicken rest for 5 minutes before cutting it into strips, and then serve as desired: Resting allows the juices to redistribute within the chicken , so when you slice it the meat stays succulent instead of losing moisture onto the cutting board. In this pause you will enjoy lingering aromas and the visual reward of the browned edges. When you cut, aim for even strips so every bite balances chicken and vegetables. A common misstep is slicing immediately, which causes juices to escape and a drier texture, so give the five minute rest the respect it deserves.
Tips and Tricks about Sheet Pan Chicken Fajitas
I like to keep these tips practical and focused on making the recipe reliable and flexible. Below are tried and true strategies I use to get consistent results and maximum flavor from a single pan.
- Make the spice mix ahead: Prepare the combined spices in advance and store them in a small jar so you can season quickly on busy nights.
- Room temperature chicken: Let the chicken sit at room temperature for about 15 minutes before roasting to promote even cooking and prevent the exterior from overbrowning before the center heats through.
- Single layer roasting: Arrange vegetables and chicken so they are not crowded on the pan, ensuring hot air circulates and edges brown rather than steam.
- Slice uniformly: Cut peppers and onions into similar thickness so everything reaches tenderness at the same time, avoiding underdone or overcooked pieces.
- Use a thermometer: Invest in an instant read thermometer to check the thickest part of the chicken and remove as soon as it hits 165 F for a juicier result.
- Rest before slicing: Allow the chicken to rest for five minutes after roasting so juices redistribute and slices remain moist when served.
Serving Options for Sheet Pan Chicken Fajitas
Serving these fajitas is joyful and flexible, and you can adapt to weeknight dinners or festive gatherings. Below I outline ways I like to present this dish for different occasions and practical storage tips to keep leftovers tasting fresh.
- Classic tortillas: Warm small tortillas and let everyone assemble their own fajitas with sliced chicken, peppers, and onion.
- Bowl style: Serve on a bed of rice or greens with toppings like guacamole and sour cream for a lighter, fork friendly option.
- Family style spread: Place the sheet pan on the table with warmed tortillas and bowls of lime wedges and optional toppings for a casual, social meal.
- Lunch prep: Pack chicken and veggies into containers with tortillas or rice for an easy next day lunch, storing refrigerated for up to four days.
- Party platter: Slice the chicken and arrange it alongside the roasted vegetables on a large platter, adding bowls of salsa and lime for guests to customize.
- Seasonal pairing: In summer serve with a bright corn salad or a simple cucumber relish to echo the fresh, vibrant flavors of the peppers.
- Storage tips: Keep the chicken and vegetables in airtight containers in the fridge, reheat gently in a skillet to revive texture, and add a squeeze of fresh lime before serving.
FAQ
Conclusion
What makes these Sheet Pan Chicken Fajitas special is how much flavor you get from a single pan and a minimal ingredient list. The combination of the quick spice rub, high heat roasting, and a short resting period consistently yields juicy chicken and caramelized vegetables that everyone can customize. Give this a try on a busy weeknight when you want something fast, flexible, and crowd pleasing. I promise the lively aromas and simple assembly will make it a regular in your rotation, and you will love how few dishes you end up with.
Sheet Pan Chicken Fajitas
Equipment
- Baking Sheet
- Aluminum Foil
- Mixing Bowl
- Tongs
- Instant read thermometer
Ingredients
- 1 tablespoon chili powder Season generously to build the foundational fajita spice blend; adds warmth, color, and mild heat that ties the other spices together. Sprinkle evenly over chicken and vegetables to infuse robust chili flavor during baking.
- 1 teaspoon smoked paprika Provide a subtle smoky note that enhances the overall depth of the seasoning blend; helps mimic grilled fajitas when using a sheet pan. Use sparingly to avoid overpowering the mix and complement the chili powder.
- 1 teaspoon ground cumin Add earthy, slightly citrusy warmth that complements the chili powder and paprika; helps create authentic Mexican-inspired flavor. Mix thoroughly with the other spices so the cumin penetrates the chicken and veggies.
- 1 teaspoon garlic powder Deliver savory, aromatic garlic flavor in a convenient powdered form; ensures even distribution without chopping fresh garlic. Combine with other dry seasonings so garlic essence infuses the entire sheet pan during roasting.
- 1 teaspoon onion powder Bring sweet, savory onion flavor and mild umami without added moisture; helps round out the dry spice mixture. Toss with chicken and peppers to ensure balanced flavor in every bite.
- 1 teaspoon dried oregano Lend herbaceous, slightly bitter Mediterranean notes that enhance the savory profile; pairs well with cumin and paprika to add complexity. Sprinkle into the spice mixture to brighten the overall seasoning.
- 1 teaspoon salt Enhance all flavors by increasing overall taste perception and balancing sweetness; necessary for seasoning both chicken and vegetables. Adjust amount as needed but start with the listed measurement for well-seasoned fajitas.
- 1/2 teaspoon black pepper or to taste Add mild heat and sharpness to balance the seasoning blend; helps accentuate other spices and brighten the profile. Grind freshly if possible and adjust to taste before roasting.
- 4 chicken breasts boneless skinless Provide the primary protein and bulk of the dish with lean, tender meat that cooks quickly; slices easily for serving in tortillas. Pound or slice uniformly so pieces cook evenly on the sheet pan and absorb the spice blend.
- 1 red bell pepper sliced Contribute sweet, crisp texture and vibrant color; softens and caramelizes while roasting to add contrast to the chicken. Slice into even strips so they cook at the same rate as the peppers and onions.
- 1 green bell pepper sliced Offer grassy, slightly bitter crunch and bright color that complements the red pepper; becomes tender and slightly charred in the oven. Slice into strips to match the red pepper for even roasting and presentation.
- 1 medium onion sliced Impart mild sweetness and aromatic depth that caramelizes beautifully; provides savory-sweet balance to the peppers and chicken. Slice into wedges or strips to ensure even cooking alongside the other vegetables.
- 3 tablespoons olive oil Coat proteins and vegetables to help spices adhere and promote roasting; adds a subtle fruity base flavor and helps with browning. Drizzle over the chicken and veggies before tossing with the spice mixture.
- For serving: tortillas, lime wedges, sour cream, guacamole, etc optional, to taste Serve as optional accompaniments to complete the meal with texture, acidity, and creaminess; tortillas hold the filling while lime and sauces brighten and cool the dish. Offer in bowls so diners can assemble fajitas to taste.
Instructions
- Preheat your oven to 450 F and move the rack to the top third of the oven.: When the oven comes up to a high, steady heat, you will notice a faint warm, dry smell and steady fan or element glow if you have a modern range, and that intense heat is what creates quick browning on the edges of the vegetables and chicken . The top third placement encourages the tops of the peppers and chicken to sear and color fast, which gives you those desirable charred spots. Why this matters, the rapid surface browning amplifies the aromatic compounds in the spice mix, releasing scent that makes the whole kitchen lively. A common mistake here is not preheating long enough, leading to steaming rather than roasting, so wait until the oven has fully reached 450 F before sliding the pan in.
- Line a baking sheet with foil. I use a baker's half sheet, but a full-size sheet will work too if you want everything spread out a bit more for better browning.: The foil reflects heat and eases cleanup, and choosing a half or full sheet affects how crowded the food sits, which changes how it browns. When ingredients are too close together they steam, losing that crisp edge, while a single layer with air between pieces produces distinct, caramelized surfaces. The sizzle is less about sound here and more about the visual cue of browning, so arrange items so air can circulate. Avoid overpacking the pan, because crowded pans trap moisture and prevent proper caramelization.
- Add the chili powder, smoked paprika, cumin, garlic powder, onion powder, oregano, and salt & pepper to a small bowl and mix together.: Mixing the spices dry unlocks a fragrant bouquet as the individual aromas mingle, giving you a harmonious rub. When you break open the jars and stir, you will notice the smoky, earthy, and slightly pungent scents combining, and that blended smell is what you will taste on the finished chicken and vegetables. Making the mix evenly ensures consistent seasoning in every bite. A common oversight is stirring too roughly and letting moisture from the air clump the powders, so keep the bowl dry and use a spoon to whisk thoroughly.
- Place the chicken breasts and veggies onto the baking sheet and drizzle the olive oil over top. Toss until everything is nicely coated in the oil, and then sprinkle the spice mixture on top and use your hands to rub the spice mixture all over both sides of the chicken and the veggies.: The first sensory cue here is the slick, shiny coating that develops on the surface of the ingredients when they are properly oiled. The oil conducts heat and encourages the Maillard reaction on both the chicken and vegetables, producing toasty aromas and richer color. Tossing by hand lets you feel if every piece is coated, which is better than guessing visually. A mistake to avoid is using too little oil, which can cause dry edges and uneven browning, or too much oil, which can lead to greasy results.
- Bake, uncovered, for 20-25 minutes (25 minutes for larger pieces of chicken) or until the chicken breasts are cooked (165 F) and the veggies are tender.: The tactile step of massaging the rub in is where flavor sinks into the surfaces, and you will smell the spices coming alive as you work. Rubbing ensures adhesion so the seasoning does not simply fall off into the pan during roasting. You may notice the texture of the chicken change slightly as the spices and oil cling to it, creating a light crust once it roasts. One pitfall is overhandling the chicken , which can cause it to tear or compress; be firm but gentle.
- Let the chicken rest for 5 minutes before cutting it into strips, and then serve as desired.: As the pan roasts, you will hear gentle crackles and the kitchen will fill with a warm, spiced fragrance. The vegetables will begin to wrinkle and the edges will darken, while the chicken will transition from pale to a warm, opaque color, and juices should run clear when the interior is probed. Hitting 165 F is crucial for safety and ensures the chicken is cooked through but still moist, and the timing window accounts for piece size. A frequent error is leaving the chicken in for too long which dries it out, so remove it as soon as the internal temperature reads correctly.
- Let the chicken rest for 5 minutes before cutting it into strips, and then serve as desired: Resting allows the juices to redistribute within the chicken , so when you slice it the meat stays succulent instead of losing moisture onto the cutting board. In this pause you will enjoy lingering aromas and the visual reward of the browned edges. When you cut, aim for even strips so every bite balances chicken and vegetables. A common misstep is slicing immediately, which causes juices to escape and a drier texture, so give the five minute rest the respect it deserves.
Notes
- Make the spice mix ahead: Prepare the combined spices in advance and store them in a small jar so you can season quickly on busy nights.
- Room temperature chicken: Let the chicken sit at room temperature for about 15 minutes before roasting to promote even cooking and prevent the exterior from overbrowning before the center heats through.
- Single layer roasting: Arrange vegetables and chicken so they are not crowded on the pan, ensuring hot air circulates and edges brown rather than steam.
- Slice uniformly: Cut peppers and onions into similar thickness so everything reaches tenderness at the same time, avoiding underdone or overcooked pieces.
- Use a thermometer: Invest in an instant read thermometer to check the thickest part of the chicken and remove as soon as it hits 165 F for a juicier result.
- Rest before slicing: Allow the chicken to rest for five minutes after roasting so juices redistribute and slices remain moist when served.