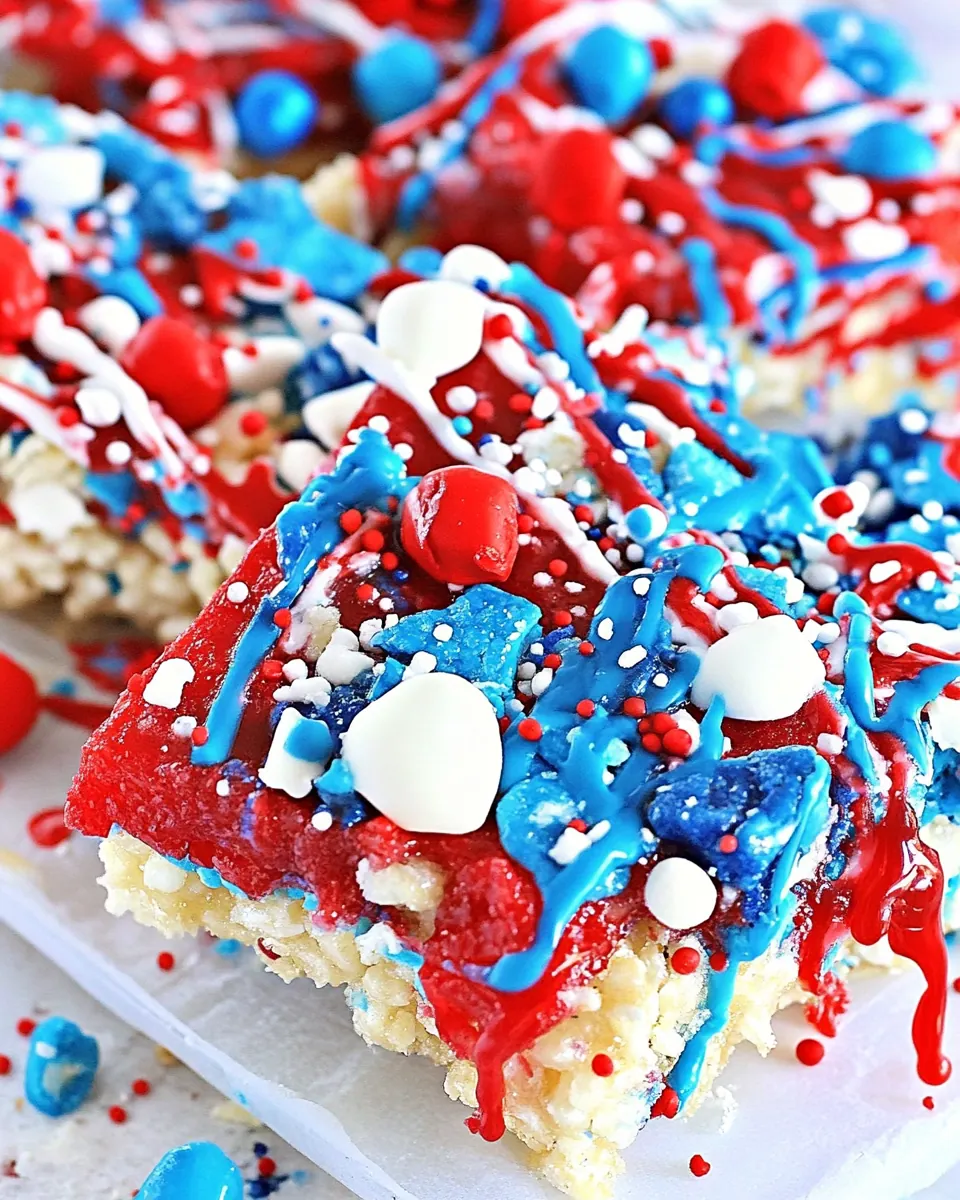
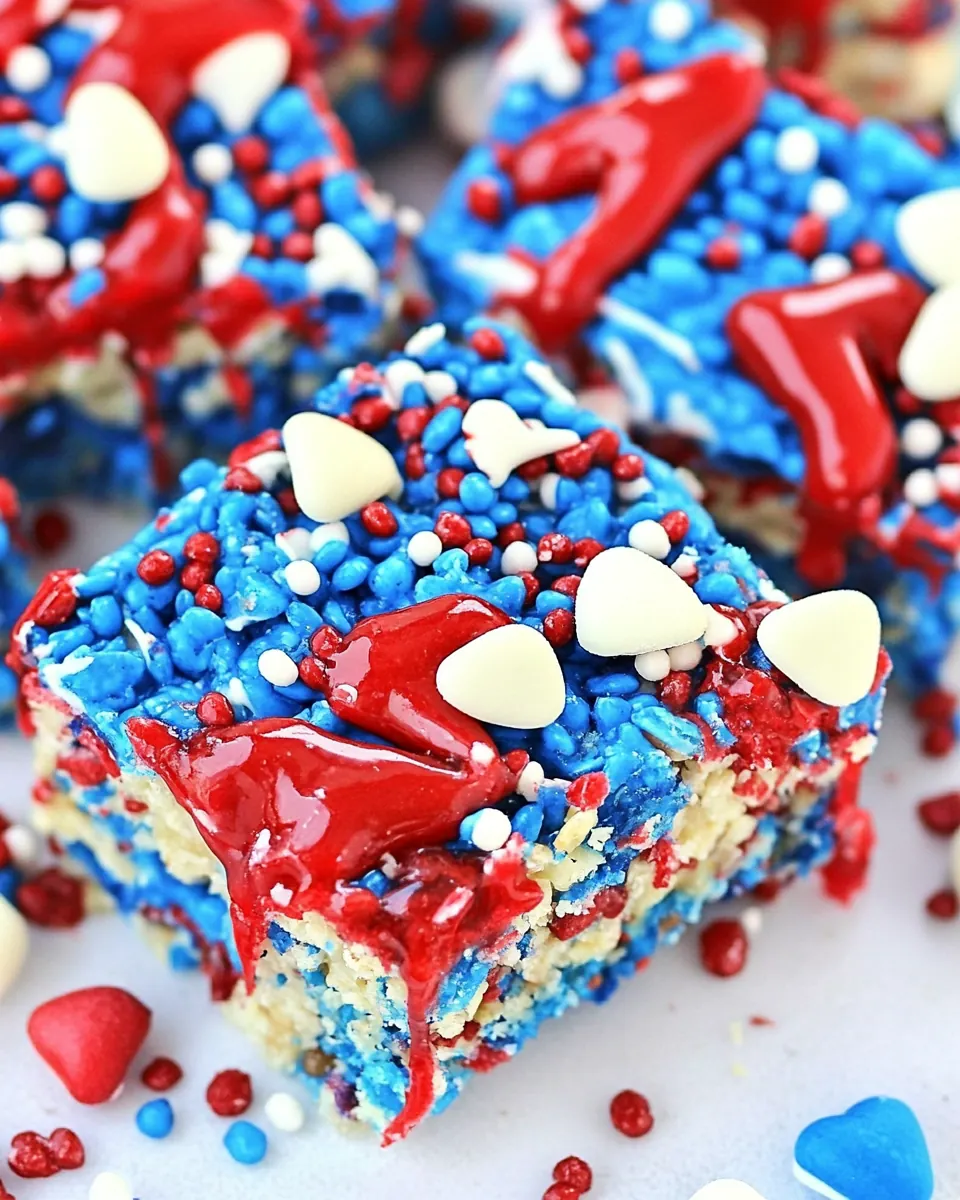
Red White and Blue Rice Crispy Treats
Red White and Blue Rice Crispy Treats are one of those nostalgic desserts I always turn to when I want to light up a gathering with color and comfort. The first time I made these I was racing the clock before a summer BBQ, juggling a spatula and a toddler with sticky fingers, and somehow the result felt celebratory and cozy all at once. The bright layers reminded me of neighborhood block parties, and the crunch paired with a sweet chew brought back memories of school bake sales.
I still remember the quiet satisfaction of pressing the warm mixture into the pan, seeing the colors blend just enough at the edges, and knowing everyone would smile when they spotted the star sprinkles. Over the years I learned small tricks that make these treats easier to handle and more reliable, and I find myself choosing this dessert when I want something fast that looks festive. Whether I am heading to a picnic, preparing a kid friendly snack, or rounding out a potluck table, these treats are a go to.
Recipe Snapshot
30 mins
20 mins
10 mins
Medium
200 kcal
American
Gluten-Free, Low FODMAP
Desserts
Large saucepan, Spatula, 13 x 9 x 2 inch pan, Mixing bowls, Microwave safe bowls
What Makes This Red White and Blue Rice Crispy Treats Special
Colors that make a moment
I love how Red White and Blue Rice Crispy Treats turn ordinary ingredients into something eye catching. The gel colors keep the hues vivid without watering down the texture, and the layered look is instantly photogenic. When I bring these to summer events they disappear quickly because people are drawn to the bright contrast.
Speed and simplicity
These treats come together with a handful of pantry staples and a short cooking window. I appreciate recipes that let me be present with guests instead of stuck at the stove. From melting butter to pressing the layers, this recipe moves fast but still yields consistent results, which is why I rely on it for last minute entertaining.
Texture play
The mix of gooey marshmallows and crispy Rice Krispies cereal hits that perfect chewy yet crunchy note. I find the combination universally loved because it balances soft and crisp, and the modest fat from the butter helps everything bind while lending a subtle richness that keeps each bite satisfying.
Kid friendly and festive
Kids adore getting involved with stirring and pressing, and parents appreciate that the ingredients are familiar. These treats are great for themed parties, school events, or any time you want to make something that feels special without elaborate baking techniques.
Customizable finishing touches
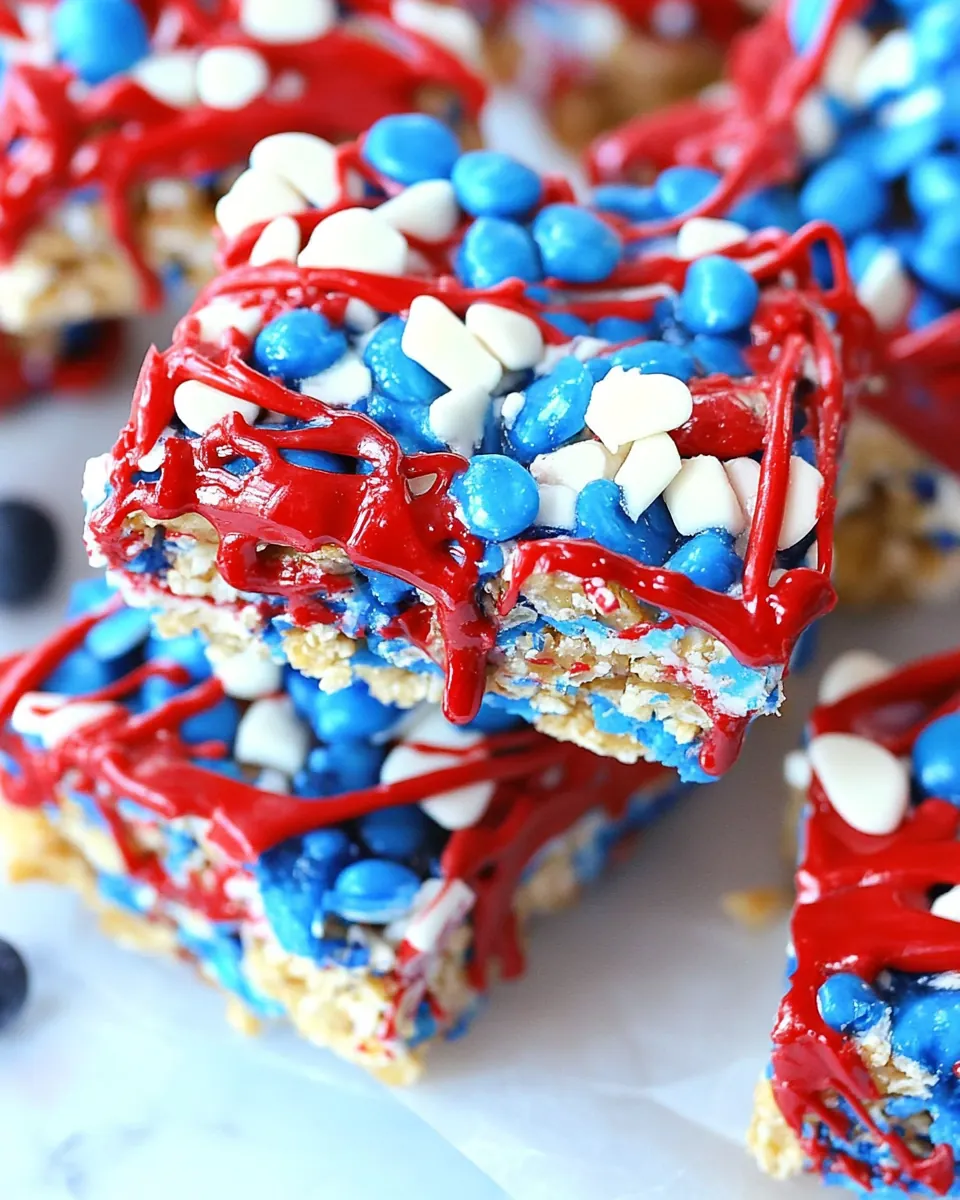
The drizzle of red and blue candy melts, plus a scatter of star sprinkles and white chocolate chips, turns a simple tray into a centerpiece. I often tweak the drizzle pattern depending on my mood, and the result always elevates the overall presentation while staying approachable.
Recipe Ingredients for Red White and Blue Rice Crispy Treats

These ingredients are straightforward and work together to create that classic marshmallow tied crunch. The key players here are the sticky marshmallows that bind, the toasty and airy Rice Krispies cereal that provide the crunch, and the butter which adds richness and helps the mixture set. The gel colors let you create bold layers without changing the texture, and the candy melts, white chocolate chips, and sprinkles give the final look a festive lift.
- 8 tablespoons butter unsalted: Melted to bind and add rich flavor, contributes a creamy mouthfeel and helps set the treats when cooled. Use unsalted to control overall saltiness and ensure the other flavors remain balanced. Soften gently to avoid burning and stir until fully incorporated with marshmallows and cereal.
- 2 packages (10 oz each) Jumbo marshmallows: Melted with butter to create a dense, chewy marshmallow base that provides sweetness and structure. Jumbo size offers a gooey, elastic texture when melted, making it easy to fold into the cereal. Heat slowly and stir constantly for a smooth, lump-free mixture.
- 6 cups Miniature marshmallows: Added to increase volume and gooeyness while lightening the overall texture of the cereal treats. Mini marshmallows melt quickly to create a cohesive matrix that helps the cereal pieces stick together. Use the measured amount to ensure proper chewiness without becoming too stiff or overly sweet.
- 2 teaspoons vanilla extract: Infuses a warm, aromatic note to the marshmallow mixture, enhancing overall flavor depth and rounding sweetness. Use the measured teaspoons to avoid overpowering the delicate balance of vanilla and marshmallow. Stir in after melting to preserve its aromatic qualities.
- 1 box rice Krispies cereal: Provides the crisp, airy base that gives the treats their characteristic crunch and structure. Rice Krispies cereal will absorb the marshmallow binder while remaining distinct, creating a light yet chewy bar. Fold gently to keep pieces intact and evenly coated.
- Blue gel food coloring: Tinted sparingly into portions of the marshmallow mixture or into melted chocolate to achieve vivid patriotic blue accents without altering flavor. Gel coloring provides concentrated hue with minimal moisture, preserving texture. Add drop by drop until desired intensity is reached.
- Red gel food coloring: Tinted sparingly into portions of the marshmallow mixture or melted chocolate to impart bright red accents for a festive appearance. Gel coloring offers deep color without thinning the mixture, so only small amounts are needed. Adjust gradually to prevent oversaturation.
- 5 ounces red chocolate melts: Melted and drizzled or pooled to add intense red color and sweet, creamy coating that complements the cereal bars. Red chocolate melts provide smooth texture and stable finish when cooled, making decorations hold shape. Apply with a spoon or piping bag for controlled designs.
- 5 ounces blue chocolate melts: Melted and drizzled to deliver vibrant blue decoration with a smooth, glossy finish that sets firmly on the treats. Blue chocolate melts help create striking contrast and festive visuals while adding a sweet chocolate layer. Temper or cool properly to avoid streaking.
- 1/4 cup white chocolate chips: Melted or sprinkled to add creamy white accents and mild sweetness with a smooth finish for contrast against colored chocolate. White chocolate chips can be used for small pools or drizzles, complementing the red and blue elements. Melt gently to avoid seizing and stir until silky.
- 2 3 tablespoons star sprinkles: Sprinkled as a final decorative touch to provide star-shaped color, crunch, and celebratory flair to the finished treats. Small amount adds visual interest and a tiny textural contrast without overwhelming the bars. Scatter evenly for balanced coverage across the surface.
Step by Step Guide for Red White and Blue Rice Crispy Treats
Follow these steps in order and take your time with the sensory cues. The recipe moves quickly once the marshmallows start melting, so have your tools and pans ready. I like to work in a calm rhythm, tasting and adjusting as I go, and remembering that small adjustments preserve the ideal chew and crunch.
- In a large saucepan, melt the butter on low heat.: The moment the butter begins to melt you will notice a rich, nutty aroma, and the pan should look glossy but not bubbling. Keeping the heat low prevents browning, which would alter the clean sweet profile we want. Use a heavy bottom pan for even heat distribution, and stir gently so the butter liquefies uniformly. A common mistake is turning the heat up too high, which can cause the butter to foam and burn, leaving bitter notes. If you see foaming, reduce the heat immediately and wipe any dark specks from the pan before continuing.
- Add the Jumbo marshmallows and stir until completely melted, about 5-7 minutes.: As the Jumbo marshmallows melt, the saucepan will fill with a thick, glossy cloud of sweet steam and a smell reminiscent of caramelized sugar. Stirring continuously helps the marshmallows incorporate into the butter into a velvety mass; scrape the sides to bring any unmelted bits into the center. The 'why' here is texture control, because thorough melting ensures a smooth binding agent for the cereal. Avoid high heat which can scorch the marshmallows; if some lumps remain, lower the heat and keep stirring until silky.
- Stir in miniature marshmallows and remove them from heat when they are not fully melted.: When you fold in the Miniature marshmallows , the mixture gains little pockets of chewiness that will finish melting from residual warmth, leading to subtle texture contrast. Remove the pan from the heat while they still hold slight shape; residual warmth will do the rest without risking overcooking. This technique ensures a mix of gooey and tender bits instead of a completely homogeneous mass. A frequent slip is leaving the pan on heat too long, which can make the mixture too fluid and difficult to shape.
- Add the Rice Krispies cereal and stir until well coated.: The sound shifts to a soft tearing as the cereal absorbs the marshmallow glaze, and visually you want every flake coated with a shiny, pale sheen. Stir gently but thoroughly to avoid crushing the airy texture of the Rice Krispies cereal . This step is critical because even coating guarantees balanced bites, otherwise some pieces will be dry and others overloaded. Over stirring can break the cereal into dust, so fold with light, deliberate strokes.
- Divide the mixture into three large bowls.: Splitting the warm mixture quickly helps the color treatments work properly because the marshmallow will set as it cools. Use a silicone spatula to portion evenly, scraping the bowls clean to keep quantity consistent. Even portions make assembly predictable and the final layers uniform. A common error is waiting too long to divide, which can cause the mixture to firm up and resist coloring, so move promptly.
- Add about 6 drops of blue gel food coloring to one bowl, and using a spatula, mix it into the rice crispy treats mixture until fully combined and blue.: The gel color disperses into the warm marshmallow matrix and you will see the bowl change to a saturated blue; mix briskly to avoid streaks. The thick nature of the gel means a little gives a strong result, which is why I start with about six drops and add more if needed. Proper mixing ensures even color without altering texture. If you see unmixed streaks, fold patiently rather than overworking, which can compress the cereal.
- Using a buttered spatula, press the blue rice krispy mixture into a 13 x 9 x 2-inch pan coated with cooking spray or layered with parchment paper. Layering with parchment paper is better, as it makes removal from the pan much easier.: When pressing the blue layer into the pan you should feel the sticky resistance as the mixture settles and hear a faint, soft pat as the cereal nests together. Buttering the spatula prevents sticking and gives clean, even pressure. Aim for an even thickness so the final squares cut uniformly. One mistake is pressing too hard, which compresses the cereal and makes the treats dense rather than light, so apply firm but gentle, even pressure.
- Press the uncolored bowl of rice krispy mixture on top of the blue layer.: Placing the middle uncolored layer creates the white stripe, and as you press you will notice the layers slightly merge at the edges creating a subtle ombre. The neutral middle keeps the trio balanced visually and in flavor. Use quick motions to press it into place while the blue layer is still slightly warm so they adhere. If the first layer is fully cooled, the layers may not bind well, so work while the blue layer retains warmth.
- Add about six drops of red gel food coloring to the remaining bowl, and using a spatula, mix into the rice crispy treats mixture until thoroughly combined and red if the mixture starts to harden and is hard to work with, microwave for 1-2 minutes.: The red gel will transform the last portion to a vibrant hue; stir until uniform and keep an eye on the texture. If the batch begins to firm, a brief microwave burst softens the mass without cooking it further, restoring malleability. The tactile cue is key, you want pliable but not molten. Do not overheat in the microwave, which can create hot spots and toughen the marshmallow.
- Press the red bowl of rice krispy mixture on top of the white layer.: The final pressing is satisfying because the layers come together to form a cohesive slab. Press evenly to avoid air pockets and to help the layers bond. The surface should be slightly tacky and smooth when you finish. If the top is too cool, the drizzle may not adhere as well, so ensure the top has slight tack before moving to decoration.
- Melt the red and blue candy melts in separate bowls per package instructions.: As the candy melts soften they become glossy and pourable; the aroma is sweet and chocolatey. Use low, gentle heat, either in short microwave bursts or over a warm water bath, stirring often for a smooth finish. Proper melting prevents graininess and ensures a fluid drizzle that sets with a sheen. If overheated, candy melts can seize, so stop heating as soon as they are pourable and smooth.
- Drizzle on top of the rice Krispy treats. Top with white chocolate chips and star sprinkles.: Drizzling creates ribbons of color that contrast with the layered slab, and the final scatter of white chocolate chips and star sprinkles adds texture and sparkle. Work while the candy melts are still warm so they set quickly and hold the sprinkles. A common misstep is drizzling from too low which produces thick blobs instead of decorative lines, so use a spoon or squeeze bag and maintain a steady hand.
- Cool. Cut into 2-inch squares and serve.: Cooling lets the layers firm and the drizzle set, and you should sense a gentle give when pressing before cutting. Use a sharp, lightly oiled knife to get clean edges, wiping between cuts to prevent tearing. Allowing adequate cooling prevents smooshed squares and helps the treats hold their shape. Cutting too soon risks sticking and uneven slices, so be patient until the slab is fully set.
Tips and Tricks about Red White and Blue Rice Crispy Treats
I like to keep a calm workflow when making these treats, organizing bowls, spatulas, and pans before melting. Small steps like buttering the spatula and dividing the mixture promptly save time and frustration. Below are practical tips I use every time to keep the layers vivid and the texture perfect.
- Prep your workspace: Line a 13 x 9 x 2 inch pan with parchment paper for easy removal and cleaner cuts when the slab sets.
- Measure colors sparingly: Start with a few drops of gel coloring and add more if needed, because gel pigments are concentrated and a little can go a long way.
- Keep stirring low and slow: Melt marshmallows on low heat, stirring constantly to achieve a glossy, smooth binder and to avoid burning.
- Use a buttered spatula: Buttering your spatula prevents sticking and helps you press the mixture evenly without tearing the cereal.
- Warm candy melts carefully: Melt candy in short intervals and stir frequently to keep the texture smooth for an even drizzle that sets with shine.
- Cut with a warm, dry knife: Wiping the knife between cuts results in neat, uniform squares instead of ragged edges.
Serving Options for Red White and Blue Rice Crispy Treats
These treats are ideal for casual gatherings, holiday picnics, or as playful snacks for kids. Their handheld size makes them great for buffet tables and they travel well when layered in airtight containers. I often bring a tray to outdoor barbecues or summer block parties, and they pair nicely with simple drinks and light finger foods.
- Party platter presentation: Arrange 2 inch squares on a tiered tray with a scattering of extra star sprinkles for visual appeal.
- Picnic packing: Layer parchment between squares and pack in a sturdy container to prevent shifting during transport.
- Kid friendly snack: Serve alongside juice boxes and fruit slices for a fun, colorful treat at birthday parties.
- Patriotic occasions: These are a natural fit for national holidays and summer celebrations where red white and blue themes are welcome.
- Storage tips: Store in an airtight container at room temperature for up to three days to preserve the crispness of the Rice Krispies cereal.
- Seasonal pairing: Pair with simple light beverages and fresh fruit to balance the sweetness at outdoor summer events.
FAQ
Conclusion
What makes these Red White and Blue Rice Crispy Treats special is their combination of nostalgic texture and bold celebratory color, all achieved with quick, familiar steps. I encourage you to give them a try the next time you want a fuss free dessert that looks festive and disappears fast. They are forgiving, kid friendly, and perfect for summery gatherings, so have fun with the colors and enjoy sharing them with friends and family.

Red White and Blue Rice Crispy Treats
Equipment
- Large saucepan
- Spatula
- 13 x 9 x 2 inch pan
- Mixing Bowls
- Microwave safe bowls
Ingredients
- 8 tablespoons butter unsalted Melted to bind and add rich flavor, contributes a creamy mouthfeel and helps set the treats when cooled. Use unsalted to control overall saltiness and ensure the other flavors remain balanced. Soften gently to avoid burning and stir until fully incorporated with marshmallows and cereal.
- 2 packages (10 oz each) Jumbo marshmallows Melted with butter to create a dense, chewy marshmallow base that provides sweetness and structure. Jumbo size offers a gooey, elastic texture when melted, making it easy to fold into the cereal. Heat slowly and stir constantly for a smooth, lump-free mixture.
- 6 cups Miniature marshmallows Added to increase volume and gooeyness while lightening the overall texture of the cereal treats. Mini marshmallows melt quickly to create a cohesive matrix that helps the cereal pieces stick together. Use the measured amount to ensure proper chewiness without becoming too stiff or overly sweet.
- 2 teaspoons vanilla extract Infuses a warm, aromatic note to the marshmallow mixture, enhancing overall flavor depth and rounding sweetness. Use the measured teaspoons to avoid overpowering the delicate balance of vanilla and marshmallow. Stir in after melting to preserve its aromatic qualities.
- 1 box rice Krispies cereal Provides the crisp, airy base that gives the treats their characteristic crunch and structure. Rice Krispies cereal will absorb the marshmallow binder while remaining distinct, creating a light yet chewy bar. Fold gently to keep pieces intact and evenly coated.
- Blue gel food coloring Tinted sparingly into portions of the marshmallow mixture or into melted chocolate to achieve vivid patriotic blue accents without altering flavor. Gel coloring provides concentrated hue with minimal moisture, preserving texture. Add drop by drop until desired intensity is reached.
- Red gel food coloring Tinted sparingly into portions of the marshmallow mixture or melted chocolate to impart bright red accents for a festive appearance. Gel coloring offers deep color without thinning the mixture, so only small amounts are needed. Adjust gradually to prevent oversaturation.
- 5 ounces red chocolate melts Melted and drizzled or pooled to add intense red color and sweet, creamy coating that complements the cereal bars. Red chocolate melts provide smooth texture and stable finish when cooled, making decorations hold shape. Apply with a spoon or piping bag for controlled designs.
- 5 ounces blue chocolate melts Melted and drizzled to deliver vibrant blue decoration with a smooth, glossy finish that sets firmly on the treats. Blue chocolate melts help create striking contrast and festive visuals while adding a sweet chocolate layer. Temper or cool properly to avoid streaking.
- 1/4 cup white chocolate chips Melted or sprinkled to add creamy white accents and mild sweetness with a smooth finish for contrast against colored chocolate. White chocolate chips can be used for small pools or drizzles, complementing the red and blue elements. Melt gently to avoid seizing and stir until silky.
- 2 -3 tablespoons star sprinkles Sprinkled as a final decorative touch to provide star-shaped color, crunch, and celebratory flair to the finished treats. Small amount adds visual interest and a tiny textural contrast without overwhelming the bars. Scatter evenly for balanced coverage across the surface.
Instructions
- In a large saucepan, melt the butter on low heat.: The moment the butter begins to melt you will notice a rich, nutty aroma, and the pan should look glossy but not bubbling. Keeping the heat low prevents browning, which would alter the clean sweet profile we want. Use a heavy bottom pan for even heat distribution, and stir gently so the butter liquefies uniformly. A common mistake is turning the heat up too high, which can cause the butter to foam and burn, leaving bitter notes. If you see foaming, reduce the heat immediately and wipe any dark specks from the pan before continuing.
- Add the Jumbo marshmallows and stir until completely melted, about 5-7 minutes.: As the Jumbo marshmallows melt, the saucepan will fill with a thick, glossy cloud of sweet steam and a smell reminiscent of caramelized sugar. Stirring continuously helps the marshmallows incorporate into the butter into a velvety mass; scrape the sides to bring any unmelted bits into the center. The 'why' here is texture control, because thorough melting ensures a smooth binding agent for the cereal. Avoid high heat which can scorch the marshmallows; if some lumps remain, lower the heat and keep stirring until silky.
- Stir in miniature marshmallows and remove them from heat when they are not fully melted.: When you fold in the Miniature marshmallows , the mixture gains little pockets of chewiness that will finish melting from residual warmth, leading to subtle texture contrast. Remove the pan from the heat while they still hold slight shape; residual warmth will do the rest without risking overcooking. This technique ensures a mix of gooey and tender bits instead of a completely homogeneous mass. A frequent slip is leaving the pan on heat too long, which can make the mixture too fluid and difficult to shape.
- Add the Rice Krispies cereal and stir until well coated.: The sound shifts to a soft tearing as the cereal absorbs the marshmallow glaze, and visually you want every flake coated with a shiny, pale sheen. Stir gently but thoroughly to avoid crushing the airy texture of the Rice Krispies cereal . This step is critical because even coating guarantees balanced bites, otherwise some pieces will be dry and others overloaded. Over stirring can break the cereal into dust, so fold with light, deliberate strokes.
- Divide the mixture into three large bowls.: Splitting the warm mixture quickly helps the color treatments work properly because the marshmallow will set as it cools. Use a silicone spatula to portion evenly, scraping the bowls clean to keep quantity consistent. Even portions make assembly predictable and the final layers uniform. A common error is waiting too long to divide, which can cause the mixture to firm up and resist coloring, so move promptly.
- Add about 6 drops of blue gel food coloring to one bowl, and using a spatula, mix it into the rice crispy treats mixture until fully combined and blue.: The gel color disperses into the warm marshmallow matrix and you will see the bowl change to a saturated blue; mix briskly to avoid streaks. The thick nature of the gel means a little gives a strong result, which is why I start with about six drops and add more if needed. Proper mixing ensures even color without altering texture. If you see unmixed streaks, fold patiently rather than overworking, which can compress the cereal.
- Using a buttered spatula, press the blue rice krispy mixture into a 13 x 9 x 2-inch pan coated with cooking spray or layered with parchment paper. Layering with parchment paper is better, as it makes removal from the pan much easier.: When pressing the blue layer into the pan you should feel the sticky resistance as the mixture settles and hear a faint, soft pat as the cereal nests together. Buttering the spatula prevents sticking and gives clean, even pressure. Aim for an even thickness so the final squares cut uniformly. One mistake is pressing too hard, which compresses the cereal and makes the treats dense rather than light, so apply firm but gentle, even pressure.
- Press the uncolored bowl of rice krispy mixture on top of the blue layer.: Placing the middle uncolored layer creates the white stripe, and as you press you will notice the layers slightly merge at the edges creating a subtle ombre. The neutral middle keeps the trio balanced visually and in flavor. Use quick motions to press it into place while the blue layer is still slightly warm so they adhere. If the first layer is fully cooled, the layers may not bind well, so work while the blue layer retains warmth.
- Add about six drops of red gel food coloring to the remaining bowl, and using a spatula, mix into the rice crispy treats mixture until thoroughly combined and red if the mixture starts to harden and is hard to work with, microwave for 1-2 minutes.: The red gel will transform the last portion to a vibrant hue; stir until uniform and keep an eye on the texture. If the batch begins to firm, a brief microwave burst softens the mass without cooking it further, restoring malleability. The tactile cue is key, you want pliable but not molten. Do not overheat in the microwave, which can create hot spots and toughen the marshmallow.
- Press the red bowl of rice krispy mixture on top of the white layer.: The final pressing is satisfying because the layers come together to form a cohesive slab. Press evenly to avoid air pockets and to help the layers bond. The surface should be slightly tacky and smooth when you finish. If the top is too cool, the drizzle may not adhere as well, so ensure the top has slight tack before moving to decoration.
- Melt the red and blue candy melts in separate bowls per package instructions.: As the candy melts soften they become glossy and pourable; the aroma is sweet and chocolatey. Use low, gentle heat, either in short microwave bursts or over a warm water bath, stirring often for a smooth finish. Proper melting prevents graininess and ensures a fluid drizzle that sets with a sheen. If overheated, candy melts can seize, so stop heating as soon as they are pourable and smooth.
- Drizzle on top of the rice Krispy treats. Top with white chocolate chips and star sprinkles.: Drizzling creates ribbons of color that contrast with the layered slab, and the final scatter of white chocolate chips and star sprinkles adds texture and sparkle. Work while the candy melts are still warm so they set quickly and hold the sprinkles. A common misstep is drizzling from too low which produces thick blobs instead of decorative lines, so use a spoon or squeeze bag and maintain a steady hand.
- Cool. Cut into 2-inch squares and serve.: Cooling lets the layers firm and the drizzle set, and you should sense a gentle give when pressing before cutting. Use a sharp, lightly oiled knife to get clean edges, wiping between cuts to prevent tearing. Allowing adequate cooling prevents smooshed squares and helps the treats hold their shape. Cutting too soon risks sticking and uneven slices, so be patient until the slab is fully set.
Notes
- Prep your workspace: Line a 13 x 9 x 2 inch pan with parchment paper for easy removal and cleaner cuts when the slab sets.
- Measure colors sparingly: Start with a few drops of gel coloring and add more if needed, because gel pigments are concentrated and a little can go a long way.
- Keep stirring low and slow: Melt marshmallows on low heat, stirring constantly to achieve a glossy, smooth binder and to avoid burning.
- Use a buttered spatula: Buttering your spatula prevents sticking and helps you press the mixture evenly without tearing the cereal.
- Warm candy melts carefully: Melt candy in short intervals and stir frequently to keep the texture smooth for an even drizzle that sets with shine.
- Cut with a warm, dry knife: Wiping the knife between cuts results in neat, uniform squares instead of ragged edges.