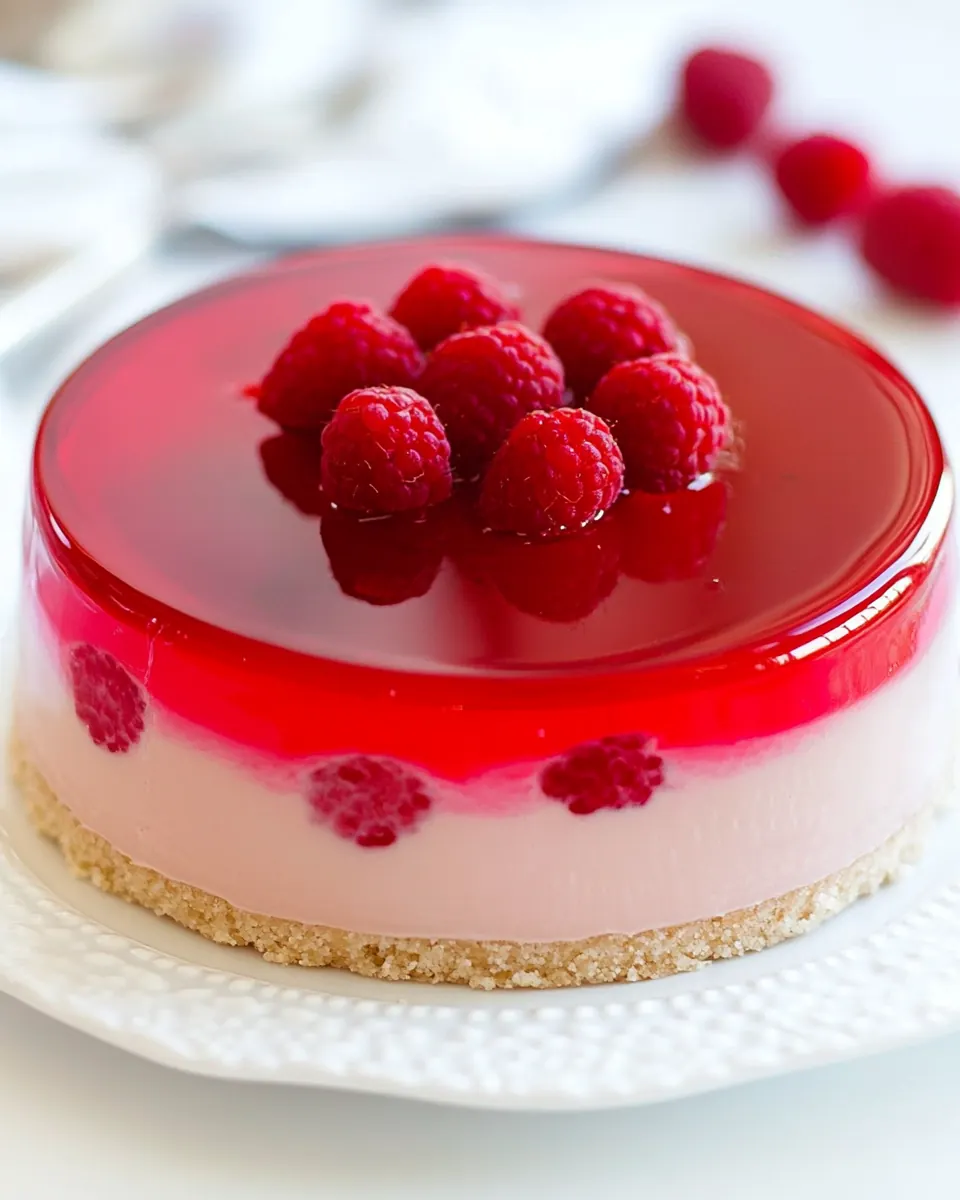
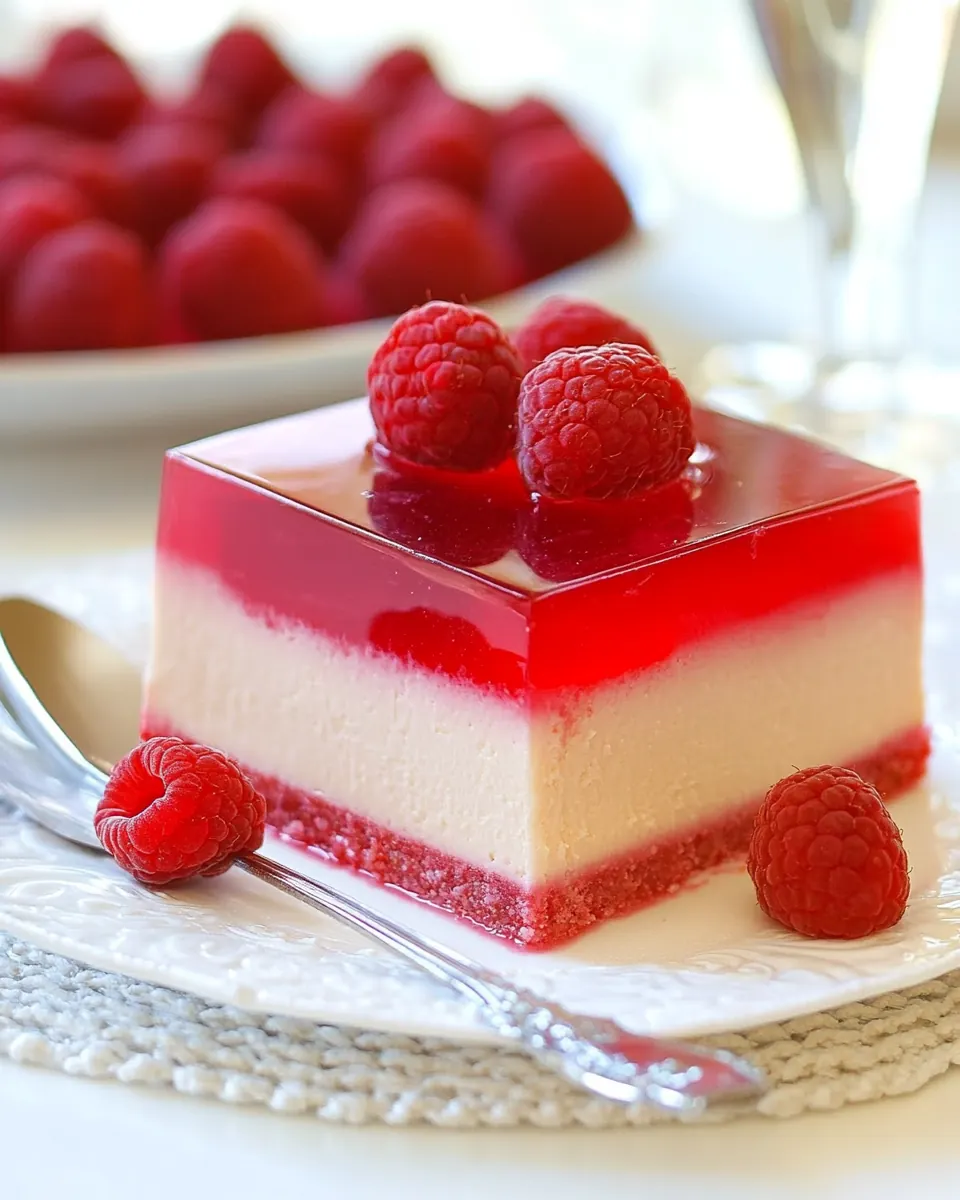
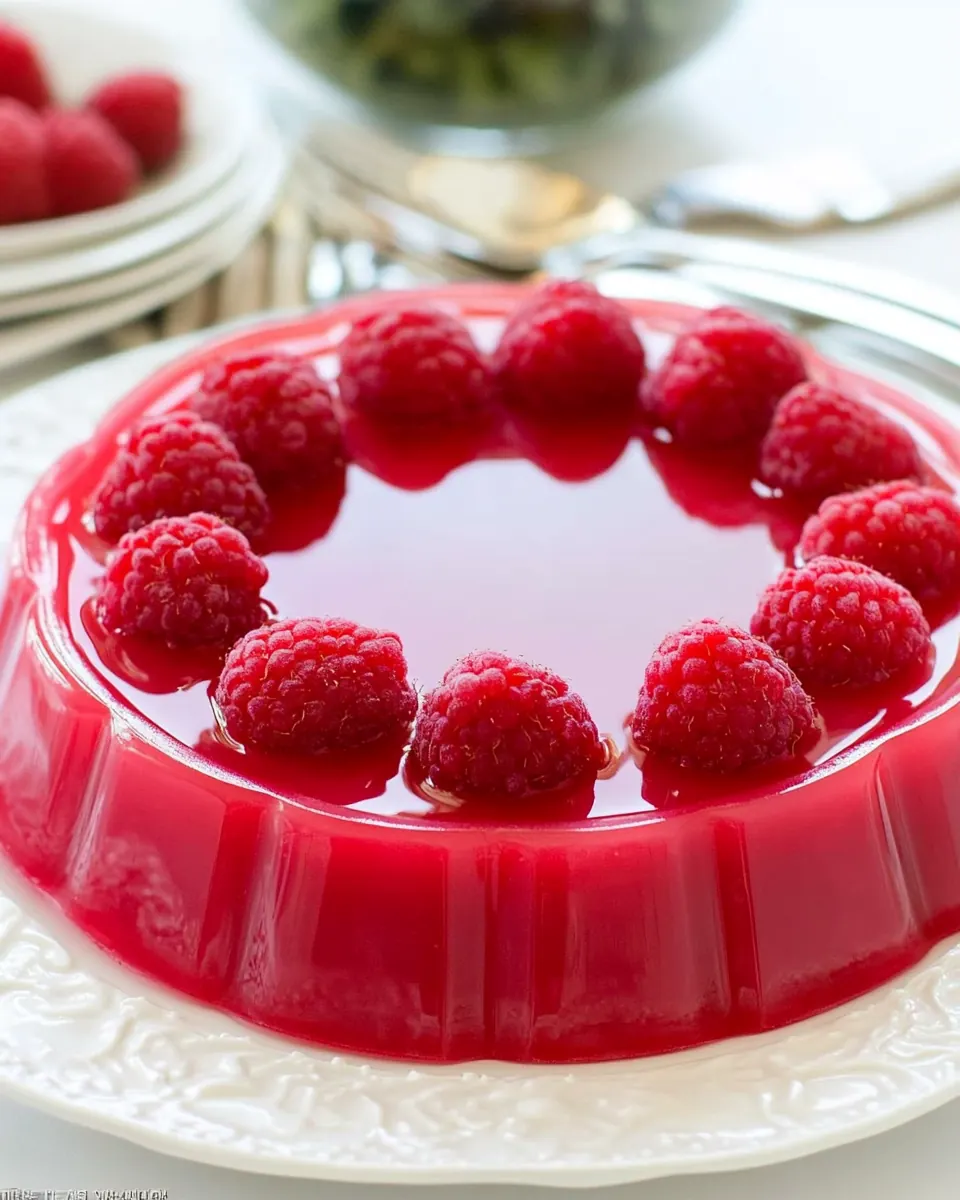
Raspberry Jello Cake
Raspberry Jello Cake has been one of those recipes that follows me through family potlucks, summer picnics, and quiet afternoons when I need something bright and comforting. I remember the first time I made it, balancing a steaming kettle while trying not to splash the glossy raspberry syrup over the countertop, and how the house filled with a sweet, berry perfume that felt like a secret signal that company was arriving. From that moment on, this dessert became my warm weather staple and a way to celebrate simple ingredients.
Every bite of Raspberry Jello Cake takes me back to my grandmother’s kitchen, where she taught me to value texture more than presentation. The pillowy cake base, the cloudlike mousse, and the shimmering jello topping all play different roles, and I love how they come together without fuss. I also enjoy the ritual of assembling it, brushing the syrup on the cake, pressing fresh raspberries into the mousse, and then waiting, with genuine impatience, for the layers to set.
Recipe Snapshot
3 hr
160 mins
20 mins
Hard
250 kcal
American
Gluten-Free, Low FODMAP
Desserts
Mixing bowl, Whisk attachment, Mixer, Sifter, Glass baking dish, Parchment paper, Spatula, Measuring cup, Refrigerator
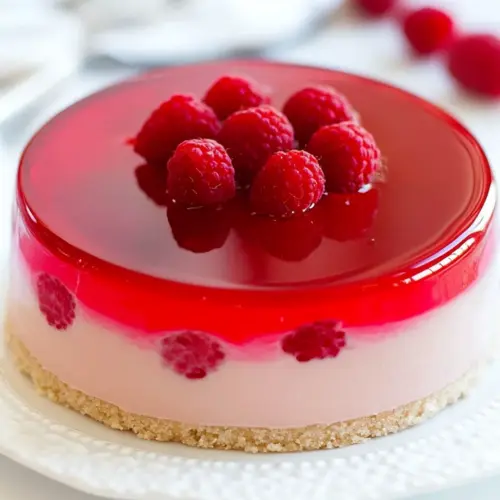
What We Adore About This Raspberry Jello Cake
Layered texture that feels thoughtful
I adore how Raspberry Jello Cake builds excitement bite by bite. The sponge is tender and slightly springy, the mousse gives a silky, airy contrast, and the jello topping adds a glossy finish. I always remark that the layered approach turns a simple list of pantry items into a composed dessert that tastes like you spent hours, even when you did not.
Bright, fruity flavor without being cloying
Raspberry is a naturally tart fruit, and when paired with the measured sugar and a touch of lemon, it sings rather than overwhelms. I find this balance makes the cake a crowd pleaser, because it is sweet enough to feel like dessert, yet clean enough to follow a heavy meal. I like to nudge guests toward seconds by promising a refreshing finish.
Accessible techniques that teach you skills
Working with the warm jello syrup, folding egg foam, and making a light mousse are great skills to practice. I often tell friends that once you master this recipe, you will be confident folding and building layer desserts. The methods are forgiving, and there are easy troubleshooting moves to rescue a slightly watery mousse or a set jello.
Visual impact with minimal effort
The final glossy top dotted with fresh raspberries looks special on a dessert table. I never worry about fancy piping or frosting here. A few well placed berries, and the cake looks celebratory. For gatherings, this is the recipe I make when I want something pretty without a lot of fuss.
Perfect for summer and gatherings
Because the cake is chilled and fruit forward, it reads like a warm weather favorite. I find it fits potlucks, backyard dinners, and lazy afternoons alike. It travels well if you keep it chilled, and it is forgiving to slight timing changes which makes hosting less stressful.
Shopping List for Raspberry Jello Cake

When I shop for Raspberry Jello Cake, I tend to think in roles: the structure player, the creamy middle, the syrup, and the bright finish. Each ingredient earns its place, contributing texture, lift, sweetness, or that vibrant raspberry note that ties everything together.
- 6 oz package raspberry jello: Adds bright raspberry flavor and gelatin structure to the cake; dissolves in hot liquid to set layers and provide a fruity, slightly firm texture. Helps bind moisture and can be adjusted for sweetness when combined with other components. Works as a primary flavoring agent that complements whipped topping and fruit.
- 8 oz tub cool whip, thawed in the fridge: Provides light, airy creaminess and stabilizes the cake when thawed and folded into mixtures; contributes moisture and a smooth mouthfeel. Adds sweetness and a cool contrast to the jello layers while helping create a mousse-like consistency. Helps balance tartness from raspberries and jello.
- 4 large eggs, room temp: Incorporates air and structure when beaten with sugar to create a tender, stable cake base; eggs also bind ingredients and contribute to leavening. Brings richness and helps emulsify fats and liquids for a cohesive batter. Also contributes to color and a soft crumb when baked.
- 1/2 cup granulated sugar: Sweetens the batter and assists in egg aeration when beaten together, promoting a delicate crumb and balanced flavor. Can caramelize slightly during baking to add depth without overpowering the raspberry components. Also affects texture by helping to tenderize the cake.
- 1/4 tsp vanilla extract: Adds aromatic sweetness and enhances flavor complexity with a subtle vanilla note that complements raspberry; used sparingly to avoid overpowering fruitiness. Helps round out the overall taste profile and improves perceived sweetness. Works well combined with sugar and whipped topping.
- 1/2 cup all-purpose flour: Provides structure and bulk to the cake batter, forming the framework that traps air and sets during baking. Helps create a tender crumb when combined with proper mixing and leavening from eggs. Also balances moisture and supports the incorporation of liquids.
- 1/2 cup warm water: Dissolves the first raspberry jello package and moistens the batter, helping gelatin activate for proper setting; warm temperature ensures complete dissolution. Contributes to overall moisture content without thinning the batter excessively. Aids in creating smooth jello layers.
- 2 tbsp granulated sugar: Adds a small additional amount of sweetness for adjustments, often used to balance tartness in the filling or drizzle; helps fine-tune the final flavor. Can assist in dissolving fruit juices or jello granules and enhance mouthfeel. Used sparingly to avoid over-sweetening delicate raspberry notes.
- 1 tsp lemon juice: Provides a touch of acidity to brighten flavors and enhance the raspberry profile; helps balance sweetness and can slightly change gelatin setting behavior. Activates fruit flavor compounds and prevents the dessert from tasting cloying. Works well combined with lemon for freshness.
- 3 oz package raspberry jello: Adds concentrated raspberry flavor and additional gelatin to reinforce jello layers and intensify fruitiness; dissolves in warm liquid to set. Helps create a more robust raspberry presence and firmer texture in layered components. Complements fresh raspberries and whipped topping.
- 6 oz package raspberries: Contributes fresh, juicy raspberry flavor and a natural texture contrast to the dessert; adds bursts of brightness and visual appeal when distributed through the cake. Provides natural acidity and seeds that enhance authenticity and mouthfeel. Pairs well with jello and whipped cream for a vibrant finish.
Step by Step Guide for Raspberry Jello Cake
I like to approach assembly methodically, laying out my ingredients and tools so the transitions from cake to mousse to topping feel calm. Below I expand each direction into detailed steps that capture sensory cues, reasons for technique, and common pitfalls to watch for.
- In a large mixing bowl, combine 6 oz jello with 2 cups boiling water. Stir until dissolved then add 1 cup cold water (this is 1/2 of the cold water the package calls for). Let jello sit at room temp until just starting to set. Note: If you need to speed set jello, you can refrigerate it for 10-15 minutes at the end or until the jello is syrupy and soft set.: Steam will rise and the aroma of raspberry will be immediate, signaling that the gelatin has fully dissolved. Stir until the mixture is completely uniform and glossy, then add 1 cup cold water. You should notice the liquid cooling and taking on a syrupy sheen as it thickens at room temperature. This cooling is crucial so the jello does not scramble or curdle when mixed later. A common mistake is pouring boiling liquid onto a cool bowl and not stirring enough, leaving undissolved granules; make sure the grains are fully dissolved for a smooth mousse. If you need it set faster, refrigerate for 10 to 15 minutes until it becomes syrupy but not firm.
- Beat 4 large eggs with the whisk attachment for 1 min on high speed. With the mixer on, add 1/2 cup sugar and continue beating on high speed for 5 min until thick and fluffy. Fold in 1/4 tsp vanilla.: As you whisk, the kitchen will fill with a faint, warm egg scent and the mixture will change from translucent to pale and frothy. After about a minute you should see medium peaks forming, indicating air is being incorporated. With the mixer on, add 1/2 cup sugar and continue beating on high speed for 5 min until thick and fluffy. This stage is essential because the trapped air gives the cake lift; you want a ribboning effect when you lift the whisk. Fold in 1/4 tsp vanilla, which will scent the batter and balance the fruit. A typical error is underwhipping or overwhipping; underwhipping yields a flat cake, while overwhipping can break the structure and become dry when baked.
- Sift in 1/2 cup flour in thirds into the batter, folding it in between each addition. When mixing, scrape the bottom of the bowl to ensure you don't have pockets of flour hiding at the bottom. Fold until no streaks of flour remain; do not over-mix or you will deflate the batter. Spread batter evenly into lined glass dish and bake at 350˚F for 18-20 minutes, or until top is golden brown and springs back when poked slightly.: As you add each portion, use a gentle folding motion to combine. The batter should feel velvety and slightly elastic, and you should scrape the bottom of the bowl to make sure there are no hidden pockets of dry flour. Folding preserves the air you incorporated, producing a tender crumb. When mixed through, stop as soon as streaks disappear; overmixing will deflate the batter and produce a dense cake. Before baking, the surface should be glossy and uniform, not glossy and runny.
- Remove from oven, cut away from edges, invert onto a cooling rack and peel back the parchment paper. (Note: Let cake sit on top of the peeled back parchment paper to cool – I have found that sometimes it sticks to a cooling rack and can be hard to pry off after it cools down). Rinse and dry the baking dish then return cooled cake back to the pan.: As the cake bakes, the edges will pull away slightly from the pan and the surface will turn a light golden brown. A gentle spring back when poked indicates it is done. The aroma will be warm and subtly sweet, and the oven should sound steady without crackling. Baking too long dries the cake, while underbaking results in a gummy center. Use the visual cue of a pale gold top and the spring back test to avoid common mistakes.
- Combine the syrup ingredients: 1/2 cup warm water, 2 Tbsp sugar and 1 tsp lemon juice and set aside to cool to room temp. Brush the top of the cooled cake evenly with syrup.: You will hear a faint sigh as steam escapes when you flip it, and the cake surface will be slightly warm and fragrant. Let the cake sit on top of the peeled back parchment while cooling; this prevents sticking to the rack which can tear the crumb. If you find a piece stuck after cooling, warm the pan slightly to loosen it rather than yanking, which can rip the cake. Rinse and dry the baking dish before returning the cooled cake to the pan for assembly.
- Once jello is starting to thicken and has a slight wiggle to it, beat in 8 oz cool whip. Tip: If your mousse is watery, you should refrigerate it for 10-15 minutes until it's slightly thickened, but keep an eye on it so it doesn't set too much or it will be hard to spread.: Mixing 1/2 cup warm water, 2 tbsp sugar and 1 tsp lemon juice produces a glossy syrup that smells faintly sweet and citrusy. Let it cool to room temperature so it soaks into the cake without steaming or collapsing the crumb. The syrup adds moisture and a subtle brightness; brush it evenly and watch the cake darken slightly as it absorbs. A mistake is applying hot syrup, which will make the cake soggy and disrupt later layers.
- Pour the mousse over the cake layer and spread evenly. Top with raspberries, pushing them down slightly into the mousse. Refrigerate 1 hour or until mousse is set. Meanwhile, start making your jello topping.: As you brush, the surface should darken and glisten, and you will notice a softening of the crumb texture that signals proper absorption. Work quickly but gently, making sure the entire surface receives the syrup. If you leave puddles, blot them with a paper towel; pooling can lead to uneven texture. The purpose here is to marry the cake to the mousse, ensuring each bite is moist and cohesive.
- In a large measuring cup, combine 3 oz jello with 1 cup boiling water and stir until gelatin is dissolved. Add 1/2 cup cold water and let cool to room temp. (Tip: Never pour warm jello over the mousse or you'll end up with a creamy layer on top) Pour jello over the back of a spoon into the pyrex dish and refrigerate another hour or until fully set.: At this syrupy, slightly thick stage, the jello still has a glossy surface and a subtle wobble. Beat in the thawed cool whip until the mixture becomes a mousse, light and airy. The smell will be sweet and faintly fruity, and the texture should be smooth and hold slight peaks. If the mousse becomes watery, refrigerate 10 to 15 minutes until it firms a bit but remains spreadable. A common issue is adding cool whip to jello that is too warm, which can thin the mousse; ensure it is only slightly thickened before combining.
- Pour the mousse over the cake layer and spread evenly, then top with raspberries: As you spread, the mousse should feel cool and pillowy, and you will hear a soft, subtle scraping sound of the spatula. Press the fresh raspberries gently into the mousse so they nestle rather than sink; visually they should be partially visible and evenly distributed. This step creates textural contrast, and ensuring even berry placement helps the top layer set around the fruit. Avoid overpressing, which can push berries through the mousse and make the top uneven.
- Refrigerate 1 hour or until mousse is set, then make the jello topping: During refrigeration you will notice the mousse firming and the raspberries settling slightly into the mousse. The fridge scent will be cool and sweet, and the surface will become stable to the touch. Meanwhile, combine 3 oz jello with 1 cup boiling water and stir until dissolved, then add 1/2 cup cold water and cool to room temp. Never pour warm jello over the mousse or you will end up with a creamy layer on top instead of a clear gel, which is a common error.
- Pour jello over the back of a spoon into the pyrex dish and refrigerate another hour or until fully set: Pouring over the back of a spoon creates a gentle flow that prevents disturbing the mousse and raspberries. The jello should flow as a ribbon and settle into a glossy, even layer. Refrigerate until the top is firm and shiny; when fully set, it will have a clean jiggle. If you rush this step, the layers can mix or the topping may not gel properly, so patience is rewarded.
Recipe Tips about Raspberry Jello Cake
I like to offer practical, hands on tips that save time and prevent stress while you build this layered dessert. The tips below expand on the key moments where a little care makes a big difference.
- Handle eggs gently: When whipping the 4 large eggs, bring them to room temperature and use the whisk attachment to create stable foam, which is the backbone of the cake’s texture.
- Watch your jello temperature: Cool the dissolved 6 oz package raspberry jello to a syrupy stage before combining with 8 oz tub cool whip, or the mousse may become too thin and watery.
- Sift and fold flour: Sifting the 1/2 cup all-purpose flour and folding in thirds preserves volume and prevents a dense cake crumb.
- Brush syrup evenly: Apply the 1/2 cup warm water, 2 tbsp granulated sugar, and 1 tsp lemon juice syrup sparingly so the cake is moist but not soggy.
- Chill between layers: Allow the mousse to partially set for at least an hour before pouring the final 3 oz package raspberry jello topping to keep layers distinct and stable.
- Use fresh raspberries: The 6 oz package raspberries are best when they are ripe and dry, as wet berries can water down the mousse during assembly.
Great Combinations for Raspberry Jello Cake
This cake works beautifully with light accompaniments and seasonal occasions. Think in terms of contrasts and temperature, pairing with things that complement the bright fruit and chilled mousse. Below are ideas for serving styles, occasions, and storage notes to help you present it well.
- Summer picnics: Serve slices chilled in a cooler with other no bake desserts for an easy, refreshing finish to an outdoor meal.
- Potluck contribution: Bring the cake in its pan and slice at the venue, keeping it chilled until service to maintain the layers.
- Holiday dessert table: For warm weather holidays, the bright color and glossy top make it a festive centerpiece that stands out among heavier desserts.
- After dinner treat: Offer small slices after a rich meal, the light mousse and fruity glaze cleanses the palate.
- Storage tips: Keep the cake covered and refrigerated, consume within three days for best texture, and avoid freezing which can disrupt the mousse and jello layers.
- Seasonal pairing: Highlight other summer fruits alongside, but serve the cake by itself if you want to showcase the raspberry flavor in every bite.
FAQ
Conclusion
Raspberry Jello Cake stands out because of its layered textures and bright raspberry flavor that feel both celebratory and approachable. It brings together a tender sponge, airy raspberry mousse, and a shiny jello top in a way that looks impressive without requiring complex techniques. I encourage you to give it a try the next time you want a summer friendly dessert that’s easy to transport and share. The steps reward gentle handling and a little patience, and the result is a dessert that feels worth the wait.
Raspberry Jello Cake
Equipment
- Mixing Bowl
- Whisk attachment
- Mixer
- Sifter
- Glass baking dish
- Parchment Paper
- Spatula
- Measuring Cup
- Refrigerator
Ingredients
- 6 oz package raspberry jello Adds bright raspberry flavor and gelatin structure to the cake; dissolves in hot liquid to set layers and provide a fruity, slightly firm texture. Helps bind moisture and can be adjusted for sweetness when combined with other components. Works as a primary flavoring agent that complements whipped topping and fruit.
- 8 oz tub cool whip, thawed in the fridge Provides light, airy creaminess and stabilizes the cake when thawed and folded into mixtures; contributes moisture and a smooth mouthfeel. Adds sweetness and a cool contrast to the jello layers while helping create a mousse-like consistency. Helps balance tartness from raspberries and jello.
- 4 large eggs, room temp Incorporates air and structure when beaten with sugar to create a tender, stable cake base; eggs also bind ingredients and contribute to leavening. Brings richness and helps emulsify fats and liquids for a cohesive batter. Also contributes to color and a soft crumb when baked.
- 1/2 cup granulated sugar Sweetens the batter and assists in egg aeration when beaten together, promoting a delicate crumb and balanced flavor. Can caramelize slightly during baking to add depth without overpowering the raspberry components. Also affects texture by helping to tenderize the cake.
- 1/4 tsp vanilla extract Adds aromatic sweetness and enhances flavor complexity with a subtle vanilla note that complements raspberry; used sparingly to avoid overpowering fruitiness. Helps round out the overall taste profile and improves perceived sweetness. Works well combined with sugar and whipped topping.
- 1/2 cup all-purpose flour Provides structure and bulk to the cake batter, forming the framework that traps air and sets during baking. Helps create a tender crumb when combined with proper mixing and leavening from eggs. Also balances moisture and supports the incorporation of liquids.
- 1/2 cup warm water Dissolves the first raspberry jello package and moistens the batter, helping gelatin activate for proper setting; warm temperature ensures complete dissolution. Contributes to overall moisture content without thinning the batter excessively. Aids in creating smooth jello layers.
- 2 tbsp granulated sugar Adds a small additional amount of sweetness for adjustments, often used to balance tartness in the filling or drizzle; helps fine-tune the final flavor. Can assist in dissolving fruit juices or jello granules and enhance mouthfeel. Used sparingly to avoid over-sweetening delicate raspberry notes.
- 1 tsp lemon juice Provides a touch of acidity to brighten flavors and enhance the raspberry profile; helps balance sweetness and can slightly change gelatin setting behavior. Activates fruit flavor compounds and prevents the dessert from tasting cloying. Works well combined with lemon for freshness.
- 3 oz package raspberry jello Adds concentrated raspberry flavor and additional gelatin to reinforce jello layers and intensify fruitiness; dissolves in warm liquid to set. Helps create a more robust raspberry presence and firmer texture in layered components. Complements fresh raspberries and whipped topping.
- 6 oz package raspberries Contributes fresh, juicy raspberry flavor and a natural texture contrast to the dessert; adds bursts of brightness and visual appeal when distributed through the cake. Provides natural acidity and seeds that enhance authenticity and mouthfeel. Pairs well with jello and whipped cream for a vibrant finish.
Instructions
- In a large mixing bowl, combine 6 oz jello with 2 cups boiling water. Stir until dissolved then add 1 cup cold water (this is 1/2 of the cold water the package calls for). Let jello sit at room temp until just starting to set. Note: If you need to speed set jello, you can refrigerate it for 10-15 minutes at the end or until the jello is syrupy and soft set.: Steam will rise and the aroma of raspberry will be immediate, signaling that the gelatin has fully dissolved. Stir until the mixture is completely uniform and glossy, then add 1 cup cold water. You should notice the liquid cooling and taking on a syrupy sheen as it thickens at room temperature. This cooling is crucial so the jello does not scramble or curdle when mixed later. A common mistake is pouring boiling liquid onto a cool bowl and not stirring enough, leaving undissolved granules; make sure the grains are fully dissolved for a smooth mousse. If you need it set faster, refrigerate for 10 to 15 minutes until it becomes syrupy but not firm.
- Beat 4 large eggs with the whisk attachment for 1 min on high speed. With the mixer on, add 1/2 cup sugar and continue beating on high speed for 5 min until thick and fluffy. Fold in 1/4 tsp vanilla.: As you whisk, the kitchen will fill with a faint, warm egg scent and the mixture will change from translucent to pale and frothy. After about a minute you should see medium peaks forming, indicating air is being incorporated. With the mixer on, add 1/2 cup sugar and continue beating on high speed for 5 min until thick and fluffy. This stage is essential because the trapped air gives the cake lift; you want a ribboning effect when you lift the whisk. Fold in 1/4 tsp vanilla, which will scent the batter and balance the fruit. A typical error is underwhipping or overwhipping; underwhipping yields a flat cake, while overwhipping can break the structure and become dry when baked.
- Sift in 1/2 cup flour in thirds into the batter, folding it in between each addition. When mixing, scrape the bottom of the bowl to ensure you don't have pockets of flour hiding at the bottom. Fold until no streaks of flour remain; do not over-mix or you will deflate the batter. Spread batter evenly into lined glass dish and bake at 350˚F for 18-20 minutes, or until top is golden brown and springs back when poked slightly.: As you add each portion, use a gentle folding motion to combine. The batter should feel velvety and slightly elastic, and you should scrape the bottom of the bowl to make sure there are no hidden pockets of dry flour. Folding preserves the air you incorporated, producing a tender crumb. When mixed through, stop as soon as streaks disappear; overmixing will deflate the batter and produce a dense cake. Before baking, the surface should be glossy and uniform, not glossy and runny.
- Remove from oven, cut away from edges, invert onto a cooling rack and peel back the parchment paper. (Note: Let cake sit on top of the peeled back parchment paper to cool - I have found that sometimes it sticks to a cooling rack and can be hard to pry off after it cools down). Rinse and dry the baking dish then return cooled cake back to the pan.: As the cake bakes, the edges will pull away slightly from the pan and the surface will turn a light golden brown. A gentle spring back when poked indicates it is done. The aroma will be warm and subtly sweet, and the oven should sound steady without crackling. Baking too long dries the cake, while underbaking results in a gummy center. Use the visual cue of a pale gold top and the spring back test to avoid common mistakes.
- Combine the syrup ingredients: 1/2 cup warm water, 2 Tbsp sugar and 1 tsp lemon juice and set aside to cool to room temp. Brush the top of the cooled cake evenly with syrup.: You will hear a faint sigh as steam escapes when you flip it, and the cake surface will be slightly warm and fragrant. Let the cake sit on top of the peeled back parchment while cooling; this prevents sticking to the rack which can tear the crumb. If you find a piece stuck after cooling, warm the pan slightly to loosen it rather than yanking, which can rip the cake. Rinse and dry the baking dish before returning the cooled cake to the pan for assembly.
- Once jello is starting to thicken and has a slight wiggle to it, beat in 8 oz cool whip. Tip: If your mousse is watery, you should refrigerate it for 10-15 minutes until it's slightly thickened, but keep an eye on it so it doesn't set too much or it will be hard to spread.: Mixing 1/2 cup warm water, 2 tbsp sugar and 1 tsp lemon juice produces a glossy syrup that smells faintly sweet and citrusy. Let it cool to room temperature so it soaks into the cake without steaming or collapsing the crumb. The syrup adds moisture and a subtle brightness; brush it evenly and watch the cake darken slightly as it absorbs. A mistake is applying hot syrup, which will make the cake soggy and disrupt later layers.
- Pour the mousse over the cake layer and spread evenly. Top with raspberries, pushing them down slightly into the mousse. Refrigerate 1 hour or until mousse is set. Meanwhile, start making your jello topping.: As you brush, the surface should darken and glisten, and you will notice a softening of the crumb texture that signals proper absorption. Work quickly but gently, making sure the entire surface receives the syrup. If you leave puddles, blot them with a paper towel; pooling can lead to uneven texture. The purpose here is to marry the cake to the mousse, ensuring each bite is moist and cohesive.
- In a large measuring cup, combine 3 oz jello with 1 cup boiling water and stir until gelatin is dissolved. Add 1/2 cup cold water and let cool to room temp. (Tip: Never pour warm jello over the mousse or you'll end up with a creamy layer on top) Pour jello over the back of a spoon into the pyrex dish and refrigerate another hour or until fully set.: At this syrupy, slightly thick stage, the jello still has a glossy surface and a subtle wobble. Beat in the thawed cool whip until the mixture becomes a mousse, light and airy. The smell will be sweet and faintly fruity, and the texture should be smooth and hold slight peaks. If the mousse becomes watery, refrigerate 10 to 15 minutes until it firms a bit but remains spreadable. A common issue is adding cool whip to jello that is too warm, which can thin the mousse; ensure it is only slightly thickened before combining.
- Pour the mousse over the cake layer and spread evenly, then top with raspberries: As you spread, the mousse should feel cool and pillowy, and you will hear a soft, subtle scraping sound of the spatula. Press the fresh raspberries gently into the mousse so they nestle rather than sink; visually they should be partially visible and evenly distributed. This step creates textural contrast, and ensuring even berry placement helps the top layer set around the fruit. Avoid overpressing, which can push berries through the mousse and make the top uneven.
- Refrigerate 1 hour or until mousse is set, then make the jello topping: During refrigeration you will notice the mousse firming and the raspberries settling slightly into the mousse. The fridge scent will be cool and sweet, and the surface will become stable to the touch. Meanwhile, combine 3 oz jello with 1 cup boiling water and stir until dissolved, then add 1/2 cup cold water and cool to room temp. Never pour warm jello over the mousse or you will end up with a creamy layer on top instead of a clear gel, which is a common error.
- Pour jello over the back of a spoon into the pyrex dish and refrigerate another hour or until fully set: Pouring over the back of a spoon creates a gentle flow that prevents disturbing the mousse and raspberries. The jello should flow as a ribbon and settle into a glossy, even layer. Refrigerate until the top is firm and shiny; when fully set, it will have a clean jiggle. If you rush this step, the layers can mix or the topping may not gel properly, so patience is rewarded.
Notes
- Handle eggs gently: When whipping the 4 large eggs, bring them to room temperature and use the whisk attachment to create stable foam, which is the backbone of the cake's texture.
- Watch your jello temperature: Cool the dissolved 6 oz package raspberry jello to a syrupy stage before combining with 8 oz tub cool whip, or the mousse may become too thin and watery.
- Sift and fold flour: Sifting the 1/2 cup all-purpose flour and folding in thirds preserves volume and prevents a dense cake crumb.
- Brush syrup evenly: Apply the 1/2 cup warm water, 2 tbsp granulated sugar, and 1 tsp lemon juice syrup sparingly so the cake is moist but not soggy.
- Chill between layers: Allow the mousse to partially set for at least an hour before pouring the final 3 oz package raspberry jello topping to keep layers distinct and stable.
- Use fresh raspberries: The 6 oz package raspberries are best when they are ripe and dry, as wet berries can water down the mousse during assembly.