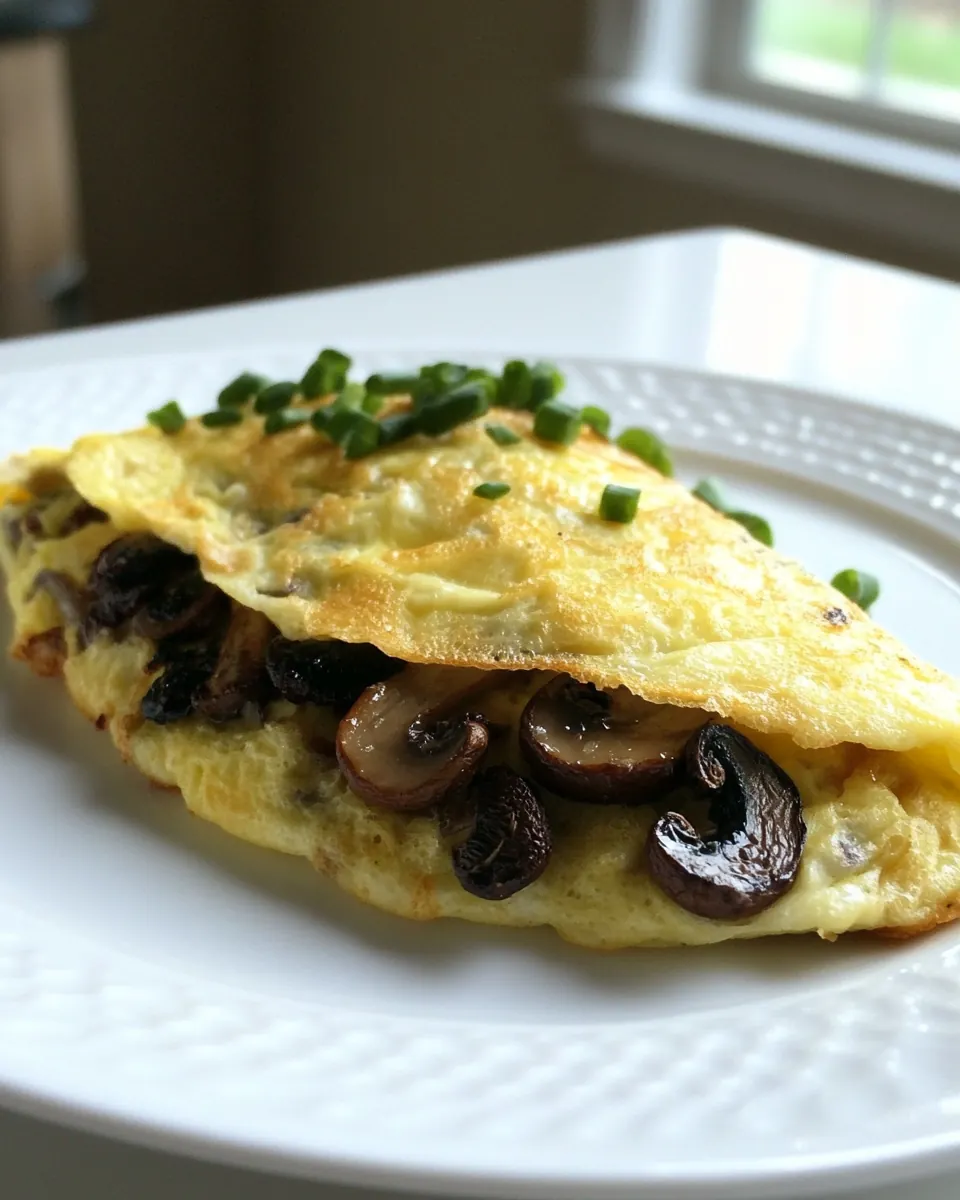
Ramp and Mushroom Omelets
Ramp and Mushroom Omelets arrived at my table on an early spring morning when the market stalls smelled like wet earth and fresh herbs, and I felt compelled to celebrate the season. I remember dragging home a bunch of ramps tucked into brown paper, and the idea of folding those garlicky greens into warm eggs with a mound of browned mushrooms felt like the right kind of small ritual to welcome longer days.
That first batch was messy, honest cooking, the kind that left a little browned crisp on the pan and a heady aroma that followed me around the kitchen. I liked how the sharp white of the ramp stalks softened but kept a bite, while the green leaves wilted into perfume. Combining those notes with coarsely grated mild cheddar cheese created a creamy counterpoint to the earthy mushrooms, and I found myself reaching for seconds without thinking.
Recipe Snapshot
15 mins
5 mins
10 mins
Easy
350 kcal
American
Gluten-Free, Low FODMAP
Breakfast
Medium non stick skillet, Spatula, Mixing bowl, Plate
Why You Need This Ramp and Mushroom Omelets
Fresh seasonal flair
I love these Ramp and Mushroom Omelets because they bring spring to the plate in a single bite. Using a bunch of tender ramps means you get that unmistakable garlicky green flavor that screams seasonality. When ramps are available, this omelet feels like a celebration of ephemeral ingredients, and I enjoy the ritual of highlighting them simply.
Balancing textures and flavors
There is something so satisfying about the contrast between silky, just set eggs and deeply caramelized mushrooms. I intentionally let the mushrooms brown until they give up their moisture and turn golden, because that concentration of flavor lifts the whole dish. The coarsely grated mild cheddar cheese melts into pockets of creamy richness, rounding the sharper ramp notes.
Fast, flexible, and forgiving
I reach for this recipe when I want a reliable, quick meal that still tastes like effort. The method is forgiving, so if your timing is slightly off, you still end up with a lovely omelet. It works for a solo breakfast, a lazy brunch, or a light dinner, and you can scale it without stress.
Simple technique, big payoff
I appreciate that the steps teach subtle pan work, folding, and timing that pay dividends in texture. Learning to pull large curds and fold with confidence makes you a stronger cook, and this dish is a gentle way to practice. The sensory cues the pan gives you are obvious and very helpful, so you get better each time you make it.
Comfort with a gourmet twist
This is comfort food with a small gourmet nudge. The ingredients are humble, yet when combined thoughtfully the result reads elevated. I keep coming back to these Ramp and Mushroom Omelets because they feel like a little luxury that is easy to achieve on a weeknight.
Ramp and Mushroom Omelets Ingredients

These ingredients are deliberately simple, allowing each component to shine. The key players are the earthy mushrooms, the bright garlicky ramps, the binding richness of the eggs, and the melting comfort of cheddar cheese. Together they create an interplay of texture and flavor where no single element overpowers the others.
- Olive oil: Drizzle to coat the pan and provide a medium for sautéing mushrooms and ramps, helping flavors meld and preventing sticking. Offer a subtle fruitiness that complements earthy mushrooms and bright ramps when heated gently.
- 8 ounces mixed mushrooms cremini, Portobello, shitakes, finely sliced: Sliced finely to develop deep, savory umami through caramelization; release moisture while absorbing oil and aromatics. Provide textural contrast and meaty bite that anchors the omelet's flavor profile.
- 1 bunch ramps trimmed of their root, white and green parts cut into 1-inch pieces: Cut into 1-inch pieces to deliver a sharp, garlicky-spring onion flavor that brightens the dish; cook briefly to soften without losing color. Add green and white parts for layered aroma and a fresh, herbaceous lift to the mushrooms and eggs.
- Sea salt: Sprinkle to enhance and balance savory notes, drawing out mushroom umami and intensifying the ramps' sweetness; use judiciously to avoid overpowering. Aid in seasoning eggs and cheese uniformly for a well-rounded finished omelet.
- 6 eggs beaten: Whisk to form the custardy base of the omelet, providing structure, richness, and moisture when cooked; beat until homogenous for even texture. Bind the mushrooms, ramps, and cheese together while setting into tender curds during gentle cooking.
- 1/2 cup coarsely grated mild cheddar cheese: Grate coarsely to melt into pockets of creamy, tangy flavor that enrich the eggs and complement the mushrooms. Provide a mild cheddar bite and gooey mouthfeel that creates pleasant contrast with sauteed vegetables.
Preparation Steps for Ramp and Mushroom Omelets

These directions teach pan control, timing, and an intuitive feel for eggs. Read them through once, then cook while paying attention to visual and auditory cues. The following steps expand on each action so you know what to look, smell, and listen for.
- Heat 2 tablespoons of olive oil in a medium non-stick skillet over high heat. Add the mushrooms and sauté, stirring occasionally, until they’ve released their moisture and begun to deeply brown, about 6-8 minutes. Stir in the ramps and cook for another 2 minutes, until the greens are very wilted and the whites are al dente. Set aside.: When the oil shimmers and moves quickly across the pan, you will hear a faint sizzle as it makes contact with the mushrooms , which signals the right temperature for browning. Browning creates complex savory notes through Maillard reactions, and that deep color is essential for the dish. A frequent mistake is starting with too cool a pan which causes the mushrooms to release moisture and steam instead of sear. If the oil smokes heavily, reduce heat slightly to avoid bitter, burnt flavors.
- Wipe out the skillet and return to medium heat. Add 1 tablespoon of olive oil and swirl it to coat the pan. Pour in half the egg mixture. Using a spatula or fork slowly scramble the eggs – waiting for large curds to form on the bottom before redistributing into an even layer. When there is only a slight layer of uncooked egg, sprinkle half the omelet with half the mushroom mixture and top with half the cheese. Slide your spatula around the edges to loosen the omelet. Tilt the pan and tap it against the stove or counter top to loosen even more. Tilting the pan, slide the naked side of the omelet towards you and gently fold in half to sandwich the filling side. Place a plate over the pan and invert the omelet onto it. Repeat with the remaining ingredients.: You will notice a progression from pale and glossy to richly golden with sticky brown bits forming on the pan, and the aroma will shift from earthy to roasted and nutty. Stirring only occasionally allows those brown bits to develop and intensify flavor. The why is simple, concentrated flavor comes from caramelization, and patience is the technique. Avoid crowding the pan, which traps moisture and prevents browning; if your mushrooms stew, spoon off excess liquid and raise heat to finish browning.
- Serve alongside mixed greens and/or skillet home fries.: As the ramps hit the pan you will smell a fresh garlic like perfume, and the bright green leaves will quickly soften while the white parts retain a slight bite. This contrast adds both flavor and texture to the filling. Cooking briefly protects their delicate aroma while cooking the denser white bits to tenderness. Common misstep is overcooking the leaves into a limp, flavorless mass, so watch the color closely and remove from heat when they look glossy and collapsed.
- Set aside: Transfer the cooked vegetables off the heat so residual pan heat does not continue to cook them and wilt the ramps further. Leaving them in a hot pan will shift texture and can make the filling soggy inside the omelet. The reason to rest them is to control final doneness and keep the fillings distinct. Avoid leaving them exposed for too long or they may cool and lose aroma, so keep them covered lightly if you need a pause.
- Wipe out the skillet and return to medium heat: Cleaning the pan removes browned bits that could burn during the next stage, and returning to medium heat creates an even surface for cooking eggs . You should hear a softer, even sizzle when oil is added next. If you skip wiping the pan you risk uneven cooking due to stuck bits, and burnt residues can impart bitter notes. Use a paper towel carefully to avoid burns when handling the hot skillet.
- Add 1 tablespoon of olive oil and swirl it to coat the pan: The thin oil film helps create a nonstick layer and transmits heat so the eggs set evenly. The swirl should leave a glossy sheen across the surface, and you will see the oil pool briefly before settling. This step ensures gentle browning and easy sliding of the omelet later. If you pour too much oil the eggs may fry rather than gently set, resulting in a heavier texture.
- Pour in half the egg mixture: The eggs should spread to coat the pan in a thin even layer, and you will see edges begin to set with a tiny fringe of cooked egg. Even distribution matters because uneven thickness leads to undercooked centers or overly firm edges. Pour slowly and tilt the pan to encourage an even layer. A common issue is pouring into an overheated pan which causes immediate, uneven coagulation; if that happens, lower the heat and give the liquid a moment to settle.
- Using a spatula or fork slowly scramble the eggs, waiting for large curds to form on the bottom before redistributing into an even layer: Listen for a gentle crackle as the egg sets, and look for the formation of substantial curds rather than tiny grains, which keeps the interior tender. Creating large curds means you are not overworking the protein structure, and it results in a creamier final texture. This technique controls moisture and softness. Avoid constant vigorous stirring which breaks curds into tiny fragments and yields a dry texture.
- When there is only a slight layer of uncooked egg, sprinkle half the omelet with half the mushroom mixture and top with half the cheese: The surface should look mostly set with just a glossy sheen of uncooked egg left, which will help the filling adhere without leaking. Adding the filling at this stage ensures warmth without overcooking. The cheese should begin to soften and knit the filling together. A frequent error is adding fillings too early, causing the eggs to remain too liquid and produce a runny center.
- Slide your spatula around the edges to loosen the omelet: As the edges lift cleanly you will see the underside develop a pale gold, and the omelet should move freely when you nudge it. This loosening is crucial for the gentle folding that follows. If the omelet sticks, use a small amount more oil and let it cook a few extra seconds; forcing it can tear the surface and spill the filling.
- Tilt the pan and tap it against the stove or counter top to loosen even more: The tilting and tapping encourages any clinging portions to release, and you may hear a soft sliding sound as the omelet shifts. This motion helps the folding step be smooth and keeps the filling intact. The reason is mechanical, gentle force completes the release without aggressive scraping. Be careful not to tap too hard or let the omelet slosh and open up prematurely.
- Tilting the pan, slide the naked side of the omelet towards you and gently fold in half to sandwich the filling side: You should see a soft seam form where the two halves meet, and the fold creates a compact pocket that finishes cooking from residual heat. Folding gently preserves the curds and prevents squeezing out the filling. The why is texture preservation, and a common mistake is forcing a fold which can push out cheese and make a mess.
- Place a plate over the pan and invert the omelet onto it: The inversion should be quick and confident, yielding a glossy, folded omelet on the plate with the seam hidden underneath. This presentation step seals the shape and allows any residual cooking to finish off the top. If the omelet sticks, slide a thin spatula underneath while inverting to guide it free. Hesitation here can cause tearing or collapse.
- Repeat with the remaining ingredients: As you cook the second omelet you will find the rhythm of heat, oil, and timing becomes familiar, and the sensory cues come faster. The second time through is often neater, as the pan temperature and your technique have adjusted. This repetition locks in the texture you want. A common slip is rushing through the second round; keep attention on the same cues to ensure consistent results.
- Serve alongside mixed greens and or skillet home fries: The finished omelets should be warm, slightly glossy from melted cheese , and fragrant with ramps and browned mushrooms . Pairing with a crisp green or starchy potato offers balance and rounds the meal. Serve immediately for best texture, and note that sitting too long will soften the exterior and diminish the contrasts you worked to create.
Change It Up
If you want to vary these Ramp and Mushroom Omelets, small swaps will shift the profile without losing the soul of the dish. Below I offer ideas to change texture, intensity, and presentation while keeping the technique intact.
- Make it herb forward: Fold in chopped fresh herbs like chives or parsley to the beaten eggs just before pouring for a bright finish that complements the ramps.
- Swap the cheese texture: Try a softer melting cheese in place of mild cheddar cheese if you prefer silkier pockets of melted dairy throughout.
- Vary the mushroom mix: Use more robust mushrooms like king trumpet for a meatier bite, which deepens the umami and pairs beautifully with ramps.
- Change the fat: Use an infused oil or a knob of butter in place of some olive oil for a richer mouthfeel and slightly toasted flavor nuances.
- Make mini omelets: Cook smaller portions in a ring or smaller skillet to create individual servings that are perfect for a brunch spread or party platter.
What Goes Well With This Ramp and Mushroom Omelets
These omelets pair nicely with bright, crisp sides and comforting starches. Consider settings and pairings that balance the earthy and garlicky notes so the meal feels composed and complete.
- Mixed greens salad: A simple dressed salad with a tangy vinaigrette cuts through the richness and brings refreshing contrast to the eggs.
- Skillet home fries: Crisp pan roasted potatoes provide a crunchy, starchy partner and make the meal heartier for lunch or dinner.
- Brunch gathering: Serve these as part of a brunch spread alongside toasted bread and fresh fruit for a balanced table.
- Weeknight dinner: Plate with a light green and quick roasted vegetables for a satisfying, quick evening meal that feels special.
- Seasonal pairing: Since ramps are springtime, pair with other spring produce like asparagus or peas to lean into seasonal flavors.
- Storage tips: Keep fillings and cooked omelets separate if you need to store leftovers, refrigerate in airtight containers, and reheat gently to avoid toughening the eggs.
FAQ
Conclusion
What makes these Ramp and Mushroom Omelets special is the way seasonal ramps and caramelized mushrooms harmonize with tender eggs and melting cheddar cheese to create a simple yet layered dish. Give it a try when ramps are at their peak, or use a thoughtful substitute if needed, and focus on the sensory cues like browning and silky curds to guide you. I hope you enjoy the ritual of quick sautéing, the aromatic lift of ramps, and the satisfying fold of a well made omelet; it is an approachable recipe that rewards attention and tastes like spring on a plate.

Ramp and Mushroom Omelets
Equipment
- Medium non stick skillet
- Spatula
- Mixing Bowl
- Plate
Ingredients
- Olive oil Drizzle to coat the pan and provide a medium for sautéing mushrooms and ramps, helping flavors meld and preventing sticking. Offer a subtle fruitiness that complements earthy mushrooms and bright ramps when heated gently.
- 8 ounces mixed mushrooms cremini, Portobello, shitakes, finely sliced Sliced finely to develop deep, savory umami through caramelization; release moisture while absorbing oil and aromatics. Provide textural contrast and meaty bite that anchors the omelet's flavor profile.
- 1 bunch ramps trimmed of their root, white and green parts cut into 1-inch pieces Cut into 1-inch pieces to deliver a sharp, garlicky-spring onion flavor that brightens the dish; cook briefly to soften without losing color. Add green and white parts for layered aroma and a fresh, herbaceous lift to the mushrooms and eggs.
- Sea salt Sprinkle to enhance and balance savory notes, drawing out mushroom umami and intensifying the ramps' sweetness; use judiciously to avoid overpowering. Aid in seasoning eggs and cheese uniformly for a well-rounded finished omelet.
- 6 eggs beaten Whisk to form the custardy base of the omelet, providing structure, richness, and moisture when cooked; beat until homogenous for even texture. Bind the mushrooms, ramps, and cheese together while setting into tender curds during gentle cooking.
- 1/2 cup coarsely grated mild cheddar cheese Grate coarsely to melt into pockets of creamy, tangy flavor that enrich the eggs and complement the mushrooms. Provide a mild cheddar bite and gooey mouthfeel that creates pleasant contrast with sauteed vegetables.
Instructions
- Heat 2 tablespoons of olive oil in a medium non-stick skillet over high heat. Add the mushrooms and sauté, stirring occasionally, until they’ve released their moisture and begun to deeply brown, about 6-8 minutes. Stir in the ramps and cook for another 2 minutes, until the greens are very wilted and the whites are al dente. Set aside.: When the oil shimmers and moves quickly across the pan, you will hear a faint sizzle as it makes contact with the mushrooms , which signals the right temperature for browning. Browning creates complex savory notes through Maillard reactions, and that deep color is essential for the dish. A frequent mistake is starting with too cool a pan which causes the mushrooms to release moisture and steam instead of sear. If the oil smokes heavily, reduce heat slightly to avoid bitter, burnt flavors.
- Wipe out the skillet and return to medium heat. Add 1 tablespoon of olive oil and swirl it to coat the pan. Pour in half the egg mixture. Using a spatula or fork slowly scramble the eggs – waiting for large curds to form on the bottom before redistributing into an even layer. When there is only a slight layer of uncooked egg, sprinkle half the omelet with half the mushroom mixture and top with half the cheese. Slide your spatula around the edges to loosen the omelet. Tilt the pan and tap it against the stove or counter top to loosen even more. Tilting the pan, slide the naked side of the omelet towards you and gently fold in half to sandwich the filling side. Place a plate over the pan and invert the omelet onto it. Repeat with the remaining ingredients.: You will notice a progression from pale and glossy to richly golden with sticky brown bits forming on the pan, and the aroma will shift from earthy to roasted and nutty. Stirring only occasionally allows those brown bits to develop and intensify flavor. The why is simple, concentrated flavor comes from caramelization, and patience is the technique. Avoid crowding the pan, which traps moisture and prevents browning; if your mushrooms stew, spoon off excess liquid and raise heat to finish browning.
- Serve alongside mixed greens and/or skillet home fries.: As the ramps hit the pan you will smell a fresh garlic like perfume, and the bright green leaves will quickly soften while the white parts retain a slight bite. This contrast adds both flavor and texture to the filling. Cooking briefly protects their delicate aroma while cooking the denser white bits to tenderness. Common misstep is overcooking the leaves into a limp, flavorless mass, so watch the color closely and remove from heat when they look glossy and collapsed.
- Set aside: Transfer the cooked vegetables off the heat so residual pan heat does not continue to cook them and wilt the ramps further. Leaving them in a hot pan will shift texture and can make the filling soggy inside the omelet. The reason to rest them is to control final doneness and keep the fillings distinct. Avoid leaving them exposed for too long or they may cool and lose aroma, so keep them covered lightly if you need a pause.
- Wipe out the skillet and return to medium heat: Cleaning the pan removes browned bits that could burn during the next stage, and returning to medium heat creates an even surface for cooking eggs . You should hear a softer, even sizzle when oil is added next. If you skip wiping the pan you risk uneven cooking due to stuck bits, and burnt residues can impart bitter notes. Use a paper towel carefully to avoid burns when handling the hot skillet.
- Add 1 tablespoon of olive oil and swirl it to coat the pan: The thin oil film helps create a nonstick layer and transmits heat so the eggs set evenly. The swirl should leave a glossy sheen across the surface, and you will see the oil pool briefly before settling. This step ensures gentle browning and easy sliding of the omelet later. If you pour too much oil the eggs may fry rather than gently set, resulting in a heavier texture.
- Pour in half the egg mixture: The eggs should spread to coat the pan in a thin even layer, and you will see edges begin to set with a tiny fringe of cooked egg. Even distribution matters because uneven thickness leads to undercooked centers or overly firm edges. Pour slowly and tilt the pan to encourage an even layer. A common issue is pouring into an overheated pan which causes immediate, uneven coagulation; if that happens, lower the heat and give the liquid a moment to settle.
- Using a spatula or fork slowly scramble the eggs, waiting for large curds to form on the bottom before redistributing into an even layer: Listen for a gentle crackle as the egg sets, and look for the formation of substantial curds rather than tiny grains, which keeps the interior tender. Creating large curds means you are not overworking the protein structure, and it results in a creamier final texture. This technique controls moisture and softness. Avoid constant vigorous stirring which breaks curds into tiny fragments and yields a dry texture.
- When there is only a slight layer of uncooked egg, sprinkle half the omelet with half the mushroom mixture and top with half the cheese: The surface should look mostly set with just a glossy sheen of uncooked egg left, which will help the filling adhere without leaking. Adding the filling at this stage ensures warmth without overcooking. The cheese should begin to soften and knit the filling together. A frequent error is adding fillings too early, causing the eggs to remain too liquid and produce a runny center.
- Slide your spatula around the edges to loosen the omelet: As the edges lift cleanly you will see the underside develop a pale gold, and the omelet should move freely when you nudge it. This loosening is crucial for the gentle folding that follows. If the omelet sticks, use a small amount more oil and let it cook a few extra seconds; forcing it can tear the surface and spill the filling.
- Tilt the pan and tap it against the stove or counter top to loosen even more: The tilting and tapping encourages any clinging portions to release, and you may hear a soft sliding sound as the omelet shifts. This motion helps the folding step be smooth and keeps the filling intact. The reason is mechanical, gentle force completes the release without aggressive scraping. Be careful not to tap too hard or let the omelet slosh and open up prematurely.
- Tilting the pan, slide the naked side of the omelet towards you and gently fold in half to sandwich the filling side: You should see a soft seam form where the two halves meet, and the fold creates a compact pocket that finishes cooking from residual heat. Folding gently preserves the curds and prevents squeezing out the filling. The why is texture preservation, and a common mistake is forcing a fold which can push out cheese and make a mess.
- Place a plate over the pan and invert the omelet onto it: The inversion should be quick and confident, yielding a glossy, folded omelet on the plate with the seam hidden underneath. This presentation step seals the shape and allows any residual cooking to finish off the top. If the omelet sticks, slide a thin spatula underneath while inverting to guide it free. Hesitation here can cause tearing or collapse.
- Repeat with the remaining ingredients: As you cook the second omelet you will find the rhythm of heat, oil, and timing becomes familiar, and the sensory cues come faster. The second time through is often neater, as the pan temperature and your technique have adjusted. This repetition locks in the texture you want. A common slip is rushing through the second round; keep attention on the same cues to ensure consistent results.
- Serve alongside mixed greens and or skillet home fries: The finished omelets should be warm, slightly glossy from melted cheese , and fragrant with ramps and browned mushrooms . Pairing with a crisp green or starchy potato offers balance and rounds the meal. Serve immediately for best texture, and note that sitting too long will soften the exterior and diminish the contrasts you worked to create.
Notes
- Make it herb forward: Fold in chopped fresh herbs like chives or parsley to the beaten eggs just before pouring for a bright finish that complements the ramps.
- Swap the cheese texture: Try a softer melting cheese in place of mild cheddar cheese if you prefer silkier pockets of melted dairy throughout.
- Vary the mushroom mix: Use more robust mushrooms like king trumpet for a meatier bite, which deepens the umami and pairs beautifully with ramps.
- Change the fat: Use an infused oil or a knob of butter in place of some olive oil for a richer mouthfeel and slightly toasted flavor nuances.
- Make mini omelets: Cook smaller portions in a ring or smaller skillet to create individual servings that are perfect for a brunch spread or party platter.