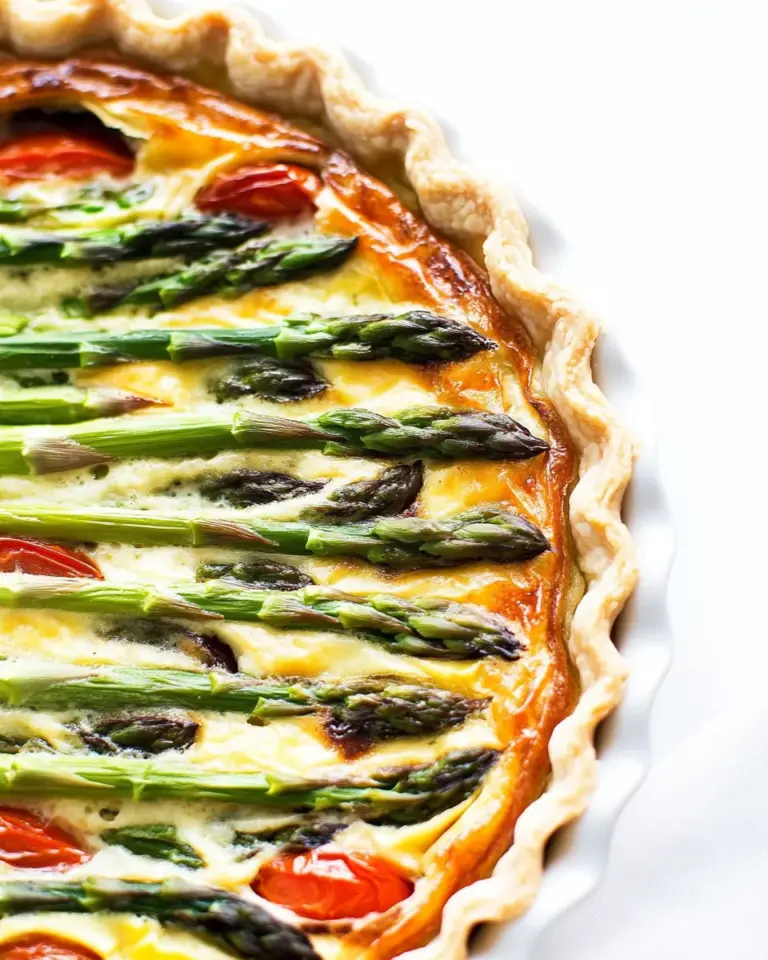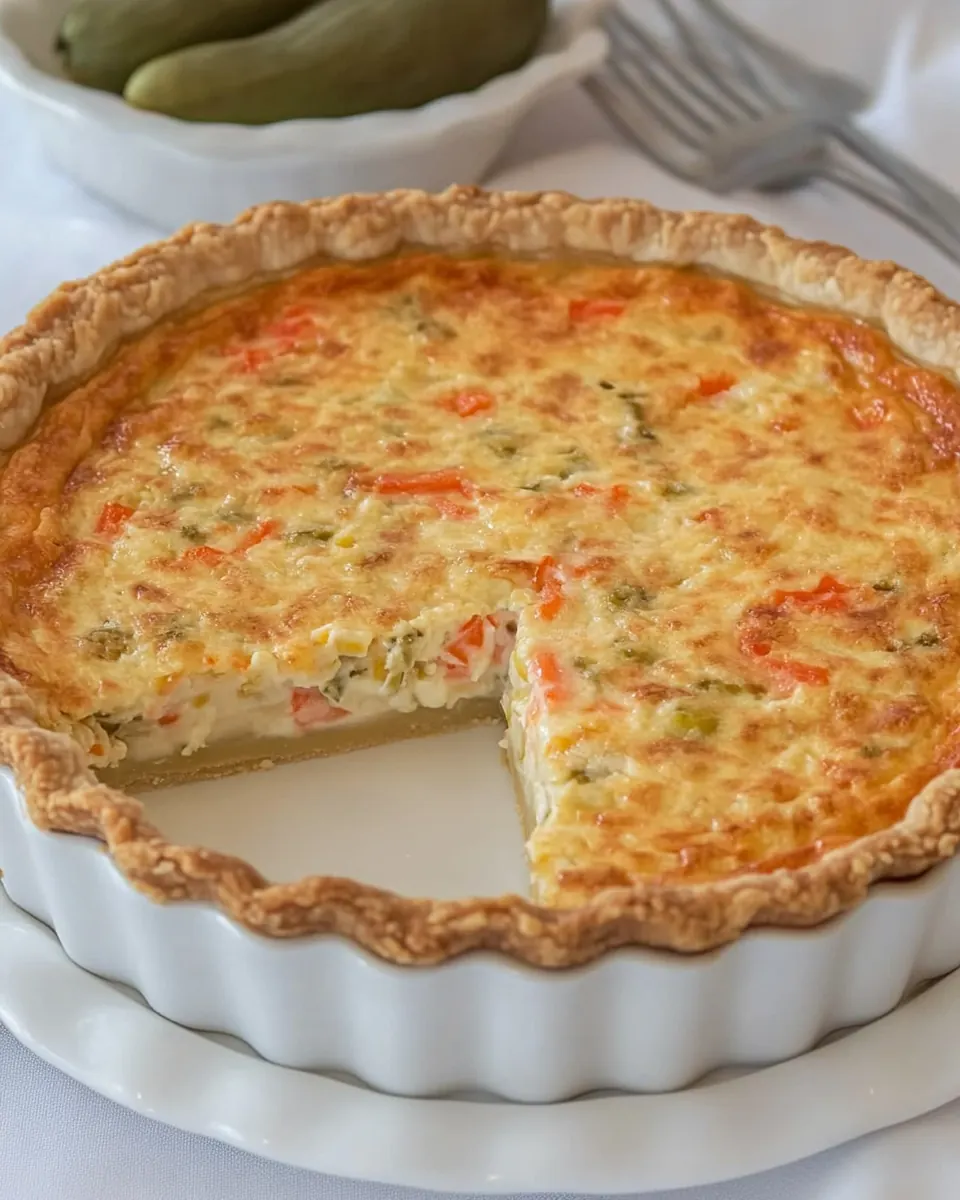
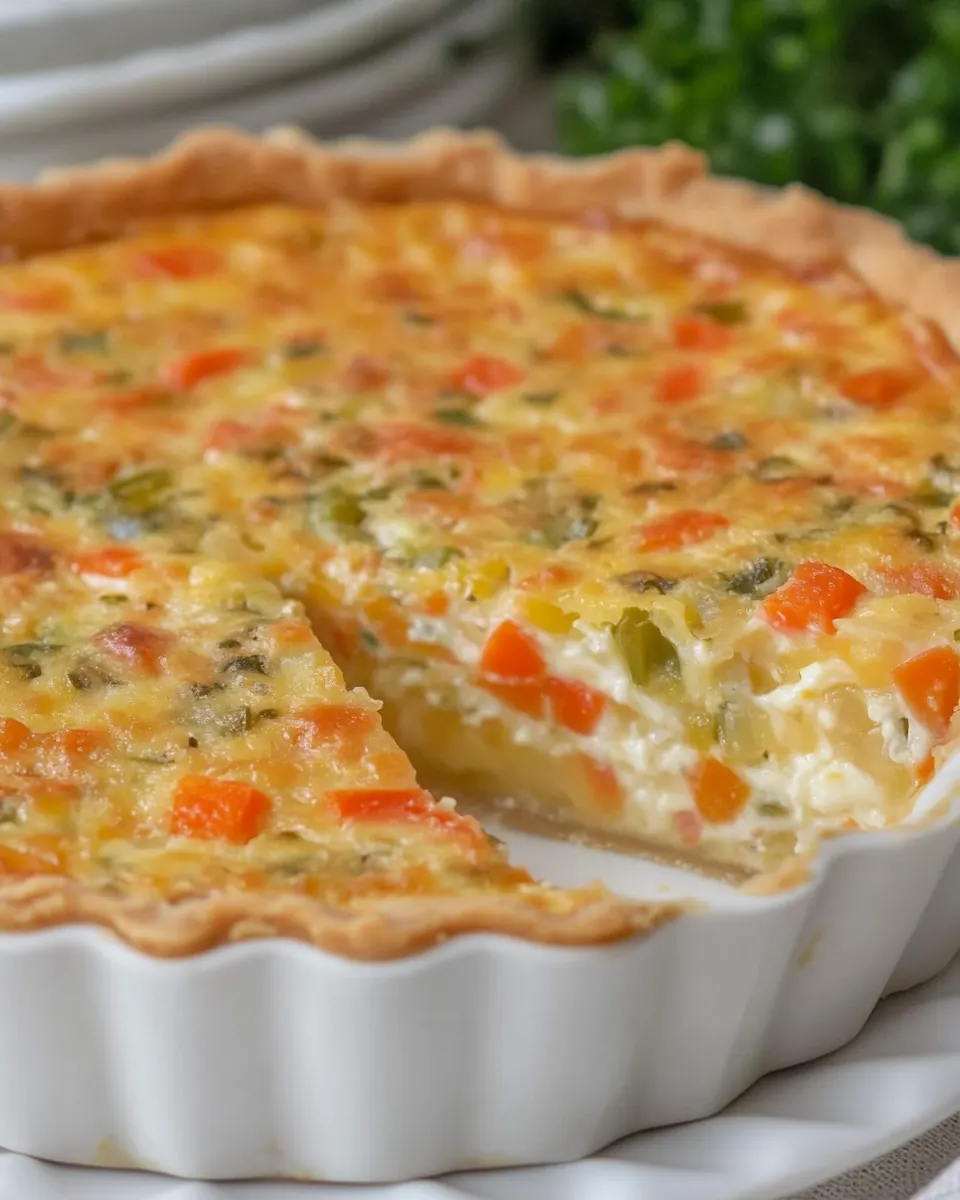
Quiche Maraîchere
Quiche Maraîchere is one of those recipes I reach for when I want vegetables to feel celebratory, and it always takes me back to a breezy spring afternoon in my tiny kitchen where the scent of softened leeks and buttered crust filled the whole apartment.
That day I was experimenting with a simple tart shell and a handful of garden produce, trying to coax out layers of flavor without fuss. The gentle simmer of the vegetables, the hush of the cream folding into eggs, it all reminded me why simple techniques reward patience. I sliced the leeks paper thin, diced the carrots and bell pepper so they would melt into the custard, and felt that quiet satisfaction when the filling set with a golden, puffed center. I like to think of Quiche Maraîchere as a vegetable celebration, rustic and refined all at once, something I would serve to friends who appreciate comfort with a light touch.
Over time I learned to trust the little signals the recipe gives you, the soft sigh when the vegetables are ready, the moment the custard settles into place, and the first crackle when the cheese browns on top. Each bake taught me a small lesson, and I began to make subtle adjustments depending on what I had on hand. Today I want to share that same warmth and those practical tips, because this tart has a way of turning ordinary produce into something memorable. If you like quiches that are layered with texture and gentle savory notes, you will enjoy making and serving Quiche Maraîchere.
Recipe Snapshot
45 mins
15 mins
30 mins
Medium
350 kcal
French
Gluten-Free, Low FODMAP
Dinner
Skillet, Whisk, Baking sheet, Parchment paper, Wire rack
Why This Quiche Maraîchere Stands Out
Vegetables take center stage
I love how Quiche Maraîchere showcases simple produce like leeks, carrots, celery, and red bell pepper. Each vegetable brings its own texture, and when lightly sautéed they meld into a tender, flavorful bed for the custard. The result is bright, layered, and never dull, which is why I keep returning to this combination.
Creamy yet light custard
The balance of heavy cream, egg, and egg yolk gives a silkiness that coats each forkful without feeling overwhelmingly rich. I find that this custard holds the filling together while letting the vegetable flavors shine, giving you a luscious mouthfeel without masking the produce.
Make-ahead friendly
This tart is a good candidate for preparing components in advance. I often cook the vegetables and cool them before assembly, which means less fuss on the day you want to serve it. That flexibility is a real lifesaver when you want to host without rushing around in the kitchen.
Textural contrast
The partially baked tart shell provides a crisp counterpoint to the soft filling, and a sprinkle of grated cheese at the end adds a toasty finish. I adore that moment when the crust holds firm while the center sets, it makes each bite interesting.
Approachable technique
You do not need advanced skills to succeed here. I remember the first time I made this tart, I was surprised at how forgiving it was. Small adjustments for seasoning and the careful pouring of custard make a big difference, and that accessibility is one of the reasons I recommend it to home cooks.
Main Ingredients for Quiche Maraîchere

The philosophy behind these ingredients is about harmony and restraint. Each item plays a distinct role so the final tart feels balanced: aromatic leeks and celery add savory depth, carrots and red bell pepper bring natural sweetness and color, while the custard binds everything into a creamy, sliceable filling. The shell provides structure, and a final dusting of grated cheese contributes that browned, slightly nutty finish that pulls the whole dish together.
- 1 tablespoon butter: Melted to provide a rich cooking fat and gentle browning for the vegetables, enhancing overall flavor and preventing sticking; use at the start of sautéing to build the base of the quiche’s savory profile.
- 2 celery stalks, small dice: Chopped finely to add gentle aromatic crunch and a subtle vegetal bitterness; cook until softened to contribute texture and savory depth without overpowering other flavors.
- 2 slender leeks, white and light green parts only, quartered lengthwise, washed, and thinly sliced: Sliced thinly to contribute a mild onion-like sweetness and tender texture; wash thoroughly before slicing to remove grit and sauté until translucent for a delicate aromatic layer.
- 2 slender carrots, peeled, and finely diced: Diced small to provide sweet, earthy notes and slight textural contrast; sauté with other vegetables until tender so its natural sugars develop and complement the filling.
- 1 medium red bell pepper, finely diced: Diced finely to add bright, sweet peppery flavor and a touch of acidity; cook briefly to soften while preserving vibrant color and a pleasant bite within the quiche.
- Salt and freshly ground pepper: Seasoned sparingly to balance and enhance all flavors; add gradually while cooking and adjust at the end to ensure the filling and crust are properly seasoned.
- 1 9-inch tart shell, partially baked and cooled: Baked partially to serve as the crisp, buttery vessel that holds the filling; pre-baking prevents a soggy bottom and yields a firm, golden shell ready for the custard.
- 2/3 cup heavy cream: Poured to create a rich, creamy custard base that binds the filling and adds silkiness; whisk with eggs and strain if desired for an ultra-smooth texture before pouring into the shell.
- 1 egg: Beaten to help set the custard and provide structure; combine with cream and other eggs to achieve the proper firmness and a tender, sliceable quiche texture.
- 1 egg yolk: Whisked to enrich the custard and add additional silkiness and color; incorporate with the whole egg and cream to fine-tune the quiche’s richness and firmness.
- 2/3 cup grated cheese, I used Gruyère: Grated to contribute nutty, savory melted cheese flavor and a golden top; sprinkle into the custard and on top so it melts into the filling and browns attractively during baking.
How to Assemble Quiche Maraîchere
Assembling the tart is a gentle, sensory process, and it helps to work with cooled vegetables and a cold crust for the cleanest result. Follow each step carefully, and rely on visual and tactile cues so your timing is spot on.
- Melt the butter in a large skillet over medium-low heat. Toss in the vegetables and cook, stirring, for about 10 minutes, or until they are tender.: You will notice the butter soften and begin to foam gently, releasing a warm, nutty aroma that signals it is ready. The sound here is quiet, a soft whisper as the butter settles into the pan; avoid raising the heat which makes it sizzle aggressively and risk browning. The reason this low heat matters is that it allows the vegetables to sweat, releasing moisture slowly and concentrating flavors without caramelizing. A common mistake is rushing with high heat which results in browned edges and an unevenly cooked filling; keep the flame modest and be patient.
- Season with salt and pepper, then place the vegetables into a bowl and let cool.: As you add the diced celery , sliced leeks , diced carrots , and diced red bell pepper , you will hear gentle sizzling and see the pieces gleam with softened butter . Stirring regularly helps the vegetables soften uniformly and prevents any single piece from clinging to the pan and browning too quickly. The visual cue to watch for is translucency in the leeks and a slight give in the carrots when pierced with a fork. This step concentrates flavors and reduces excess moisture, which is why it matters for a non soggy tart. A potential pitfall is overcrowding the pan, which causes steaming instead of gentle sweating, so use a wide skillet if possible.
- Preheat the oven to 400 degrees. Put the crust on a baking sheet lined with parchment paper.: The first sprinkle of salt and freshly ground pepper awakens the vegetables and balances their natural sweetness. Moving them to a bowl and allowing them to cool prevents the residual heat from prematurely cooking the custard when poured into the tart shell. The tactile cue is that the vegetables stop steaming and become warm rather than hot; this helps preserve the texture of the filling. Avoid pouring piping hot vegetables into the shell, as that can make the custard overcook and curdle in spots.
- Spoon the vegetables into the tart shell and spread them out evenly.: You should feel the warmth of anticipation as the oven reaches temperature and the kitchen becomes slightly warmer; this is the right moment to ready your baking sheet and parchment. Setting the oven accurately ensures the crust crisps and the custard sets in the correct time frame. Using an oven that has not fully preheated can lead to underbaked centers or a crust that takes too long to brown. If your oven runs hot or cold, consider using an oven thermometer to get consistent results.
- Whisk the cream, egg, and egg yolk together, season with salt and pepper, and carefully pour over the vegetables. You may have too much custard, so wait for it to settle and add just enough so your tart shell does not overflow.: The parchment prevents sticking and makes it easier to slide the tart into and out of the oven, and the baking sheet provides stability so the shell does not warp while baking. You'll notice the crust is fragile when cold, so handle it gently and center it on the sheet for even heat circulation. A common oversight is placing the shell directly on a rack which can cause spills if the custard overflows; the baking sheet catches any spills and protects your oven.
- Carefully place the baking sheet into the oven.: The act of spooning reveals subtle sounds, a soft pat as the vegetables settle into the shell, and visually you want an even layer so every slice has a balanced mix. Use the back of your spoon to gently level the surface without pressing too hard which would compress the vegetables and change the final texture. Even distribution matters because denser pockets can affect how the custard sets locally. Avoid piling vegetables in the center, which can lead to an uneven bake and a soggy middle.
- Bake for 20 minutes. Sprinkle the cheese over the top and bake for another 5 to 10 minutes, or until the cheese is light brown and the center is puffed and set.: The whisking creates a silky, homogeneous custard and you will see it form ribbons as it falls back into the bowl. Pouring gently allows the liquid to soak around the vegetables without displacing them, and waiting for it to settle helps you judge how much the shell can hold. The custard should flow smoothly and not be foamy; excessive whisking that introduces air can create unwanted bubbles in the set. A troubleshooting note: if you end up with too much custard, spoon some out rather than risk overflow during baking.
- Let cool on a wire rack before serving.: Sliding the sheet into the preheated oven you will hear the quiet thud of metal meeting hot racks, and the smell of warming butter and vegetables will intensify. Positioning the sheet in the center rack gives even heat to the shell and filling. This step matters because consistent oven environment helps the custard set evenly. Avoid opening the oven frequently during the initial bake, as temperature fluctuations can cause the center to deflate.
- Bake for 20 minutes: As it bakes you will notice the edges of the crust take on a deeper color and the center begins to puff slightly, a visual cue that the custard is coagulating. The sound is mostly quiet but occasional tiny pops as trapped steam escapes are normal. This stage sets the structure so the filling holds together. A frequent mistake is baking for too short a time which leaves the center wobbly; if your oven heats unevenly, rotate the sheet once midway to promote even browning.
- Sprinkle the cheese over the top and bake for another 5 to 10 minutes, or until the cheese is light brown and the center is puffed and set: When you add the grated cheese you will immediately smell its richer, toasted aroma as it melts into the warm custard. The final minutes of baking develop a golden top and a slightly crisp texture where the cheese browns, signaling readiness. The puffed center should hold with a slight jiggle but not be liquid. Overbaking can dry the custard out, so watch carefully; remove it as soon as the center is set and the cheese is nicely colored.
- Let cool on a wire rack before serving: Cooling allows the custard to finish setting and makes slicing cleaner, and you will appreciate the way the tart firms up as it rests. The fragrance will mellow slightly and the structure becomes easier to handle. Trying to slice it while too hot can cause the filling to spill and tear the crust, which is why a cooling time is important. Aim for a warm or room temperature slice rather than serving straight from the oven.
Making Adjustments

I like to offer options that keep the recipe true to its character while letting you adapt it to what you have. Below are practical adjustments and small technique notes to help you vary texture, seasoning, and presentation without losing the heart of the tart.
- Adjust the custard richness, by slightly reducing the heavy cream and increasing the whole egg if you want a firmer set with less richness; this alters mouthfeel but maintains structure.
- Vegetable timing, cook firmer vegetables like carrots a bit longer before adding softer ones so everything finishes tender at the same moment; staggered cooking prevents crunchy surprises.
- Salt in stages, season both during vegetable cooking and again in the custard to build balanced seasoning; taste the cooled vegetables before final seasoning to avoid oversalting.
- Cheese placement, add the grated cheese toward the end of baking for a browned top, or dot some on the vegetables before pouring the custard for pockets of melted flavor throughout.
- Crust handling, blind bake the tart shell until just set to protect against sogginess, and cool it fully before filling for the cleanest slices.
Serve This Quiche Maraîchere With
This tart pairs beautifully with light salads, seasonal sides, or as the centerpiece of a casual brunch. Below I suggest serving ideas, occasions that suit the tart, and storage tips so you can enjoy leftovers without sacrificing texture.
- Light green salad, a crisp salad with a bright vinaigrette complements the creamy custard and balances richness for a spring lunch or light dinner.
- Simple soup, a bowl of clear vegetable broth or a chilled soup can make this tart feel like part of a composed multi course meal for a relaxed weekend gathering.
- Brunch spread, include slices of the tart alongside sliced fruit and warm bread for a convivial brunch where guests can graze and sample small plates.
- Picnic friendly, serve slices at room temperature for an easy outdoor meal, and pack in a flat container to keep slices intact during transport.
- Storage tip, refrigerate leftovers in an airtight container for up to three days, and reheat slices gently in a low oven to restore flakiness to the crust and creaminess to the filling.
- Seasonal pairing, this tart shines in spring when leeks are at their best, but the combination works whenever fresh vegetables are available, making it versatile for many occasions.
FAQ
Conclusion
Quiche Maraîchere stands out because it turns humble spring vegetables into a comforting, elegant tart that is both approachable and special. The blend of softened leeks, diced carrots, and sweet red bell pepper folded into a creamy custard creates a layered texture and balanced flavor. Give it a try on a weekend morning or for a light dinner with a simple salad, and you will likely find it becomes one of your dependable recipes for feeding company or enjoying solo. I hope this recipe brings you the same quiet satisfaction I felt learning its small techniques and tasting that first golden slice.

Quiche Maraîchere
Equipment
- Skillet
- Whisk
- Baking Sheet
- Parchment Paper
- Wire Rack
Ingredients
- 1 tablespoon butter Melted to provide a rich cooking fat and gentle browning for the vegetables, enhancing overall flavor and preventing sticking; use at the start of sautéing to build the base of the quiche’s savory profile.
- 2 celery stalks, small dice Chopped finely to add gentle aromatic crunch and a subtle vegetal bitterness; cook until softened to contribute texture and savory depth without overpowering other flavors.
- 2 slender leeks, white and light green parts only, quartered lengthwise, washed, and thinly sliced Sliced thinly to contribute a mild onion-like sweetness and tender texture; wash thoroughly before slicing to remove grit and sauté until translucent for a delicate aromatic layer.
- 2 slender carrots, peeled, and finely diced Diced small to provide sweet, earthy notes and slight textural contrast; sauté with other vegetables until tender so its natural sugars develop and complement the filling.
- 1 medium red bell pepper, finely diced Diced finely to add bright, sweet peppery flavor and a touch of acidity; cook briefly to soften while preserving vibrant color and a pleasant bite within the quiche.
- Salt and freshly ground pepper Seasoned sparingly to balance and enhance all flavors; add gradually while cooking and adjust at the end to ensure the filling and crust are properly seasoned.
- 1 9-inch tart shell, partially baked and cooled Baked partially to serve as the crisp, buttery vessel that holds the filling; pre-baking prevents a soggy bottom and yields a firm, golden shell ready for the custard.
- 2/3 cup heavy cream Poured to create a rich, creamy custard base that binds the filling and adds silkiness; whisk with eggs and strain if desired for an ultra-smooth texture before pouring into the shell.
- 1 egg Beaten to help set the custard and provide structure; combine with cream and other eggs to achieve the proper firmness and a tender, sliceable quiche texture.
- 1 egg yolk Whisked to enrich the custard and add additional silkiness and color; incorporate with the whole egg and cream to fine-tune the quiche’s richness and firmness.
- 2/3 cup grated cheese, I used Gruyère Grated to contribute nutty, savory melted cheese flavor and a golden top; sprinkle into the custard and on top so it melts into the filling and browns attractively during baking.
Instructions
- Melt the butter in a large skillet over medium-low heat. Toss in the vegetables and cook, stirring, for about 10 minutes, or until they are tender.: You will notice the butter soften and begin to foam gently, releasing a warm, nutty aroma that signals it is ready. The sound here is quiet, a soft whisper as the butter settles into the pan; avoid raising the heat which makes it sizzle aggressively and risk browning. The reason this low heat matters is that it allows the vegetables to sweat, releasing moisture slowly and concentrating flavors without caramelizing. A common mistake is rushing with high heat which results in browned edges and an unevenly cooked filling; keep the flame modest and be patient.
- Season with salt and pepper, then place the vegetables into a bowl and let cool.: As you add the diced celery , sliced leeks , diced carrots , and diced red bell pepper , you will hear gentle sizzling and see the pieces gleam with softened butter . Stirring regularly helps the vegetables soften uniformly and prevents any single piece from clinging to the pan and browning too quickly. The visual cue to watch for is translucency in the leeks and a slight give in the carrots when pierced with a fork. This step concentrates flavors and reduces excess moisture, which is why it matters for a non soggy tart. A potential pitfall is overcrowding the pan, which causes steaming instead of gentle sweating, so use a wide skillet if possible.
- Preheat the oven to 400 degrees. Put the crust on a baking sheet lined with parchment paper.: The first sprinkle of salt and freshly ground pepper awakens the vegetables and balances their natural sweetness. Moving them to a bowl and allowing them to cool prevents the residual heat from prematurely cooking the custard when poured into the tart shell. The tactile cue is that the vegetables stop steaming and become warm rather than hot; this helps preserve the texture of the filling. Avoid pouring piping hot vegetables into the shell, as that can make the custard overcook and curdle in spots.
- Spoon the vegetables into the tart shell and spread them out evenly.: You should feel the warmth of anticipation as the oven reaches temperature and the kitchen becomes slightly warmer; this is the right moment to ready your baking sheet and parchment. Setting the oven accurately ensures the crust crisps and the custard sets in the correct time frame. Using an oven that has not fully preheated can lead to underbaked centers or a crust that takes too long to brown. If your oven runs hot or cold, consider using an oven thermometer to get consistent results.
- Whisk the cream, egg, and egg yolk together, season with salt and pepper, and carefully pour over the vegetables. You may have too much custard, so wait for it to settle and add just enough so your tart shell does not overflow.: The parchment prevents sticking and makes it easier to slide the tart into and out of the oven, and the baking sheet provides stability so the shell does not warp while baking. You'll notice the crust is fragile when cold, so handle it gently and center it on the sheet for even heat circulation. A common oversight is placing the shell directly on a rack which can cause spills if the custard overflows; the baking sheet catches any spills and protects your oven.
- Carefully place the baking sheet into the oven.: The act of spooning reveals subtle sounds, a soft pat as the vegetables settle into the shell, and visually you want an even layer so every slice has a balanced mix. Use the back of your spoon to gently level the surface without pressing too hard which would compress the vegetables and change the final texture. Even distribution matters because denser pockets can affect how the custard sets locally. Avoid piling vegetables in the center, which can lead to an uneven bake and a soggy middle.
- Bake for 20 minutes. Sprinkle the cheese over the top and bake for another 5 to 10 minutes, or until the cheese is light brown and the center is puffed and set.: The whisking creates a silky, homogeneous custard and you will see it form ribbons as it falls back into the bowl. Pouring gently allows the liquid to soak around the vegetables without displacing them, and waiting for it to settle helps you judge how much the shell can hold. The custard should flow smoothly and not be foamy; excessive whisking that introduces air can create unwanted bubbles in the set. A troubleshooting note: if you end up with too much custard, spoon some out rather than risk overflow during baking.
- Let cool on a wire rack before serving.: Sliding the sheet into the preheated oven you will hear the quiet thud of metal meeting hot racks, and the smell of warming butter and vegetables will intensify. Positioning the sheet in the center rack gives even heat to the shell and filling. This step matters because consistent oven environment helps the custard set evenly. Avoid opening the oven frequently during the initial bake, as temperature fluctuations can cause the center to deflate.
- Bake for 20 minutes: As it bakes you will notice the edges of the crust take on a deeper color and the center begins to puff slightly, a visual cue that the custard is coagulating. The sound is mostly quiet but occasional tiny pops as trapped steam escapes are normal. This stage sets the structure so the filling holds together. A frequent mistake is baking for too short a time which leaves the center wobbly; if your oven heats unevenly, rotate the sheet once midway to promote even browning.
- Sprinkle the cheese over the top and bake for another 5 to 10 minutes, or until the cheese is light brown and the center is puffed and set: When you add the grated cheese you will immediately smell its richer, toasted aroma as it melts into the warm custard. The final minutes of baking develop a golden top and a slightly crisp texture where the cheese browns, signaling readiness. The puffed center should hold with a slight jiggle but not be liquid. Overbaking can dry the custard out, so watch carefully; remove it as soon as the center is set and the cheese is nicely colored.
- Let cool on a wire rack before serving: Cooling allows the custard to finish setting and makes slicing cleaner, and you will appreciate the way the tart firms up as it rests. The fragrance will mellow slightly and the structure becomes easier to handle. Trying to slice it while too hot can cause the filling to spill and tear the crust, which is why a cooling time is important. Aim for a warm or room temperature slice rather than serving straight from the oven.
Notes
- Adjust the custard richness, by slightly reducing the heavy cream and increasing the whole egg if you want a firmer set with less richness; this alters mouthfeel but maintains structure.
- Vegetable timing, cook firmer vegetables like carrots a bit longer before adding softer ones so everything finishes tender at the same moment; staggered cooking prevents crunchy surprises.
- Salt in stages, season both during vegetable cooking and again in the custard to build balanced seasoning; taste the cooled vegetables before final seasoning to avoid oversalting.
- Cheese placement, add the grated cheese toward the end of baking for a browned top, or dot some on the vegetables before pouring the custard for pockets of melted flavor throughout.
- Crust handling, blind bake the tart shell until just set to protect against sogginess, and cool it fully before filling for the cleanest slices.