Pina Colada Poke Cake
Pina Colada Poke Cake is the kind of dessert that brings the warm hum of summer into my kitchen, even on an ordinary Tuesday. The first time I made this cake I was chasing a memory of a beachside treat, and the moment the coconut aroma hit the oven I could practically hear waves. I love how this recipe balances bright pineapple with rich, velvety coconut, creating a slice that manages to be both playful and comforting.
I remember serving this at a neighborhood potluck and watching people come back for second helpings, some with surprised looks because they could not believe such a simple box-mix cake could taste so luscious. The secret, I found, is in the poke step and the cream of coconut soak, which makes every forkful sing with juicy, tropical flavor. As it chills, the topping sets just enough to slice cleanly while staying soft and pillowy. That contrast between the moist cake and the fluffy topping is what keeps me coming back to this recipe.
What I appreciate most is how forgiving the method is. You do not need elaborate techniques to impress a crowd, just a few thoughtful steps and attention to texture. I often bring this to backyard gatherings because it travels well and presents beautifully straight from the fridge. If you like desserts that taste like a sunny getaway, this is the cake you will make again and again.
Recipe Snapshot
55 mins
25 mins
30 mins
Medium
300 kcal
American
Gluten-Free, Low FODMAP
Desserts
Electric hand mixer, Stand mixer, 13 x 9 x 2 inch pan
What Makes This Pina Colada Poke Cake Special
It tastes like summer in every bite
I adore how Pina Colada Poke Cake manages to capture refreshing tropical notes without feeling heavy. The combination of canned crushed pineapple and cream of coconut gives a bright, juicy backbone that sings on the palate, so each bite feels like a mini vacation.
Simple but impressive
One of the main reasons I reach for this recipe is how straightforward it is, yet guests always react as if I spent hours. Using a boxed yellow cake mix keeps things reliable, while the poke and soak technique transforms it into something that tastes homemade and decadent.
Textural contrast that delights
The interplay between a tender cake crumb and the airy, whipped topping makes every forkful interesting. When the heavy cream and extra cream of coconut are whipped to medium stiff peaks, the texture becomes luxurious, balancing the moist cake and toasted, sweetened shredded coconut on top.
Great for entertaining and make ahead
I love that you can make this a day ahead, letting the flavors meld while it chills. That makes hosting relaxed, since the cake benefits from resting in the refrigerator and slices cleanly when it is well chilled.
Flexible and friendly
Finally, this recipe is very forgiving. If your cake bakes a touch longer or the soak soaks in faster than you expect, it still turns out delightfully. I often tweak minor details based on what I have on hand, but the essentials always shine through.
Essential Ingredients for Pina Colada Poke Cake

These ingredients are straightforward and work together to deliver bright tropical flavor and a soft, creamy texture. The boxed yellow cake mix forms a tender base that soaks up the pineapple and coconut liquids, while the dairy elements add richness and a light, whipped crown. The toasted shredded coconut provides the finishing crunchy, sweet note that ties everything to its pina colada inspiration.
- 1 (13.25-ounce) box yellow cake mix: Provides a light, tender cake base that holds the poke holes and absorbs pineapple juices; contains flour, sugar, and leavening to ensure proper rise and structure. Adds familiar yellow cake flavor that complements the tropical elements and gives body to the dessert.
- 1 (8-ounce) can crushed pineapple with juice: Adds bright pineapple flavor and moisture to the cake when poured into the holes; its juice helps infuse the interior with tropical sweetness. Contributes small fruit pieces for texture and enhances overall moistness without additional chopping or preparation.
- 1/2 cup vegetable oil: Emulsifies the batter and contributes richness and moist crumb while helping the cake bake evenly; oil keeps the cake tender and soft. Provides neutral flavor that allows the pineapple and coconut elements to shine.
- 4 large eggs: Enriches the cake batter, adds structure and stability from proteins, and helps trap air for lift during baking. Contributes to a richer mouthfeel and helps set the cake so it holds the poke pattern and fillings.
- 1 cup cream of coconut: Imparts concentrated coconut sweetness and creaminess to the filling, mimicking classic piña colada flavors; thick texture helps form a lush, flavorful topping. Balances the acidity of pineapple and enhances overall tropical profile.
- 1/2 cup pineapple juice: Dilutes and balances the cream of coconut for a pourable filling that soaks into cake holes; adds additional pineapple flavor and brightness. Helps achieve the right consistency for moistening the cake without making it soggy.
- 1 1/2 cup heavy cream: Whips into a light, airy topping that adds volume and creamy contrast to the dense cake and filling; heavy cream stabilizes whipped layers and contributes a silky mouthfeel. Acts as a neutral base that lifts and spreads the sweeter coconut and pineapple notes.
- 1/4 cup cream of coconut: Boosts coconut flavor in the topping and filling with concentrated sweetness and creamy texture; used in smaller amount to avoid overpowering other elements. Helps reinforce the piña colada character while adding richness to the whipped layer.
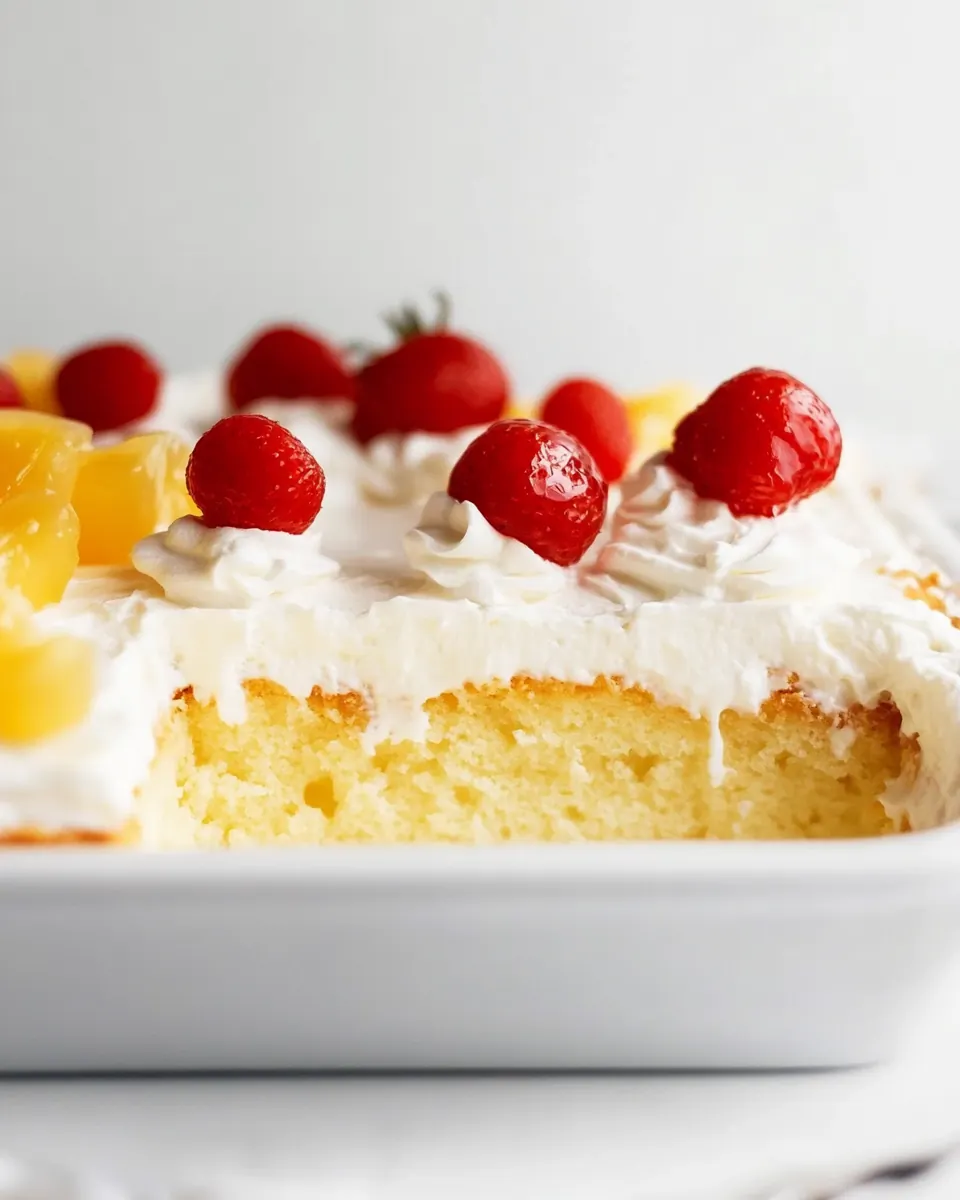
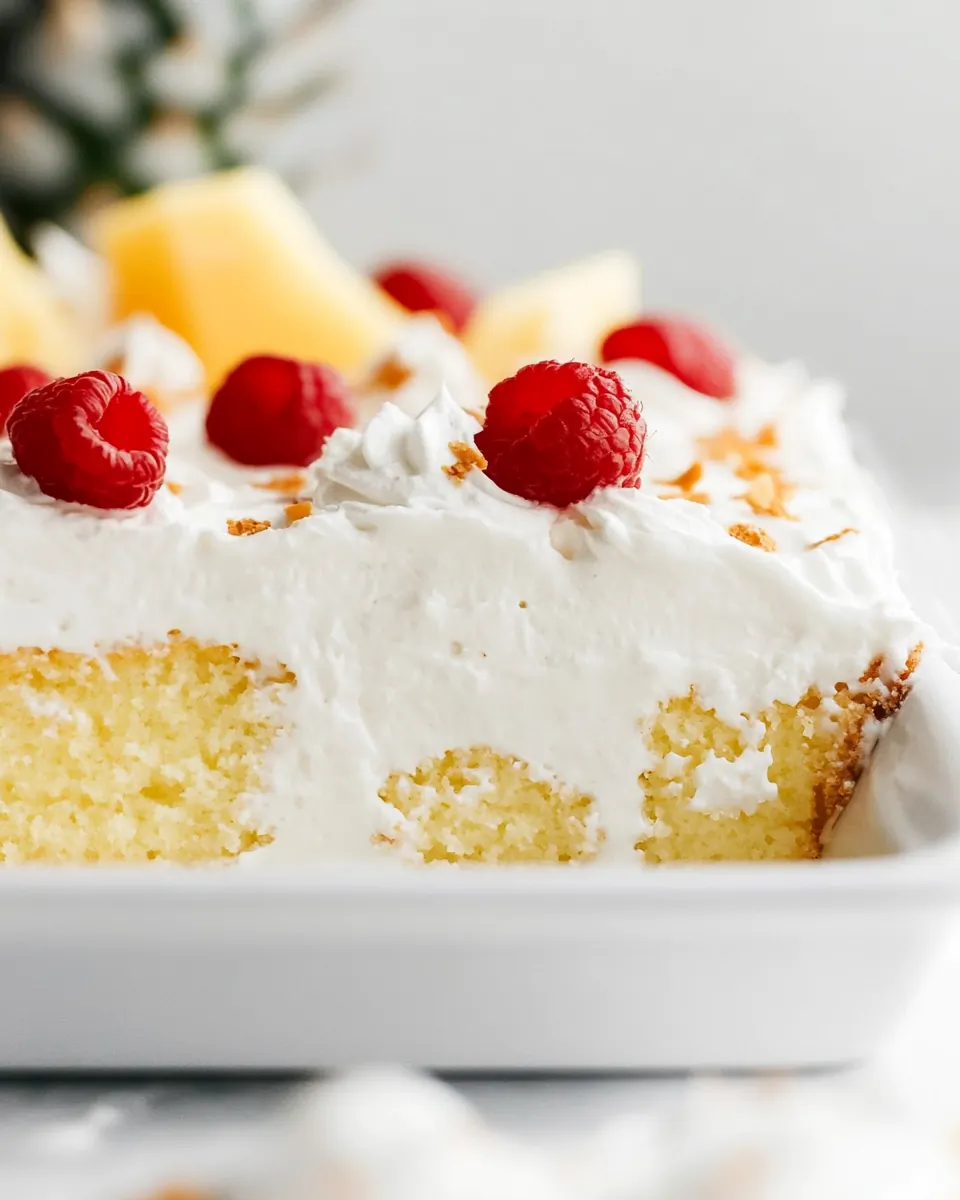
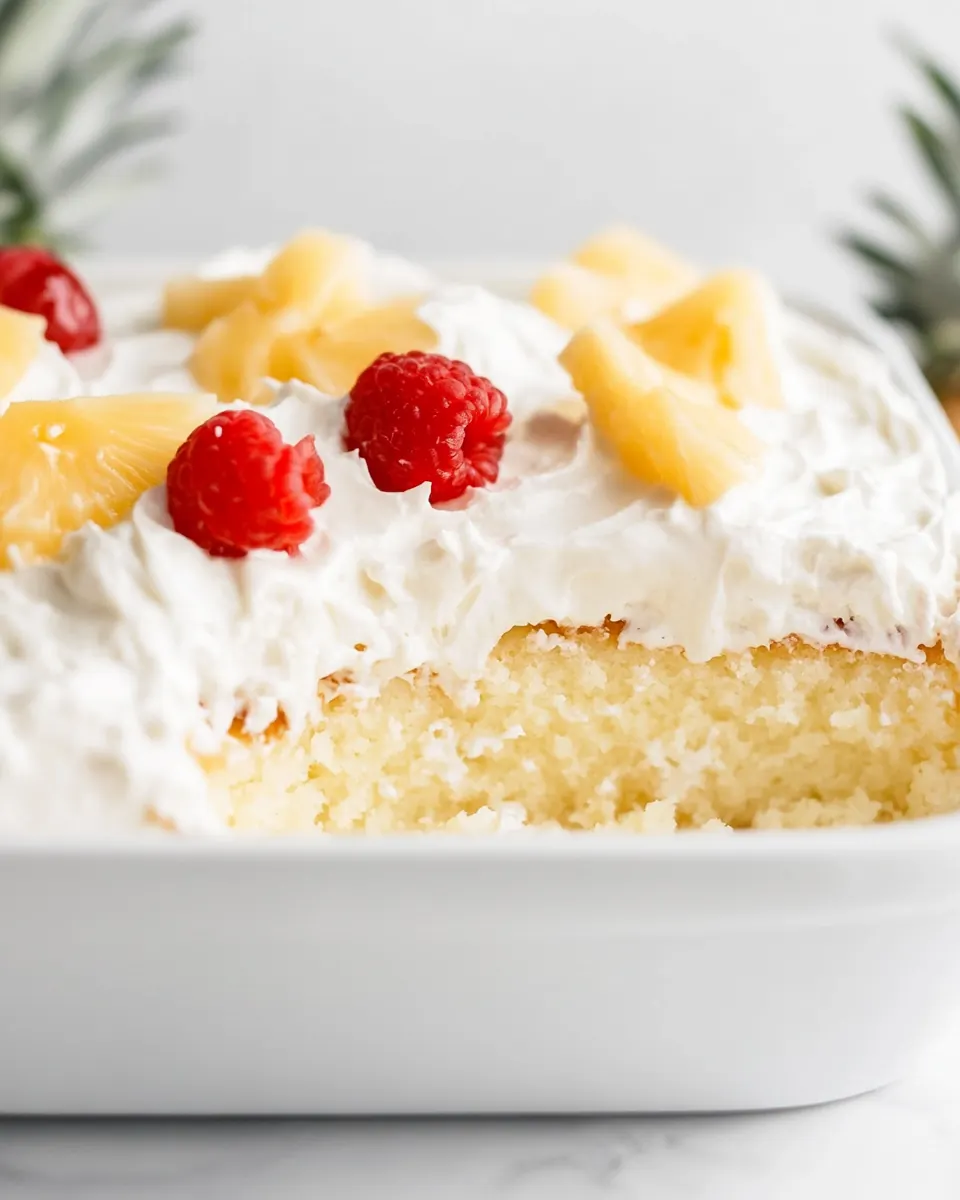
- 1/2 cup toasted sweetened shredded coconut: Provides a crunchy, toasted garnish with sweet coconut flavor that contrasts the soft cake and creamy topping; deepens flavor through toasting and adds visual appeal. Sprinkled atop the finished cake to introduce texture and a caramelized coconut note.
Recipe Directions for Pina Colada Poke Cake
These directions are friendly and easy to follow, guiding you from batter to chilled, sliceable dessert. Below I break each step down with sensory cues and troubleshooting notes so you know what to expect at every stage.
- Preheat the oven to 350 degrees Fahrenheit. Spray a 13 x 9 x 2-inch pan with non-stick cooking spray and set aside.: When the oven warms to 350 degrees Fahrenheit , you should feel a steady, warm air when you briefly open the door; this even heat is essential for a uniform rise and golden edges. Spraying the pan prevents sticking and encourages clean slices, which matters when you want neat servings. A common trap is rushing the oven warm up, which can produce uneven texture and cause the center to cook slower than the edges, so always wait until the oven reaches temperature.
- In a large bowl, add 1 (13.25-ounce) box yellow cake mix, 1 (8-ounce) can crushed pineapple, 1/2 cup vegetable oil, and 4 large eggs. Using an electric hand mixer on medium speed, mix for 2 minutes.: As you mix, you will hear a consistent, humming beat from the mixer and see the batter turn smooth and glossy, with small air bubbles forming that promise a tender crumb. The vegetable oil lends silkiness while the eggs build the batter's structure, and the crushed pineapple disperses tiny pockets of fruit. Avoid overmixing beyond the recommended time, because that can produce a tougher texture as gluten develops; stop when the batter looks homogenous and slightly aerated.
- Pour the batter into the prepared pan and bake for 25-30 minutes, or until a toothpick comes out clean from the center.: During baking you will notice the cake edges pulling away slightly from the pan and the top turning a warm golden hue, a great visual cue the center is nearly done. The toothpick test is the most reliable check, and when it emerges clean or with a few moist crumbs, the cake is ready. Be careful not to open the oven too often, which can make the cake sink, and avoid overbaking since that dries the crumb and reduces the cake's ability to absorb the soaking liquid.
- In a small bowl, whisk together 1 cup cream of coconut and 1/2 cup pineapple juice.: Whisking these creates a glossy, pourable mixture where the sweetness of the cream of coconut integrates with the bright, tangy pineapple juice . The combined aroma is intensely coconut and pineapple, and the liquid should be smooth with no lumps. If the mixture seems separated, a brief, vigorous whisk will bring it back together; do not heat it, because warming changes the texture and reduces its ability to soak into the cake properly.
- When the cake is done baking and is still warm, use a large fork to poke holes all over the cake. Pour the coconut and pineapple mixture evenly over the cake and allow it to be completely absorbed and fill the poked holes.: As you poke, the surface will give slightly and steam may rise, releasing the scent of baked yellow cake . Pouring the coconut pineapple liquid while the cake is warm helps it sink into the crumb and fill those little wells, creating pockets of moist, flavored cake. Pour slowly and allow time for absorption between pours so the top does not pool; the most common mistake is pouring too fast and ending up with uneven soaking or a soggy surface rather than evenly infused cake.
- In the bowl of a stand mixer, add 1 1/2 cup heavy cream and 1/4 cup cream of coconut. Using the whisk attachment, whip until medium stiff peaks form, about 5 minutes.: As you whip, the sound changes from liquid sloshing to a thicker, rhythmic whipping, and the cream will begin to leave trails and hold shape on the whisk. Achieving medium stiff peaks means the whipped cream stands tall but is still slightly glossy, perfect for spreading. Watch closely to avoid whipping past this stage into butter; if you see graininess, you have gone too far and should start again with a fresh bowl and chilled cream.
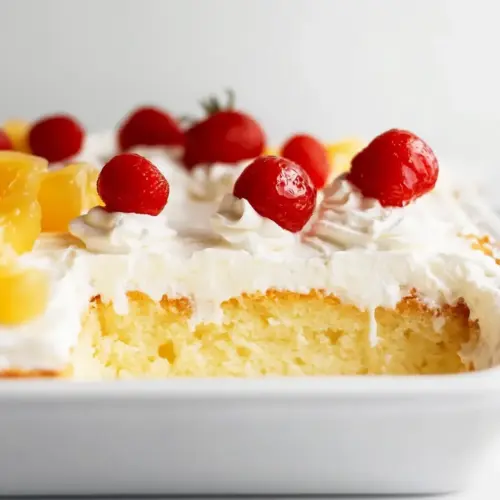
- Once the cake is completely cool, spread the whipped cream over the top. Top with 1/2 cup toasted sweetened shredded coconut. Refrigerate until ready to serve.: Spreading the whipped topping on a fully cooled cake prevents it from sliding off, and you will feel the cool, pillowy texture contrast with the denser cake below. The toasted sweetened shredded coconut adds crispness and a toasty scent that balances the sweet cream, and a final chill helps the layers set so you can slice clean pieces. A common error is refrigerating before the soak has settled fully, which can lead to uneven texture; always ensure the soak is absorbed and the cake has cooled before topping and chilling.
How to Switch It Up
You can adapt this cake in small ways without changing the core flavor profile. Below I share tips to tweak texture, presentation, and make ahead plans while keeping the tropical soul of the dessert intact.
- Use full flavor cream of coconut: Choosing a rich, quality cream of coconut deepens the coconut aroma and avoids a thin, watery soak that will not deliver the same punch.
- Adjust sweetness with juice ratio: If you prefer a less sweet finish, reduce the added cream of coconut slightly and increase the pineapple juice to keep the soak fluid but brighter.
- Make it ahead: Prepare the cake a day early and top and chill on the day of serving for easier transport and better set slices.
- Serve with chilled slices: Serving cold ensures clean cuts and a refreshing mouthfeel that highlights the tropical flavors.
- Toast coconut just before serving: Toasting right before plating keeps the coconut crisp and aromatic, offering the best contrast.
- Use a serrated knife for slicing: A gentle sawing motion gives neat pieces without compressing the moist crumb.
How to Serve Pina Colada Poke Cake
This cake shines in casual gatherings and special moments alike. Chill it well, slice with care, and present on a simple platter so the tropical colors and toasted coconut take center stage.
- Casual potlucks: Bring the cake chilled and slice it into squares for easy sharing, pairing it with other light desserts for variety.
- Summer brunch: Offer slices alongside fresh fruit platters and cold beverages for a bright midday spread.
- Ramadan iftar: Serve small slices to break the fast with a sweet but not overly heavy finish, complemented by dates and tea.
- Picnics: Keep the cake chilled in an insulated container and serve on chilled plates to preserve texture on warm days.
- Storage: Store tightly covered in the refrigerator for up to four days, and freeze slices wrapped in plastic and foil for up to one month.
- Pairings: Offer light, citrusy drinks or coconut infused beverages to echo the cake‘s flavors without overpowering them.
FAQ
Conclusion
This Pina Colada Poke Cake stands out because it captures bright pineapple and rich coconut in a simple, make ahead dessert that serves a crowd. Give it a try the next time you want a relaxed, impressive sweet that feels like summer with every bite. I hope you enjoy the effortless balance of moist cake, creamy coconut topping, and toasty coconut crunch, and that it becomes a go to for your warm weather gatherings and festive moments.
Pina Colada Poke Cake
Equipment
- electric hand mixer
- Stand mixer
- 13 x 9 x 2 inch pan
Ingredients
- 1 (13.25-ounce) box yellow cake mix Provides a light, tender cake base that holds the poke holes and absorbs pineapple juices; contains flour, sugar, and leavening to ensure proper rise and structure. Adds familiar yellow cake flavor that complements the tropical elements and gives body to the dessert.
- 1 (8-ounce) can crushed pineapple with juice Adds bright pineapple flavor and moisture to the cake when poured into the holes; its juice helps infuse the interior with tropical sweetness. Contributes small fruit pieces for texture and enhances overall moistness without additional chopping or preparation.
- 1/2 cup vegetable oil Emulsifies the batter and contributes richness and moist crumb while helping the cake bake evenly; oil keeps the cake tender and soft. Provides neutral flavor that allows the pineapple and coconut elements to shine.
- 4 large eggs Enriches the cake batter, adds structure and stability from proteins, and helps trap air for lift during baking. Contributes to a richer mouthfeel and helps set the cake so it holds the poke pattern and fillings.
- 1 cup cream of coconut Imparts concentrated coconut sweetness and creaminess to the filling, mimicking classic piña colada flavors; thick texture helps form a lush, flavorful topping. Balances the acidity of pineapple and enhances overall tropical profile.
- 1/2 cup pineapple juice Dilutes and balances the cream of coconut for a pourable filling that soaks into cake holes; adds additional pineapple flavor and brightness. Helps achieve the right consistency for moistening the cake without making it soggy.
- 1 1/2 cup heavy cream Whips into a light, airy topping that adds volume and creamy contrast to the dense cake and filling; heavy cream stabilizes whipped layers and contributes a silky mouthfeel. Acts as a neutral base that lifts and spreads the sweeter coconut and pineapple notes.
- 1/4 cup cream of coconut Boosts coconut flavor in the topping and filling with concentrated sweetness and creamy texture; used in smaller amount to avoid overpowering other elements. Helps reinforce the piña colada character while adding richness to the whipped layer.
- 1/2 cup toasted sweetened shredded coconut Provides a crunchy, toasted garnish with sweet coconut flavor that contrasts the soft cake and creamy topping; deepens flavor through toasting and adds visual appeal. Sprinkled atop the finished cake to introduce texture and a caramelized coconut note.
Instructions
- Preheat the oven to 350 degrees Fahrenheit. Spray a 13 x 9 x 2-inch pan with non-stick cooking spray and set aside.: When the oven warms to 350 degrees Fahrenheit , you should feel a steady, warm air when you briefly open the door; this even heat is essential for a uniform rise and golden edges. Spraying the pan prevents sticking and encourages clean slices, which matters when you want neat servings. A common trap is rushing the oven warm up, which can produce uneven texture and cause the center to cook slower than the edges, so always wait until the oven reaches temperature.
- In a large bowl, add 1 (13.25-ounce) box yellow cake mix, 1 (8-ounce) can crushed pineapple, 1/2 cup vegetable oil, and 4 large eggs. Using an electric hand mixer on medium speed, mix for 2 minutes.: As you mix, you will hear a consistent, humming beat from the mixer and see the batter turn smooth and glossy, with small air bubbles forming that promise a tender crumb. The vegetable oil lends silkiness while the eggs build the batter's structure, and the crushed pineapple disperses tiny pockets of fruit. Avoid overmixing beyond the recommended time, because that can produce a tougher texture as gluten develops; stop when the batter looks homogenous and slightly aerated.
- Pour the batter into the prepared pan and bake for 25-30 minutes, or until a toothpick comes out clean from the center.: During baking you will notice the cake edges pulling away slightly from the pan and the top turning a warm golden hue, a great visual cue the center is nearly done. The toothpick test is the most reliable check, and when it emerges clean or with a few moist crumbs, the cake is ready. Be careful not to open the oven too often, which can make the cake sink, and avoid overbaking since that dries the crumb and reduces the cake's ability to absorb the soaking liquid.
- In a small bowl, whisk together 1 cup cream of coconut and 1/2 cup pineapple juice.: Whisking these creates a glossy, pourable mixture where the sweetness of the cream of coconut integrates with the bright, tangy pineapple juice . The combined aroma is intensely coconut and pineapple, and the liquid should be smooth with no lumps. If the mixture seems separated, a brief, vigorous whisk will bring it back together; do not heat it, because warming changes the texture and reduces its ability to soak into the cake properly.
- When the cake is done baking and is still warm, use a large fork to poke holes all over the cake. Pour the coconut and pineapple mixture evenly over the cake and allow it to be completely absorbed and fill the poked holes.: As you poke, the surface will give slightly and steam may rise, releasing the scent of baked yellow cake . Pouring the coconut pineapple liquid while the cake is warm helps it sink into the crumb and fill those little wells, creating pockets of moist, flavored cake. Pour slowly and allow time for absorption between pours so the top does not pool; the most common mistake is pouring too fast and ending up with uneven soaking or a soggy surface rather than evenly infused cake.
- In the bowl of a stand mixer, add 1 1/2 cup heavy cream and 1/4 cup cream of coconut. Using the whisk attachment, whip until medium stiff peaks form, about 5 minutes.: As you whip, the sound changes from liquid sloshing to a thicker, rhythmic whipping, and the cream will begin to leave trails and hold shape on the whisk. Achieving medium stiff peaks means the whipped cream stands tall but is still slightly glossy, perfect for spreading. Watch closely to avoid whipping past this stage into butter; if you see graininess, you have gone too far and should start again with a fresh bowl and chilled cream.
- Once the cake is completely cool, spread the whipped cream over the top. Top with 1/2 cup toasted sweetened shredded coconut. Refrigerate until ready to serve.: Spreading the whipped topping on a fully cooled cake prevents it from sliding off, and you will feel the cool, pillowy texture contrast with the denser cake below. The toasted sweetened shredded coconut adds crispness and a toasty scent that balances the sweet cream, and a final chill helps the layers set so you can slice clean pieces. A common error is refrigerating before the soak has settled fully, which can lead to uneven texture; always ensure the soak is absorbed and the cake has cooled before topping and chilling.
Notes
- Use full flavor cream of coconut: Choosing a rich, quality cream of coconut deepens the coconut aroma and avoids a thin, watery soak that will not deliver the same punch.
- Adjust sweetness with juice ratio: If you prefer a less sweet finish, reduce the added cream of coconut slightly and increase the pineapple juice to keep the soak fluid but brighter.
- Make it ahead: Prepare the cake a day early and top and chill on the day of serving for easier transport and better set slices.
- Serve with chilled slices: Serving cold ensures clean cuts and a refreshing mouthfeel that highlights the tropical flavors.
- Toast coconut just before serving: Toasting right before plating keeps the coconut crisp and aromatic, offering the best contrast.
- Use a serrated knife for slicing: A gentle sawing motion gives neat pieces without compressing the moist crumb.