Peanut Butter Pie
Peanut Butter Pie has been my go to showstopper for birthdays and last minute potlucks because it manages to feel both indulgent and unfussy at once.
I first made Peanut Butter Pie on a rainy Sunday when I wanted something that would make my neighbors knock on the door uninvited. I remember pressing the cookie crumbs into the pan, the familiar smell of chocolate cookie dust, and thinking how something so simple could feel so luxurious. Over the years I have learned small timing tricks and little textural choices that keep this pie from ever turning flat or stodgy. I often swap between a springform and a deep pie plate depending on whether I want neat slices or rustic wedges, and each yields something slightly different but always delicious.
Friends always ask how I get the filling so smooth and airy without it collapsing, and that question led me to experiment with chilling times and the exact order of mixing. Those experiments created a version that holds its shape, has a creamy peanut butter center, and a glossy chocolate top that cracks just enough when you slice into it. When you serve Peanut Butter Pie I like to let guests choose whether they want an extra smear of ganache or a few candy pieces on top, it makes the presentation playful and personal.
Recipe Snapshot
31 mins
30 mins
1 mins
Medium
350 kcal
American
Gluten-Free, Low FODMAP
Desserts
Food processor, Springform pan or pie plate, Stand mixer or hand mixer, Mixing bowls, Microwave or small saucepan
Why This Peanut Butter Pie Is a Winner
Classic comfort with a gourmet twist
I love how Peanut Butter Pie blends nostalgic flavors with a grown up finish. The creamy peanut butter center is familiar and comforting, while the glossy chocolate ganache on top elevates the whole thing. I find that this contrast keeps everyone coming back for seconds, and it makes the dessert feel special without being fussy.
Textural contrast that sings
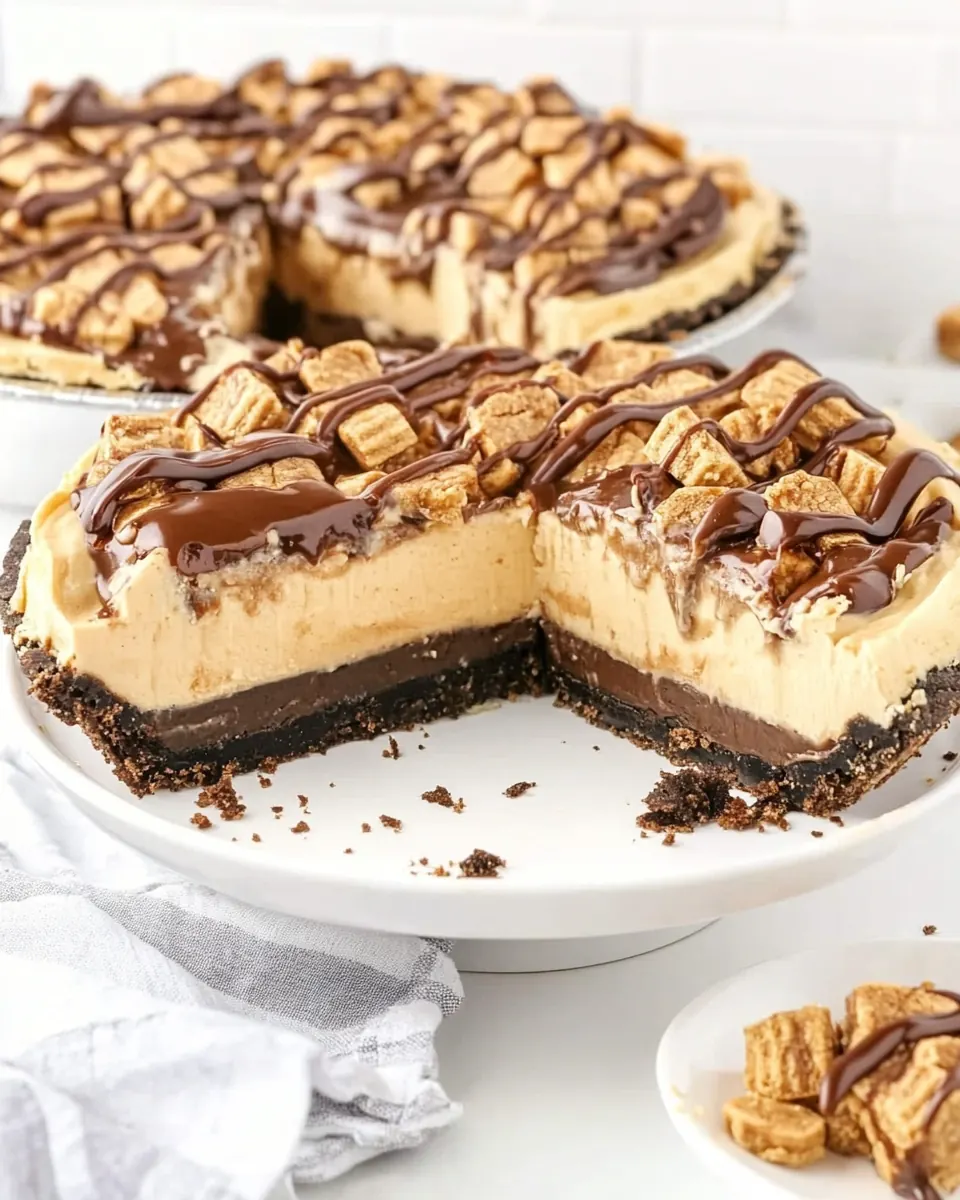
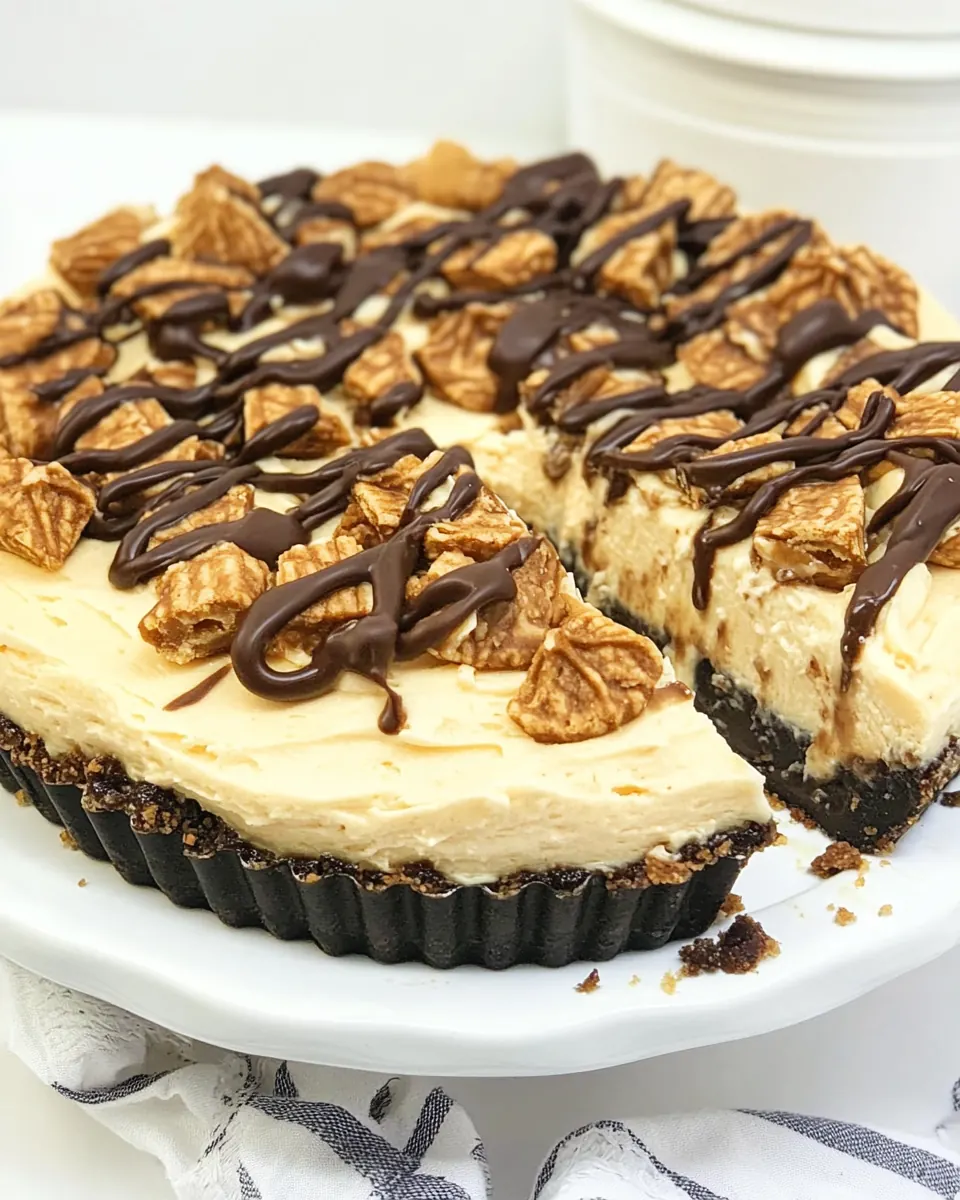
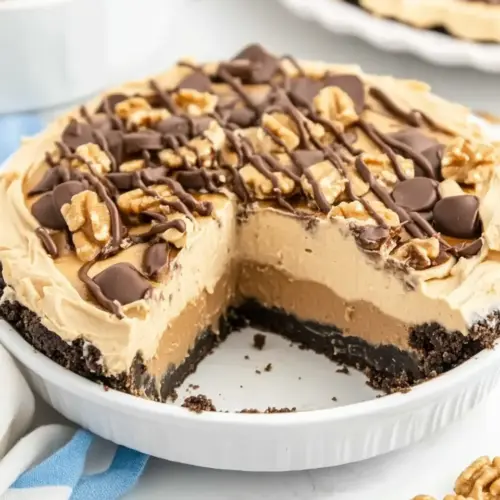
The crunchy cookie crumb crust paired with a pillowy filling and a silky ganache creates a trio of textures that melt together in your mouth. I intentionally press the crust partway up the sides so each bite has that chocolate cookie note, and the chilled filling holds up beautifully so you get clean slices and satisfying mouthfeel.
Make ahead friendly
I appreciate recipes that let me get ahead, and Peanut Butter Pie is one of those lifesaving desserts. You can prepare the crust, make the filling, and chill it hours or even a day in advance. The ganache can be made a little early too, which makes the final assembly quick and calm. I often assemble everything the night before a gathering, which means the day of the event I can focus on company instead of the oven.
Flexible garnish options
One of my favorite things about this pie is how easy it is to personalize. Whether you top it with mini cups, chopped candy, or delicate chocolate curls, each choice adds a new personality. I like leaving a small rim of filling visible under the ganache for a classic look, but sometimes I cover the whole top for a richer finish. Guests always comment, and that little flourish makes me feel proud.
Reliable technique, forgiving results
I love sharing recipes that reward small skills rather than require perfection. The methods here are straightforward, and a few sensory cues help you know you’re on track. I teach tastes like aiming for a slightly steaming cream before pouring it over chocolate, and checking that the filling is chilled enough to support ganache. These small checks keep the final pie stable and glossy, and they save you from the most common pitfalls.
Ingredients Required for Peanut Butter Pie
These ingredients are chosen to balance richness, texture, and structure. The cookie crumbs form a sturdy, chocolatey base, while the combination of cream cheese, peanut butter, and heavy cream builds a filling that is at once airy and dense. The ganache brings a silky top note that ties the whole dessert together. Together they create a sophisticated yet approachable pie that stands up to slicing and looks elegant on a plate.
- 2 1/2 cups (one 12.06 oz., 342 g package, 30 cookies) Gluten Free or Regular Oreo cookie crumbs: Provide a crisp, flavorful base by forming a crumb crust that holds the pie filling together when combined with melted butter and pressed into a pan.
- 5 tablespoons unsalted butter, melted: Melt to bind the cookie crumbs and create a firm, sliceable crust while adding a subtle richness without altering the filling texture.
- 3/4 cup (6 oz, 175 ml) heavy cream: Whip to soft peaks and fold into the filling for lightness and a silky mouthfeel, also adding richness and stability to whipped components.
- 8 ounces (227 g) cream cheese, softened: Soften to a smooth, creamy stage to create the filling’s tangy, stabilizing body and to help emulsify with peanut butter for a cohesive texture.
- 1 1/2 cups (15 oz, 425 g) creamy peanut butter: Add creamy, nutty flavor and primary structure to the filling while contributing fat and smoothness that define the pie’s character.
- 3/4 cup (3.4 oz, 97 g) powdered sugar: Sweeten and slightly thicken the filling while balancing saltiness from the peanut butter and helping create a smooth consistency.
- 1 teaspoon vanilla extract: Enhance overall flavor with warm, aromatic notes that lift the sweetness and round out the filling’s palate without adding texture.
- 4 ounces (113 g) chocolate chips, chopped: Melt to create a glossy chocolate ganache or drizzle that adds a contrasting chocolate element, depth of flavor, and visual appeal.
- 1/2 cup (4 fl. oz, 125 ml) heavy cream: Heat and whip into chocolate to make a ganache, adding shine, smoothness, and a decadent layer that complements the peanut butter filling.
- Mini peanut butter cups or chopped full-size Reese’s and chocolate curls for garnish (optional): Garnish to add visual appeal, additional texture, and concentrated peanut–chocolate flavors that personalize presentation and serving portions.
Cooking Instructions for Peanut Butter Pie
The method here is straightforward but benefits from attention to sensory cues. I will walk you through the crust, filling, chilling, and the ganache so your pie looks and tastes like it came from a bakery. Keep an eye on temperature and texture at each stage for best results.
- Add the Oreos to a food processor and pulse until they are crumbs. Add the melted butter and mix it together until it resembles wet sand.: You'll notice a warm, chocolate aroma as the cookies break down, and the crumbs should shift like beach sand when stirred. This texture is important because it lets the melted butter coat each particle, helping the crust bind when pressed. A common mistake is overblending into dust, which can cause a dense crust, so pulse and check often. If the crumbs feel too dry after adding butter, pause and scrape the bowl, then add a teaspoon of melted butter at a time until the crumbs hold together when pressed.
- Pour the cookie crumbs into a springform pan or pie plate. Press them into an even layer on the bottom and part way up the sides of the springform pan or up the sides of the pie plate.: When pressing, you should hear a faint compacting sound and feel the crust become firm under your fingers. Use the bottom of a measuring cup to press evenly and avoid thin spots, which can make slices fall apart. Pressing partway up the sides creates a rim that frames the filling and prevents it from sliding out. Avoid pressing too hard, which makes the crust too dense; aim for firm but slightly springy to the touch.
- Place in the fridge to set for 10 minutes.: As the crust chills, the butter solidifies and locks the crumbs into shape, giving you a stable foundation. You should notice the surface go from slightly glossy to matte as it firms. A common error is skipping this rest, which can cause the crust to crumble during slicing. Ten minutes is usually sufficient, but if your kitchen is warm, give it a few extra minutes until it feels compact and cool to the touch.
- In the meantime, start the filling by adding the heavy cream, cream cheese, peanut butter, powdered sugar and vanilla extract to a large mixing bowl or the bowl of your stand mixer. Beat on high speed using a hand mixer or stand mixer until smooth and fluffy, about 2 minutes.: As you whip, you will hear the mixer change pitch and see the mixture lighten in color, becoming pillowy and airy. This aeration is what gives the filling its light texture while still holding shape. If the cream cheese has cold lumps, stop and scrape the bowl, then continue to avoid a gritty filling. Overbeating can make the mixture too loose, so watch for a soft peak like texture as your cue to stop.
- Spoon the cream cheese mixture into the chilled Oreo crust and use a spatula or the back of a spoon to smooth out the top and spread it to the edge. Place in the fridge to chill for at least 2 hours but up to overnight.: The filling should settle into the crust with a satiny sheen and slight resistance when smoothed. Chilling firms the filling so it slices cleanly and holds the ganache. A frequent slip up is not chilling long enough, which leads to a runny pie once the ganache is added. If you chill longer than 2 hours, cover lightly to prevent a skin from forming on the surface.
- Once the filling has chilled, place the chocolate chips in a small mixing bowl. Warm the heavy cream in the microwave for 1 minute. The cream should be steaming but not boiling. Pour the hot cream over the chocolate chips and let stand for 5 minutes before whisking smooth. Let cool to room temperature to thicken slightly.: The steaming heavy cream will bloom the chopped chocolate, causing it to melt into a glossy mass. After the rest period, whisking transforms it into a velvety ganache that smells intensely of chocolate. If the cream was too cool, the chocolate will not melt evenly, and if it was boiling, the ganache can separate; aim for steaming as the ideal cue. Let the ganache cool until it thickens slightly or it will sink into the filling instead of sitting on top.
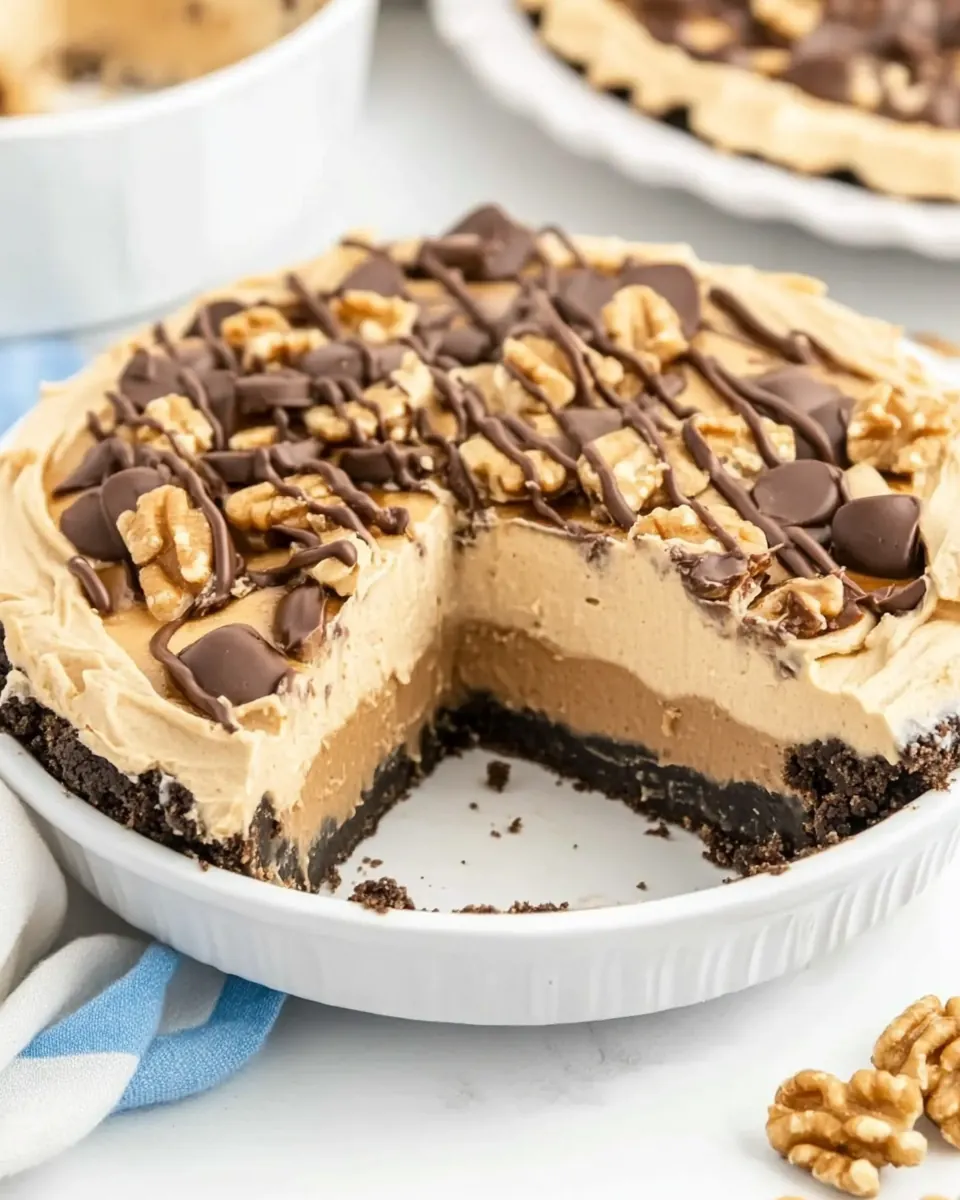
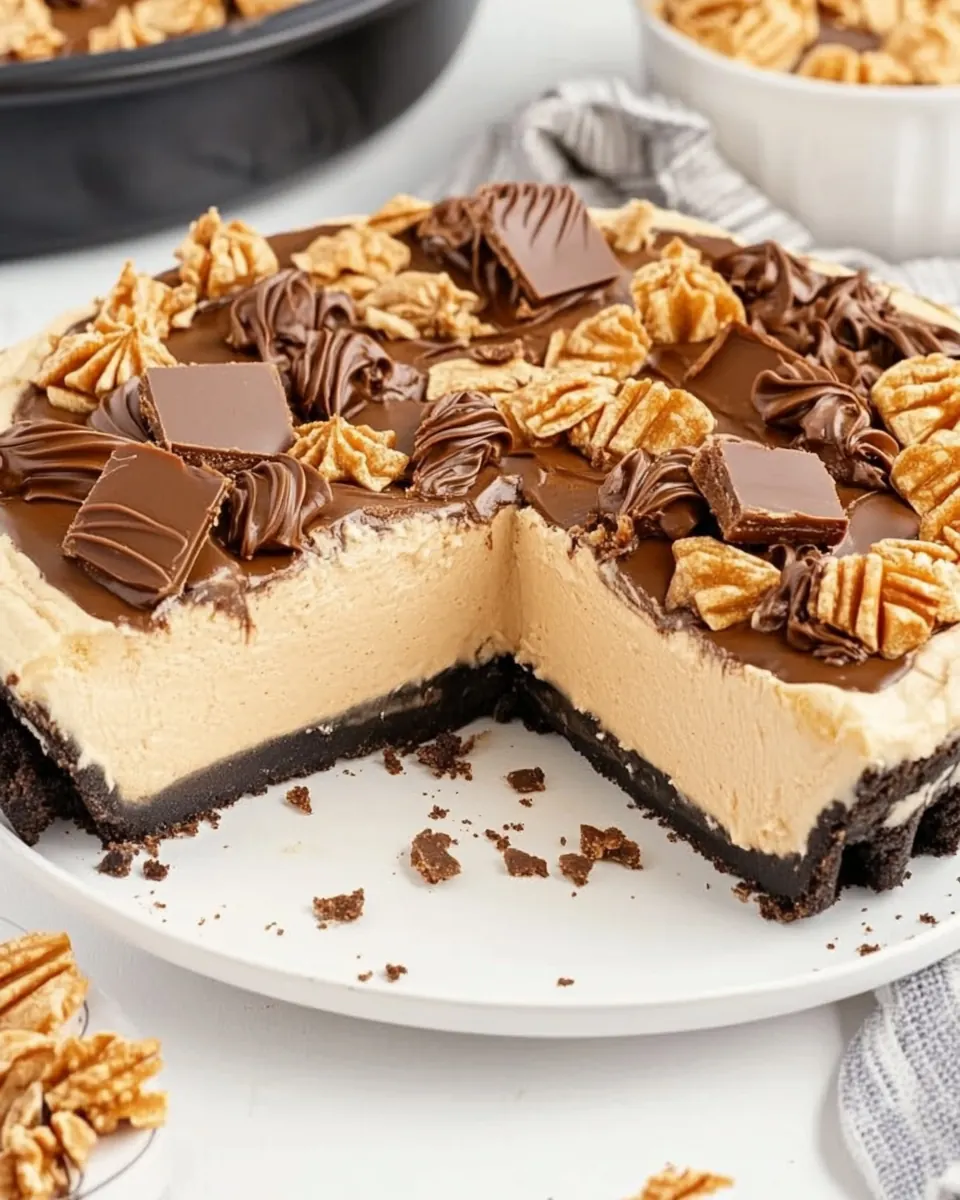
- Spoon the chocolate ganache over the peanut butter filling. I like to leave an edge of the filling peeking out but you can cover the entire top of the pie.: When you pour the ganache, listen for a soft, spreading sound and watch it form a mirror like sheen over the filling. I like to leave an edge of the filling peeking out for visual contrast, but you can cover the entire top for a fully chocolate finish. If the ganache seems too runny, let it cool a bit more; too thin a ganache will drip down the sides and make the pie messy. Pour steadily and use a spatula to nudge it into an even layer if needed.
- Cover the top of the ganache with as many peanut butter cups as you can fit and sprinkle with chocolate curls. Put the pie in the fridge for 5 minutes to harden up a little before slicing and serving.: The final garnish adds both visual drama and extra peanut butter flavor. The ganache should set to a slightly firm but glossy finish in those five minutes, giving clean slices when you cut. Avoid long waits at room temperature before serving because warm ganache can soften the filling. If you prefer, chill for a bit longer to ensure very clean slices, especially when serving to a crowd.
Tips and Tricks about Peanut Butter Pie
This pie responds well to small technique choices, and a few tips help you get bakery quality results without stress. The list below highlights actions that matter most, from temperature control to garnish timing, each expanded so you can choose what matters for your occasion.
- Room temperature cream cheese: Allow the cream cheese to sit out for about 30 minutes so it blends into a silky, lump free filling that whips easily with the peanut butter.
- Pulse not grind: Pulse the cookies in the food processor until they become coarse crumbs rather than fine powder to preserve a pleasant crust texture that binds with the melted butter.
- Check ganache temperature: Aim for steaming heavy cream when making ganache, and let it rest 5 minutes before whisking to ensure a glossy, smooth finish without seizing.
- Chill sufficiently: Chill the filled crust for at least 2 hours, which helps the filling set firm enough to support the ganache and yield clean slices when serving.
- Garnish last: Add peanut butter cups and chocolate curls after the ganache has slightly set so the decorations stay in place and look intentional rather than sinking.
Serving This Peanut Butter Pie
This pie is versatile enough for casual and formal settings, and a few serving notes will help you present it beautifully. I outline pairing ideas, storage tips, and how to adapt slices for different occasions.
- Serve chilled: Keep slices chilled until just before serving to maintain structure and a clean presentation, especially in warm environments.
- Occasion friendly: This pie works for birthdays, potlucks, holiday gatherings, or a sweet Ramadan iftar treat where a rich dessert is welcomed after fasting.
- Plate styling: For individual plates, add a small spoonful of whipped heavy cream or a few chopped peanut butter cups beside the slice to complement textures.
- Storage: Store leftovers, covered, in the fridge for up to 5 days for best texture retention, or freeze wrapped tightly for up to 3 months and thaw in the fridge before serving.
- Portioning: Slice with a hot, dry knife for the cleanest edges; run the knife under hot water and dry it between cuts to prevent dragging ganache and filling.
- Seasonal pairing: Pair with coffee in cooler months for a cozy dessert, or offer mini frozen slices on hot days for a cool treat that eats almost like ice cream.
FAQ
Conclusion
Peanut Butter Pie stands out for its perfect harmony of textures and flavors, combining a crunchy cookie crust, a silky peanut butter filling, and a glossy chocolate top. Give it a try when you want a dessert that looks impressive but is forgiving to make. Whether you make it for a special occasion or a cozy night in, this pie rewards a little patience with delicious, crowd pleasing results.
Peanut Butter Pie
Equipment
- Food Processor
- Springform pan or pie plate
- Stand mixer or hand mixer
- Mixing Bowls
- Microwave or small saucepan
Ingredients
- 2 1/2 cups (one 12.06 oz., 342 g package, 30 cookies) Gluten Free or Regular Oreo cookie crumbs Provide a crisp, flavorful base by forming a crumb crust that holds the pie filling together when combined with melted butter and pressed into a pan.
- 5 tablespoons unsalted butter, melted Melt to bind the cookie crumbs and create a firm, sliceable crust while adding a subtle richness without altering the filling texture.
- 3/4 cup (6 oz, 175 ml) heavy cream Whip to soft peaks and fold into the filling for lightness and a silky mouthfeel, also adding richness and stability to whipped components.
- 8 ounces (227 g) cream cheese, softened Soften to a smooth, creamy stage to create the filling’s tangy, stabilizing body and to help emulsify with peanut butter for a cohesive texture.
- 1 1/2 cups (15 oz, 425 g) creamy peanut butter Add creamy, nutty flavor and primary structure to the filling while contributing fat and smoothness that define the pie’s character.
- 3/4 cup (3.4 oz, 97 g) powdered sugar Sweeten and slightly thicken the filling while balancing saltiness from the peanut butter and helping create a smooth consistency.
- 1 teaspoon vanilla extract Enhance overall flavor with warm, aromatic notes that lift the sweetness and round out the filling’s palate without adding texture.
- 4 ounces (113 g) chocolate chips, chopped Melt to create a glossy chocolate ganache or drizzle that adds a contrasting chocolate element, depth of flavor, and visual appeal.
- 1/2 cup (4 fl. oz, 125 ml) heavy cream Heat and whip into chocolate to make a ganache, adding shine, smoothness, and a decadent layer that complements the peanut butter filling.
- Mini peanut butter cups or chopped full-size Reese’s and chocolate curls for garnish, optional Garnish to add visual appeal, additional texture, and concentrated peanut-chocolate flavors that personalize presentation and serving portions.
Instructions
- Add the Oreos to a food processor and pulse until they are crumbs. Add the melted butter and mix it together until it resembles wet sand.: You'll notice a warm, chocolate aroma as the cookies break down, and the crumbs should shift like beach sand when stirred. This texture is important because it lets the melted butter coat each particle, helping the crust bind when pressed. A common mistake is overblending into dust, which can cause a dense crust, so pulse and check often. If the crumbs feel too dry after adding butter, pause and scrape the bowl, then add a teaspoon of melted butter at a time until the crumbs hold together when pressed.
- Pour the cookie crumbs into a springform pan or pie plate. Press them into an even layer on the bottom and part way up the sides of the springform pan or up the sides of the pie plate.: When pressing, you should hear a faint compacting sound and feel the crust become firm under your fingers. Use the bottom of a measuring cup to press evenly and avoid thin spots, which can make slices fall apart. Pressing partway up the sides creates a rim that frames the filling and prevents it from sliding out. Avoid pressing too hard, which makes the crust too dense; aim for firm but slightly springy to the touch.
- Place in the fridge to set for 10 minutes.: As the crust chills, the butter solidifies and locks the crumbs into shape, giving you a stable foundation. You should notice the surface go from slightly glossy to matte as it firms. A common error is skipping this rest, which can cause the crust to crumble during slicing. Ten minutes is usually sufficient, but if your kitchen is warm, give it a few extra minutes until it feels compact and cool to the touch.
- In the meantime, start the filling by adding the heavy cream, cream cheese, peanut butter, powdered sugar and vanilla extract to a large mixing bowl or the bowl of your stand mixer. Beat on high speed using a hand mixer or stand mixer until smooth and fluffy, about 2 minutes.: As you whip, you will hear the mixer change pitch and see the mixture lighten in color, becoming pillowy and airy. This aeration is what gives the filling its light texture while still holding shape. If the cream cheese has cold lumps, stop and scrape the bowl, then continue to avoid a gritty filling. Overbeating can make the mixture too loose, so watch for a soft peak like texture as your cue to stop.
- Spoon the cream cheese mixture into the chilled Oreo crust and use a spatula or the back of a spoon to smooth out the top and spread it to the edge. Place in the fridge to chill for at least 2 hours but up to overnight.: The filling should settle into the crust with a satiny sheen and slight resistance when smoothed. Chilling firms the filling so it slices cleanly and holds the ganache. A frequent slip up is not chilling long enough, which leads to a runny pie once the ganache is added. If you chill longer than 2 hours, cover lightly to prevent a skin from forming on the surface.
- Once the filling has chilled, place the chocolate chips in a small mixing bowl. Warm the heavy cream in the microwave for 1 minute. The cream should be steaming but not boiling. Pour the hot cream over the chocolate chips and let stand for 5 minutes before whisking smooth. Let cool to room temperature to thicken slightly.: The steaming heavy cream will bloom the chopped chocolate, causing it to melt into a glossy mass. After the rest period, whisking transforms it into a velvety ganache that smells intensely of chocolate. If the cream was too cool, the chocolate will not melt evenly, and if it was boiling, the ganache can separate; aim for steaming as the ideal cue. Let the ganache cool until it thickens slightly or it will sink into the filling instead of sitting on top.
- Spoon the chocolate ganache over the peanut butter filling. I like to leave an edge of the filling peeking out but you can cover the entire top of the pie.: When you pour the ganache, listen for a soft, spreading sound and watch it form a mirror like sheen over the filling. I like to leave an edge of the filling peeking out for visual contrast, but you can cover the entire top for a fully chocolate finish. If the ganache seems too runny, let it cool a bit more; too thin a ganache will drip down the sides and make the pie messy. Pour steadily and use a spatula to nudge it into an even layer if needed.
- Cover the top of the ganache with as many peanut butter cups as you can fit and sprinkle with chocolate curls. Put the pie in the fridge for 5 minutes to harden up a little before slicing and serving.: The final garnish adds both visual drama and extra peanut butter flavor. The ganache should set to a slightly firm but glossy finish in those five minutes, giving clean slices when you cut. Avoid long waits at room temperature before serving because warm ganache can soften the filling. If you prefer, chill for a bit longer to ensure very clean slices, especially when serving to a crowd.
Notes
- Room temperature cream cheese: Allow the cream cheese to sit out for about 30 minutes so it blends into a silky, lump free filling that whips easily with the peanut butter.
- Pulse not grind: Pulse the cookies in the food processor until they become coarse crumbs rather than fine powder to preserve a pleasant crust texture that binds with the melted butter.
- Check ganache temperature: Aim for steaming heavy cream when making ganache, and let it rest 5 minutes before whisking to ensure a glossy, smooth finish without seizing.
- Chill sufficiently: Chill the filled crust for at least 2 hours, which helps the filling set firm enough to support the ganache and yield clean slices when serving.
- Garnish last: Add peanut butter cups and chocolate curls after the ganache has slightly set so the decorations stay in place and look intentional rather than sinking.