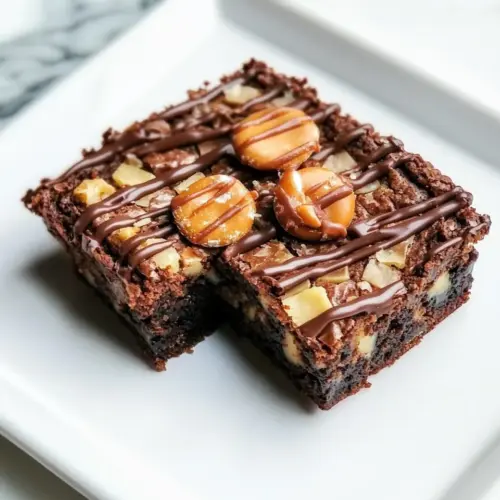
Peanut Butter Nutella Candy Bar Brownie
Peanut Butter Nutella Candy Bar Brownie first stole my attention on a Saturday when the house smelled like a tiny chocolate factory and every surface was suddenly fair game for sneaky tastes. I remember tearing through the pantry for inspiration and finding a lonely jar of peanut butter and a dollop of nutella that seemed to glow under the kitchen light. I decided to layer those flavors into something decadent, and what emerged was part brownie, part candy bar, and entirely irresistible.
I tested this recipe across a weekend, sharing slices with neighbors and friends who declared it an emergency must make. The texture sits squarely between fudgy and brownie like a candy bar that put on a tuxedo, while the dark chocolate anchors the sweetness. Each time I cut into it, the aroma of melted chocolate and roasted peanuts filled the room, and it became our go to for celebrations where we wanted something a little wild yet familiar.
Recipe Snapshot
45 mins
15 mins
30 mins
Medium
350 kcal
American
Gluten-Free, Low FODMAP
Desserts
9-inch tart pan with removable bottom, small saucepan, mixing bowl, whisk, oven
Why We Love This Peanut Butter Nutella Candy Bar Brownie
1. Candy bar meets brownie in a perfect mash up
What really hooks me about this Peanut Butter Nutella Candy Bar Brownie is how it blends textures and moods. You get the dense, slightly gooey center of a brownie with the creamy, spreadable luxury of a nutella and peanut butter ganache. I love that it can feel homey, yet indulgent enough for a party platter.
2. Layered flavor makes every bite interesting
We layered dark chocolate, sugar, and a whisper of salt into the batter, which gives the finished bar depth. The sprinkle of candy on top adds crunchy contrast that keeps the experience playful. I find myself reaching for a second piece to chase the way the bitter chocolate marries the sweet spreads.
3. Simple techniques, dramatic results
From my perspective, the method is forgiving. Melting the butter, nutella, and peanut butter together is straightforward, and the ganache comes together with warm heavy cream poured over chopped dark chocolate. I appreciate desserts that reward minimal effort with maximum payoff, and this recipe does exactly that.
4. Crowd friendly and versatile
I often bring this to gatherings because it travels well and slices cleanly when cooled. You can dress it up for holidays by swapping the candy on top, or keep it classic with nothing more than a glossy ganache. In my experience, it pleases both kids who love the candy and adults who crave richer chocolate notes.
5. Textural play and presentation
There’s something theatrical about spreading a slightly thick ganache over a fudgy base and watching it set. I’ve learned that letting the ganache cool to a spreadable thickness makes for neater slices. It’s a small technique that elevates the finished look, and people always notice when it’s glossy and smooth.
Peanut Butter Nutella Candy Bar Brownie Shopping List
These ingredients are intentionally straightforward, built around a few key players that carry flavor and texture. The batter relies on melted butter and chocolate for richness, while sugar, eggs, and flour give structure. The ganache and toppings let the nutella and peanut butter shine, creating a candy bar vibe with every bite.
- 1/2 cup unsalted butter: Melted to provide rich, tender fat that creates moist brownie texture and helps dissolve cocoa and sugar; imparts a silky mouthfeel and helps set the bars when cooled. Use unsalted to control overall seasoning and balance sweetness without added sodium, allowing salt level to be adjusted precisely in the batter.
- 1/2 cup nutella: Swirled into the batter to add intense hazelnut-chocolate flavor and creamy richness, contributing both fat and flavor complexity to the brownies. Melting or softening Nutella helps it incorporate smoothly and creates pockets of gooey chocolate-hazelnut throughout the bar.
- 1/3 cup creamy peanut butter: Stirred in for creamy, nutty fat that enhances flavor depth and contrasts with the chocolate, contributing to density and chewiness. Using creamy texture ensures even distribution and helps form a cohesive bite without crunchy bits interfering with the brownie crumb.
- 3 ounces high-quality dark chocolate, chopped: Melted into the batter to deepen chocolate flavor and increase the fudgy quality; high–quality dark chocolate adds cocoa intensity and a glossy finish when combined with butter. Chopping ensures even melting and helps control texture so the chocolate integrates smoothly without graininess.
- 1/3 cup sugar: Dissolved to provide sweetness and contribute to tenderness by interfering with gluten formation, balancing the bitterness of dark chocolate and the saltiness of other ingredients. Using the specified amount keeps the bars sweet but still allows the nut and chocolate flavors to remain prominent.
- 1/4 teaspoons salt: Added to balance sweetness and enhance the overall flavor profile while strengthening the perception of chocolate; salt also tightens dough structure slightly. Using a small measured amount ensures the brownies are not overly salty but have rounded, complex flavor.
- 1 teaspoon vanilla extract: Whisked in to provide aromatic complexity and enhance other flavors, especially chocolate and nuts, lifting the overall profile. Using pure vanilla extract gives depth and warmth without adding moisture or altering texture significantly.
- 2 large eggs: Beaten to incorporate structure and leavening through coagulated proteins that set the brownie crumb while adding moisture and richness. Using large eggs ensures proper ratio of liquid and fat for a fudgy, slightly tender interior and helps bind the batter together.
- 1/2 cup all-purpose flour: Folded in to provide light structure and minimal gluten formation for a slightly fudgy brownie; flour gives body and allows the bars to hold together after baking. Using all-purpose keeps the texture balanced between cakey and fudgy, depending on mixing and ratios.
- nutella peanut butter ganache: Prepared separately and spooned or spread over the baked bars to add a concentrated layer of melted chocolate and peanut butter flavor that contrasts with the brownie base. Formulating a ganache-like topping creates glossy, sliceable layers that set when chilled and deliver intense flavor in each bite.
- 1/3 cup heavy cream: Heated to create the base liquid for the ganache, providing richness and allowing chocolate to melt smoothly into a cohesive emulsion; heavy cream contributes a silky, spreadable texture. Using the specified amount helps achieve the right ganache thickness for spreading without running off the bars.
- 4 ounces high-quality dark chocolate, chopped: Melted with cream to form the ganache’s chocolate component, offering deep cocoa richness and helping the mixture set into a firm but creamy layer atop the brownies. Choosing high–quality dark chocolate ensures balanced bitterness and structure in the ganache rather than a waxy or overly sweet finish.
- 2 tablespoons creamy peanut butter: Swirled into the warm ganache to infuse nutty peanut butter flavor and add creaminess, creating a layered peanut–chocolate profile that complements the brownie. Using creamy peanut butter ensures the ganache remains smooth and homogeneous without grainy or separated texture.
- 2 tablespoons nutella: Folded into or drizzled over the ganache to impart additional hazelnut-chocolate notes and a glossy finish, enhancing both flavor complexity and visual appeal. Using a small amount allows a pronounced Nutella character without overpowering the peanut–chocolate balance in the ganache.
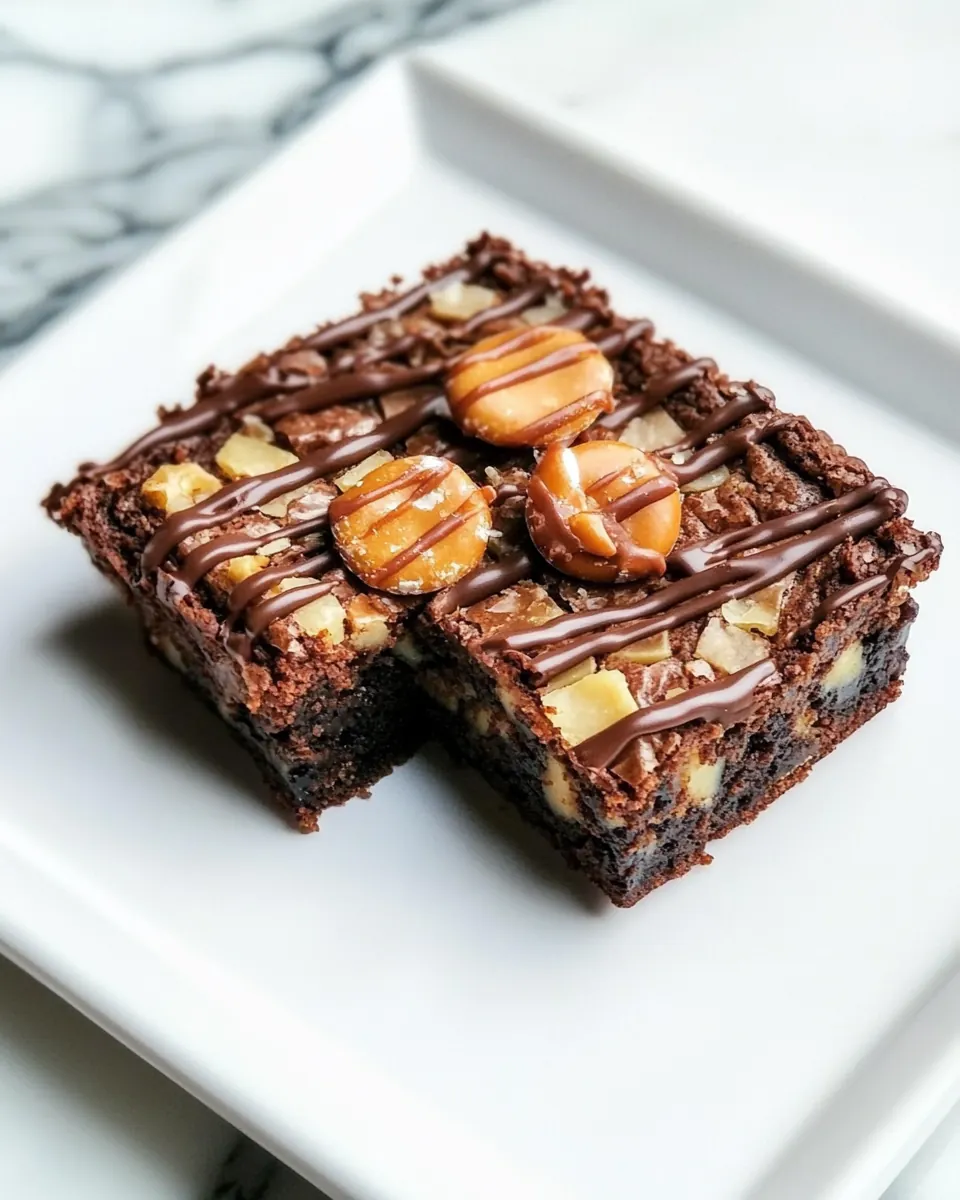
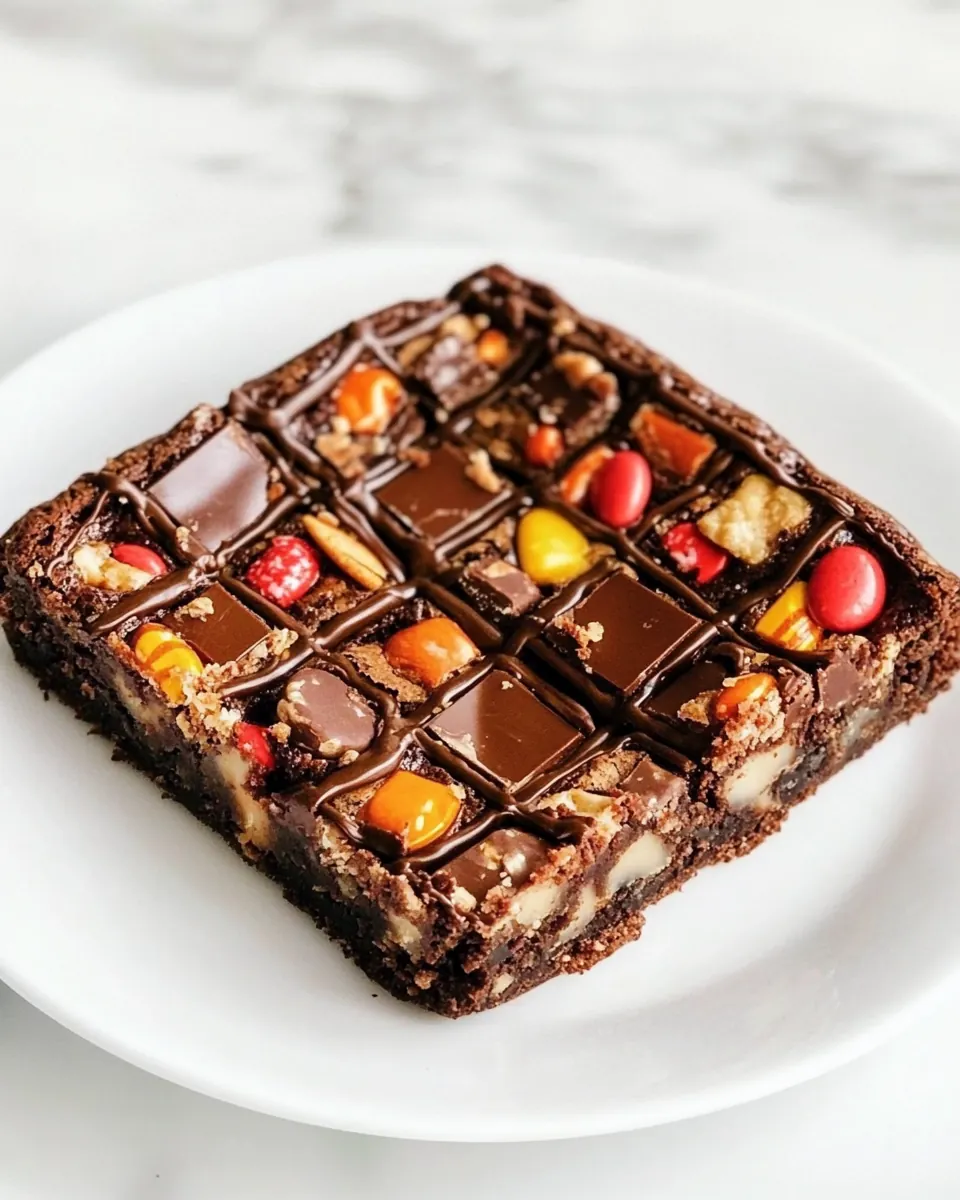
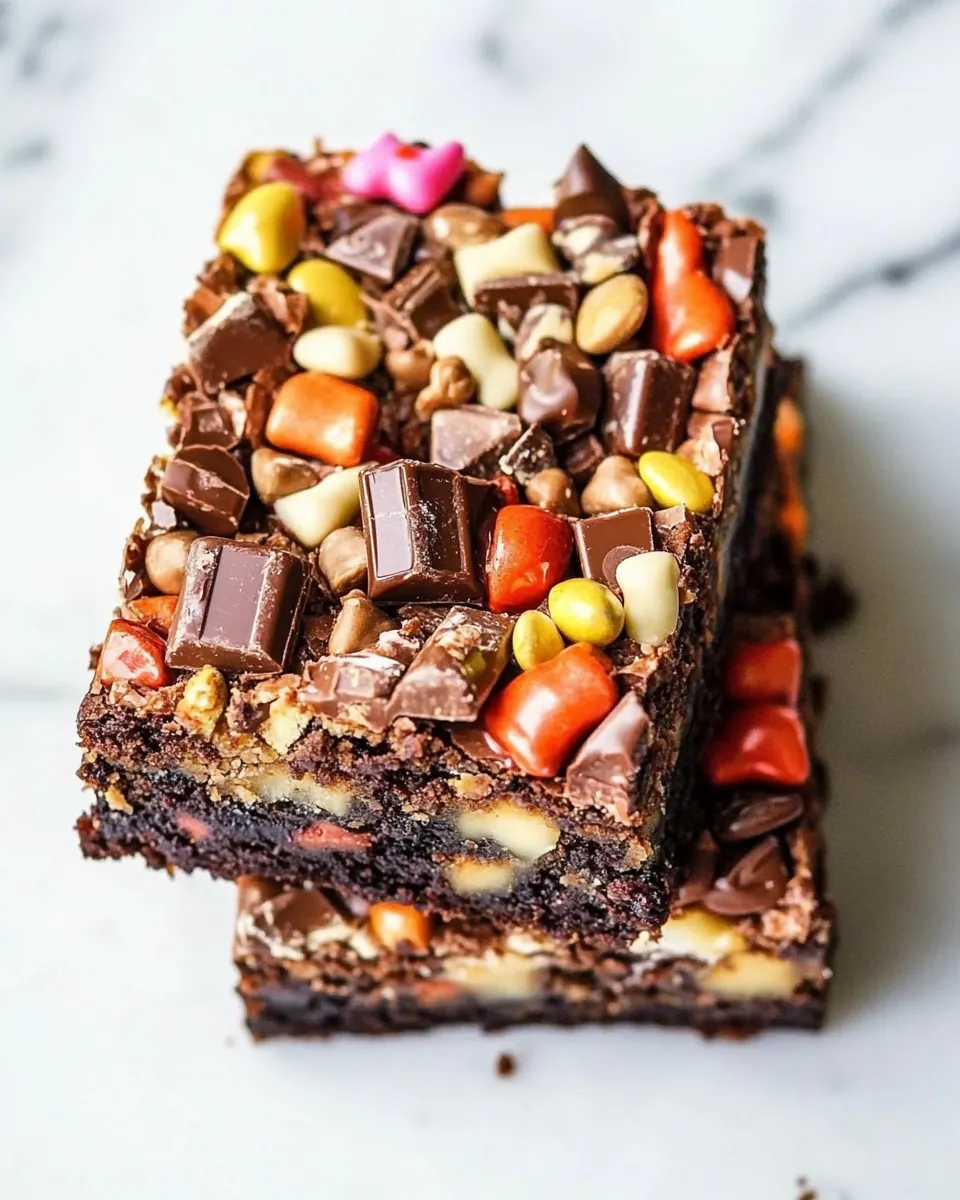
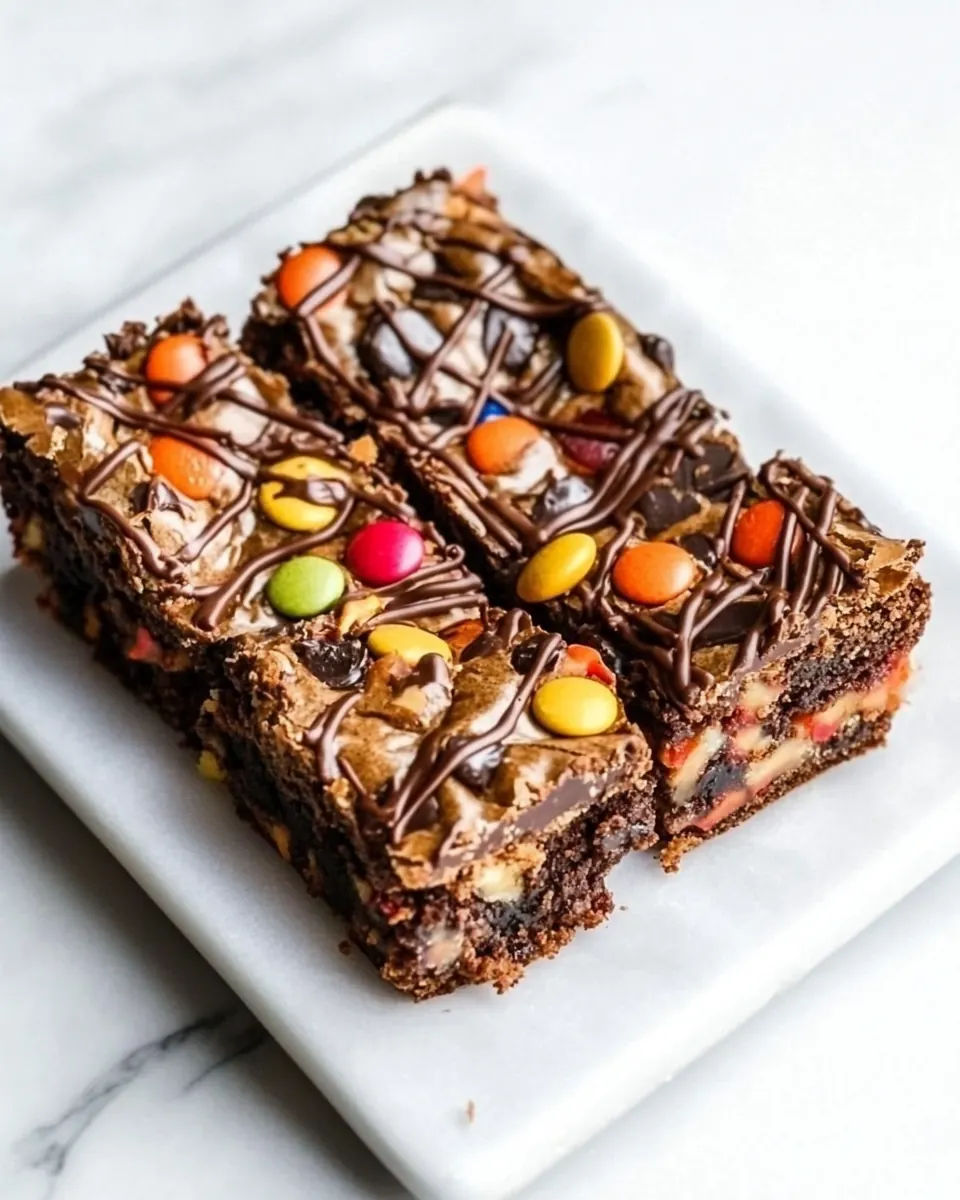
- assorted candy for topping, if desired: Sprinkled on top to add color, texture, and extra sweetness or saltiness depending on choice, providing a playful contrast to the rich ganache and dense brownie layer. Selecting assorted candy lets you customize flavor combinations and create an attractive, festive presentation for serving.
How to Cook Peanut Butter Nutella Candy Bar Brownie
These steps transform a handful of pantry staples into a dazzling, candy bar inspired brownie. I like to move deliberately and savor each sensory cue as the batter comes together, and then be patient while the ganache sets. Follow the sequence for the best texture and finish.
- Preheat the oven to 350 degrees F. Grease a 9-inch tart pan with a removable bottom.: The air should feel warm and even as the oven climbs to 350 degrees F , which creates the right environment for the center to set just enough while keeping the edges tender. I make sure the pan is well greased so the brownie releases cleanly, running my fingertip around the rim to check for missed spots. You will notice a slight aromatic rise as the oven heats, and that warm olfactory nudge tells you it is ready. Avoid using too much oil when greasing which can fry the edges; a thin even coating is best. If your oven runs hot or cold, use an oven thermometer to ensure accurate temperature because uneven heat will change the bake time and texture.
- Heat the butter, nutella and peanut butter in a small saucepan over low heat until melted. Whisk until smooth. Add in the chocolate and let it sit for a minute, then whisk until it melts. Stir in the sugar, salt and vanilla extract. Beat in the eggs one at a time, beating until combined. Stir in the flour until JUST combined. Pour the batter in the greased tart pan. Bake for 25 to 30 minutes. It won’t appear finished, but you don’t want to bake it longer! Let it cool completely.: As the butter liquefies and the jars of nutella and peanut butter soften, you will see glossy swirls form; this is when to whisk. The sound is quiet, a gentle shimmer rather than a boil, and the scent is a warm, toasty nut aroma. Heating low prevents the fats from separating and preserves that silky mouthfeel. One mistake I once made was turning the heat too high which scorched the mixture and left a burnt note, so keep it gentle and patient. Stir constantly to merge the textures and avoid hot spots.
- Spread the ganache over top of the brownie and cover in your favorite halloween candy – or leave it plain! Slice and devour.: When you add chopped dark chocolate , the pieces will soften, and for a moment the mixture looks patchy; letting it sit one minute allows residual heat to begin melting the chocolate slowly. Your whisking will then coax it into a uniform, glossy blend. The visual cue is a seamless, shiny batter and the aroma sharpens into deep cocoa. If you whisk too vigorously or add the chocolate cold, you can bring in air that changes the texture, so let it rest briefly before gentle whisking.
- Add the chopped chocolate, peanut butter and nutella to a bowl. Heat the cream in a saucepan over low heat just until bubbles appear around the edges and it’s warm. Pour the cream over the chocolate and let it sit for 30 seconds, then stir continuously until it’s smooth. Let it cool slightly until it thickens and is spreadable without dripping. Spread on the cooled brownie.: As the sugar dissolves into the warm chocolate mixture, you'll notice the shine slightly soften then resurface, and the scent of vanilla extract lifts the profile with a sweet floral note. The salt quietly balances sweetness, and you sense it most when you pause to taste a spoonful. Use a steady stirring motion to ensure the sugar dissolves; undissolved sugar can create a grainy mouthfeel in the finished brownie. Avoid rushing to add eggs immediately which could affect incorporation.
- Beat in the eggs one at a time, beating until combined.: The moment you add the first egg , the batter lightens and takes on a satiny sheen as the proteins bind with the fats. Beating them in one at a time ensures even texture and prevents curdling. You will see the mixture thicken slightly and become more elastic under the whisk, which translates to the tender crumb you want. If the chocolate is too hot, eggs can scramble; temper them by letting the mixture cool a touch or whisking briefly in a separate bowl before adding.
- Stir in the flour until JUST combined.: Folding in the all-purpose flour requires a gentle hand to keep the crumb fudgy. Watch for the last streaks of flour to disappear, and stop mixing the moment they do. Overmixing develops gluten and leads to a cakier result, so aim for a uniformly colored batter with minimal movement. The batter should be thick and glossy, not stiff. A common error is aggressive stirring which produces a dryer texture, so slow, circular folds are the trick.
- Pour the batter in the greased tart pan.: As you pour, the batter should flow slowly, coating the pan with a velvety surface. Gently tapping the pan on the counter releases large air bubbles and helps level the top. Visually, you want a few tiny bubbles and a smooth, even finish that will bake uniformly. Avoid spreading with a utensil which can leave fingerprints and disrupt the texture; let gravity do the work. If the batter pools unevenly, rotate the pan gently to level it.
- Bake for 25 to 30 minutes.: In the oven, the smell will evolve from chocolate to a richer, toasted note and the edges will set first, taking on a slight firmness while the center remains glossy. The surface may crack faintly but should still appear slightly underdone in the middle, which ensures a fudgy bite once cooled. Use the toothpick test sparingly; you want a few moist crumbs, not dry crumbs, to preserve the candy bar texture. Overbaking is the most common mistake; it dries the center and loses the fudgy character.
- It won’t appear finished, but you don’t want to bake it longer! Let it cool completely.: This pause is essential because the brownie continues to set as it cools, firming without drying out. The aroma mellows into deep chocolate notes, and the texture transitions from wobbly to sliceable. I leave the tart pan on a rack until it reaches room temperature, then chill briefly to make slicing neater. Cutting too soon invites crumbling and a messy plate, so patience pays off here.
- Spread the ganache over top of the brownie and cover in your favorite halloween candy – or leave it plain! Slice and devour.: When you spread the ganache, its glossy surface should ribbon and then settle, forming a smooth top that catches the light. Adding assorted candy creates contrast in flavor and texture, and pressing them gently into the ganache helps them adhere. The ganache should be thick enough to hold pieces without them sinking, which is a sign it cooled to the right consistency. Slicing when the ganache is set yields clean edges; if it is still runny, refrigerate until firm to avoid smeared slices.
- Add the chopped chocolate, peanut butter and nutella to a bowl.: For the ganache base, the chopped dark chocolate will sit in the bowl with spoonfuls of peanut butter and nutella creating a mosaic of textures before the warm heavy cream joins them. The contrast between solid chocolate and creamy spreads primes the mixture to become glossy and emulsified. A common mistake is uneven chopping, which delays melting; aim for small, consistent pieces to ensure even transformation when the hot cream is added.
- Heat the cream in a saucepan over low heat just until bubbles appear around the edges and it’s warm.: The heavy cream should steam gently without boiling, showing tiny bubbles at the rim. This temperature is perfect to melt the chocolate without separating the fats. You will smell the dairy warmth as it softens and see a mirage of steam. Boiling will create a skin or cause the emulsion to break, so remove it from heat the moment you see those edge bubbles.
- Pour the cream over the chocolate and let it sit for 30 seconds, then stir continuously until it’s smooth.: The 30 second rest allows the heat to penetrate and coax the chocolate to a soft sheen, and the first stirs are slow and satisfying as the mixture transforms into a silky ganache. Stirring continuously develops an emulsion that gives you a glossy, stable topping. If you hurry and whisk aggressively you might incorporate air, which can dull the finish, so steady, even strokes are best.
- Let it cool slightly until it thickens and is spreadable without dripping.: As the ganache cools, its viscosity increases and it becomes easier to control when spreading. You want a spreadable ribbon that does not run off the edges; that velvet thickness makes for a neat finish and clean slices. If it cools too much and firms, warm it gently over a bain marie to regain spreadability. A frequent misstep is pouring it while too hot which makes the topping sink into the brownie.
Tips and Variations
This recipe loves small adjustments that personalize flavor and texture. Below are practical tips and serving variations I rely on to make the best possible bars every time.
- Room temperature eggs incorporate more smoothly; take your eggs out of the fridge 30 minutes before mixing to ensure even batter and avoid shock when adding to warm chocolate.
- Chill slightly before slicing so the ganache firms and you get neat pieces; I often refrigerate 20 minutes after setting to make clean cuts without smearing.
- Swap candy thoughtfully by choosing toppings with different textures; crunchy bits contrast the fudgy interior and make each bite interesting.
- Stir the ganache slowly to preserve shine; brisk vigorous stirring can trap air and dull the glossy finish you want for presentation.
- Measure flour accurately by spooning into the cup then leveling, to avoid a dry result; too much flour leads to cakier bars instead of fudgy ones.
Pairing Suggestions for Peanut Butter Nutella Candy Bar Brownie
These bars pair well with simple accompaniments and different occasions, from casual gatherings to special nights. Below are thoughtful serving ideas and storage tips to keep them tasting their best.
- Serve with plain coffee for balance; the bitterness of brewed coffee contrasts the sweet, nutty layers and refreshes the palate between bites.
- Bring to parties as a tray bake; slice into small squares for a dessert table where people can sample without committing to a large piece.
- Pack for picnics by wrapping individual slices in parchment; they travel well at room temperature for a few hours and keep their texture.
- Gift for celebrations in a box with parchment separators; the glossy ganache and candy topping make for an impressive homemade present.
- Store in the fridge to extend freshness for up to a week, or freeze slices individually wrapped for up to a month; thaw in the fridge for a few hours before serving.
FAQ
Conclusion
This Peanut Butter Nutella Candy Bar Brownie stands out because it marries fudgy brownie texture with candy bar nostalgia, topped in glossy ganache for a show stopping finish. Try it because the combination of nutella, peanut butter, and dark chocolate creates a layered dessert experience that is both comforting and indulgent. I hope it becomes one of your go to recipes when you want a dessert that feels special with minimal fuss, and that sharing it sparks those little moments of joy I always look for in the kitchen.
Peanut Butter Nutella Candy Bar Brownie
Equipment
- 9 inch Tart Pan with Removable Bottom
- Small Saucepan
- Mixing Bowl
- Whisk
- Oven
Ingredients
- 1/2 cup unsalted butter Melted to provide rich, tender fat that creates moist brownie texture and helps dissolve cocoa and sugar; imparts a silky mouthfeel and helps set the bars when cooled. Use unsalted to control overall seasoning and balance sweetness without added sodium, allowing salt level to be adjusted precisely in the batter.
- 1/2 cup nutella Swirled into the batter to add intense hazelnut-chocolate flavor and creamy richness, contributing both fat and flavor complexity to the brownies. Melting or softening Nutella helps it incorporate smoothly and creates pockets of gooey chocolate-hazelnut throughout the bar.
- 1/3 cup creamy peanut butter Stirred in for creamy, nutty fat that enhances flavor depth and contrasts with the chocolate, contributing to density and chewiness. Using creamy texture ensures even distribution and helps form a cohesive bite without crunchy bits interfering with the brownie crumb.
- 3 ounces high-quality dark chocolate, chopped Melted into the batter to deepen chocolate flavor and increase the fudgy quality; high-quality dark chocolate adds cocoa intensity and a glossy finish when combined with butter. Chopping ensures even melting and helps control texture so the chocolate integrates smoothly without graininess.
- 1/3 cup sugar Dissolved to provide sweetness and contribute to tenderness by interfering with gluten formation, balancing the bitterness of dark chocolate and the saltiness of other ingredients. Using the specified amount keeps the bars sweet but still allows the nut and chocolate flavors to remain prominent.
- 1/4 teaspoons salt Added to balance sweetness and enhance the overall flavor profile while strengthening the perception of chocolate; salt also tightens dough structure slightly. Using a small measured amount ensures the brownies are not overly salty but have rounded, complex flavor.
- 1 teaspoon vanilla extract Whisked in to provide aromatic complexity and enhance other flavors, especially chocolate and nuts, lifting the overall profile. Using pure vanilla extract gives depth and warmth without adding moisture or altering texture significantly.
- 2 large eggs Beaten to incorporate structure and leavening through coagulated proteins that set the brownie crumb while adding moisture and richness. Using large eggs ensures proper ratio of liquid and fat for a fudgy, slightly tender interior and helps bind the batter together.
- 1/2 cup all-purpose flour Folded in to provide light structure and minimal gluten formation for a slightly fudgy brownie; flour gives body and allows the bars to hold together after baking. Using all-purpose keeps the texture balanced between cakey and fudgy, depending on mixing and ratios.
- nutella peanut butter ganache Prepared separately and spooned or spread over the baked bars to add a concentrated layer of melted chocolate and peanut butter flavor that contrasts with the brownie base. Formulating a ganache-like topping creates glossy, sliceable layers that set when chilled and deliver intense flavor in each bite.
- 1/3 cup heavy cream Heated to create the base liquid for the ganache, providing richness and allowing chocolate to melt smoothly into a cohesive emulsion; heavy cream contributes a silky, spreadable texture. Using the specified amount helps achieve the right ganache thickness for spreading without running off the bars.
- 4 ounces high-quality dark chocolate, chopped Melted with cream to form the ganache’s chocolate component, offering deep cocoa richness and helping the mixture set into a firm but creamy layer atop the brownies. Choosing high-quality dark chocolate ensures balanced bitterness and structure in the ganache rather than a waxy or overly sweet finish.
- 2 tablespoons creamy peanut butter Swirled into the warm ganache to infuse nutty peanut butter flavor and add creaminess, creating a layered peanut-chocolate profile that complements the brownie. Using creamy peanut butter ensures the ganache remains smooth and homogeneous without grainy or separated texture.
- 2 tablespoons nutella Folded into or drizzled over the ganache to impart additional hazelnut-chocolate notes and a glossy finish, enhancing both flavor complexity and visual appeal. Using a small amount allows a pronounced Nutella character without overpowering the peanut-chocolate balance in the ganache.
- assorted candy for topping, if desired Sprinkled on top to add color, texture, and extra sweetness or saltiness depending on choice, providing a playful contrast to the rich ganache and dense brownie layer. Selecting assorted candy lets you customize flavor combinations and create an attractive, festive presentation for serving.
Instructions
- Preheat the oven to 350 degrees F. Grease a 9-inch tart pan with a removable bottom.: The air should feel warm and even as the oven climbs to 350 degrees F , which creates the right environment for the center to set just enough while keeping the edges tender. I make sure the pan is well greased so the brownie releases cleanly, running my fingertip around the rim to check for missed spots. You will notice a slight aromatic rise as the oven heats, and that warm olfactory nudge tells you it is ready. Avoid using too much oil when greasing which can fry the edges; a thin even coating is best. If your oven runs hot or cold, use an oven thermometer to ensure accurate temperature because uneven heat will change the bake time and texture.
- Heat the butter, nutella and peanut butter in a small saucepan over low heat until melted. Whisk until smooth. Add in the chocolate and let it sit for a minute, then whisk until it melts. Stir in the sugar, salt and vanilla extract. Beat in the eggs one at a time, beating until combined. Stir in the flour until JUST combined. Pour the batter in the greased tart pan. Bake for 25 to 30 minutes. It won’t appear finished, but you don’t want to bake it longer! Let it cool completely.: As the butter liquefies and the jars of nutella and peanut butter soften, you will see glossy swirls form; this is when to whisk. The sound is quiet, a gentle shimmer rather than a boil, and the scent is a warm, toasty nut aroma. Heating low prevents the fats from separating and preserves that silky mouthfeel. One mistake I once made was turning the heat too high which scorched the mixture and left a burnt note, so keep it gentle and patient. Stir constantly to merge the textures and avoid hot spots.
- Spread the ganache over top of the brownie and cover in your favorite halloween candy – or leave it plain! Slice and devour.: When you add chopped dark chocolate , the pieces will soften, and for a moment the mixture looks patchy; letting it sit one minute allows residual heat to begin melting the chocolate slowly. Your whisking will then coax it into a uniform, glossy blend. The visual cue is a seamless, shiny batter and the aroma sharpens into deep cocoa. If you whisk too vigorously or add the chocolate cold, you can bring in air that changes the texture, so let it rest briefly before gentle whisking.
- Add the chopped chocolate, peanut butter and nutella to a bowl. Heat the cream in a saucepan over low heat just until bubbles appear around the edges and it’s warm. Pour the cream over the chocolate and let it sit for 30 seconds, then stir continuously until it’s smooth. Let it cool slightly until it thickens and is spreadable without dripping. Spread on the cooled brownie.: As the sugar dissolves into the warm chocolate mixture, you'll notice the shine slightly soften then resurface, and the scent of vanilla extract lifts the profile with a sweet floral note. The salt quietly balances sweetness, and you sense it most when you pause to taste a spoonful. Use a steady stirring motion to ensure the sugar dissolves; undissolved sugar can create a grainy mouthfeel in the finished brownie. Avoid rushing to add eggs immediately which could affect incorporation.
- Beat in the eggs one at a time, beating until combined.: The moment you add the first egg , the batter lightens and takes on a satiny sheen as the proteins bind with the fats. Beating them in one at a time ensures even texture and prevents curdling. You will see the mixture thicken slightly and become more elastic under the whisk, which translates to the tender crumb you want. If the chocolate is too hot, eggs can scramble; temper them by letting the mixture cool a touch or whisking briefly in a separate bowl before adding.
- Stir in the flour until JUST combined.: Folding in the all-purpose flour requires a gentle hand to keep the crumb fudgy. Watch for the last streaks of flour to disappear, and stop mixing the moment they do. Overmixing develops gluten and leads to a cakier result, so aim for a uniformly colored batter with minimal movement. The batter should be thick and glossy, not stiff. A common error is aggressive stirring which produces a dryer texture, so slow, circular folds are the trick.
- Pour the batter in the greased tart pan.: As you pour, the batter should flow slowly, coating the pan with a velvety surface. Gently tapping the pan on the counter releases large air bubbles and helps level the top. Visually, you want a few tiny bubbles and a smooth, even finish that will bake uniformly. Avoid spreading with a utensil which can leave fingerprints and disrupt the texture; let gravity do the work. If the batter pools unevenly, rotate the pan gently to level it.
- Bake for 25 to 30 minutes.: In the oven, the smell will evolve from chocolate to a richer, toasted note and the edges will set first, taking on a slight firmness while the center remains glossy. The surface may crack faintly but should still appear slightly underdone in the middle, which ensures a fudgy bite once cooled. Use the toothpick test sparingly; you want a few moist crumbs, not dry crumbs, to preserve the candy bar texture. Overbaking is the most common mistake; it dries the center and loses the fudgy character.
- It won’t appear finished, but you don’t want to bake it longer! Let it cool completely.: This pause is essential because the brownie continues to set as it cools, firming without drying out. The aroma mellows into deep chocolate notes, and the texture transitions from wobbly to sliceable. I leave the tart pan on a rack until it reaches room temperature, then chill briefly to make slicing neater. Cutting too soon invites crumbling and a messy plate, so patience pays off here.
- Spread the ganache over top of the brownie and cover in your favorite halloween candy – or leave it plain! Slice and devour.: When you spread the ganache, its glossy surface should ribbon and then settle, forming a smooth top that catches the light. Adding assorted candy creates contrast in flavor and texture, and pressing them gently into the ganache helps them adhere. The ganache should be thick enough to hold pieces without them sinking, which is a sign it cooled to the right consistency. Slicing when the ganache is set yields clean edges; if it is still runny, refrigerate until firm to avoid smeared slices.
- Add the chopped chocolate, peanut butter and nutella to a bowl.: For the ganache base, the chopped dark chocolate will sit in the bowl with spoonfuls of peanut butter and nutella creating a mosaic of textures before the warm heavy cream joins them. The contrast between solid chocolate and creamy spreads primes the mixture to become glossy and emulsified. A common mistake is uneven chopping, which delays melting; aim for small, consistent pieces to ensure even transformation when the hot cream is added.
- Heat the cream in a saucepan over low heat just until bubbles appear around the edges and it’s warm.: The heavy cream should steam gently without boiling, showing tiny bubbles at the rim. This temperature is perfect to melt the chocolate without separating the fats. You will smell the dairy warmth as it softens and see a mirage of steam. Boiling will create a skin or cause the emulsion to break, so remove it from heat the moment you see those edge bubbles.
- Pour the cream over the chocolate and let it sit for 30 seconds, then stir continuously until it’s smooth.: The 30 second rest allows the heat to penetrate and coax the chocolate to a soft sheen, and the first stirs are slow and satisfying as the mixture transforms into a silky ganache. Stirring continuously develops an emulsion that gives you a glossy, stable topping. If you hurry and whisk aggressively you might incorporate air, which can dull the finish, so steady, even strokes are best.
- Let it cool slightly until it thickens and is spreadable without dripping.: As the ganache cools, its viscosity increases and it becomes easier to control when spreading. You want a spreadable ribbon that does not run off the edges; that velvet thickness makes for a neat finish and clean slices. If it cools too much and firms, warm it gently over a bain marie to regain spreadability. A frequent misstep is pouring it while too hot which makes the topping sink into the brownie.
Notes
- Room temperature eggs incorporate more smoothly; take your eggs out of the fridge 30 minutes before mixing to ensure even batter and avoid shock when adding to warm chocolate.
- Chill slightly before slicing so the ganache firms and you get neat pieces; I often refrigerate 20 minutes after setting to make clean cuts without smearing.
- Swap candy thoughtfully by choosing toppings with different textures; crunchy bits contrast the fudgy interior and make each bite interesting.
- Stir the ganache slowly to preserve shine; brisk vigorous stirring can trap air and dull the glossy finish you want for presentation.
- Measure flour accurately by spooning into the cup then leveling, to avoid a dry result; too much flour leads to cakier bars instead of fudgy ones.