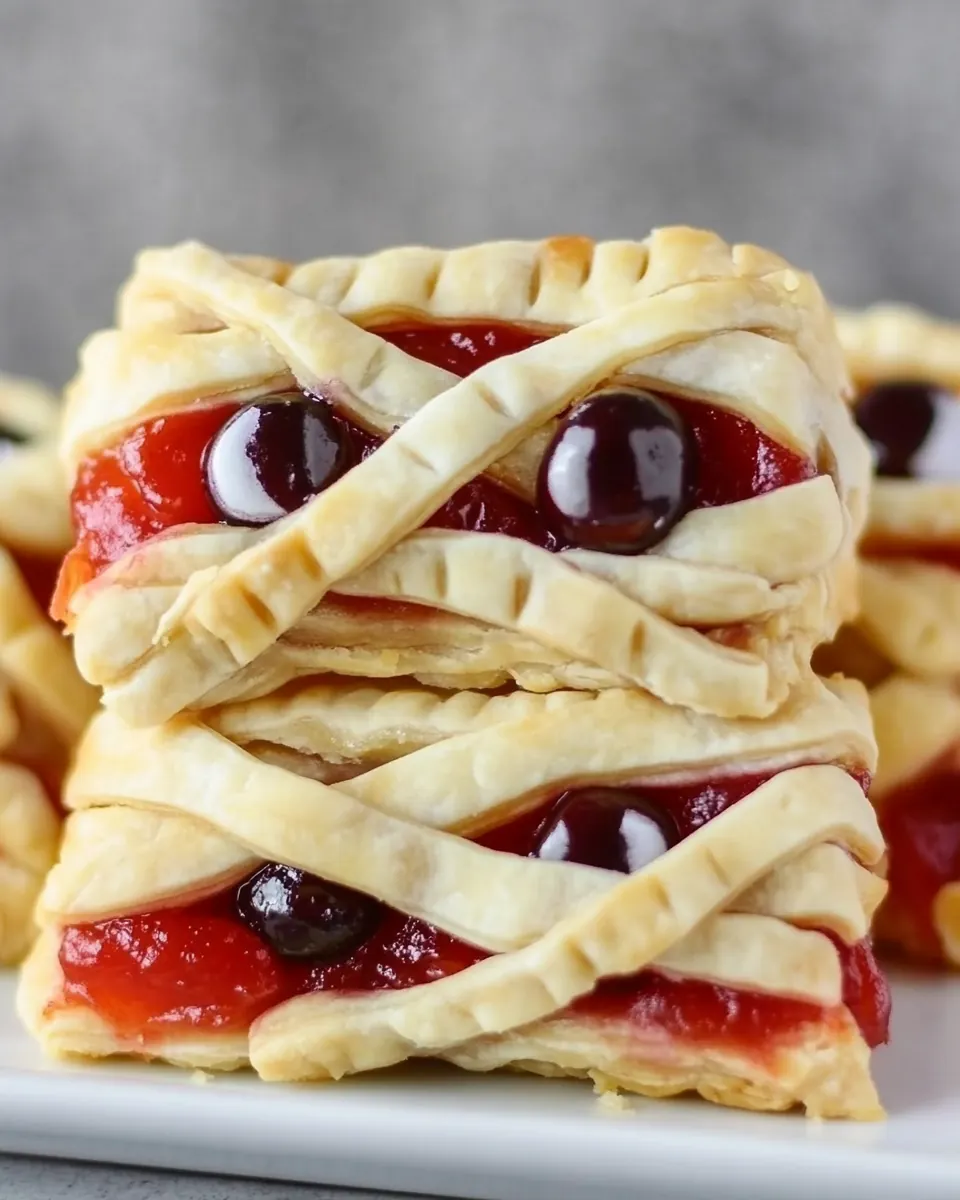
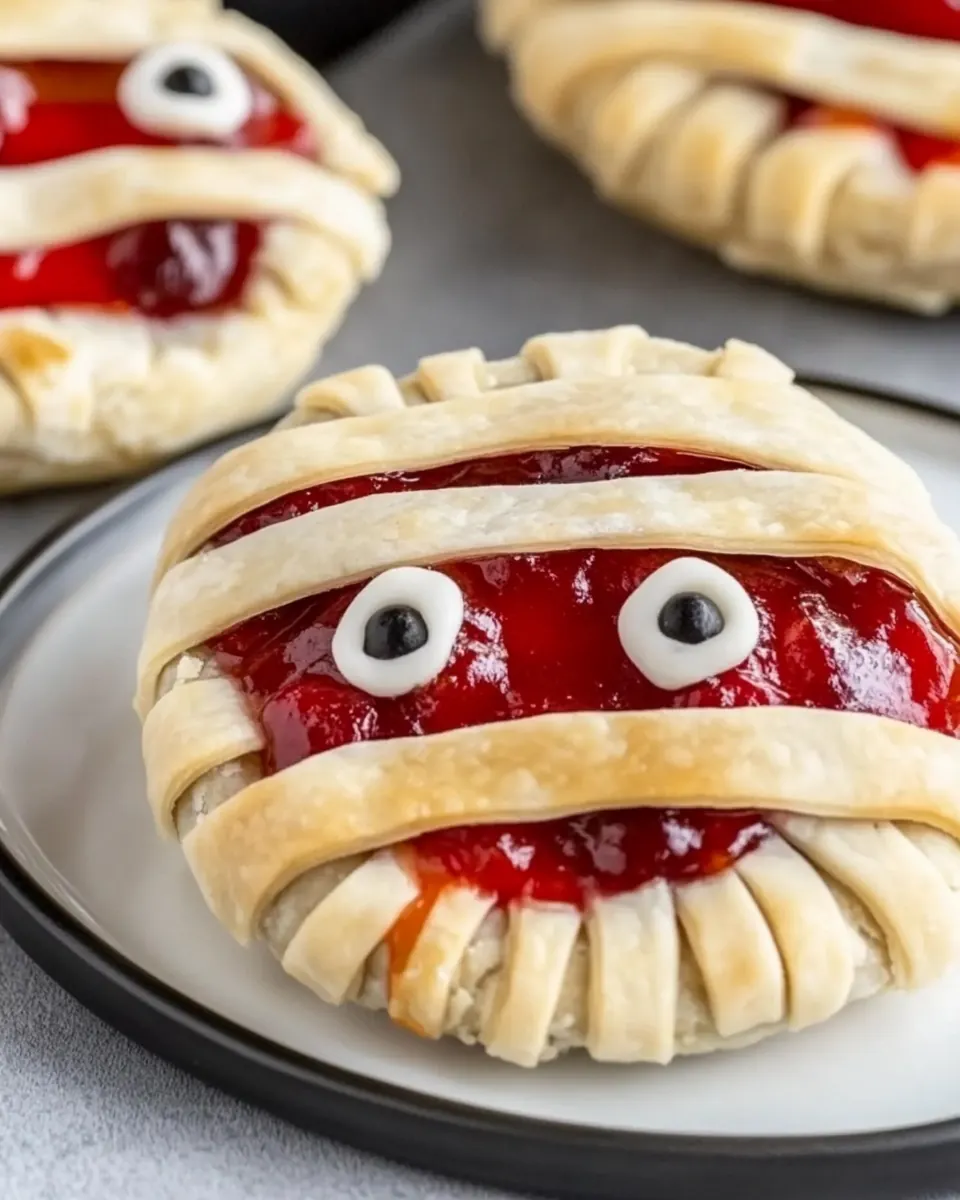
Mummy Halloween Cherry Hand Pies
Mummy Halloween Cherry Hand Pies were the first spooky treat I learned to make with my niece, and that memory still makes me grin. I remember how her eyes lit up when we peeled back the chilled pie dough together, and how proud she felt when those little bandage strips transformed into tiny, mischievous mummies. That first batch smelled of warm fruit and buttery crust, and we kept sneaking one while the rest cooled on the counter.
Over the years I’ve adapted the process to be faster and more foolproof, keeping the playful look but tightening the technique so you can make them on a school night or for a Halloween party. I love that Mummy Halloween Cherry Hand Pies let you be creative with the faces, and the filling stays pleasantly tangy against the flaky crust. When I make these now, I think of quick kitchen lessons, sticky fingers, and how simple shapes can turn baking into a small celebration.
Recipe Snapshot
25 mins
15 mins
10 mins
Medium
180 kcal
American
Paleo, Gluten-Free
Desserts
3 inch cookie cutter, Pizza cutter, Baking sheet, parchment paper, Oven, Pot, Measuring cups and spoons, Small bowl, Silicone brush
What Makes This Mummy Halloween Cherry Hand Pies Special
They are irresistibly playful
I honestly adore how these little pies invite creativity. You get to cut, weave, and place tiny dough bandages, and that hands on step makes the whole process feel like crafting rather than just baking. Kids and adults both lean in, and the payoff is a tray of whimsical pastries that look like they took forever, even when they did not.
Speed without sacrifice
Using ready chilled pie dough keeps the process moving, yet you still get a buttery, flaky texture. I like that I can assemble a batch in under 30 minutes, then pop them into the Oven while I tidy up. The quick bake time preserves the fruit filling‘s brightness, so you taste cherry rather than an overly cooked jammy syrup.
Textural contrast that sings
The combination of a crisp outer crust and a warm, slightly syrupy cherry pie filling is what makes these memorable. When you bite in, the crust flakes apart while the filling gives a small, pleasant resistance, then yields into a sweet, slightly tart mouthful. That contrast elevates each pie and keeps people coming back for more.
Totally adaptable for parties
I bring these to Halloween gatherings because they travel well and are easy to plate. They stack on a tray, hold their shape, and the candy eyes are the last fun touch to add on site if you want them fresh. The recipe scales nicely, and you can prep dough circles ahead, then finish when guests arrive.
Comforting, nostalgic flavors
These pies remind me of simple holidays and cozy kitchens. The cherry pie filling evokes fruit pies you grew up with, while the homemade looking mummies bring a playful twist. I think that combination of familiar taste and whimsical appearance is why I keep making them year after year.
What You’ll Need for Mummy Halloween Cherry Hand Pies
These ingredients are intentionally simple, each serving a clear role. The chilled pie dough provides the flaky structure, the cherry pie filling delivers bright, sweet fruit flavor, the candy eyes bring the character, and the egg gives color and adhesion. Together they create a small pastry that is more than the sum of its parts, balancing texture, sweetness, and visual fun.
- 29 inch sheets Pie dough I used the refridgerated kind that includes two 9 inch crusts. You can also use your favorite pie dough mix or make your own homemade crust.: Unroll and layer to form the pastry structure; provides the dough base for shaping, baking, and crisp flakiness while encasing the filling. Handle gently to avoid overworking, and chill if necessary to maintain texture and prevent shrinking during baking.
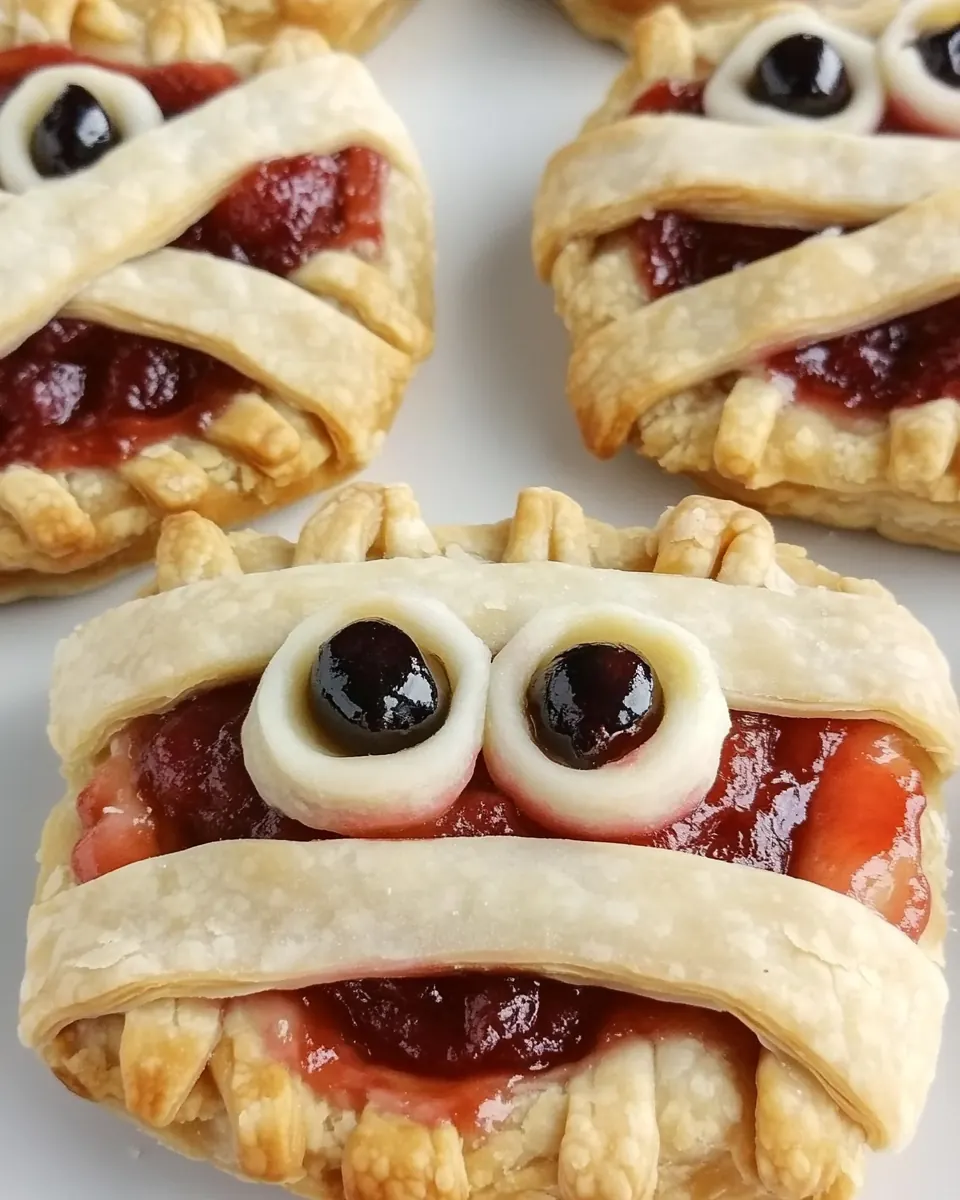
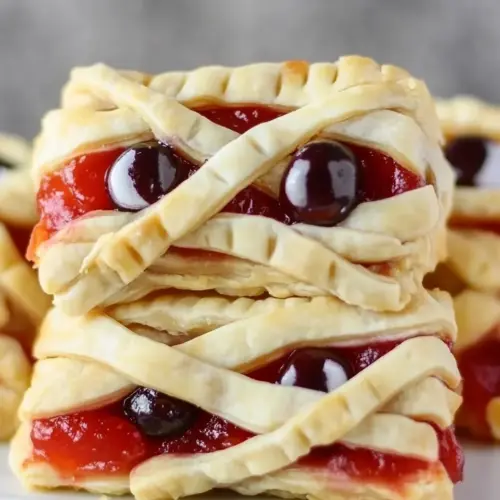
- 16 candy eyes: Place on top of each pie as a decorative accent; adds a playful, spooky appearance and small edible detail that makes the hand pies feel festive for Halloween. Press gently into the dough so they adhere before baking or attach after with a dab of egg wash.
- 1 cup Cherry pie filling: Spoon into the dough pockets to create the sweet, fruity center; supplies moisture, flavor, and a glossy filling that contrasts with the flaky crust. Drain slightly if overly watery to prevent sogginess, and portion evenly to avoid leaking during baking.
- 1 large egg: Beat and brush onto pastry edges and surfaces to seal and give a golden, shiny finish; promotes browning and helps decorative pieces stick during baking. Use a light, even coating to achieve attractive color without pooling or burning.
Mummy Halloween Cherry Hand Pies Instructions
I like to keep the rhythm simple, working from chilled dough to filled rounds, then sealing with pastry bandages. The directions below expand each short instruction into careful, sensory driven guidance so you can get consistent results and charming mummies every time.
- Preheat oven to 375 degrees. Line a baking sheet with parchment paper.: The warm air of the Oven will create a cozy, toasty scent as the crust browns, signaling that your pies are turning golden. Preheating ensures the crust begins to set immediately on contact, which helps maintain flakiness, and the lined baking sheet prevents sticking while catching any small leaks, making cleanup easier. A common mistake is not fully preheating, which can lead to underbaked interiors and pale tops; always wait until the oven reaches the full temperature. As you work, you might notice the kitchen filling with a mild, buttery scent that promises the final result.
- Use a 3-inch cookie cutter, cut 7-8 circles out of each piece of pie dough, saving the dough scraps to the side. Place eight of the circles on a baking sheet lined with parchment paper.: As you press the 3 inch cookie cutter through the chilled dough, you should hear a slight, clean press and see a neat, defined edge. Cutting from cold dough gives crisp rings and makes the strips easier to form later. Arrange the base circles with space between them so heat circulates and crusts brown evenly. If your cutter drags, chill the dough briefly and flour the cutter to prevent sticking. The dough scraps are valuable, so keep them cold for later re rolling and cutting.
- Using a pizza cutter, slice the remaining pie dough circles into thin strips that will become the mummy's bandages.: As you glide the Pizza cutter across the dough, you want clean, even strips about a quarter inch wide, which will bake into delicate, ribbon like bandages. The sound is subtle, a soft rasp as the wheel meets chilled dough. Uniform strips bake at the same rate, giving a consistent golden color across the mummies. Beware of making the strips too thin, as they can dry out or tear, and too thick will look clumsy; if strips tear while placing, press seams with a fingertip to mend them.
- Beat the egg in a small bowl with a fork.: The beaten egg should be smooth and slightly frothy, with a glossy sheen. Use a Small bowl so you can control the amount needed for brushing, and you'll notice the aroma of fresh egg, neutral yet essential. This wash helps the pastry brown and acts as an adhesive for the bandages. Over beating is harmless, but if you see large bubbles, let them settle before brushing to avoid uneven sheen. Keep an extra scrap of dough to test the egg wash on a tiny piece if you're unsure of coverage.
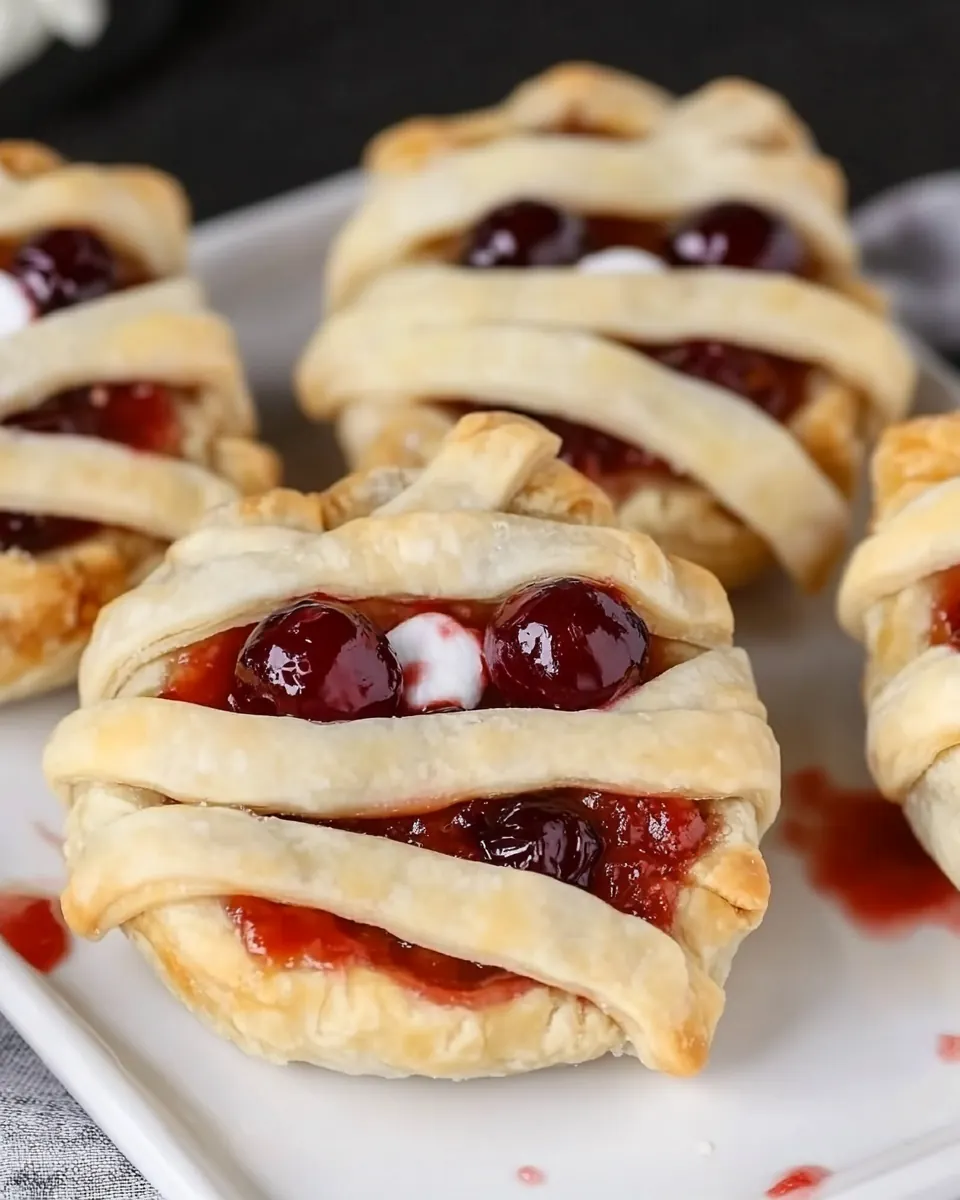
- Place a spoonful of cherry pie filling in the middle of each circle on the parchment paper. Leave a little room around the outside of each pie filling to attach the bandages. Brush the edge of each pie crust circle with a silicone brush and the beaten egg so the bandages will stick to the bottom circle.: When you drop the cherry pie filling into the center, listen for the soft plop and watch how it pools, shining wet and deep red. Keeping a clear margin around the filling is essential so the bandage strips can adhere and create a secure seal. The Silicone brush spreads a thin, lustrous coat of egg along the rim, which looks wet and reflective; this tackiness is what bonds the dough. A frequent error is overfilling, which causes leakage while baking; aim for a modest spoonful so the filling stays contained.
- Top the pie filling with the mummy bandages, pressing the bandages together with the bottom crust using your fingers. If you need more bandages, cut extra from the leftover scraps of dough.: As you place the thin strips over the filling, they should overlap and create an artful, slightly irregular pattern that resembles wrappings. Pressing gently with your fingertips fuses seams where the egg wash has been applied, and you will feel the tender resistance of the raw dough as it conforms to the filling. If a strip lifts, a little extra egg wash can act like glue. Avoid pressing too hard, which can squeeze filling out; aim for a light, secure touch that keeps the pies airy and flaky.
- Brush the tops of the mummy hand pies with the egg and a silicone brush to help the pies brown.: The final sweep of egg wash should make the surfaces gleam, catching light and promising a golden finish. The wash encourages even color and a subtly crisp exterior, and you may notice the dough becoming faintly tacky. Apply a light, even coat to avoid pools that can darken or create streaks. A common pitfall is overapplying, which can weigh down the strips and flatten the texture, so use quick, gentle strokes.
- Bake for 8-10 minutes. Watch carefully through the oven door, the crust will start to turn a golden brown color. Let the pies cool completely, then add the eyes and enjoy!: During baking you will see steam escape and the edges take on a warm, toasty hue, accompanied by a comforting, faintly sugary aroma from the cherry pie filling . Visual cues are key the tops should be evenly golden and not overly dark. After removing the tray, allow the pies to cool so the filling firms slightly; this prevents eyes from sliding and makes handling easier. A frequent mistake is removing them too early, which leads to squishy centers and lost shape, so be patient as they cool before adding the final decorative candy eyes .
Pro Tips and Tweaks
I like to keep a few tricks up my sleeve when making Mummy Halloween Cherry Hand Pies, small adjustments that improve texture and ease without changing the playful spirit. These tips help whether you are making a dozen or a few for the family.
- Chill dough before cutting Use refrigerated pie dough straight from the fridge and return scraps to the refrigerator so strips remain firm and easy to handle.
- Control filling moisture If your cherry filling seems runny, drain briefly or thicken with a small cornstarch slurry, this stops leaks during baking.
- Work quickly Speed keeps the dough cold and flaky, so pre measure tools and filling before you start to cut and assemble.
- Even bandages Aim for consistent strip width so they bake uniformly and create a cohesive, attractive pattern on each pie.
- Egg wash economy Lightly brush the rim for adhesion and the tops for shine, wiping excess from the brush prevents pooling and uneven coloring.
- Cool before adding eyes Let pies settle and cool slightly so the candy eyes stay in place and do not deform or melt.
- Batch baking Arrange pies with space on the sheet; baking in a single layer yields consistent browning and helps you monitor progress easily.
Serving Options for Mummy Halloween Cherry Hand Pies
These hand pies are a charming addition to any Halloween spread and can be served warm or at room temperature. They are portable, kid friendly, and easy to present on a platter for trick or treaters, parties, or casual family gatherings. I like to pair them with simple beverages and place them on tiered trays for a dramatic table display.
- Party platters Arrange multiple pies on a decorative tray with parchment separators so guests can pick them up easily, perfect for Halloween parties or school events.
- Family dessert Serve warm from the Oven with a side of napkins for a cozy after dinner treat, ideal for a fall weeknight dessert.
- Kid friendly snack Pack one or two pies in individual boxes for school or playdate treats, they travel well and hold their shape.
- Seasonal gatherings These pies fit right into fall themed tables, pair them with warm apple cider or a simple coffee station for adults.
- Storage tips Keep leftover pies in an airtight container for up to two days at room temperature, or refrigerate for longer keeping; reheat briefly in the Oven to refresh the crust.
- Occasion ideas Use them for Halloween brunches, potlucks, or as a sweet addition to a Ramadan iftar spread where sweet pastries are served to break fast.
FAQ
Conclusion
These Mummy Halloween Cherry Hand Pies are special because they pair nostalgic cherry filling with fun, approachable pastry work that anyone can enjoy. Give them a try if you want a festive treat that looks impressive but is simple to make. They are perfect for sharing at a party or making with family, and their playful appearance always brings smiles.
Mummy Halloween Cherry Hand Pies
Equipment
- 3 inch Cookie Cutter
- Pizza Cutter
- Baking Sheet
- Parchment Paper
- Oven
- Pot
- Measuring Cups and Spoons
- Small Bowl
- Silicone brush
Ingredients
- 29 inch sheets Pie dough I used the refridgerated kind that includes two 9 inch crusts. You can also use your favorite pie dough mix or make your own homemade crust. Unroll and layer to form the pastry structure; provides the dough base for shaping, baking, and crisp flakiness while encasing the filling. Handle gently to avoid overworking, and chill if necessary to maintain texture and prevent shrinking during baking.
- 16 candy eyes Place on top of each pie as a decorative accent; adds a playful, spooky appearance and small edible detail that makes the hand pies feel festive for Halloween. Press gently into the dough so they adhere before baking or attach after with a dab of egg wash.
- 1 cup Cherry pie filling Spoon into the dough pockets to create the sweet, fruity center; supplies moisture, flavor, and a glossy filling that contrasts with the flaky crust. Drain slightly if overly watery to prevent sogginess, and portion evenly to avoid leaking during baking.
- 1 large egg Beat and brush onto pastry edges and surfaces to seal and give a golden, shiny finish; promotes browning and helps decorative pieces stick during baking. Use a light, even coating to achieve attractive color without pooling or burning.
Instructions
- Preheat oven to 375 degrees. Line a baking sheet with parchment paper.: The warm air of the Oven will create a cozy, toasty scent as the crust browns, signaling that your pies are turning golden. Preheating ensures the crust begins to set immediately on contact, which helps maintain flakiness, and the lined baking sheet prevents sticking while catching any small leaks, making cleanup easier. A common mistake is not fully preheating, which can lead to underbaked interiors and pale tops; always wait until the oven reaches the full temperature. As you work, you might notice the kitchen filling with a mild, buttery scent that promises the final result.
- Use a 3-inch cookie cutter, cut 7-8 circles out of each piece of pie dough, saving the dough scraps to the side. Place eight of the circles on a baking sheet lined with parchment paper.: As you press the 3 inch cookie cutter through the chilled dough, you should hear a slight, clean press and see a neat, defined edge. Cutting from cold dough gives crisp rings and makes the strips easier to form later. Arrange the base circles with space between them so heat circulates and crusts brown evenly. If your cutter drags, chill the dough briefly and flour the cutter to prevent sticking. The dough scraps are valuable, so keep them cold for later re rolling and cutting.
- Using a pizza cutter, slice the remaining pie dough circles into thin strips that will become the mummy's bandages.: As you glide the Pizza cutter across the dough, you want clean, even strips about a quarter inch wide, which will bake into delicate, ribbon like bandages. The sound is subtle, a soft rasp as the wheel meets chilled dough. Uniform strips bake at the same rate, giving a consistent golden color across the mummies. Beware of making the strips too thin, as they can dry out or tear, and too thick will look clumsy; if strips tear while placing, press seams with a fingertip to mend them.
- Beat the egg in a small bowl with a fork.: The beaten egg should be smooth and slightly frothy, with a glossy sheen. Use a Small bowl so you can control the amount needed for brushing, and you'll notice the aroma of fresh egg, neutral yet essential. This wash helps the pastry brown and acts as an adhesive for the bandages. Over beating is harmless, but if you see large bubbles, let them settle before brushing to avoid uneven sheen. Keep an extra scrap of dough to test the egg wash on a tiny piece if you're unsure of coverage.
- Place a spoonful of cherry pie filling in the middle of each circle on the parchment paper. Leave a little room around the outside of each pie filling to attach the bandages. Brush the edge of each pie crust circle with a silicone brush and the beaten egg so the bandages will stick to the bottom circle.: When you drop the cherry pie filling into the center, listen for the soft plop and watch how it pools, shining wet and deep red. Keeping a clear margin around the filling is essential so the bandage strips can adhere and create a secure seal. The Silicone brush spreads a thin, lustrous coat of egg along the rim, which looks wet and reflective; this tackiness is what bonds the dough. A frequent error is overfilling, which causes leakage while baking; aim for a modest spoonful so the filling stays contained.
- Top the pie filling with the mummy bandages, pressing the bandages together with the bottom crust using your fingers. If you need more bandages, cut extra from the leftover scraps of dough.: As you place the thin strips over the filling, they should overlap and create an artful, slightly irregular pattern that resembles wrappings. Pressing gently with your fingertips fuses seams where the egg wash has been applied, and you will feel the tender resistance of the raw dough as it conforms to the filling. If a strip lifts, a little extra egg wash can act like glue. Avoid pressing too hard, which can squeeze filling out; aim for a light, secure touch that keeps the pies airy and flaky.
- Brush the tops of the mummy hand pies with the egg and a silicone brush to help the pies brown.: The final sweep of egg wash should make the surfaces gleam, catching light and promising a golden finish. The wash encourages even color and a subtly crisp exterior, and you may notice the dough becoming faintly tacky. Apply a light, even coat to avoid pools that can darken or create streaks. A common pitfall is overapplying, which can weigh down the strips and flatten the texture, so use quick, gentle strokes.
- Bake for 8-10 minutes. Watch carefully through the oven door, the crust will start to turn a golden brown color. Let the pies cool completely, then add the eyes and enjoy!: During baking you will see steam escape and the edges take on a warm, toasty hue, accompanied by a comforting, faintly sugary aroma from the cherry pie filling . Visual cues are key the tops should be evenly golden and not overly dark. After removing the tray, allow the pies to cool so the filling firms slightly; this prevents eyes from sliding and makes handling easier. A frequent mistake is removing them too early, which leads to squishy centers and lost shape, so be patient as they cool before adding the final decorative candy eyes .
Notes
- Chill dough before cutting Use refrigerated pie dough straight from the fridge and return scraps to the refrigerator so strips remain firm and easy to handle.
- Control filling moisture If your cherry filling seems runny, drain briefly or thicken with a small cornstarch slurry, this stops leaks during baking.
- Work quickly Speed keeps the dough cold and flaky, so pre measure tools and filling before you start to cut and assemble.
- Even bandages Aim for consistent strip width so they bake uniformly and create a cohesive, attractive pattern on each pie.
- Egg wash economy Lightly brush the rim for adhesion and the tops for shine, wiping excess from the brush prevents pooling and uneven coloring.
- Cool before adding eyes Let pies settle and cool slightly so the candy eyes stay in place and do not deform or melt.
- Batch baking Arrange pies with space on the sheet; baking in a single layer yields consistent browning and helps you monitor progress easily.