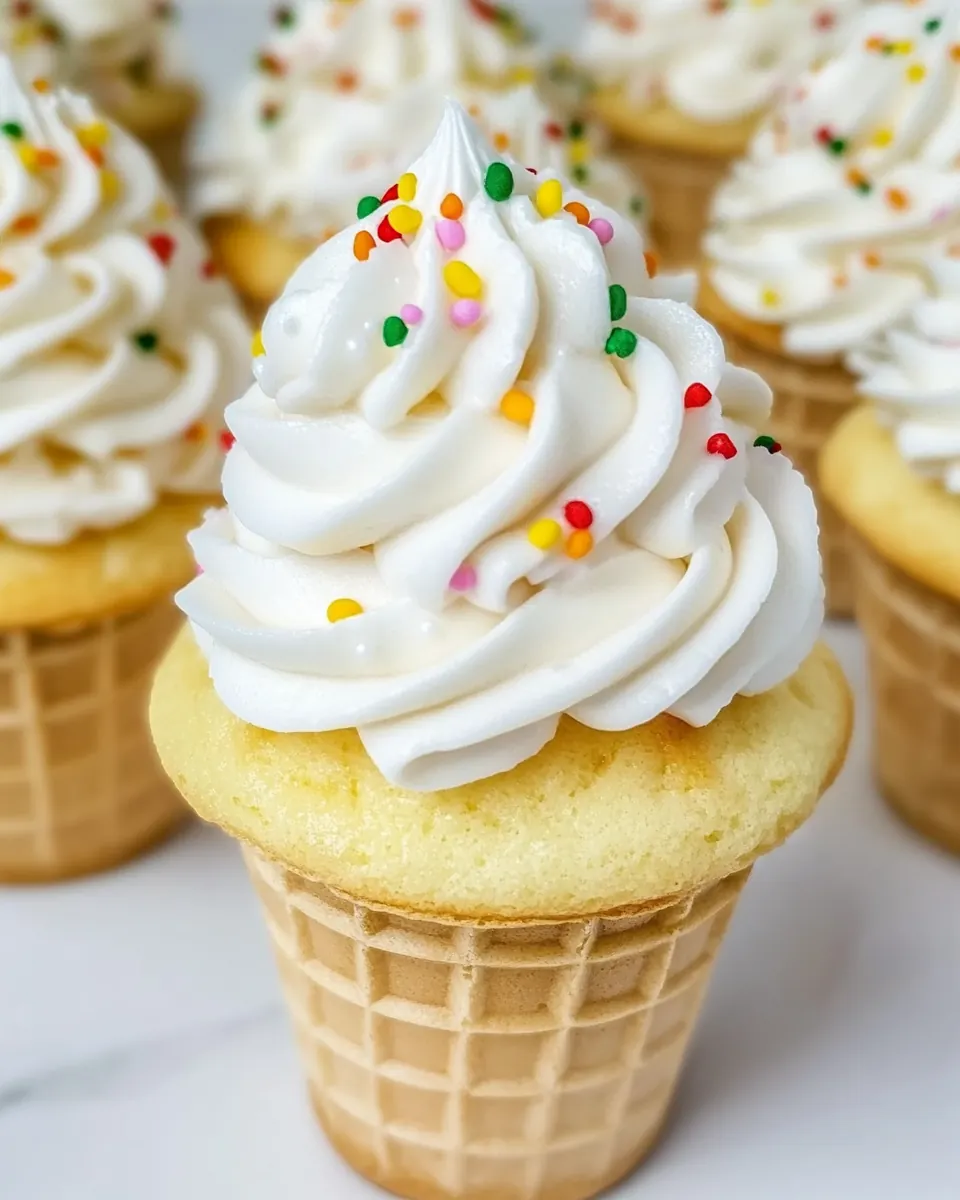
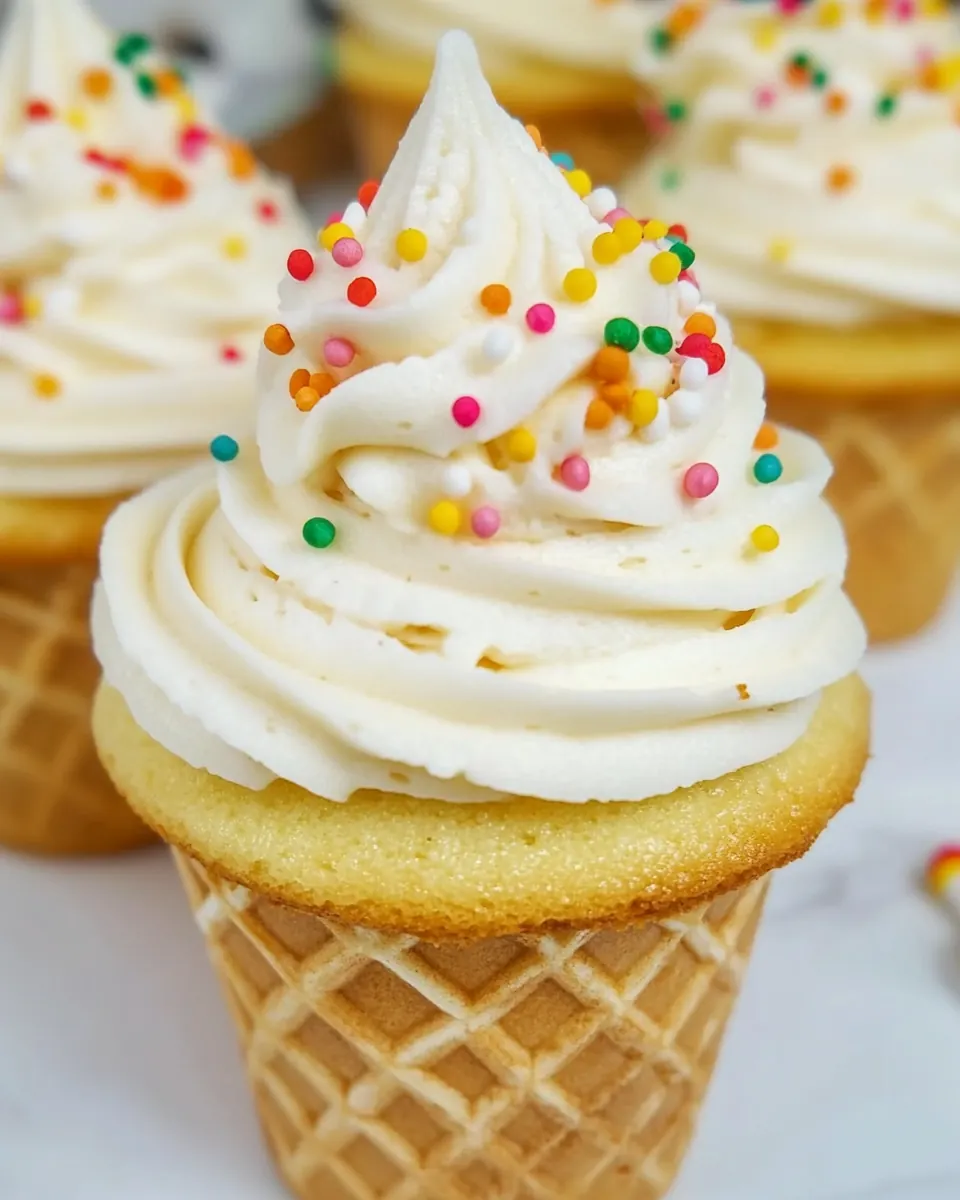
Ice Cream Cone Cupcakes
Ice Cream Cone Cupcakes started as a tiny experiment in my kitchen the summer I wanted dessert to feel playful and portable at the same time.
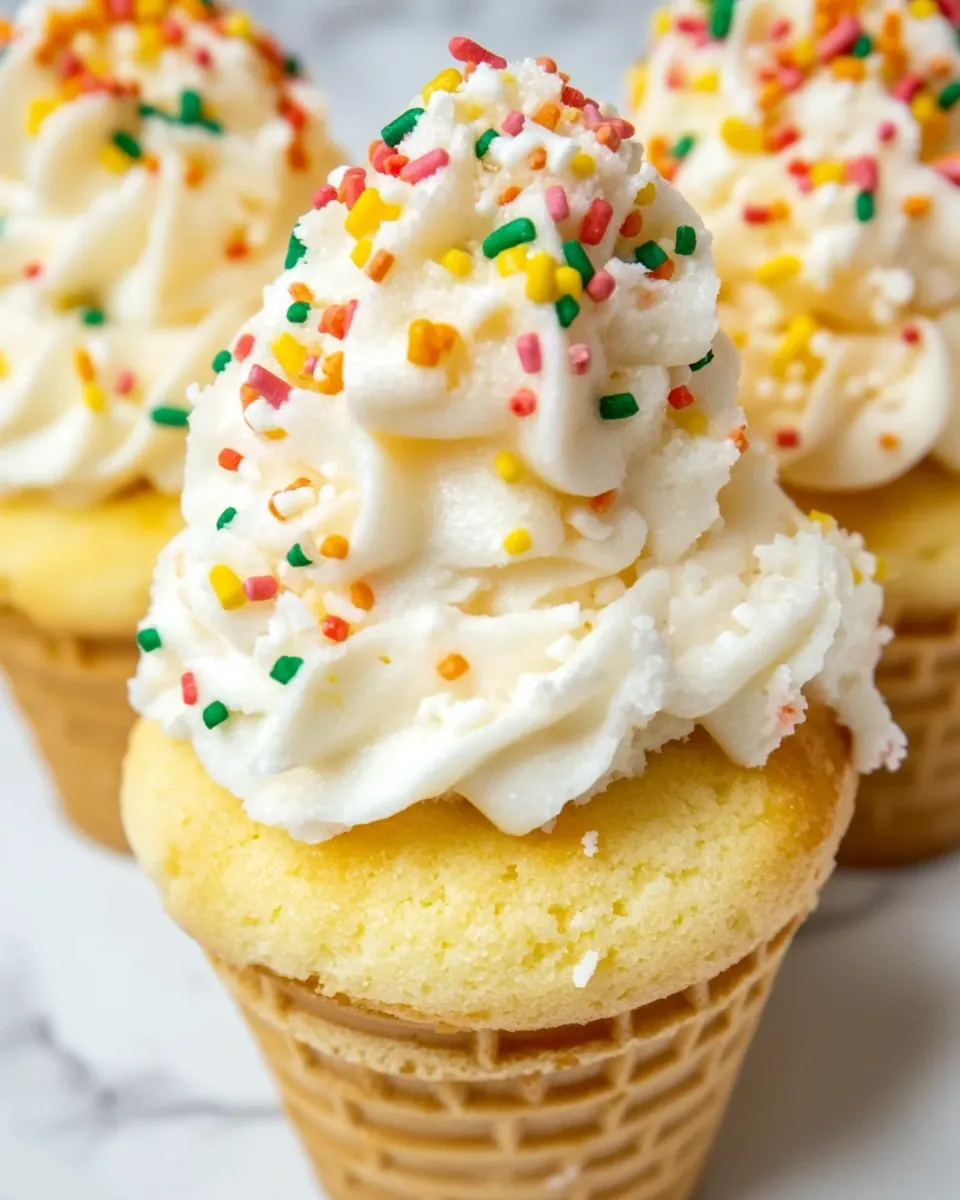
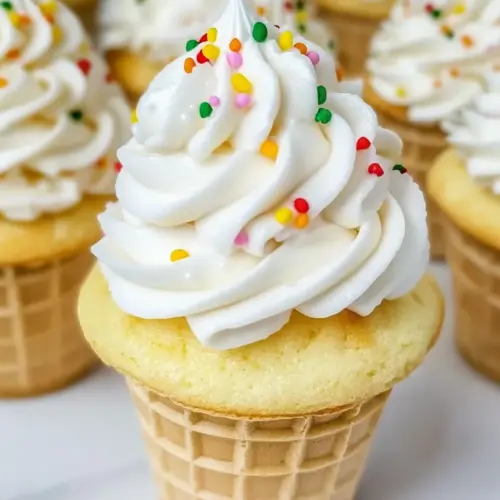
I remember pulling a box of white cake mix from the pantry, lining up a dozen flat bottomed ice cream cones in a muffin tin, and feeling a little giddy at how the batter puffed up inside those cones as it baked. The first batch was eaten warm at a neighborhood picnic, and the kids called them cupcake cones while the adults smiled at how neat and tidy they were to serve. Over time I adjusted the frosting so it would pipe like soft serve, and added sprinkles to make them party ready. Each bite is a balance of tender cake and crisp cone, and I still love how the cone gives a satisfying crunch against the soft crumb.
When I make Ice Cream Cone Cupcakes now, I think about small celebrations, backyard gatherings, and moments when dessert should be simple to hand out and impossible to resist. I keep a stash of flat bottom cones in the pantry for last minute ideas, and I often double the frosting because folks sneak it from the bowl. These cupcakes are one of those recipes that makes me smile when I plate them, because they look festive without being fussy, and they travel well to picnics or potlucks. If you want something that reads playful yet is genuinely delicious, this is the trick I reach for.
Recipe Snapshot
45 mins
30 mins
15 mins
Medium
250 kcal
American
Gluten-Free, Low FODMAP
Desserts
Mixing bowl, Hand mixer, Muffin pan, Stand mixer, Piping bag, Star tip
The Magic of This Ice Cream Cone Cupcakes
They are irresistibly fun
I love how Ice Cream Cone Cupcakes instantly bring a playful mood to any table. The cone shape makes them feel like a novelty, but the taste is straightforward and crowd friendly, so they work for birthdays, casual get togethers, and summer parties.
Easy to portion and serve
One of the reasons I reach for this recipe is practicality. Because each ice cream cone is its own handheld serving, there is no need for plates and forks, so clean up becomes almost effortless. Guests can grab a cone and move on, and that simplicity is a huge win for busy hosts.
Textural contrast that surprises
The contrast between the soft, moist white cake mix crumb and the crisp ice cream cone edge is the kind of detail I adore. It gives every bite a little crunch and a little tenderness, which keeps you coming back for more. I especially appreciate how the cone seals in moisture at the base while staying pleasantly crunchy at the rim.
Adaptable frosting and finishing
I find the buttercream in this recipe is forgiving, so you can pipe swirls that look like soft serve. I often tweak the whipping time to control texture, and sprinkles make them festive. Because the frosting is straightforward, you can change color palettes for themes and holidays without changing the technique.
Great for making ahead and transporting
When I need a dessert that travels well, these cupcakes are a top choice. They keep their shape if cooled and stored properly, and they are less likely to collapse than filled cupcakes. That reliability makes them a staple for potlucks and park picnics.
Essential Ingredients for Ice Cream Cone Cupcakes
I think of the ingredient list as a small orchestra where each player has a clear role. The boxed mixes provide structure and reliable rise, the eggs and oil add moisture and tenderness, and the ice cream cones contribute a fun vessel and crisp texture. The frosting ingredients unite to create a light, pipeable finish that sings on top of the cake, and the sprinkles are the final note that turns them festive.
- 15.25 ounces white cake mix: Adds a light, sweet structure and base for the cupcake batter; provides flour, sugar, and leavening to ensure proper rise and tender crumb. Helps streamline preparation by combining multiple dry components into one dependable mix. Complements the pudding mix to create a moist, cake-like texture ideal for cone baking.
- 3.5 ounces instant vanilla pudding: Contributes concentrated vanilla flavor and additional thickening to the batter; helps retain moisture and tenderness when mixed with the cake mix. Enhances stability so cupcakes hold shape inside the cones during baking. Balances sweetness and supports a creamier crumb.
- 4 large eggs: Provides leavening support, moisture, and richness; beaten into the batter to incorporate air for a lighter texture. Adds protein for structure so cupcakes set properly while baking in cones. Helps emulsify fat and liquid ingredients for consistent batter.
- 3/4 cup vegetable oil: Supplies fat and tenderness, yielding a moist crumb and smooth mouthfeel when combined with other liquids. Aids in creating an emulsion with eggs and milk for even texture throughout the cupcakes. Contributes to browning and rich flavor during baking.
- 1/2 cup milk: Adds necessary liquid to hydrate dry ingredients and adjust batter consistency for proper pouring into cones. Contributes mild dairy richness to complement the sour cream and eggs. Helps achieve the correct balance so cupcakes bake evenly without drying out.
- 1 cup sour cream: Adds tangy richness and extra moisture to create a tender, creamy crumb; helps prevent the cupcakes from becoming dry. Introduces slight acidity that can brighten flavors and react with leavening agents for lift. Improves overall texture, giving a denser, more luscious bite ideal for cones.
- 32 cake-style ice cream cones (flat-bottomed): Provides the baking vessel with a convenient, cone-shaped form and flat bottom for stability; serves as both container and edible treat. Defines portion size and presentation while adding a light crisp texture contrast to the soft cupcake. Must be flat–bottomed so cupcakes stand upright and are easy to decorate.
- 1 cup unsalted butter (room temperature): Creates a smooth, rich frosting base with butterfat that whips to a fluffy consistency; used at room temperature to achieve proper aeration. Contributes creamy mouthfeel and stability so the frosting holds peaks on the cupcake cones. Balances sweetness from the powdered sugar and carries vanilla flavor.
- 6 cups powdered sugar: Sweetens and stabilizes the frosting, building structure and body for piping onto cones; sifted to avoid lumps and achieve a silky finish. Controls sweetness intensity while allowing the butter to whip to a smooth texture. Helps maintain firm frosting that holds sprinkles and decorations.
- 2 tablespoons clear vanilla extract: Impacts aroma and flavor by providing clear vanilla notes without altering color; blends into frosting for a bright vanilla profile. Enhances overall sweetness perception and complements the cake and butter components. Ensures consistent vanilla flavor throughout the buttercream.
- sprinkles (as needed): Adds visual appeal and playful texture as a finishing touch; available in many colors and shapes to match themes. Provides slight crunch and additional sweetness contrast to soft frosting and cake. Used sparingly to decorate and personalize each cone cupcake.
Putting Together Ice Cream Cone Cupcakes

These steps take you from mixing batter to piping a swirled crown that looks like soft serve. Follow the sequence and pay attention to texture cues, because the cones bake differently than standard cupcakes and the tiny vessel affects timing and moisture.
- Preheat the oven to 400°F. In a large mixing bowl, mix together the cake mix, dry vanilla pudding mix, eggs, oil, milk, and sour cream with a hand mixer. Mix until everything is just combined, being careful not to over-mix.: When the oven warms to 400°F , you will notice an even heat that allows the batter inside the cones to rise quickly and set with a lightly golden exterior. The scent of warm air and faint sweetness will start to come through once the oven reaches temperature, signaling that you should work efficiently to fill the cones so they go straight into heat. This high temperature helps create a slight crisp at the cone edge while keeping the interior tender. A typical mistake is placing cones in before the oven is ready which can lead to uneven rise, so always confirm the temperature with a reliable oven thermometer.
- Place each ice cream cone in the well of a muffin pan. Fill each cone half full with the prepared batter.: In a large mixing bowl, combine the white cake mix , instant vanilla pudding , eggs , vegetable oil , milk , and sour cream with a hand mixer until just combined. You will hear a gentle whir and see a silky batter that is smooth without streaks of flour. The batter should be thick enough to hold shape but loose enough to scoop; over mixing produces a tougher crumb, so stop when you no longer see dry pockets. This technique matters because the right batter texture prevents the cones from overflowing and ensures an even crumb. Avoid the common mistake of overbeating which creates tunnels and a dense texture.
- Bake for 14 to 16 minutes or until a toothpick inserted into the center of the cupcake comes out clean.: Place each ice cream cone in the well of a muffin pan so they stand upright, then fill each cone about half full with the prepared batter. As you scoop, listen for the soft plop of batter settling into the cone and watch the level rise; filling halfway allows room for rise and prevents spills. Using a cookie scoop gives consistent portions and minimizes drips around the base. If you overfill, batter will spill onto the muffin tin and bake into a crust, which is the usual mistake here.
- Remove from the oven and let cool completely before frosting.: Bake until a toothpick inserted into the center of the cupcake comes out clean, usually between 14 to 16 minutes at 400°F . During baking you will notice the cones take on a light golden color at the rim and the tops of the cakes slightly doming. The aroma of baked cake will waft through the kitchen, a cue that they are nearing doneness. The reason for watching closely is that cones conduct heat differently than pans alone, so a shorter, attentive bake prevents dryness. A common error is leaving them in too long which dries the tiny cakes out quickly.
- In a stand mixer fitted with the whisk attachment, combine the softened butter, powdered sugar, and vanilla. Turn on low and mix until all the powdered sugar is mixed into the butter. Turn on high and whip for 30 seconds until the frosting is light and fluffy.: Remove from the oven and let cool completely before frosting so the buttercream does not melt on contact. Cooling allows the internal crumb to set, and you will feel the cones become room temperature and firm to the touch. If you pipe frosting on warm cakes, it will slide and lose shape, so patience here preserves presentation. People sometimes rush this step, resulting in sloppy frosting, so ensure they are fully cool.
- Place the frosting into a piping bag fitted with a star tip. Frost the cupcakes, and top with sprinkles. These cupcakes are best served the same day they are prepared.: In a stand mixer fitted with the whisk attachment, combine the softened unsalted butter , powdered sugar , and clear vanilla extract . Start on low so the sugar blends into the butter without a cloud of dust, then increase speed to whip the frosting for about 30 seconds until it becomes light and fluffy. The frosting should feel silky and hold soft peaks, with a faint sweet dairy aroma. Proper whipping incorporates air, giving a lighter mouthfeel and making piping easier. A common pitfall is using butter that is too cold, which prevents smooth mixing and leaves lumps.
- Fill piping bag and frost: Place the frosting into a piping bag fitted with a star tip and pipe swirls onto each cooled cupcake, finishing with a sprinkle of sprinkles . When you pipe, listen to the gentle squeeze and watch the frosting form tall, defined ridges that mimic soft serve. Piping with steady pressure creates uniform swirls, while a shaky hand causes uneven peaks. If the frosting is too stiff, add a splash of milk to adjust consistency; if too soft, chill briefly. Avoid piping directly from a spoon which yields a messy finish.
- Serve same day: These cupcakes are best served the same day they are prepared to enjoy the ideal contrast between crisp cones and tender cake. As they sit, moisture migrates and cones can soften, altering the texture balance, so plan to display and serve them shortly after decorating. If storing, keep them in a single layer in an airtight container to minimize condensation and sogginess. A frequent misstep is stacking them, which squashes the frosting and damages presentation.
Ways to Adapt This Recipe
These ideas help you adapt the recipe for different occasions, textures, and ease of service. Below are practical tips to change finishing, make assembly simpler, and ensure consistent baking results.
- Swap presentation Use colorful sprinkles or themed toppings to match parties, switching colors to fit holidays or celebrations without altering the core technique.
- Make filling easier Use a cookie scoop to portion batter into each ice cream cone for uniform sizes and minimal mess when filling the muffin tin.
- Control frosting texture If the buttercream is too thick, add a tablespoon of milk at a time to reach piping consistency; if it is too thin, chill briefly to firm up for cleaner swirls.
- Bake in batches Arrange cones in muffin pans across two racks if making many at once, rotating pans if needed to promote even browning and consistent bake across the oven.
- Check for doneness early Start testing with a toothpick at the lower end of the bake window to prevent overbaking, as the small volume in cones can finish quickly.
What to Serve With Ice Cream Cone Cupcakes
These handheld cupcakes pair well with casual beverages and make a festive dessert centerpiece for summer gatherings. Below are serving ideas, occasions, storage tips, and seasonal pairings to help you plan around this recipe.
- Portable party dessert Serve a platter of Ice Cream Cone Cupcakes at picnics, birthday parties, or backyard barbecues where guests can grab and go, minimizing the need for plates.
- Kids birthday staple These are perfect for children s parties because the sprinkles and cone shape feel playful, and they are easy to distribute in snack lines without utensils.
- Summer gatherings For warm weather events, keep cupcakes slightly chilled until service to maintain the piped frosting shape, and place them on a flat tray for easy transport to your outdoor table.
- Storage tips If not serving the same day, store unfrosted cupcakes in an airtight container at room temperature up to one day, and keep frosting refrigerated separately to pipe just before serving to avoid soggy cones.
- Seasonal pairings Use themed sprinkles for holidays, or change frosting color for seasonal events; these cupcakes fit well into summer fairs, festive brunches, and casual celebrations.
FAQ
Conclusion
These Ice Cream Cone Cupcakes stand out because they combine tender, moist cake with the crisp fun of an ice cream cone, creating a charming handheld dessert that delights all ages. Give them a try at your next gathering for an easy to serve, visually playful sweet that keeps cleanup simple and smiles plentiful. I hope you enjoy the process of filling, baking, and piping these little treats, and that they become a repeat favorite for your summer parties and casual get togethers.
Ice Cream Cone Cupcakes
Equipment
- Mixing Bowl
- Hand Mixer
- Muffin Pan
- Stand mixer
- Piping Bag
- Star tip
Ingredients
- 15.25 ounces white cake mix Adds a light, sweet structure and base for the cupcake batter; provides flour, sugar, and leavening to ensure proper rise and tender crumb. Helps streamline preparation by combining multiple dry components into one dependable mix. Complements the pudding mix to create a moist, cake-like texture ideal for cone baking.
- 3.5 ounces instant vanilla pudding Contributes concentrated vanilla flavor and additional thickening to the batter; helps retain moisture and tenderness when mixed with the cake mix. Enhances stability so cupcakes hold shape inside the cones during baking. Balances sweetness and supports a creamier crumb.
- 4 large eggs Provides leavening support, moisture, and richness; beaten into the batter to incorporate air for a lighter texture. Adds protein for structure so cupcakes set properly while baking in cones. Helps emulsify fat and liquid ingredients for consistent batter.
- 3/4 cup vegetable oil Supplies fat and tenderness, yielding a moist crumb and smooth mouthfeel when combined with other liquids. Aids in creating an emulsion with eggs and milk for even texture throughout the cupcakes. Contributes to browning and rich flavor during baking.
- 1/2 cup milk Adds necessary liquid to hydrate dry ingredients and adjust batter consistency for proper pouring into cones. Contributes mild dairy richness to complement the sour cream and eggs. Helps achieve the correct balance so cupcakes bake evenly without drying out.
- 1 cup sour cream Adds tangy richness and extra moisture to create a tender, creamy crumb; helps prevent the cupcakes from becoming dry. Introduces slight acidity that can brighten flavors and react with leavening agents for lift. Improves overall texture, giving a denser, more luscious bite ideal for cones.
- 32 cake-style ice cream cones (flat-bottomed) Provides the baking vessel with a convenient, cone-shaped form and flat bottom for stability; serves as both container and edible treat. Defines portion size and presentation while adding a light crisp texture contrast to the soft cupcake. Must be flat-bottomed so cupcakes stand upright and are easy to decorate.
- 1 cup unsalted butter (room temperature) Creates a smooth, rich frosting base with butterfat that whips to a fluffy consistency; used at room temperature to achieve proper aeration. Contributes creamy mouthfeel and stability so the frosting holds peaks on the cupcake cones. Balances sweetness from the powdered sugar and carries vanilla flavor.
- 6 cups powdered sugar Sweetens and stabilizes the frosting, building structure and body for piping onto cones; sifted to avoid lumps and achieve a silky finish. Controls sweetness intensity while allowing the butter to whip to a smooth texture. Helps maintain firm frosting that holds sprinkles and decorations.
- 2 tablespoons clear vanilla extract Impacts aroma and flavor by providing clear vanilla notes without altering color; blends into frosting for a bright vanilla profile. Enhances overall sweetness perception and complements the cake and butter components. Ensures consistent vanilla flavor throughout the buttercream.
- sprinkles (as needed) Adds visual appeal and playful texture as a finishing touch; available in many colors and shapes to match themes. Provides slight crunch and additional sweetness contrast to soft frosting and cake. Used sparingly to decorate and personalize each cone cupcake.
Instructions
- Preheat the oven to 400°F. In a large mixing bowl, mix together the cake mix, dry vanilla pudding mix, eggs, oil, milk, and sour cream with a hand mixer. Mix until everything is just combined, being careful not to over-mix.: When the oven warms to 400°F , you will notice an even heat that allows the batter inside the cones to rise quickly and set with a lightly golden exterior. The scent of warm air and faint sweetness will start to come through once the oven reaches temperature, signaling that you should work efficiently to fill the cones so they go straight into heat. This high temperature helps create a slight crisp at the cone edge while keeping the interior tender. A typical mistake is placing cones in before the oven is ready which can lead to uneven rise, so always confirm the temperature with a reliable oven thermometer.
- Place each ice cream cone in the well of a muffin pan. Fill each cone half full with the prepared batter.: In a large mixing bowl, combine the white cake mix , instant vanilla pudding , eggs , vegetable oil , milk , and sour cream with a hand mixer until just combined. You will hear a gentle whir and see a silky batter that is smooth without streaks of flour. The batter should be thick enough to hold shape but loose enough to scoop; over mixing produces a tougher crumb, so stop when you no longer see dry pockets. This technique matters because the right batter texture prevents the cones from overflowing and ensures an even crumb. Avoid the common mistake of overbeating which creates tunnels and a dense texture.
- Bake for 14 to 16 minutes or until a toothpick inserted into the center of the cupcake comes out clean.: Place each ice cream cone in the well of a muffin pan so they stand upright, then fill each cone about half full with the prepared batter. As you scoop, listen for the soft plop of batter settling into the cone and watch the level rise; filling halfway allows room for rise and prevents spills. Using a cookie scoop gives consistent portions and minimizes drips around the base. If you overfill, batter will spill onto the muffin tin and bake into a crust, which is the usual mistake here.
- Remove from the oven and let cool completely before frosting.: Bake until a toothpick inserted into the center of the cupcake comes out clean, usually between 14 to 16 minutes at 400°F . During baking you will notice the cones take on a light golden color at the rim and the tops of the cakes slightly doming. The aroma of baked cake will waft through the kitchen, a cue that they are nearing doneness. The reason for watching closely is that cones conduct heat differently than pans alone, so a shorter, attentive bake prevents dryness. A common error is leaving them in too long which dries the tiny cakes out quickly.
- In a stand mixer fitted with the whisk attachment, combine the softened butter, powdered sugar, and vanilla. Turn on low and mix until all the powdered sugar is mixed into the butter. Turn on high and whip for 30 seconds until the frosting is light and fluffy.: Remove from the oven and let cool completely before frosting so the buttercream does not melt on contact. Cooling allows the internal crumb to set, and you will feel the cones become room temperature and firm to the touch. If you pipe frosting on warm cakes, it will slide and lose shape, so patience here preserves presentation. People sometimes rush this step, resulting in sloppy frosting, so ensure they are fully cool.
- Place the frosting into a piping bag fitted with a star tip. Frost the cupcakes, and top with sprinkles. These cupcakes are best served the same day they are prepared.: In a stand mixer fitted with the whisk attachment, combine the softened unsalted butter , powdered sugar , and clear vanilla extract . Start on low so the sugar blends into the butter without a cloud of dust, then increase speed to whip the frosting for about 30 seconds until it becomes light and fluffy. The frosting should feel silky and hold soft peaks, with a faint sweet dairy aroma. Proper whipping incorporates air, giving a lighter mouthfeel and making piping easier. A common pitfall is using butter that is too cold, which prevents smooth mixing and leaves lumps.
- Fill piping bag and frost: Place the frosting into a piping bag fitted with a star tip and pipe swirls onto each cooled cupcake, finishing with a sprinkle of sprinkles . When you pipe, listen to the gentle squeeze and watch the frosting form tall, defined ridges that mimic soft serve. Piping with steady pressure creates uniform swirls, while a shaky hand causes uneven peaks. If the frosting is too stiff, add a splash of milk to adjust consistency; if too soft, chill briefly. Avoid piping directly from a spoon which yields a messy finish.
- Serve same day: These cupcakes are best served the same day they are prepared to enjoy the ideal contrast between crisp cones and tender cake. As they sit, moisture migrates and cones can soften, altering the texture balance, so plan to display and serve them shortly after decorating. If storing, keep them in a single layer in an airtight container to minimize condensation and sogginess. A frequent misstep is stacking them, which squashes the frosting and damages presentation.
Notes
- Swap presentation Use colorful sprinkles or themed toppings to match parties, switching colors to fit holidays or celebrations without altering the core technique.
- Make filling easier Use a cookie scoop to portion batter into each ice cream cone for uniform sizes and minimal mess when filling the muffin tin.
- Control frosting texture If the buttercream is too thick, add a tablespoon of milk at a time to reach piping consistency; if it is too thin, chill briefly to firm up for cleaner swirls.
- Bake in batches Arrange cones in muffin pans across two racks if making many at once, rotating pans if needed to promote even browning and consistent bake across the oven.
- Check for doneness early Start testing with a toothpick at the lower end of the bake window to prevent overbaking, as the small volume in cones can finish quickly.