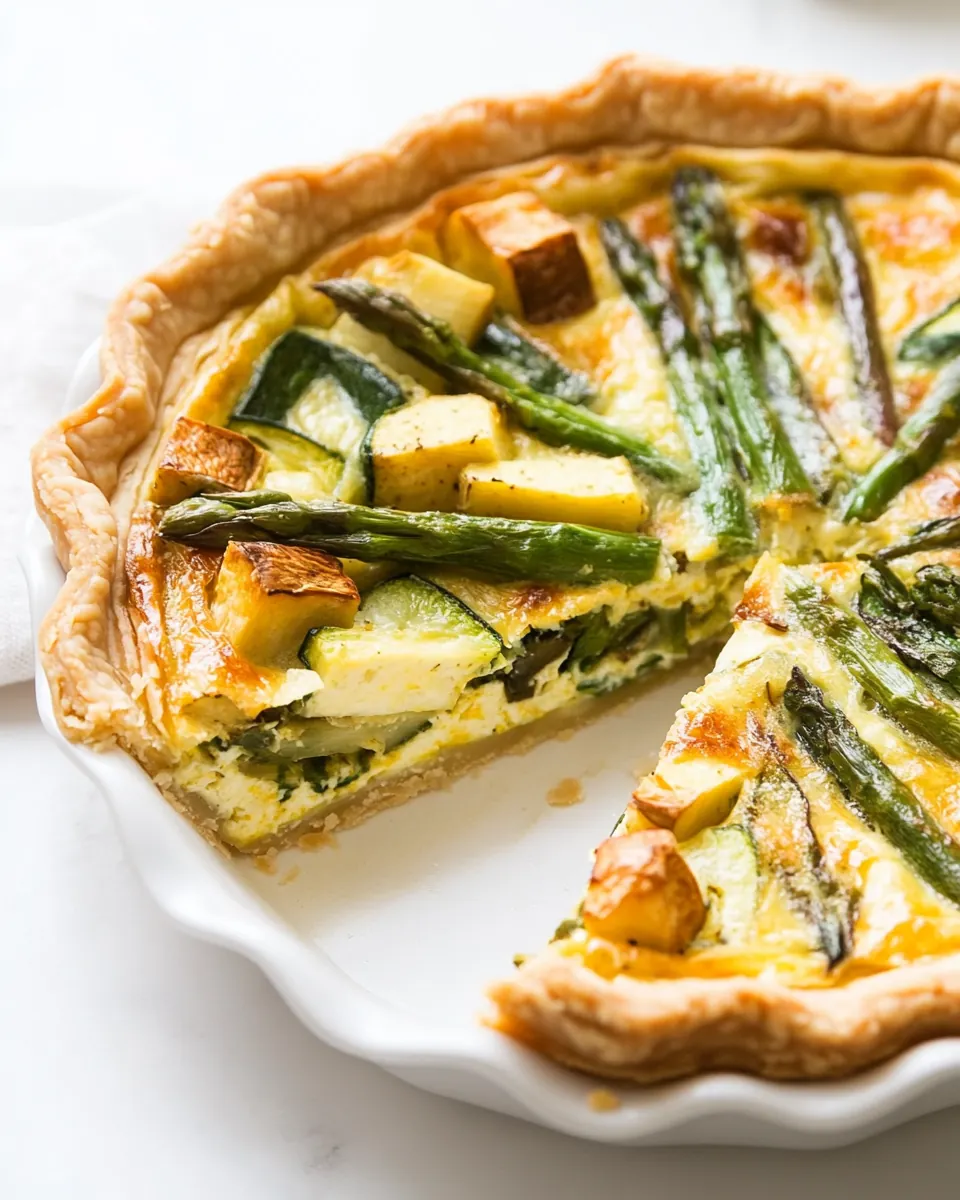
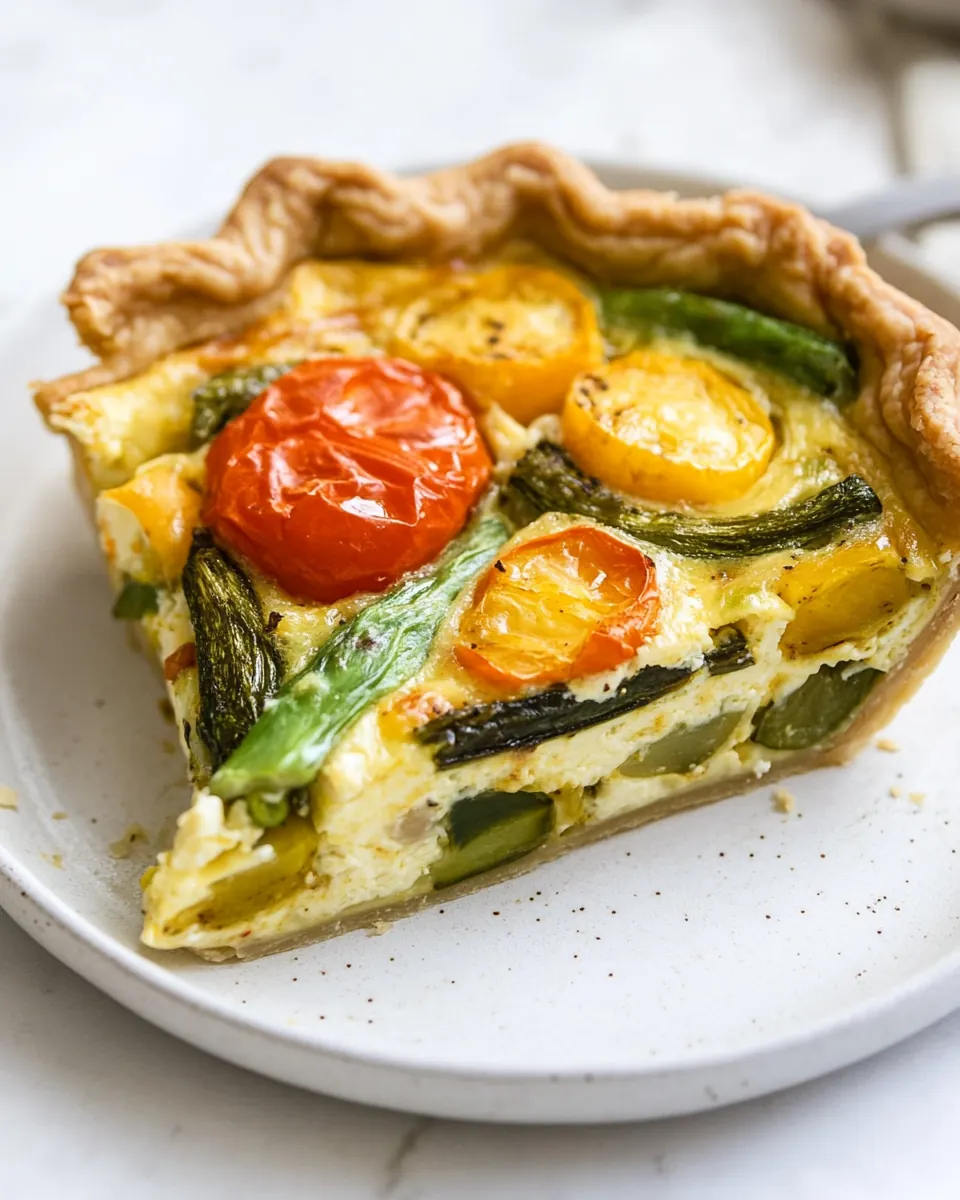
Gluten Free Spring Veggie Quiche
Gluten Free Spring Veggie Quiche has been one of those recipes I reach for when the market is overflowing with tender asparagus and fresh chives. I remember the first time I baked it, sunlight spilling across my counter while I fumbled with a chilled crust that smelled faintly of butter and almond. That little tingle of excitement as I slid the pie into the oven stays with me; it felt like a celebration of spring in a single pan.
Over the years I have made this quiche for lazy weekend breakfasts, for a neighbor who needed a comforting meal, and for a casual Easter brunch where everyone wanted something pretty but not fussy. Each time I tinker with the filling, I find myself leaning into textures, letting potatoes soften just enough to stay distinct beneath the custard, and arranging asparagus spears like sunbeams across the top. You will notice small changes matter, like roasting the potatoes until they get golden at the edges, or letting the swiss chard wilt down to an emerald whisper.
Recipe Snapshot
1 hr 20 mins
25 mins
55 mins
Medium
300 kcal
American
Gluten-Free, Low FODMAP
Dinner
Food Processor, 9 inch Pie Tin, Sheet Pan, Small Skillet, Mixing Bowl
Why This Gluten Free Spring Veggie Quiche Shines
Bright seasonal flavor
I love how Gluten Free Spring Veggie Quiche showcases spring produce, turning simple vegetables into the centerpiece. The interplay of tender asparagus, thin potatoes, and sweet leek makes every bite feel fresh and light.
Textural contrast
The combination of a crumbly, nutty crust and a silky egg custard creates contrast that keeps each slice interesting. Crisp roasted edges on the potatoes sit next to soft, silky chard so the mouthfeel is never one note.
Accessible for many diets
Because the crust is made with almond and tapioca flours, this quiche is naturally lower in gluten content while staying indulgent. I appreciate that guests with dietary constraints can enjoy a classic quiche experience without missing the texture or savor.
Impressive but forgiving
It looks elegant on a brunch table, yet you do not need perfect pastry skills to succeed. I often tell friends they can relax about minor cracks or uneven edges, the filling puffs up and hides imperfections. That forgiving nature makes it a go to for entertaining.
Make ahead convenience
I often prep the crust and roast the vegetables in advance, which lets me assemble and bake with less stress on the day. That buffer of time is invaluable when hosting, and it keeps flavors humming together as they rest.
Key Ingredients for Gluten Free Spring Veggie Quiche

These ingredients work in harmony to deliver a rich, spring forward quiche. The crust relies on the nutty texture of almond flour and the stretch of tapioca starch, while the filling balances creamy eggs with layers of roasted and sautéed vegetables. Each item plays a clear role, from structure to flavor to mouthfeel.
- 1 cup 98 g almond flour: Provide a nutty, tender base for the crust and contribute moisture and structure to the gluten-free dough while adding subtle flavor complexity.
- 1 cup 120 g tapioca flour / starch: Supply a light, starchy texture to the crust, helping bind the almond flour and create a pliable dough that holds together when baked.
- 1/2 teaspoons salt: Enhance overall flavor balance by seasoning the crust and filling, helping to bring out natural sweetness and savory notes in the vegetables and egg custard.
- 1/2 cup butter cold, cut into cubes: Introduce cold fat to the crust to create flakiness and a delicate, tender texture; cutting into cubes allows even distribution for a consistent dough.
- 1 egg: Bind the crust ingredients together and add richness to the dough while also contributing structure and a tender crumb when baked.
- 1 teaspoon honey: Add a touch of sweetness to the crust to balance savory elements and improve browning and flavor depth in the finished pastry.
- 1 small bunch about 1 lb. asparagus, ends trimmed (see note): Offer fresh, slightly grassy flavor and a crisp-tender texture when blanched or roasted; contribute bright color and seasonal character to the quiche.
- 4 6 small yellow potatoes about 12 ounces, thinly sliced: Provide a creamy, starchy component with a tender texture when thinly sliced and cooked; add heartiness and mild flavor to the vegetable layer.
- 1 tablespoon olive oil divided: Facilitate cooking of the vegetables by preventing sticking and promoting even browning; a portion can be used to sauté aromatics and ribbons.
- 1 teaspoons salt divided: Season the vegetables and custard in stages for balanced flavor; adding some to the potatoes and some to the filling ensures consistent seasoning.
- 1/2 teaspoon black pepper divided: Impart warm, pungent spice notes to both the vegetables and filling; dividing it allows control over seasoning intensity throughout the dish.
- 1 small onion diced: Deliver sweet, aromatic depth when sautéed and form part of the savory base that complements the leeks and greens in the filling.
- 1 small leek or about 1 cup diced leeks: Provide a mild, onion-like sweetness and body to the filling when sautéed; soften into a subtle background layer of flavor alongside onions.
- 2 3 pieces swiss chard center ribs removed, sliced and divided and the leaves thinly sliced: Add earthy, slightly bitter greens and tender stems to the filling; slicing the ribs and leaves separately ensures even cooking and pleasant texture contrast.
- 1 garlic clove minced: Contribute pungent savory aroma and depth when minced and sautéed briefly, enhancing the overall savory profile of the quiche filling.
- cup thinly sliced chives: Offer a mild onion-like herbaceous note and fresh green color when thinly sliced and sprinkled into the custard or used as garnish for subtle brightness.
- 8 eggs: Create a rich, silky custard base that sets during baking, providing structure, protein, and a creamy mouthfeel to the quiche.
- 1/2 teaspoon paprika: Introduce warm, smoky color and a hint of smoky-sweet flavor to the custard, complementing the vegetables and adding visual appeal.
- 1/4 teaspoon garlic powder: Enhance savory depth with a subtle, roasted garlic flavor to the custard; help round out seasonings without overpowering delicate vegetables.
Directions for Gluten Free Spring Veggie Quiche

These steps combine careful pastry technique with layered vegetable preparation for a quiche that slices clean and tastes vibrant. Take your time with the crust chilling and roast the vegetables to build flavor, then assemble with a gentle hand so the custard sets evenly.
- In a food processor combine almond flour, tapioca flour, salt and cold butter and pulse until the butter is broken down into pea-sized pieces.: The scent at this stage is faintly nutty and cold, and you should see small, uniform pea sized butter fragments coated in flour. This distribution is what creates flakiness as the butter melts during baking, so pulsing just enough is crucial. If you overprocess to a paste, the dough will lose its flaky texture and become dense. A common mistake is letting the processor run too long, which warms the butter; if that happens, chill the mixture briefly before proceeding.
- Add in egg and honey and process until the dough comes together around the blade.: When the egg and honey are incorporated the dough will begin to clump and gather near the blade, forming a cohesive mass that still looks slightly shaggy. This binding step brings moisture and a touch of sweetness to the crust. Avoid adding extra liquid, because the dough should be firm yet pliable; if it seems crumbly, press it together with cold hands rather than adding water. Overworking at this point can warm the butter and affect texture.
- Shape dough into a round disk, wrap tightly in plastic wrap and transfer to the refrigerator until cold, at least 2 hours or overnight.: Chilling is where the crust sets its structure and allows the fats to firm up, which promotes flakiness when baked. The disk will feel solid and easier to roll after chilling. Rushing this step often yields a sticky dough that tears while rolling; if pressed for time, a minimum two hour chill is necessary but overnight is best for flavor and ease.
- Between two sheets of parchment or plastic wrap, or on a tapioca floured work surface, roll out dough to fit the size of a 9 inch pie tin, about a 12 inch circle. Removing one sheet of parchment and invert the pie dough into your tin. Crimp the edges as desired. Store the pie dough in the refrigerator while you make the filling.: Rolling between sheets helps keep the surface clean and prevents sticking while letting you achieve an even thickness. You want an even, thin circle so it bakes uniformly, and light dusting of tapioca prevents tearing. If the dough resists or cracks, let it sit a few minutes to relax, or patch gently with extra dough. A common issue is uneven thickness, which causes thin spots to brown faster; rotate while rolling for evenness.
- Pre-heat the oven to 400°F. Line a sheet pan with parchment.: Inverting the dough helps preserve shape and prevents stretching that can cause shrinkage during baking, and crimping makes a neat finished rim. Refrigerating the assembled crust stabilizes it so it holds the filling without slumping. If the dough slides or wrinkles, press gently into place and chill longer; warm dough will slump and lose its edge definition.
- Place half of the asparagus on the sheet pan. Cut the other half into 1” pieces and place on the roasting pan, along with sliced potatoes. Drizzle with 2 teaspoons olive oil, and 1/2 teaspoon salt and 1/4 teaspoon of black pepper and toss together. Spread out into an even layer. Roast in the oven for 10-15 minutes, flipping the potatoes halfway through until the veggies are just tender.: Preheating to the correct temperature ensures the oven is ready for roasting and that the crust will begin to set properly later on. The high heat helps the vegetables develop color quickly. If your oven runs hot or cool, use an oven thermometer to verify temperature because inconsistent heat can alter roast times. Avoid opening the oven repeatedly as it drops temperature and prolongs roasting.
- Meanwhile, heat olive oil in a small skillet over medium-high heat. Add in onion, leek, swiss chard stems, and garlic and cook until beginning to soften, about 5-8 minutes. Add in swiss chard leaves and cook until wilted, about 1 minute. Let the veggies cool slightly, about 5 minutes.: As the vegetables roast you will smell a toasty sweetness as the potatoes begin to caramelize and the asparagus gives off a green, vegetal aroma. The potatoes should show golden edges and the asparagus pieces should be tender but not mushy. Crowding the pan traps steam and prevents browning, so keep a single layer; if you see steam gathering, separate into two pans. Overroasted asparagus becomes stringy and the potatoes can become dry, so check for gentle tenderness.
- In a large bowl whisk together eggs, remaining salt and pepper, paprika and garlic powder.: Sautéing develops savory depth as the onion and leek turn translucent and the chard stems tenderize, releasing a faintly sweet aroma. The wilted leaves will darken and collapse, concentrating flavor while retaining bright color. Letting the mixture cool prevents the hot vegetables from cooking the eggs prematurely when combined. A common error is rushing the saute so the onion remains sharp; cook until gentle aromatic sweetness emerges.
- Transfer pie plate from the fridge and place it on a rimmed baking sheet. Add slightly cooled swiss chard mixture, roasted potatoes and 1” asparagus pieces into the prepared pie dough. Pour the egg mixture over the veggies and place the full asparagus stems decoratively over the top, slightly pushing them into the egg mixture. Sprinkle the chives over the top.: The eggs should be whisked until uniformly colored and slightly aerated, which creates a lighter custard. Spices blended in at this stage ensure even seasoning throughout the custard matrix. Whisking too vigorously can introduce too much air, causing an overly puffy quiche that may collapse; a steady whisk until combined is ideal.
- Bake in the lower part of the oven for 40-50 minutes, or until the eggs are fully set and puffed up throughout. Cover the crust if browning too much.: When you assemble, the contrast of warm roasted vegetables and chilled crust is comforting, and pouring the eggs slowly helps them fill gaps so there are no air pockets. Decorating with whole asparagus stems makes a pretty presentation and helps indicate doneness visually as the custard puffs. If the filling bubbles excessively when baking, it may indicate too much air was whisked in; tap the tray gently to release large bubbles before baking.
- Let cool for about 10-15 minutes, before slicing and serving. Garnish with additional fresh chives if desired.: During baking you will notice the quiche rise and the center will look set but still have a slight wobble, which indicates perfect custard doneness. Edges should be golden and the asparagus tops slightly roasted. If the crust is browning too quickly, tent with foil to protect it while the center finishes. Underbaking leads to a runny center, while overbaking dries the custard, so monitor in the last 10 minutes.
- Let cool for about 10-15 minutes, before slicing and serving. Garnish with additional fresh chives if desired: Cooling allows the custard to settle and makes slicing neater, and the aroma of warm eggs and roasted vegetables becomes more inviting. A short rest also prevents the slices from falling apart as you serve. Cutting too soon will cause the quiche to be floppy, so exercise patience for a clean slice.
Change It Up
These ideas help you tailor the quiche to the occasion or pantry. Small adjustments to technique and garnish make a familiar recipe feel new.
- Swap herbs: If you want a brighter finish, fold extra chives into the egg mixture and sprinkle more on top after baking for fresh herbal notes.
- Make it heartier: Increase the potato quantity slightly to add more body to each slice, which makes the quiche more filling for brunch or lunch.
- Crispier crust: Blind bake the crust briefly for 8 to 10 minutes before filling to prevent a soggy bottom if you prefer extra crispness.
- Advance prep: Roast the vegetables the day before and refrigerate, making assembly quick when you have guests arriving.
- Presentation tip: Arrange the asparagus decoratively after pouring the custard so it remains visually striking and provides an inviting first impression.
Serving Ideas for Gluten Free Spring Veggie Quiche
This quiche is versatile, fitting casual breakfasts and special gatherings. Below are serving suggestions and storage notes to help you plan meals around it.
- Brunch centerpiece: Serve warm slices with a simple green salad dressed in lemon vinaigrette to contrast the rich custard with bright acidity for a balanced plate.
- Lunch option: Pair slices with a bowl of light soup or pickled vegetables for a satisfying midday meal that feels composed and seasonal.
- Easter or holiday: Present whole on a platter garnished with extra chives and lemon wedges for guests to refresh flavors, making it a festive addition to a holiday table.
- Make ahead and reheat: Refrigerate leftover slices in an airtight container for up to three days; reheat in a 350°F oven until warmed through to preserve texture rather than microwaving, which can make the crust soggy.
- Freezing guidance: Freeze baked slices on a tray until solid, then wrap individually for up to two months; reheat from frozen in a preheated oven to retain structure and avoid watery custard.
- Seasonal pairings: In spring highlight fresh herbs and light salads, while in cooler months serve the quiche with roasted root vegetables for a heartier plate.
FAQ
Conclusion
This quiche stands out because it turns bright spring vegetables into a satisfying, sliceable centerpiece with a tender gluten free crust. I encourage you to try the recipe on a weekend or for a special brunch, because the combination of roasted potatoes, asparagus, and leek in a rich custard is both comforting and celebratory. Baking it can be a calm, rewarding process, and sharing the finished quiche around the table always feels like a small ritual of hospitality and seasonal enjoyment.

Gluten Free Spring Veggie Quiche
Equipment
- Food Processor
- 9 inch Pie Tin
- Sheet Pan
- Small skillet
- Mixing Bowl
Ingredients
- 1 cup 98 g almond flour Provide a nutty, tender base for the crust and contribute moisture and structure to the gluten-free dough while adding subtle flavor complexity.
- 1 cup 120 g tapioca flour / starch Supply a light, starchy texture to the crust, helping bind the almond flour and create a pliable dough that holds together when baked.
- 1/2 teaspoons salt Enhance overall flavor balance by seasoning the crust and filling, helping to bring out natural sweetness and savory notes in the vegetables and egg custard.
- 1/2 cup butter cold, cut into cubes Introduce cold fat to the crust to create flakiness and a delicate, tender texture; cutting into cubes allows even distribution for a consistent dough.
- 1 egg Bind the crust ingredients together and add richness to the dough while also contributing structure and a tender crumb when baked.
- 1 teaspoon honey Add a touch of sweetness to the crust to balance savory elements and improve browning and flavor depth in the finished pastry.
- 1 small bunch about 1 lb. asparagus, ends trimmed (see note) Offer fresh, slightly grassy flavor and a crisp-tender texture when blanched or roasted; contribute bright color and seasonal character to the quiche.
- 4 -6 small yellow potatoes about 12 ounces, thinly sliced Provide a creamy, starchy component with a tender texture when thinly sliced and cooked; add heartiness and mild flavor to the vegetable layer.
- 1 tablespoon olive oil divided Facilitate cooking of the vegetables by preventing sticking and promoting even browning; a portion can be used to sauté aromatics and ribbons.
- 1 teaspoons salt divided Season the vegetables and custard in stages for balanced flavor; adding some to the potatoes and some to the filling ensures consistent seasoning.
- 1/2 teaspoon black pepper divided Impart warm, pungent spice notes to both the vegetables and filling; dividing it allows control over seasoning intensity throughout the dish.
- 1 small onion diced Deliver sweet, aromatic depth when sautéed and form part of the savory base that complements the leeks and greens in the filling.
- 1 small leek or about 1 cup diced leeks Provide a mild, onion-like sweetness and body to the filling when sautéed; soften into a subtle background layer of flavor alongside onions.
- 2 -3 pieces swiss chard center ribs removed, sliced and divided and the leaves thinly sliced Add earthy, slightly bitter greens and tender stems to the filling; slicing the ribs and leaves separately ensures even cooking and pleasant texture contrast.
- 1 garlic clove minced Contribute pungent savory aroma and depth when minced and sautéed briefly, enhancing the overall savory profile of the quiche filling.
- cup thinly sliced chives Offer a mild onion-like herbaceous note and fresh green color when thinly sliced and sprinkled into the custard or used as garnish for subtle brightness.
- 8 eggs Create a rich, silky custard base that sets during baking, providing structure, protein, and a creamy mouthfeel to the quiche.
- 1/2 teaspoon paprika Introduce warm, smoky color and a hint of smoky-sweet flavor to the custard, complementing the vegetables and adding visual appeal.
- 1/4 teaspoon garlic powder Enhance savory depth with a subtle, roasted garlic flavor to the custard; help round out seasonings without overpowering delicate vegetables.
Instructions
- In a food processor combine almond flour, tapioca flour, salt and cold butter and pulse until the butter is broken down into pea-sized pieces.: The scent at this stage is faintly nutty and cold, and you should see small, uniform pea sized butter fragments coated in flour. This distribution is what creates flakiness as the butter melts during baking, so pulsing just enough is crucial. If you overprocess to a paste, the dough will lose its flaky texture and become dense. A common mistake is letting the processor run too long, which warms the butter; if that happens, chill the mixture briefly before proceeding.
- Add in egg and honey and process until the dough comes together around the blade.: When the egg and honey are incorporated the dough will begin to clump and gather near the blade, forming a cohesive mass that still looks slightly shaggy. This binding step brings moisture and a touch of sweetness to the crust. Avoid adding extra liquid, because the dough should be firm yet pliable; if it seems crumbly, press it together with cold hands rather than adding water. Overworking at this point can warm the butter and affect texture.
- Shape dough into a round disk, wrap tightly in plastic wrap and transfer to the refrigerator until cold, at least 2 hours or overnight.: Chilling is where the crust sets its structure and allows the fats to firm up, which promotes flakiness when baked. The disk will feel solid and easier to roll after chilling. Rushing this step often yields a sticky dough that tears while rolling; if pressed for time, a minimum two hour chill is necessary but overnight is best for flavor and ease.
- Between two sheets of parchment or plastic wrap, or on a tapioca floured work surface, roll out dough to fit the size of a 9 inch pie tin, about a 12 inch circle. Removing one sheet of parchment and invert the pie dough into your tin. Crimp the edges as desired. Store the pie dough in the refrigerator while you make the filling.: Rolling between sheets helps keep the surface clean and prevents sticking while letting you achieve an even thickness. You want an even, thin circle so it bakes uniformly, and light dusting of tapioca prevents tearing. If the dough resists or cracks, let it sit a few minutes to relax, or patch gently with extra dough. A common issue is uneven thickness, which causes thin spots to brown faster; rotate while rolling for evenness.
- Pre-heat the oven to 400°F. Line a sheet pan with parchment.: Inverting the dough helps preserve shape and prevents stretching that can cause shrinkage during baking, and crimping makes a neat finished rim. Refrigerating the assembled crust stabilizes it so it holds the filling without slumping. If the dough slides or wrinkles, press gently into place and chill longer; warm dough will slump and lose its edge definition.
- Place half of the asparagus on the sheet pan. Cut the other half into 1” pieces and place on the roasting pan, along with sliced potatoes. Drizzle with 2 teaspoons olive oil, and 1/2 teaspoon salt and 1/4 teaspoon of black pepper and toss together. Spread out into an even layer. Roast in the oven for 10-15 minutes, flipping the potatoes halfway through until the veggies are just tender.: Preheating to the correct temperature ensures the oven is ready for roasting and that the crust will begin to set properly later on. The high heat helps the vegetables develop color quickly. If your oven runs hot or cool, use an oven thermometer to verify temperature because inconsistent heat can alter roast times. Avoid opening the oven repeatedly as it drops temperature and prolongs roasting.
- Meanwhile, heat olive oil in a small skillet over medium-high heat. Add in onion, leek, swiss chard stems, and garlic and cook until beginning to soften, about 5-8 minutes. Add in swiss chard leaves and cook until wilted, about 1 minute. Let the veggies cool slightly, about 5 minutes.: As the vegetables roast you will smell a toasty sweetness as the potatoes begin to caramelize and the asparagus gives off a green, vegetal aroma. The potatoes should show golden edges and the asparagus pieces should be tender but not mushy. Crowding the pan traps steam and prevents browning, so keep a single layer; if you see steam gathering, separate into two pans. Overroasted asparagus becomes stringy and the potatoes can become dry, so check for gentle tenderness.
- In a large bowl whisk together eggs, remaining salt and pepper, paprika and garlic powder.: Sautéing develops savory depth as the onion and leek turn translucent and the chard stems tenderize, releasing a faintly sweet aroma. The wilted leaves will darken and collapse, concentrating flavor while retaining bright color. Letting the mixture cool prevents the hot vegetables from cooking the eggs prematurely when combined. A common error is rushing the saute so the onion remains sharp; cook until gentle aromatic sweetness emerges.
- Transfer pie plate from the fridge and place it on a rimmed baking sheet. Add slightly cooled swiss chard mixture, roasted potatoes and 1” asparagus pieces into the prepared pie dough. Pour the egg mixture over the veggies and place the full asparagus stems decoratively over the top, slightly pushing them into the egg mixture. Sprinkle the chives over the top.: The eggs should be whisked until uniformly colored and slightly aerated, which creates a lighter custard. Spices blended in at this stage ensure even seasoning throughout the custard matrix. Whisking too vigorously can introduce too much air, causing an overly puffy quiche that may collapse; a steady whisk until combined is ideal.
- Bake in the lower part of the oven for 40-50 minutes, or until the eggs are fully set and puffed up throughout. Cover the crust if browning too much.: When you assemble, the contrast of warm roasted vegetables and chilled crust is comforting, and pouring the eggs slowly helps them fill gaps so there are no air pockets. Decorating with whole asparagus stems makes a pretty presentation and helps indicate doneness visually as the custard puffs. If the filling bubbles excessively when baking, it may indicate too much air was whisked in; tap the tray gently to release large bubbles before baking.
- Let cool for about 10-15 minutes, before slicing and serving. Garnish with additional fresh chives if desired.: During baking you will notice the quiche rise and the center will look set but still have a slight wobble, which indicates perfect custard doneness. Edges should be golden and the asparagus tops slightly roasted. If the crust is browning too quickly, tent with foil to protect it while the center finishes. Underbaking leads to a runny center, while overbaking dries the custard, so monitor in the last 10 minutes.
- Let cool for about 10-15 minutes, before slicing and serving. Garnish with additional fresh chives if desired: Cooling allows the custard to settle and makes slicing neater, and the aroma of warm eggs and roasted vegetables becomes more inviting. A short rest also prevents the slices from falling apart as you serve. Cutting too soon will cause the quiche to be floppy, so exercise patience for a clean slice.
Notes
- Swap herbs: If you want a brighter finish, fold extra chives into the egg mixture and sprinkle more on top after baking for fresh herbal notes.
- Make it heartier: Increase the potato quantity slightly to add more body to each slice, which makes the quiche more filling for brunch or lunch.
- Crispier crust: Blind bake the crust briefly for 8 to 10 minutes before filling to prevent a soggy bottom if you prefer extra crispness.
- Advance prep: Roast the vegetables the day before and refrigerate, making assembly quick when you have guests arriving.
- Presentation tip: Arrange the asparagus decoratively after pouring the custard so it remains visually striking and provides an inviting first impression.