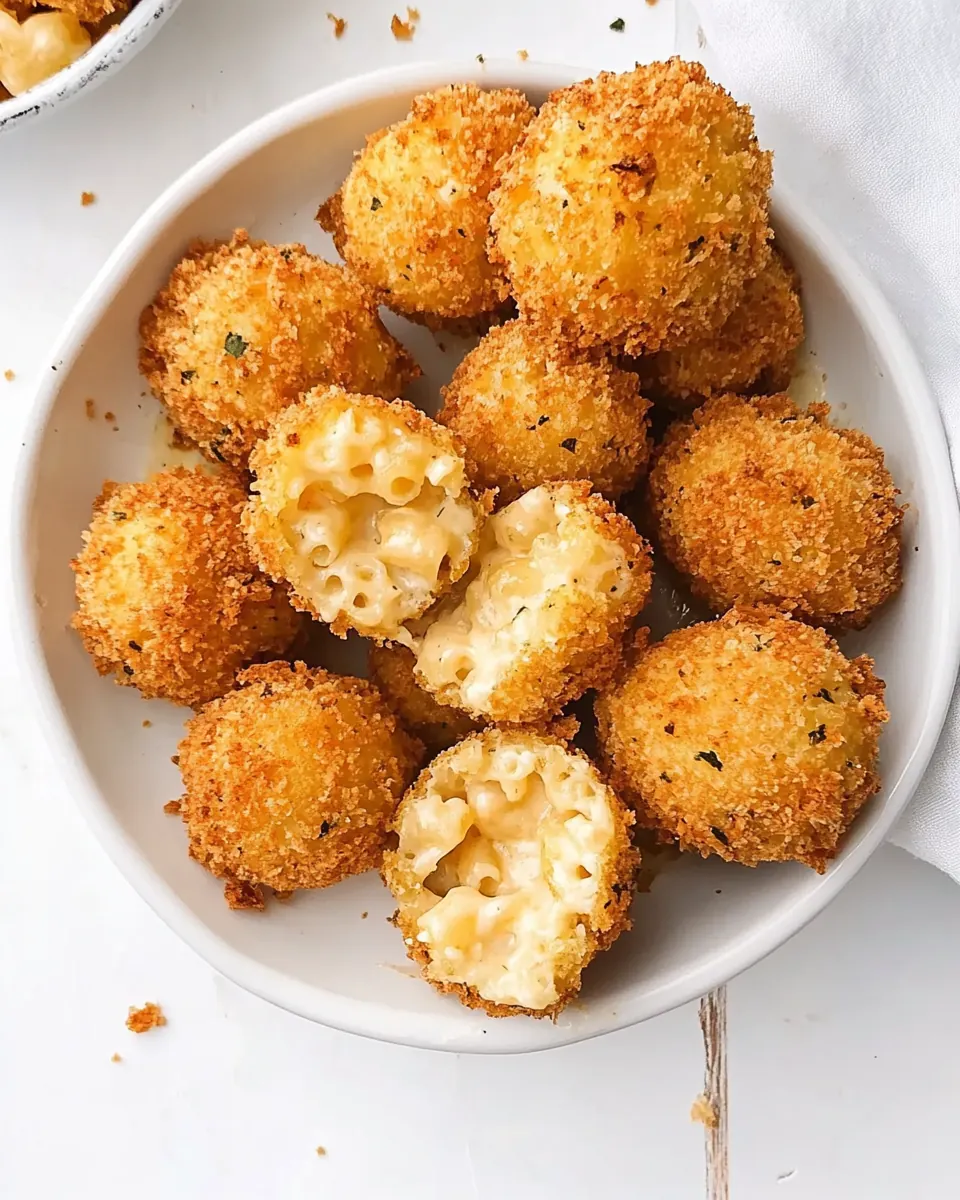
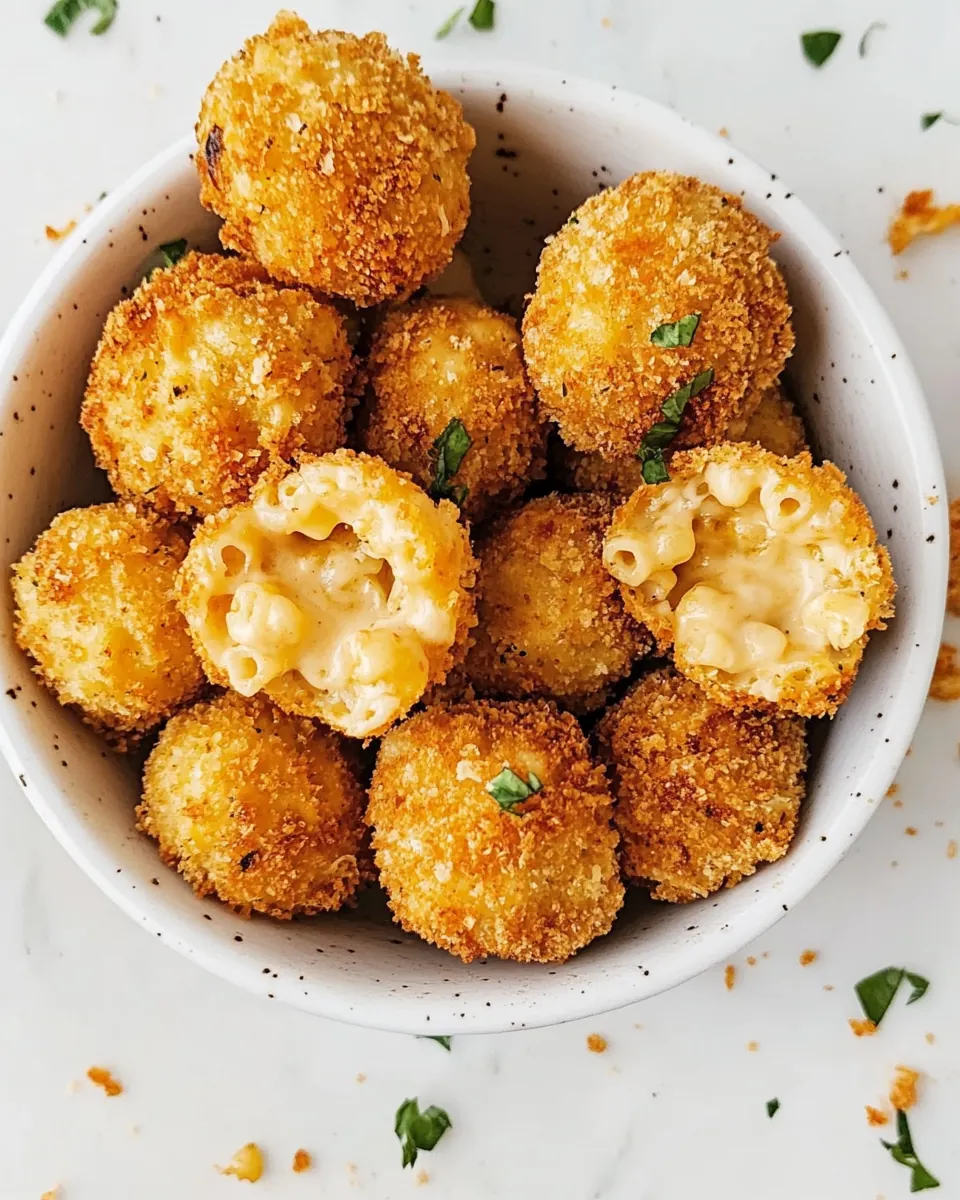
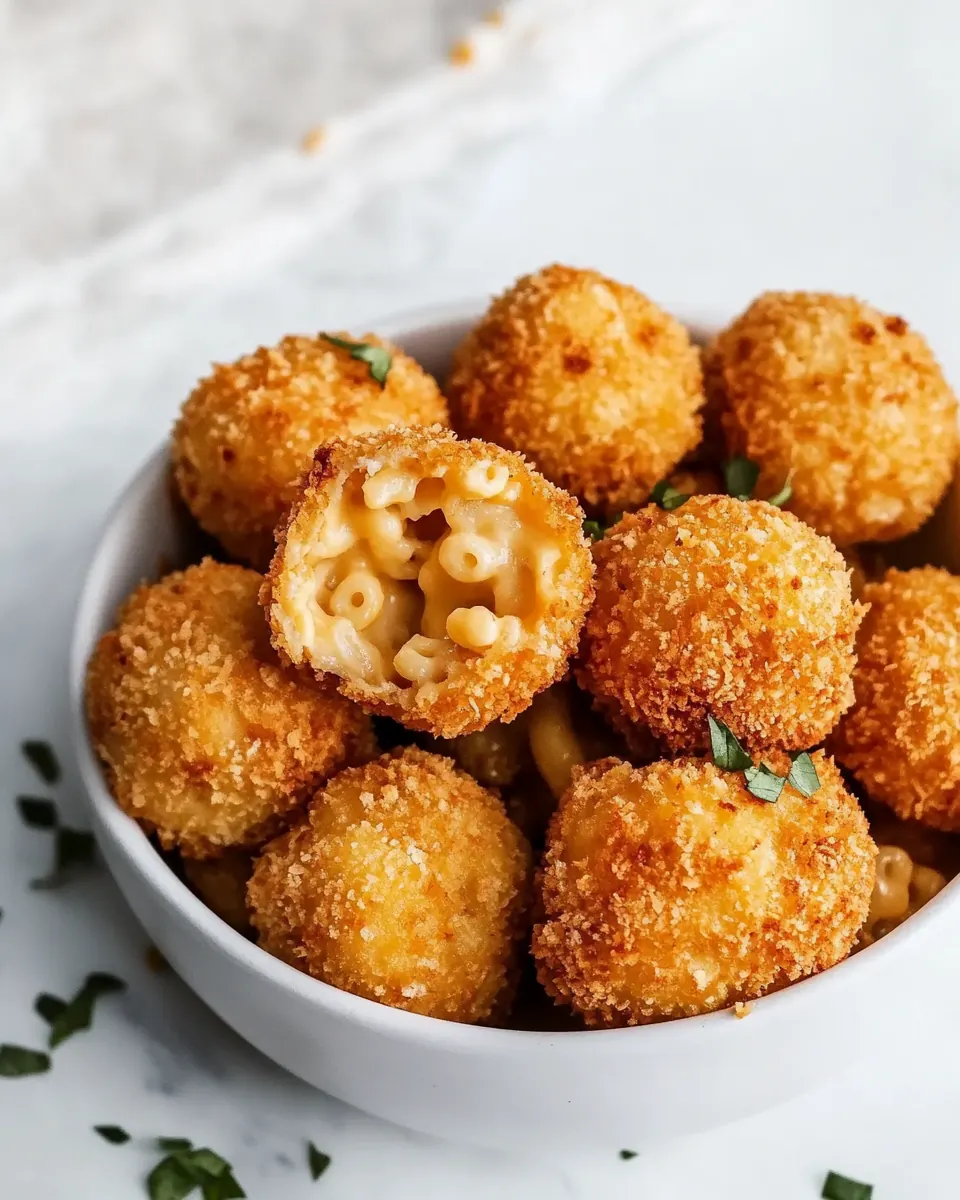
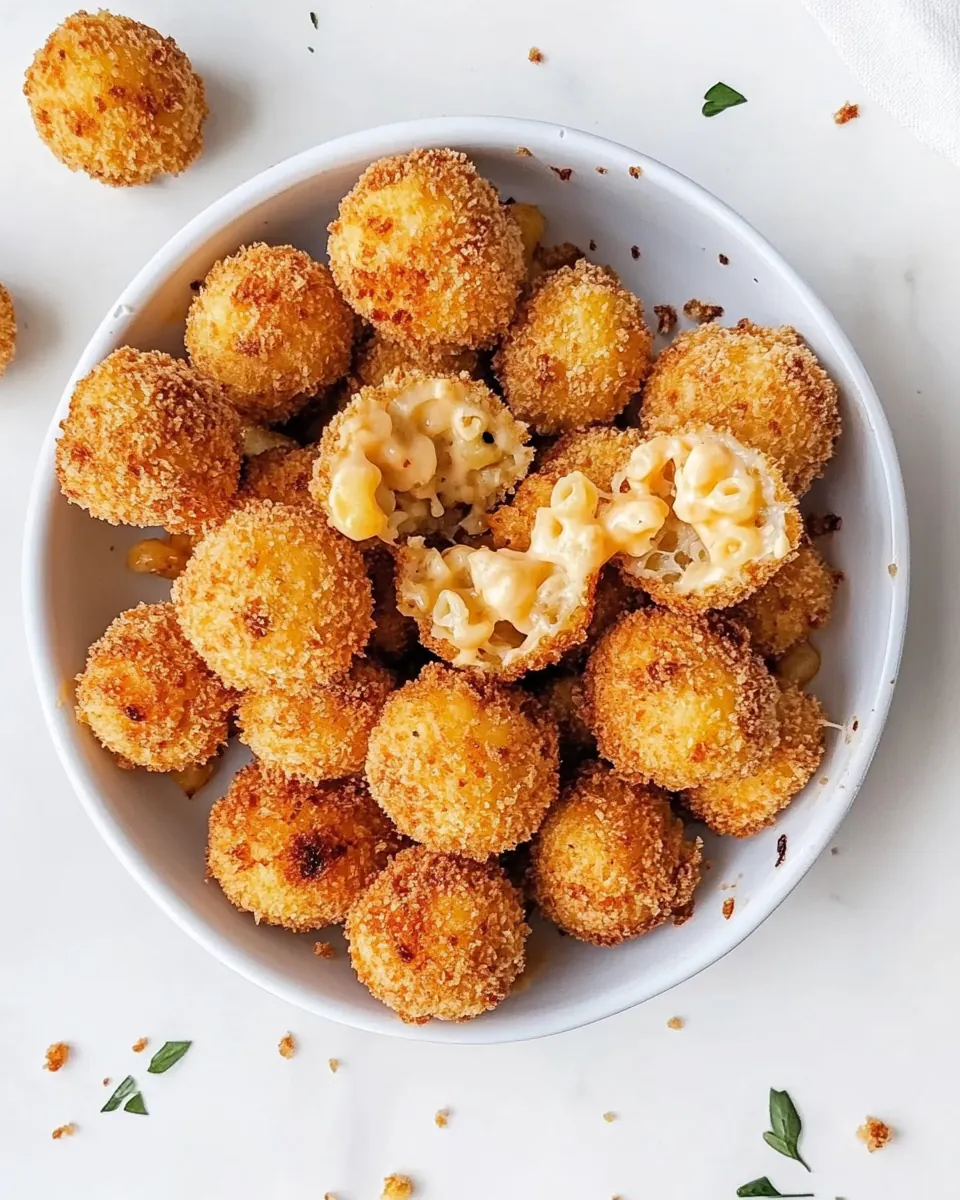
Fried Mac and Cheese Balls
Fried Mac and Cheese Balls started showing up at my neighborhood block parties long before I attempted them at home, and from the first crunch I was hooked. The first sentence here is a confession, I used to think making crunchy, cheese filled bites was best left to pros, however after a few trials I learned how simple and rewarding the process can be. I still remember the summer afternoon when I made a double batch for friends, the air filling with toasty oil and the cheesiest aroma, and how everyone clustered around the cooling rack like it was a mini celebration.
There is something nostalgic about the combination of tender macaroni and molten cheddar, then wrapped in a crisp Panko breadcrumbs shell. I often make these when I want a shareable snack that feels indulgent but is really just clever comfort food. Over time I developed a rhythm that keeps the inside creamy while the exterior is perfectly golden and crackly. I will walk you through the tricks I learned so your batch turns out reliably crunchy, not greasy, with that satisfying pull of cheese when you bite in.
Recipe Snapshot
2 hr
30 mins
90 mins
Medium
250 kcal
American
Gluten-Free, Low FODMAP
Appetizers
9×13 Baking Pan, Baking Sheet, Dutch Oven, Deep Frying Thermometer
Why This Fried Mac and Cheese Balls Is So Good
Showstopper Texture Contrast
I love how Fried Mac and Cheese Balls pair a silky, cheesy center with a shattering exterior. The contrast is what makes people pause and smile, it plays on familiar comfort yet surprises with a crisp shell.
Make Ahead Friendly
One of the reasons I return to this recipe is because you can prepare and freeze the balls in advance. I like to make them the day before a party, then fry from frozen for a consistent result and less stress on the event day.
Customizable Cheese Profile
I appreciate that this recipe gives you control over the cheese balance. Using both cheddar and mozzarella creates a savory tang plus creamy stretch, which makes each bite interesting rather than one note.
Kid Friendly and Crowd Pleasing
When I serve these, kids flock to them, but adults cannot resist either. They work as finger food, appetizer, or party snack, which is why I reach for them for game nights and casual gatherings.
Textural Reliability with Panko
I favor Panko breadcrumbs because they deliver light, airy crunch without absorbing too much oil. That crispiness stays longer which is why I recommend them when you want tray after tray that remains appetizing.
Recipe Ingredients for Fried Mac and Cheese Balls
I believe great results come from a small cast of reliable ingredients that each play a clear role. For these Fried Mac and Cheese Balls, the elbow macaroni forms the tender base, the butter and flour build a creamy binder, the spices give depth, and the two cheeses deliver both flavor and stretch. The Panko breadcrumbs and vegetable oil make the magic happen at the finish, creating the irresistible crunch.
- 16 ounces dry elbow macaroni (1 box): Cook thoroughly as the base pasta that holds the mac and cheese structure; boil until al dente to avoid mushy balls. Drain well and cool slightly so the macaroni mixes easily with the cheese binding. Use the specified amount to yield the right texture and volume for forming balls.
- 2 tablespoons unsalted butter (1/4 stick): Melt smoothly to create a rich, creamy roux and add flavor; use unsalted butter to control overall saltiness. Whisk with flour to thicken the sauce and coat the pasta evenly. Allow to brown slightly for a deeper, nutty flavor without burning.
- 2 tablespoons all-purpose flour: Whisk evenly to thicken the milk into a béchamel; sprinkle in and cook a minute to remove raw flour taste. Use measured amount to achieve a creamy sauce that binds the cheese and pasta together. Integrate well with butter before adding milk for a smooth texture.
- 1/2 1 teaspoon ground cayenne pepper: Season lightly to add a warm, spicy kick that balances the richness of cheese; adjust within the range to control heat level. Sprinkle into the sauce or mix with breadcrumbs for a subtle background warmth. Use sparingly to avoid overpowering other flavors.
- 1 teaspoon garlic powder: Season subtly to impart a mellow garlic flavor that complements the cheese; sprinkle into the sauce or seasoning mix. Use powdered form for consistent distribution without adding texture. Combine with onion powder for aromatic depth.
- 1 teaspoon onion powder: Season to contribute a sweet, savory onion note that enhances overall flavor; blend into the sauce or breadcrumb coating. Use powdered onion for even dispersion and no grittiness. Pair with garlic powder for balanced seasoning.
- 1/2 teaspoon kosher salt: Season carefully to control the savory balance and enhance other flavors; measure precisely since unsalted butter and cheeses affect final saltiness. Dissolve into the sauce and taste before adjusting. Use kosher salt for easy pinch control.
- 1/2 teaspoon ground black pepper: Season to add mild heat and depth while enhancing the cheese's flavor; freshly ground preferred for aromatic impact. Stir into the sauce or seasoning blend and taste to balance with salt. Avoid over-seasoning as pepper can become prominent when fried.
- 2 cups milk: Pour gradually to create a smooth, creamy sauce; warm milk combines with the roux to form the béchamel base. Heat gently while whisking to prevent scorching and achieve a silky texture. Use whole or reduced-fat milk depending on desired richness.
- 4 ounces cheddar cheese freshly shredded: Melt into the béchamel to provide sharp, tangy cheesiness and structure; shred freshly for optimal melting and texture. Fold into the warm sauce until fully incorporated to create a cohesive mac and cheese mixture. Use measured amount to balance with mozzarella.
- 4 ounces mozzarella cheese freshly shredded: Melt for gooey, stretchy texture and mild milky flavor; shred freshly to ensure even melting and prevent clumping. Combine with cheddar to create a balanced melty filling that helps bind the macaroni. Use specified amount to maintain desired creaminess.
- Vegetable oil for frying: Heat to fryer-ready temperature and provide a neutral oil medium for crisp, golden exteriors; choose a high smoke point variety. Fill deep fryer or heavy pot to an appropriate depth for even frying without crowding. Maintain temperature for consistent browning and minimal oil absorption.
- 2 large eggs: Whisk gently to create an egg wash that helps breadcrumbs adhere and add richness to the coating. Beat until smooth and combine with water for the proper brushing consistency. Use large eggs to ensure adequate binding and moisture.
- 1/4 cup water: Mix to thin the egg mixture so it coats evenly and helps breadcrumbs stick; use room-temperature water for consistent results. Add to the beaten eggs and whisk until homogeneous. Adjust slightly to achieve a batter-like wash that clings to the mac and cheese balls.
- 2 1/2 cups Panko breadcrumbs: Coat thoroughly to create an extra-crispy, airy crust that contrasts the creamy interior; use Panko for superior crunch. Pack or press breadcrumbs around each ball for uniform coverage and deep-frying durability. Reserve enough for multiple coatings if desired.
Step by Step Instructions for Fried Mac and Cheese Balls
These directions will guide you through each stage with sensory cues and troubleshooting tips so your Fried Mac and Cheese Balls come out reliably crunchy outside and creamy inside. Read through fully before starting so you can prep equipment and mise en place. Work methodically and keep chilled items cold until ready to bread.
- Boil 6 cups of salted water in a large pot set over high heat. Add the pasta and cook for 6 minutes. Drain the cooked pasta and set it aside.: Your first cue is the rolling boil and the sound of vigorous bubbling which tells you the water is hot enough to cook the elbow macaroni quickly and evenly. You'll notice the pasta soften but still offer a slight bite at six minutes, which is perfect because it will finish cooking slightly in the sauce; overcooking here leads to a mushy center. A common mistake is under salting the water, which yields bland noodles, so be generous with the salt. Drain thoroughly so excess water does not thin the cheese sauce.
- In the same pot, melt the butter. Add the flour, cayenne pepper, garlic powder, onion powder, salt, and pepper. Whisk until the mixture starts to brown, about 2 minutes.: As the butter melts you'll smell a nutty aroma, then whisk in the flour to form a roux; you want gentle bubbling and a light toasty scent after about two minutes. This step builds a savory backbone and prevents a runny sauce later. Avoid letting the roux darken too much because it will color and alter the sauce flavor. If lumps appear, whisk vigorously and reduce heat to smooth them out.
- Whisk in the milk and continue stirring until it starts to thicken, about 5 minutes.: Pouring in the milk will momentarily quiet the sizzle, then resume as the mixture heats; a gentle simmer and consistent whisking will coax the roux and milk into a glossy, velvety sauce in five minutes. The aroma will shift to a creamy dairy note, and the sauce should coat the back of a spoon. If it seems too thin, keep cooking and stirring patiently, if too thick, thin with a splash more milk. Do not rush by cranking heat, as that can cause separation.
- Stir in the cheddar and mozzarella cheeses until fully melted. Mix in the cooked pasta.: Adding the freshly shredded cheddar and mozzarella transforms the sauce, releasing a rich, savory perfume. Stir slowly so the cheese melds into a smooth, glossy mélange without clumping. When the macaroni is added, you'll see strands coated and small pockets of molten cheese hugging each piece, signaling a cohesive mixture. A common issue is adding cheese to boiling liquid which can make it grainy, so remove from high heat and stir gently as it melts.
- Pour the macaroni into a 9×13-inch baking pan and spread it out. Cover and refrigerate for at least 2 hours.: Spread the cheesy pasta into an even layer so it cools uniformly on the surface, which promotes easier scooping later. As it chills, the sauce firms and binds the macaroni , while the cooler air removes heat that would otherwise make forming difficult. If you rush this step you'll struggle to shape balls and risk collapse, so respect the two hour chill for best structure. Covering prevents a skin from forming and keeps flavors locked in.
- Once the macaroni is chilled, remove it from the refrigerator and line a baking sheet with parchment paper. Form equal size 2-inch balls from the mac and cheese and place them onto the prepared pan.: Working with cold mixture, you'll feel the texture change from tacky to pliable, and the balls will hold their shape when rolled gently. Use a cookie scoop for uniformity and press lightly to round them. If the mixture sticks to your hands, wet them slightly or use parchment to shape; excessive handling will warm the filling and make them sloppy.
- Cover the baking sheet and freeze for at least 2 hours.: Freezing sets the shape and hardens the interior which is crucial for maintaining structure during frying, you will notice the surface go from tacky to firm. Frozen balls also reduce oil penetration, keeping them less greasy. A common oversight is not freezing long enough, which can lead to breakage when breading, so allow the full two hours or longer for consistent results.
- Once the balls are frozen, prepare the oil. Fill a deep-frying skillet or Dutch oven with 3 inches of oil. Heat the pan of oil over medium heat until it reaches 300°F.: As the oil warms you'll see gentle shimmer lines and subtle wisps of steam, and the thermometer will give you the target 300°F. This moderate temperature cooks the crust through without burning it before the interior thaws and warms. If your oil is too hot the exterior will darken too quickly while the center remains cold; too cool and the balls will absorb oil and become greasy. Keep a reliable deep frying thermometer on hand.
- While the oil heats, prepare the breading. Whisk the eggs and water together in a shallow bowl. Pour the bread crumbs into another bowl.: Combining the two large eggs and the water produces a glossy wash that helps the Panko breadcrumbs adhere evenly. You will see the mixture become slightly frothy, which is normal. If the wash appears too thin the crumbs will slide off, if too thick it creates a dense coating, so maintain the measured ratio for balance.
- Place a cooling rack on top of a baking sheet. Set aside.: This simple staging area will allow excess oil to drip away and keep the coating crisp rather than soggy. You'll hear a faint drip and see the balls settle into a perfect post fry crisp as they cool. Avoid stacking fried pieces directly on paper towels, which can trap steam and soften the crust.
- Remove the mac and cheese balls from the freezer. Dip each ball into the whisked eggs and then coat with bread crumbs.: When you dip the frozen balls you will notice the wash clinging and the crumbs forming a rough, textured shell that signals a successful breading. Press crumbs lightly to ensure full coverage but do not compress them, as that reduces the desirable air pockets. A common mistake is allowing the balls to thaw too much before breading, which leads to a loose coating and messy hands.
- Once the oil is hot, work in batches to fry the balls. Fry 5-6 balls at a time for about 3 minutes, flipping halfway through or until golden.: As the balls hit the oil there will be a lively sizzle and the surface will gradually shift to a rich golden brown in about three minutes; flipping exposes all sides to even browning. The sound will mellow as the moisture inside reduces. Overcrowding causes the oil temperature to drop, resulting in greasy results, so respect the batch size and monitor the thermometer to return to the 300°F range.
- Place the fried Mac and cheese balls on the cooling rack while the rest of the balls cook. Serve with dipping sauce and enjoy!: After frying, you'll notice the crunch remains pronounced as steam escapes on the rack, and the first bite often delivers a warm burst of melted cheese. Let them rest briefly so the interior sets a bit, preventing a molten spill. A common error is serving straight from the oil to plate, which traps steam and softens the crust; a short rest makes them perform better in texture and presentation.
Substitutions and Tips
Below are practical tips and small substitutions I rely on when making Fried Mac and Cheese Balls. Each tip highlights an important step or option to adapt the recipe while keeping texture and flavor intact. Read them before you begin to streamline the process.
- Panko for crispiness: Using Panko breadcrumbs creates a lighter, crunchier shell than fine crumbs, which helps the balls stay crisp longer after frying.
- Cheese balance: A mix of 4 ounces cheddar and 4 ounces mozzarella yields both flavor and stretch; you can slightly adjust proportions for sharper or milder results.
- Egg wash consistency: Whisking 2 large eggs with 1/4 cup water produces a thin, sticky wash that evenly tacks crumbs to the frozen balls without clumping.
- Oil selection: Choose a neutral, high smoke point oil for frying; maintaining steady temperature is more important than the specific oil type.
- Make ahead timing: Prepare and freeze the balls up to a month in advance, keeping them in a single layer until solid, then transfer to a sealed container for long term storage.
What to Serve With Fried Mac and Cheese Balls
These crunchy bites are versatile, they play well as an appetizer or part of a casual meal. Below I outline pairing ideas, occasions, and serving suggestions that help you present them beautifully and practically. I focus on complementary textures and flavor contrasts to balance the rich, cheesy interior.
- Simple dipping sauces: A tangy marinara or a creamy garlic aioli complements the rich cheese without overpowering it, offering a bright or silky counterpoint.
- Salad pairing: Serve alongside a crisp green salad with a citrus vinaigrette to cut through the richness and refresh the palate between bites.
- Party platter: Arrange with other finger foods for game nights or gatherings, letting guests mix and match flavors and textures.
- Occasions: Great for casual lunches, weekend get togethers, potlucks, and Ramadan if breaking fast with shareable, warm bites.
- Storage tips: Keep fried balls in a warm oven set to low to preserve crispness for a short period; cool completely and refrigerate leftovers, then reheat in a hot oven to restore crunch.
- Seasonal pairing: In cooler months serve with a bowl of soup to add a crunchy, cheesy side, while in warmer months pair with a bright, herb laden salad.
FAQ
Conclusion
These Fried Mac and Cheese Balls shine because they combine a luscious, cheesy interior with a light, crackling exterior to create a snack that is both comforting and exciting. The freeze ahead steps and straightforward technique make them approachable for cooks of all levels, while the Panko coating ensures repeatable crunch. Try making a batch for your next gathering; they reheat well and consistently disappear fast at parties. I hope this guide helps you achieve the perfect balance of creamy and crispy, and that these bites become a beloved staple in your entertaining repertoire.

Fried Mac and Cheese Balls
Equipment
- 9×13 baking pan
- Baking Sheet
- Dutch Oven
- Deep-Frying Thermometer
Ingredients
- 16 ounces dry elbow macaroni (1 box) Cook thoroughly as the base pasta that holds the mac and cheese structure; boil until al dente to avoid mushy balls. Drain well and cool slightly so the macaroni mixes easily with the cheese binding. Use the specified amount to yield the right texture and volume for forming balls.
- 2 tablespoons unsalted butter (1/4 stick) Melt smoothly to create a rich, creamy roux and add flavor; use unsalted butter to control overall saltiness. Whisk with flour to thicken the sauce and coat the pasta evenly. Allow to brown slightly for a deeper, nutty flavor without burning.
- 2 tablespoons all-purpose flour Whisk evenly to thicken the milk into a béchamel; sprinkle in and cook a minute to remove raw flour taste. Use measured amount to achieve a creamy sauce that binds the cheese and pasta together. Integrate well with butter before adding milk for a smooth texture.
- 1/2 -1 teaspoon ground cayenne pepper Season lightly to add a warm, spicy kick that balances the richness of cheese; adjust within the range to control heat level. Sprinkle into the sauce or mix with breadcrumbs for a subtle background warmth. Use sparingly to avoid overpowering other flavors.
- 1 teaspoon garlic powder Season subtly to impart a mellow garlic flavor that complements the cheese; sprinkle into the sauce or seasoning mix. Use powdered form for consistent distribution without adding texture. Combine with onion powder for aromatic depth.
- 1 teaspoon onion powder Season to contribute a sweet, savory onion note that enhances overall flavor; blend into the sauce or breadcrumb coating. Use powdered onion for even dispersion and no grittiness. Pair with garlic powder for balanced seasoning.
- 1/2 teaspoon kosher salt Season carefully to control the savory balance and enhance other flavors; measure precisely since unsalted butter and cheeses affect final saltiness. Dissolve into the sauce and taste before adjusting. Use kosher salt for easy pinch control.
- 1/2 teaspoon ground black pepper Season to add mild heat and depth while enhancing the cheese's flavor; freshly ground preferred for aromatic impact. Stir into the sauce or seasoning blend and taste to balance with salt. Avoid over-seasoning as pepper can become prominent when fried.
- 2 cups milk Pour gradually to create a smooth, creamy sauce; warm milk combines with the roux to form the béchamel base. Heat gently while whisking to prevent scorching and achieve a silky texture. Use whole or reduced-fat milk depending on desired richness.
- 4 ounces cheddar cheese freshly shredded Melt into the béchamel to provide sharp, tangy cheesiness and structure; shred freshly for optimal melting and texture. Fold into the warm sauce until fully incorporated to create a cohesive mac and cheese mixture. Use measured amount to balance with mozzarella.
- 4 ounces mozzarella cheese freshly shredded Melt for gooey, stretchy texture and mild milky flavor; shred freshly to ensure even melting and prevent clumping. Combine with cheddar to create a balanced melty filling that helps bind the macaroni. Use specified amount to maintain desired creaminess.
- Vegetable oil for frying Heat to fryer-ready temperature and provide a neutral oil medium for crisp, golden exteriors; choose a high smoke point variety. Fill deep fryer or heavy pot to an appropriate depth for even frying without crowding. Maintain temperature for consistent browning and minimal oil absorption.
- 2 large eggs Whisk gently to create an egg wash that helps breadcrumbs adhere and add richness to the coating. Beat until smooth and combine with water for the proper brushing consistency. Use large eggs to ensure adequate binding and moisture.
- 1/4 cup water Mix to thin the egg mixture so it coats evenly and helps breadcrumbs stick; use room-temperature water for consistent results. Add to the beaten eggs and whisk until homogeneous. Adjust slightly to achieve a batter-like wash that clings to the mac and cheese balls.
- 2 1/2 cups Panko breadcrumbs Coat thoroughly to create an extra-crispy, airy crust that contrasts the creamy interior; use Panko for superior crunch. Pack or press breadcrumbs around each ball for uniform coverage and deep-frying durability. Reserve enough for multiple coatings if desired.
Instructions
- Boil 6 cups of salted water in a large pot set over high heat. Add the pasta and cook for 6 minutes. Drain the cooked pasta and set it aside.: Your first cue is the rolling boil and the sound of vigorous bubbling which tells you the water is hot enough to cook the elbow macaroni quickly and evenly. You'll notice the pasta soften but still offer a slight bite at six minutes, which is perfect because it will finish cooking slightly in the sauce; overcooking here leads to a mushy center. A common mistake is under salting the water, which yields bland noodles, so be generous with the salt. Drain thoroughly so excess water does not thin the cheese sauce.
- In the same pot, melt the butter. Add the flour, cayenne pepper, garlic powder, onion powder, salt, and pepper. Whisk until the mixture starts to brown, about 2 minutes.: As the butter melts you'll smell a nutty aroma, then whisk in the flour to form a roux; you want gentle bubbling and a light toasty scent after about two minutes. This step builds a savory backbone and prevents a runny sauce later. Avoid letting the roux darken too much because it will color and alter the sauce flavor. If lumps appear, whisk vigorously and reduce heat to smooth them out.
- Whisk in the milk and continue stirring until it starts to thicken, about 5 minutes.: Pouring in the milk will momentarily quiet the sizzle, then resume as the mixture heats; a gentle simmer and consistent whisking will coax the roux and milk into a glossy, velvety sauce in five minutes. The aroma will shift to a creamy dairy note, and the sauce should coat the back of a spoon. If it seems too thin, keep cooking and stirring patiently, if too thick, thin with a splash more milk. Do not rush by cranking heat, as that can cause separation.
- Stir in the cheddar and mozzarella cheeses until fully melted. Mix in the cooked pasta.: Adding the freshly shredded cheddar and mozzarella transforms the sauce, releasing a rich, savory perfume. Stir slowly so the cheese melds into a smooth, glossy mélange without clumping. When the macaroni is added, you'll see strands coated and small pockets of molten cheese hugging each piece, signaling a cohesive mixture. A common issue is adding cheese to boiling liquid which can make it grainy, so remove from high heat and stir gently as it melts.
- Pour the macaroni into a 9×13-inch baking pan and spread it out. Cover and refrigerate for at least 2 hours.: Spread the cheesy pasta into an even layer so it cools uniformly on the surface, which promotes easier scooping later. As it chills, the sauce firms and binds the macaroni , while the cooler air removes heat that would otherwise make forming difficult. If you rush this step you'll struggle to shape balls and risk collapse, so respect the two hour chill for best structure. Covering prevents a skin from forming and keeps flavors locked in.
- Once the macaroni is chilled, remove it from the refrigerator and line a baking sheet with parchment paper. Form equal size 2-inch balls from the mac and cheese and place them onto the prepared pan.: Working with cold mixture, you'll feel the texture change from tacky to pliable, and the balls will hold their shape when rolled gently. Use a cookie scoop for uniformity and press lightly to round them. If the mixture sticks to your hands, wet them slightly or use parchment to shape; excessive handling will warm the filling and make them sloppy.
- Cover the baking sheet and freeze for at least 2 hours.: Freezing sets the shape and hardens the interior which is crucial for maintaining structure during frying, you will notice the surface go from tacky to firm. Frozen balls also reduce oil penetration, keeping them less greasy. A common oversight is not freezing long enough, which can lead to breakage when breading, so allow the full two hours or longer for consistent results.
- Once the balls are frozen, prepare the oil. Fill a deep-frying skillet or Dutch oven with 3 inches of oil. Heat the pan of oil over medium heat until it reaches 300°F.: As the oil warms you'll see gentle shimmer lines and subtle wisps of steam, and the thermometer will give you the target 300°F. This moderate temperature cooks the crust through without burning it before the interior thaws and warms. If your oil is too hot the exterior will darken too quickly while the center remains cold; too cool and the balls will absorb oil and become greasy. Keep a reliable deep frying thermometer on hand.
- While the oil heats, prepare the breading. Whisk the eggs and water together in a shallow bowl. Pour the bread crumbs into another bowl.: Combining the two large eggs and the water produces a glossy wash that helps the Panko breadcrumbs adhere evenly. You will see the mixture become slightly frothy, which is normal. If the wash appears too thin the crumbs will slide off, if too thick it creates a dense coating, so maintain the measured ratio for balance.
- Place a cooling rack on top of a baking sheet. Set aside.: This simple staging area will allow excess oil to drip away and keep the coating crisp rather than soggy. You'll hear a faint drip and see the balls settle into a perfect post fry crisp as they cool. Avoid stacking fried pieces directly on paper towels, which can trap steam and soften the crust.
- Remove the mac and cheese balls from the freezer. Dip each ball into the whisked eggs and then coat with bread crumbs.: When you dip the frozen balls you will notice the wash clinging and the crumbs forming a rough, textured shell that signals a successful breading. Press crumbs lightly to ensure full coverage but do not compress them, as that reduces the desirable air pockets. A common mistake is allowing the balls to thaw too much before breading, which leads to a loose coating and messy hands.
- Once the oil is hot, work in batches to fry the balls. Fry 5-6 balls at a time for about 3 minutes, flipping halfway through or until golden.: As the balls hit the oil there will be a lively sizzle and the surface will gradually shift to a rich golden brown in about three minutes; flipping exposes all sides to even browning. The sound will mellow as the moisture inside reduces. Overcrowding causes the oil temperature to drop, resulting in greasy results, so respect the batch size and monitor the thermometer to return to the 300°F range.
- Place the fried Mac and cheese balls on the cooling rack while the rest of the balls cook. Serve with dipping sauce and enjoy!: After frying, you'll notice the crunch remains pronounced as steam escapes on the rack, and the first bite often delivers a warm burst of melted cheese. Let them rest briefly so the interior sets a bit, preventing a molten spill. A common error is serving straight from the oil to plate, which traps steam and softens the crust; a short rest makes them perform better in texture and presentation.
Notes
- Panko for crispiness: Using Panko breadcrumbs creates a lighter, crunchier shell than fine crumbs, which helps the balls stay crisp longer after frying.
- Cheese balance: A mix of 4 ounces cheddar and 4 ounces mozzarella yields both flavor and stretch; you can slightly adjust proportions for sharper or milder results.
- Egg wash consistency: Whisking 2 large eggs with 1/4 cup water produces a thin, sticky wash that evenly tacks crumbs to the frozen balls without clumping.
- Oil selection: Choose a neutral, high smoke point oil for frying; maintaining steady temperature is more important than the specific oil type.
- Make ahead timing: Prepare and freeze the balls up to a month in advance, keeping them in a single layer until solid, then transfer to a sealed container for long term storage.