Apple Butter Brie Bites
Apple Butter Brie Bites were the snack I always bring to neighborhood gatherings when I want something that feels fancy but is shockingly simple to make. The first time I served these, everyone circled the platter with cocktail napkins in hand, curious about that warm, gooey center. I remember standing by the oven, arms folded, feeling quietly proud as the tiny cups browned and a sweet, spiced aroma drifted through the house.
Over the years I have tweaked small details, like how thick to cut the brie cheese and whether to gently press the seams of the dough. Those tiny choices changed the texture so much that now I never skip them. Friends have asked for the recipe between bites, which is how these little pastries became my go to for holidays and casual get togethers.
What I love most is how approachable they are. You do not need advanced skills, just a mini muffin pan and a patient hand to place the fillings. The contrast of pillowy crescent rolls, rich brie cheese, and the sticky tartness of apple butter creates a bite that is at once comforting and special. Every time I make a batch I change one small thing, and every time I learn something new about balance. If you like easy finger foods that impress without fuss, these are for you.
Recipe Snapshot
28 mins
15 mins
13 mins
Easy
120 kcal
American
Gluten-Free, Low FODMAP
Appetizers
Mini muffin pan
The Best Thing About This Apple Butter Brie Bites
Perfect party bite that feels upscale
I love serving Apple Butter Brie Bites because they look like I spent a long time in the kitchen, even though they are fast to assemble. Guests immediately assume effort went into each piece, which makes them a brilliant option when you want to wow without stress.
Contrast of textures and flavors
The combination of pillowy crescent rolls, creamy brie cheese, and the sticky tang of apple butter creates a layered tasting experience. I often say that texture is half the fun of eating, and these bites deliver on that promise in every mouthful.
Flexible and forgiving
These bites tolerate small mistakes wonderfully. If your dough does not rise perfectly, the cheese and filling still create an irresistible pocket of flavor. I like recipes that do not punish you for being human, and this one is very forgiving.
Seasonal appeal for fall and holidays
With the warm notes of apple butter they slot into autumn entertaining seamlessly. I reach for them at Thanksgiving because they pair well with bold mains and leafy salads, and they bring a touch of seasonal sweetness to the table.
Minimal equipment, maximum impact
All you need is a mini muffin pan and a few minutes to assemble. I appreciate recipes that keep the tool list short, so I can focus on timing and presentation rather than hunting for specialized gadgets.
Apple Butter Brie Bites Ingredients
I treat this ingredient list like a small orchestra where each player has a clear role. The dough provides structure, the brie cheese gives creaminess and richness, and the apple butter adds a concentrated, spiced sweetness. When you balance these components, the result is more than the sum of its parts.
- 1 tube crescent rolls 8 ounces: Unroll and separate into individual triangles to form the sturdy, buttery pastry cups that hold the filling; provides a flaky, slightly salty base that complements sweet and savory flavors. Work quickly with chilled dough to keep layers tender and ensure even browning during baking. Can be shaped into mini cups or wrapped around toppings for convenient bite-sized appetizers.
- 4 ounces brie cheese: Melt gently to create a rich, creamy, and slightly tangy center that balances the sweetness of the apple butter; offers a smooth, luxurious texture when warmed. Trim rind if desired for milder flavor or leave on for added complexity and rustic presentation. Slice or cube into small portions so it softens evenly in the oven without overpowering the other components.
- 1/3 cup homemade apple butter: Spoon into the pastry cups to add concentrated apple flavor, natural sweetness, and warm spices that define the character of the bites; acts as the primary sweet component that pairs with the creamy brie and buttery dough. Use a thick, spreadable consistency to prevent sogginess and to stay nestled inside the crescent cups during baking. Homemade version allows control over spice level and sweetness for tailored taste.
Cooking Method for Apple Butter Brie Bites
These instructions are meant to be conversational, like I am guiding you over the counter as you assemble each little parcel. Follow the sequence and pay attention to the sensory cues, because they will tell you when each bite is perfectly done.
- Preheat oven to 375°F. Lightly grease a mini muffin pan.: As the oven warms you will notice a dry, warming air and a steady hum from the elements, signaling readiness. Preheating ensures the crescent rolls begin their rise immediately, which helps create a tender yet structured shell. A common mistake here is placing the pan in before the oven reaches temperature, which can yield underbaked dough, so always wait until the oven indicator reads steady heat. You'll want to feel confident the oven is even, so I often rotate my rack to the center for consistent browning.
- Unroll the crescent rolls and gently press the seams together. Cut the dough into 18 rectangles. Place each rectangle into a cup of the mini tin. Do not worry if the dough does not go up all sides of the cup.: Greasing the pan gives the dough a smooth release and helps those edges come away cleanly. Run a small amount of neutral oil or nonstick spray around each cup, and you will hear a faint slicking sound as you move the pan, which is a subtle reassurance you did it right. If you skip greasing, the buttery dough can stick, tearing the base when you remove the bites. For a fail safe, I sometimes line a couple of cups with a little parchment circle for stubborn pans.
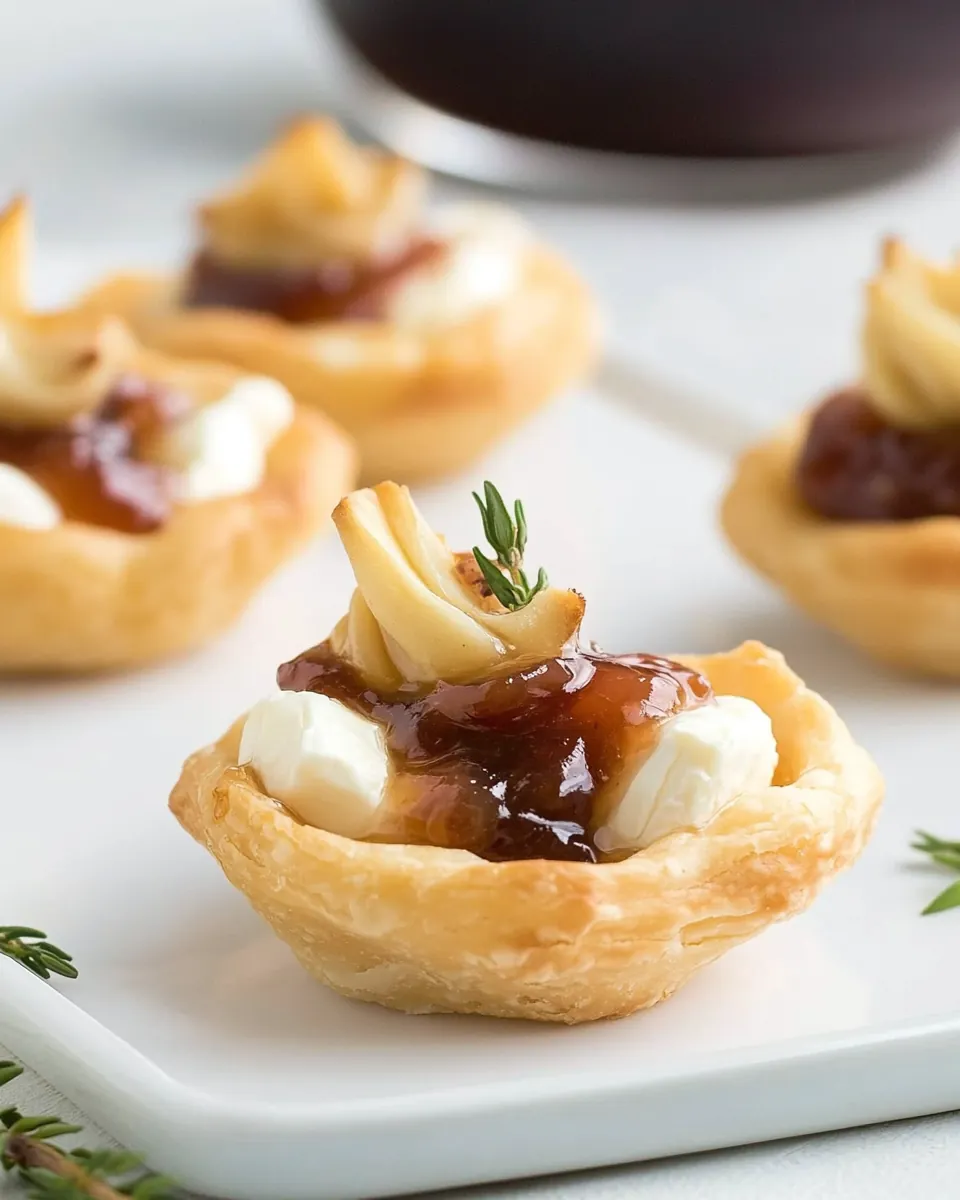
- Cut the brie into 18 small pieces. Place a piece into each of the dough-filled muffin cups. Top each with about a teaspoon of apple butter.: The dough will feel cool and slightly tacky to the touch. Pressing the seams eliminates holes where filling could leak, creating a uniform sheet to cut. Use gentle, even pressure to avoid stretching the dough thin, because overstretched dough will shrink back and lose structure while baking. If your seams resist, give the dough a few minutes to relax at room temperature, then try again.
- Bake for 11-13 minutes or until the dough is golden brown and the cheese is bubbly.: As you slice, the blade will glide and leave clean edges, which helps the dough settle into the pans more predictably. Even rectangles mean each bite bakes at the same pace, preventing some from over browning while others stay pale. Uneven pieces can create inconsistent textures, so I use a straight edge or ruler if I want exactness, though casual rough cuts often work fine for home entertaining.
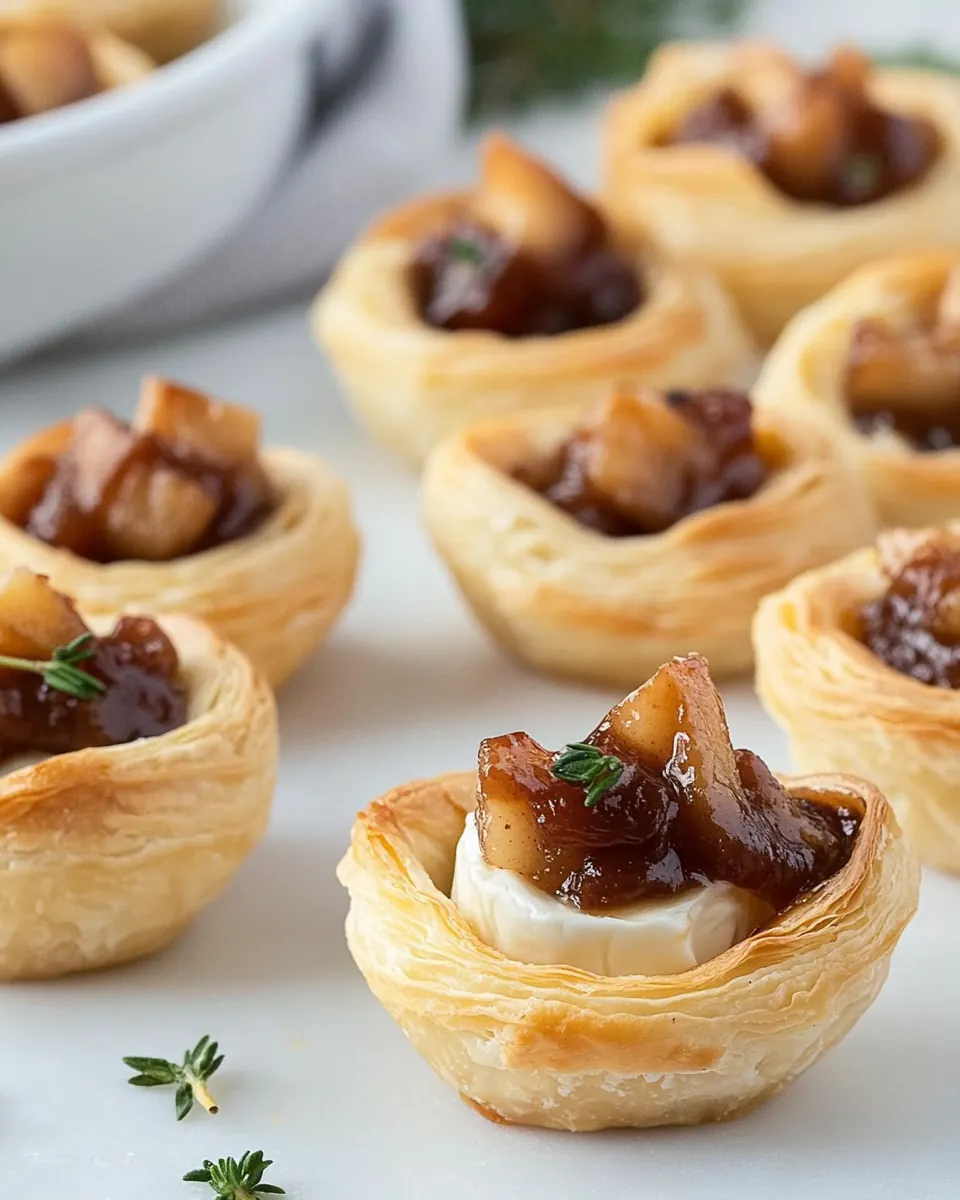
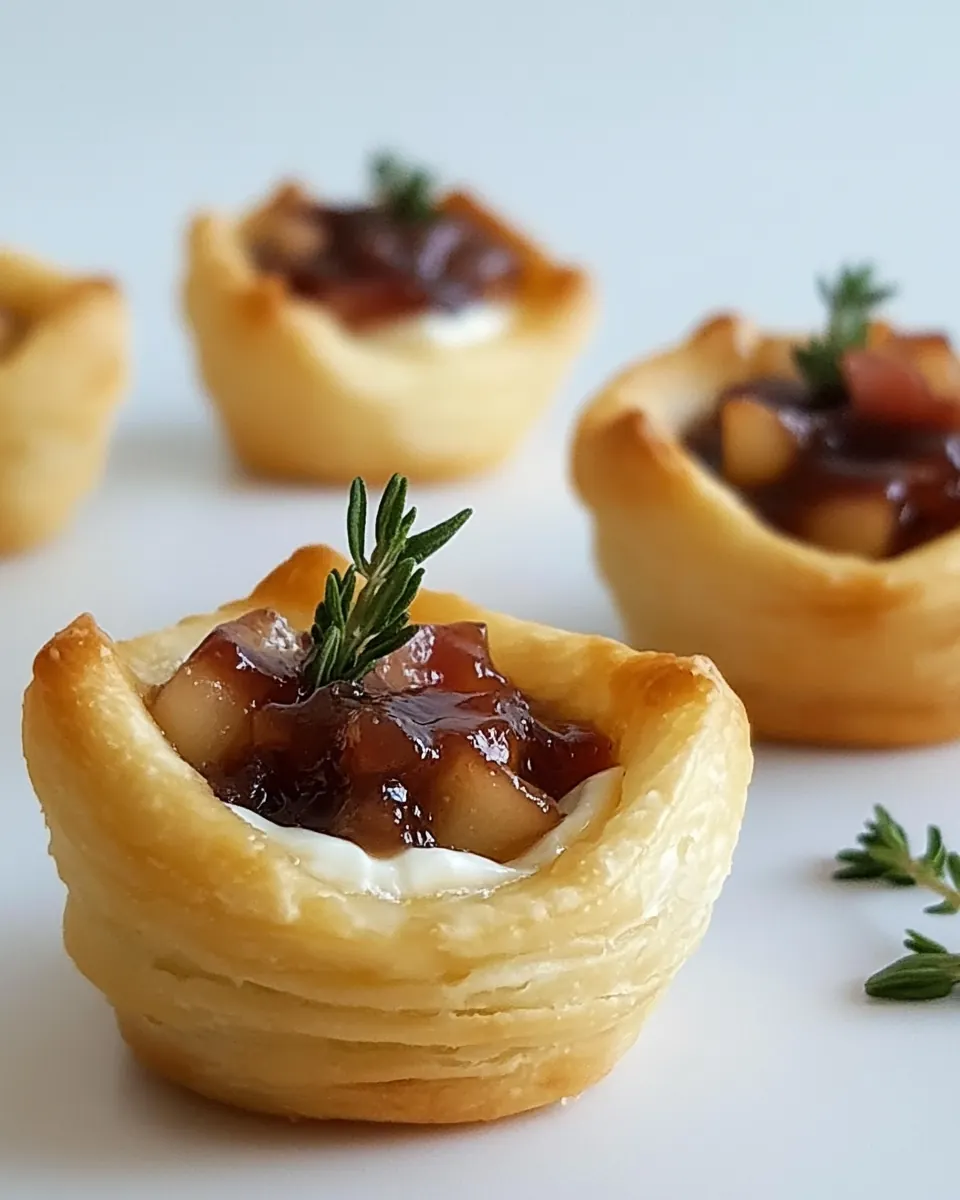
- Let rest for 1-2 minutes to allow the cheese to stop bubbling, then immediately remove the bites from the muffin tin. Serve warm, garnished with chives if desired.: Nest the dough gently so it lines the bottom and partially up the sides, noticing how it relaxes and forms a pocket. You may see slight folding at the corners, which is fine, as it creates extra layers that turn golden and flaky. Do not worry if the dough does not go up all sides of the cup, a common misunderstanding is thinking it must form a full wall; instead it just needs a stable base to hold the fillings. If a rectangle shrinks or pulls away, press it back into place so the filling sits centered.
- Cut the brie into 18 small pieces: The brie cheese will be cool and slightly firm, making clean slicing easy. Smaller, uniform pieces ensure an even melt and prevent a single bite from being overwhelmingly cheesy. One common pitfall is cutting uneven chunks, which leads to inconsistent melting and texture. If your brie cheese seems sticky, chill it briefly for cleaner cuts before placing into the dough cups.
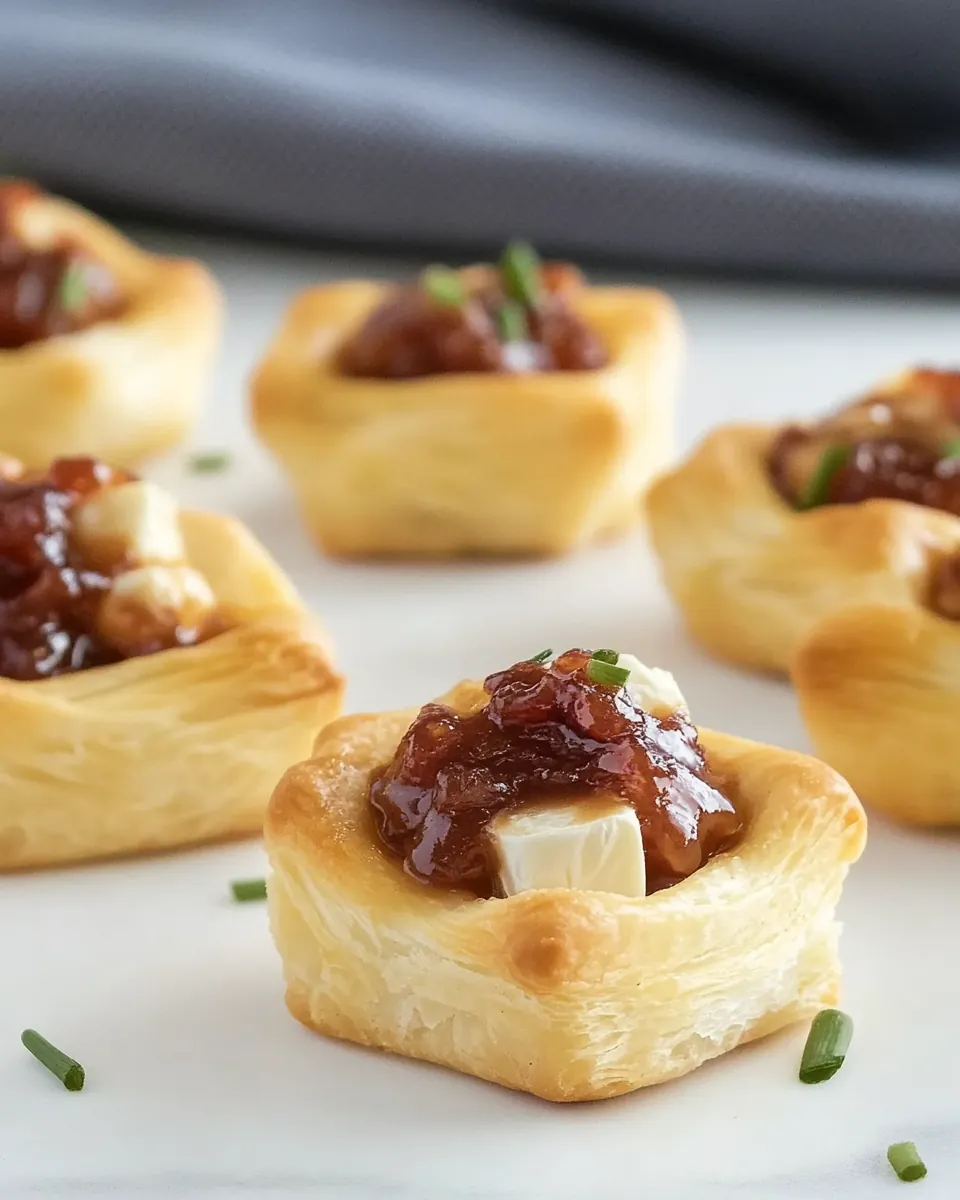
- Place a piece into each of the dough filled muffin cups: As you tuck in the brie cheese , you will feel the gentle give of the dough and the weight of the cheese settling into its nest. The contact between the cheese and dough is crucial for integrated flavor, so press each piece lightly into the base. Avoid stacking or pressing the cheese through the dough, because that can tear the shell and cause leakage. If a piece seems too large, trim it slightly rather than forcing it down.
- Top each with about a teaspoon of apple butter: Dolloping the apple butter gives a glossy, jewel like dot on each piece, and its stickiness helps it adhere rather than slide off during baking. I spoon a small amount and then tap the side of the spoon so the dollop stays compact. A mistake to watch for is using too much apple butter , which can spill and caramelize on the pan, making cleanup harder and the bottoms soggy. Use a measured teaspoon to maintain consistency.
- Bake for 11 to 13 minutes or until the dough is golden brown and the cheese is bubbly: You will notice the kitchen fill with a warm, spiced perfume and the edges take on a deep golden hue when they are nearly done. The bubbling of the brie cheese is a clear visual cue that the interior has reached a luscious melt. Pulling them too early leaves the cheese only partially melted, while overbaking can cause dryness, so watch the color closely from minute 10 onward. If you see excessive browning, tent the pan with foil for the last minute.
- Let rest for 1 to 2 minutes to allow the cheese to stop bubbling: Allowing a short rest calms the molten interior, making the bites easier to remove and eat without immediate drips. You will feel a gentle reduction in steam as the temperature stabilizes, and the aroma will mellow slightly. A common error is rushing this step, which can result in very hot cheese that spills when you remove the bites. Patience here helps maintain tidy presentation and safer serving.
- Immediately remove the bites from the muffin tin: Once rested, the bites should release smoothly and present a glossy top with a golden rim. Use a small offset spatula or a spoon to lift them if needed, noting the satisfying gentle pull as they come free. Leaving them too long in the tin can cause steaming and soggy bottoms, so remove promptly for best texture. If any bits cling, run a thin knife around the edge to release without crushing the delicate shell.
- Serve warm, garnished with chives if desired: Warm service highlights the melted brie cheese and the aromatic quality of the apple butter . A sprinkling of fine chopped chives adds a bright note and a contrasting green visual pop. Avoid garnishing too early, as residual oven heat can wilt delicate herbs. I like to place them on a warmed platter so the bites stay inviting for the first round of guests.
Tips for Success
These tips reflect years of making small bites for gatherings, helping you get consistent results without stress. I focus on moment to moment choices that influence texture and presentation.
- Chill the dough briefly if it becomes too soft, this makes cutting neater and helps the pieces hold their shape when placed into the pan.
- Use a measuring teaspoon for the apple butter, this prevents overfilling which can cause the dough bases to become soggy during baking.
- Trim the rind only if thick, a thin edible rind adds texture and does not need removal, but overly thick rind can be chewy when melted.
- Rotate the pan mid bake for even browning, if your oven has hot spots rotating once ensures consistent golden color across all bites.
- Remove promptly from the pan after a short rest, keeping them out prevents steam buildup and preserves the crisp base of each bite.
Serving This Apple Butter Brie Bites
These little bites are a natural fit for holiday parties, casual cocktail hours, or as an elegant appetizer before a main meal. Serve them warm to highlight the melted interior and the aromatic apple butter.
- Party platter presentation, arrange the bites on a warmed serving tray in concentric circles so guests can grab them easily.
- Paired with leafy salad, offer a crisp, lightly dressed salad nearby to provide a refreshing contrast to the rich brie cheese.
- Serve at Thanksgiving, their autumnal flavor profile makes them a charming starter before turkey and sides.
- Storage tip for leftovers, place cooled bites in an airtight container in the fridge for up to two days and reheat in a 325°F oven until warm.
- Warm before serving, reheat briefly to revive the melt, but avoid microwaving which can make the dough chewy.
- Garnish options, add a light sprinkle of chopped chives just before serving for color and a mild onion note.
FAQ
Conclusion
These Apple Butter Brie Bites stand out because they pair creamy melted brie with sweet spiced apple butter inside a tender crescent roll shell for a small bite that feels both homey and elegant. I encourage you to give them a try at your next gathering or holiday table, because they require minimal hands on time yet deliver maximum flavor impact. Making them is a simple way to elevate an appetizer spread, and the process is forgiving enough to enjoy even on a busy day. Serve them warm, watch them disappear, and then smile at the compliments that follow.

Apple Butter Brie Bites
Equipment
- Mini Muffin Pan
Ingredients
- 1 tube crescent rolls 8 ounces Unroll and separate into individual triangles to form the sturdy, buttery pastry cups that hold the filling; provides a flaky, slightly salty base that complements sweet and savory flavors. Work quickly with chilled dough to keep layers tender and ensure even browning during baking. Can be shaped into mini cups or wrapped around toppings for convenient bite-sized appetizers.
- 4 ounces brie cheese Melt gently to create a rich, creamy, and slightly tangy center that balances the sweetness of the apple butter; offers a smooth, luxurious texture when warmed. Trim rind if desired for milder flavor or leave on for added complexity and rustic presentation. Slice or cube into small portions so it softens evenly in the oven without overpowering the other components.
- 1/3 cup homemade apple butter Spoon into the pastry cups to add concentrated apple flavor, natural sweetness, and warm spices that define the character of the bites; acts as the primary sweet component that pairs with the creamy brie and buttery dough. Use a thick, spreadable consistency to prevent sogginess and to stay nestled inside the crescent cups during baking. Homemade version allows control over spice level and sweetness for tailored taste.
Instructions
- Preheat oven to 375°F. Lightly grease a mini muffin pan.: As the oven warms you will notice a dry, warming air and a steady hum from the elements, signaling readiness. Preheating ensures the crescent rolls begin their rise immediately, which helps create a tender yet structured shell. A common mistake here is placing the pan in before the oven reaches temperature, which can yield underbaked dough, so always wait until the oven indicator reads steady heat. You'll want to feel confident the oven is even, so I often rotate my rack to the center for consistent browning.
- Unroll the crescent rolls and gently press the seams together. Cut the dough into 18 rectangles. Place each rectangle into a cup of the mini tin. Do not worry if the dough does not go up all sides of the cup.: Greasing the pan gives the dough a smooth release and helps those edges come away cleanly. Run a small amount of neutral oil or nonstick spray around each cup, and you will hear a faint slicking sound as you move the pan, which is a subtle reassurance you did it right. If you skip greasing, the buttery dough can stick, tearing the base when you remove the bites. For a fail safe, I sometimes line a couple of cups with a little parchment circle for stubborn pans.
- Cut the brie into 18 small pieces. Place a piece into each of the dough-filled muffin cups. Top each with about a teaspoon of apple butter.: The dough will feel cool and slightly tacky to the touch. Pressing the seams eliminates holes where filling could leak, creating a uniform sheet to cut. Use gentle, even pressure to avoid stretching the dough thin, because overstretched dough will shrink back and lose structure while baking. If your seams resist, give the dough a few minutes to relax at room temperature, then try again.
- Bake for 11-13 minutes or until the dough is golden brown and the cheese is bubbly.: As you slice, the blade will glide and leave clean edges, which helps the dough settle into the pans more predictably. Even rectangles mean each bite bakes at the same pace, preventing some from over browning while others stay pale. Uneven pieces can create inconsistent textures, so I use a straight edge or ruler if I want exactness, though casual rough cuts often work fine for home entertaining.
- Let rest for 1-2 minutes to allow the cheese to stop bubbling, then immediately remove the bites from the muffin tin. Serve warm, garnished with chives if desired.: Nest the dough gently so it lines the bottom and partially up the sides, noticing how it relaxes and forms a pocket. You may see slight folding at the corners, which is fine, as it creates extra layers that turn golden and flaky. Do not worry if the dough does not go up all sides of the cup, a common misunderstanding is thinking it must form a full wall; instead it just needs a stable base to hold the fillings. If a rectangle shrinks or pulls away, press it back into place so the filling sits centered.
- Cut the brie into 18 small pieces: The brie cheese will be cool and slightly firm, making clean slicing easy. Smaller, uniform pieces ensure an even melt and prevent a single bite from being overwhelmingly cheesy. One common pitfall is cutting uneven chunks, which leads to inconsistent melting and texture. If your brie cheese seems sticky, chill it briefly for cleaner cuts before placing into the dough cups.
- Place a piece into each of the dough filled muffin cups: As you tuck in the brie cheese , you will feel the gentle give of the dough and the weight of the cheese settling into its nest. The contact between the cheese and dough is crucial for integrated flavor, so press each piece lightly into the base. Avoid stacking or pressing the cheese through the dough, because that can tear the shell and cause leakage. If a piece seems too large, trim it slightly rather than forcing it down.
- Top each with about a teaspoon of apple butter: Dolloping the apple butter gives a glossy, jewel like dot on each piece, and its stickiness helps it adhere rather than slide off during baking. I spoon a small amount and then tap the side of the spoon so the dollop stays compact. A mistake to watch for is using too much apple butter , which can spill and caramelize on the pan, making cleanup harder and the bottoms soggy. Use a measured teaspoon to maintain consistency.
- Bake for 11 to 13 minutes or until the dough is golden brown and the cheese is bubbly: You will notice the kitchen fill with a warm, spiced perfume and the edges take on a deep golden hue when they are nearly done. The bubbling of the brie cheese is a clear visual cue that the interior has reached a luscious melt. Pulling them too early leaves the cheese only partially melted, while overbaking can cause dryness, so watch the color closely from minute 10 onward. If you see excessive browning, tent the pan with foil for the last minute.
- Let rest for 1 to 2 minutes to allow the cheese to stop bubbling: Allowing a short rest calms the molten interior, making the bites easier to remove and eat without immediate drips. You will feel a gentle reduction in steam as the temperature stabilizes, and the aroma will mellow slightly. A common error is rushing this step, which can result in very hot cheese that spills when you remove the bites. Patience here helps maintain tidy presentation and safer serving.
- Immediately remove the bites from the muffin tin: Once rested, the bites should release smoothly and present a glossy top with a golden rim. Use a small offset spatula or a spoon to lift them if needed, noting the satisfying gentle pull as they come free. Leaving them too long in the tin can cause steaming and soggy bottoms, so remove promptly for best texture. If any bits cling, run a thin knife around the edge to release without crushing the delicate shell.
- Serve warm, garnished with chives if desired: Warm service highlights the melted brie cheese and the aromatic quality of the apple butter . A sprinkling of fine chopped chives adds a bright note and a contrasting green visual pop. Avoid garnishing too early, as residual oven heat can wilt delicate herbs. I like to place them on a warmed platter so the bites stay inviting for the first round of guests.
Notes
- Chill the dough briefly if it becomes too soft, this makes cutting neater and helps the pieces hold their shape when placed into the pan.
- Use a measuring teaspoon for the apple butter, this prevents overfilling which can cause the dough bases to become soggy during baking.
- Trim the rind only if thick, a thin edible rind adds texture and does not need removal, but overly thick rind can be chewy when melted.
- Rotate the pan mid bake for even browning, if your oven has hot spots rotating once ensures consistent golden color across all bites.
- Remove promptly from the pan after a short rest, keeping them out prevents steam buildup and preserves the crisp base of each bite.