
Fajita Veggies
Fajita Veggies came into my weeknight rotation the moment I realized vegetables could carry a meal with as much attitude as any protein. The first time I tossed a colorful mix of peppers and mushrooms into a hot cast iron skillet and heard that immediate sizzle, I knew I had something special. I remember standing by the grill, a glass of water in hand, watching edges char and aromas lift into the evening air, and thinking this is how easy, honest food should feel.
That night evolved into a ritual for me. I started keeping a stash of tortillas in the freezer and a small jar of chili powder next to the oil, so when the mood struck I could pull together a vibrant plate in minutes. Friends began to drop by on short notice, and these Fajita Veggies became the kind of dish I was proud to offer: colorful, smoky, and joyful on the table. We piled tortillas high, squeezed limes, and let everyone build their own rounds, laughter and conversation filling the gaps between bites.
Over time I played with little finishes that mattered to the final bite. A splash of balsamic on the mushrooms deepened the caramel notes, while a quick finishing squeeze of lime lifted everything. I learned to watch for the exact moment when peppers go glossy and just-crumbly at the edges, and when onions turn translucent but still keep a bite. These small rituals turned simple vegetables into something you remember. Every time I make Fajita Veggies, it feels like a tiny celebration, a reminder that great dinners can be fast and unpretentious.
Recipe Snapshot
30 mins
15 mins
15 mins
Easy
200 kcal
Mexican
Vegan, Gluten-Free
Dinner
Cast Iron Skillet, Grill or Grill Pan, Small Bowl, Tongs
The Magic of This Fajita Veggies
Bold, smoky flavor without fuss
I love how Fajita Veggies deliver that classic grilled smokiness without hours over a flame. The char from a hot cast iron pan or grill pan transforms simple peppers and mushrooms into something rich and savory. You get caramelized edges and bright centers, which gives every bite contrast, texture, and depth.
Flexible for every eater
We can make this dish for vegetarians and for folks who like to customize. The recipe is a modular canvas: tortillas, guacamole, salsas, and pickled jalapeños let everyone build plates to their appetite. I often let guests choose their heat level, from a gentle dusting of chili powder to a generous splash of hot salsa.
Fast weeknight win
What keeps me coming back is speed. From start to finish, Fajita Veggies cook up in about the time it takes to set the table. That makes it perfect for evenings when you want something satisfying without a lot of babysitting. I can have tortillas warmed, toppings prepped, and the veggies sizzling in under 30 minutes.
Vivid presentation
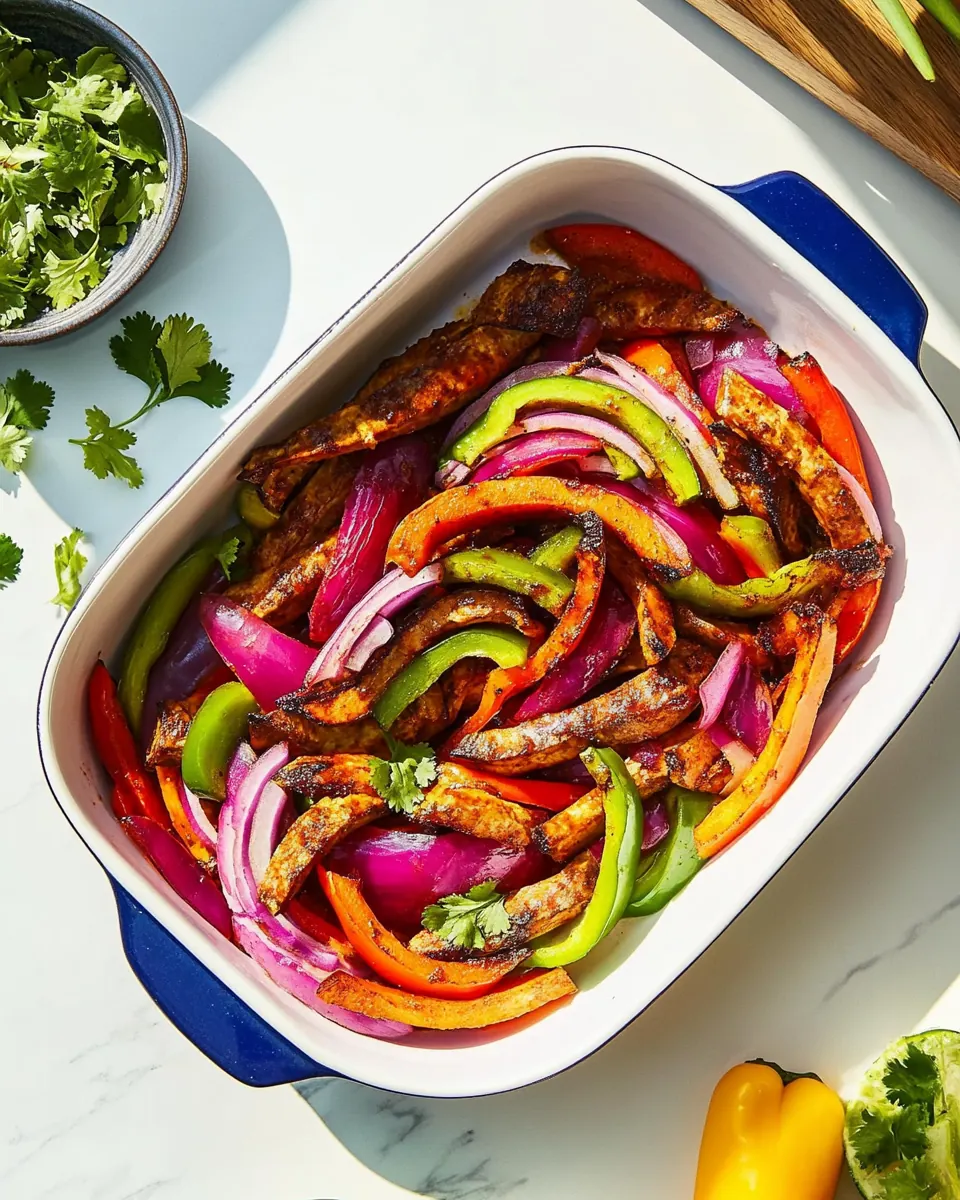
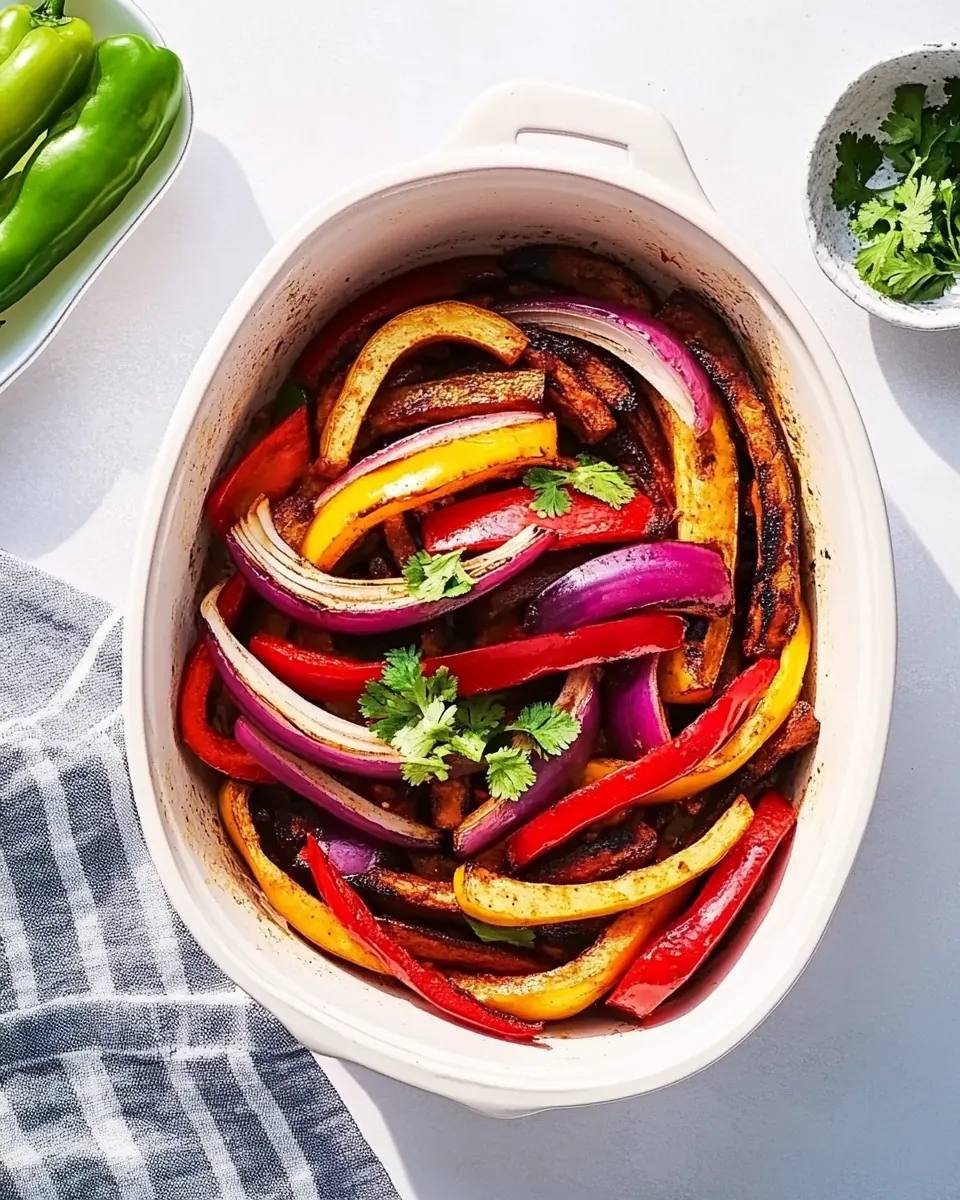
There is real pleasure in serving a platter of bright peppers, glossy mushrooms, and ruby onion wedges. It looks like a celebration on the plate, and the visual appeal encourages people to dig in. I find that colorful food tastes better because you want it to, and these veggies never fail to draw compliments.
A pantry friendly, seasonal choice
These ingredients are easy to find and store, especially in summer when multi colored peppers are at their sweetest. Minimal seasoning and a squeeze of fresh lime finish the dish, letting the veggies shine rather than masking them. I appreciate that it feels both indulgent and wholesome, which is a rare combination for a fast dinner.
What to Buy for Fajita Veggies
These ingredients are intentionally straightforward, focusing on texture and brightness. The key players are high quality fresh peppers for color and sweetness, meaty mushrooms for a satisfying bite, and a few pantry spices to tie everything together. I aim for tactile contrasts, so the combination of charred edges and juicy interiors makes each bite interesting.
- 3 multi-colored peppers, stemmed and sliced into strips: Provide vibrant color and crisp texture when sliced into strips; release sweet, slightly smoky flavor as they char during cooking and complement other vegetables in fajitas.
- 3 portobello mushrooms, stemmed and wiped clean: Add a meaty, umami-rich bite when wiped clean and sliced or torn; absorb seasonings and provide satisfying chew that mimics traditional fajita proteins.
- 1 red onion, sliced into wedges: Contribute mild sweetness and a slightly sharp bite when sliced into wedges; soften and caramelize when cooked, balancing the peppers and mushrooms.
- 2 tablespoons avocado oil: Coat vegetables evenly to facilitate high-heat sautéing or roasting; add a neutral, rich mouthfeel while helping spices adhere and preventing sticking.
- 2 garlic cloves, chopped: Introduce aromatic pungency and depth when chopped; soften and mellow with heat, enhancing the overall savory profile of the fajita mix.
- 1/2 teaspoon chili powder, more to taste: Lend warm, smoky heat; awaken other spices and bring classic fajita flavor while allowing adjustment of spiciness to personal taste.
- 1/2 teaspoon cumin: Provide earthy, warm undertones and savory complexity; pair well with chili powder to create a balanced southwestern spice profile.
- 1/2 teaspoons ea salt, more to taste: Season the vegetables with essential salinity; enhance and round other flavors while being easy to adjust to taste for the finished dish.
- Splash of balsamic vinegar: Brighten and add a slightly sweet, acidic note when splashed over cooked vegetables; help deglaze the pan and intensify flavor layers.
- 2 limes, sliced into wedges: Offer fresh acidity and a zesty finish when served as wedges; squeeze over assembled fajitas to cut richness and brighten flavors.
- Freshly ground black pepper: Season with a sharp, aromatic bite; freshly ground pepper adds mild heat and complexity without overpowering the other spices.
- 8 Flour or Corn Tortillas: Provide a soft, warm vehicle to hold fillings; choose flour or corn for preferred texture and authenticity when assembling fajita tacos.
- Guacamole or avocado slices squeezed with lime: Add creamy richness or fresh, buttery texture when spread or sliced; a squeeze of lime prevents browning and brightens the flavor.
- Pickled Jalapeños or sliced plain jalapeños: Bring tangy heat or crisp fresh kick depending on pickled or plain choice; add backbone to each bite and contrast the roasted vegetables.
- Diced tomatoes or Pico de Gallo: Contribute refreshing acidity and juicy texture when added diced or as salsa; add freshness and help balance the richer components.
- Cilantro: Add an herby, citrusy finish when sprinkled; provide bright green flavor that lifts the whole dish and complements lime and salsa.
- Tomatillo Salsa or Pineapple Salsa: Supply vibrant tangy-spicy flavor as a condiment; either tomatillo or pineapple salsas add acidity and complexity to the fajita experience.
- Tomatillo Salsa or Pineapple Salsa: Supply vibrant tangy-spicy flavor as a condiment; either tomatillo or pineapple salsas add acidity and complexity to the fajita experience.
Step by Step Instructions for Fajita Veggies
These steps are written to keep you company at the stove, guiding you through aromas and textures. I lay everything out so you can tune into the sound of sizzle and the sight of char, which are your best cues that the dish is on the right track.
- Heat a grill to medium heat with a 12-inch cast-iron skillet (or grill pan) inside.: The moment the skillet hits the hot grill you will hear an eager sizzle, which tells you the pan is ready to sear. That immediate sound means the surfaces of the vegetables will caramelize instead of steaming, creating those prized charred bits that add smoky flavor. You want the grill steady at medium so the pan gets hot enough to brown without smoking excessively. A common mistake is rushing and using high heat, which can burn the exterior before the interior softens. If you are unsure, test with a drop of water it should dance and evaporate quickly. When the pan is fully heated you will see a faint shimmer across the oil when it is added, another signal that the surface is primed for quick, flavorful browning.
- Arrange the peppers on a tray and the mushrooms and onion wedges on a separate rimmed plate. In a small bowl, whisk together the avocado oil, garlic, chili powder, cumin, salt, and several grinds of pepper. Drizzle 1 scant tablespoon of the mixture over the peppers and toss to coat. Drizzle the remaining marinade over the mushrooms and onions. Drizzle the mushrooms with a splash of balsamic vinegar and use your hands to coat the mushrooms on both sides.: Handling ingredients in organized groups keeps the cooking flow smooth and prevents cross crowding on the pan. The peppers will char and collapse differently than mushrooms and onions, so keeping them separated helps you manage cook times. Tossing the peppers with a scant tablespoon of the marinade first ensures they get a light coating without becoming saturated, which preserves their snap. A common slip is overcrowding the pan, which causes the veggies to steam rather than char. Make sure each piece has room to touch the hot surface so you get browned edges and concentrated flavor.
- Grill the peppers in the cast-iron pan for 8 to 10 minutes, tossing occasionally, until charred and soft. Be careful not to overfill the pan or the veggies won’t char on the edges – cook them in 2 batches, if necessary. Grill the mushrooms and onion wedges directly on the grill for about 4 minutes per side. Remove everything from the grill, using a potholder to remove the cast-iron pan. Squeeze the juice of 1/2 lime over the peppers and season with salt, pepper, and more chili powder, to taste. Slice the mushrooms into strips and place on a serving dish. Transfer the onions and the peppers to a serving skillet or large platter.: The aroma of minced garlic and warm cumin blooming in oil is a key sensory moment the smell should be fragrant and slightly toasty. Whisking emulsifies the oil with the spices so they cling to the vegetables during cooking, helping create even seasoning pockets. Let the mixture sit for a minute to soften the garlic and let the spices hydrate, which makes them release more flavor when they hit the hot pan. One thing to avoid is adding too much salt at this stage, which can draw out excess moisture; start light and adjust at the end.
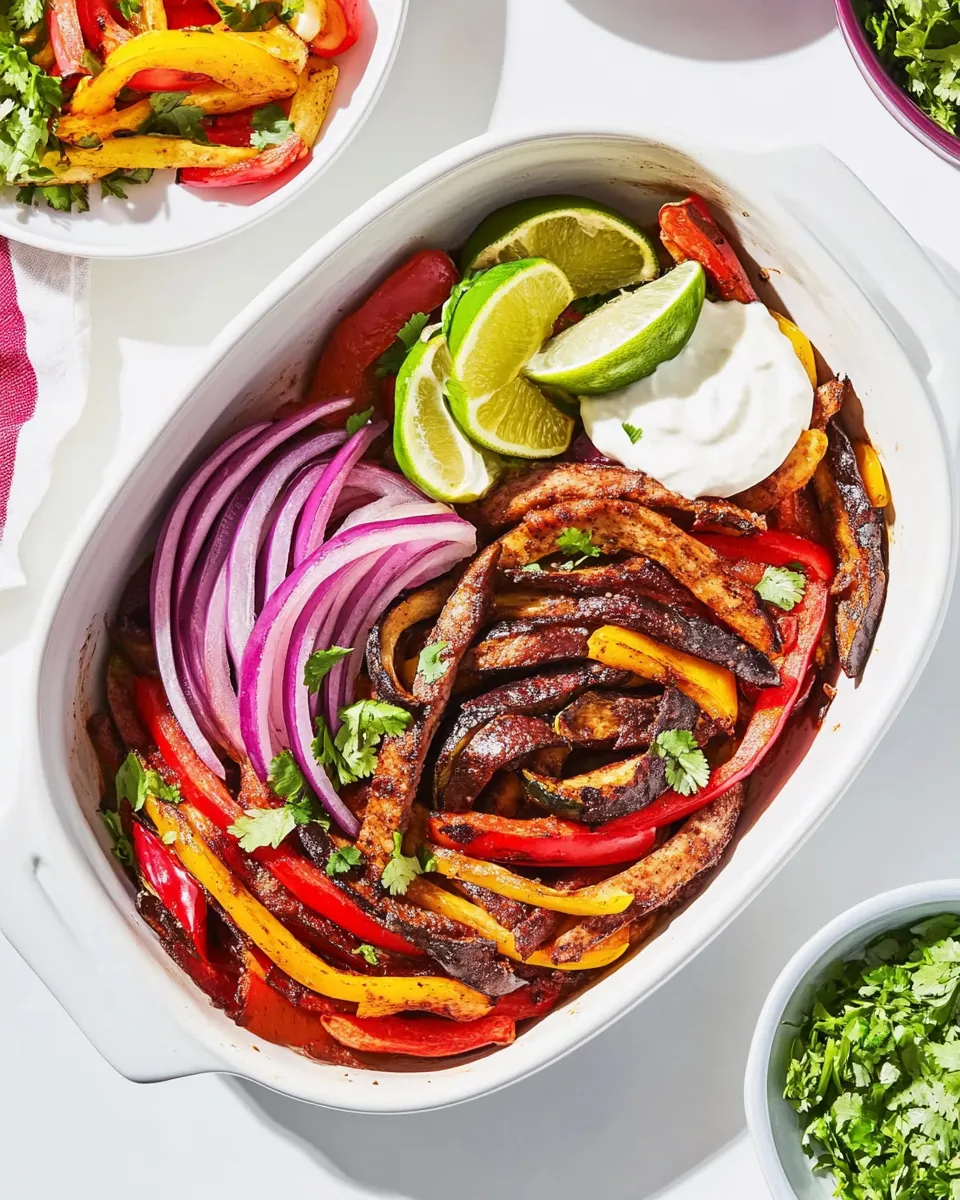
- Serve with the tortillas, guacamole, jalapeños, tomatoes, cilantro, salsa, and remaining lime wedges for serving.: As you toss, notice how the peppers take on a glossy sheen, which helps them blister and caramelize rather than sticking. The scant tablespoon gives them enough flavor without weighing them down, preserving their bright, crunchy texture. Tossing by hand ensures each strip gets an even, thin layer of seasoning, which is especially important for uniform charring. The typical error here is over marinating the peppers, which can make them limp instead of delectably charred. Keep it light and reserve the rest for the mushrooms and onions.
- Drizzle the remaining marinade over the mushrooms and onions: Mushrooms are sponges they soak up the marinade and its savory notes, and onions develop sweet, golden layers as they cook. Use your hands to ensure the marinade reaches every crevice, especially in the mushroom gills. A splash of balsamic vinegar on the mushrooms before cooking will deepen their flavor and help create a lush, caramelized surface. A common mistake is adding too much liquid, which prevents searing. Keep the coating thin and concentrated so those meaty edges can form.
- Drizzle the mushrooms with a splash of balsamic vinegar and use your hands to coat the mushrooms on both sides: The balsamic adds an acid driven sweetness that intensifies during searing, contributing sticky, savory notes. When you handle the mushrooms you should feel them become slightly tacky as they absorb the liquid, which helps the surface caramelize. This is when the smell will deepen into a roast like complexity. Avoid overworking them, which can bruise the flesh and release excess water. A light, even coat is all you need to get that deep flavor without sogginess.
- Grill the peppers in the cast iron pan for 8 to 10 minutes, tossing occasionally, until charred and soft: As the peppers hit the hot surface you will hear a lively sizzle, and after a few minutes their edges will blacken and blister. Tossing occasionally ensures multiple sides get charred without burning, and you will notice the skin collapse and the flesh become glossy and tender. Resist cooking them in a single crowded batch, because too many pieces will steam and lose that surface char. If you see lots of steam instead of sizzle, reduce the batch size and give the pan space to work properly.
- Be careful not to overfill the pan or the veggies won t char on the edges cook them in 2 batches, if necessary: Crowding is the enemy of caramelization, it traps moisture and prevents the Maillard reaction that creates rich flavors. When you cook in two batches you preserve high heat and get more consistent charring. The sense to watch for is bubbling moisture pooling in the pan if you see that, it means you have too many pieces. A typical mistake is trying to hurry by combining everything at once, which leads to limp, steamed vegetables instead of the bright, smoky pieces you want.
- Grill the mushrooms and onion wedges directly on the grill for about 4 minutes per side: Cooking the mushrooms and onions over direct grill heat imparts a smoky char and those sweet, caramelized lines on the onion wedges are a great visual cue. You will hear a pronounced sizzle when they meet the grill, and the aroma should turn deeper and more savory as the surface browns. Turn them once to get even marks and avoid excessive handling which can tear the onion layers. A common error is flipping too frequently that interrupts browning and prevents proper caramelization.
- Remove everything from the grill, using a potholder to remove the cast iron pan: When you pull the pan off, the first breath you take will be filled with concentrated grilled fragrance, a mix of char, citrus, and spices. Let the ingredients rest briefly so their juices redistribute, which keeps slices from becoming watery. Use a sturdy spatula or tongs to transfer items to a serving dish and be mindful of hot handles. The mistake to avoid is immediately covering the pan which traps steam and softens texture, losing the crisp char you worked for.
- Squeeze the juice of 1/2 lime over the peppers and season with salt, pepper, and more chili powder, to taste: The bright citrus acid from the lime wakes up the flavors and balances the oil and charred notes. As you squeeze, notice how the aroma brightens and the surface gains a light sheen. Tasting and adjusting seasoning at this point is crucial because heat concentrates flavors during cooking. A common oversight is under seasoning after grilling, which can leave the dish flat. Add small amounts at a time and re taste until it sings.
- Slice the mushrooms into strips and place on a serving dish: Slicing exposes the caramelized interior and releases those savory juices onto the plate, adding moisture and flavor to every bite. The texture should be tender but not mushy the edges will retain a slight chew which contrasts the softer midsection. Arrange them so the juices mingle with the peppers and onions, creating a cohesive platter. Avoid cutting while they are still too hot to handle, which can cause uneven slices and loss of juices.
- Transfer the onions and the peppers to a serving skillet or large platter: Presenting the vegetables on a warm skillet holds heat and keeps the edges slightly crisp. The combination of glossy peppers and soft onion wedges looks inviting and makes it easy for everyone to assemble tortillas. Mistakes at this stage include covering the platter, which will steam the veggies; leave them uncovered if you want to keep the char intact.
- Serve with the tortillas, guacamole, jalapeños, tomatoes, cilantro, salsa, and remaining lime wedges for serving: The final assembly is a sensory parade warm tortillas, cool creamy guacamole , vibrant cilantro , and tart lime slices. Encourage guests to build their own creations, combining textures and flavors to taste. A common serving mistake is offering everything cold, which can dull the impact of the grilled vegetables. Keep the tortillas warm and the toppings at room temperature to maintain contrast and brightness.
Helpful Hints
These compact tips are built from years of making this dish for friends and family. Each one focuses on a single tweak that improves texture, flavor, or ease of service.
- Heat management matters: Preheat the cast iron skillet until you see a faint shimmer before adding oil; this ensures immediate searing and the signature char you want.
- Batch cooking is worth it: Cook peppers in two batches if necessary to avoid steaming and to develop even caramelization on each strip.
- Marinade restraint: Use a scant coating on peppers so they maintain a snap, saving the remainder for mushrooms which absorb more flavor.
- Acid at the end: Squeeze fresh lime over the finished vegetables to brighten flavors contrast the char and lift the dish.
- Keep toppings at room temperature: Warm tortillas and room temperature salsas preserve contrast between hot veggies and cool accompaniments.
- Use tactile cues: Look for glossy peppers, softened onion layers, and meaty mushroom edges to know when each component is done.
What Goes Well With This Fajita Veggies
This dish pairs easily with many sides and occasions, making it a versatile choice for casual gatherings or weeknight dinners. Below are thoughtful serving suggestions, storage notes, and pairing ideas to help you present it beautifully.
- Serve family style: Arrange the hot vegetables on a large platter with warm tortillas on the side, and let guests assemble their own, creating an interactive meal for relaxed dinners.
- Accompaniments: Offer bowls of guacamole, pico de gallo, and tomatillo salsa so diners can mix creamy, fresh, and tangy elements onto each tortilla.
- Make it a summer spread: For outdoor lunches or backyard dinners, this recipe fits perfectly into a seasonal menu of grilled corn, a citrusy salad, and light beverages.
- Occasion tips: For casual gatherings like game nights or potlucks, keep tortillas wrapped in a towel to stay warm and provide plenty of napkins and small plates for easy passing.
- Storage and leftovers: Store cooled vegetables in an airtight container for up to three days, and reheat gently in a skillet over medium heat to restore some char and texture.
- Make ahead: You can slice the vegetables and mix the marinade the day before; toss and grill when you are ready to eat for faster assembly without losing quality.
- Seasonal pairings: In summer, choose fresh pineapple salsa for a sweet contrast, while in cooler months a tangy tomatillo salsa adds brightness and acidity.
- Diet friendly serving: Use corn tortillas and load up on veg toppings for a lighter plate, or offer both flour and corn to accommodate preferences.
- Presentation idea: Serve on a warm cast iron skillet for rustic appeal and to keep everything hot while guests assemble their tortillas.
- Make it a main or side: These veggies are hearty enough to be a main course, but they also work beautifully as a side for grilled proteins if you want to expand the meal.
FAQ
Conclusion
What makes this recipe special is its ability to transform simple vegetables into a bold, grill forward main that feels celebratory and effortless. The contrast of smoky charred edges, juicy interiors, and bright toppings makes every bite exciting. I encourage you to try it this week, invite a few friends, or keep it all to yourself for a satisfying, colorful meal. Enjoy the hands on assembly and the way fresh lime and a good salsa bring everything to life.
Fajita Veggies
Equipment
- Cast-Iron Skillet
- Grill or Grill Pan
- Small Bowl
- Tongs
Ingredients
- 3 multi-colored peppers, stemmed and sliced into strips Provide vibrant color and crisp texture when sliced into strips; release sweet, slightly smoky flavor as they char during cooking and complement other vegetables in fajitas.
- 3 portobello mushrooms, stemmed and wiped clean Add a meaty, umami-rich bite when wiped clean and sliced or torn; absorb seasonings and provide satisfying chew that mimics traditional fajita proteins.
- 1 red onion, sliced into wedges Contribute mild sweetness and a slightly sharp bite when sliced into wedges; soften and caramelize when cooked, balancing the peppers and mushrooms.
- 2 tablespoons avocado oil Coat vegetables evenly to facilitate high-heat sautéing or roasting; add a neutral, rich mouthfeel while helping spices adhere and preventing sticking.
- 2 garlic cloves, chopped Introduce aromatic pungency and depth when chopped; soften and mellow with heat, enhancing the overall savory profile of the fajita mix.
- 1/2 teaspoon chili powder, more to taste Lend warm, smoky heat; awaken other spices and bring classic fajita flavor while allowing adjustment of spiciness to personal taste.
- 1/2 teaspoon cumin Provide earthy, warm undertones and savory complexity; pair well with chili powder to create a balanced southwestern spice profile.
- 1/2 teaspoons ea salt, more to taste Season the vegetables with essential salinity; enhance and round other flavors while being easy to adjust to taste for the finished dish.
- Splash of balsamic vinegar Brighten and add a slightly sweet, acidic note when splashed over cooked vegetables; help deglaze the pan and intensify flavor layers.
- 2 limes, sliced into wedges Offer fresh acidity and a zesty finish when served as wedges; squeeze over assembled fajitas to cut richness and brighten flavors.
- Freshly ground black pepper Season with a sharp, aromatic bite; freshly ground pepper adds mild heat and complexity without overpowering the other spices.
- 8 Flour or Corn Tortillas Provide a soft, warm vehicle to hold fillings; choose flour or corn for preferred texture and authenticity when assembling fajita tacos.
- Guacamole or avocado slices squeezed with lime Add creamy richness or fresh, buttery texture when spread or sliced; a squeeze of lime prevents browning and brightens the flavor.
- Pickled Jalapeños or sliced plain jalapeños Bring tangy heat or crisp fresh kick depending on pickled or plain choice; add backbone to each bite and contrast the roasted vegetables.
- Diced tomatoes or Pico de Gallo Contribute refreshing acidity and juicy texture when added diced or as salsa; add freshness and help balance the richer components.
- Cilantro Add an herby, citrusy finish when sprinkled; provide bright green flavor that lifts the whole dish and complements lime and salsa.
- Tomatillo Salsa or Pineapple Salsa Supply vibrant tangy-spicy flavor as a condiment; either tomatillo or pineapple salsas add acidity and complexity to the fajita experience.
- Tomatillo Salsa or Pineapple Salsa Supply vibrant tangy-spicy flavor as a condiment; either tomatillo or pineapple salsas add acidity and complexity to the fajita experience.
Instructions
- Heat a grill to medium heat with a 12-inch cast-iron skillet (or grill pan) inside.: The moment the skillet hits the hot grill you will hear an eager sizzle, which tells you the pan is ready to sear. That immediate sound means the surfaces of the vegetables will caramelize instead of steaming, creating those prized charred bits that add smoky flavor. You want the grill steady at medium so the pan gets hot enough to brown without smoking excessively. A common mistake is rushing and using high heat, which can burn the exterior before the interior softens. If you are unsure, test with a drop of water it should dance and evaporate quickly. When the pan is fully heated you will see a faint shimmer across the oil when it is added, another signal that the surface is primed for quick, flavorful browning.
- Arrange the peppers on a tray and the mushrooms and onion wedges on a separate rimmed plate. In a small bowl, whisk together the avocado oil, garlic, chili powder, cumin, salt, and several grinds of pepper. Drizzle 1 scant tablespoon of the mixture over the peppers and toss to coat. Drizzle the remaining marinade over the mushrooms and onions. Drizzle the mushrooms with a splash of balsamic vinegar and use your hands to coat the mushrooms on both sides.: Handling ingredients in organized groups keeps the cooking flow smooth and prevents cross crowding on the pan. The peppers will char and collapse differently than mushrooms and onions, so keeping them separated helps you manage cook times. Tossing the peppers with a scant tablespoon of the marinade first ensures they get a light coating without becoming saturated, which preserves their snap. A common slip is overcrowding the pan, which causes the veggies to steam rather than char. Make sure each piece has room to touch the hot surface so you get browned edges and concentrated flavor.
- Grill the peppers in the cast-iron pan for 8 to 10 minutes, tossing occasionally, until charred and soft. Be careful not to overfill the pan or the veggies won’t char on the edges - cook them in 2 batches, if necessary. Grill the mushrooms and onion wedges directly on the grill for about 4 minutes per side. Remove everything from the grill, using a potholder to remove the cast-iron pan. Squeeze the juice of 1/2 lime over the peppers and season with salt, pepper, and more chili powder, to taste. Slice the mushrooms into strips and place on a serving dish. Transfer the onions and the peppers to a serving skillet or large platter.: The aroma of minced garlic and warm cumin blooming in oil is a key sensory moment the smell should be fragrant and slightly toasty. Whisking emulsifies the oil with the spices so they cling to the vegetables during cooking, helping create even seasoning pockets. Let the mixture sit for a minute to soften the garlic and let the spices hydrate, which makes them release more flavor when they hit the hot pan. One thing to avoid is adding too much salt at this stage, which can draw out excess moisture; start light and adjust at the end.
- Serve with the tortillas, guacamole, jalapeños, tomatoes, cilantro, salsa, and remaining lime wedges for serving.: As you toss, notice how the peppers take on a glossy sheen, which helps them blister and caramelize rather than sticking. The scant tablespoon gives them enough flavor without weighing them down, preserving their bright, crunchy texture. Tossing by hand ensures each strip gets an even, thin layer of seasoning, which is especially important for uniform charring. The typical error here is over marinating the peppers, which can make them limp instead of delectably charred. Keep it light and reserve the rest for the mushrooms and onions.
- Drizzle the remaining marinade over the mushrooms and onions: Mushrooms are sponges they soak up the marinade and its savory notes, and onions develop sweet, golden layers as they cook. Use your hands to ensure the marinade reaches every crevice, especially in the mushroom gills. A splash of balsamic vinegar on the mushrooms before cooking will deepen their flavor and help create a lush, caramelized surface. A common mistake is adding too much liquid, which prevents searing. Keep the coating thin and concentrated so those meaty edges can form.
- Drizzle the mushrooms with a splash of balsamic vinegar and use your hands to coat the mushrooms on both sides: The balsamic adds an acid driven sweetness that intensifies during searing, contributing sticky, savory notes. When you handle the mushrooms you should feel them become slightly tacky as they absorb the liquid, which helps the surface caramelize. This is when the smell will deepen into a roast like complexity. Avoid overworking them, which can bruise the flesh and release excess water. A light, even coat is all you need to get that deep flavor without sogginess.
- Grill the peppers in the cast iron pan for 8 to 10 minutes, tossing occasionally, until charred and soft: As the peppers hit the hot surface you will hear a lively sizzle, and after a few minutes their edges will blacken and blister. Tossing occasionally ensures multiple sides get charred without burning, and you will notice the skin collapse and the flesh become glossy and tender. Resist cooking them in a single crowded batch, because too many pieces will steam and lose that surface char. If you see lots of steam instead of sizzle, reduce the batch size and give the pan space to work properly.
- Be careful not to overfill the pan or the veggies won t char on the edges cook them in 2 batches, if necessary: Crowding is the enemy of caramelization, it traps moisture and prevents the Maillard reaction that creates rich flavors. When you cook in two batches you preserve high heat and get more consistent charring. The sense to watch for is bubbling moisture pooling in the pan if you see that, it means you have too many pieces. A typical mistake is trying to hurry by combining everything at once, which leads to limp, steamed vegetables instead of the bright, smoky pieces you want.
- Grill the mushrooms and onion wedges directly on the grill for about 4 minutes per side: Cooking the mushrooms and onions over direct grill heat imparts a smoky char and those sweet, caramelized lines on the onion wedges are a great visual cue. You will hear a pronounced sizzle when they meet the grill, and the aroma should turn deeper and more savory as the surface browns. Turn them once to get even marks and avoid excessive handling which can tear the onion layers. A common error is flipping too frequently that interrupts browning and prevents proper caramelization.
- Remove everything from the grill, using a potholder to remove the cast iron pan: When you pull the pan off, the first breath you take will be filled with concentrated grilled fragrance, a mix of char, citrus, and spices. Let the ingredients rest briefly so their juices redistribute, which keeps slices from becoming watery. Use a sturdy spatula or tongs to transfer items to a serving dish and be mindful of hot handles. The mistake to avoid is immediately covering the pan which traps steam and softens texture, losing the crisp char you worked for.
- Squeeze the juice of 1/2 lime over the peppers and season with salt, pepper, and more chili powder, to taste: The bright citrus acid from the lime wakes up the flavors and balances the oil and charred notes. As you squeeze, notice how the aroma brightens and the surface gains a light sheen. Tasting and adjusting seasoning at this point is crucial because heat concentrates flavors during cooking. A common oversight is under seasoning after grilling, which can leave the dish flat. Add small amounts at a time and re taste until it sings.
- Slice the mushrooms into strips and place on a serving dish: Slicing exposes the caramelized interior and releases those savory juices onto the plate, adding moisture and flavor to every bite. The texture should be tender but not mushy the edges will retain a slight chew which contrasts the softer midsection. Arrange them so the juices mingle with the peppers and onions, creating a cohesive platter. Avoid cutting while they are still too hot to handle, which can cause uneven slices and loss of juices.
- Transfer the onions and the peppers to a serving skillet or large platter: Presenting the vegetables on a warm skillet holds heat and keeps the edges slightly crisp. The combination of glossy peppers and soft onion wedges looks inviting and makes it easy for everyone to assemble tortillas. Mistakes at this stage include covering the platter, which will steam the veggies; leave them uncovered if you want to keep the char intact.
- Serve with the tortillas, guacamole, jalapeños, tomatoes, cilantro, salsa, and remaining lime wedges for serving: The final assembly is a sensory parade warm tortillas, cool creamy guacamole , vibrant cilantro , and tart lime slices. Encourage guests to build their own creations, combining textures and flavors to taste. A common serving mistake is offering everything cold, which can dull the impact of the grilled vegetables. Keep the tortillas warm and the toppings at room temperature to maintain contrast and brightness.
Notes
- Heat management matters: Preheat the cast iron skillet until you see a faint shimmer before adding oil; this ensures immediate searing and the signature char you want.
- Batch cooking is worth it: Cook peppers in two batches if necessary to avoid steaming and to develop even caramelization on each strip.
- Marinade restraint: Use a scant coating on peppers so they maintain a snap, saving the remainder for mushrooms which absorb more flavor.
- Acid at the end: Squeeze fresh lime over the finished vegetables to brighten flavors contrast the char and lift the dish.
- Keep toppings at room temperature: Warm tortillas and room temperature salsas preserve contrast between hot veggies and cool accompaniments.
- Use tactile cues: Look for glossy peppers, softened onion layers, and meaty mushroom edges to know when each component is done.