Easy Chicken Satay Recipe
Easy Chicken Satay Recipe has been one of those dishes I reach for when I want something that tastes like a weekend cookout but comes together with weekday speed and comfort. The first time I made it, I brought a tray to a neighborhood picnic and watched people circle the platter, drawn by the smoky grill notes and that irresistible peanut finish. I remember juggling skewers, napkins, and conversation, and feeling proud that a simple mix of aromatic spices and a quick marinade could create such a happy scene.
Over the years I’ve tamed and tuned this dish to fit small dinners and larger gatherings alike. I like to think of it as friendly party food that also behaves like a reliable weeknight winner, because the prep is straightforward and the flavors are bold without being fussy. When I teach friends, I emphasize easy swaps that keep the soul of the dish intact, while helping them avoid small mistakes that can send sugar or soy into flames on a hot grill. Every time I serve Easy Chicken Satay Recipe, someone asks for the recipe, which is always a compliment I happily accept.
Recipe Snapshot
28 mins
20 mins
8 mins
Medium
300 kcal
Asian
Gluten-Free, Keto
Dinner
Food processor or blender, Grill or grill pan, Wooden or metal skewers, Large bowl
Why This Easy Chicken Satay Recipe Hits Different
1. Bright, layered flavors
I love how the mix of ground coriander, cumin, turmeric, fresh ginger, garlic, and lime juice creates an exotic but approachable profile. The marinade gives depth without dominating the chicken, so every bite is balanced and inviting.
2. Speed and make ahead flexibility
This recipe plays well with time, because you can marinate for as little as four hours or overnight for extra flavor. I often prepare the marinade in the morning and let the flavors develop while I handle the rest of my day. It transforms last minute hosting from chaotic to manageable.
3. Textural contrast
The quick char from high heat grilling delivers caramelized edges while the interior stays tender. Paired with a creamy peanut sauce, the contrast between crisped exterior and juicy chicken is one of my favorite parts of serving this dish.
4. Crowd friendly and versatile
I find Easy Chicken Satay Recipe works for picnics, casual dinners, and festive gatherings. It holds well for short periods under a low oven, and guests love picking up skewers, which makes it an effortless option when you want to mingle instead of plate.
5. Minimal equipment, maximum impact
All you really need is a blender or food processor for the marinade and a grill or hot pan to cook. That simplicity is why I keep this in my repertoire; big flavor does not require complicated tools.
Shopping List for Easy Chicken Satay Recipe
These ingredients sing together because they each play a clear role. The aromatics like shallot, garlic, and ginger build the savory backbone, while citrus and sugar add the sweet acid lift. Spices such as ground coriander and cumin provide warmth and an earthy counterpoint, and the sauces deliver umami and caramelization on the grill.
- 1 peeled shallot: Provide a mild, sweet oniony base that softens when cooked and helps meld aromatics into the marinade and sauce, enhancing overall depth and balance.
- 4 garlic cloves: Add pungent, savory flavor and aromatic warmth that intensifies during cooking and supports the marinade's savory backbone for the chicken.
- 2 teaspoons ground coriander: Deliver citrusy, slightly floral warmth that complements the other spices and helps create an authentically Southeast Asian satay spice profile in the marinade.
- 1 teaspoon ground cumin: Contribute earthy, warm notes that round out the spice blend and enhance the savory complexity of both the chicken and the accompanying sauce.
- 1/2 teaspoon ground turmeric: Impart a mild, earthy bitterness and bright color while adding a subtle warmth that complements the coriander and cumin in the marinade.
- 2 tablespoons palm or brown sugar: Provide caramelized sweetness and a hint of molasses that balances salty and spicy elements, helping to create a well-rounded and slightly sticky glaze when grilled.
- 1 seeded red finger, Fresno, or jalapeño pepper: Bring fresh heat and a bright, fruity chili flavor that can be adjusted for spiciness; seeds removed for less heat or kept for more kick in the marinade.
- 1 ” piece peeled fresh ginger: Offer sharp, peppery aromatic warmth with a citrusy finish that brightens the marinade and pairs well with garlic and lime for a lively flavor profile.
- juice of 1 lime: Add bright acidity that cuts through richness, helps tenderize the chicken, and lifts flavors to create a balanced and zesty finish in the marinade.
- 2 tablespoons peanut oil: Provide a neutral, high-heat oil that carries flavors, aids in cooking and browning, and helps the marinade adhere to the chicken for even grilling.
- 2 tablespoons soy sauce: Contribute salty, umami richness and depth that enhances savory notes, balances sweetness, and helps create a complex, flavorful marinade.
- 1/4 cups sweet soy sauce, kecap manis: Introduce thick, syrupy sweetness with molasses undertones that adds body and caramelization potential, reinforcing the sweet-savory balance of the dish.
- 3 pounds dark and/or white chicken meat cut into 1/2” pieces: Supply lean protein that absorbs the marinade flavors and offers tender, juicy meat when cooked; choose dark or white meat based on preferred richness and texture.
- 1/2 recipe for peanut sauce: Complement the grilled chicken by adding a creamy, nutty, and slightly sweet sauce component that ties together spices and provides dipping richness.
How to Cook Easy Chicken Satay Recipe

Cooking these skewers is straightforward but rewarding. A little attention to heat and timing will return perfectly caramelized edges and juicy interiors. Below, I expand each direction into deep, sensory forward guidance so you can feel confident at every step.
- Add everything except for the chicken to a food processor or a blender and process or blend until smooth. Set aside.: The moment you start processing, you will smell the bright citrus from the lime and the pungent warmth of garlic and ginger , which signals the marinade is coming together. The sound of the blender will change as the mixture becomes homogeneous, shifting from clattering chunks to a steady hum. This texture matters because a smooth marinade clings to each piece of chicken , infusing flavor uniformly; bits wind up burning on the grill and create uneven char if left too coarse. If the mixture feels too thick, a teaspoon of water or additional peanut oil can help it move through the blades. Avoid over processing for more than a minute, since heat from high speed can dull fresh aromatics and make the mixture too thin, which reduces adherence to the meat.
- Prepare the chicken removing any skin or bones and cut into small 1/2” pieces and add to a large bowl.: When you work the chicken , you want consistent pieces so each skewer cooks evenly. As you slice, notice the texture change from firm raw flesh to neatly trimmed bites; uniformity prevents some pieces from drying while others finish. Placing the cut chicken into a large bowl gives you room to toss and coat without spilling. A common mistake is leaving uneven sizes which leads to undercooked centers or overly charred edges, so take the time to pare pieces down to similar thickness. Patting the pieces dry with a paper towel before adding them to the bowl helps the marinade adhere without diluting it.
- Add the marinade onto the chicken and optionally season with salt and pepper. Mix everything together completely. Cover and keep in the refrigerator for at least 4 hours or up to 24 hours.: As the marinade touches the chicken , it releases a fresh burst of aroma, the citrus brightening the spices and the sweet soy bringing almost caramel notes. Use tongs or a sturdy spoon to fold the mixture so every piece is coated. The salt in the soy sauce seasons through and helps proteins denature slightly, promoting tenderness and deeper flavor penetration. Covering the bowl and refrigerating for at least four hours, ideally overnight, lets the spices mellow and the chicken absorb the marinade’s complexity. Avoid skimping on time if you can, because brief contact yields surface flavor only, while longer marination delivers a richer bite.
- When you are ready to cook, preheat the grill to high heat (450° to 550°) and soak some wooden skewers in water for 20 minutes, so they do not catch on fire while grilling.: As you combine, you will see the marinade glaze the chicken with a glossy sheen, which is a good visual indicator that the pieces are ready to rest. The tactile feel changes from dry to slick, and that surface coating will caramelize beautifully on high heat. Thorough mixing ensures spices are evenly dispersed, so every skewer tastes the same. A common pitfall is mixing too roughly and bruising the meat; treat the pieces with enough motion to coat but not so much that texture is compromised.
- Next, skewer the chicken leaving about 3” at the bottom of the skewer to make it easy to hold and eat. I got 12 8” skewers.: During refrigeration, the marinade works slowly, and aromas deepen as the lime and spices interact with the chicken . You may notice a subtle mellowing of raw edge flavors and an integration that will read as more rounded on the palate after cooking. Refrigeration also helps firm the meat slightly, making it easier to thread on skewers later. Avoid leaving the chicken out at room temperature for extended periods, which risks bacterial growth; stick to the four hour minimum or refrigerate longer for best results.
- Place the chicken on the grill and cook for 3-4 minutes per side or until browned and cooked throughout.: A hot grill is essential because the intense heat triggers caramelization and Maillard reactions that give the skewers that smoky, slightly charred edge. Soaking wooden skewers prevents them from scorching or igniting while you cook. You should hear a confident sizzle when the chicken hits the grate, which means juices are sealing and the surface will brown. If your grill is too cool, the meat will slowly dry rather than sear, so resist the temptation to use medium heat for speed; the result will lack that signature char. For indoor cooking, a preheated grill pan or cast iron skillet is a good stand in.
- Optionally garnish with chopped fresh cilantro and serve with peanut sauce.: Threading the chicken onto skewers gives you control and creates those handheld bites everyone loves. Leave space at the bottom so guests can hold them without touching hot meat. Arrange pieces tightly enough to cook evenly but not so tightly that heat cannot circulate; slightly spaced pieces cook more uniformly. A slip here is uneven threading, which causes some pieces to be overexposed and others undercooked. If using metal skewers, be aware they conduct heat and the handle can get hot, so protect fingers with a towel or hold farther from the tip.
- I got 12 8” skewers: This is a practical yield for the ingredient amounts, and visual cues like the number of skewers help you plan servings. Distributing the chicken across multiple skewers prevents crowding and promotes even browning. As you place them on the grill, arrange so there is space between skewers for air and smoke to circulate; this enhances flavor. Avoid piling skewers on top of each other, which will trap steam and prevent crisping.
- Place the chicken on the grill and cook for 3-4 minutes per side or until browned and cooked throughout: Listen for the satisfying sizzle that announces caramelization, and watch for golden brown to dark mahogany edges as the sugars and soy darken. The aroma will shift from raw spice to nutty, smoky notes. Flip carefully to develop even char on each side, and test doneness by ensuring juices run clear and the meat feels springy. A common error is overcooking which will yield dry bites; remove from heat promptly when centers reach done and let rest briefly before serving so juices redistribute.
- Optionally garnish with chopped fresh cilantro and serve with peanut sauce: The final garnish brightens the plate and the peanut sauce adds creaminess and a sweet salty contrast. When you spoon the sauce, notice the way it coats the chicken and how the salty sweet elements amplify the char. If you skip the garnish, the skewers remain delicious, but herbs add freshness. Watch out for heavy saucing too early, which can soften char and mask crisp edges; serve the sauce on the side for dipping if you prefer to keep textures distinct.
Tips and Variations

I like to offer a few ways to adapt this recipe while keeping the core flavors intact. These tips focus on timing, texture, and small switches that make a big difference.
- Make ahead strategy Save time by blending the marinade earlier in the day and refrigerating it separately. When you are ready, toss with the chicken so you do not have to rush marinade prep during hosting.
- Control the heat If you are worried about flare ups from the sweet soy and sugar, grill over a two zone fire and move skewers away from direct flame when caramelization is achieved.
- Skewer choices Soak wooden skewers to prevent burning, or use metal skewers if you prefer reusable tools; metal heats up faster, so handle with caution.
- Textural tweak For slightly crispier edges, finish briefly over the hottest part of the grill for thirty to sixty seconds per side, watching carefully so sugars do not burn.
- Serving sauce thickness Adjust the peanut sauce with warm water to thin for dipping or keep it thicker for drizzling over plated skewers.
- Adjusting sweetness If you do not have sweet soy sauce, increase regular soy and sugar proportionally to mimic the deep sweetness of kecap manis, tasting as you go.
- Indoor cooking option Use a hot cast iron pan or grill pan and press gently for char marks if you do not have an outdoor grill, keeping oil to a minimum to avoid splatter.
Serving This Easy Chicken Satay Recipe
This dish is naturally social and pairs well with simple sides that complement its savory sweet profile. Below are serving ideas that cover occasions from casual lunches to festive dinners, along with storage suggestions to keep leftovers fresh.
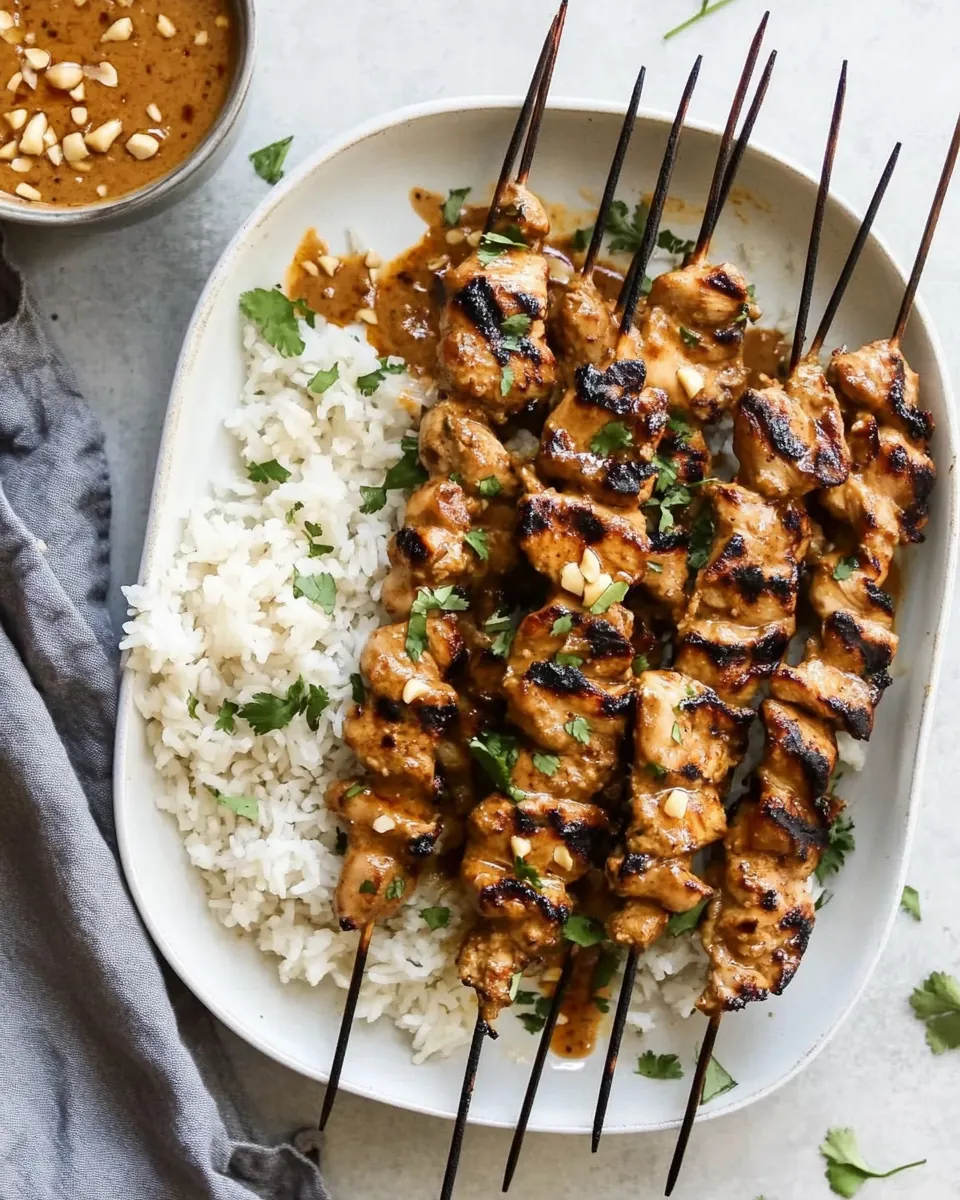
- Family dinner Serve skewers alongside steamed rice and sliced cucumbers to balance richness and provide a crisp, cooling contrast.
- Party platter Arrange skewers on a large board with small bowls of peanut sauce for dipping and little piles of chopped herbs for guests to garnish as they like.
- Ramadan or festive meals Offer skewers as a shareable protein with fragrant rice and a light salad so guests can pick and choose portions easily during gatherings.
- Picnic friendly Keep the sauce in a sealed container and serve at room temperature, placing skewers on parchment so they are easy to transport and eat.
- Storage tips Cool skewers to room temperature, then refrigerate covered up to four days, or freeze for up to three months; thaw overnight in the refrigerator before reheating gently.
- Reheating Warm in a 350° oven for six to eight minutes covered, or quickly sear in a pan to refresh char without drying the interior.
- Seasonal pairing In summer, pair with crisp salads and grilled vegetables, while in cooler months I like to serve skewers with warm pilafs or roasted root sides for comfort.
FAQ
Conclusion
What makes this recipe special is its brilliant balance of bright citrus, warm spices, and sweet umami that yields juicy, caramelized skewers every time. I encourage you to give the Easy Chicken Satay Recipe a try this week, whether for a casual family meal or a gathering where people can graze and chat. It’s forgiving, adaptable, and delivers big flavor with modest effort, so you can focus on the company rather than fussing in the kitchen. Enjoy the process of making it your own, and savor those little moments when everyone reaches for another skewer.

Easy Chicken Satay Recipe
Equipment
- Food processor or blender
- Grill or Grill Pan
- Wooden or metal skewers
- Large Bowl
Ingredients
- 1 peeled shallot Provide a mild, sweet oniony base that softens when cooked and helps meld aromatics into the marinade and sauce, enhancing overall depth and balance.
- 4 garlic cloves Add pungent, savory flavor and aromatic warmth that intensifies during cooking and supports the marinade's savory backbone for the chicken.
- 2 teaspoons ground coriander Deliver citrusy, slightly floral warmth that complements the other spices and helps create an authentically Southeast Asian satay spice profile in the marinade.
- 1 teaspoon ground cumin Contribute earthy, warm notes that round out the spice blend and enhance the savory complexity of both the chicken and the accompanying sauce.
- 1/2 teaspoon ground turmeric Impart a mild, earthy bitterness and bright color while adding a subtle warmth that complements the coriander and cumin in the marinade.
- 2 tablespoons palm or brown sugar Provide caramelized sweetness and a hint of molasses that balances salty and spicy elements, helping to create a well-rounded and slightly sticky glaze when grilled.
- 1 seeded red finger, Fresno, or jalapeño pepper Bring fresh heat and a bright, fruity chili flavor that can be adjusted for spiciness; seeds removed for less heat or kept for more kick in the marinade.
- 1 ” piece peeled fresh ginger Offer sharp, peppery aromatic warmth with a citrusy finish that brightens the marinade and pairs well with garlic and lime for a lively flavor profile.
- juice of 1 lime Add bright acidity that cuts through richness, helps tenderize the chicken, and lifts flavors to create a balanced and zesty finish in the marinade.
- 2 tablespoons peanut oil Provide a neutral, high-heat oil that carries flavors, aids in cooking and browning, and helps the marinade adhere to the chicken for even grilling.
- 2 tablespoons soy sauce Contribute salty, umami richness and depth that enhances savory notes, balances sweetness, and helps create a complex, flavorful marinade.
- 1/4 cups sweet soy sauce, kecap manis Introduce thick, syrupy sweetness with molasses undertones that adds body and caramelization potential, reinforcing the sweet-savory balance of the dish.
- 3 pounds dark and/or white chicken meat cut into 1/2” pieces Supply lean protein that absorbs the marinade flavors and offers tender, juicy meat when cooked; choose dark or white meat based on preferred richness and texture.
- 1/2 recipe for peanut sauce Complement the grilled chicken by adding a creamy, nutty, and slightly sweet sauce component that ties together spices and provides dipping richness.
Instructions
- Add everything except for the chicken to a food processor or a blender and process or blend until smooth. Set aside.: The moment you start processing, you will smell the bright citrus from the lime and the pungent warmth of garlic and ginger , which signals the marinade is coming together. The sound of the blender will change as the mixture becomes homogeneous, shifting from clattering chunks to a steady hum. This texture matters because a smooth marinade clings to each piece of chicken , infusing flavor uniformly; bits wind up burning on the grill and create uneven char if left too coarse. If the mixture feels too thick, a teaspoon of water or additional peanut oil can help it move through the blades. Avoid over processing for more than a minute, since heat from high speed can dull fresh aromatics and make the mixture too thin, which reduces adherence to the meat.
- Prepare the chicken removing any skin or bones and cut into small 1/2” pieces and add to a large bowl.: When you work the chicken , you want consistent pieces so each skewer cooks evenly. As you slice, notice the texture change from firm raw flesh to neatly trimmed bites; uniformity prevents some pieces from drying while others finish. Placing the cut chicken into a large bowl gives you room to toss and coat without spilling. A common mistake is leaving uneven sizes which leads to undercooked centers or overly charred edges, so take the time to pare pieces down to similar thickness. Patting the pieces dry with a paper towel before adding them to the bowl helps the marinade adhere without diluting it.
- Add the marinade onto the chicken and optionally season with salt and pepper. Mix everything together completely. Cover and keep in the refrigerator for at least 4 hours or up to 24 hours.: As the marinade touches the chicken , it releases a fresh burst of aroma, the citrus brightening the spices and the sweet soy bringing almost caramel notes. Use tongs or a sturdy spoon to fold the mixture so every piece is coated. The salt in the soy sauce seasons through and helps proteins denature slightly, promoting tenderness and deeper flavor penetration. Covering the bowl and refrigerating for at least four hours, ideally overnight, lets the spices mellow and the chicken absorb the marinade’s complexity. Avoid skimping on time if you can, because brief contact yields surface flavor only, while longer marination delivers a richer bite.
- When you are ready to cook, preheat the grill to high heat (450° to 550°) and soak some wooden skewers in water for 20 minutes, so they do not catch on fire while grilling.: As you combine, you will see the marinade glaze the chicken with a glossy sheen, which is a good visual indicator that the pieces are ready to rest. The tactile feel changes from dry to slick, and that surface coating will caramelize beautifully on high heat. Thorough mixing ensures spices are evenly dispersed, so every skewer tastes the same. A common pitfall is mixing too roughly and bruising the meat; treat the pieces with enough motion to coat but not so much that texture is compromised.
- Next, skewer the chicken leaving about 3” at the bottom of the skewer to make it easy to hold and eat. I got 12 8” skewers.: During refrigeration, the marinade works slowly, and aromas deepen as the lime and spices interact with the chicken . You may notice a subtle mellowing of raw edge flavors and an integration that will read as more rounded on the palate after cooking. Refrigeration also helps firm the meat slightly, making it easier to thread on skewers later. Avoid leaving the chicken out at room temperature for extended periods, which risks bacterial growth; stick to the four hour minimum or refrigerate longer for best results.
- Place the chicken on the grill and cook for 3-4 minutes per side or until browned and cooked throughout.: A hot grill is essential because the intense heat triggers caramelization and Maillard reactions that give the skewers that smoky, slightly charred edge. Soaking wooden skewers prevents them from scorching or igniting while you cook. You should hear a confident sizzle when the chicken hits the grate, which means juices are sealing and the surface will brown. If your grill is too cool, the meat will slowly dry rather than sear, so resist the temptation to use medium heat for speed; the result will lack that signature char. For indoor cooking, a preheated grill pan or cast iron skillet is a good stand in.
- Optionally garnish with chopped fresh cilantro and serve with peanut sauce.: Threading the chicken onto skewers gives you control and creates those handheld bites everyone loves. Leave space at the bottom so guests can hold them without touching hot meat. Arrange pieces tightly enough to cook evenly but not so tightly that heat cannot circulate; slightly spaced pieces cook more uniformly. A slip here is uneven threading, which causes some pieces to be overexposed and others undercooked. If using metal skewers, be aware they conduct heat and the handle can get hot, so protect fingers with a towel or hold farther from the tip.
- I got 12 8” skewers: This is a practical yield for the ingredient amounts, and visual cues like the number of skewers help you plan servings. Distributing the chicken across multiple skewers prevents crowding and promotes even browning. As you place them on the grill, arrange so there is space between skewers for air and smoke to circulate; this enhances flavor. Avoid piling skewers on top of each other, which will trap steam and prevent crisping.
- Place the chicken on the grill and cook for 3-4 minutes per side or until browned and cooked throughout: Listen for the satisfying sizzle that announces caramelization, and watch for golden brown to dark mahogany edges as the sugars and soy darken. The aroma will shift from raw spice to nutty, smoky notes. Flip carefully to develop even char on each side, and test doneness by ensuring juices run clear and the meat feels springy. A common error is overcooking which will yield dry bites; remove from heat promptly when centers reach done and let rest briefly before serving so juices redistribute.
- Optionally garnish with chopped fresh cilantro and serve with peanut sauce: The final garnish brightens the plate and the peanut sauce adds creaminess and a sweet salty contrast. When you spoon the sauce, notice the way it coats the chicken and how the salty sweet elements amplify the char. If you skip the garnish, the skewers remain delicious, but herbs add freshness. Watch out for heavy saucing too early, which can soften char and mask crisp edges; serve the sauce on the side for dipping if you prefer to keep textures distinct.
Notes
- Make ahead strategy Save time by blending the marinade earlier in the day and refrigerating it separately. When you are ready, toss with the chicken so you do not have to rush marinade prep during hosting.
- Control the heat If you are worried about flare ups from the sweet soy and sugar, grill over a two zone fire and move skewers away from direct flame when caramelization is achieved.
- Skewer choices Soak wooden skewers to prevent burning, or use metal skewers if you prefer reusable tools; metal heats up faster, so handle with caution.
- Textural tweak For slightly crispier edges, finish briefly over the hottest part of the grill for thirty to sixty seconds per side, watching carefully so sugars do not burn.
- Serving sauce thickness Adjust the peanut sauce with warm water to thin for dipping or keep it thicker for drizzling over plated skewers.
- Adjusting sweetness If you do not have sweet soy sauce, increase regular soy and sugar proportionally to mimic the deep sweetness of kecap manis, tasting as you go.
- Indoor cooking option Use a hot cast iron pan or grill pan and press gently for char marks if you do not have an outdoor grill, keeping oil to a minimum to avoid splatter.