Easter Cupcakes
Easter Cupcakes have been my go to when I want something playful and bright to share at family gatherings. The first sentence alone lets you know this is a recipe tied to memories from hopping between a sunlit kitchen and a living room full of cousins. I remember the flour dust on my forearms and the way the kitchen filled with a gentle, warm sweetness as the cupcakes baked, voices drifting in from the yard while I fiddled with tiny pastel eggs for the tops.
There was one year when a last minute storm forced us inside, and I set about turning a simple batter into a comforting ritual. I stirred the batter slowly, feeling the change from gritty sugar to smooth silk under the whisk, and I loved how the buttercream came together like a secret reward. The frosting took patience, and I chatted with my aunt as we piped each swirl, comparing tips about color and texture. The kids thought the sprinkles and eggs were the best part, but I found joy in the quiet details, like the gentle snap when the mini eggs met the frosting. That afternoon taught me why small, thoughtful touches matter more than elaborate decorations.
Recipe Snapshot
33 mins
15 mins
18 mins
Hard
350 kcal
American
Gluten-Free, Low FODMAP
Desserts
Stand mixer, Whisk attachment, Paddle attachment, 12 hole cupcake pan, Cupcake liners, Wire cooling rack, Saucepan, Piping bag, Star nozzle
What’s Great About This Easter Cupcakes
Perfect for festive gatherings
I love these cupcakes because they scale beautifully for parties and still feel homemade. When you bring a tray of Easter Cupcakes to a table, people smile before they taste them. The look sets expectations, and the tender crumb and silky frosting keep everyone coming back for seconds. I find that the visual delight often starts conversations and makes the dessert feel like the event centerpiece.
Texture contrast that sings
The balance between a soft cupcake interior and the airy Swiss meringue buttercream is where this recipe shines. I pay attention to the beat and the fold so the crumb stays moist while the frosting remains light and stable. That contrast is why I keep this recipe in my rotation, it offers that pleasing softness against a cloud like frosting that melts on the tongue.
Hands on, forgiving technique
Working through the buttercream teaches patience, and the process rewards small adjustments. I often tell friends that the method feels fancy but is surprisingly forgiving. If the buttercream looks split, it is almost always salvageable by continuing to beat and warming slightly. That reliability makes me recommend this recipe to bakers who want to build confidence without risking disaster.
Customizable celebration canvas
These cupcakes are a blank slate for creativity. I like to tint the buttercream with a gentle color and add speckled cocoa for a rustic look, while others might use sprinkles or edible glitter. I’ve seen them dressed up for spring baby showers or kept simple for a cozy dessert after Sunday dinner. That adaptability is why I reach for this recipe for different occasions.
Kid friendly and interactive
Everyone from toddlers to grandparents can help, whether it is filling liners or placing the mini eggs on top. I enjoy how sharing the work becomes part of the memory, and it’s a sweet way to involve kids in the kitchen. The recipe’s steps are clear enough that helpers feel useful, and the end result keeps smiles wide.
Everything You Need for Easter Cupcakes
These ingredients come together to create a classic cupcake with a light, tender crumb and a cloud like Swiss meringue buttercream. The batter is anchored by the all purpose flour and leavened with baking powder, while the combination of softened unsalted butter and white granulated sugar creates a delicate structure and sweetness. The buttercream relies on gently cooked egg whites and more unsalted butter for that silky texture, and tiny accents like cocoa powder and mini Easter eggs add visual contrast and festive charm.
- 3/4 cup unsalted butter softened at room temperature: Creamed to provide tenderness and richness, softened unsalted butter contributes moisture and a fine crumb to the cupcake batter. Use at room temperature to ensure even incorporation with sugar and to trap air for lift. Balance sweetness and support the structure during baking.
- 3/4 cup white granulated sugar: Beaten with butter until light and fluffy, white granulated sugar adds sweetness and helps create a tender, airy texture. Dissolves into the fat to assist creaming and caramelizes slightly for flavor during baking. Controls browning and balances other flavors.
- 2 large eggs: Whisked in to bind and add moisture, large eggs contribute structure and stability through coagulation of proteins. Provide leavening support and help emulsify fat and liquid for a smooth batter. Promote a soft yet sturdy crumb that holds fillings or frostings.
- 2 teaspoons vanilla extract: Stirred into the batter to enhance aroma, vanilla extract amplifies sweetness and rounds out flavors without adding moisture. Use measured teaspoons to maintain balance with other flavorings and avoid overpowering delicate notes. Complements butter and egg flavors for a classic cupcake taste.
- 1 cup all-purpose flour: Sifted and folded gently to form the dry base, all-purpose flour supplies the gluten needed for structure and chew. Measure carefully to avoid dense cupcakes; overmixing can develop excess gluten and toughen the crumb. Works with leaveners to create the desired rise.
- 1 1/4 teaspoons baking powder: Leavened into the dry mix to introduce chemical lift, baking powder releases carbon dioxide when heated and reacts with moisture. Use precise amounts to ensure proper rise without a metallic aftertaste. Balances batter density and helps create a light, tender cupcake.
- pinch salt: Added sparingly to balance flavor, a pinch of salt enhances sweetness and rounds out the overall taste profile. Strengthens gluten slightly and improves the perception of other ingredients. Prevents flat or cloying flavors by providing contrast.
- 1 tablespoon milk: Mixed in to adjust batter consistency, milk adds necessary liquid for hydration and helps dissolve sugar and leavening agents. Contributes tenderness and a finer crumb when combined with fat and eggs. Use at room temperature to integrate smoothly.
- 3/4 cup egg whites: Folded in carefully to add volume without yolk richness, egg whites lighten the texture and contribute lift when aerated. Provide protein structure that stabilizes the cupcake crumb while keeping flavors delicate. Help create an airy, soft interior.
- 1 cup white granulated sugar: Whisked into egg whites or butter for sweetness, white granulated sugar helps stabilize aeration and sweeten both the cake and any meringue-like components. Dissolves to create a smooth texture and promotes gentle browning. Balances acidity and enriches flavor.
- 2 1/4 cups unsalted butter softened at room temperature and cut into cubes: Beaten to create a rich, creamy frosting base, unsalted butter softened at room temperature and cut into cubes ensures smooth, lump-free creaming. Cubing facilitates even whipping and aeration, producing a stable, spreadable buttercream. Provides structure, richness, and flavor for decorating.
- 2 teaspoons vanilla extract: Blended into frosting for flavor depth, vanilla extract enhances sweetness and harmonizes other flavors in the buttercream. Use consistent measurement to maintain a balanced aroma across all cupcakes. Imparts a familiar, comforting note that complements colored or chocolate elements.
- drop teal food coloring: Tinted sparingly to achieve a delicate hue, a drop of teal food coloring provides visual appeal for decorative frosting sections. Use a small amount and mix thoroughly to avoid streaking or strong artificial flavor perception. Helps create festive, thematic presentation without affecting texture.
- 1 teaspoon cocoa powder: Sprinkled or lightly dusted to add a hint of chocolate flavor and color contrast, cocoa powder intensifies visual interest and flavor complexity in small amounts. Sift into frosting or batter to prevent lumps and ensure even distribution. Balances sweetness with a subtle bitter note.
- 1 tablespoon vanilla extract: Added for concentrated vanilla flavor, a tablespoon of vanilla extract gives a pronounced aromatic boost to frostings or fillings. Enhances overall sweetness perception and rounds out buttery notes for a more complex taste. Use measured amounts to avoid overpowering other delicate flavors.
- 36 mini Easter eggs: Placed as decorative toppers to provide crunchy texture and festive presentation, 36 mini Easter eggs finish the cupcakes with color and bite. Space evenly to ensure each cupcake receives uniform decoration and appeal. Offer a sweet, candy-enhanced contrast to the soft cake and frosting.
Easter Cupcakes Instructions
I find that making these cupcakes is a relaxed, rhythmic process that rewards attention to texture and timing. Start by setting up your equipment and ingredients so nothing surprises you mid bake. The steps below follow the original method, rewritten to give sensory cues and troubleshooting notes so you can feel confident at each stage.
- Preheat the oven to 350 degrees Fahrenheit. Add 12 cupcake liners to a 12-hole cupcake pan.: You will notice the air in the oven warming and the edges of the liners smoothing as the oven reaches temperature, that initial heat ensures even lift from the moment the batter hits the pan. If you skip preheating, cupcakes can bake unevenly and domes may not form properly. A common mistake is placing the pan in a not fully heated oven, which causes slow rise and denser texture, so wait until the oven signals it is ready.
- Combine the soft butter and sugar in a large mixing bowl with a stand mixer with whisk attachment until light and fluffy.: As you cream unsalted butter with white granulated sugar , the mixture will transform from pale and creamy to visibly lighter and aerated, with tiny sugar crystals softening the fat. This step creates air pockets that lead to a tender crumb, you should hear a quiet whir and see a ribbon like trail when the paddle lifts. Over beating can heat the butter and make it too soft, so stop when it looks pale and billowy.
- Add the eggs, vanilla and beat until the mixture is voluminous.: When you add the large eggs and vanilla extract , the batter will loosen and become glossy, with the mixer producing a gentle, smooth sound. Adding eggs one at a time keeps the emulsion stable and prevents curdling, which would show as a separated, greasy mixture. If the batter appears broken, adding a small spoonful of flour and mixing briefly can help rebind it.
- In a separate bowl mix together the flour, baking powder and salt then add it to the bowl with creamed butter. Use a spatula to gently fold it into the batter.: The dry ingredients will smell faintly of wheat and baking powder, and folding them preserves the aeration from earlier steps. Use a gentle motion, scraping the bowl sides, and fold until streaks disappear, stopping before over mixing. Over working develops gluten and yields denser cupcakes, so fold just until combined.
- Pour the milk into the bowl with batter and fold until combined.: Adding the milk lightens the batter and makes it smooth; you will see it loosen into a glossy, spoonable consistency. The batter should fall slowly from the spatula in a thick ribbon. If it seems too stiff, a touch more milk will help, but add in small amounts to avoid making the batter too loose.
- Divide the cupcake batter between the 12 cupcake liners filling them 2/3 full.: As you spoon the batter, it should settle in each liner with a gentle mound that levels during baking. Filling to two thirds gives room for rise without overflow. Over filling is a frequent error that produces spilled tops and uneven baking, so measure or use an ice cream scoop for consistent portions.
- Bake in the center of the preheated oven for 18 minutes or until the cupcakes have risen and are a pale golden brown color. When properly baked, they will feel springy to the touch.: During baking you will smell a warm, sweet aroma and see the tops puff and blush into a pale gold. The edges will set and the centers spring back when gently touched. If the cupcakes are still wet in the center or sink after cooling, the oven temperature may be off or they were underbaked, so test with a toothpick if unsure.
- Remove from the oven and transfer to a wire cooling rack.: Moving the pan to a rack stops the baking and prevents soggy bottoms by allowing air to circulate under the liners. The cupcakes will cool and the structure will firm. Leaving them in a hot pan continues cooking, which can dry them out, so transfer promptly but carefully to avoid jostling the tops while warm.
- Fill a saucepan with a couple of inches of water and bring it to a simmer. Put the egg whites and sugar into the bowl of a stand mixer and set it over the simmering pan. Do not let the bottom of the bowl touch the water or the egg whites will scramble.: Heating the egg whites and white granulated sugar over simmering water dissolves the sugar without scrambling proteins, and you will see the mixture steam gently. The bowl should be warm to the touch but not hot. Touching the bottom of the bowl to water is a common risk that cooks the eggs, so keep the bowl elevated and maintain a gentle simmer.
- Use a handheld whisk to beat continuously for 4-5 minutes. The mixture will look frothy. Dip your finger into the mixture and feel it between your fingers. If you can feel any grain keep heating and mixing until you can feel the mixture is smooth and slippery. This means the sugar has dissolved.: As you whisk, the egg whites will change from translucent to a foamy, satin texture and the sugar will melt away. The fingertip test is crucial; gritty sugar ruins the meringue stability later. If grains remain, continue whisking over the heat in short bursts until smooth, patience here makes the final buttercream glossy and stable.
- Add the bowl to the stand mixer fitted with the whisk attachment. Whisk on a medium-high speed until the egg whites reach stiff peaks. This will take at least 10 minutes but sometimes longer.: The mixer will sing as the meringue gains volume and becomes glossy, forming peaks that hold their shape. At this stage the aroma is neutral and the mixture is cool. Rushing this step can leave soft peaks that will not support the butter, so whisk until firm peaks form.
- When the egg whites are at stiff peaks feel the outside of the bowl. It should be cool by now but if it isn’t put the whole bowl into the fridge for 10 minutes.: The bowl cooling shows the meringue has released heat; warm meringue can melt butter later. Chilling briefly if still warm prevents a runny buttercream. Avoid freezing, which can make the meringue weep, and only chill a short time if necessary.
- Swap the whisk attachment for the paddle attachment.: Changing to the paddle lets you incorporate the unsalted butter without over emulsifying, the paddle works the butter into a silky texture. Make sure the bowl and attachments are clean and dry to maintain stability. Using the whisk instead can whip too much air into the buttercream creating a foamy texture, so switch tools as directed.
- When the outside of the bowl is cool, add the butter a tbsp at a time. Beat on high speed fully incorporating each addition of butter until all the butter has been added.: Adding cubed unsalted butter gradually lets it emulsify into the meringue, and you will hear the mixer change from a high pitched whir to a deeper, smoother sound as texture becomes silky. Each addition should vanish into the mixture before the next goes in. If additions are too large, the buttercream can separate, so patience is key.
- At this point the mixture will look split. Do not panic! Add the vanilla extract and keep the mixer running until the mixture comes together into a silky smooth Swiss meringue buttercream.: A split phase looks curdled but usually resolves with continued mixing and the addition of vanilla extract . The final buttercream will be glossy and silky, with a smooth mouthfeel. If it refuses to come together, the bowl may be too cold, briefly warming it by hand can help, but avoid overheating which can make it too loose.
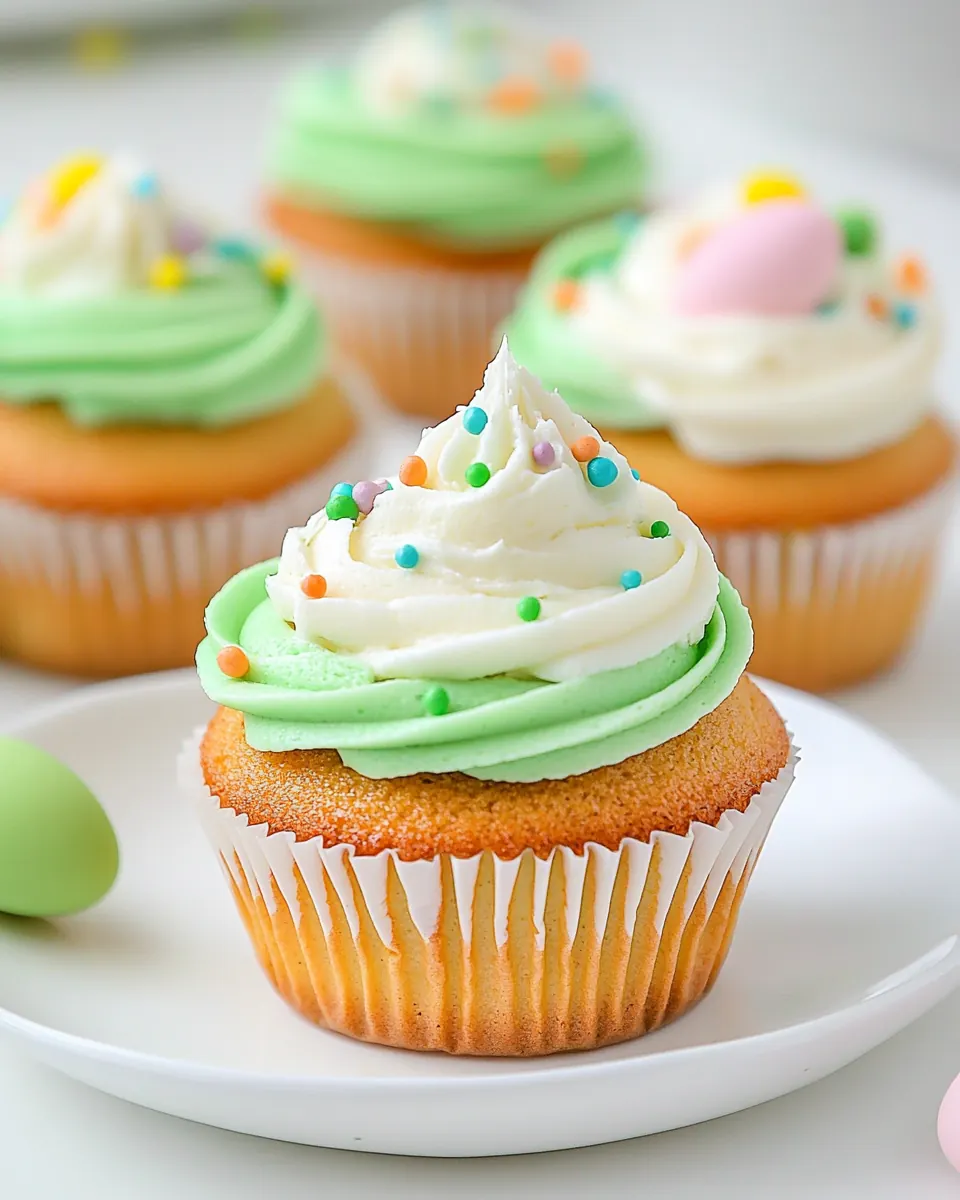
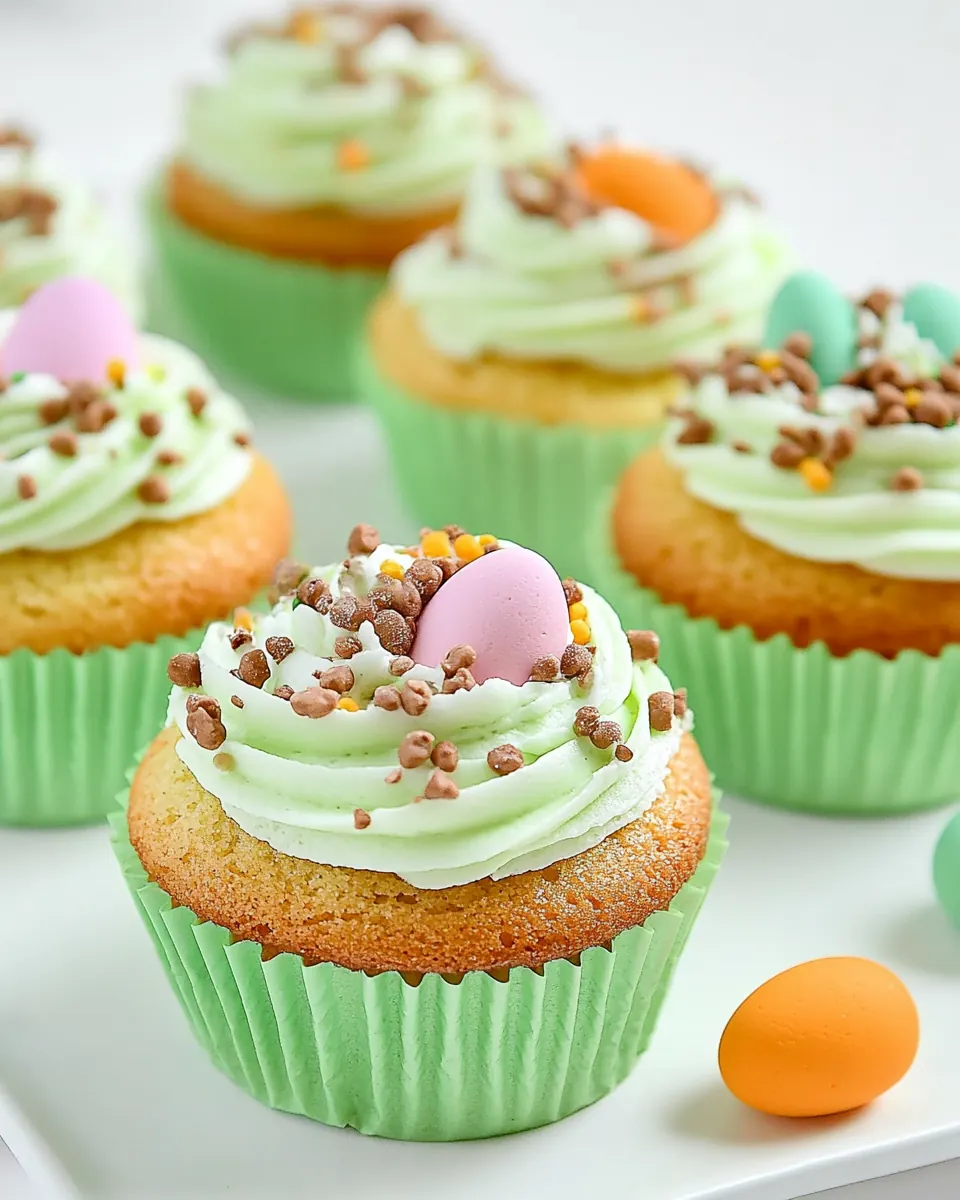
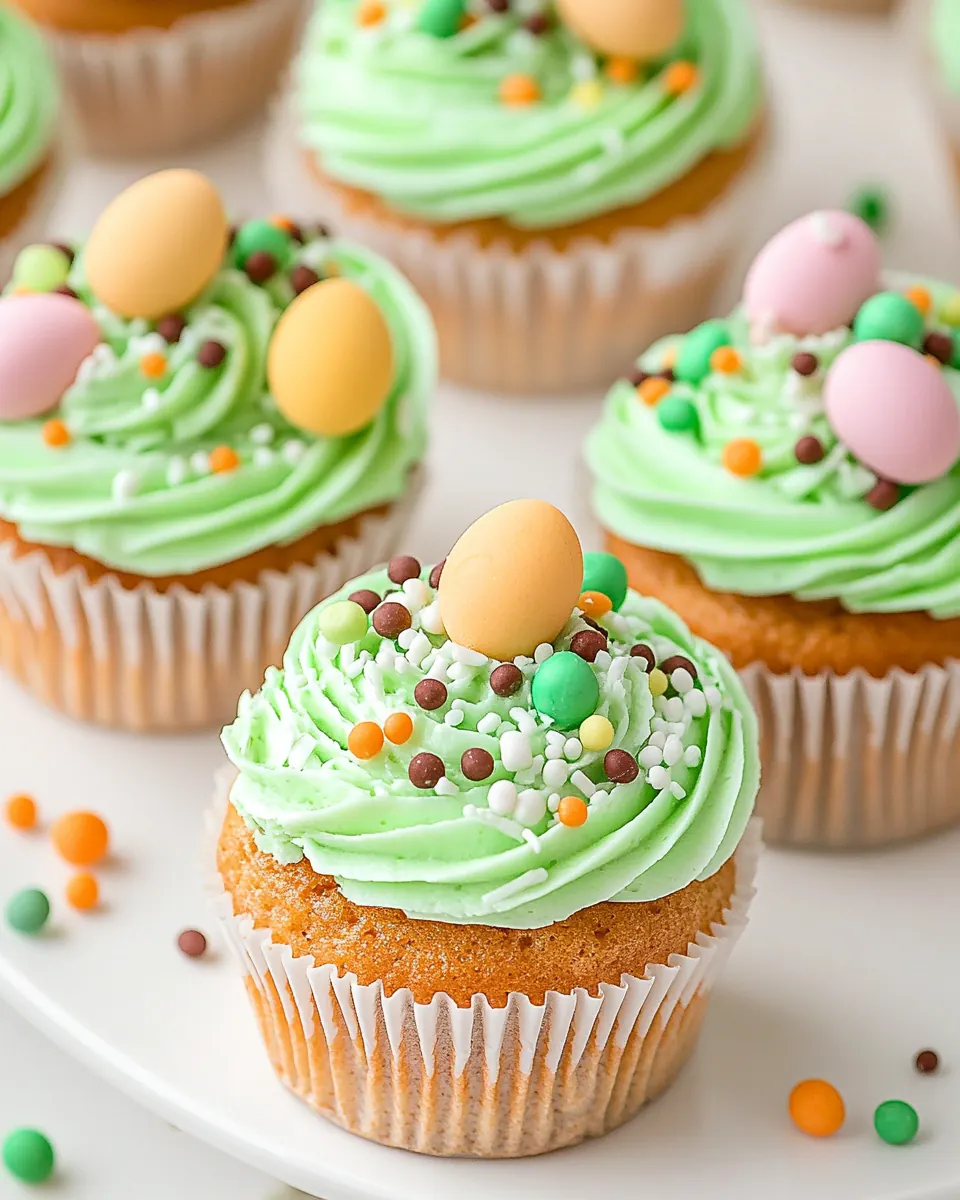
- Add a drop of food coloring and briefly beat until the buttercream is a uniform color. Transfer the buttercream to a piping bag fitted with a star nozzle (we used a Wilton 1 M).: A single drop of drop teal food coloring will tint the frosting; mixing briefly disperses color evenly. The buttercream should hold piping ridges without flattening. If color seems patchy, fold gently to avoid deflating the buttercream.
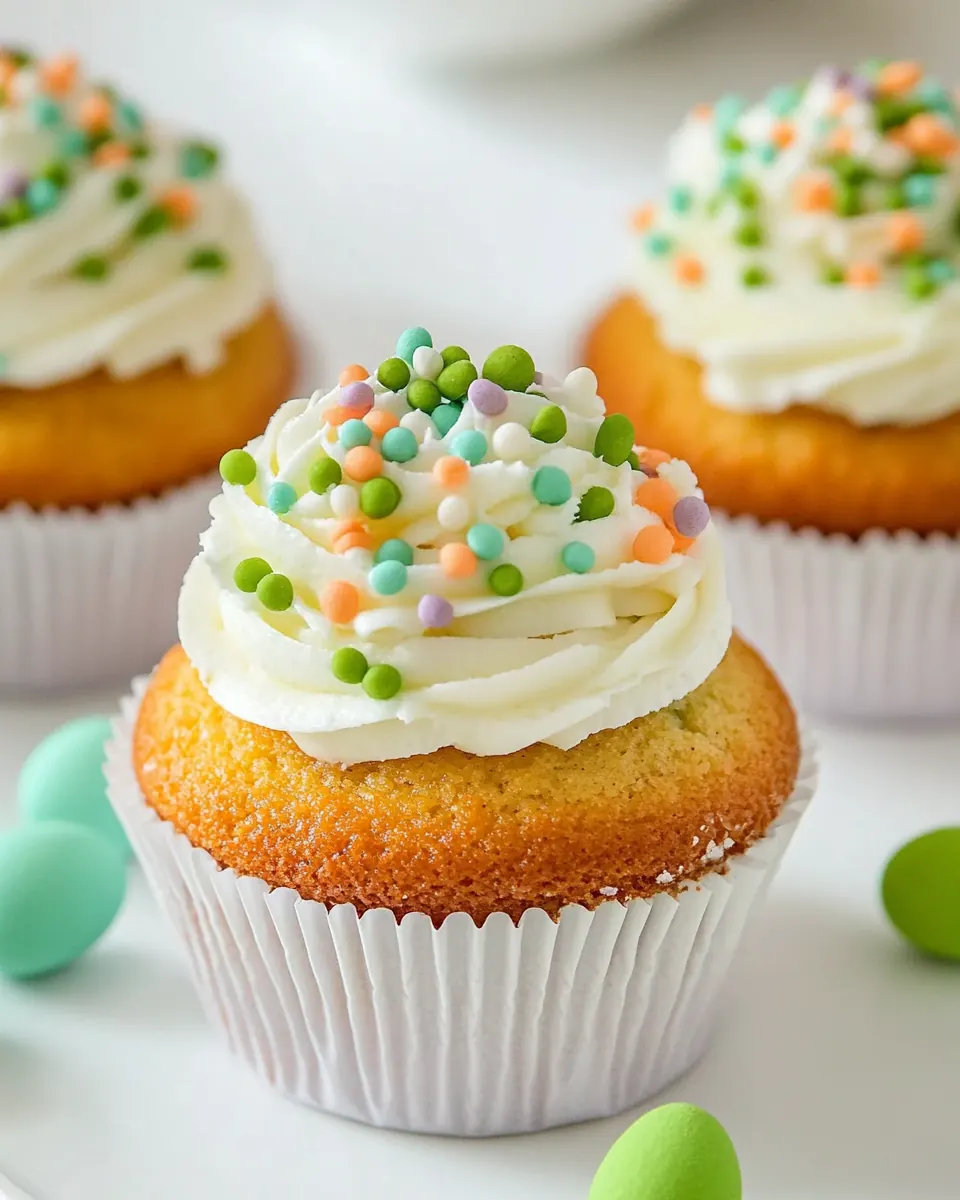
- Pipe the buttercream in swirls on top of the cooled cupcakes.: As you pipe, the buttercream will form ridged swirls with a satiny sheen, and the aroma will be buttery and sweet. Pipe with steady pressure, starting from the outside and spiraling up, to create uniform rosettes. Common mistakes include piping on warm cupcakes which causes sliding, so ensure the cupcakes are fully cooled.
- To add a speckled effect mix the cocoa powder and vanilla then dip a small paintbrush into the mixture and flick it on to the cupcakes using your finger.: The tiny cocoa powder specks create a delicate, rustic look, and the action produces a satisfying, flicking sound as droplets land. Work over a sheet of parchment for easy cleanup. Avoid dipping the brush into overly wet paint, which can create blobs instead of fine speckles.
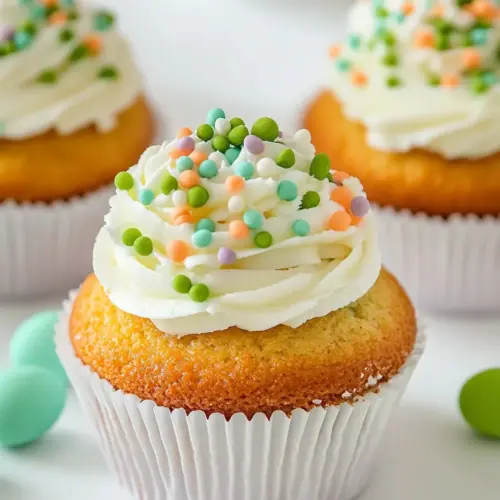
- For a final flourish add 3 mini Easter eggs to the top of each cupcake.: Adding the mini Easter eggs provides a crisp snap against the soft frosting and a playful, colorful finish. Press gently so they sit securely without damaging the swirl. Placing them too early while the frosting is warm will cause sinking, so wait until the buttercream has slightly set.
Substitutions and Tips
These tips will help you get consistent results and make small adjustments without changing the recipe. Read through them before you start so you have a plan for timing and troubleshooting.
- Storage advice: These cupcakes will do best stored in the refrigerator in an airtight container tall enough not to smush the frosting; they keep for about 4 to 5 days and are easiest served at room temperature.
- Make ahead strategy: Bake the cupcakes a day ahead and refrigerate them un frosted, then make the buttercream and pipe the next day to save hands on time and keep frosting fresh.
- Using store mix: You can use a store bought cupcake mix if you need a shortcut, following the package for the base and using the Swiss meringue buttercream for an elevated finish.
- Frosting consistency fixes: If the buttercream is too soft chill the bowl for 10 minutes and beat again, if too stiff let it sit at room temperature briefly and re beat in short bursts.
- Color control: Add food coloring a drop at a time until you reach the desired pastel, gel colors require much less so proceed cautiously to avoid overly intense hues.
How to Serve Easter Cupcakes
These cupcakes work for casual gatherings and special occasions alike. Serve them on a platter at room temperature for best texture, and consider pairing with light beverages or simple sides depending on the occasion.
- Party platter presentation: Arrange cupcakes on a tiered stand with pastel liners face up for a festive centerpiece at brunch or an Easter table, leaving space between each for easy picking.
- Seasonal pairing: These are lovely for spring events and pair well with light tea, coffee, or fruit salads for a balanced spread during midday celebrations.
- Portion tips: Plan for one to two cupcakes per person depending on the guest list and other desserts, offering a variety of decorations to accommodate different tastes.
- Serving temperature: Bring refrigerated cupcakes to room temperature for about 20 to 30 minutes before serving so the buttercream softens slightly and flavors are more pronounced.
- Storage after serving: Leftovers should be refrigerated in an airtight container, arranged in a single layer to avoid damaging the frosting, and they will remain good for about 4 to 5 days.
- Occasion ideas: Use these for brunches, baby showers, school parties, or as a sweet finish to a spring dinner, the pastel look makes them especially fitting for Easter and spring themed gatherings.
FAQ
Conclusion
These Easter Cupcakes are special for their soft, tender crumb and airy Swiss meringue buttercream, paired with playful mini eggs for a festive finish. I encourage you to try them because the method teaches patience and rewards you with professional tasting results that are approachable. Whether you make them for a holiday table or a casual spring gathering, they’re a joyful project that invites helpers and brightens any dessert spread. Take your time with the buttercream, enjoy the tactile nature of piping, and relish the smiles when everyone tastes the first bite.
Easter Cupcakes
Equipment
- Stand mixer
- Whisk attachment
- Paddle attachment
- 12 hole cupcake pan
- cupcake liners
- wire cooling rack
- Saucepan
- Piping Bag
- Star nozzle
Ingredients
- 3/4 cup unsalted butter softened at room temperature Creamed to provide tenderness and richness, softened unsalted butter contributes moisture and a fine crumb to the cupcake batter. Use at room temperature to ensure even incorporation with sugar and to trap air for lift. Balance sweetness and support the structure during baking.
- 3/4 cup white granulated sugar Beaten with butter until light and fluffy, white granulated sugar adds sweetness and helps create a tender, airy texture. Dissolves into the fat to assist creaming and caramelizes slightly for flavor during baking. Controls browning and balances other flavors.
- 2 large eggs Whisked in to bind and add moisture, large eggs contribute structure and stability through coagulation of proteins. Provide leavening support and help emulsify fat and liquid for a smooth batter. Promote a soft yet sturdy crumb that holds fillings or frostings.
- 2 teaspoons vanilla extract Stirred into the batter to enhance aroma, vanilla extract amplifies sweetness and rounds out flavors without adding moisture. Use measured teaspoons to maintain balance with other flavorings and avoid overpowering delicate notes. Complements butter and egg flavors for a classic cupcake taste.
- 1 cup all-purpose flour Sifted and folded gently to form the dry base, all-purpose flour supplies the gluten needed for structure and chew. Measure carefully to avoid dense cupcakes; overmixing can develop excess gluten and toughen the crumb. Works with leaveners to create the desired rise.
- 1 1/4 teaspoons baking powder Leavened into the dry mix to introduce chemical lift, baking powder releases carbon dioxide when heated and reacts with moisture. Use precise amounts to ensure proper rise without a metallic aftertaste. Balances batter density and helps create a light, tender cupcake.
- pinch salt Added sparingly to balance flavor, a pinch of salt enhances sweetness and rounds out the overall taste profile. Strengthens gluten slightly and improves the perception of other ingredients. Prevents flat or cloying flavors by providing contrast.
- 1 tablespoon milk Mixed in to adjust batter consistency, milk adds necessary liquid for hydration and helps dissolve sugar and leavening agents. Contributes tenderness and a finer crumb when combined with fat and eggs. Use at room temperature to integrate smoothly.
- 3/4 cup egg whites Folded in carefully to add volume without yolk richness, egg whites lighten the texture and contribute lift when aerated. Provide protein structure that stabilizes the cupcake crumb while keeping flavors delicate. Help create an airy, soft interior.
- 1 cup white granulated sugar Whisked into egg whites or butter for sweetness, white granulated sugar helps stabilize aeration and sweeten both the cake and any meringue-like components. Dissolves to create a smooth texture and promotes gentle browning. Balances acidity and enriches flavor.
- 2 1/4 cups unsalted butter softened at room temperature and cut into cubes Beaten to create a rich, creamy frosting base, unsalted butter softened at room temperature and cut into cubes ensures smooth, lump-free creaming. Cubing facilitates even whipping and aeration, producing a stable, spreadable buttercream. Provides structure, richness, and flavor for decorating.
- 2 teaspoons vanilla extract Blended into frosting for flavor depth, vanilla extract enhances sweetness and harmonizes other flavors in the buttercream. Use consistent measurement to maintain a balanced aroma across all cupcakes. Imparts a familiar, comforting note that complements colored or chocolate elements.
- drop teal food coloring Tinted sparingly to achieve a delicate hue, a drop of teal food coloring provides visual appeal for decorative frosting sections. Use a small amount and mix thoroughly to avoid streaking or strong artificial flavor perception. Helps create festive, thematic presentation without affecting texture.
- 1 teaspoon cocoa powder Sprinkled or lightly dusted to add a hint of chocolate flavor and color contrast, cocoa powder intensifies visual interest and flavor complexity in small amounts. Sift into frosting or batter to prevent lumps and ensure even distribution. Balances sweetness with a subtle bitter note.
- 1 tablespoon vanilla extract Added for concentrated vanilla flavor, a tablespoon of vanilla extract gives a pronounced aromatic boost to frostings or fillings. Enhances overall sweetness perception and rounds out buttery notes for a more complex taste. Use measured amounts to avoid overpowering other delicate flavors.
- 36 mini Easter eggs Placed as decorative toppers to provide crunchy texture and festive presentation, 36 mini Easter eggs finish the cupcakes with color and bite. Space evenly to ensure each cupcake receives uniform decoration and appeal. Offer a sweet, candy-enhanced contrast to the soft cake and frosting.
Instructions
- Preheat the oven to 350 degrees Fahrenheit. Add 12 cupcake liners to a 12-hole cupcake pan.: You will notice the air in the oven warming and the edges of the liners smoothing as the oven reaches temperature, that initial heat ensures even lift from the moment the batter hits the pan. If you skip preheating, cupcakes can bake unevenly and domes may not form properly. A common mistake is placing the pan in a not fully heated oven, which causes slow rise and denser texture, so wait until the oven signals it is ready.
- Combine the soft butter and sugar in a large mixing bowl with a stand mixer with whisk attachment until light and fluffy.: As you cream unsalted butter with white granulated sugar , the mixture will transform from pale and creamy to visibly lighter and aerated, with tiny sugar crystals softening the fat. This step creates air pockets that lead to a tender crumb, you should hear a quiet whir and see a ribbon like trail when the paddle lifts. Over beating can heat the butter and make it too soft, so stop when it looks pale and billowy.
- Add the eggs, vanilla and beat until the mixture is voluminous.: When you add the large eggs and vanilla extract , the batter will loosen and become glossy, with the mixer producing a gentle, smooth sound. Adding eggs one at a time keeps the emulsion stable and prevents curdling, which would show as a separated, greasy mixture. If the batter appears broken, adding a small spoonful of flour and mixing briefly can help rebind it.
- In a separate bowl mix together the flour, baking powder and salt then add it to the bowl with creamed butter. Use a spatula to gently fold it into the batter.: The dry ingredients will smell faintly of wheat and baking powder, and folding them preserves the aeration from earlier steps. Use a gentle motion, scraping the bowl sides, and fold until streaks disappear, stopping before over mixing. Over working develops gluten and yields denser cupcakes, so fold just until combined.
- Pour the milk into the bowl with batter and fold until combined.: Adding the milk lightens the batter and makes it smooth; you will see it loosen into a glossy, spoonable consistency. The batter should fall slowly from the spatula in a thick ribbon. If it seems too stiff, a touch more milk will help, but add in small amounts to avoid making the batter too loose.
- Divide the cupcake batter between the 12 cupcake liners filling them 2/3 full.: As you spoon the batter, it should settle in each liner with a gentle mound that levels during baking. Filling to two thirds gives room for rise without overflow. Over filling is a frequent error that produces spilled tops and uneven baking, so measure or use an ice cream scoop for consistent portions.
- Bake in the center of the preheated oven for 18 minutes or until the cupcakes have risen and are a pale golden brown color. When properly baked, they will feel springy to the touch.: During baking you will smell a warm, sweet aroma and see the tops puff and blush into a pale gold. The edges will set and the centers spring back when gently touched. If the cupcakes are still wet in the center or sink after cooling, the oven temperature may be off or they were underbaked, so test with a toothpick if unsure.
- Remove from the oven and transfer to a wire cooling rack.: Moving the pan to a rack stops the baking and prevents soggy bottoms by allowing air to circulate under the liners. The cupcakes will cool and the structure will firm. Leaving them in a hot pan continues cooking, which can dry them out, so transfer promptly but carefully to avoid jostling the tops while warm.
- Fill a saucepan with a couple of inches of water and bring it to a simmer. Put the egg whites and sugar into the bowl of a stand mixer and set it over the simmering pan. Do not let the bottom of the bowl touch the water or the egg whites will scramble.: Heating the egg whites and white granulated sugar over simmering water dissolves the sugar without scrambling proteins, and you will see the mixture steam gently. The bowl should be warm to the touch but not hot. Touching the bottom of the bowl to water is a common risk that cooks the eggs, so keep the bowl elevated and maintain a gentle simmer.
- Use a handheld whisk to beat continuously for 4-5 minutes. The mixture will look frothy. Dip your finger into the mixture and feel it between your fingers. If you can feel any grain keep heating and mixing until you can feel the mixture is smooth and slippery. This means the sugar has dissolved.: As you whisk, the egg whites will change from translucent to a foamy, satin texture and the sugar will melt away. The fingertip test is crucial; gritty sugar ruins the meringue stability later. If grains remain, continue whisking over the heat in short bursts until smooth, patience here makes the final buttercream glossy and stable.
- Add the bowl to the stand mixer fitted with the whisk attachment. Whisk on a medium-high speed until the egg whites reach stiff peaks. This will take at least 10 minutes but sometimes longer.: The mixer will sing as the meringue gains volume and becomes glossy, forming peaks that hold their shape. At this stage the aroma is neutral and the mixture is cool. Rushing this step can leave soft peaks that will not support the butter, so whisk until firm peaks form.
- When the egg whites are at stiff peaks feel the outside of the bowl. It should be cool by now but if it isn’t put the whole bowl into the fridge for 10 minutes.: The bowl cooling shows the meringue has released heat; warm meringue can melt butter later. Chilling briefly if still warm prevents a runny buttercream. Avoid freezing, which can make the meringue weep, and only chill a short time if necessary.
- Swap the whisk attachment for the paddle attachment.: Changing to the paddle lets you incorporate the unsalted butter without over emulsifying, the paddle works the butter into a silky texture. Make sure the bowl and attachments are clean and dry to maintain stability. Using the whisk instead can whip too much air into the buttercream creating a foamy texture, so switch tools as directed.
- When the outside of the bowl is cool, add the butter a tbsp at a time. Beat on high speed fully incorporating each addition of butter until all the butter has been added.: Adding cubed unsalted butter gradually lets it emulsify into the meringue, and you will hear the mixer change from a high pitched whir to a deeper, smoother sound as texture becomes silky. Each addition should vanish into the mixture before the next goes in. If additions are too large, the buttercream can separate, so patience is key.
- At this point the mixture will look split. Do not panic! Add the vanilla extract and keep the mixer running until the mixture comes together into a silky smooth Swiss meringue buttercream.: A split phase looks curdled but usually resolves with continued mixing and the addition of vanilla extract . The final buttercream will be glossy and silky, with a smooth mouthfeel. If it refuses to come together, the bowl may be too cold, briefly warming it by hand can help, but avoid overheating which can make it too loose.
- Add a drop of food coloring and briefly beat until the buttercream is a uniform color. Transfer the buttercream to a piping bag fitted with a star nozzle (we used a Wilton 1 M).: A single drop of drop teal food coloring will tint the frosting; mixing briefly disperses color evenly. The buttercream should hold piping ridges without flattening. If color seems patchy, fold gently to avoid deflating the buttercream.
- Pipe the buttercream in swirls on top of the cooled cupcakes.: As you pipe, the buttercream will form ridged swirls with a satiny sheen, and the aroma will be buttery and sweet. Pipe with steady pressure, starting from the outside and spiraling up, to create uniform rosettes. Common mistakes include piping on warm cupcakes which causes sliding, so ensure the cupcakes are fully cooled.
- To add a speckled effect mix the cocoa powder and vanilla then dip a small paintbrush into the mixture and flick it on to the cupcakes using your finger.: The tiny cocoa powder specks create a delicate, rustic look, and the action produces a satisfying, flicking sound as droplets land. Work over a sheet of parchment for easy cleanup. Avoid dipping the brush into overly wet paint, which can create blobs instead of fine speckles.
- For a final flourish add 3 mini Easter eggs to the top of each cupcake.: Adding the mini Easter eggs provides a crisp snap against the soft frosting and a playful, colorful finish. Press gently so they sit securely without damaging the swirl. Placing them too early while the frosting is warm will cause sinking, so wait until the buttercream has slightly set.
Notes
- Storage advice: These cupcakes will do best stored in the refrigerator in an airtight container tall enough not to smush the frosting; they keep for about 4 to 5 days and are easiest served at room temperature.
- Make ahead strategy: Bake the cupcakes a day ahead and refrigerate them un frosted, then make the buttercream and pipe the next day to save hands on time and keep frosting fresh.
- Using store mix: You can use a store bought cupcake mix if you need a shortcut, following the package for the base and using the Swiss meringue buttercream for an elevated finish.
- Frosting consistency fixes: If the buttercream is too soft chill the bowl for 10 minutes and beat again, if too stiff let it sit at room temperature briefly and re beat in short bursts.
- Color control: Add food coloring a drop at a time until you reach the desired pastel, gel colors require much less so proceed cautiously to avoid overly intense hues.